Maytag MDE308DAYW Le manuel du propriétaire
- Catégorie
- Sèche-linge électriques
- Taper
- Le manuel du propriétaire

M_ AG
®
MD-1
Important Safety
Instructions ................ 1-2
Using the Controls
Auto Dry Models .............. 3-4
Sensor Models ................ 5-6
Electronic Controls ............ 7-9
Troubleshooting ............. 14
Operating Tips .............. 10
Service & Warranty .......... 15
Accessories ................ 10
Guide d'utilisation
et d'entretien ............... 16
Care & Cleaning ............ 1 1
Guia de uso y cuidado ....... 32
Form No. Y81904 A Part No. 2206672 www.maytag.com Litho U.S.A. _2006 Maytag Appliances Sales Co.

ImportnntSnfet¥Instructions
What You Need to Know About
Safety Instructions
Warning and Important Safety Instructions appearing in
this guide are not meant to cover all possible
conditions and situations that may occur. Common
sense, caution and care must be exercised when
installing, maintaining or operating appliance.
Always contact the manufacturer about problems or
conditions you do not understand.
Recognize Safety Symbols, Words,
Labels

ImportnntSnfet¥Instructions
1. Read all instructions before using the appliance.
2. To avoid the possibility of fire or explosion:
a. Do not dry items that have been previously
cleaned in, washed in, soaked in, or spotted
with gasoline, dry-cleaning solvents, other
flammable or explosive substances as they give
off vapors that could ignite or explode. Any
material on which you have used a cleaning
solvent, or which is saturated with flammable
liquids or solids, should not be placed in the
dryer, until all traces of these flammable liquids
or solids and their fumes have been removed.
There are many highly flammable items used in
homes, such as: acetone, denatured alcohol,
gasoline, kerosene, some liquid household
cleaners, some spot removers, turpentine, waxes
and wax removers.
b. Items containing foam rubber (may be labeled
latex foam) or similarly textured rubber-like
materials must not be dried on a heat setting.
Foam rubber materials when heated, can under
certain circumstances produce fire by
spontaneous combustion.
3. Do not allow children or pets to play on, in, or in
front of the appliance. Close supervision is
necessary when the appliance is used near
children and pets.
/4. Before the appliance is removed from service or
discarded, remove the door to the drying
compartment.
5. Do not reach into the appliance if the drum is
moving.
6. Do not install or store this appliance where it will
be exposed to the weather.
7. Do not tamper with controls.
8. Do not repair or replace any part of the appliance
or attempt any servicing unless specifically
recommended in published user-repair instructions
that you understand and have the skills to carry out.
9. Do not use fabric softeners or products to
eliminate static unless recommended for dryer use
10.
11.
12.
13.
by the manufacturer of the fabric softener or
product.
Clean the lint screen before or after each load.
Keep the area around the exhaust opening and
surrounding areas free from lint accumulation, dust
and dirt.
The interior of the dryer and exhaust duct should be
cleaned periodically by qualified service personnel.
This appliance must be properly grounded. Never
plug the appliance cord into a receptacle which is
not grounded adequately and in accordance with
local and national codes. See installation
instructions for grounding this appliance.
1/4. Do not sit on top of the clothes dryer.
Important Safety
Notice & Warning
The California Safe Drinking Water and Toxic
Enforcement Act of 1986 (Proposition 65) requires the
Governor of California to publish a list of substances
known to the State of California to cause cancer or
reproductive harm, and requires businesses to warn
customers of potential exposures to such substances.
Users of this appliance are hereby warned that the
burning of gas can result in low-level exposure to
some of the listed substances, including benzene,
formaldehyde, and soot, due primarily to the
incomplete combustion of natural gas or liquid
petroleum (LP) fuels. Exhaust ducts should be kept
free of obstructions and properly exhausted dryers will
minimize exposure.
Note: Because of continuing product
improvements, Maytag reserves the right to change
specifications without notice. For complete details,
see the Installation Instructions packed with your
product before selecting cabinetry, making cutouts
or beginning installation.
SAVE THESE INSTRUCTIONS

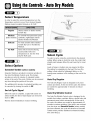
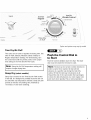
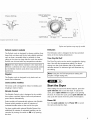
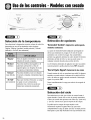
UsingtheControls-AutoDryModels
Select Temperature
In order to select the correct temperature, turn the
Temperature control to one of four choices; Regular,
Medium (select models], Delicate or Air Fluff.
Regular Sturdy cottons or labels marked
Tumble Dry.
Medium For wrinkle-free/permanent press
(select models] synthetics, lightweight cottons
labeled Tumble Dry Medium.
Delicate For heat sensitive items labeled
Tumble Dry Low or Tumble Dry
Medium.
Air Fluff Items which need freshening.
Load tumbles with room
temperature air. Use the Time
Dry/Air Fluff cycle.
Select Options
Extended Tumble Cselect models)
Extended Tumble is provided to minimize wrinkles in
the Auto Dry Wrinkle Control cycle. This feature
provides an extra 60 minutes of unheated tumble
action at the end of the cycle. Clothes can be removed
any time during this portion of the cycle.
The additional 60 minutes of unheated tumbling can
be canceled by turning the switch to Off.
End of Cycle Signal
When the cycle is complete, a signal will sound. On
select models, the End of Cycle Signal can be turned
down or Off.
Remove load immediately to reduce wrinkling.
Temperature
Delicate
Air Fluff
@
r_eavy Duty / SuperSIze Capac [y / Quiet Sedes 10
Select Cycle
To select a cycle, rotate the control dial to the desired
setting. When using an Auto Dry cycle, the control dial
should point between More Dry and Less Dry for most
loads.
Loads of larger or bulkier size may require the More
Dry setting to completely dry the load. The Less Dry
setting is best suited for lightweight fabrics or for
leaving some moisture in the clothing at the end of the
cycle.
Auto Dry Regular
The Auto Dry Regular cycle is designed to dry most
cottons and linens. At the end of the cycle, the clothes
are cooled for approximately 10 minutes to reduce
wrinkling.
Auto Dry Wrinkle Control
The Auto Dry Wrinkle Control cycle is designed to dry
wrinkle-free cottons, synthetic fabrics, double knits and
permanent press fabrics automatically. At the end of
the cycle, the clothes are cooled for approximately 25
minutes to reduce wrinkling. If the load is not removed
from the dryer and Extended Tumble (select models]
has been selected, the cycle will advance to Extended
Tumble which provides additional unheated tumbling
time. (See Step 2].

Signd
Less Dry Auto Dry
Auto Dry Normal Dry Off SC
Mo_eD_ Wrinkle Co ntrol
Regular 4o
30 Extended Tumble
Time Dry
/ tocy4_ Air Fluff
off
40 70
50 6(
Push to Start
_'_off
lOG
90
Extended
80 Tumble
.... /
Cycles and options may vary by modeL
Time Dry/Air Fluff
This cycle can be used to regulate the drying time. Use
with Air Fluff, Delicate, Medium (select models) or
Regular temperature settings. For timed drying, turn
the control dial until the pointer points to the proper
time setting in the Time Dry/Air Fluff cycle.
I Note: Using the Air Fluff temperature setting will
require a longer drying time.
Damp Dry (select models)
Damp Dry is located on the Time Dry/Air Fluff section
of the dial. It is designed to partially dry items and can
be used with any temperature selection. Damp Dry will
provide 20 minutes of tumbling time, followed by
10 minutes of cool-down tumbling.
Push the Control Dial in
to Start
Push the control dial in to start the dryer. The dryer
door must be closed for the dryer to start.
Note: The dial can be turned in either direction to
select a cycle. Once started, the dial will not
advance at a specific rate during the Auto Dry
cycles. At first the dial may not advance at all.
Toward the end of the cycle (when the load begins
to dry), the dial will advance at a more regular rate
and much more quickly. This is normal operation.

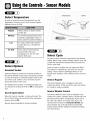
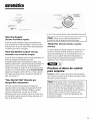
UsingtheControls-SensorModels
Select Temperature
In order to select the correct temperature, turn the
Temperature control to one of four choices; Regular,
Medium, Low or Air Fluff.
Regular Sturdy cottons or labels marked
Tumble Dry.
Medium For wrinkle-free/permanent press
synthetics, lightweight cottons or
items labeled Tumble Dry Medium.
Low For heat sensitive items labeled
Tumble Dry Low or Tumble Dry
Medium.
Air Fluff Items which need freshening.
Load tumbles with room
temperature air. Use the Time
Dry/Air Fluff cycle.
Select Options
Extended Tumble
Extended Tumble is provided to minimize wrinkles in
the Sensor Wrinkle Control cycle. This feature provides
an extra 60 minutes of unheated tumble action at the
end of the cycle. Clothes can be removed any time
during this portion of the cycle.
The additional 60 minutes of unheated tumbling can
be canceled by turning the knob to Off or opening the
door.
End of Cycle Chime
When the cycle is complete, a chime will sound. The
End of Cycle Chime can be turned off by turning the
selector knob to Off.
Remove load immediately to reduce wrinkling.
Temperature
Chime
lOW M_dJU[/1
A[_"Fluff
Commercial Ouality Stainless Steel Tumbler t Sup
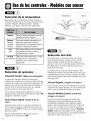
Select Cycle
To select a cycle, rotate the control dial to the desired
setting. When using a Sensor Wrinkle Control cycle, the
control dial should point between More Dry and Less
Dry for most loads.
Loads of larger or bulkier size may require the More
Dry setting to completely dry the load. The Less Dry
setting is best suited for lightweight fabrics or for
leaving some moisture in the clothing at the end of the
cycle.
Sensor Regular
The Sensor Regular cycle is designed to dry most
cottons and linens. At the end of the cycle, the clothes
are cooled to reduce wrinkling.
Sensor Wrinkle Control
The Sensor Wrinkle Control cycle is designed to dry
wrinkle-free cottons, synthetic fabrics, double knits and
permanent press fabrics automatically. At the end of
the cycle, the clothes are cooled. If the load is not
removed from the dryer and Extended Tumble has
been selected, the cycle will advance to Extended
Tumble which provides additional unheated tumbling
time. (See Step 2).

Extended Tumble
rSize Capacity / Quiet SerBes100 / 12 Cvdes
_essDr_ Sensor
Sensor Wrinkle Control
Re_.ular _
Off 3o Extended Tumble
Cool Down
Time Dry _° _'°
Air Fluff Pushtos_
........ /
Cycles and options may vary by model
Time Dry/Air Fluff
This cycle can be used to regulate the drying time. Use
with Air Fluff, Low, Medium or Regular temperature
settings. For timed drying, turn the control dial until the
pointer points to the proper time setting in the Time
Dry/Air Fluff cycle.
Note: Using the Air Fluff temperature setting will
require a longer drying time.
Damp Dry (select models)
Damp Dry is located on the Time Dry/Air Fluff section
of the dial. It is designed to partially dry items and can
be used with any temperature selection. Damp Dry will
provide 20 minutes of tumbling time, followed by
10 minutes of cool-down tumbling.
Push the Control Dial in
to Start
Push the control dial in to start the dryer. The dryer
door must be closed for the dryer to start.
Note: The dial can be turned in either direction to
select a cycle. Once started, the dial will not
advance at a specific rate during the Sensor cycles.
At first the dial may not advance at all. Toward the
end of the cycle (when the load begins to dry), the
dial will advance at a more regular rate and much
more quickly. This is normal operation.

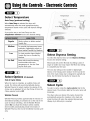
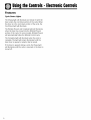
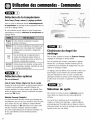
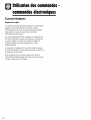
UsingtheControls-|lectronicControls
Select Temperature
Auto Temp [preferred setting)
When Auto Temp is selected, the dryer will
automatically select the most appropriate drying
temperature based on the cycle and dryness settings
selected.
If you prefer not to use Auto Temp. turn the
temperature selector knob to the desired setting.
Regular Sturdy cottons or labels marked
Tumble Dry.
Medium For wrinkle-free/permanent press
synthetics, lightweight cottons or
items labeled Tumble Dry Medium.
Low For heat sensitive items labeled
Tumble Dry Low or Tumble Dry
Medium.
Air Fluff Items which need freshening.
Load tumbles with room
temperature air. Use the Time
Dry/Air Fluff cycle.
Select Options [if desired)
End of Cycle Chime
When the cycle is complete, an audible chime will
sound. The chime will sound intermittently during
Wrinkle Prevent. On select models, the volume of the
chime can be adjusted. To turn the Chime off, turn the
Chime selector knob to Off.
Wrinkle Prevent
Wrinkle Prevent provides approximately 95 minutes of
intermittent tumbling in unheated air at the end of the
cycle to reduce wrinkling. Set the Wrinkle Prevent
switch On to activate this feature (select models).
Some models automatically provide 30 minutes of
Wrinkle Prevent at the end of the Wrinkle Control cycle
only.
Temperature
Medium
I
Requ_ar
J
Auto TemD
Chime
Off On
Commercial Ouall_y Stainless Steel Tumbler ] SuoerS
Select Dryness Setting
To select the dryness level, turn the Dryness Settings
knob to the desired setting.
Most loads will use the Normal dry setting. Loads of
larger or bulkier size may require the More dry setting
to completely dry the load.
The Less dry setting is best suited for lightweight
fabrics or for leaving some moisture in the load at the
end of the cycle. Damp dry is designed to partially dry
items. Use for items that lay flat or hang to dry.
Select Cycle
To select a cycle, rotate the cycle selector dial to the
desired cycle. The indicator light by the cycle name will
illuminate.
The dryer cycles are Sensor Dry cycles. Sensor Dry
automatically senses the moisture in the load and
shuts the dryer off when the selected dryness level
(Damp dry to More dry) is reached.

FabricSelection
DrynessSettings sensorDry
Jeans
Less Normal
_ Wdnk[e Control
_More
De[icates c
Regular
Refresh
6o Time Dry
50 Air Fluff
40
L_
ii 20
Power
Off
On
_eCapadty Ouiet Sedes 200 / 12 Cvdes
Dryinq Pause
"__LyQe Status Push to Stale - Push to Stoo
Off
Wrinkle
Prevent
.... /
Cycles and options may vary by model.
Refresh (select models)
Delicates
The Refresh cycle is designed to release wrinkles from
items that are clean and dry but only slightly wrinkled,
such as from a crowded closet or suitcase or from
sitting in the dryer too long after the cycle has ended.
Refresh can be used with any temperature selection.
Note: If the dryer detects moisture in the load when
Refresh is selected, the dryer will automatically switch
to the Wrinkle Control cycle which may extend the
cyc e time.
Regular
The Regular cycle is designed to dry loads such as
towels and underwear.
The Delicates cycle is designed to dry heat-sensitive
items at the low drying temperature.
Time Dry/Air Fluff
The Time Dry cycle can be used to regulate the drying
time. Use with any temperature setting. For timed
drying, turn the cycle selector dial to the number of
minutes desired. An indicator light will illuminate by
the setting.
I
Note: Using the Air Fluff temperature setting will I
require a longer drying time.
I
Jeans (select models)
The Jeans cycle is designed to reduce wrinkling and
tangling in loads of jeans.
Wrinkle Control
The Wrinkle Control cycle is designed to dry wrinkle-
free cottons, synthetic fabrics, knits and permanent
press fabrics automatically.
Select models will automatically advance into Wrinkle
Prevent which provides an extra 30 minutes of
unheated tumble action at the end of the cycle.
Start the Dryer
After setting the cycle and desired options, press the
cycle selector dial to start the dryer. To pause the
cycle, press cycle selector dial again or by opening
the door. To restart the cycle, press cycle selector dial
and cycle will resume from the point of interruption.
Power Off
Turn the cycle selector dial to Power Off to cancel
the cycle and stop the dryer.
On dryer models with optional Wrinkle Prevent, the
additional 95 minutes of unheated tumbling can be
canceled by turning the switch to Off or by opening
the door.

UsingtheControls-ElectronicControls
Features
Cycle Status Lights
The Drying light will illuminate and remain lit until the
dryer enters the cool down portion of the cycle. When
the dryer is in the cool down portion of the cycle, the
Cool Down light will illuminate.
The Wrinkle Prevent and Complete light will illuminate
when the dryer has moved into the Wrinkle Prevent
portion of the cycle. On some models, Wrinkle Prevent
will automatically follow the Wrinkle Control cycle.
The Complete light will illuminate when the cycle is
complete. The light will remain illuminated until the
dryer door is opened or selector dial is moved.
If the dryer is paused during a cycle, the Pause light
will illuminate until the cycle is resumed or the dryer is
turned off.

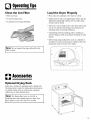
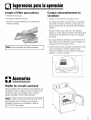
OperutingTips
Clean the Lint Filter
• After each load.
• To shorten drying time.
• To operate more energy efficiently.
i Note: Do not operate the dryer without the lint
filter in place.
Load the Dryer Properly
• Place only one washload in the dryer at a time.
• Mixed loads of heavy and lightweight clothes will dry
differently. Lightweight clothes will dry, while heavy
clothes may be damp.
• Add one or more similar items to the dryer when only
one or two articles need drying. This improves the
tumbling action and drying efficiency.
• Overloading restricts tumbling action, resulting in
uneven drying as well as excessive wrinkling of some
fabrics.
• When drying large, bulky items such as a blanket or
comforter, it may be necessary to reposition the load
during the cycle to ensure even drying.
[]
0
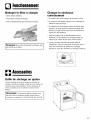
Accessories
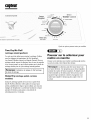
Optional Drying Rack
Select dryer models are equipped with a drying rack.
The drying rack is useful for drying items that require
no tumble drying, such as tennis shoes, sweaters,
stuffed toys or other delicate items.
Note: The Drying Rack, part no. 504105, is
available when not included with your dryer. See
your dealer or call 1-877-232-6771 to order.
10

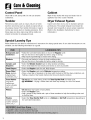
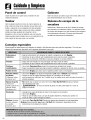
Care& Cleaning
Control Panel
Clean with a soft, damp cloth. Do not use abrasive
substances.
Tumbler
Remove any stains such as crayon, ink pen or fabric
dye from new items (such as towels or jeans) with an
all-purpose cleaner. Then tumble old towels or rags to
remove any excess stain or cleaning substance. Once
these steps are done, stains may still be visible, but
should not transfer to subsequent loads.
Cabinet
Wipe off any marks with soap and water. Use an
appliance wax once a year if desired.
Dryer Exhaust System
Inspect and clean once a year to maintain optimum
performance. The outside exhaust hood should be
cleaned more frequently to ensure proper operation.
(Refer to the Installation Instructions for more
information.)
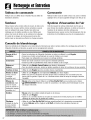
Special Laundry Tips
Please follow the care label or manufacturer's instructions for drying special items. If care label instructions are not
available, use the following information as a guide.
Bedspreads and • Follow the care label instructions or dry on the Regular cycle.
Comforters • Be sure the item is thoroughly dry before using or storing.
• May require repositioning to ensure even drying.
Blankets • Dry only one blanket at a time for best tumbling action.
• Be sure the item is thoroughly dry before using or storing.
• Select the Wrinkle Control cycle to help minimize wrinkling.
• Dry in small loads for best results and remove as soon as possible.
• Select the Regular cycle for soft, fluffy diapers.
• Select the Regular cycle and a Delicate temperature setting.
• Place a clean pair of sneakers in the dryer with the item to fluff the down comforters, etc.
Adding a couple of dry towels shortens dry time and absorbs moisture.
Curtains and
Draperies
Cloth Diapers
Down-Filled
Items Oackets,
sleeping bags,
comforters, etc._)
Foam Rubber
(rug hacks,
stuffed toys,
certain shoulder
pads, etc.)
Pillows
Plastics
(shower curtains,
outdoor furniture
covers, etc.)
• Do not dry on a heat setting. Select the Time Dry/Air Fluff (no-heat) cycle.
• ,_ WARNING - Drying a rubber item with heat may damage it or be a fire hazard.
• Do not dryer-dry kapok or foam pillows.
• Select the Regular cycle.
• Add a couple of dry towels and a pair of clean sneakers to help the tumbling action and
to fluff the item.
• Select the Time Dry/Air Fluff cycle on a Delicate or Air Fluff temperature depending on
the care label instructions.
11

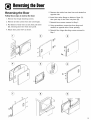
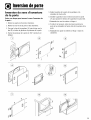
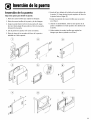
ReversingtheDoor
Reversing the Door
Follow these steps to reverse the door:
1. Remove four hinge-attaching screws.
2. Remove all nine screws from door and hinges.
3. Pull bottom of door liner out (A), then pull down
(B), removing door liner from door panel.
4. Rotate door panel 180° as shown.
5. Remove door strike from door liner and reinstall on
opposite side.
6. Insert liner under flange on bottom of door (A),
then push top of door liner into place (B).
7. Reinstall nine screws removed in Step 2.
8. Using screwdriver, remove two door plugs and
reinstall on opposite side of door opening.
9. Reinstall four hinge attaching screws removed in
Step 1.
B
A
12

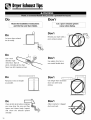
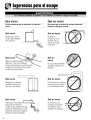
DryerExhnustTips
Do DON'T
Let a poor exhaust system
cause slow drying.
Do
Let your dryer exhaust
the air easily.
DON'T
Restrict your dryer with a
poor exhaust system.
Do
Use 4 inch
diameter rigid
metal duct. Tape all
joints, including at the dryen
Never use lint-trappingscrews.
DON'T
Use plastic, thin foil, or
non-metal flexible duct.
Do
Keep duct runs as straight
as possible.
El I i
DON'T ( I I I
Use longer than necessary
duct runs with many
elbows.
Do [
Clean all old ducts before installing
your new dryer. Be sure vent flap
opens and closes freely. Inspect
and clean the exhaust system
annually.
DON'T
Allow crushed or clogged
ducts and vent.
13

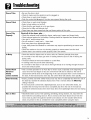
Troubleshooting
Doesn't Run
Doesn't Heat
Doesn't Dry
Properly
Is Noisy
Control Knob
Advances
Slowly
[select models)
Dries Unevenly
• Be sure the door is shut.
• Check to make sure the electrical cord is plugged in.
• Check fuse or reset circuit breaker.
• Push the control dial in again if the door was opened during the cycle.
• Check fuse or reset circuit breaker.
• Select a heat setting, not air fluff.
• Check that the gas supply is on for gas dryers.
• Clean the lint filter and exhaust duct.
• Dryer timer may have moved into the cool-down portion of the cycle.
Check all of the above, plus...
• Check the exhaust hood outside the house, make sure it opens and closes freely.
• Check exhaust system for lint buildup. Ducting should be inspected and cleaned annually.
• Use rigid 4" metal exhaust duct.
• Do not overload. 1 wash load = 1 dryer load.
• Sort heavy items from lightweight items.
• Large, bulky items like blankets or comforters may require repositioning to ensure even
drying.
• Check the washer to be sure it is draining properly to extract water from the load.
• Clothes load is too small to tumble properly. Add a few towels.
• Check the load for objects such as coins, nails, etc. Remove promptly from dryer.
• It is normal to hear the dryer gas valve or heating element cycle on and off during the
drying cycle.
• The dryer should be level and installed on a solid floor.
• A clicking noise may be the timer advancing.
• It is normal for the dryer to hum due to the high velocity of air moving through the dryer
drum and exhaust system.
This is normal operation for an Auto Dry or Sensor cycle, especially at the beginning of
cycle. Once the load begins to dry, the control knob will start to advance. The rate of
advancement will be slow at the beginning of the cycle because there is more moisture in
the load. As the load becomes more dry, the control knob will advance more quickly.
Seams, pockets and other similar heavy areas may not be completely dry when the rest of
the load has reached the selected dryness level. This is normal. Select the More Dry
setting if desired.
If one heavy item is dried with a lightweight load, such as one towel with sheets, it is
possible that the heavy item will not be completely dry when the rest of the load has
reached the selected dryness level. Sort heavy items from lightweight items for best drying
results.
Has an Odor • Household odors such as from painting, varnishing, strong cleaners, etc. may enter the
dryer with the surrounding room air. This is normal as the dryer draws the air from the
room, heats it, pulls it through the tumbler and exhausts it to the outside. When these
odors are present in the air, ventilate the room completely before using the dryer.
14

Service& Wurru,t¥
CUSTOMER'S SOLE AND EXCLUSIVE
REMEDY UNDER THIS LIMITED
WARRANTY SHALL BE PRODUCT REPAIR
AS PROVIDED HEREIN. IMPLIED
WARRANTIES, INCLUDING WARRANTIES
OF MERCHANTABILITY OR FITNESSFOR
A PARTICULAR PURPOSE,ARE LIMITED
TO ONE YEAR ORTHE SHORTEST
PERIOD ALLOWED BY LAW. MAYTAG
CORPORATION SHALL NOT BE LIABLE
FOR INCIDENTAL OR CONSEQUENTIAL
DAMAGES. SOME STATESAND
PROVINCES DO NOT ALLOW THE
EXCLUSION OR LIMITATION OF
INCIDENTAL OR CONSEQUENTIAL
DAMAGES, OR LIMITATIONS ON THE
DURATION OF IMPLIED WARRANTIES OF
MERCHANTABILITY OR FITNESS,SO
THESE EXCLUSIONS OR LIMITATIONS
MAY NOT APPLY TOYOU. THIS
WARRANTY GIVESYOU SPECIFIC LEGAL
RIGHTS AND YOU MAY ALSO HAVE
OTHER RIGHTS,WHICH VARY STATETO
STATEOR PROVINCE TO PROVINCE.
What is Not Covered By These Warranties
1. Conditions and damages resulting from any of the following:
a. Improper installation, delivery, or maintenance.
b. Any repair, modification, alteration, or adjustment not authorized by the
manufacturer or an authorized servicer.
c. Misuse, abuse, accidents, unreasonable use, or acts of God.
d. Incorrect electric current, voltage, electrical and/or gas supply.
e. Improper setting of any control.
2. Warranties are void if the original serial numbers [lave been removed, altered,
or cannot be readily determined.
3. Light bulbs, water filters and air filters.
4. Products purchased for commercial or industrial use.
5. Tile cost of service or service call to:
a. Correct installation errors. For products requiring ventilation, rigid metal
ducting must be used.
b. Instruct the user on the proper use of the product.
c. Transport tile appliance to and from the servicer.
6. Any food loss due to refrigerator or freezer product failures.
7. Expenses for travel and transportation for product service in remote locations.
8. Outside of tile United States and Canada this warranty does not apply.
Contact your dealer to determine if another warranty applies.
9. Consequential or incidental damages sustained by any person as a result of
any breach of these warranties. Some states do not allow the exclusion or
limitation of consequential or incidental damages, so the above exclusion may
not apply.
If You Need Service
First see the Troubleshooting section in your Use and Care Guide or call the
dealer from whom your appliance was purchased or call Maytag Services, LLC,
Customer Assistance at 1-800-688-9900 USA and 1-800-688-2002 Canada to
locate an authorized servicer.
Be sure to retain proof of purchase to verify warranty status. Referto WARRANTY
for further information on owner's responsibilities for warranty service.
If the dealer or service company cannot resolve the problem, write to Maytag
Services, LLC,Attn: CAIR_ Center, P.O.Box 2370,Cleveland,TN 37320-2370,or call
1-800-688-9900 USA and 1-800-688-2002 Canada. U.S.customers using
TTY for deaf, hearing impaired or speech impaired,call 1-800-688-2080.
User'sguides, service manualsand parts information are available from Maytag
Services, LLC,Customer Assistance.
Notes: When writing or calling about a service problem, please include:
a. Your name, address and telephone number;
b. Model number and serial number;
c. Name and address of your dealer or servicer;
d. A clear description of the problem you are [laving;
e. Proof of purchase (sales receipt).
15

M_ Y AG
®
MD-1
Table des mati_res
Importantes consignes
de s6curit6 ............... 17-18
Utilisation des commandes
ModUles & s6chage automatique ...19-20
ModUles avec capteur ............ 21-22
Commandes 61ectroniques ........ 23-25
Fonctionnement .............. 26
Inversion de porte ........... 28
Conseils pour 1'6vacuation
de I'air ..................... 29
Recherche des pannes ........ 30
Accessoires ................ 26
Nettoyage et entretien ........ 27
Garantie et service
apr_s-vente ................. 31
Guia de uso y cuidado ....... 32

Importnntesconsignesdesecurit6
Ce qu'il faut savoir _ propos
des consignes de s_curitd
Les consignes de securite et les mises en garde presentees
dans ce guide ne couvrent pas toutes les situations
possibles. Faire preuve de jugement, de prudence et
d'attention Iors de I'installation, de I'entretien et de
rutilisation de I'appareil.
Lorsque survient un probleme ou une situation inhabituelle,
toujours communiquer avec le fabricant.
Reconnaissez les _tiquettes, phrases
ou symboles sur la securite
17

Importnntesconsignesdesecurit6
1. Lire toutes les instructions avant d'utiliser I'appareil.
2. Pour eviter les risques d'incendie ou d'explosion :
a. Ne pas secher d'articles qui ont auparavant ete
nettoyes ou laves a I'aide d'essence, de solvants de
nettoyage a sec ou d'autres produits explosifs ou
inflammables, ou qui en sont imbibes ou eclabousses,
car ces substances produisent des vapeurs qui
peuvent s'enflammer ou exploser. Tout tissu sur lequel
des solvants de nettoyage ont ete utilises ou qui sont
satures de liquides ou solides inflammables ne doit
pas etre mis dans la secheuse avant que toute trace
et toute vapeur de ces liquides ou solides ne soient
completement eliminees. De nombreux produits
extremement inflammables sont communement
utilises a la maison, entre autres racetone, I'alcool
denature, ressence, le kerosene, certains produits de
nettoyage menagers, les detachants, la terebenthine,
les cires et les decapants de cire.
b. Les articles contenant du caoutchouc mousse
(l'etiquette indique parfois : mousse de latex) ou tout
materiau de texture similaire ne doivent pas etre
seches sur un cycle utilisant de I'air chaud. Lorsqu'ils
sont exposes a la chaleur, ces materiaux peuvent,
dans certaines conditions, s'enflammer par un
phenomene de combustion spontanee.
3. Ne pas permettre aux enfants ou aux animaux familiers
de jouer sur I'appareil, a I'interieur ou en face de celui-ci.
Une supervision etroite est necessaire Iorsque I'appareil
est utilise a proximite d'enfants ou d'animaux familiers.
4. Avant de mettre rappareil hors service ou au rebut,
retirer la porte du compartiment de sechage.
5. Ne pas mettre la main ou le bras dans rappareil si le
tambour est en mouvement.
6. Ne pas installer ou remiser I'appareil dans un endroit or)
il est expose aux intemperies.
7. Ne pas modifier les mecanismes de commande.
8. Ne pas reparer ou remplacer une piece de rappareil ou
proceder a un depannage, saul si les instructions
publiees le recommandent et que la personne effectuant
la reparation les comprend et possede les connaissances
voulues pour les executer.
9. Ne pas utiliser d'assouplissant textile ni de produit visant
reduire I'electricite statique saul si le fabricant de ces
produits recommande leur usage dans la secheuse.
10. Nettoyer le filtre a charpie avant et apres chaque utilisation.
11. I_viterraccumulation de charpie, de poussiere et de
salete directement autour du conduit d'evacuation et
dans toute la zone environnante.
12. Faire nettoyer regulierement I'interieur de la secheuse et
du conduit d'evacuation par des techniciens qualifies.
13. Cet appareil doit etre correctement mis a la terre. Ne
jamais brancher le c_ble electrique de I'appareil sur une
prise murale non mise a la terre conformement aux
codes Iocaux et nationaux. Voir les instructions
d'installation pour la mise a la terre de cet appareil.
14. Ne pas s'asseoir sur la secheuse.
Mesures de s curitd
importantes
En application de la Ioi californienne concernant la salubrite
de I'eau et la protection contre les substances chimiques
California Safe Drinking Water and Toxic Enforcement Act de
1986 (Proposition 65), le gouverneur de Californie est tenu de
publier une liste des substances reconnues par I'etat de
Californie comme etant cancerigenes ou pouvant etre cause
d'infertilite, et les commerces et industries sont tenus
d'avertir les consommateurs des risques potentiels
d'exposition a de telles substances.
Enconsequence, les utilisateursde rappareil sont avertisque la
combustion de gaz peut entrainer une faible exposition
certaines dessubstances nomenclaturees par I'etat deCalifornie,
dont le benzene,le formaldehydeet lasuie, principalementen
raisond'une combustion incomplete de gaz naturel ou de gazde
petrole liqudie (GPL).Lesconduits d'evacuation ne doivent pas
etre obstrueset rexposition a cos substances peut etre reduite
en assurant une evacuationd'air adequate.
Remarque: En raison des am61iorations apport6es
r6gulierement _ ses produits, Maytag se r6serve le droit
de modifier les sp6cifications sans pr_avis. Pour de plus
amples renseignements, consulter les instructions
d'installation incluses avec votre appareil avant de choisir
des meubles de rangement, de faire du d6coupage ou de
commencer I'installation.
CONSERVER CES INSTRUCTIONS
18

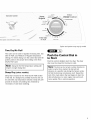
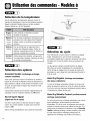
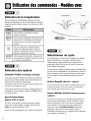
Utilisutiondescommundes- Modeles
S lection de la temperature
Afin de selectionner la temperature adequate, tourner le
selecteur de temperature a rune des trois positions suivantes :
Regular (ordinaire), Medium (moyen, certains modeles)
Delicate (delicat) ou Air Fluff [gonflant).
Regular
Normal
Medium
iVloyen
(certains
modeles)
Delicate
Delicat
Air Fluff
Gonflant
Coton resistant ou etiquettes marquees
Sechable en secheuse.
Pour les tissus synthetiques infroissables/a pli
permanent, les cotons legers dont I'etiquette
indique secher en secheuse a temperature
moyenne.
Pour les articles qui ne supportent pas la
chaleur dont I'etiquette indique Secher en
secheuse a temperature douce ou Secher en
secheuse a temperature moyenne.
Articles devant etre rafraichis. Le linge seche
la temperature ambiante. Choisissez le cycle
de sechage minute/gonflant.
S lection des options
Extended Tumble (culbutage prolonge,
certains modbles)
Cette option permet de reduire le froissement au minimum
Iorsque le cycle Auto Dry Wrinkle Control est selectionn& Le
linge continue a culbuter a froid pendant 60 minutes a lafin
du cycle. On peut enlever le linge a tout moment de cette
portion du cycle.
II est possible d'annuler les 60 minutes supplementaires de
culbutage a froid en mettant le selecteur sur Off (arret).
End of Cycle Signal
(signal de fin de cycle)
Une lois le cycle termine, la secheuse produit un signal
sonore. Sur certains modeles, le signal sonore peut etre
baisse ou Off.
Enlever le linge immediatement pour reduire le froissement.
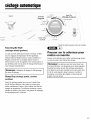
Temperature
Delicate
Air Fluff _'_
_teavy Duty / SuperSize Capacity / Quiet Series 10
S lection du cycle
Pour selectionner un cycle, tourner le selecteur au reglage
desire. L'utilisation d'un cycle de Auto Dry [sechage
automatique) signifie que le selecteur doit pointer entre More
Dry (plus sec] et Less Dry [moins sec] pour la plupart des
charges.
Les plus grosses charges necessitent parfois le reglage
More Dry pour secher completement. II est preferable de
secher le linge au reglage Less Dry Iorsque les tissus sont
plus legers ou que le linge doit rester legerement humide
la fin du cycle.
Auto Dry Regular (sechage automatique
des tissus ordinaires)
Le cycle de sechage automatique ordinaire est con_u pour
secher la plupart des articles en coton et le linge de maison.
,&,la fin du cycle, les vetements refroidissent pendant environ
10 minutes pour reduire les faux plis.
Auto Dry Wrinkle Control (antifroissement
sechage automatique)
Ce cycle est prevu pour le sechage automatique des cotons,
tissus synthetiques, tricots doubles et autres tissus
infroissables. A la fin du cycle, les vetements sont refroidis
pendant 25 minutes environ pour reduire les faux plis. Si la
charge n'est pas enlevee de la secheuse et qu'un Extended
Tumble (culbutage prolonge, certains modeles) a ete choisi,
le cycle avance jusqu'a Culbutage prolonge pour un
supplement de culbutage sans chaleur (voir etape 2).
19
La page est en cours de chargement...
La page est en cours de chargement...
La page est en cours de chargement...
La page est en cours de chargement...
La page est en cours de chargement...
La page est en cours de chargement...
La page est en cours de chargement...
La page est en cours de chargement...
La page est en cours de chargement...
La page est en cours de chargement...
La page est en cours de chargement...
La page est en cours de chargement...
La page est en cours de chargement...
La page est en cours de chargement...
La page est en cours de chargement...
La page est en cours de chargement...
La page est en cours de chargement...
La page est en cours de chargement...
La page est en cours de chargement...
La page est en cours de chargement...
La page est en cours de chargement...
La page est en cours de chargement...
La page est en cours de chargement...
La page est en cours de chargement...
La page est en cours de chargement...
La page est en cours de chargement...
La page est en cours de chargement...
La page est en cours de chargement...
-
 1
1
-
 2
2
-
 3
3
-
 4
4
-
 5
5
-
 6
6
-
 7
7
-
 8
8
-
 9
9
-
 10
10
-
 11
11
-
 12
12
-
 13
13
-
 14
14
-
 15
15
-
 16
16
-
 17
17
-
 18
18
-
 19
19
-
 20
20
-
 21
21
-
 22
22
-
 23
23
-
 24
24
-
 25
25
-
 26
26
-
 27
27
-
 28
28
-
 29
29
-
 30
30
-
 31
31
-
 32
32
-
 33
33
-
 34
34
-
 35
35
-
 36
36
-
 37
37
-
 38
38
-
 39
39
-
 40
40
-
 41
41
-
 42
42
-
 43
43
-
 44
44
-
 45
45
-
 46
46
-
 47
47
-
 48
48


Maytag MDE308DAYW Le manuel du propriétaire
- Catégorie
- Sèche-linge électriques
- Taper
- Le manuel du propriétaire
dans d''autres langues
- English: Maytag MDE308DAYW Owner's manual
- español: Maytag MDE308DAYW El manual del propietario
Documents connexes
-
Maytag MD-1 Mode d'emploi
-
Maytag PYET344AZW Le manuel du propriétaire
-
Maytag MDE3758AZW Manuel utilisateur
-
Maytag HY-2 Mode d'emploi
-
-
Maytag MDG6800AWW Manuel utilisateur
-
-
-
-