
RotoForce-1
Instruction Manual
Manual No.: 15227001
Date of Release 20.02.1998


RotoForce-1
Instruction Manual
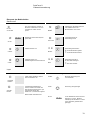
Table of Contents Page
User’s Guide............................................................. 1
Reference Guide..................................................... 15
Quick Reference Guide.......................................... 23
A
lways state Serial No and Voltage/frequency if you have technical questions or when ordering spare parts.
You will find the Serial No. and Voltage on the type plate of the machine itself. We may also need the Date
and Article No of the manual. This information is found on the front cover.
The following restrictions should be observed, as violation of the restrictions may cause cancellation of Struers
legal obligations:
Instruction Manuals: Struers Instruction Manual may only be used in connection with Struers equipment
covered by the Instruction Manual.
Service Manuals: Struers Service Manual may only be used by a trained technician authorised by Struers.
The Service Manual may only be used in connection with Struers equipment covered by the Service Manual.
Struers assumes no responsibility for errors in the manual text/illustrations. The information in this manual is
subject to changes without notice. The manual may mention accessories or parts not included in the present
version of the equipment.
The contents of this manual is the property of Struers. Reproduction of any part of this manual without the
written permission of Struers is not allowed.
A
ll rights reserved. © Struers 1998.
Struers A/S
Valhøjs Allé 176
DK-2610 Rødovre/Copenhagen
Denmark
Telephone +45 36 70 35 00
Fax +45 38 27 27 01


RotoForce-1
Instruction Manual
RotoForce-1
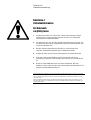
Safety Precaution Sheet
To be read carefully
before use
1. The operator should be fully aware of the use of the machine according
to the Instruction Manual. The machine must be placed in an adequate
working position.
2. Be sure that the actual voltage corresponds to the voltage stated on the
back of the machine. The machine must be earthed.
3. Keep your hands clear of the supporting plate or specimen mover plate
when lowering RotoForce-1.
4. Do not touch the rotating parts during operation.
5. If you observe malfunctions or hear unusual noises - stop the machine
and call technical service.
6. Blue lubricant: follow the current safety rules for handling, mixing, filling,
emptying and disposal of the alcohol-based lubricant.
The equipment is designed for use with consumables supplied by Struers. If subjected to misuse, improper
installation, alteration, neglect, accident or improper repair, Struers will accept no responsibility for damage(s)
to the user or the equipment.
Dismantling of any part of the equipment, during service or repair, should always be performed by a qualified
technician (electromechanical, electronic, mechanical, pneumatic, etc.).


RotoForce-1
Instruction Manual
1
User’s Guide
Table of Contents Page
1. Getting Started
Checking the Contents of Packing .................................................2
Getting Acquainted with RotoForce-1............................................3
Setting Up RotoForce-1 on RotoPol-11...........................................4
RotoForce-1 on RotoPol-21/22/25....................................................4
Disc Margin..................................................................................... 5
Connecting RotoForce-1..................................................................5
Supplying Power......................................................................5
Electrical Connection............................................................... 5
Connection to Compressed Air................................................ 5
Connection to the Preparation Equipment....................................6
RotoPol alone ........................................................................... 6
RotoPol with Multidoser and/or RotoCom .............................. 6
Choosing between Menus............................................................... 6
Setting the Language...................................................................... 7
Mounting Lupo................................................................................8
2. Operation
Using the Controls.......................................................................... 9
Front Panel Controls of RotoForce-1 and Lupo...................... 9
Front Panel Controls .................................................................... 10
RotoForce-1 ............................................................................ 10
Lupo........................................................................................ 10
The Handle....................................................................................11
Changing to Another Lupo Unit (Accessory) ............................... 11
Changing Lubricant Type / Refilling............................................ 11
Running a Preparation Method.................................................... 12
Using a Specimen Mover plate.............................................. 12
Using the Specimen Holder................................................... 12
Adjusting the Force....................................................................... 12
Adjusting the Preparation Time................................................... 12
Operation of Lupo......................................................................... 13
Operation of RotoForce-1.............................................................. 13

RotoForce-1
Instruction Manual
2
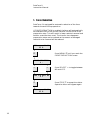
1. Getting Started
In the packing box you should find the following parts:
1 RotoForce-1
1 Mains cable
1 Lupo automatic drip lubricator
1 Nozzle arm (to be used with Multidoser)
1 Pressure hose, 1/4” 3 m
1 Nylon tube ø8x6
1 Hose clamp
1 Quick coupling
1 Hose nipple
6 Screws M4x10
2 Screw M5x12
1 Screw M3x3
3Washers ø16.5x30x3
3Washers ø16.5x30x1
1Nut M16
1 Socket spanner
1 Hexagon key 1.5
1 Hexagon key 2.5
3 Instruction manuals
1 Spare Part and Diagrams manual
Remove RotoForce-1 from the transportation box.
Checking the Contents of
Packing

RotoForce-1
Instruction Manual
3
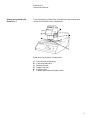
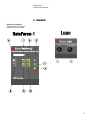
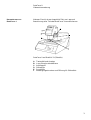
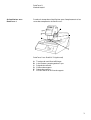
Take a moment to familiarise yourself with the location and
names of the RotoForce-1 components.
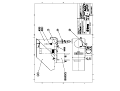
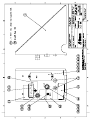
RotoForce-1 on RotoPol-11 (optional)
AControl keys and display.
BLupo drip lubricator.
CRelease handle.
DSupport column.
EPressure feet.
FFastening screws and support hole.
Getting Acquainted with
RotoForce-1

RotoForce-1
Instruction Manual
4
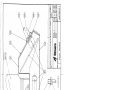
n Remove the cap covering the support hole placed on the top of
the RotoPol-11 cabinet.
n Remove the two caps covering the fastening screws on the
left-hand side of the RotoPol cabinet by lifting them off with a
knife.
n Lead the supporting column of RotoForce-1 down into the
support hole in RotoPol-11. Turn the column until the
specimen mover plate is positioned correctly over the
preparation disc. (see figure)
n Mount a preparation disc on RotoPol-11 and adjust the
distance between disc and specimen mover plate to about
1 - 1.5 mm.
n Tighten the two fastening screws on the left-hand side of the
RotoPol-11 cabinet and mount the two caps again.
Place two working tables of equal height at a distance about half
the length of RotoPol. Balance RotoPol between the tables.
n Lead the supporting column of RotoForce-1 down into the
support hole of RotoPol.
n Turn the column until the specimen mover plate is positioned
correctly over the preparation disc.
n Fasten the nut and washer from the transportation box
loosely under the column of RotoForce-1 below RotoPol.
n Adjust the height of the specimen mover in relation to the
preparation disc:
− Mount a preparation disc on RotoPol.
− Mount a specimen mover plate on RotoForce-1.
− Lower RotoForce-1 into working position.
− Measure the distance between the specimen mover plate
and the preparation disc.
− The correct distance should be 1 - 1.5 mm. If the distance
is not correct, remove RotoForce-1 again.
− Grease 1 or more extra washers (1-3 mm) and place them
on the thread at the end of the column. (the grease
makes the washers stick to the column.)
− Put RotoForce-1 back onto RotoPol and make sure the
distance is correct now.
− Fasten the bottom nut tightly.
Setting Up RotoForce-1
on RotoPol-11
RotoForce-1
on RotoPol-21/22/25

RotoForce-1
Instruction Manual
5
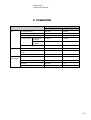
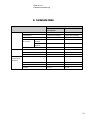
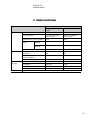
Before final tightening of the two fastening screws or the bottom
nut you must check the margin between the specimen holder
plate hole and the edge of the grinding / polishing disc. This
distance should be:
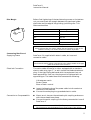
Diameter of the Holes Disc Margin
40 mm 1.5 mm
1½" 2.5 mm
1¼" 6.0 mm
30 mm 6.5 mm
25 mm 9.0 mm
RotoForce-1 is supplied with electric cable, air hose and
connection cable.
The mains cable of RotoPol is either equipped with a standard
electric male plug, type “F” or with a male flat blade attachment
plug. If the type of plug delivered with the equipment has not
been approved for local use, the plug must be replaced with an
approved type. The leads have to be connected as following:
Yellow/green: earth
Brown: phase
Blue or black: neutral
n Insert the female plug of the power cable into the socket on
the back of the machine.
n Connect the male plug to a grounded electric outlet.
n Mount an air hose on the enclosed quick coupling and secure
with the enclosed hose clamp.
n Connect the quick coupling to the factory-mounted air hose of
RotoForce-1.
Disc Margin
IMPORTANT
Having adjusted the disc margin, tighten the two fastening screws or the
bottom nut firmly. The column should now remain in position.
Connecting RotoForce-1
Supplying Power
IMPORTANT
Check that the mains voltage corresponds to the voltage stated on the type
plate on the back of the machine.
Electrical Connection
Connection to Compressed Air
IMPORTANT
The air pressure must be between 5 bar (73 psi) and 6.5 bar (95 psi)

RotoForce-1
Instruction Manual
6
Connect the communication cable to the back of RotoPol (see the
Instruction Manual of RotoPol).
Connect the communication cable to the back of Multidoser (see
the Instruction Manual of Multidoser)
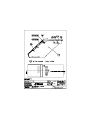
Press the MENU m key to move from one screen to another:
LANGUAGE
ENGLISH
,
m
,
COMMUNICATION
STANDARD
,
m
,
FORCE REDUCTION
NO
Connection to
the Preparation Equipment
RotoPol alone
RotoPol with Multidoser and/or
RotoCom
Choosing between Menus

RotoForce-1
Instruction Manual
7
30N 01:00
STOP
,
mPress MENU m to activate the set-
up menu.
,
LANGUAGE
ENGLISH The LANGUAGE screen appears.
,
LPress SELECT L to choose English,
German, French or Japanese.
,
SPRACHE
DEUTSCH
,
o
,
Press STOP o to accept the choice.
The Operation Menu will appear
again in the language you have
chosen.
30N 01:00
STOP
Remember to set the same language on all the connected
RotoSystem modules.
Setting the Language

RotoForce-1
Instruction Manual
8
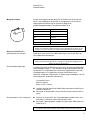
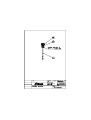
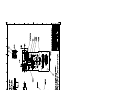
n Remove Lupo from its box
n Guide Lupo onto the connector on the supporting arm on
RotoForce-1.
n Remove the top lid of the bottle and fill with lubricant.
n Remount the top lid, and Lupo is ready for use.
Mounting Lupo

RotoForce-1
Instruction Manual
9
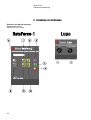
2. Operation
Using the Controls
Front Panel Controls of
RotoForce-1 and Lupo

RotoForce-1
Instruction Manual
10
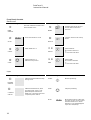
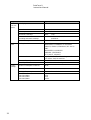
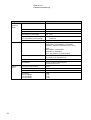
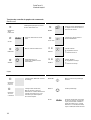
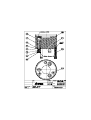
Front Panel Controls
RotoForce-1
Name Key Function Name Key Function
Q
MAIN
SWITCH
The main switch is located on the
back of RotoForce-1. U
MENU mActivates the set-up menu or
moves down in the menu
structure.
R
AUTO
Auto Turns Auto mode on or off. V
SELECT LChanges values in the set-up
menu.
S
START sStarts RotoForce-1.
FORCE fSelect FORCE:
O Increases the force
N Decreases the force
T
STOP oStops RotoForce-1.
Exits the set-up menu.
TIME tSelect TIME:
O Increases the time
N Decreases the time
Lupo
Name Key Function Name Key Function
DOSING
SWITCH
Switches between different step
dosing levels. START sManual predosing.
CONTROL
SWITCH
Switches between Auto, Start
and Stop mode. Lupo is sup-
plied with power direct from
RotoForce-1 and does not need
a separate power switch.
STOP oStop the predosing.
AUTO Auto When Auto mode is active start
and stop of Lupo can be control-
led from RotoForce-1. When
RotoForce-1 is started/stopped
Lupo also starts/stops.

RotoForce-1
Instruction Manual
11
The handle of RotoForce-1 is used to move RotoForce-1 into an
upright position. In this position it is possible to exchange
specimen mover plates and preparation discs. As RotoForce-1 is
equipped with a gas spring, it will be moved upwards
automatically after the handle is moved backwards.
To move RotoForce-1 down again, simply press it down until the
locking pins engage in the bottom plate.
n Set the mode switch on Lupo to STOP o position.
n Remove the current Lupo.
n Place the other Lupo (accessory) with an alternative lubricant
in the connector on the supporting arm.
n Set the mode switch on Lupo to STOP o position.
n Remove Lupo from RotoForce-1.
n Hold the Lupo lubricant bottle firmly and remove the top lid.
n Empty the bottle, still mounted on Lupo, of any remaining
lubricant.
− Fill the bottle with mild, soapy water.
− Put Lupo back on the supporting arm.
− Set the mode switch on Lupo to START s.
− Set the dosing control to max. dosing (step 10) and let the
water run through the nozzle for 2-3-min.
Repeat the above points but fill with tap water to rinse out
any soap residue.
n Refill with lubricant and remount the top lid.
The Handle
Changing to Another
Lupo Unit (Accessory)
Changing Lubricant Type /
Refilling
IMPORTANT
Always avoid turning the socket cap while unscrewing the Lupo bottle, as the
turning movement may cause damage to the socket cap gasket.

RotoForce-1
Instruction Manual
12
n Move RotoForce-1 into the upright position.
n Remove the three screws securing the mover plate or slide
the specimen holder off the legs.
n Put a specimen mover plate in position and secure it with the
three screws.
n Move RotoForce-1 into the upright position.
n Remove the three screws securing the specimen mover plate.
n Slide the specimen holder evenly onto the three legs.
n Insert the correct preparation disc and press RotoForce-1
down into the correct position.
Press FORCE fO or fN to adjust the force to the desired value.
30N 01:00
STOP
,
fO
,
35N 01:00
STOP
The force displayed is the force applied per specimen. Also when
working with the specimen holder ROFLU, as the three pressure
feet will transfer the force to the specimen holder where three
specimens are clamped. It is not necessary to apply higher forces.
Press TIME tO or tN to adjust the preparation time.
35N 01:00
STOP
,
tO
,
35N 01:10
STOP
Running a Preparation Method
Using a Specimen Mover Plate
Using the Specimen Holder
Adjusting the Force
Adjusting the Preparation Time

RotoForce-1
Instruction Manual
13
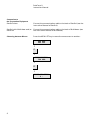
n Adjust the dosing level
n Set Lupo to Auto mode
n After setting the correct time and force on RotoForce-1 and
the dosing level on Lupo, press Auto on RotoForce-1.
n Press START s on the RotoPol grinding/polishing machine to
start both machines simultaneously.
n When the pre-set time has elapsed, all machines will stop
simultaneously.
Operation of Lupo
Operation of RotoForce-1

RotoForce-1
Instruction Manual
14
La page est en cours de chargement...
La page est en cours de chargement...
La page est en cours de chargement...
La page est en cours de chargement...
La page est en cours de chargement...
La page est en cours de chargement...
La page est en cours de chargement...
La page est en cours de chargement...
La page est en cours de chargement...
La page est en cours de chargement...
La page est en cours de chargement...
La page est en cours de chargement...
La page est en cours de chargement...
La page est en cours de chargement...
La page est en cours de chargement...
La page est en cours de chargement...
La page est en cours de chargement...
La page est en cours de chargement...
La page est en cours de chargement...
La page est en cours de chargement...
La page est en cours de chargement...
La page est en cours de chargement...
La page est en cours de chargement...
La page est en cours de chargement...
La page est en cours de chargement...
La page est en cours de chargement...
La page est en cours de chargement...
La page est en cours de chargement...
La page est en cours de chargement...
La page est en cours de chargement...
La page est en cours de chargement...
La page est en cours de chargement...
La page est en cours de chargement...
La page est en cours de chargement...
La page est en cours de chargement...
La page est en cours de chargement...
La page est en cours de chargement...
La page est en cours de chargement...
La page est en cours de chargement...
La page est en cours de chargement...
La page est en cours de chargement...
La page est en cours de chargement...
La page est en cours de chargement...
La page est en cours de chargement...
La page est en cours de chargement...
La page est en cours de chargement...
La page est en cours de chargement...
La page est en cours de chargement...
La page est en cours de chargement...
La page est en cours de chargement...
La page est en cours de chargement...
La page est en cours de chargement...
La page est en cours de chargement...
La page est en cours de chargement...
La page est en cours de chargement...
La page est en cours de chargement...
La page est en cours de chargement...
La page est en cours de chargement...
La page est en cours de chargement...
La page est en cours de chargement...
La page est en cours de chargement...
La page est en cours de chargement...
La page est en cours de chargement...
La page est en cours de chargement...
La page est en cours de chargement...
La page est en cours de chargement...
La page est en cours de chargement...
La page est en cours de chargement...
La page est en cours de chargement...
La page est en cours de chargement...
La page est en cours de chargement...
La page est en cours de chargement...
La page est en cours de chargement...
La page est en cours de chargement...
La page est en cours de chargement...
La page est en cours de chargement...
La page est en cours de chargement...
La page est en cours de chargement...
La page est en cours de chargement...
La page est en cours de chargement...
La page est en cours de chargement...
La page est en cours de chargement...
La page est en cours de chargement...
La page est en cours de chargement...
La page est en cours de chargement...
La page est en cours de chargement...
-
 1
1
-
 2
2
-
 3
3
-
 4
4
-
 5
5
-
 6
6
-
 7
7
-
 8
8
-
 9
9
-
 10
10
-
 11
11
-
 12
12
-
 13
13
-
 14
14
-
 15
15
-
 16
16
-
 17
17
-
 18
18
-
 19
19
-
 20
20
-
 21
21
-
 22
22
-
 23
23
-
 24
24
-
 25
25
-
 26
26
-
 27
27
-
 28
28
-
 29
29
-
 30
30
-
 31
31
-
 32
32
-
 33
33
-
 34
34
-
 35
35
-
 36
36
-
 37
37
-
 38
38
-
 39
39
-
 40
40
-
 41
41
-
 42
42
-
 43
43
-
 44
44
-
 45
45
-
 46
46
-
 47
47
-
 48
48
-
 49
49
-
 50
50
-
 51
51
-
 52
52
-
 53
53
-
 54
54
-
 55
55
-
 56
56
-
 57
57
-
 58
58
-
 59
59
-
 60
60
-
 61
61
-
 62
62
-
 63
63
-
 64
64
-
 65
65
-
 66
66
-
 67
67
-
 68
68
-
 69
69
-
 70
70
-
 71
71
-
 72
72
-
 73
73
-
 74
74
-
 75
75
-
 76
76
-
 77
77
-
 78
78
-
 79
79
-
 80
80
-
 81
81
-
 82
82
-
 83
83
-
 84
84
-
 85
85
-
 86
86
-
 87
87
-
 88
88
-
 89
89
-
 90
90
-
 91
91
-
 92
92
-
 93
93
-
 94
94
-
 95
95
-
 96
96
-
 97
97
-
 98
98
-
 99
99
-
 100
100
-
 101
101
-
 102
102
-
 103
103
-
 104
104
-
 105
105
-
 106
106


dans d''autres langues
- English: Struers RotoForce-1 User manual
- Deutsch: Struers RotoForce-1 Benutzerhandbuch
Documents connexes
-
 Struers RotoForce-4 Manuel utilisateur
-
 Struers PDM-Force-20 Manuel utilisateur
-
 Struers RotoPol-31 Manuel utilisateur
-
 Struers RotoPol-11 Manuel utilisateur
-
 Struers RotoPol-21 Manuel utilisateur
-
 Struers LaboForce-3 Manuel utilisateur
-
 Struers Abramin Manuel utilisateur
-
 Struers MAPS Manuel utilisateur
-
 Struers Prepamatic-2 Manuel utilisateur
-
 Struers Tenupol-3 Manuel utilisateur


