La page est en cours de chargement...

Manual No.: 13947001
Date of Release 0..20
Abramin
Instruction Manual

Abramin
Instruction Manual
Always state Serial No and Voltage/frequency if you have technical questions or when ordering spare parts.
You will find the Serial No. and Voltage on the type plate of the machine itself. We may also need the Date
and Article No of the manual. This information is found on the front cover.
The following restrictions should be observed, as violation of the restrictions may cause cancellation of
Struers legal obligations:
Instruction Manuals: Struers Instruction Manual may only be used in connection with Struers equipment
covered by the Instruction Manual.
Service Manuals: Struers Service Manual may only be used by a trained technician authorised by Struers.
The Service Manual may only be used in connection with Struers equipment covered by the Service Manual.
Struers assumes no responsibility for errors in the manual text/illustrations. The information in this manual is
subject to changes without notice. The manual may mention accessories or parts not included in the present
version of the equipment.
The contents of this manual is the property of Struers. Reproduction of any part of this manual without the
written permission of Struers is not allowed.
All rights reserved. © Struers 2010.
Struers A/S
Pederstrupvej 84
DK-2750 Ballerup
Denmark
Telephone +45 44 600 800
Fax +45 44 600 801

Abramin
Instruction Manual
Abramin
Safety Precaution Sheet
To be read carefully
before use
1. The operator should be fully aware of the use of the machine according to
the Instruction Manual. The machine must be placed in an adequate
working position.
2. Be sure that the actual voltage corresponds to the voltage stated on the
back of the machine. The machine must be earthed.
3. Be sure that the water connections do not leak.
4. Keep clear of the rotational disc when operating. Be careful that you do not
hurt your fingers/knuckles (the cooling water will prevent you feeling any
pain while the injury is done!). Do not drop the sample while grinding.
5. Struers recommend that the mains water supply is shut off or disconnected
if the machine is to be left unattended.
6. If you observe malfunctions or hear unusual noises - stop the apparatus
and call technical service.
The equipment should only be used for its intended purpose and as detailed in the Instruction Manual.
The equipment is designed for use with consumables supplied by Struers. If subjected to misuse, improper
installation, alteration, neglect, accident or improper repair, Struers will accept no responsibility for
damage(s) to the user or the equipment.
Dismantling of any part of the equipment, during service or repair, should always be performed by a qualified
technician (electromechanical, electronic, mechanical, pneumatic, etc.).

Abramin
Instruction Manual
Disposal
Equipment marked with a WEEE symbol contain electrical and
electronic components and must not be disposed of as general
waste.
Please contact your local authorities for information on the correct
method of disposal in accordance with national legislation.

Abramin
Instruction Manual
1
User’s Guide
Table of Contents Page
1. Description ............................................................................... 3
2. Technical Data ........................................................................ 4
3. Accessories and Connected Equipment
Accessories ........................................................................................ 5
Grinding with Grinding Paper .................................................... 5
Polishing on Al-Discs ................................................................ 5
4. Preparation of Specimens
Preparation Methods .......................................................................... 7
PG Plane Grinding .................................................................... 7
FG Fine Grinding ...................................................................... 7
DP Diamond Polishing .............................................................. 7
OP Oxide Polishing ................................................................... 7
Struers Metalog GuideTM .................................................................... 8
5. Installation
Contents of Packing Box .................................................................... 9
Unpacking/ Removal of Transport Fittings ......................................... 9
Connection to Compressed-air .......................................................... 9
Connection to Mains ........................................................................ 10
Connection of Water ........................................................................ 10
Lubricator ......................................................................................... 10
6. Operation
Controls ............................................................................................ 11
Front Panel and Controls of Abramin ............................................... 12
Mounting the Grinding and Polishing Disc ....................................... 14
Inserting the Specimen Holder ......................................................... 14
Programming .................................................................................... 14
Preparation and Tips ........................................................................ 17
Manual Preparation .......................................................................... 18

Abramin
Instruction Manual
2
7. Cleaning .................................................................................. 19
8. Service and Repair
Technical Information ....................................................................... 20
Mechanical Construction ......................................................... 20
Pneumatic System .................................................................. 21
Electric System ....................................................................... 22
Trouble Shooting .............................................................................. 23
Fault in the Power Circuit ........................................................ 23
Faults in the Operating Circuit ................................................ 23
Faults in the µP -circuit or Display .......................................... 24
Index for Components ............................................................. 25
Maintenance ..................................................................................... 26
Adjustment ....................................................................................... 27
Adjustment of Down-speed ..................................................... 27
Adjustment of Up-speed ......................................................... 27
Adjustment of Slide Friction .................................................... 27
Removal of the Quick-release Coupling ........................................... 27

Abramin
Instruction Manual
3
1. Description
Abramin is a microprocessor controlled machine for the grinding and
polishing of specimens fixed in a specimen holder disc. Grinding and
polishing are carried out on a horizontal rotating disc and the rotating
specimen holder with the specimen is pressed eccentrically against
it.
Amount of pressure, lubricant or cooling water can be manually
adjusted whereas the microprocessor controls time, disc speed and
choice between water and lubricant.
Abramin has 8 program steps into which the above-mentioned data
can be individually programmed. The disc and cooling water or
lubricant can also be started manually.
With normal use there is, therefore, only the need to select the
respective program step, adjust the pressure and start the process
with the two push-buttons marked "Start".

Abramin
Instruction Manual
4
2. Technical Data
Subject Specifications
Electrical Data Voltage/
frequency Max. Power
Consumption Cable
Specification Fuse size
Min. Max.
3 X 200V 50HZ 3.9 A 3x1,5mm² + PE 6 16
3 x 200V 60Hz 3.9 A 3xAWG12 + PE 6 15
3 X 220V 50HZ 3.8 A 3x1,5mm² + PE 6 16
3 X 220V 60HZ 3.8 A 3xAWG12 + PE 6 15
3 X 380V 50HZ 2.1 A 3x1,5mm² + PE 6 16
3 X 415V 50HZ 1.9 A 3x1,5mm² + PE 6 16
3 X 440V 60HZ 2.1 A 3xAWG12 + PE 6 15
3 x 480V 60Hz 2.1 A 3xAWG12 + PE 6 15
Residual Current Circuit Breaker type A, 30 mA (or higher) is recommended.
Compressed air supply 6 bar (6 kp/cm2)
Compressed air consumption Approx. 15 l/min.
Effect transferred to the disc 300 W at 150 rpm
550 W at 300 rpm
Effect, specimen holder motor 50 W
Speed of rotation, turntable 150/300 rpm
Speed of rotation, specimen
holder motor 150 rpm, 50 Hz
180 rpm, 60 Hz
Vertical specimen holder
pressure: 30-450 N
Polishing disc diameter Max. 320 mm
Max. height of specimen outside
the specimen holder disc 10 mm
Dimensions Height: 650 mm
Width: 530 mm
Depth: 780 mm
Weight 99 kg (gross 121 kg)
Safety Standard Please refer to the Declaration of Conformity
Noise level Approx. 56 dB at a distance of 1 m from the machine

Abramin
Instruction Manual
5
3. Accessories and Connected Equipment
All of the preparation steps necessary for the preparation of
specimens can be carried out on Abramin, e.g. plane grinding,
ordinary grinding, diamond disc grinding, polishing with diverse
polishing cloths and finally, fine polishing with OP-S. Plane grinding
can either be carried out with grinding paper or on the grindstone. In
order to be able to use the grindstone on Abramin, however, it is
necessary to mount a diamond truing device unit. If large specimens
or many specimens are to be prepared, it will be more advantageous
to carry out plane grinding on AbraPlan-20 as thereby much time and
many pieces of grinding paper can be saved. Abramin can be used
with specimen holder disc 160 mm dia. (see the Specimen Holders
User's Guide) and in order to get full benefit from the consumables it
is recommended that the various accessory discs are chosen in
accordance herewith.
Specimen holder 160 mm dia. can be combined with the following
preparation discs (Cat. No. in brackets):
Ø 305 mm disc (02426909) for non-adhesive grinding paper in
accordance with the Knuth-Rotor principle or Ø 230 mm disc
(02426908) for quick-adhesion of grinding paper with Double-
adhesive discs.
Ø 250 mm (02426907) or Ø 300 mm (02426906)
− Microstop for Abramin (03946901).
− Multidoser for 6 bottles. Automatic dosing, supplying constant
amounts of suspension and lubricant.
− Levelling apparatus Uniforce (04886102 / 04886101) which has
its own levelling disc (please ask for separate leaflet).
− Diamond truing device unit (04146903) for truing the grinding
wheel (40800007) for plane grinding.
− Metason 200-HT ultrasonic bath for cleaning the specimen
holder with specimens between the various steps.
− Drybox-2 drying apparatus for drying the specimen holder with
specimens.
Accessories
Grinding with Grinding Paper
Polishing on Al-Discs

Abramin
Instruction Manual
6
Specification
Code
Accessories
Wet Grinding Discs with Ring
250 mm dia., aluminium 02426915
305 mm dia., aluminium 02426909
Polishing Discs
250 mm dia., aluminium 02426907
300 mm dia., aluminium 02426906
Discs for Magnetic Fixation
MD-Disc, 250 mm dia. 02426919
MD-Disc, 300 mm dia. 02426918
Connected Equipment
Multidoser (6 Bottles)
for automatic dosing of 6 liquids (1-5 suspensions, 0-4
lubricants and 1 OP-Suspension)
04606204
Multidoser Connection kit for Abramin 04606907
Spare Parts
Swivel 2NF10130

Abramin
Instruction Manual
7
4. Preparation of Specimens
Plane Grinding (PG) may be carried out on PG-paper, SiC paper or,
for hard materials, on Diamond Pad.
SiC paper is used on a wet grinding disc, according to the Knuth-
Rotor principle. PG-paper or Diamond Pad is glued to a
grinding/polishing disc.
Fine Grinding (FG) is carried out on a cloth with low resilience such
as DP-Plan, DP-Pan or DP-Dur, or on Petrodisc-M. SiC-Paper may
also be used.
Diamond Polishing (DP) is carried out on a polishing cloth using
diamond abrasive and a lubricant. The correct choice of cloth
depends on the material.
Oxide Polishing (OP) is especially suited for soft and ductile material
as a final polishing step.
Preparation Methods
PG Plane Grinding
FG Fine Grinding
DP Diamond Polishing
OP Oxide Polishing

Abramin
Instruction Manual
8
Abramin is designed for both grinding and polishing. In Struers
Metalog GuideTM you will find a detailed description of
grinding/polishing for automated mechanical specimen preparation.
Struers Metalog GuideTM offers preparation methods for the most
common materials, based on a simple analysis of two key properties:
hardness and ductility. Finding the right method is easy, including
choice of consumables. Always consult Struers Metalog GuideTM for
the correct preparation method for the actual specimens.
Struers Metalog Guide TM contains 6 useful chapters:
Metalogram: a quick and safe guide to the right preparation method.
Metalog Methods: a complete catalogue of preparation methods,
based on Struers' vast store of materialographic experience, and
employing Struers' range of consumables.
Preparation Philosophy: the basics of modern specimen preparation,
seen from a professional point of view.
Metalog Process: the materialographic preparation process from
start to finish, logically explained.
Metalog Master: a combined trouble-shooting guide and supply of in-
depth information on the processes of mechanical preparation,
including an expert system for the solving of preparation problems.
Consumables specification
: quick access to the relevant
consumables for the chosen preparation methods.
Struers Metalog GuideTM
Struers Metalog Guide
A complete guide to materialographic specimen preparation.
Contact your local dealer for a free copy of Metalog Guide.

Abramin
Instruction Manual
9
5. Installation
1 Abramin
1 Set of Instruction Manuals
100 Process cards
1 Protection ring of PVC
1 Lid for protection ring of PVC
1 Lubricant bottles, 250 ml
1 Lubricant stopper
1 Outlet tube 1" x 1.5 m
1 Elbow pipe for outlet (PVC)
3 Hose clips, 30 mm
1 Reinforced tube for compressed air, ¼" x 3 m
1 Hose connection for compressed air
2 Hose clips, 12 mm
1 Hose connection
1 Union for hose connection
1 Gasket for hose connection
1 Hose clip, 13 mm
1 Allen key, 6 mm
1 Allen key, 2.5 mm
1 Grease gun for spindle
Abramin is secured by 4 bolts to a base frame in the packing case.
Abramin can be taken off the base frame, using the pipe wrench (13
mm), after which it can be placed where it will be used.
Connect the reinforced compressed-air tube to the branch at the
back of the apparatus (see fig. 3. in the Spare Parts manual), use
hose clamp (12 mm). Abramin is equipped with a water separator
with filter and, therefore, no extra air purification is necessary.
Feed supply pressure should be 6 bar and can be supplied either
from the central compressor, portable compressor with compressed
air reservoir or compressed-air bottle. A capacity of 15 l/min at
atmospheric pressure is sufficient.
Contents of Packing Box
Unpacking/ Removal
of Transport Fittings
Note:
The Figures referred to in this manual can be found
in the Spare Parts and Diagrams section.
Connection to Compressed-air

Abramin
Instruction Manual
10
Check that the serial plate which is placed above the wire (fig. 3.),
is marked with the correct voltage and frequency.
Connect the wires (fig. 3.) as follows:
Yellow/green: earth
Black: phase
Black: phase
Brown: phase
Check that the turntable rotates counter-clockwise when "Disc" is
activated. If it rotates clockwise, reverse the direction by changing
over two phases. The voltage must not deviate more than 10% from
that indicated on the serial plate, otherwise damage can be caused
to the electronics or the power can be reduced.
Connect the thin reinforced hose (fig. 3.) to the tap and use a
13 mm hose clip to secure it. The supplied hose connection with
union and gasket can also be mounted on the tap (½" pipe thread BS
2779:G ½).
Connect the outlet hose to the union on Abramin. The hose is led to
the outlet in a gradual slope. This prevents the water from
discharging too slowly as this may cause overflow or blocking of the
outlet. The elbow pipe must be suitably placed in order to prevent
elbows on the hose.
For the outlet hose use hose clip (30 mm). It must not be tightened
too much (plastic tubing).
If the built-in lubricator is to be used, the apparatus is ready for use
when the 250 ml bottle is full of lubricant, the special stopper is set in
and the bottle in position as shown on fig. 1 in the Spare Parts
manual.
If Multidoser is to be used, connect it to the multiple socket on the
right side of the apparatus.
Connection to Mains
Connection of Water
Lubricator

Abramin
Instruction Manual
11
6. Operation
Please refer to the Spare Parts manual for figures.
The main switch is located on the left side of the apparatus (fig.3.).
The switch is only used in connection with servicing and can be
locked when switched off during maintenance operations. The Stand-
by/On switch on the front panel is used during normal operating
procedure.
The program step starts by pressing the two buttons simultaneously
until the specimen holder begins to rotate. If the display shows 00.00
the sample holder is lowered without the motors being started. By
activating the key Stop the sample holder returns to its initial
position. This is used in connection with Microstop (accessory).
Interrupts all functions.
The specimen holder remains in lower position until the emergency
button is released by pulling the button. When the emergency stop is
activated the display shows intermittently E.S. or O.L., signifying
Emergency Stop or Overload. (If the Emergency Stop has not been
activated and the display nevertheless shows E.S or O.L., one of the
two motors in the apparatus is overloaded - see chapter 8, Service
and Repair).
Used to adjust the water flow.
The turning on/off of the water is effected by a built-in magnetic valve
which is controlled by the microprocessor.
For adjusting the flow of lubricant.
Opening and closing of the lubricant valve is controlled by the
microprocessor.
For connection of automatic dosing with Multidoser.
For quick connection and disconnection to the specimen holder.
Controls
Main Switch
Fig. 1.
Start Buttons
Emergency Stop
Water Valve
Needle Valve for Lubricant
Socket for Multidoser
Quick-coupling

Abramin
Instruction Manual
12
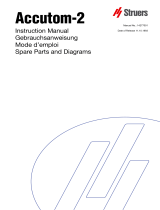
Front Panel and Controls of
Abramin

Abramin
Instruction Manual
13
The machine cannot operate in Stand-by and all buttons are
blocked. Stand-by is indicated by a dot on the display.
8 keys for choice of preparation step. The 8 program steps can be
programmed individually in regard to time, disc speed and
water/lubricant.
Shows the set time in the relative step in minutes and seconds. It is
also used to indicate various warnings.
When a program step has been selected the time can be entered
with the two pointer keys to the left and . The two middle
keys are for the selection of either 150 or 300 rpm for the polishing
disc. The two keys Water and Doser are used for admission of
either water or lubricant (lubricant and diamond suspension if
Multidoser is connected).
The Stop key interrupts the program step and the manual
functions. The Disc key in the middle (150 rpm/300 rpm) starts the
grinding or polishing disc and the Water key opens the flow of
water. By re-pressing Water or Disc, or by pressing Stop, the
function is interrupted. If Doser has been selected in the program
step the water will be cut off.
Holder for fixing the process card, a key plan stating which program
step should be used, which grinding/polishing backing should be put
on the turntable and which pressure should be set (see examples of
programming at the back of this manual).
For reading the grinding and polishing pressure.
Adjusting knob for the setting of grinding or polishing pressure.
By using the handwheel (fig. 3.) the specimen holder can be
moved radially in relation to the centre of the polishing disc so that
the grinding paper and polishing cloths can be used to their full
extent.
Stand-by/On Switch
Program Step
Display
Data
Manual Keys
Process Card Holder
Pressure Gauge
Force (F)
Eccentricity Markings

Abramin
Instruction Manual
14
Place the grinding and polishing disc on the turntable by inserting the
three legs in the matching holes of the turntable. In order to prevent
the polishing disc from wobbling the contact face of the polishing disc
and the turntable should be clean.
Secure the specimen holder with the pre-levelled specimens (see
chapter 3.) in the quick-coupling (fig. 1.) in such a way that the stud
on the specimen holder engages in the quick-coupling and while the
specimen holder is being pressed up, press the quick-coupling's
plastic flange down with the thumbs. In this way, the specimen holder
moves further up in the coupling. While the specimen holder is still
being pressed up, release the plastic flange so that it jumps back into
place. The quick-coupling now grips the specimen holder stud and by
turning the specimen holder the driving pins on the quick-coupling
will engage the specimen holder so that it will rotate with it. (To
remove the specimen holder, press the quick-coupling's plastic
flange down with the thumbs while the other fingers are ready to
'catch' the specimen holder, which will fall down). Thereafter the
quick-coupling with the specimen holder can be adjusted sideways in
relation to the disc.
When grinding with grinding paper, adjustment shall be effected in
such a way that the grinding paper is used to its full extent.
When grinding, the specimens should move out over the edge. When
polishing, as much of the polishing cloth as possible should be used,
but in such a way that the specimens do not move out over the edge.
With use of matching diameters for the various discs (see chapter 3),
a fixed eccentricity can be used so that adjustment in between each
step is avoided.
Abramin is equipped with 8 program steps into which data such as
time, number of revolutions and cooling medium (water or lubricant)
can be entered. This presents the opportunity to build a specimen
preparation with up to 8 different steps, for example 4 grinding steps
and 4 polishing steps. Often the preparation data in the 4 grinding
steps will be the same and, therefore, the same program step can be
used for all 4 grinding steps.
Mounting the Grinding and
Polishing Disc
Inserting the Specimen Holder
Programming

Abramin
Instruction Manual
15
Explanation Key 1 Key 2 Key 3 Display: min/sec
Programming of grinding step (example)
1 Turn on main switch. 1 300 rpm
2 Change from "Stand-by" to "On".
When grinding, operate with 300
rpm and cooling water. Only time
needs to be adjusted.
00.00
3 Setting of time. Counts in steps
of 5 seconds. At constant
pressure change occurs quickly.
00.50
4 Reduction of time. 00.45
Programming of polishing step (example)
1 Select the program step. 2 300 rpm 00.00
2 Change to 150 rpm 150 rpm 00.00
3 Turn off cooling water and
change to Doser. 00.00
4 Set time (1 min 30 sec) 01.30

Abramin
Instruction Manual
16
When the selected preparation step is programmed the various data
can be entered on an empty process card (100 cards supplied with
Abramin).
The left half of the card is for all necessary information needed when
grinding or polishing, such as: which program step to select, which
polishing disc or which cloth should be used, which grain size, paper
or diamond type should be added and the grinding or polishing
pressure to be set.
On the right half enter the data which is programmed in the steps.
For example: time, speed and if water or lubricant is to be used.
The cards can be used as a file covering the different materials
prepared in the laboratory. Fix the card in the holder on the front
plate of Abramin so that the various steps in the preparation can be
followed throughout the entire process. To make place for this, fold
the card along the thick vertical line.
For grinding, use 300 rpm to get a quick grinding and to make sure
that the grinding paper is held as firmly as possible when a grinding
disc in accordance with the Knuth-Rotor principle (ROTAL) is used.
For polishing, 150 rpm - which is the same number of revolutions at
which the specimen holder rotates - is generally used. This gives a
perfect and uniform polishing all over the specimens without
directional preferences which reduces the pull-out of inclusions. In
the case of routine specimens, polishing can be carried out at 300
rpm to minimise the time. Grinding and polishing speeds are also
dependent on the eccentricity between the axis of the turntable and
the specimen holder. Large eccentricity gives relatively high speed
and thereby a high rate of abrasion. By shifting the quick-coupling
with the handwheel (fig. 3.) the relative speed can be varied from 0
(when the turntable rotates at 150 rpm and by placing centre over
centre) to max.
1/137