DeLonghi 34655 Manuel utilisateur
- Catégorie
- Mélangeurs
- Taper
- Manuel utilisateur
Ce manuel convient également à

DSM800 and DSM700 Series
DSM800 et DSM700 Séries
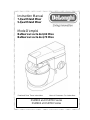
Instruction Manual
7-Quart Stand Mixer
5-Quart Stand Mixer
Read and Save These Instructions
Lisez et Conservez Ces Instructions
Mode D’emploi
Batteur sur socle de 6,62 litres
Batteur sur socle de 4,73 litres

IMPORTANT SAFEGUARDS
When using electrical appliances, basic safety precautions should always be
followed to reduce the risk of fire, electrical shock and/or personal injury.
SHORT CORD INSTRUCTIONS
A short power cord is provided to reduce the risk resulting from entanglement or
tripping over a longer cord. Longer detachable power supply cords are available
and may be used if care is exercised in their use. If a longer detachable power cord
or extension cord is used (1) the marked electrical rating of the extension cord
should be at least as great as the electrical rating of the appliance, and (2) the
longer cord should be arranged so that it will not drape over the countertop or table
top where it can be pulled on by children or tripped over unintentionally. The
electrical rating of the appliance is listed on the bottom of the unit. If the appliance is
of the grounded type, the extension cord should be a grounded type 3 wire cord.
This appliance has a polarized plug. One blade is wider than the other. As a safety
feature this plug will fit in a polarized outlet only one way. If the plug does not fit,
contact a qualified electrician. Do not attempt to defeat this safety feature.
1) Read all instructions.
2) Close supervision is necessary when any appliance is used by or near
children.
3) To protect against fire, electric shock and/or personal injury, do not place cord,
plugs, or appliance in water or any other liquid.
4) Turn the unit off and unplug it from the outlet when not in use, before cleaning
and before installing or removing attachments.
5) Do not operate any appliance with a damaged cord or plug or after the
appliance malfunctions, or has been damaged in any manner. Return appliance
to an authorized DeLonghi service center for examination, repair or adjustment.
6) To disconnect, remove plug from wall outlet. Always hold the plug, but never
pull the cord.
7) Do not use outdoors.
8) Do not let cord hang over edge of table or counter, or touch hot surfaces.
9) Do not use appliance for other than intended use.
10) Keep fingers away from moving parts and fitted attachments.
11) Do not leave machine unattended.
12) Do not use unauthorized attachments.
13) Do not exceed the maximum capacity. (See “Overload Protection Device”)
14) When using an attachment, be sure to read the safety instructions.
15) For household use only
SAVE THESE INSTRUCTIONS

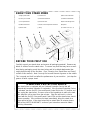
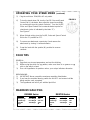
KNOW YOUR STAND MIXER
A) High-Speed Outlet
B) Citrus Juicer Outlet
C) Low-Speed Outlet
D) Attachment Outlet
E) Mixer Head
A
B
C
D
F) Outlet Catch
G) Stainless Steel Bowl
H) Head-Lift Lever
I) On/Off, Pulse and Speed Control Dial
J) Body
K) Non-Stick Flat Beater
L) Stainless Steel Whisk
M) Non-Stick Dough Hook
N) Spatula
O) Outlet Covers (1, 2, 3)
F
G
H
K
L
M
N
Your stand mixer is equipped with an Overload Protection Device that will
automatically terminate operation if overloaded. If the Overload Protection Device
is activated, turn the On/Off, Pulse and Speed Control Dial to the “O” position and
then unplug the stand mixer. Remove some of the ingredients to reduce the load,
then allow the unit to stand for a few minutes. Plug the unit back in, select a
speed with the On/Off, Pulse and Speed Control Dial, and the stand mixer should
resume operation. If the unit does not start immediately, allow it to stand for a
longer period of time. If the stand mixer fails to restart after 20 minutes please
refer to the LIMITED WARRANTY section of your instruction manual to obtain
servicing information.
OVERLOAD PROTECTION DEVICE
O-1
O-2
O-3
J
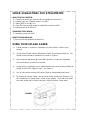
BEFORE YOUR FIRST USE
Carefully unpack your stand mixer and remove all packaging material. Remove any
labels or stickers from the stand mixer. To remove any dust that may have accumu-
lated during packaging, wash the stand mixer and its included attachments thor-
oughly before using for the first time. (See “Cleaning Your Stand Mixer and Parts”)
section of this manual).
Note:
You may find a small amount of grease on the outlets.
This is normal and it will not affect the performance of your machine. Just wipe the
grease off with a paper towel.
E
I

SUGGESTIONS FOR USES
• Non-Stick Flat Beater: For making cakes, biscuits, pastry, icing, fillings and
mashed potatoes.
• Stainless Steel Whisk: For eggs, cream batters, meringues, cheesecakes,
mousses and souffles. To avoid damaging the machine, do not use the whisk
for heavy mixtures.
• Non-Stick Dough Hook: For yeast mixtures.
STAND MIXER INCLUDED ATTACHMENTS
OPERATING YOUR STAND MIXER
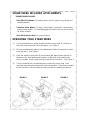
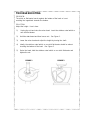
1) Turn the head-lift lever counterclockwise and the mixer head (E) will pop up.
Raise the mixer head until it locks into place.
See Figure 1.
2) To insert an attachment, place it in the Attachment Outlet (D) and push in until it
locks into place.
See Figure 2.
3) Place the stainless steel bowl (G) on the base and align the two grooves on
the base of the bowl with two the notches on the base of the stand mixer.
Once in position, turn the bowl clockwise until it locks into place.
See Figure 3.
4) Turn the head-lift lever counterclockwise to unlock the mixer head. Once
unlocked, lower the mixer head until it locks into position. If the mixer head fails
to lock into place, check the bowl to make sure that it is properly positioned.
FIGURE 2FIGURE 1 FIGURE 3

FOOD TIPS
GENERAL:
1) Eggs that are at room temperature are best for whisking.
2) Before using the whisk for egg whites, make sure there is no grease or egg
yolk on the whisk or bowl.
3) Use cold ingredients for pastries unless your recipe indicates otherwise.
BREADMAKING:
1) IMPORTANT: Never exceed the maximum capacities listed below.
2) If you hear the machine laboring, switch the unit OFF and remove half the
dough and do each separately.
3) The ingredients mix best if you add the liquid first.
MAXIMUM CAPACITIES
Food Type
Pastry Dough
Yeast Dough
Cake Mix
Eggs
Weight Type
Flour Weight
Flour Weight
Total Weight
Amount
2 lbs.
3 lbs. 5 oz.
10 lbs.
16
DSM800 Series
Food Type
Pastry Dough
Yeast Dough
Cake Mix
Eggs
Amount
1 lb. 8 oz.
3 lbs.
6 lbs.
12
DSM700 Series
Weight Type
Flour Weight
Flour Weight
Total Weight
5) Plug the unit into a 120V/60Hz AC only outlet.
6) To turn the stand mixer ON, turn the On/Off, Pulse and Speed
Control Dial (I) clockwise, then adjust the speed accordingly
by continuing to turn the control clockwise. Turn the On/Off,
Pulse and Speed Control Dial counterclockwise to pulse for
short bursts (pulse is indicated by the letter “P”).
See Figure 4.
7) When finished mixing, turn the On/Off, Pulse and Speed Control
Dial to the “O” position for OFF.
8) To remove an attachment, repeat step 1 and remove the
attachment by turning it counterclockwise.
9) Scrap the bowl with the spatula (N) provided to remove
contents.
OPERATING YOUR STAND MIXER (continued)
FIGURE 4

SPEED SUGGESTIONS FOR ATTACHMENTS
NON-STICK FLAT BEATER:
1)
Creaming fat and sugar:
Start on MIN and gradually increase to 5.
2)
Beating eggs into creamed mixture:
4 to MAX
3)
Adding flour or fruit:
Min to 1
4)
Cake Mix:
Start on MIN speed and gradually increase to MAX.
5)
Mixing fat into flour:
MIN to 2.
STAINLESS STEEL WHISK:
1) Gradually increase to MAX.
NON-STICK DOUGH HOOK:
1) Start on MIN and gradually increase to 1.
USING YOUR SPLASH GUARD
1) Follow direction 1 under the “Operating Your Stand Mixer” section of the
manual.
2) Fit the Splash Guard onto the Attachment Outlet (D) by firmly pushing up. The
hinged section should be positioned as shown in Figure 1.
3) Insert required attachment tool and follow direction 2 under the “Operating
Your Stand Mixer” section of the manual.
4) During mixing, ingredients can be added directly to the bowl by simply lifting the
hinged section of the Splash Guard.
See Figure 1.
5) You do not need to remove the Splash Guard to change attachment tools.
6) To remove the Splash Guard, raise the mixer head according to direction (1) in
the “Operating Your Stand Mixer” section of the manual. Once the mixer head
has been raised and is locked into place, slide the Splash Guard down.
FIGURE 1

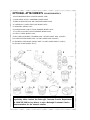
TROUBLESHOOTING
PROBLEM:
The whisk or flat beater knocks against the bottom of the bowl or is not
reaching the ingredients towards the bottom.
SOLUTION:
Adjust the height. Here’s how:
1) Unplug the unit and raise the mixer head. Insert the stainless steel whisk or
non-stick flat beater.
2) Hold the attachment and then loosen nut.
See Figure 1.
3) Lower the mixer head and adjust the height by turning the shaft.
4) Ideally, the stainless steel whisk or non-stick flat beater should be almost
touching the bottom of the bowl.
See Figure 2.
5) Raise the head, hold the stainless steel whisk or non-stick flat beater and
tighten the nut.
FIGURE 1 FIGURE 2

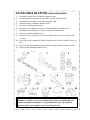
1) PASTA MAKER WITH SIX SCREENS (MODEL A936)
2) HIGH-SPEED SLICER / SHREDDER (MODEL A998)
3) MINI FOOD PROCESSOR AND CHOPPER (MODEL A938)
4) CONTINUOUS JUICE EXTRACTOR (MODEL A935)
5) GRAIN MILL (MODEL A941)
6) PROFESSIONAL-QUALITY FOOD GRINDER (MODEL A950)
7) 1.2-LITER (40-OUNCE) GLASS BLENDER (MODEL A994)
8) CITRUS JUICER (MODEL A995)
9) FRUIT AND VEGETABLE STRAINER (A930: 7-QUART; MODEL A992: 5-QUART)
10) POTATO PEELER (MODEL A952: 7-QUART; MODEL A934: 5-QUART)
11) STAINLESS STEEL BOWL (MODEL 34655: 7-QUART; MODEL 34654: 5-QUART)
12) SPLASH GUARD (MODEL 31227)
OPTIONAL ATTACHMENTS (SOLD SEPARATELY)*
1
456 7
89 10
11
12
*To purchase an additional included attachment or an attachment sold
separately either contact the DeLonghi Customer Service Department
at 1-800-322-3848 to buy direct, or ask a DeLonghi Customer Service
Representative for the nearest retailer.
231

CLEANING YOUR STAND MIXER AND PARTS
1) CAUTION: Be sure to switch off and unplug this appliance before cleaning the
body and its attachments. To protect against electrical shock, do not immerse cord,
plug or unit in water or liquid. After each use, always make sure plug is first
removed from wall outlet.
2) A small amount of grease may appear on the outlets when you first use them.
This is normal and it will not affect the performance of your machine. Just wipe the
grease off with a paper towel.
•BODY: Wipe the body of the stand mixer with a damp cloth and then dry with a
towel. Do not use harsh or abrasive cleansers on the exterior of the unit. Do not
immerse the body in water.
•STAINLESS STEEL BOWL: Never use a wire brush, steel wool or bleach to clean
the stainless steel bowl. The bowl can be placed in the top rack of the dishwasher.
The bowl can also be washed by hand with mild deteregent.
•ACCESSORY ATTACHMENTS: Wash the accessory attachments by hand with
mild detergent, and then dry thoroughly. The stainless steel whisk may be placed in
the top rack of your dishwasher.
•SPLASH GUARD: Wash by hand with mild detergent, and then dry thoroughly.

POUND CAKE
(Using Non-Stick Flat Beater)
INGREDIENTS:
•1 cup butter or margarine, softened
•1 1/2 cups sugar
•4 eggs
•2 teaspoons vanilla extract
•2 cups cake flour
•1 teaspoon baking powder
•1/2 teaspoon salt
•1/4 cup milk
DIRECTIONS:
1) Preheat oven to 325ºF. Grease a 9 x 5 x 2 3/4-inch loaf pan.
2) Attach flat beater to the mixer head.
3) Add butter and sugar to mixing bowl.
4) Blend thoroughly using speed 3.
5) Gradually increase speed to 6 and continue mixing until light and fluffy.
6) Turn OFF mixer. Add eggs, one at a time, blending thoroughly using speed 3.
DIRECTIONS:
1) Attach flat beater to mixer head.
2) Add butter and sugar to mixing bowl and blend thoroughly using speed 3.
3) Gradually increase speed to 6 and continue mixing until light and fluffy.
4) Turn stand mixer OFF, and add egg and vanilla extract.
5) Mix together using speed 3 until well blended.
6) Turn down to speed 1 and slowly add flour, baking power and salt.
7) Gradually increase speed to 3 until well blended.
8) Turn stand mixer OFF, and shape dough into a ball and wrap in wax paper.
9) Refrigerate for about 2 hours and then preheat oven to 375ºF.
10) Divide dough in half. On lightly floured surface roll dough 1/4-inch thick
11) Using a floured cookie cutter, cut dough and place cookies on greased sheet.
12) Sprinkle with sugar, if desired. Bake for 7 to 8 minutes or until lightly browned.
Makes about 5 dozen cookies.
SUGAR COOKIES
(Using Non-Stick Flat Beater)
INGREDIENTS:
•3/4 cup butter or margarine, softened
•3/4 cup sugar
•1 egg
•1 teaspoon vanilla extract
•1 1/2 cups all-purpose flour
•1 teaspoon baking powder
•1/2 teaspoon salt
RECIPES

RECIPES (CONTINUED)
WHITE BREAD
(Using Non-Stick Dough Hook)
INGREDIENTS:
•1 cup milk
•1/4 cup butter or margarine
•2 teaspoons salt
•2 packages active dry yeast
•1/4 cup sugar
•1 cup warm water (105º - 115º F)
•5 1/2 cups all-purpose flour
DIRECTIONS:
1) In a 1-quart saucepan add milk, butter and salt. Heat over low heat until very
warm and butter melts. Set aside to cool.
2) Attach dough hook to mixer head.
3) Dissolve yeast and sugar in warm water in mixing bowl.
4) Allow mixture to stand for 5 minutes or until mixture looks foamy.
5) Add cooled milk mixture and 2 cups of flour. Blend thoroughly using sped 2.
6) Kneading on speed 1, gradually add additional flour until mixture leaves the
side of the bowl.
7) Increase speed to 2 and knead for about 3 minutes or until dough becomes
smooth and elastic. Add additional flour if necessary.
8) Coat dough lightly with oil. Cover bowl tightly; allow dough to rise in a warm
draft-free location for 1 hour or until doubled in size.
9) Remove dough from bowl and punch down. Divide dough in half.
10) Roll out each half to a rectangle; roll up tightly.
11) Place in two greased 8 1/2 x 4 1/2 x 3-inch loaf pans.
12) Brush top of loaves with oil. Cover and let rise for 1 hour or until doubled in
size.
13) Preheat oven to 350º F. Bake for 35 to 40 minutes or until loaves sound hollow
when tapped.
Makes 2 loaves.
POUND CAKE
(Using Non-Stick Flat Beater) - continued
7) Blend in vanilla extract, and then turn mixer down to speed 1.
8) Add flour, baking powder, salt and milk. Scrape side of bowl if necessary.
9) Gradually increase to speed 3 until well blended.
10) Pour batter into prepared baking pan.
11) Bake for 55 minutes to 1 hour, or until toothpick inserted in the center comes
out clean.
Makes 1 loaf.

RECIPES (CONTINUED)
CREAMY ITALIAN DRESSING
(Using Stainless Steel Whisk)
INGREDIENTS:
•1 cup mayonnaise
•1/4 cup red wine vinegar
•1 teaspoon oregano
•1 teaspoon basil
•1/2 teaspoon parsley
•1/2 teaspoon garlic powder
•1/2 teaspoon salt
•1/4 teaspoon black pepper
DIRECTIONS:
1) Attach whisk to mixer.
2) Add all ingredients to mixing bowl.
3) Blend thoroughly on maximum speed.
4) Place in airtight container and refrigerate.
Makes 1 2/3 cups dressing.
DIRECTIONS:
1) Attach dough hook to mixer.
2) Dissolve yeast and sugar in warm water in mixing bowl.
3) Allow mixture to stand for 5 minutes or until mixture looks foamy.
4) Add remaining ingredients and blend thoroughly using speed 2.
5) Kneading on speed 2 blend until smooth. Dough will be sticky.
6) Scrape dough from side of bowl. Cover with plastic wrap; allow dough to rise
in a warm (90º F) draft-free location for 1 hour or until doubled in size.
7) Use as directed in pizza recipe.
PIZZA DOUGH
(Using Non-Stick Dough Hook)
INGREDIENTS:
•1 package active dry yeast
•1 teaspoon sugar
•3/4 cup warm water (105º - 115º F)
•1/2 teaspoon salt
•1 tablespoon olive oil
•2 1/4 cups all-purpose flour
Makes about 1 pound pizza dough.

SWEETENED WHIPPED CREAM
(Using Stainless Steel Whisk)
INGREDIENTS:
•1 cup heavy cream
•2 tablespoons sugar
•1/2 teaspoon vanilla extract
DIRECTIONS:
1) Attach whisk to mixer. Add cream to mixing bowl.
2) Beat cream using speed 3 until foamy. Gradually increase speed to maximum,
adding remaining ingredients.
3) Whip until soft peaks form.
Makes about 2 cups.
RECIPES (CONTINUED)
© 2002 DeLonghi
Made in U.K.
Power Requirement: 120 Volts / 60 Hz
Power Consumption: 800 Watts (DSM800)
Power Consumption: 705 Watts (DSM700)
Website: www.delonghi.com
10-Year Warranty on Stand Mixer Motor
The maximum rating is based on the attachment that draws the greatest
load. Other attachments may draw significantly less power.
ADDITIONAL PRODUCT INFORMATION

WHAT DOES THE WARRANTY COVER?
We warrant each appliance to be free from defects in material and workmanship. Our
obligation under this warranty is limited to replacement or repair, free of charge at our
factory or authorized service centers of any defective part or parts thereof other than
parts damaged in transit, which shall be returned to us, transportation prepaid. This
warranty shall apply only if the appliance is used in accordance with the factory
directions which accompany it, and on an Alternating Current (AC) circuit.
HOW LONG DOES THE COVERAGE LAST?
This warranty runs for one year from the date of delivery and applies only to the original
purchaser for use.
WHAT IS NOT COVERED BY THE WARRANTY?
The warranty does not cover defects or damage of the appliance which result from
repairs or alterations to the appliance outside our factory or authorized service centers,
nor shall it apply to any appliance which has been subject to abuse, misuse, negligence
or accidents. Also, consequential and incidental damage resulting from the use of this
product or arising out of any breach of contract or breach of this warranty are not
recoverable under this warranty. Some states do not allow the exclusion or limitation of
incidental or consequential damage, so the above limitation may not apply to you.
HOW DO YOU GET SERVICE?
If repairs become necessary or spare parts are needed, please contact:
DeLonghi America, Inc.
Park 80 West, Plaza One
Saddle Brook, NJ 07663
Or call us at: 1-800-322-3848
The above warranty is in lieu of all other express warranties and representations. All
implied warranties are limited to the applicable warranty period set forth above. This
limitation does not apply if you enter into an extended warranty with DeLonghi. Some
states do not allow limitations on how long an implied warranty lasts, so the above
exclusions may not apply to you. DeLonghi does not authorize any other person or
company to assume for it any liability in connection with the sale or use of its appliance.
HOW DOES STATE LAW APPLY?
This warranty gives you specific legal rights, and you may also have other rights which
vary from state to state.
••Limited Warranty••

PRÉCAUTIONS IMPORTANTES
Lorsque vous utilisez des appareils électriques, respectez toujours des précautions
élémentaires, y compris les précautions suivantes :
1) Lisez toutes les instructions.
2) Une surveillance constante est nécessaire lorsqu’un appareil est utilisé en
présence d’enfants.
3) Pour éviter les risques d’incendie, d’électrocution ou de blessures, ne plongez
pas le cordon, la fiche ou l’appareil dans l’eau ou dans un autre liquide.
4) Éteignez et débranchez l’appareil de la prise électrique lorsqu’il n’est pas en
service, avant de le nettoyer ou avant d’y installer ou d’en retirer des
accessoires.
5) N’utilisez aucun appareil qui a été endommagé, dont la fiche ou le cordon
électrique est abîmé ou dont le fonctionnement est anormal. Retournez l’appareil
à un centre de réparation DeLonghi autorisé pour y être examiné, réparé ou
réglé.
6) Débranchez l’appareil en retirant la fiche de la prise électrique. Pour le faire,
tirez uniquement sur la fiche et jamais sur le cordon électrique.
7) Ne l’utilisez pas à en plein air.
8) Ne laissez pas le cordon électrique pendre sur le côté d’une table ou d’un
comptoir et ne le laissez pas toucher des surfaces chaudes.
9) N’utilisez pas l’appareil à des fins autres que celle pour laquelle il est prévu.
10) Éloignez vos doigts des pièces mobiles et des accessoires installés.
11) Ne laissez pas l’appareil sans surveillance.
12) N’utilisez pas d’accessoires non autorisés.
13) N’en dépassez jamais la capacité maximale. (Consultez « Dispositif protecteur
contre les surintensités »)
14) Lorsque vous utilisez un accessoire, veillez à en lire les précautions
d’utilisation.
15) Cette machine est uniquement destinée à une utilisation domestique.
PRÉCAUTIONS POUR LE CORDON COURT
Un cordon électrique court est fourni pour réduire les risques d’entortillement et de
trébuchement associés à un cordon électrique plus long. N’utilisez pas de
prolongateurs. Un prolongateur pourrait surchauffer et poser des risques d’incendie.
Néanmoins, si l’utilisation d’un prolongateur s’avère nécessaire, (1) son calibre minimal
doit être au moins égal à celui de l’appareil et (2) il doit être placé afin de ne pas
pendre d’un comptoir ou d’une table là où il pourrait être tiré par des enfants ou faire
trébucher quelqu’un par accident. Les caractéristiques électriques de cet appareil sont
indiquées sur son socle. Si l’appareil est conçu pour être mis à la terre, le prolongateur
devrait être composé de trois fils et mis à la terre. Cet appareil est équipé d’une fiche
polarisée. Une branche est plus large que l’autre. À titre de sécurité, cette fiche ne
peut être insérée que d’une seule façon dans la prise de courant murale. Si elle ne
s’insère pas complètement dans la prise murale, contactez un électricien qualifié.
N’essayez en aucun cas de modifier ce dispositif de sécurité.
CONSERVEZ LES INSTRUCTIONS

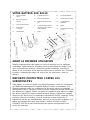
VOTRE BATTEUR SUR SOCLE
K) Fouet plat antiadhésif
L) Fouet en acier inoxydable
M) Crochet pétrisseur
antiadhésif
N) Spatule
O) Couvercles des raccords
(1, 2, 3)
A) Raccord à grande
vitesse
B) Raccord pour presse-
agrumes
C) Raccord à basse vitesse
D) Raccord pour
accessoire
E) Tête du batteur
F) Fermeture du raccord
G) Bol en acier inoxydable
H) Levier de basculement de la
tête
I) Commande de Marche/Arrêt
(On/Off), Impulsion (Pulse) et
Vitesse (Speed)
J) Boîtier
K
L
M
N
A
B
C
E
F
G
O-1
O-2
O-3
J
AVANT LA PREMIÈRE UTILISATION
Déballez soigneusement votre batteur sur socle et retirez-en tous les matériaux
d’emballage. Retirez toutes les étiquettes et tous les autocollants du batteur. Pour
retirer la poussière qui aurait pu s’accumuler pendant l’emballage, lavez bien le
batteur et ses accessoires inclus avant de l’utiliser pour la première fois. (Consultez
la section « Nettoyage du batteur sur socle et de ses accessoires » dans ce
manuel.)
DISPOSITIF PROTECTEUR CONTRE LES
SURINTENSITÉS
Votre batteur sur socle est équipé d’un dispositif protecteur contre les surintensités
qui l’éteint automatiquement si la capacité dépasse la valeur recommandée. Si le
dispositif protecteur contre les surintensités se déclenche, placez la commande
Marche/Arrêt (On/Off), Impulsion (Pulse) et Vitesse (Speed) en position éteinte (Off)
puis débranchez l’appareil. Retirez une partie des ingrédients pour réduire la charge
puis laissez l’appareil se reposer pendant quelques minutes. Rebranchez l’appareil,
choisissez une vitesse avec la commandes Marche/Arrêt (On/Off), Impulsion (Pulse)
et Vitesse (Speed) et le batteur sur socle devrait de nouveau fonctionner. Si
l’appareil ne démarre pas immédiatement, laissez-le se reposer plus longtemps. Si le
batteur ne redémarre pas après vingt minutes, veuillez consulter la section
GARANTIE LIMITÉE de votre mode d’emploi pour plus de renseignements sur le
service de réparation.
D
I
H

ACCESSOIRES INCLUS AVEC LE BATTEUR SUR
SOCLE
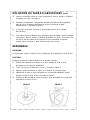
FIGURE 2FIGURE 1 FIGURE 3
UTILISATION DU BATTEUR SUR SOCLE
1) Tournez le levier de verrouillage dans le sens inverse des aiguilles d’une montre
pour libérer la tête du batteur (E). Soulevez-la jusqu’à ce qu’elle se verrouille en
position ouverte.
Consultez la figure 1.
2) Pour insérer un accessoire, placez-le dans le raccord pour accessoire (D) et
enfoncez-le jusqu’à ce qu’il soit solidement en place.
Consultez la figure 2.
3) Placez le bol en acier inoxydable (G) sur le socle et alignez les deux rainures
de la base du bol avec les deux encoches du socle du batteur. Une fois en
position, tournez le bol dans le sens des aiguilles d’une montre jusqu’à ce qu’il
soit solidement en place.
Consultez la figure 3.
4) Tournez le levier de verrouillage de le sens des aiguilles d’une montre pour
libérer la tête du batteur. Une fois qu’elle est déverrouillée, abaissez-la jusqu’à
ce qu’elle se verrouille en position d’utilisation. Si vous ne parvenez pas à la
verrouiller, vérifiez la position du bol.
5) Branchez l’appareil dans une prise de courant de 120 V/60 Hz c.a. uniquement.
RECOMMANDATIONS D’UTILISATION
• Fouet plat antiadhésif : pour préparer des gâteaux, des biscuits, des
pâtisseries, du glaçage, des garnitures et de la purée de pommes de terre.
• Fouet en acier inoxydable : pour battre des œufs, des crèmes, des
meringues, des gâteaux au fromage, des mousses et des soufflés. Pour
éviter d’endommager l’appareil, n’utilisez pas le fouet pour des mélanges
lourds.
• Crochet pétrisseur antiadhésif : Pour les mélanges de levure.

UTILISATION DU BATTEUR SUR SOCLE (suite)
6) Pour allumer le batteur, tournez la commande Marche/Arrêt
(On/Off), Impulsion (Pulse) et Vitesse (Speed) (I) dans le
sens des aiguilles d’une montre puis réglez la vitesse en
conséquence pour continuant de la tourner dans ce sens.
Tournez la commande Marche/Arrêt (On/Off), Impulsion
(Pulse) et Vitesse (Speed) dans le sens inverse des
aiguilles d’une montre pour lancer le fouet pendant un court
instant (le mode Impulsion est indiqué par la lettre « P »).
Consultez la figure 4.
7) Une fois que vous avez terminé, tournez la commande
Marche/Arrêt (On/Off), Impulsion (Pulse) et Vitesse (Speed)
en position « O » (Off) pour éteindre l’appareil.
8) Pour retirer un accessoire, répétez l’étape 1 et retirez
l’accessoire en le tournant dans le sens inverse des
aiguilles d’une montre.
9) Raclez le bol avec la spatule (N) fournie pour retirer le
contenu.
CONSEILS DE PRÉPARATION
GÉNÉRALITÉS :
1) Les œufs à la température ambiante donnent de meilleurs résultats pour le
fouettement.
2) Avant d’utiliser le fouet pour les blancs d’œuf, veillez à ce qu’il n’y ait aucune
graisse ni jaune d’œuf sur le fouet ou dans le bol.
3) Utilisez des ingrédients froids pour les pâtisseries, à moins que votre recette
indique le contraire.
PRÉPARATION D’UNE PÂTE À PAIN :
1) IMPORTANT : Ne dépassez jamais les capacités maximales indiquées ci-
dessous.
2) Si vous sentez que l’appareil a du mal à pétrir les ingrédients, éteignez-la et
retirez la moitié de la pâte et pétrissez séparément les deux moitiés.
3) Les ingrédients sont plus faciles à mélanger si vous ajoutez le liquide en
premier.
FIGURE 4

Type de pâte
Pâte à pâtisserie
Pâte levée
Préparation pour gâteau
Œufs
CAPACITÉS MAXIMALES
Type de poids
Poids de la farine
Poids de la farine
Poids total
Quantité
910 grammes
1,5 kg
4,55 kg
16
Type de pâte
Pâte à pâtisserie
Pâte levée
Préparation pour gâteau
Œufs
Série DSM800 Série DSM700
Type de poids
Poids de la farine
Poids de la farine
Poids total
Quantité
680 grammes
1,36 kg
2,72 kg
12
VITESSES RECOMMANDÉES POUR LES
ACCESSOIRES
FOUET PLAT ANTIADHÉSIF :
1)
Pour faire mousse de la graisse et du sucre
: Commencez à MIN et augmentez
progressivement jusqu’à 5.
2)
Pour battre des œufs en crème:
de 4 à MAX.
3)
Pour ajouter de la farine ou des fruits:
de MIN à 1.
4)
Pour les préparations à gâteau:
Commencez à MIN et augmentez
progressivement jusqu’à MAX.
5)
Pour mélanger de la graisse à de la farine:
de MIN à 2.
FOUET EN ACIER INOXYDABLE :
1) Augmentez progressivement jusqu’à MAX.
CROCHET PÉTRISSEUR ANTIADHÉSIF :
1) Commencez à MIN et augmentez progressivement jusqu’à 1.
UTILISATION DU PARE-ÉCLABOUSSURES
1) Suivez l’instruction 1 dans la section « Utilisation du batteur sur socle » du
manuel.
2) Installez le pare-éclaboussures sur le raccord pour accessoire (D) en
poussant fermement. La section à charnière devrait être positionnée comme
l’illustre la figure 1.
FIGURE 1

3) Insérez l’accessoire désiré et suivez l’instruction 2 dans la section « Utilisation
du batteur sur socle » du manuel.
4) Pendant le fouettement, il est possible d’ajouter directement des ingrédients
dans le bol en soulevant simplement la section à charnière du pare-
éclaboussures.
Consultez la figure 1.
5) Il n’est pas nécessaire de retirer le pare-éclaboussures pour changer
d’accessoire.
6) Pour retirer le pare-éclaboussures, soulevez la tête du batteur comme l’explique
l’instruction 1 dans la section « Utilisation du batteur sur socle » du manuel. Une
fois que la tête du batteur a été soulevée et s’est verrouillée en position
ouverte, faites coulisser le pare-éclaboussures vers le bas.
UTILISATION DU PARE-ÉCLABOUSSURES (suite)
PROBLÈME :
Le fouet frappe contre le fond du bol ou n’atteint pas les ingrédients au fond du bol.
SOLUTION :
Réglez la hauteur de la tête du batteur de la manière suivante :
1) Débranchez l’appareil et soulevez-en la tête. Installez le fouet en acier
inoxydable ou le fouet plat antiadhésif.
2) Tenez l’accessoire et desserrez l’écrou.
Consultez la figure 1.
3) Abaissez la tête du batteur et réglez-en la hauteur en tournant l’arbre.
4) Idéalement, le fouet en acier inoxydable ou le fouet plat antiadhésif devrait
presque toucher le fond du bol.
Consultez la figure 2.
5) Soulevez la tête du batteur, tenez le fouet en acier inoxydable ou le fouet plat
antiadhésif et serrez l’écrou.
DÉPANNAGE
FIGURE 1 FIGURE 2
La page charge ...
La page charge ...
La page charge ...
La page charge ...
La page charge ...
La page charge ...
La page charge ...
La page charge ...
La page charge ...
La page charge ...
-
 1
1
-
 2
2
-
 3
3
-
 4
4
-
 5
5
-
 6
6
-
 7
7
-
 8
8
-
 9
9
-
 10
10
-
 11
11
-
 12
12
-
 13
13
-
 14
14
-
 15
15
-
 16
16
-
 17
17
-
 18
18
-
 19
19
-
 20
20
-
 21
21
-
 22
22
-
 23
23
-
 24
24
-
 25
25
-
 26
26
-
 27
27
-
 28
28
-
 29
29
-
 30
30


DeLonghi 34655 Manuel utilisateur
- Catégorie
- Mélangeurs
- Taper
- Manuel utilisateur
- Ce manuel convient également à
dans d''autres langues
- English: DeLonghi 34655 User manual
Documents connexes
Autres documents
-
 Yoo Digital COOKYOO 4500 Le manuel du propriétaire
-
Breville the Scraper Mixer Pro Manuel utilisateur
-
Hamilton Beach 63222GR Manuel utilisateur
-
-
Cuisinart CHM-Series Manuel utilisateur
-
-
-
-
Kiwi KMX-3637 Manuel utilisateur
-
Master Chef Bowl-Lift Manuel utilisateur
