Panasonic NN-TK813CSCP Manuel utilisateur
- Catégorie
- Cuisine
- Taper
- Manuel utilisateur

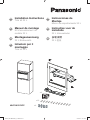
x4
x12
x4
NN-TK813CSCP
en
Installation Instructions
Trim kit 32 L
es
Instrucciones de
Montaje
Marco de empotramiento 32 L
fr
Manuel de montage
Kit d’encastrement du
modèle 32 L
nl
Instructies voor de
installatie
32 L Inbouwkader
de
Montageanweisung
32 L Einbausatz.
zh
安装说明
32 L 框架
It
Istruzioni per il
montaggio
Trim kit 32 L
IP4704_F0313BH20BP_22_130812.indd 1IP4704_F0313BH20BP_22_130812.indd 1 2013-8-12 15:18:052013-8-12 15:18:05

1
en
Microwave ovens should not be built into a unit directly above a top front venting conventional cooker. This will
invalidate your one year guarantee.
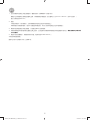
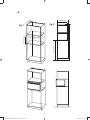
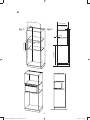
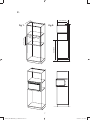
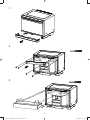
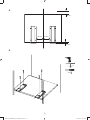
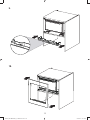
1. This trim kit can be installed into a cabinet.The cabinet opening must have the following internal dimensions as shown in
fig.1, p.5-7.
A vent is required at the rear of the cabinet it should travel the full height of the cabinet and the cabinet should not be
obstructed. Minimum dimension of vent 45 mm x 562 mm (fig.2, p.5-7).
MINIMUM INSTALLATION HEIGHT 850 MM.
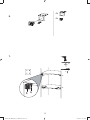
2. Electrical Connections
The appliance is supplied with a mains plug attached and should only be connected into an earthed socket that has been
installed according to the relevant safety regulations.
If the plug is no longer accessible after the appliance has been built into the cabinet, a dual pole isolator must be installed
to conform to the relevant safety standards.
3. It is essential that the cabinet is fixed to the wall for stability. The shelf must be able to support a weight of 30 kg.
4. If the microwave oven is to be removed from the kitchen cabinet and used free standing, the built in parts must be
removed, and the oven returned to its original condition. Keep these installation instructions for future reference so the
installation process can be reversed.
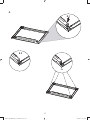
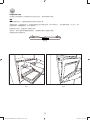
5. The trim kit is supplied with a replacement drip tray for the oven (labelled NN-TK813CSCP), which must be used in order
for the frame to fit.
TAKE CARE NOT TO KINK OR TRAP THE MICROWAVE ELECTRICAL CABLE.
The diagram may vary from the actual unit and is only for your reference.
fr
Un four à micro-ondes ne doit pas être encastré dans une unité directement au dessus d’un four traditionnel avec
ventilation par le haut. Cela invalidera votre garantie d’un an.
1. Ce kit d’encastrement peut être encastré.L’emplacement prévu doit avoir les dimensions intérieures mentionnées dans la
fig.1, p.5-7.
Une ventilation doit être prévue à l’arrière du meuble ; elle doit couvrir toute la hauteur du meuble et ne peut en aucun cas
être obstruée. Dimensions minimales de l’espace de ventilation : 45 mm x 562 mm (fig.2, p.5-7).
LA HAUTEUR MINIMUM POUR INSTALLER LE FOUR DOIT ÊTRE DE 850 MM.
2. Branchement électrique
L’appareil est fourni avec un cordon d’alimentation et peut être connecté uniquement à une prise de courant avec mise à la
terre, conforme aux réglementations de sécurité en vigueur. Un commutateur bipolaire doit être installé conformément aux
normes de sécurité en vigueur dans le cas où la prise de courant ne serait plus accessible après l’installation de l’appareil
dans un meuble.
3. Le meuble doit être fixé solidement au mur afin d’obtenir une stabilité adéquate. la tablette inférieure du meuble doit
pouvoir supporter un poids de 30 kg.
4. Si le four à micro-ondes doit être retiré du meuble et utiliser de manière isolée, les élément ajoutés doivent être retirés et
le four remis dans son étal initial. Conservez ces instructions d’installation pour référence ultérieure de manière à
pouvoir inverser le processus d’installation.
5. The trim kit is supplied with a replacement drip tray for the oven (labelled NN-TK813CSCP), which must be used in order
for the frame to fit.
PRENDRE GARDE DE NE PAS COINCER NI ENTORTILLER LE CÂBLE ÉLECTRIQUE.
Le schéma peut différer légèrement du modèle de four en votre possession. Il vous sert seulement de référence.
IP4704_F0313BH20BP_22_130812.indd Sec1:1IP4704_F0313BH20BP_22_130812.indd Sec1:1 2013-8-12 15:18:052013-8-12 15:18:05
La page charge ...
La page charge ...
La page charge ...
La page charge ...
La page charge ...
La page charge ...
La page charge ...
La page charge ...
La page charge ...
La page charge ...
La page charge ...
La page charge ...
La page charge ...
La page charge ...
La page charge ...
La page charge ...
-
 1
1
-
 2
2
-
 3
3
-
 4
4
-
 5
5
-
 6
6
-
 7
7
-
 8
8
-
 9
9
-
 10
10
-
 11
11
-
 12
12
-
 13
13
-
 14
14
-
 15
15
-
 16
16
-
 17
17
-
 18
18


Panasonic NN-TK813CSCP Manuel utilisateur
- Catégorie
- Cuisine
- Taper
- Manuel utilisateur
dans d''autres langues
- italiano: Panasonic NN-TK813CSCP Manuale utente
- English: Panasonic NN-TK813CSCP User manual
- español: Panasonic NN-TK813CSCP Manual de usuario
- Nederlands: Panasonic NN-TK813CSCP Handleiding
Documents connexes
-
Panasonic NNCD87KS Mode d'emploi
-
-
-
-
-
-
Panasonic NNTK922SS Le manuel du propriétaire
-
Autres documents
-
Sharp KV-840E Le manuel du propriétaire
-
NAPOLEON BILEX485NSS-1 Manuel utilisateur
-
Waring WGR140X Manuel utilisateur
-
Samsung WF340ANG/XAC Manuel utilisateur
-
-
Samsung WF210ANW/XAC Manuel utilisateur
-
-