TEAC AX-505 Le manuel du propriétaire
- Catégorie
- Équipement musical supplémentaire
- Taper
- Le manuel du propriétaire

D01343121A
Z
AX-505
Integrated Amplifier
OWNER’S MANUAL
MODE D’EMPLOI
MANUAL DEL USUARIO
ENGLISH
FRANÇAIS
ESPAÑOL

2
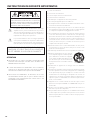
IMPORTANT SAFETY INSTRUCTIONS
CAUTION: TO REDUCE THE RISK OF ELECTRIC SHOCK,
DO NOT REMOVE COVER (OR BACK). NO USER-
SERVICEABLE PARTS INSIDE. REFER SERVICING TO
QUALIFIED SERVICE PERSONNEL.
<
The lightning flash with arrowhead symbol, within an
equilateral triangle, is intended to alert the user to the
presence of uninsulated “dangerous voltage” within the
product’s enclosure that may be of sufficient magni-
tude to constitute a risk of electric shock to persons.
B
The exclamation point within an equilateral triangle is
intended to alert the user to the presence of important
operating and maintenance (servicing) instructions in
the literature accompanying the appliance.
WARNING: TO PREVENT FIRE OR SHOCK HAZARD,
DO NOT EXPOSE THIS APPLIANCE TO RAIN OR
MOISTURE.
CAUTION
o DO NOT REMOVE THE EXTERNAL CASES OR CABINETS TO EXPOSE
THE ELECTRONICS. NO USER SERVICEABLE PARTS ARE INSIDE.
o IF YOU ARE EXPERIENCING PROBLEMS WITH THIS PRODUCT,
CONTACT THE STORE WHERE YOU PURCHASED THE UNIT FOR
A SERVICE REFERRAL. DO NOT USE THE PRODUCT UNTIL IT HAS
BEEN REPAIRED.
o USE OF CONTROLS OR ADJUSTMENTS OR PERFORMANCE OF
PROCEDURES OTHER THAN THOSE SPECIFIED HEREIN MAY RESULT
IN HAZARDOUS RADIATION EXPOSURE.
1) Read these instructions.
2) Keep these instructions.
3) Heed all warnings.
4) Follow all instructions.
5) Do not use this apparatus near water.
6) Clean only with dry cloth.
7) Do not block any ventilation openings. Install in accordance
with the manufacturer’s instructions.
8) Do not install near any heat sources such as radiators, heat
registers, stoves, or other apparatus (including amplifiers) that
produce heat.
9) Do not defeat the safety purpose of the polarized or grounding-
type plug. A polarized plug has two blades with one wider than
the other. A grounding type plug has two blades and a third
grounding prong. The wide blade or the third prong are pro-
vided for your safety. If the provided plug does not fit into your
outlet, consult an electrician for replacement of the obsolete
outlet.
10) Protect the power cord from being walked on or pinched par-
ticularly at plugs, convenience receptacles, and the point where
they exit from the apparatus.
11) Only use attachments/accessories specified by the manufacturer.
12) Use only with the cart, stand, tripod,
bracket, or table specified by the manufac-
turer, or sold with the apparatus. When a
cart is used, use caution when moving the
cart/apparatus combination to avoid injury
from tip-over.
13) Unplug this apparatus during lightning storms or when unused
for long periods of time.
14) Refer all servicing to qualified service personnel. Servicing is
required when the apparatus has been damaged in any way,
such as power-supply cord or plug is damaged, liquid has been
spilled or objects have fallen into the apparatus, the apparatus
has been exposed to rain or moisture, does not operate nor-
mally, or has been dropped.
o The apparatus draws nominal non-operating power from the
AC outlet with its POWER or STANDBY/ON switch not in the ON
position.
o The mains plug is used as the disconnect device; the disconnect
device shall remain readily operable.
o Caution should be taken when using earphones or headphones
with the product because excessive sound pressure (volume)
from earphones or headphones can cause hearing loss.

EN
3
CAUTION
o Do not expose this apparatus to drips or splashes.
o Do not place any objects filled with liquids, such as vases, on
the apparatus.
o Do not install this apparatus in a confined space such as a
book case or similar unit.
o The apparatus should be located close enough to the AC
outlet so that you can easily reach the power cord plug at any
time.
o If the product uses batteries (including a battery pack or
installed batteries), they should not be exposed to sunshine,
fire or excessive heat.
o CAUTION for products that use replaceable lithium batter-
ies: there is danger of explosion if a battery is replaced with
an incorrect type of battery. Replace only with the same or
equivalent type.
WARNING
Products with Class ! construction are equipped with a power
supply cord that has a grounding plug. The cord of such a prod-
uct must be plugged into an AC outlet that has a protective
grounding connection.
IN USA/CANADA, USE ONLY ON 120V SUPPLY.
V
Precautions concerning batteries
Misuse of batteries could cause them to rupture or leak leading to
fire, injury or the staining of nearby things. Please read and observe
the following precautions carefully.
o Be sure to insert the batteries with correct positive (¥) and
negative (^) orientations.
o Use batteries of the same type. Never use different types of bat-
teries together.
o If the remote control is not used for a long time (more than a
month), remove the batteries to prevent them from leaking.
o If the batteries leak, wipe away the leakage inside the battery
compartment and replace the batteries with new ones.
o Do not use batteries of types other than those specified. Do not
mix new batteries with old ones or use different types of batter-
ies together.
o Do not heat or disassemble batteries. Never throw batteries into
fire or water.
o Do not carry or store batteries with other metallic objects. The
batteries could short circuit, leak or explode.
o Never recharge a battery unless it is confirmed to be a recharge-
able type.
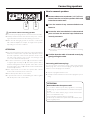
The nameplate is located on the bottom of the unit as shown below.
Front side
Nameplate

4
IMPORTANT SAFETY INSTRUCTIONS (continued)
Model for USA
Declaration of Conformity
Responsible party:
Pioneer & Onkyo U.S.A. Corporation
Address: 22828 Lockness Avenue, Torrance, CA 90501 U.S.A.
Telephone number: 1-201-785-2600
This device complies with Part.15 of FCC Rules. Operation is
subject to the following two conditions: (1) this device may not
cause harmful interference, and (2) this device must accept any
interference received, including interference that may cause
undesired operation.
Information
This equipment has been tested and found to comply with the
limits for a Class B digital device, pursuant to Part 15 of the FCC
Rules. These limits are designed to provide reasonable protec-
tion against harmful interference in a residential installation. This
equipment generates, uses, and can radiate radio frequency
energy and, if not installed and used in accordance with the
instructions, may cause harmful interference to radio communi-
cations. However, there is no guarantee that interference will not
occur in a particular installation. If this equipment does cause
harmful interference to radio or television reception, which can
be determined by turning the equipment off and on, the user is
encouraged to try to correct the interference by one or more of
the following measures:
• Reorient or relocate the equipment and/or the receiving
antenna.
• Increase the separation between the equipment and receiver.
• Connect the equipment into an outlet on a circuit different
from that to which the receiver is connected.
• Consult the dealer or an experienced radio/TV technician for
help.
CAUTION
Changes or modifications not expressly approved by the party
responsible for compliance could void the user’s authority to
operate the equipment.
Model for Canada
Industry Canada’s Compliance Statement:
This Class B digital apparatus complies with Canadian ICES-003.
Model for Europe
This product complies with the European
Directives request, and the other Commission
Regulations.
For European Customers
Disposal of electrical and electronic equipment and
batteries and/or accumulators
a) All electrical/electronic equipment and waste batteries/
accumulators should be disposed of separately from the
municipal waste stream via collection facilities designated by
the government or local authorities.
b) By disposing of electrical/electronic equipment and waste
batteries/accumulators correctly, you will help save valuable
resources and prevent any potential negative effects on
human health and the environment.
c) Improper disposal of waste electrical/electronic equipment
and batteries/accumulators can have serious effects on the
environment and human health because of the presence of
hazardous substances in the equipment.
d) The Waste Electrical and Electronic Equipment (WEEE)
symbols, which show wheeled bins that have been
crossed out, indicate that electrical/electronic equip-
ment and batteries/accumulators must be collected
and disposed of separately from household waste.
If a battery or accumulator contains more than the
specified values of lead (Pb), mercury (Hg), and/or
cadmium (Cd) as defined in the Battery Directive
(2006/66/EC), then the chemical symbols for those
elements will be indicated beneath the WEEE symbol.
e) Return and collection systems are available to end users. For
more detailed information about the disposal of old electri-
cal/electronic equipment and waste batteries/accumulators,
please contact your city office, waste disposal service or the
shop where you purchased the equipment.
Pb
, Hg,
Cd
Company names and product names in this document are the trademarks or registered trademarks of their respective owners.

EN
5
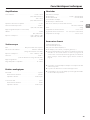
Contents
Check to be sure the box contains all the included items shown
below.
Please contact the store where you purchased this unit if any of these
items are missing or have been damaged during transportation.
Power cord × 1
Remote control (RC-1332) × 1
Batteries for remote control (AAA) × 2
Owner’s manual (this document, including warranty) × 1
o For information about the warranty, users living in the USA and
Canada should see pages 44–45 and the back cover (war-
ranty document). Users living in Europe and other regions should
see page45.
Maintenance
Wipe dirt from the top cover and other panel surfaces using a
soft cloth that has been slightly dampened with a diluted neutral
cleanser.
Do not wipe with chemical cleaning cloths, thinner or other chemi-
cal agents. Doing so could damage the surface.
V
For your safety, disconnect the power cord
from the outlet before cleaning.
Using the TEAC Global Site
You can download updates for this unit from the TEAC Global Site:
http://teac-global.com/
In the TEAC Downloads section, click the desired language to open
the Downloads website page for that language.
Included accessories
IMPORTANT SAFETY INSTRUCTIONS ...............................2
Included accessories ............................................... 5
Maintenance ......................................................5
Using the TEAC Global Site ......................................... 5
Before use .........................................................6
Using the remote control ..........................................6
Connecting speakers ..............................................7
Connections ....................................................... 8
Connecting headphones ..........................................9
Main unit parts and functions .....................................10
Remote control parts and functions. . . . . . . . . . . . . . . . . . . . . . . . . . . . . . . 11
Basic operation ...................................................12
Troubleshooting ..................................................14
Specifications .....................................................15
Thank you for choosing TEAC.
Read this manual carefully to get the best performance from this
unit.
After reading it, keep it in a safe place for future reference.

6
V
Placement precautions
o Place the unit in a stable location near the audio system that you
will use with it.
o Do not install this unit in a location that could become hot.
This includes places that are exposed to direct sunlight or near
a radiator, heater, stove or other heating equipment. Moreover,
do not place it on top of an amplifier or other equipment that
generates heat. Doing so could cause discoloration, deformation
or malfunction.
Also avoid locations that are subject to vibrations or exposed to
excessive dust, cold or moisture.
o When installing this unit, leave a little space (at least 3cm or 1")
between it and walls and other devices in order to allow good
heat dissipation.
If you put it in a rack, for example, leave at least 5cm (2") open
above it and at least 10cm (4") open behind it. Failure to provide
these gaps could cause heat to build up inside and result in fire.
o You may stack this unit with a PD-501HR, NT-505 or other
501/503/505 series units. However, if heat should cause the pro-
tection circuit to be activated and sound output stops suddenly,
place this unit on top and with sufficient distance between it and
walls and other devices in order to improve heat dissipation.
o Do not place CDs, CD-Rs, cassette tapes, other audio equipment
or other items that are susceptible to heat on top of the unit.
Doing so could damage these items.
o Do not put cloth on top of the unit or place the unit on top of
bedding or thick carpets. Doing so could cause the unit to over-
heat and damage it.
o Do not move the unit during use.
o The voltage supplied to the unit should match the voltage
printed on the rear panel. If you are in any doubt regarding this
matter, consult an electrician.
o Do not open the body of the unit as this might result in damage
to the circuitry or cause electric shock. If a foreign object should
get into the unit, contact your dealer.
o When removing the power plug from the wall outlet, always pull
directly on the plug; never yank on the cord.
Before use
Precautions for use
V
Misuse of batteries could cause them to rupture
or leak, which might result in fire, injury or the
staining of nearby materials. Please carefully read
and observe the precautions on page3.
o When using the remote control, point it toward the remote con-
trol signal receiver on the main unit from a distance of 5m (16ft)
or less. Do not place obstructions between the main unit and the
remote control.
o The remote control might not work if the remote control signal
receiver on the unit is exposed to direct sunlight or bright light. If
this occurs, try moving the unit.
o Beware that use of this remote control could cause the unin-
tentional operation of other devices that can be controlled by
infrared rays.
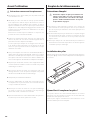
Installing batteries
Remove the cover from the back of the remote control and insert
two AAA batteries with their ¥/^ oriented as shown in the case.
Replace the cover.
When to replace batteries
If the distance required between the remote and the main unit
decreases or if the unit stops responding to the remote buttons,
replace both batteries with new ones.
Dispose of the used batteries according to the instructions on them
or requirements set by your local municipality.
Using the remote control

EN
7
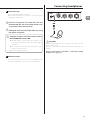
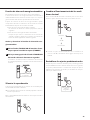
Connecting speakers
How to connect speakers
1 Remove about one centimeter (1/2") of insu-
lation from the end of the speaker cable and
twist the core wires well.
2 Turn the terminal cap counterclockwise to
loosen it.
3 Insert the wire into the hole in the terminal
post and turn the terminal cap clockwise to
securely connect it.
o Connect it so that none of the wire insulation is touching
the terminal.
4 Conrm that the cable is fastened securely by
gently pulling the cable.
Connecting with banana plugs
You can also make connections using commercially-available
banana plugs. First, connect the banana plugs to the speaker cables
and then connect the plugs to the terminals.
o Keep the caps tightened when in use.
o Carefully read the instructions for the banana plugs that you are
using.
ATTENTION
Notice about the European model
In accordance with European safety regulations, connecting
banana plugs to speaker terminals is not allowed on European
models.
The holes into which banana plugs could be inserted have
been covered with black caps.
Connect speakers using bare wires or spade lugs.
If a black cap should become separated from its terminal, return
it to its original position.
V
Precautions when connecting speakers
o Connect the power plugs after all connections have been made.
o Carefully read the manuals of the devices that you are connect-
ing and follow their instructions when making connections.
o When the left and right grounds are shared in a sub woofer
with a built-in amplifier, for example, use might not be possible
depending on connection conditions.
ATTENTION
o This unit works with speakers that have nominal impedances
between 4Ω and 8Ω. Use of speakers with impedances of less
than 4Ω, in particular, could cause the protection circuit to acti-
vate and sound output to stop. In some cases, damage could
even occur to this unit and the speakers.
o This unit’s red terminal is positive (¥) and its black terminal
is negative (^). Generally, the ¥ wire of the speaker cable is
marked to distinguish it from the ^ wire of the cable. Connect
the marked wire to the red ¥ terminal and the unmarked wire
to the black ^ terminal.
o If the exposed end of a core wire in a speaker cable contacts
another cable or terminal, a short could occur.
o Never allow speaker cables to cause a short.
o To prevent hum and noise, avoid bundling the cables together
with the AC power cord or other cables.

8
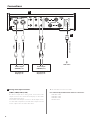
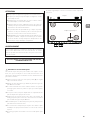
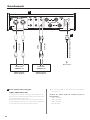
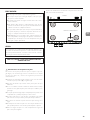
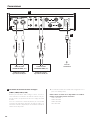
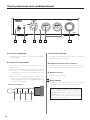
Connections
A Analog audio input connectors
(LINE 1, LINE 2, LINE 3, XLR)
Use these to input stereo analog audio. Connect the audio
output connectors of a cassette deck, CD player or other audio
output equipment to these.
Connect this unit’s R input connector to the R output connec-
tor of the audio output device, and this unit’s L input connector
to the L output connector of the other device.
o This unit’s XLR connectors are 2: HOT.
Use commercially-available audio cables for connections.
LINE1: RCA cables
LINE2: RCA cables
LINE3: RCA cables
XLR: XLR cables
A
B
C
XLR cables
RCA cables
Included power cord
c
Wall outlet
R L R L
Audio output
(LINE OUT, etc.)
Audio output
(LINE OUT, etc.)
Cassette deck,
CD player, etc.
Cassette deck,
CD player, etc.

EN
9
B Power inlet (~IN)
Connect the supplied power cord here.
After all other connections are complete, connect the power
cord’s plug to a wall outlet.
V
Do not use any power cord other than the one
included with this unit. Use of other power cords
could result in fire or electric shock.
V
Unplug the cord from the outlet when not using
the unit for a long time.
V
Complete all other connections before setting
the STANDBY/ON switch to ON.
o Carefully read the manuals of the devices that you are
connecting and follow their instructions when making
connections.
o Do not bundle connecting cables with power cords.
Doing so could cause noise.
o Connect all plugs completely.
C Maintenance port
This is used for maintenance. Do not connect anything to this
port unless instructed to do so by our service department.
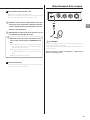
Connecting headphones
V
CAUTION
While wearing headphones, do not connect or disconnect them or
turn the unit on or off.
Doing so could result in a sudden loud noise that could harm your
hearing.
Always set the volume to minimum (−∞dB) before putting
headphones on (page12).

10
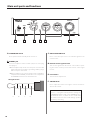
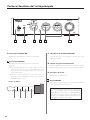
Main unit parts and functions
A STANDBY/ON switch
Use to put the unit into standby mode or turn it on.
B PHONES jack
Connect headphones with a 3.5mm (1/8") stereo mini plug
here (page9).
o This headphone amp circuit uses a four-pole connector with
independent left and right for grounding. Ordinary plugs
with 3 or 4 poles can be used.
o When headphones are connected to this unit, sound will be
output from the PHONES jack but will not be output from
the SPEAKERS terminals on the back of the unit.
Wiring illustration
L+ R+ L− R−
C INPUT SELECTOR knob
Use to select the input source. The indicator lights for the
selected source.
D Remote control signal receiver
This receives signals from the remote control. When operat-
ing the remote control, point it at the remote control signal
receiver.
E Level meters
These show the output levels.
F VOLUME knob
Use to adjust the volume. Turn right to increase and left to
decrease the volume.
The maximum volume level is 0 and the minimum
level is −∞ (negative infinity). Before setting the
STANDBY/ON switch to ON, set the VOLUME knob to
its minimum value (−∞). Failure to do so could result
in sudden loud noises that could damage speakers
and harm your hearing.
B C E FA D

EN
11
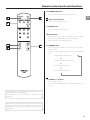
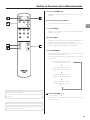
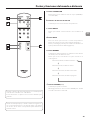
Remote control parts and functions
a STANDBY/ON button
Press to put the unit into standby mode or turn it on.
b Input selection buttons
Use to select the playback source.
c METER button
Press to change level meter operation.
d MUTE button
Press this button to mute the sound temporarily. Press it again
to restore sound output at the previous level (page13).
Press and hold to cancel muting (page13).
e DIMMER button
Use to change the brightness of the input source indicators
and level meters.
Press to cycle through the brightness settings in the following
order.
Bright indicators, bright meters
c
Medium indicators, medium meters
c
Dim indicators, dim meters
c
Dim indicators, unlit meters
f VOLUME (+/−) buttons
Use to adjust the volume.
Press and hold a VOLUME button to continuously change the
volume.
The RC-1332 remote control supplied with the AX-505 can con-
trol both AX-505 and PD-501HR units.
Only the buttons used for the AX-505 are explained in this
document.
When the main unit and the remote control both have buttons
with the same functions, this manual explains how to use one of
the buttons. The other corresponding button can be used in the
same manner.
c
d
b
a
f
e

12
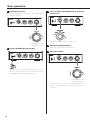
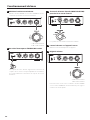
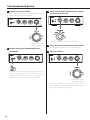
Basic operation
1 Minimize the volume.
Use the VOLUME knob or the remote control VOLUME buttons
to minimize the volume.
−∞dB: Minimum volume
0dB: Maximum volume
2 Set the STANDBY/ON switch to ON.
The input source indicators will blink and the mute function
will turn on. When the amplifier operation stabilizes, the indica-
tors will light and the mute function will turn off.
3 Turn the INPUT SELECTOR knob to select the
input source.
The input indicator lights for the selected source.
4 Operate the playback device.
Refer to the operation manual of that device.
5 Adjust the volume.
−∞dB: Minimum volume
0dB: Maximum volume
Start playback on the source and use the VOLUME knob or
remote control VOLUME buttons to adjust the volume to its
optimal level.

EN
13
Automatic power saving function
This unit has an automatic power saving function.
If the automatic power saving function is set to on, the unit will
automatically enter standby mode if there is no audio input for
about 30 minutes.
You can check the automatic power saving setting by looking at the
input source indicators immediately after turning the unit on.
Automatic power saving function on
An input source indicator will blink every two seconds.
Automatic power saving function off
After all input source indicators light for two seconds, an input
source indicator will blink every two seconds.
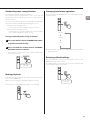
Turning automatic power saving on and off
1 Press the remote control STANDBY/ON button
to put the unit into standby.
2 Press and hold the remote control STANDBY/
ON button for three seconds.
The unit turns on, all the input source indicators blink and the
on/off setting changes.
Press for
3seconds
Muting playback
If you want to temporarily mute the volume of this unit, press the
remote control MUTE button.
o The input source indicators blink when playback is muted.
Press the remote control MUTE button again to cancel muting.
Changing level meter operation
Press the remote control METER button to cycle through level meter
operation settings.
Normal
c
+20dB
c
Off
o When level meter operation is +20dB, needle movement will be
greater than usual.
Restoring default settings
After minimizing the volume, press and hold the remote control
MUTE button for at least 3seconds.
The defaults will be restored after the input source indicators and
level meters blink and the unit restarts.
Press for at least
3seconds

14
If you experience a problem with the unit, please take a moment
to review the following information before requesting service. If it
still does not operate correctly, contact the retailer where you pur-
chased the unit.
General
The unit does not turn on.
e Check that the power cord is completely plugged into the
power outlet. If the outlet is switched, confirm that the switch
is in the ON position.
e Connect a different electrical device to the outlet to confirm
that it is supplying power.
No sound is output.
e Adjust the VOLUME knob. Turn it clockwise (right) to increase
the volume (page10).
e Use the INPUT SELECTOR knob to select the input that is con-
nected to the source that you want to hear (page12).
e Reconfirm the connections with other equipment.
Remote control does not work.
e Set the main unit STANDBY/ON switch to ON before using the
remote control.
e If the batteries are exhausted, replace both of them with new
ones.
e The remote control will not work if there is an obstruction
between it and the main unit.
Point the remote control at the remote control center on the
unit from a distance of less than 5m (16ft.).
A television set or another device operates in error.
e Some televisions that are able to receive signals from wire-
less remote controls might be operated in error by this unit’s
remote control.
If this is the case, turn the other devices off when using this
remote control.
Noise occurs.
e Place the unit as far away as possible from TVs, microwave
ovens and other devices that have strong magnetism.
There is a humming noise.
e If a connecting cable is near a power cord, fluorescent light or
similar cause of interference, increase the distance between
them as much as possible.
Troubleshooting
There is no sound from one side of the headphones.
e Confirm that the headphones plug is inserted completely.
The level meter lights are blinking and no sound is
output.
e The ¥ and ^ speaker cables might have shorted. Set the
STANDBY/ON switch to STANDBY, and check the speaker
connections.
Sound output stops suddenly and the level meter
lights are blinking.
e The protection circuit might have activated due to high tem-
perature, excessive load or another cause. Set the STANDBY/
ON switch to STANDBY, check the power and speaker connec-
tions, and wait several minutes before setting it to ON again.
If this unit is becoming hot, increase the amount of space
between it and walls and other devices to increase the dis-
sipation of heat.
Automatic power saving caused the unit to enter
standby.
e Set the STANDBY/ON switch to STANDBY once and then set it
to ON again.

EN
15
Specifications
General
Power supply
Model for Europe ........................... AC 220–240V, 50/60Hz
Model for USA/Canada ............................. AC 120V, 60Hz
Power consumption
Models for Europe and USA/Canada ........................... 56W
External dimensions (W × H × D, including protrusions)
290 × 81.2 × 264 mm (11 1/2" × 3 1/4" × 10 1/2")
Weight ............................................. 4.2kg (9 3/8lb)
Operating temperature range ....................... +5°C to +35°C
Operating humidity range ............. 5% – 85% (no condensation)
Storage temperature range ......................... −20°C to +55°C
Included accessories
Power cord × 1
Remote control (RC-1332) × 1
Batteries for remote control (AAA) × 2
Owner’s manual (this document, including warranty) × 1
o For information about the warranty, users living in the USA and
Canada should see pages 44–45 and the back cover (warranty
document). Users living in Europe and other regions should see
page45.
o Design and specifications are subject to change without notice.
o Weight and dimensions are approximate.
o Illustrations in this manual might differ slightly from production
models.
Amplifier
Rated output . . . . . . . . . . . . . . . . . . . . . . . . . . . . . . . . . . . . . . . . 115W + 115W
(4Ω, 1kHz, THD 0.8%)
70W + 70W
(8Ω, 1kHz, THD 0.8%)
Allowable speaker impedance ................................ 4–8Ω
Total harmonic distortion .................................... 0.002%
(8Ω, 1kHz, 1W, JEITA)
S/N ratio (input short)
LINE IN ...................................................... 110dB
(8Ω, 1kHz, IHF-A)
Frequency response ......................... 10Hz – 50kHz (−5dB)
(8Ω, 1kHz, 1W, JEITA)
Headphones output
Connector ..................... 3.5mm (1/8") 4-pole stereo mini jack
Maximum output level ......................... 360mW + 360mW
(into 32Ω load, THD 10%, JEITA)
Frequency response ......................... 5Hz – 150kHz (−3 dB)
Distortion ................................................... 0.003%
(30mW output into 32Ω load, JEITA)
S/N ratio ..................................................... 115dB
Compatible impedance range ............................ 16–600Ω
Analog inputs
LINE connectors ............................................. 3 pairs
Maximum input level ................................... 2.5Vrms
Input impedance ................................. 10kΩ or more
XLR connectors ............................................... 1 pair
Maximum input level ..................................... 3Vrms
Input impedance ................................. 10kΩ or more

16
INSTRUCTIONS DE SÉCURITÉ IMPORTANTES
ATTENTION : POUR RÉDUIRE LE RISQUE
D’ÉLECTROCUTION, NE RETIREZ PAS LE CAPOT (OU
L’ARRIÈRE). AUCUNE PIÈCE INTERNE N’EST RÉPARABLE
PAR L’UTILISATEUR. CONFIEZ TOUTE RÉPARATION À
UN SERVICE APRÈS-VENTE QUALIFIÉ.
<
Le symbole d’éclair à tête de flèche dans un triangle
équilatéral sert à prévenir l’utilisateur de la présence
dans l’enceinte du produit d’une «tension dangereuse»
non isolée d’une grandeur suffisante pour constituer un
risque d’électrocution pour les personnes.
B
Le point d’exclamation dans un triangle équilatéral
sert à prévenir l’utilisateur de la présence d’instructions
importantes de fonctionnement et de maintenance
(entretien) dans les documents accompagnant l’appareil.
AVERTISSEMENT: POUR PRÉVENIR LES RISQUES
D’INCENDIE ET D’ÉLECTROCUTION, N’EXPOSEZ
PAS CET APPAREIL À LA PLUIE NI À L’HUMIDITÉ.
ATTENTION
o NE RETIREZ PAS LES CAPOTS EXTERNES OU BOÎTIERS POUR
EXPOSER L’ÉLECTRONIQUE. AUCUNE PIÈCE INTERNE N’EST
RÉPARABLE PAR L’UTILISATEUR.
o SI VOUS RENCONTREZ DES PROBLÈMES AVEC CE PRODUIT,
CONTACTEZ LE MAGASIN OÙ VOUS AVEZ ACHETÉ L’UNITÉ.
N’UTILISEZ PAS LE PRODUIT TANT QU’IL N’A PAS ÉTÉ RÉPARÉ.
o L’UTILISATION DE COMMANDES, DE RÉGLAGES OU LE SUIVI
DE PROCÉDURES AUTRES QUE CE QUI EST DÉCRIT DANS CE
DOCUMENT PEUT PROVOQUER UNE EXPOSITION À UN
RAYONNEMENT DANGEREUX.
1) Lisez ces instructions.
2) Conservez ces instructions.
3) Tenez compte de tous les avertissements.
4) Suivez toutes les instructions.
5) N’utilisez pas cet appareil avec de l’eau à proximité.
6) Ne nettoyez l’appareil qu’avec un chiffon sec.
7) Ne bloquez aucune ouverture de ventilation. Installez-le confor-
mément aux instructions du fabricant.
8) N’installez pas l’appareil près de sources de chaleur telles que
des radiateurs, bouches de chauffage, poêles ou autres appareils
(y compris des amplificateurs) dégageant de la chaleur.
9) Ne neutralisez pas la fonction de sécurité de la fiche polarisée
ou de terre. Une fiche polarisée a deux broches, l’une plus large
que l’autre. Une fiche de terre a deux broches identiques et une
troisième broche pour la mise à la terre. La broche plus large ou
la troisième broche servent à votre sécurité. Si la fiche fournie
n’entre pas dans votre prise, consultez un électricien pour le
remplacement de la prise obsolète.
10) Évitez de marcher sur le cordon d’alimentation et de le pincer,
en particulier au niveau des fiches, des prises secteur, et du
point de sortie de l’appareil.
11) N’utilisez que des fixations/accessoires spécifiés par le fabricant.
12) Utilisez-le uniquement avec des chariots,
socles, trépieds, supports ou tables spécifiés
par le fabricant ou vendus avec l’appareil.
Si un chariot est utilisé, faites attention à ne
pas être blessé par un renversement lors
du déplacement de l’ensemble chariot/
appareil.
13) Débranchez cet appareil en cas d’orage ou de non utilisation
prolongée.
14) Confiez toute réparation à des techniciens de maintenance quali-
fiés. Une réparation est nécessaire si l’appareil a été endommagé
d’une quelconque façon, par exemple si le cordon ou la fiche
d’alimentation est endommagé, si du liquide a été renversé sur
l’appareil ou si des objets sont tombés dedans, si l’appareil a été
exposé à la pluie ou à l’humidité, s’il ne fonctionne pas normale-
ment, ou s’il est tombé.
o L’appareil tire un courant nominal de veille de la prise secteur
quand son interrupteur POWER ou STANDBY/ON n’est pas en
position ON.
o La fiche secteur est utilisée comme dispositif de déconnexion et
doit donc toujours rester disponible.
o Des précautions doivent être prises en cas d’utilisation d’écouteurs
ou d’un casque avec le produit car une pression sonore excessive
(volume trop fort) dans les écouteurs ou dans le casque peut cau-
ser une perte auditive.

FR
17
ATTENTION
o N’exposez pas cet appareil aux gouttes ni aux éclaboussures.
o Ne placez pas d’objet rempli de liquide sur l’appareil, comme
par exemple un vase.
o N’installez pas cet appareil dans un espace confiné comme
une bibliothèque ou un meuble similaire.
o L’appareil doit être placé suffisamment près de la prise de
courant pour que vous puissiez à tout moment attraper facile-
ment la fiche du cordon d’alimentation.
o Si le produit utilise des piles/batteries (y compris un pack de
batteries ou des piles installées), elles ne doivent pas être
exposées au soleil, au feu ou à une chaleur excessive.
o PRÉCAUTION pour les produits qui utilisent des batteries rem-
plaçables au lithium: remplacer une batterie par un modèle
incorrect entraîne un risque d’explosion. Remplacez-les uni-
quement par un type identique ou équivalent.
AVERTISSEMENT
Les produits ayant une construction de Classe ! sont équipés
d’un cordon d’alimentation avec une fiche de terre. Le cordon
d’un tel produit doit être branché dans une prise secteur avec
terre de sécurité.
AUX USA/CANADA, UTILISEZ UNIQUEMENT UNE TENSION
D’ALIMENTATION DE 120V.
V
Précautions concernant les piles
Un mauvais emploi des piles peut entraîner leur rupture ou leur
fuite, avec pour conséquence un incendie, des blessures ou la
salissure des objets proches. Veuillez lire et suivre attentivement les
précautions suivantes.
o Veillez à insérer les piles avec leurs pôles positif (¥) et négatif
(^) correctement orientés.
o Utilisez des piles du même type. N’utilisez jamais des types de
pile différents ensemble.
o Si la télécommande doit rester inutilisée durant une période
prolongée (plus d’un mois), retirez ses piles pour éviter qu’elles
ne coulent.
o Si les piles coulent, essuyez le liquide dans le compartiment des
piles et remplacez les piles par des neuves.
o N’utilisez pas de piles d’un type autre que celui spécifié. Ne
mélangez pas des piles neuves avec des anciennes et n’utilisez
pas ensemble des types de pile différents.
o Ne chauffez pas et ne démontez pas les piles. Ne jetez jamais les
piles dans un feu ou dans de l’eau.
o Ne conservez et ne transportez pas les piles avec d’autres objets
métalliques. Les piles pourraient entrer en court-circuit, couler ou
exploser.
o Ne rechargez jamais une batterie sans avoir vérifié qu’elle peut
l’être.
La plaque signalétique se trouve sous l’unité comme représenté
ci-dessous.
Façade
Plaque signalétique

18
INSTRUCTIONS DE SÉCURITÉ IMPORTANTES (suite)
Modèle pour le Canada
Déclaration de conformité d’Industrie Canada :
CET APPAREIL NUMÉRIQUE DE LA CLASSE B EST CONFORME À LA
NORME NMB-003 DU CANADA
Modèle pour l’Europe
Ce produit est conforme aux directives euro-
péennes et aux autres réglementations de la
Commission européenne.
Pour les consommateurs européens
Mise au rebut des équipements électriques et électro-
niques et des piles et/ou accumulateurs
a) Tout équipement électrique/électronique et pile/accumula-
teur hors d’usage doit être traité séparément de la collecte
municipale d’ordures ménagères dans des points de collecte
désignés par le gouvernement ou les autorités locales.
b) En vous débarrassant correctement des équipements élec-
triques/électroniques et piles/accumulateurs hors d’usage, vous
contribuerez à la sauvegarde de précieuses ressources et à la
prévention de potentiels effets négatifs sur la santé humaine et
l’environnement.
c) Le traitement incorrect des équipements électriques/électro-
niques et piles/accumulateurs hors d’usage peut avoir des effets
graves sur l’environnement et la santé humaine en raison de la
présence de substances dangereuses dans les équipements.
d) Le symbole de déchets d’équipements électriques et
électroniques (DEEE), qui représente une poubelle à rou-
lettes barrée d’une croix, indique que les équipements
électriques/électroniques et piles/accumulateurs
doivent être collectés et traités séparément des déchets
ménagers.
Si une pile ou un accumulateur contient plus que les
valeurs de plomb (Pb), mercure (Hg) et/ou cadmium
(Cd) spécifiées dans la directive sur les piles et accu-
mulateurs (2006/66/CE), alors les symboles chimiques
de ces éléments seront indiqués sous le symbole DEEE.
e) Des systèmes de retour et de collecte sont disponibles pour
l’utilisateur final. Pour des informations plus détaillées sur la
mise au rebut des vieux équipements électriques/électro-
niques et piles/accumulateurs hors d’usage, veuillez contacter
votre mairie, le service d’ordures ménagères ou le magasin dans
lequel vous avez acquis l’équipement.
Pb
, Hg,
Cd
Les noms de société et de produit cités dans ce document sont des marques commerciales ou déposées de leurs détenteurs respectifs.

FR
19
Sommaire
Vérifiez que l’emballage contient bien tous les éléments indiqués
ci-dessous.
Veuillez contacter le magasin dans lequel vous avez acheté cette
unité si l’un de ces éléments manque ou a été endommagé durant
le transport.
Cordon d’alimentation × 1
Télécommande (RC-1332) × 1
Piles pour télécommande (AAA) × 2
Mode d’emploi (ce document, y compris la garantie) × 1
o Pour plus d’informations sur la garantie, les utilisateurs vivant aux
États-Unis et au Canada doivent consulter les pages 44–45
et le dos de la couverture (document de garantie). Les utilisateurs
vivant en Europe et dans d’autres régions doivent consulter la
page45.
Entretien
Essuyez les saletés du capot supérieur et des autres surfaces au
moyen d’un chiffon doux légèrement humidifié avec un nettoyant
neutre dilué.
N’utilisez pas de lingettes de nettoyage imbibées de produit
chimique, de diluant ou d’autres agents chimiques. Cela pourrait
endommager la surface.
V
Pour votre sécurité, débranchez le cordon
d’alimentation de la prise secteur avant
tout nettoyage.
Utilisation du site mondial TEAC
Vous pouvez télécharger des mises à jour pour cette unité depuis le
site mondial TEAC:
http://teac-global.com/
Dans la section TEAC Downloads (téléchargements TEAC), cliquez
sur la langue souhaitée afin d’ouvrir la page de téléchargement du
site web pour cette langue.
Accessoires fournis
INSTRUCTIONS DE SÉCURITÉ IMPORTANTES .......................16
Accessoires fournis ...............................................19
Entretien .........................................................19
Utilisation du site mondial TEAC ..................................19
Avant l’utilisation .................................................20
Emploi de la télécommande ......................................20
Branchement des enceintes ......................................21
Branchements ....................................................22
Branchement d’un casque ........................................23
Parties et fonctions de l’unité principale ...........................24
Parties et fonctions de la télécommande ..........................25
Fonctionnement de base .........................................26
Guide de dépannage .............................................28
Caractéristiques techniques. . . . . . . . . . . . . . . . . . . . . . . . . . . . . . . . . . . . . . . 29
Nous vous remercions d’avoir choisi TEAC.
Lisez ce mode d’emploi avec attention pour tirer les meilleures per-
formances de cette unité.
Après l’avoir lu, gardez-le en lieu sûr pour vous y référer ultérieurement.

20
V
Précautions concernant l’emplacement
o Placez l’unité sur une surface stable près du système audio que
vous allez utiliser avec elle.
o N’installez pas cette unité dans un lieu qui pourrait chauffer.
Cela comprend les endroits exposés directement au soleil ou
près d’un radiateur, d’un chauffage, d’une cuisinière ou d’autres
appareils chauffants. En outre, ne la placez pas au-dessus d’un
amplificateur ou autre équipement dégageant de la chaleur. Cela
pourrait causer une décoloration, une déformation ou un mau-
vais fonctionnement.
Évitez aussi les endroits sujets aux vibrations ou exposés à une
poussière excessive, au froid et à l’humidité.
o Quand vous installez cette unité, laissez un peu d’espace (au
moins 3cm) entre elle et les murs et d’autres appareils afin de
permettre une bonne dissipation thermique.
Si vous la placez par exemple sur une étagère, laissez au moins
5cm de libre au-dessus de l’unité et 10cm derrière elle. Ne pas
laisser ces espaces peut faire monter la température au risque
d’entraîner un incendie.
o Vous pouvez empiler cette unité avec un PD-501HR, NT-505 ou
d’autres unités des gammes 501/503/505. Toutefois, si la chaleur
déclenche le circuit de protection et que le son se coupe brutale-
ment, placez cette unité sur le dessus et à distance suffisante des
murs et autres appareils afin d’améliorer la dissipation thermique.
o Ne placez pas de CD, CD-R, cassettes, autres équipements audio
ou autres éléments sensibles à la chaleur sur l’unité. Cela pourrait
endommager ces articles.
o Ne posez pas de tissu sur l’unité et ne placez pas celle-ci sur
du linge de maison ou sur une épaisse moquette. Cela pourrait
entraîner la surchauffe de l’unité et l’endommager.
o Ne déplacez pas l’unité durant l’utilisation.
o La tension d’alimentation de l’unité doit correspondre à la ten-
sion imprimée sur son panneau arrière. Si vous avez des doutes à
ce sujet, consultez un électricien.
o N’ouvrez pas le boîtier de l’unité car cela peut endommager
les circuits ou causer un choc électrique. Si un objet étranger
pénètre dans l’unité, consultez votre revendeur.
o Quand vous débranchez le cordon d’alimentation de la prise sec-
teur, tirez toujours sur sa fiche, jamais sur le cordon.
Avant l’utilisation
Précautions d’emploi
V
Un mauvais emploi des piles peut entraîner leur
rupture ou leur fuite, avec pour conséquence un
incendie, des blessures ou la salissure des objets
proches. Veuillez attentivement lire et respecter
les précautions en page17.
o Pour utiliser la télécommande, pointez-la vers le capteur de
télécommande de l’unité principale dans un rayon maximal
de 5m. Ne placez pas d’obstacles entre l’unité principale et la
télécommande.
o La télécommande peut ne pas fonctionner si le capteur de signal
de télécommande de l’unité est exposé à la lumière du soleil
ou à une forte source lumineuse. Si cela se produit, essayez de
déplacer l’unité.
o Sachez que l’emploi de cette télécommande peut entraîner le
déclenchement involontaire d’opérations sur d’autres appareils
contrôlables par rayons infrarouges.
Installation des piles
Ouvrez l’arrière de la télécommande et insérez deux piles AAA avec
leurs pôles ¥/^ orientés comme indiqué dans le boîtier. Replacez
le couvercle.
Quand faut-il remplacer les piles?
Si la portée d’action de la télécommande diminue ou si l’unité
principale cesse de répondre aux touches de la télécommande,
remplacez les deux piles par des neuves.
Jetez les piles usagées conformément à leurs instructions ou aux
directives établies par votre municipalité.
Emploi de la télécommande
La page est en cours de chargement...
La page est en cours de chargement...
La page est en cours de chargement...
La page est en cours de chargement...
La page est en cours de chargement...
La page est en cours de chargement...
La page est en cours de chargement...
La page est en cours de chargement...
La page est en cours de chargement...
La page est en cours de chargement...
La page est en cours de chargement...
La page est en cours de chargement...
La page est en cours de chargement...
La page est en cours de chargement...
La page est en cours de chargement...
La page est en cours de chargement...
La page est en cours de chargement...
La page est en cours de chargement...
La page est en cours de chargement...
La page est en cours de chargement...
La page est en cours de chargement...
La page est en cours de chargement...
La page est en cours de chargement...
La page est en cours de chargement...
La page est en cours de chargement...
La page est en cours de chargement...
La page est en cours de chargement...
La page est en cours de chargement...
-
 1
1
-
 2
2
-
 3
3
-
 4
4
-
 5
5
-
 6
6
-
 7
7
-
 8
8
-
 9
9
-
 10
10
-
 11
11
-
 12
12
-
 13
13
-
 14
14
-
 15
15
-
 16
16
-
 17
17
-
 18
18
-
 19
19
-
 20
20
-
 21
21
-
 22
22
-
 23
23
-
 24
24
-
 25
25
-
 26
26
-
 27
27
-
 28
28
-
 29
29
-
 30
30
-
 31
31
-
 32
32
-
 33
33
-
 34
34
-
 35
35
-
 36
36
-
 37
37
-
 38
38
-
 39
39
-
 40
40
-
 41
41
-
 42
42
-
 43
43
-
 44
44
-
 45
45
-
 46
46
-
 47
47
-
 48
48


TEAC AX-505 Le manuel du propriétaire
- Catégorie
- Équipement musical supplémentaire
- Taper
- Le manuel du propriétaire
dans d''autres langues
- English: TEAC AX-505 Owner's manual
- español: TEAC AX-505 El manual del propietario
Documents connexes
-
TEAC AI-301DA Le manuel du propriétaire
-
-
-
-
-
TEAC AI-501DA Le manuel du propriétaire
-
-
TEAC AP-505 Le manuel du propriétaire
-
TEAC LS-M100 Le manuel du propriétaire
-
Autres documents
-
Esoteric F-05 Le manuel du propriétaire
-
Esoteric F-07 Le manuel du propriétaire
-
Esoteric F-03A Le manuel du propriétaire
-
Esoteric Grandioso F1 Le manuel du propriétaire
-
ONKYO TX-SR876 Manuel utilisateur
-
-
ONKYO TX-SR605 Manuel utilisateur
-
Roland ST-AX2 Le manuel du propriétaire
-
Roland AX-Synth Le manuel du propriétaire