Regency Fireplace Products Plateau PTO30CFT Le manuel du propriétaire
- Catégorie
- Cheminées
- Taper
- Le manuel du propriétaire

FPI FIREPLACE PRODUCTS INTERNATIONAL LTD. 6988 Venture St., Delta, BC Canada, V4G 1H4
920-281 03.22.21
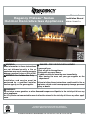
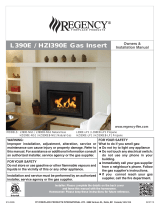
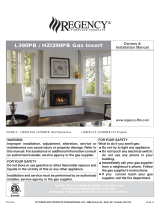
Owners &
Installation Manual
Tested by:
Installer: Leave this manual with the appliance.
Consumer: Retain this manual for future reference.
MODELS: PTO30CFT-11
Regency Plateau
®
Series
Outdoor Decorative Gas Appliances
www.regency-re.com
Regency Plateau® Outdoor Firetable Video
WARNING:
If the information in these instructions
are not followed exactly, a fire or
explosion may result causing property
damage, personal injury or loss of life.
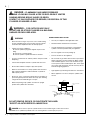
DANGER - FIRE OR EXPLOSION HAZARD
If you smell gas:
• Shut off gas to the appliance.
• Extinguish any open flame.
• If odour continues, leave the area immediately.
• After leaving the area, call your gas supplier or fire
department.
Failure to follow these instructions could result in fire or
explosion, which could cause property damage, personal
injury, or death.
WARNING: For Outdoor Use Only.
Installation and service must be
performed by a qualified installer,
service agency, or the gas supplier.
WARNING:
Do not store or use gasoline, or other flammable vapors and liquids, in the vicinity of this or any
other appliance.
An LP-cylinder not connected for use shall not be stored in the vicinity of this or any other appli-
ance.

2 | Regency Plateau
®
Series Outdoor Gas Fireplace
|
2
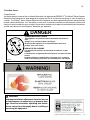
DANGER • FLAMMABLE GAS UNDER PRESSURE
LEAKING LP-GAS MAY CAUSE A FIRE OR EXPLOSION IF IGNITED
CAUSING SEROUS BODILY INJURY OR DEATH.
CONTACT LP GAS SUPPLIER FOR REPAIRS, OR DISPOSAL OF THIS
CYLINDER OR UNUSED LP-GAS.
WARNING • FOR OUTDOOR USE ONLY.*
DO NOT USE OR STORE CYLINDER IN A BUILDING,
GARAGE OR ENCLOSED AREA.
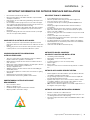
WARNING
• Know the odor of LP-gas. If you hear, see or smell leaking
LP-gas, immediately get everyone away from the cylinder
and call the Fire Department. Do not attempt repairs.
• Caution you LP gas supplier to:
Be certain cylinder is purged of trapped air prior to first
filling.
Be certain not to overfill cylinder.
Be certain cylinder re qualification date is checked.
• LP- gas is heavier than air and may settle in low paces while
dissipating.
• Contact with the liquid contents of cylinder will cause free
• Do not allow children to tamper or play with cylinder.
• When not connected for use, keep cylinder valve turned off.
Self contained appliances shall be limited to a cylinder of
30lb capacity or less.
• Do not use, store, or transport cylinder where it would be ex-
posed to high temperatures. Relief valve may open allowing
a large amount of flammable gas to escape.
• When transporting, keep cylinder secured in an upright
position with cylinder valve turned off.
WHEN CONNECTING FOR USE:
• Use only in compliance with applicable codes.
• Read and follow manufacturer's instructions.
• Consult manufacturer's instructions concerning the
cylinder connection provided with your appliance.
• Be sure regulator vent is not pointing up.
• Turn off all valves on the appliance.
• Do not check for gas leaks with a match or open flame.
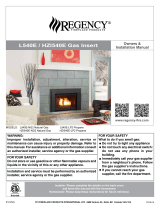
Apply soapy water at areas marked "X". Open cylinder
valve. If bubble appears, close valve and have LP-gas
service person make needed repairs. Also, check appli-
ance valves and connections to make sure they do not
leak before lighting appliance.
• Light appliance(s) following manufacturer's instructions.
• When appliance is not in use, keep the cylinder valve
closed.
DO NOT REMOVE, DEFACE, OR OBLITERATE THIS LABEL
*EXCEPT AS AUTHORIZED BY ANSI/NFPA 58.
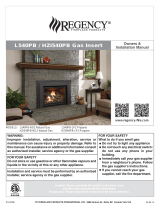
DANGER. Do not store a spare LP cylinder under or near a barbecue grill, or other heat sources.
NEVER fill an LP cylinder beyond 80% full: a fire causing death or serious injury may occur.
Cylinder valve hand wheel
Point of connection
Pressure relief v
alve
Liquid lev
el indicator (optional)
Cylinder
X
X
X
X
X

Regency Plateau
®
Series Outdoor Gas Fireplace | 3
3
|
To the New Owner:
Congratulations!
You are the owner of a state-of-the-art Outdoor Decorative Gas Appliance by REGENCY
®
. The Plateau
®
Series Outdoor
Decorative Gas Appliance has been designed to provide you with all the warmth and charm of a fire at the flick of
a switch. The Plateau
®
Series Outdoor Decorative Gas Appliance has been approved by Warnock Hersey/Intertek
for both safety and efficiency. As it also bears our own mark, it promises to provide you with economy, comfort and
security for many trouble free years to follow. Please take a moment now to acquaint yourself with these instructions
and the many features of your Regency
®
decorative gas appliance.
PTO30CFT
MONOXYDE DE CARBONE
Cet appareil peut produire du monoxyde de carbone, un gaz
inodore.
L’utilisation de cet appareil dans des espaces clos peut entraîner
la mort.
Ne jamais utiliser cet appareil dans un espace clos comme un
véhicule de camping, une tente, une automobile ou une maison.
X
X
X
Part # 919-780a
Class IIIA marking
Size@ 100% - 6”H x 2.7”W
Black font on silver background
Apr. 27/17: Created draft
May 8/20: Rev A. Wording changed
919-780a
DANGER
CARBON MONOXIDE HAZARD
This appliance can produce carbon monoxide which has no
odor.
Using it in an enclosed space can kill you.
Never use this appliance in an enclosed space such as a
camper, tent, car or home
.
WARNING:
Improper installation, adjustment, alteration, service
or maintenance can cause injury or property dam-
age. Read the installation, operating and mainte-
nance instructions thoroughly before installing or
servicing this equipment.

4 | Regency Plateau
®
Series Outdoor Gas Fireplace
|
4
table of contents
Copy of Safety Decal .....................................................5
PTO30CFT Decal Location............................................5
DIMENSIONS
Unit Dimensions - Coffee Table .....................................6
INSTALLATION
Important Message ......................................................7
Before You Start .............................................................7
General Safety Information ............................................7
Installation Checklist ......................................................8
Locating Your Outdoor Decorative Gas Appliance .........8
Important Information for Outdoor Fireplace
Installations ....................................................................9
Minimum Clearances to Combustibles ........................10
System Data ................................................................11
High Elevation ..............................................................11
Gas Line Installation ....................................................11
Copreci Valve Description ............................................11
Aeration Adjustment ....................................................11
Gas Pipe Pressure Testing ..........................................11
Gas Connection ...........................................................12
Conversion from LP to NG...........................................13
LP Hard Line Conversion.............................................16
LP Tank Installation ......................................................18
Table Top Installation ...................................................19
Glass Crystal / Basalt Volcanic Stones Installation .....20
Optional Log Set Installation ........................................21
Optional Glass Surround Installation ...........................23
Plateau Table Cover Installations .................................24
OPERATING INSTRUCTIONS
Operating Instructions .................................................25
Lighting Procedure ......................................................25
Shutdown Procedure ...................................................25
First Fire ......................................................................25
Copy of Lighting Plate Instructions ..............................26
OPERATING INSTRUCTIONS
Maintenance Instructions ............................................27
Thermocouple Replacement .......................................27
Valve Assembly Replacement .....................................28
Gas Maintenance ........................................................29
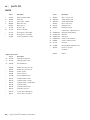
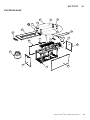
PARTS
Parts ............................................................................30
Optional Accessories ...................................................30
Coffee Table Unit .........................................................31
WARRANTY
Warranty ......................................................................32

Regency Plateau
®
Series Outdoor Gas Fireplace | 5
5
|
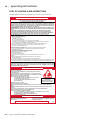
safety decal
This is a copy of the label that accompanies each
Regency
®
Series Outdoor decorative gas appliance.
We have printed a copy of the contents here for
your review.
NOTE: Regency
®
units are constantly being
improved. Check the label on the unit and if there is
a difference, the label on the unit is the correct one.
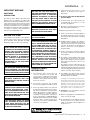
COPY OF SAFETY DECAL
For the State of Massachusetts, installation and
repair must be done by a plumber or gas fitter
licensed in the Commonwealth of Massachusetts.
For the State of Massachusetts, flexible connec-
tors shall not exceed 36 inches in length.
For the State of Massachusetts, the appliances
individual manual shut-off must be a t-handle
type valve.
Part #: 920-253
Printer: Continue with Serial # series DO NOT start at 0
(previous 919-015)
Colour: Black on grey except what is indicated as being printed red.
Material: 2 ml silver matt polyester (DPM SMS)
Size: (File at 100%)12.525”x 2.857”
Mar 27/20: Created Draft
May 27/20: Updated with Intertek blurb
DO NOT REMOVE THIS LABEL / NE PAS ENLEVER CETTE ÉTIQUETTE
553
553
FPI Fireplace Products International Ltd.
6988 Venture St.
Delta, BC, Canada V4G 1H4
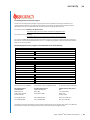
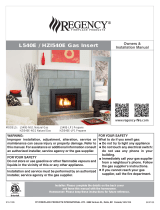
Minimum Clearances to Combustibles /
Dégagements min. des matériaux combustibles
Serial No./ No de série
Listed: OUTDOOR DECORATIVE GAS APPLIANCE / EXTÉRIEUR DÉCORATIFS APPAREIL À GAZ
Certified for/Certifié :
ANSI Z21.97-2017 - CSA 2.41-2017/CSA 2.17-2017
Refer to lntertek's Directory of Building Products for detailed information.
Pour plus de details, se reporter au Repertoire des produits de construction de lntertek.
.
NOT FOR USE WITH SOLID FUELS. /
NE PAS UTILISER AVEC DES COMBUSTIBLES SOLIDES.
Made in Canada /
Fabriqué au Canada
Duplicate S/N
APPAREIL FONCTIONNANT AU GAZ PROPANE
Modèle PTO30CFT-LP11
PROPANE GAS: Model TO30CFT-LP11P
NATURAL GAS: Model PTO30CFT-NG11
Maximum supply pressure
Minimum supply pressure
Manifold pressure high
Manifold pressure low
Orifice size
Maximum input
Minimum input
Altitude
Pression d'alimentation maximale
Pression d'alimentation minimale
Pression manifold lev eé é
Pression manifold basse
Taille de l’orifice
D bit calorifique maximalé
D bit calorifique minimal seloné
l'altitude
14” WC/C.E. (3.49 kPa)
5" WC/C.E. (1.25 kPa)
3.5" WC/C.E. (0.87 kPa)
0.5" WC/C.E. (0.12 kPa)
# 23 DMS
49,000 Btu/h (14.36 kW)
18,000 Btu/h (5.27 kW)
0-4500 ft/pi (0-1372 m)
Pression d'alimentation maximale
Pression d'alimentation minimale
Pression lev emanifold é é
Pression manifold basse
Taille de l’orifice
D bit calorifique maximalé
D
bit calorifique minimal seloné
l'altitude
14" WC/C.E. (3.49 kPa)
12” WC/C.E. (2.99 kPa)
11” WC/C.E. (2.74 kPa)
1" WC/C.E. (0.25 kPa)
# 45 DMS
48,000 Btu/h (14.06 kW)
15,000 Btu/h (4.39 kW)
0-4500 ft/pi (0-1372 m)
Maximum supply pressure
Minimum supply pressure
Manifold pressure high
Manifold pressure low
Orifice size
Maximum input
Minimum input
Altitude
Back Wall/Mur du fond
A 17” (432mm)
Side Wall/Mur latéral
B 17” (432mm)
Ceiling/Plafond
C 45” (1143mm)
Floor/Plancher
D 1” (25mm)
The installation must conform with local codes or, in the absence of local codes, with CAN/CSA-B149.1, Natural Gas and Propane Installation Code or ANSI Z223.1/NFPA 54. The appliance, when installed, must be electrically grounded in accordance with local codes or, in the absence of
local codes, with the Canadian Electrical Code, CSA C22.1 or with the National Electrical Code, ANSI/NFPA 70. This appliance is only for use with the type of gas indicated on the rating plate . See owner's manual for details.
L'installation doit être conforme aux codes locaux ou, en l'absence de codes locaux, au CAN/CSA-B149.1, gaz naturel et propane ou du Code d'installation au ANSI Z223.1/NFPA 54.
L'appareil, une fois installé, doit être branché électriquement à la terre conformément aux codes locaux ou, en l'absence de codes locaux, au Code canadien de l'électricité, CSA C22.1 ou au National Electrical Code, ANSI / NFPA 70.
Cet appareil doit être utilisé uniquement avec le type de gaz indiqué sur la plaque signalétique. Voir le manuel d’installation pour les détails. Electrical supply: 6VDC or 115V 60Hz, less than 1A/Alimentation électrique : 6VDC ou 115V 60Hz, inférieur à 1A.
APPAREIL FONCTIONNANT AU GAZ NATUREL
Modèle PTO30CFT-NG11
FOR OUTDOOR USE ONLY / POUR USAGE EXTÉRIEUR SEULEMENT
IF STORED INDOORS, DETACH AND LEAVE CYLINDER OUTDOORS /
SI À L'INTÉRIEUR, DÉTACHER LA BOUTEILLE DE GAZ ET LA LAISSER À L'EXTÉRIEUR
920-253
PTO30CFT-NG11
PTO30CFT-LP11
A
C
D
B
MODELS:
C#4001172
For Use Only with Barrier (Part # 378-932)
o
Utiliser uniquement avec l’écran (n 378-932)
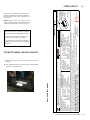
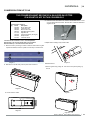
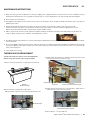
PTO30CFT SERIAL # DECAL LOCATION
1) Remove gas knob on side of unit and remove side panel (see
manual).
2) Once side panel has been removed you will see the rating plate
inside base of unit. See below.

6 | Regency Plateau
®
Series Outdoor Gas Fireplace
|
6
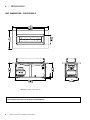
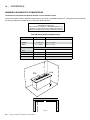
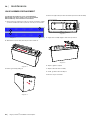
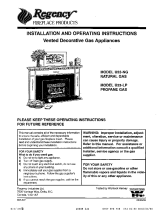
dimensions
UNIT DIMENSIONS - COFFEE TABLE
NOTE: Optional glass surround shown
ALL PICTURES / DIAGRAMS SHOWN THROUGHOUT THIS MANUAL ARE FOR ILLUSTRATION PURPOSES ONLY.
ACTUAL PRODUCT MAY VARY DUE TO PRODUCT ENHANCEMENTS.

Regency Plateau
®
Series Outdoor Gas Fireplace | 7
7
|
installation
IMPORTANT MESSAGE
SAVE THESE
INSTRUCTIONS
The Plateau
®
Series Outdoor Decorative Gas
Appliance must be installed in accordance with
these instructions. Carefully read all the instructions
in this manual first. Consult the "authority having
jurisdiction" to determine the need for a permit prior
to starting the installation. It is the responsibility of
the installer to ensure this decorative gas appliance
is installed in compliance with manufacturers
instructions and all applicable codes.
BEFORE YOU START
Safe installation and operation of this appliance
requires common sense, however, we are required
by the Canadian Safety Standards and ANSI
Standards to make you aware of the following:
GENERAL SAFETY
INFORMATION
1. The installation must conform with local
codes or, in the absence of local codes, with
CAN/CSA-B149.1, Natural Gas and Propane
Installation Code or CAN/CSA-B149.2, Propane
installation code the Natural Gas Fuel Code,
ANSI Z223.1/NFPA 54.
2. See general construction and assembly
instructions. The appliance should be enclosed.
3. The LP-gas supply cylinder to be used must
be:(a)Constructed and marked in accordance
with the U.S. Department of Transportation
(D.O.T.) Specifications for LP-Gas Cylinders,
or the Standard for Cylinders, Spheres
and Tubes for Transportation of Dangerous
Goods and Commission, CAN/CSA-B339 as
applicable; (b)Provided with a listed overfilling
prevention device; and(c)Provided with a
cylinder connection device compatible with the
connection for the appliance.
CHILDREN AND ADULTS SHOULD BE
ALERTED TO THE HAZARDS OF HIGH
SURFACE TEMPERATURES, ESPE-
CIALLY THE DECORATIVE GAS APPLI-
ANCE GLASS AND FACEPLATE, AND
SHOULD STAY AWAY TO AVOID BURNS
OR CLOTHING IGNITION.
THIS APPLIANCE SHALL BE USED
ONLY OUTDOORS IN A WELL-VENTI-
LATED SPACE AND SHALL NOT BE
USED IN A BUILDING, GARAGE OR ANY
OTHER ENCLOSED AREA.
INSTALLATION AND REPAIR SHOULD
BE DONE BY AN AUTHORIZED SERVICE
PERSON. THE APPLIANCE SHOULD
BE INSPECTED BEFORE USE AND AT
LEAST ANNUALLY BY A PROFESSIONAL
SERVICE PERSON. IT IS IMPERATIVE
THAT CONTROL COMPARTMENTS,
BURNERS AND CIRCULATING AIR
PASSAGEWAYS OF THE APPLIANCE
BE KEPT CLEAN.
ANY GUARD OR OTHER PROTECTIVE
DEVICE REMOVED FOR SERVICING
THE APPLIANCE MUST BE REPLACED
PRIOR TO OPERATING THE APPLIANCE
WARNING: FAILURE TO INSTALL THIS
APPLIANCE CORRECTLY WILL VOID
YOUR WARRANTY AND MAY CAUSE A
SERIOUS FIRE.
CLOTHING OR OTHER FLAMMABLE
MATERIAL SHOULD NOT BE PLACED
ON OR NEAR THE APPLIANCE.
SOLID FUELS SHALL NOT BE BURNED
IN THIS APPLIANCE.
DO NOT USE THIS APPLIANCE IF
ANY PART HAS BEEN UNDER WATER.
IMMEDIATELY CALL A QUALIFIED
SERVICE TECHNICIAN TO INSPECT
THE APPLIANCE AND TO REPLACE
ANY PART OF THE CONTROL SYSTEM
AND ANY GAS CONTROL WHICH HAS
BEEN SUBMERGED UNDER WATER.
YOUNG CHILDREN SHOULD BE CARE-
FULLY SUPERVISED WHEN THEY ARE
IN THE SAME AREA AS THE APPLI-
ANCE. TODDLERS, YOUNG CHILDREN
AND OTHERS MAY BE SUSCEPTIBLE
TO ACCIDENTAL CONTACT BURNS. A
PHYSICAL BARRIERS IS RECOMMEND-
ED IF THERE ARE AT RISK INDIVIDUAL
IN THE HOUSE. TO RESTRICT ACCESS
TO A DECORATIVE GAS APPLIANCE
OR STOVE, INSTALL AN ADJUSTABLE
SAFETY GATE TO KEEP TODDLERS,
YOUNG CHILDREN AND OTHER AT RISK
INDIVIDUALS OUT OF THE ROOM AND
AWAY FROM HOT SURFACES.
4. Inspect the burner before each use of the
appliance for blockage and any signs of
deterioration.
5. DO NOT SIT OR STAND ON DECORATIVE
GAS APPLIANCE
6. To prevent injury, do not allow anyone who
is unfamiliar with the operation to use the
decorative gas appliance.
7. Wear gloves and safety glasses for protection
while doing required maintenance.
8. Maximum gas inlet pressure = 1/2 psig.
9. Under no circumstances should this appliance
be modified. Parts that have to be removed for
servicing should be replaced prior to operating
this appliance.
10. Installation and any repairs to this appliance
should be done by a qualified service person.
A professional service person should be called
to inspect this appliance annually. Make it a
practice to have all of your gas appliances
checked annually.
11. Under no circumstances should any solid fuels
(wood, paper, cardboard, coal, etc.) be burned
in this appliance.
12. The appliance and its individual shutoff valve
must be disconnected from the gas supply
piping system during any pressure testing of
that system at test pressures in excess of 1/2
psi (3.5kPa).
The appliance must be isolated from the gas
supply piping system by closing its individual
manual shutoff valve during any pressure testing
of the gas supply piping system at test pressures
equal to or less than 1/2 psi (3.5 kPa).
13. The appliance area must be kept clear and
free of combustible materials, (gases and other
flammable vapours and liquids).
It is highly recommended to protect the interior
from moisture (rain, snow). Cover the enclosure
opening when not in use. This decorative gas
appliance is only for use with the type of gas
indicated on the rating plate. This decorative
gas appliance is not convertible for use with
other gases, unless a certified kit is used.
14. IMPORTANT: Leaf cover must be removed
when burner is in operation.
15. When not using appliance for extended periods
of time - turn off gas supply.
16. The 4 levelling legs on this appliance must not
be removed. These are for safety and must
remain on the appliance. Ensure appliance is
level prior to use.

8 | Regency Plateau
®
Series Outdoor Gas Fireplace
|
8
installation
INSTALLATION
CHECKLIST
1. Appliance is factory equipped for Propane (LP).
For LP - use a maximum 11 pound tank or direct
hard pipe from an external LP supply.
When using Natural Gas, see NG conversion
section in this manual.
2. Locate appliance:
a) Refer to "Locating Your Outdoor decorative
gas appliance" section
b) Clearances to Combustibles (Refer to
"Clearances" section)
3. Gas Connection - for ease of installation and
gas connection, remove left side panel (one
opposite gas knob. Test for leaks..
4. Install standard and optional features. Refer to
the following sections:
a. Tabletop Installation
b. Glass Crystals
c. Volcanic Stone Installation (optional)
d. Log Installation (optional)
e. Glass Surround Installation (optional)
f. Weather Cover Installation
5. Final check.
This includes:
1. Clocking the appliance to ensure the correct firing
rate (noted on label), after burning appliance for
45 minutes.
2. If required, adjusting the primary air to ensure
that the flame does not carbon. First allow the
unit to burn for 15-20 min. to stabilize.
CAUTION: Any alteration to the product that
causes sooting or carboning that results in dam-
age is not the responsibility of the manufacturer.
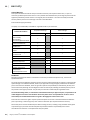
LOCATING YOUR
OUTDOOR DECORATIVE GAS APPLIANCE
1. When selecting a location for your outdoor decorative gas appliance, ensure that the clearances are
met.
2. This appliance must be installed in an open-air situation with natural ventilation, without stagnant
areas, where gas leakage and products of combustion are rapidly dispersed by wind and natural
convection.
3. Certain materials or items, when placed under or near the appliance, will be subjected to radiant
heat and could become damaged.
4. Typically an outdoor space is not enclosed but, any enclosure in which the appliance is used shall
comply with one of the following:
An enclosure with walls on all sides, but at least one permanent opening at ground level and no
overhead cover.
Within a partial enclosure that includes an overhead cover and no more that two walls.
Within a partial enclosure that includes an overhead cover and more than two walls, the following
shall apply:
• At least 25% of the total wall area is completely open, and
• At least 30% of the remaining wall area is open and unrestricted
30% or more in total of the remaining wall
area is open and unrestricted.
Open side at least 25% of total wall area
*SEE IMPORTANT INSTALLATION NOTES NEXT PAGE

Regency Plateau
®
Series Outdoor Gas Fireplace | 9
9
|
installation
• Never insulate around the body of the unit
• Excessive heat retention in the firebox will lead to component failure
and fireplace malfunction
• Heat retention can cause “Oil-canning” and damage the fireplace due
to overheating
• Do not build up a wall of any type in front or to the sides of the appli-
ance, higher than the firebox opening. This will create a pressure zone
at the firebox and will prevent the unit from venting
• This is an outdoor appliance with a built-in drain. This drain should be
installed and connected in all applications as per the instructions in
this manual
• Inadequate drainage will cause rust and reduce the life of your appli-
ance, this is not protected by warranty
• Installed correctly, these components will be subjected to far lower
temperatures than indoor units, which have been certified as safe from
heat etc
• Working gas pressures are as critical in outdoor products as they are
in indoor products, even more important in Electronic systems
• Unit shutting down intermittently
• Overheating of components leading to failure
• Lifting flame
• Poor flame package (i.e. all to one side, lazy flame)
• Failure to ignite
• Excess carbon
• Safety issues and concerns created from the by products of combus-
tion
• Outdoor appliances must be installed in: open-air situations with natu-
ral ventilation and without stagnant areas
• Any gas leakage and products of combustion need to be rapidly dis-
persed by wind and natural convection
• Typically outdoor spaces are not enclosed, however, failure to adhere
to installation guidelines, may cause the outdoor fireplace to be af-
fected by wind or air pressure inside the enclosure
• ANY enclosure in which the appliance is used shall comply with one of
the diagrams on the previous page.
• All walls + overhead cover = 100% total area
• One of four walls or full overhead area must be totally open, plus—one
of remaining walls must have a fixed opening
• All outdoor fireplaces/fire tables require total natural ventilation of 50%
open space
• Correct Working Gas pressure is critical
• Wherever possible avoid locating on a flat wall in a tight corner
• Floor space doesn’t count as “open area”
• Install to the manual specs for framing and do not insulate unit or
enclosure
• Only Regency approved media should be used in the firebox (i.e.
stones/glass)
• Be aware of pressure zones due to location (i.e. facing the ocean)
• Open walls and doorways to outside air are beneficial to the perfor-
mance of an outdoor appliance
• Fixed roof/ceiling open areas count towards the total open area overall
requirement
• Screens create 40% or more air restriction
• Screened areas are restrictions and reduce open air space, calculate
area based on a closed screen
• The biggest problems are created by lack of airflow for the appliance
• Outdoor fireplaces are often built-in systems and incorrect installation
can result in high repair costs
• Units must not be modified or altered in any way
• There is a common misconception that being outdoors, an Outdoor
Fireplace will function, regardless of circumstances,
• Outdoor fireplaces require the same amount of ventilation as indoor
units, often more
• Outdoor units require adequate ventilation to the atmosphere, which in
turn provides ongoing circulatory combustion air
• This type of Appliance Vents.
• All Outdoor Fireplace Products have the same need for Air/Oxygen,
and an ability to Vent
• Even though the appliance is outdoors, this doesn’t mean it is getting
adequate air
• Requirements are not specific to Regency units
• Read and follow critical location guidelines in this manual
• Don’t overlook the obvious
• Widen your margin for error
• Combustion always requires the same three elements
• Only the quantities and volumes change
IMPORTANT INFORMATION FOR OUTDOOR FIREPLACE INSTALLATIONS
IMPORTANT THINGS TO REMEMBER
ANTICIPATED ISSUES CAUSED BY
INCORRECT LOCATION OR INSTALLATION
OUTDOOR APPLIANCES REQUIRE VENTING
COMPONENTS IN OUTDOOR APPLIANCES
COMMON MISCONCEPTIONS REGARDING
OUTDOOR FIREPLACES
UNDERSTANDING OUTDOOR APPLIANCE
REQUIREMENTS
OUTDOOR APPLIANCE INSTALLATION SUMMARY

10 | Regency Plateau
®
Series Outdoor Gas Fireplace
|
10
installation
WARNING
Fire hazard is an extreme risk
if these clearances (air space) to combustible materials are not
adhered to. It is of greatest importance that this decorative gas
appliance be installed only in accordance with these instructions.
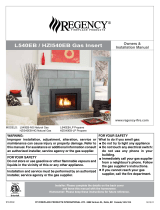
MINIMUM CLEARANCES TO COMBUSTIBLES
The clearances listed below are Minimum distances unless otherwise stated.
A major cause of fires is failure to maintain required clearances (air space) to combustible materials. It is of the greatest importance that this
decorative gas appliance be installed only in accordance with these instructions.
Plateau® Series Clearance Requirements
Clearance Dimension Measured From:
A: Back wall
17" (432mm) Burner to back wall
B: Sidewall
17" (432mm) Burner to sidewall
C: Ceiling
45" (1143mm) Burner to Ceiling
D
1
: Floor
D
2
: Floor
0" When using supplied leveling legs or optional casters.
1"(25mm) Unit Base to Floor
E: Alcove Width
84"(2134mm) Wall to Wall (Minimum)
F: Alcove Depth
60" (1524mm) Front to Back Wall (Maximum)
Notes:
0" No Hearth Required
E
F
Alcove
A
C
D
B

Regency Plateau
®
Series Outdoor Gas Fireplace | 11
11
|
installation
HIGH ELEVATION
This unit is approved for altitude 0 to 4500 ft. (CAN/
CGA 2.17-M91).
GAS LINE
INSTALLATION
Since some municipalities have additional local
codes it is always best to consult with your local
authorities and the CAN/CGA B149 installation
code.
For USA installations follow local codes and/or the
current National Fuel Gas Code, ANSI Z223.1.
When using copper or flex connectors use only
approved fittings. Always provide a union so that
gas lines can be easily disconnected for servicing.
Flare nuts for copper lines and flex connectors are
usually considered to meet this requirement.
NOTE: A shutoff / dante valve should be sup-
plied in or near the unit (or as per local codes)
for ease of servicing this appliance.
IMPORTANT: Always check for gas leaks with
a soap and water solution or gas leak detector.
Do not use open flame for leak testing.
PLATEAU
®
SERIES-NG11
SYSTEM DATA
Max. Supply Pressure 14" WC (3.49 kpa)
Min. Supply Pressure 5" WC (1.25 kpa)
Manifold Pressure 3.5" WC (0.87 kpa)
Manifold Pressure -Low 0.5" WC (0.12 kpa)
Orifice Size #23 DMS
Minimum Input 18,000 Btu/h
(5.27 kW)
Maximum Input 49,000 Btu/h
(14.36 kW)
PLATEAU
®
SERIES-LP11
SYSTEM DATA
Max. Supply Pressure 14" WC (3.49 kpa)
Min. Supply Pressure 12" WC (2.99 kpa)
Manifold Pressure 11" WC (2.73 kpa)
Manifold Pressure-Low 1" WC (0.25 kpa)
Orifice Size #45 DMS
Minimum Input 15,000 Btu/h
(4.39 kW)
Maximum Input 48,000 Btu/h
(14.06 kW)
AERATION ADJUSTMENT
The burner aeration is factory set but may need
adjusting due to either the local gas supply or
altitude. Open the air shutter for a blue flame or
close for a more yellow flame.
Follow steps 1-4 in LP -NG conversion in this manual.
Minimum Air Shutter Opening:
Fully Closed NG
Fully Open LP
Note: Any damage due to carboning resulting
from improperly setting the aeration
controls is NOT covered under warranty.
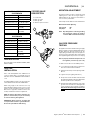
COPRECI VALVE
DESCRIPTION
1. Push nozzle
2. Main gas outlet
3. Main gas inlet
4. Thermocouple connection
GAS PIPE PRESSURE
TESTING
The appliance must be isolated from the gas supply
piping system by closing its individual manual shut-
off valve during any pressure testing of the gas
supply piping system at test pressures equal to or
less than 1/2 psig. (3.45 kPa). Disconnect piping
from supplied regulator at pressures over 1/2 psig.
Note: To properly check the inlet pressure, use
the regulator pressure tap (see P.15).
1. Make sure the valve is in the "OFF" position.
2. Loosen the pressure tap, turning counterclock-
wise with a 1/8" wide flat screwdriver.
3. Attach manometer to pressure tap using a 5/16"
ID hose.
4. Light the unit (see Lighting instructions).
5. The pressure check should be carried out with
the unit burning and the setting should be within
the limits specified on the safety label.
6. When finished reading manometer, turn off the
gas valve, disconnect the hose and tighten the
screw (clockwise) with a 1/8" flat screwdriver.
Note: Screw should be snug, but do not over
tighten.
4
3
1
2

12 | Regency Plateau
®
Series Outdoor Gas Fireplace
|
12
installation
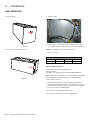
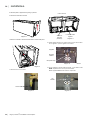
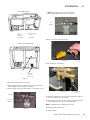
3. Connect gas line.
1. Pull off gas knob.
2. Remove end panel by lifting up and off.
GAS CONNECTION
4. Check all gas connections (both valve train & propane tank or NG
source) under normal operating pressure, for leaks, with soapy water.
NOTE: If soap bubbles, this would indicate a gas leak.
5. Reverse steps 1 & 2.
Gas connection
@ unit
Average LP Tank Burn Times
High Low
CFT 11lb Tank 3.5 Hrs 11 Hrs
Diagram 1
Diagram 2
Recommended Propane Tank
Manufacturer: Manchester Tank & Equipment Co.
Catalog #: 10393.1
Description: 11 lb. Vertical Propane Cylinder with QCC1/OPD Valve
Other cylinders may be acceptable for use with the appliance provided they
are compatible with the retention means (see LP Tank Installation).
Propane cylinders must be:
1. Constructed and marked in accordance with the U.S. Department of
Transportation (D.O.T.) Specifications for LP-Gas Cylinders, or the Stan-
dard for Cylinders, Spheres and Tubes for Transportation of Dangerous
Goods and Commission, CAN/CSA-B339.
2. Provided with a listed overfilling prevention device.
3. Provided with a cylinder connection device (QCC1/OPD).

Regency Plateau
®
Series Outdoor Gas Fireplace | 13
13
|
installation
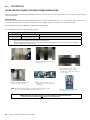
CONVERSION FROM LP TO NG
1
OUTDOOR SERIES
919-342 06/26/17
CONVERSION FROM LP TO NG
2. Slide burner to the left, away from the pilot orifi ce and lift out.
3. Locate LP burner orifi ce.
THIS CONVERSION MUST BE DONE BY A QUALIFIED GAS FITTER
IF IN DOUBT DO NOT DO THIS CONVERSION !!
Each Kit contains one NG Conversion Kit
Conversion Kit Contains:
Qty. Part # Description
1 904-989 Burner Orifi ce #23
1 908-529 Yellow NG Label
1 909-265 Max 0.5 PSI Label
1 286-035 Regulator Mounting Base
1 911-135 Regulator NG
1 904-978 3/8" fl ex pipe black (18" length)
4 904-959 Phillips screws
1 919-342 Instruction Sheet
4. Remove burner orifi ce with a 1/2" wrench. Use another wrench to hold
on to the elbow behind the orifi ce. Discard orifi ce. Install new NG orifi ce
supplied with kit.
1. Remove burner by removing 4 screws in locations shown below. If glass
crystals are installed, move the crystals out of the way to reveal screws.
Turn the unit off and allow to cool to room temperature.
Remove leaf cover and any media (glass etc) if installed.
Remove Table Top - see instructions in this manual.
5. Adjust aeration setting to fully closed for NG.
6. Reinstall burner.
7. Remove gas knob by pulling off - then remove end panel by lifting up
and off .
Diagram 6
Diagram 7
Diagram 8
Diagram 5
Diagram 2
Diagram 1
Diagram 3

14 | Regency Plateau
®
Series Outdoor Gas Fireplace
|
14
installation
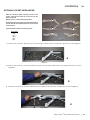
2
OUTDOOR SERIES
919-342a
03.06.18
11. Remove LP hose from valve.
13. Secure regulator in position with top bracket - secure with 2 screws.
NOTE: Top bracket to sit over top of lower bracket.
Attach supplied "MAX. 0.5 PSI" sticker to top bracket.
LP hose
Regulator
Flexline
Regulator
Bracket
Inlet pressure tap
Top
Bracket
12. Install regulator bracket onto unit base with 2 screws. Connect fl ex
line to regulator—position regulator onto bracket.
Diagram 8
Diagram 9
Diagram 10
Location to install
regulator
Access for
Hard line
(knockout)
Diagram 11
Diagram 13
Diagram 14
8. Remove panel on opposite end by lifting up and off .
9. Disconnect and remove LP tank.
10. Remove 2 screws in locations shown below to remove side panel.
Coffee table unit

Regency Plateau
®
Series Outdoor Gas Fireplace | 15
15
|
installation
3
OUTDOOR SERIES
919-342a 03.06.18
14. Remove connector from end of fl ex line.
Remove
connector
Diagram 15
16. Attach the label "this unit has been converted to NG" near on top of
the serial # decal.
17. Replace red "LPG" label with yellow "NG" label.
18. Bring gas to appliance. The connector removed in previous steps
can be used on the inlet side of the regulator.
19. Check all gas connections (at valve, regulator, and NG outlet) under
normal operating pressure, for leaks, with soapy water.
NOTE: If soap bubbles, this would indicate a gas leak.
20. Check inlet and outlet pressures.
21. Reinstall panels.
15. Connect fl ex line to valve fi tting.
Connect fl ex line
to valve
Diagram 16

16 | Regency Plateau
®
Series Outdoor Gas Fireplace
|
16
installation
LP HARD LINE CONVERSION
(FOR USE IN PLACE OF LP TANK)
1
OUTDOOR SERIES
919-345 01/21/14
LP HARD LINE CONVERSION
THIS CONVERSION MUST BE DONE BY A QUALIFIED GAS FITTER
IF IN DOUBT DO NOT DO THIS CONVERSION !!
Each Kit contains one LP Hard Line Conversion Kit
Conversion Kit Contains:
Qty. Part # Description
1 909-265 Max 0.5 psi label
1 286-035 Regulator mounting base
1 286-036 Regulator mounting top
1 911-136 Regulator LP
1 904-978 3/8” flex pipe 18” length
4 904-959 #8 Philips
1 919-345 Instruction sheet
Turn off unit and allow to cool to room temperature.
1. Remove gas knob by pulling off - then remove end panel by lifting up
and off.
Diagram 1
Diagram 2
5. Remove LP hose from valve.
LP hose
Diagram 3
Diagram 4
Diagram 5
2. Remove panel on opposite end by lifting up and off.
3. Disconnect and remove LP tank.
4. Remove 3 screws in locations shown below to remove side panel.
Note: Coffee height table requires removal of only 2 screws (no middle
screw).
THIS CONVERSION MUST BE DONE BY A QUALIFIED GAS FITTER
IF IN DOUBT DO NOT DO THIS CONVERSION !!

Regency Plateau
®
Series Outdoor Gas Fireplace | 17
17
|
installation
2
OUTDOOR SERIES
919-345
01/21/14
9. Remove connector from end of flex line.
Remove
connector
Diagram 10
11. Bring gas to appliance. The connector removed in previous steps can
be used on the inlet side of the regulator.
12. Check all gas connections (at valve, regulator, and LP outlet) under
normal operating pressure, for leaks, with soapy water.
NOTE: If soap bubbles, this would indicate a gas leak.
13. Check inlet and outlet pressures.
14. Reinstall panels.
10. Connect flex line to valve fitting.
Connect flex line
to valve
Diagram 11
NOTE: Top bracket to sit over top of lower bracket.
Attach supplied "MAX. 0.5 PSI" sticker to top bracket.
Regulator
Regulator
Bracket
6. Remove LP tank and LP hose from valve.
7. Install regulator bracket onto unit base with 2 screws. Connect flex
line to regulator—position regulator onto bracket.
8. Secure regulator in position with top bracket - secure with 2 screws.
Diagram 8
Top
Bracket
Diagram 9
Location to install
regulator
Location to install
regulator
Access for
Hard line
(knockout)
Access for
Hard line
(knockout)
Diagram 6
Diagram 7
Coffee table unit only
Island and Cocktail table units

18 | Regency Plateau
®
Series Outdoor Gas Fireplace
|
18
installation
LP TANK INSTALLATION
NOTE: Max. tank size 11lb.
1. Lift up and remove end panel (opposite end of gas knob).
2. Loosen butterfly bolt to allow LP tank to be seated on the holder.
3. Seat tank on tray and tighten butterfly bolt to secure tank to tray.
4. Connect the LP regulator quick connect to the tank. Locate the hose
away from pathways where people may trip over it and away from areas
where the hose may be subject to accidental damage.
5. Check all gas connections (both valve train & LP tank) under normal
operating pressure, for leaks, with soapy water.
NOTE: If soap bubbles, this would indicate a gas leak.
Part #: 919-031
Size: 5” W x .77” H (File at 100%)
Color: Black font on silver background
Warning= black background - silver font
Material: Matte Silver DPM
919-031
WARNING!
When using a LP tank - a minimum 1”(25mm) gap
at all times, between the floor and base of unit.
(Refer to owners manual)
must be maintained
Gas connection
@ tank
IMPORTANT:
PTO30 CFT (Coffee table only)
To avoid tank pressure regulator freezing - when using an 11LB LP tank,
it is recommended the appliance is run on low (turned down 30%).
Note: To turn off gas at LP tank source, lift up panel with handle and tilt forward
to access control.
WARNING!
The cylinder hose must be inspected for damage or cracks before each use
of the appliance. The hose assembly must be replaced prior to the appliance
being put into operation if there is evidence of excessive abrasion or wear or if
the hose is damaged. If replacement is required, it must be replaced with FPI
part number 911-089.
The hose must be located away from sharp edges and away from pathways
where people may trip over it or in areas where the hose may be subject to
accidental damage.
The burner must be inspected annually before being put into service. If damage
is evident during inspection, the burner must be replaced with FPI part number
378-526 prior to the appliance being put into operation.

Regency Plateau
®
Series Outdoor Gas Fireplace | 19
19
|
installation
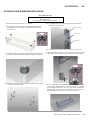
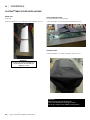
TABLE TOP INSTALLATION
1
PLATEAU SERIES
919-112b 01/23/13
End Caps
Before installation,stainless steel must be handled and cleaned as per instructions noted below:
Stainless Steel Table Top
• Stainless table top must be inspected for scratches and dimples prior to installation. All claims to be recorded at this time.
Claims for damage after installation will not receive consideration.
• To protect the nish during installation and handling - cotton gloves MUST be worn at all times while handling the panels (even when
removing protective coating).
•Stainless table top will discolor a little during normal operation.
This is normal and should not be considered a defect.
*
All hand and fi nger marks MUST be cleaned off with a soft cloth and a stainless steel cleaner. Most stainless steel cleaners leave a fi lm/
residue on the surface of the panels. Use an ammonia based cleaner (ie. glass cleaner) to remove this fi lm before applying heat to the unit.
Failure to do this will result in burn stains on table top which you will be unable to remove.
Not protected by product warranty.
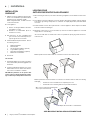
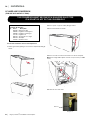
TABLE TOP INSTALLATION - BUILT-IN UNIT & COFFEE TABLE UNIT
NOTE: These instructions apply to both the stainless steel and sunset
bronze table tops.
NOTE: Coffee table unit shown below, instructions also apply to built-in
burner.
Two brackets need to be installed before installing the Table Top.
1. Remove end panels and gas
knob, by pulling off.
7) Place end caps over pilot and opposite end to com-
plete installation.
8) To remove - reverse steps 7-5.
5. Place Table Top
on Unit.
6. Secure table to unit from underside (on each end),
with 4 screws in locations shown below.
Final Install
2. Install Table Top bracket (on each
end) with 3 screws to unit as
shown below.
3. Reinstall end panels and gas knob.
4. Repeat Step 1 and 2 on other side.

20 | Regency Plateau
®
Series Outdoor Gas Fireplace
|
20
installation
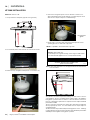
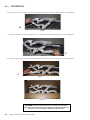
BURNER PACKAGES
Unit Glass Crystals Only
*Glass Crystals + Volcanic stones¹
Plateau Series 10 lbs 5lb glass + 1 box stones- recommended
NOTE: * Glass Crystals are available in 1lb and 5lb bags.
¹ Glass Crystals to be installed on the burner prior to installing stones.
Basalt Volcanic Stones are measured by weight not quantity. Each bag contains 15 lbs of stones, however the exact quantity
and size vary. Sizes vary between 2" - 3"
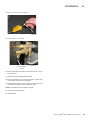
Evenly spread the Glass Crystals and optional Basalt Volcanic Stones over the burner. Ensure the crystals (or stones) do not overlap too much as this will
effect the flame pattern.
IMPORTANT NOTE:
Only the supplied approved Glass Crystals and Basalt Volcanic stones are to be used with these fireplaces. Use of any other type of glass crystals or stones
can alter the unit's performance, any damage caused by the use of any unapproved glass or stones will not be covered under warranty.
When using Basalt Volcanic Stones DO NOT cover pilot light that lead to pilot flame.
Do not add Basalt Volcanic Stones when using driftwood log set.
1. Start pouring Crystals on one end
of the burner.
2. Work Crystals to other end of the
Burner. Base and burner tube
should not be visible when crystals
are spread out.
3. Work Crystals downwards to front
edge of top edge of burner.
4. Basalt Volcanic Stones shown
spread evenly over the burner and
crystal base.
5. Ensure Crystals do not block the
front of the thermocouple.
NOTE: Basalt Volcanic Stones are NOT to be placed anywhere on the Pilot assembly area.
Glass Crystals to be installed on the burner prior to installing stones.
NOTE: Correct final glass installation of Crystals as shown in step 2 and 3.
The Burner should not be visible when the flame is out.
GLASS CRYSTAL / BASALT VOLCANIC STONES INSTALLATION
La page est en cours de chargement...
La page est en cours de chargement...
La page est en cours de chargement...
La page est en cours de chargement...
La page est en cours de chargement...
La page est en cours de chargement...
La page est en cours de chargement...
La page est en cours de chargement...
La page est en cours de chargement...
La page est en cours de chargement...
La page est en cours de chargement...
La page est en cours de chargement...
La page est en cours de chargement...
La page est en cours de chargement...
La page est en cours de chargement...
La page est en cours de chargement...
La page est en cours de chargement...
La page est en cours de chargement...
La page est en cours de chargement...
La page est en cours de chargement...
-
 1
1
-
 2
2
-
 3
3
-
 4
4
-
 5
5
-
 6
6
-
 7
7
-
 8
8
-
 9
9
-
 10
10
-
 11
11
-
 12
12
-
 13
13
-
 14
14
-
 15
15
-
 16
16
-
 17
17
-
 18
18
-
 19
19
-
 20
20
-
 21
21
-
 22
22
-
 23
23
-
 24
24
-
 25
25
-
 26
26
-
 27
27
-
 28
28
-
 29
29
-
 30
30
-
 31
31
-
 32
32
-
 33
33
-
 34
34
-
 35
35
-
 36
36
-
 37
37
-
 38
38
-
 39
39
-
 40
40


Regency Fireplace Products Plateau PTO30CFT Le manuel du propriétaire
- Catégorie
- Cheminées
- Taper
- Le manuel du propriétaire
dans d''autres langues
Documents connexes
-
 Regency Fireplace Products Horizon HZI390EB Le manuel du propriétaire
-
 Regency Fireplace Products HZI390E-NG Le manuel du propriétaire
-
 Regency Fireplace Products Liberty L540PB Le manuel du propriétaire
-
 Regency Fireplace Products Horizon HZI540EB Le manuel du propriétaire
-
 Regency Fireplace Products Horizon HZI540EB Le manuel du propriétaire
-
 Regency Fireplace Products Horizon HZI390PB Le manuel du propriétaire
-
 Regency Fireplace Products Horizon HZI540EB Le manuel du propriétaire
-
 Regency Fireplace Products Energy U23 Le manuel du propriétaire


