PowerStroke PSL1PS21 Le manuel du propriétaire
- Taper
- Le manuel du propriétaire

SAVE THIS MANUAL FOR FUTURE REFERENCE
Cette pulvérisateur à peinture a été conçue et fabriquée
conformément aux strictes normes de fiabilité, simplicité d’emploi
et sécurité d’utilisation. Correctement entretenu, cet outil vous
donnera des années de fonctionnement robuste et sans problème.
AVERTISSEMENT :
Pour réduire les risques de
blessures, l’utilisateur doit lire et veiller à bien comprendre
le manuel d’utilisation avant d’employer ce produit.
Merci de votre achat.
Su rociador de pintura ha sido diseñado y fabricado de conformi-
dad con nuestras estrictas normas para brindar fiabilidad, facili-
dad de uso y seguridad para el operador. Con el debido cuidado, le
brindará muchos años de sólido funcionamiento y sin problemas.
ADVERTENCIA: Para reducir el riesgo de lesiones,
el usuario debe leer y comprender el manual del operador
antes de usar este producto.
Le agradecemos su compra.
CONSERVER CE MANUEL POUR
FUTURE RÉFÉRENCE GUARDE ESTE MANUAL PARA
FUTURAS CONSULTAS
Your paint sprayer has been engineered and manufactured to our high standard for dependability, ease of operation, and
operator safety. When properly cared for, it will give you years of rugged, trouble-free performance.
WARNING: To reduce the risk of injury, the user must read and understand the operator’s manual before using this
product. If you do not understand the warnings and instructions in the operator’s manual, do not use this product.
Thank you for your purchase.
OPERATOR’S MANUAL
MANUEL D’UTILISATION
MANUAL DEL OPERADOR
AIRLESS/HVLP ASSIST PAINT SPRAYER
PULVÉRISATEUR À PEINTURE SANS AIR/HVLP ASSIST
ROCIADOR DE PINTURA SIN AIRE/HVLP ASSIST
PSL1PS21
To register your POWERSTROKE product, please visit:
http://register.powerstroketools.com/
Pour enregistrer votre produit de POWERSTROKE, s’il vous plaît
la visite: http://register.powerstroketools.com/
Para registrar su producto de POWERSTROKE, por favor visita:
http://register.powerstroketools.com/
CUSTOMER SERVICE
SERVICE CLIENTELE
SERVICIO AL CLIENTE
1-877-617-3501
www.powerstroketools.com

Page 2 — English
Introduction ..................................................................................................................................................................... 2
Warranty .......................................................................................................................................................................... 2
Important Safety Instructions .......................................................................................................................................3-4
Specific Safety Rules ....................................................................................................................................................4-5
Symbols ........................................................................................................................................................................... 6
Electrical .......................................................................................................................................................................... 7
Features ........................................................................................................................................................................7-8
Assembly ...................................................................................................................................................................... 8-9
Operation ..................................................................................................................................................................10-13
Maintenance .................................................................................................................................................................. 14
Troubleshooting ........................................................................................................................................................ 15-16
Figure numbers (illustrations) ...................................................................................................................................17-20
Parts Ordering / Service ................................................................................................................................... Back page
This tool has many features for making its use more pleasant and enjoyable. Safety, performance, and dependability have
been given top priority in the design of this product making it easy to maintain and operate.
POWERSTROKE AIRLESS PAINT SPRAYER – LIMITED TWO YEAR WARRANTY
Your POWERSTROKE airless paint sprayer is warranted to the original purchaser only to be free from defects in material and
workmanship. Subject to certain expectations, POWERSTROKE will repair or replace any part on your POWERSTROKE airless
paint sprayer which is defective in material and workmanship for a period of two (2) years after the date of purchase. Return of
the product and a copy of proof of purchase to a service center authorized to service POWERSTROKE airless paint sprayers (a
“POWERSTROKE Authorized Airless Paint Sprayer Service Center”) freight prepaid and insured, are required for this warranty to
be effective. This warranty does not apply to damage from repairs made or attempted by anyone other than an Authorized Airless
Paint Sprayer Service Center, misuse, alterations, abuse, normal wear and tear, lack of maintenance, or accidents.
Warranty Registration is not necessary to obtain the applicable warranty on a POWERSTROKE airless paint sprayer. However,
proof of purchase in the form of a sales receipt or other information deemed sufficient by POWERSTROKE, is required. The
manufacturing date of the product will be used to determine the warranty period if no proof of purchase is provided at the time
warranty service is requested.
ACCEPTANCE OF THIS EXCLUSIVE REPAIR AND REPLACEMENT REMEDIES DESCRIBED HEREIN IS A CONDITION OF THE
CONTRACT FOR THE PURCHASE OF EVERY POWERSTROKE PRODUCT. IF YOU DO NOT AGREE TO THIS CONDITION, YOU
SHOULD NOT PURCHASE THE PRODUCT. IN NO EVENT SHALL POWERSTROKE BE LIABLE FOR ANY INCIDENTAL, SPECIAL,
CONSEQUENTIAL OR PUNITIVE DAMAGES, OR ANY COSTS, ATTORNEY FEES, EXPENSES, LOSSES OR DELAYS ALLEGED TO
BE AS A CONSEQUENCE OF ANY DAMAGE TO, FAILURE OF, OR DEFECT IN ANY PRODUCT INCLUDING, BUT NOT LIMITED
TO, ANY CLAIMS FOR LOSS OF PROFITS. SOME STATES DO NOT ALLOW THE EXCLUSION OR LIMITATION OF INCIDENTAL
TO CONSEQUENTIAL DAMAGES, SO THE ABOVE LIMITATION OR EXCLUSION MAY NOT APPLY TO YOU. THIS WARRANTY
IS EXCLUSIVE AND IN LIEU OF ALL OTHER EXPRESS WARRANTIES, WRITTEN OR ORAL. TO THE EXTENT PERMITTED BY
LAW, POWERSTROKE DISCLAIMS ANY IMPLIED WARRANTIES, INCLUDING WITHOUT LIMITATION ANY IMPLIED WARRANTY
OF MERCHANTABILITY OR FITNESS FOR A PARTICULAR USE OR PURPOSE; TO THE EXTENT SUCH DISCLAIMER IS NOT
PERMITTED BY LAW, SUCH IMPLIED WARRANTIES ARE LIMITED TO THE DURATION OF THE APPLICABLE EXPRESS WARRANTY
AS DESCRIBED ABOVE. SOME STATES DO NOT ALLOW LIMITATIONS ON HOW LONG AN IMPLIED WARRANTY LASTS, SO
THE ABOVE LIMITATION MAY NOT APPLY TO YOU. THIS WARRANTY GIVES YOU SPECIFIC LEGAL RIGHTS, AND YOU MAY
ALSO HAVE OTHER RIGHTS WHICH VARY FROM STATE TO STATE.
This warranty applies to products sold in the U.S.A, Canada and Mexico only.
TO GET SERVICE: Return your POWERSTOKE Airless Paint Sprayer, properly packaged and postage prepaid, to a POWERSTROKE
Authorized Airless Paint Sprayer Service Center for warranty or non-warranty service. You can obtain the location of the Authorized
POWERSTROKE Service Center nearest you by contacting a service representative at One World Technologies, Inc., P.O. Box
1207, Anderson, SC 29622-1207, by calling 1-877-617-3501 or by logging onto www.powerstroketools.com.
TABLE OF CONTENTS
INTRODUCTION
WARRANTY

Page 3 — English
IMPORTANT SAFETY INSTRUCTIONS
WARNING:
SAVE THESE INSTRUCTIONS. To reduce the risks of fire
or explosion, electric shock, and the injury to persons,
read and understand all instructions included in this
manual. Be familiar with the controls and the proper
usage of the equipment.
READ ALL INSTRUCTIONS
KNOW YOUR PAINT SPRAYER. Read the operator’s
manual carefully. Learn the machine’s applications and
limitations as well as the specific potential hazards related
to this paint sprayer.
GROUNDING INSTRUCTIONS
This product must be grounded. In the event of a malfunction
or breakdown, grounding provides a path of least resistance
for electric current to reduce the risk of electric shock.
This product is equipped with an electric cord having an
equipment-grounding conductor and a grounding plug. The
plug must be plugged into a matching outlet that is properly
installed and grounded in accordance with all local codes
and ordinances.
Do not modify the plug provided. If it will not fit the outlet,
have the proper outlet installed by a qualified electrician.
WARNING:
Improper connection of the grounding plug can result in a
risk of electric shock. When repair or replacement of the
cord is required, do not connect the grounding wire to
either flat blade terminal. The wire with insulation having
an outer surface that is green with or without yellow
stripes is the grounding wire.
Check with a qualified electrician or service personnel if the
grounding instructions are not completely understood, or if
in doubt as to whether the product is properly grounded.
Repair or replace a damaged or worn cord immediately.
This product is for use on a nominal 120 V circuit and has
a grounding plug similar to the plug illustrated below. Only
connect the product to an outlet having the same configuration
as the plug. Do not use an adapter with this product.
WARNING: To reduce the risk of fire or explosion:
Do not spray flammable or combustible materials near
an open flame or sources of ignition such as cigarettes,
motors, and electrical equipment.
Use with only water-based or mineral spirit-type materials
with a minimum flash point of 140°F (60°C). Do not spray
or clean with liquids having a flash point less than 140°F
(60°C).
Paint or solvent flowing through the equipment is able to
result in static electricity. Static electricity creates a risk
of fire or explosion in the presence of paint or solvent
fumes. All parts of the spray system, including the pump,
hose assembly, pistol-grip sprayer, and objects in and
around the spray area shall be properly grounded to
protect against static discharge and sparks.
Use only conductive or grounded high-pressure airless
paint sprayer hoses specified by the manufacturer.
Verify that all containers and collection systems are
grounded to prevent static discharge.
Connect to a grounded outlet and use grounded extension
cords. Do not use a 3 to 2 adapter.
Do not use a paint or a solvent containing halogenated
hydrocarbons (a solvent containing Fluorine, Bromine,
Chlorine, or Iodine) such as methyl bromine, carbon
tetrachloride, and ethyl iodide.
Keep spray area well ventilated. Keep a good supply of
fresh air moving through the area. Keep pump assembly
in a well ventilated area.
Do not smoke in the spray area.
Do not operate light switches, engines, or similar spark
producing products in the spray area.
Keep area clean and free of paint or solvent containers,
rags, and other flammable materials.
Know the contents of the paints and solvents being
sprayed. Read all Material Safety Data Sheets (MSDS) and
container labels provided with the paints and solvents.
Follow the paint and solvent manufacturer’s safety
instructions.
Fire extinguisher equipment shall be present and working.
WARNING: To reduce the risk of skin injection:
Do not aim the nozzle at, or spray any person or animal.
Keep hands and other body parts away from the
discharge. For example, do not try to stop leaks with any
part of the body.
Always use the nozzle tip guard. Do not spray without
nozzle tip guard in place.
Only use a spray tip specified by the manufacturer.
Use caution when cleaning and changing spray tips. In
the case where the spray tip clogs while spraying, follow
the manufacturer’s instructions for turning off the unit and
relieving the pressure before removing the spray tip to clean.
GROUNDING
PIN
GFCI
RECEPTACLE

Page 4 — English
SPECIFIC SAFETY RULES
Keep guards in place and in working order. Never op-
erate the paint sprayer with any guard or cover removed.
Make sure all guards are operating properly before each
use.
To reduce the risk of injury, keep children and visitors
away. All visitors should wear safety glasses and be kept
a safe distance from work area.
Keep the area of operation clear of all persons, par-
ticularly small children, and pets.
Use right paint sprayer. Don’t force paint sprayer or
attachment to do a job it was not designed for. Don’t use
it for a purpose not intended.
Do not operate the equipment while barefoot or when
wearing sandals or similar lightweight footwear. Wear
protective footwear that will protect your feet and improve
your footing on slippery surfaces.
Exercise caution to avoid slipping or falling.
Always wear eye protection with side shields marked
to comply with ANSI Z87.1. Failure to do so could result
in fluids entering your eyes resulting in possible serious
injury.
Use only recommended accessories. The use of im-
proper accessories may cause risk of injury.
Follow the maintenance instructions specified in this
manual.
Check damaged parts. Before further use of the paint
sprayer
, a guard or other part that is damaged should be
carefully checked to determine that it will operate properly
and perform its intended function. Check for alignment
of moving parts, binding of moving parts, breakage of
parts, mounting, and any other conditions that may af-
fect its operation. A guard or other part that is damaged
must be properly repaired or replaced by an authorized
service center to avoid risk of personal injury.
Never leave paint sprayer running unattended. Turn
power off. Don’t leave paint sprayer until it comes to a
complete stop.
Follow manufacturer’s recommendations for safe
loading, unloading, transport, and storage of machine.
Be thoroughly familiar with controls. Know how to stop
the product and bleed pressure quickly.
Keep paint sprayer dry, clean, and free from oil and
grease. Always use a clean cloth when cleaning. Never
use brake fluids, gasoline, petroleum-based products, or
any solvents to clean paint sprayer.
IMPORTANT SAFETY INSTRUCTIONS
WARNING: To reduce the risk of injury:
Always wear appropriate gloves, eye protection
marked to comply with ANSI Z87.1, and a respirator
or mask when painting.
Do not operate or spray near children. Keep children
away from equipment at all times.
Do not overreach or stand on an unstable support.
Keep effective footing and balance at all times.
Stay alert and watch what you are doing.
Do not operate the unit when fatigued or under the
influence of drugs or alcohol.
Do not kink or overbend the hose.
Do not expose the hoses to temperatures or to pres-
sures in excess of those specified by the manufacturer.
Do not use the hose as a strength member to pull or
lift the equipment.
Do not leave the unit energized or under pressure while
unattended. When the unit is not in use, turn off the
unit and relieve the pressure in accordance with the
manufacturer’s instructions.
High pressure spray is able to inject toxins into the body
and cause serious bodily injury. In the event that injection
occurs, seek medical attention immediately.
Check hoses and parts for signs of damage. Replace any
damaged hoses or parts.
This system is capable of producing 2,800 psi. Only use
replacement parts or accessories that are specified by
the manufacturer and are rated a minimum of 3,200 psi.
Always engage the trigger lock when not spraying. Verify
the trigger lock is functioning properly.
Verify that all connections are secure before operating
the unit.
Know how to stop the unit and bleed pressure quickly.
Be thoroughly familiar with the controls.

Page 5 — English
SPECIFIC SAFETY RULES
Do not use paint sprayer if switch does not turn it
off. Have defective switches replaced by an authorized
service center.
Before cleaning, repairing, or inspecting, shut off the
motor, release pressure, and make certain all moving
parts have stopped.
Avoid dangerous environment. Don’t use in damp or
wet locations or expose to rain. Keep work area well
lit.
Never direct a paint stream toward people or pets,
or any electrical device.
Never start the machine if ice has formed in any part
of the equipment.
WARNING: High pressure spray can be dangerous
if subject to misuse. The spray must not be directed
at persons, animals, electrical devices, or the machine
itself.
Keep away from hot parts.
Check bolts and nuts for looseness before each use.
A loose bolt or nut may cause serious motor problems.
Before storing, allow the product to cool.
Store in a cool, well-ventilated area, safely away from
spark and/or flame-producing equipment.
When servicing use only identical replacement parts.
Use of any other parts may create a hazard or cause
product damage.
Never use the sprayer without a spray tip installed.
An injection injury can lead to possible amputation.
See a physician immediately.
Never put your hand in front of the spray tip when in
use. Gloves will not always provide protection against
an injection injury.
Wear protective clothing to keep paint off skin and
hair, along with a mask or respirator during use. Paints,
solvents, and other materials can be harmful if inhaled or
if they come into contact with the body.
Always unplug the paint sprayer, shut the unit off
and release pressure before servicing, cleaning
the tip or guard, changing the tip, or leaving unat-
tended.
Plastic can cause sparks. Never hang plastic to
enclose a spray area. Do not use plastic drop cloths
when spraying flammable materials.
Do not spray outdoors on windy days.
Do not attempt to clean or unclog the spray tip with
your finger.
Make sure your extension cord is in good condition.
When using an extension cord, be sure to use one
heavy enough to carry the current your product will
draw. A wire gauge size (A.W.G.) of at least 14 is
recommended for an extension cord 50 feet or less
in length. A cord exceeding 100 feet is not recom-
mended. If in doubt, use the next heavier gauge. The
smaller the gauge number, the heavier the cord. An un-
dersized cord will cause a drop in line voltage resulting
in loss of power and overheating.
Save these instructions. Refer to them frequently and
use them to instruct other users. If you loan someone this
paint sprayer, loan them these instructions also.

Page 6 — English
SYMBOLS
The following signal words and meanings are intended to explain the levels of risk associated with this product.
SYMBOL SIGNAL MEANING
DANGER: Indicates an imminently hazardous situation, which, if not avoided, will result
in death or serious injury.
WARNING: Indicates a potentially hazardous situation, which, if not avoided, could result
in death or serious injury.
CAUTION: Indicates a potentially hazardous situation, which, if not avoided, may result in
minor or moderate injury.
NOTICE: (Without Safety Alert Symbol) Indicates important information not related to an
injury hazard, such as a situation that may result in property damage.
Some of the following symbols may be used on this product. Please study them and learn their meaning. Proper
interpretation of these symbols will allow you to operate the product better and safer.
SYMBOL NAME DESIGNATION/EXPLANATION
Safety Alert Indicates a potential personal injury hazard.
Read Operator’s Manual To reduce the risk of injury, user must read and understand
operator’s manual before using this product.
Eye Protection Always wear eye protection with side shields marked to comply
with ANSI Z87.1.
Risk of Injection
To reduce the risk of injection or injury, never direct a fluid stream
towards people or pets or place any body part in the stream.
Leaking hoses and fittings are also capable of causing injection
injury. Do not hold hoses or fittings.
V Volts Voltage
PSI Pounds Per Square Inch Fluid Pressure
GPM Gallons Per Minute Amount fluid used per minute of continuous use.
A Amperes Current
Hz Hertz Frequency (cycles per second)
min Minutes Time
Alternating Current Type of current
n
o
No Load Speed Rotational speed, at no load
Class II Tool Double-insulated construction
.../min Per Minute Revolutions, strokes, surface speed, orbits etc., per minute

Page 7 — English
ELECTRICAL
PRODUCT SPECIFICATIONS
Flow Rate ............................................................ 0.31 GPM
Fluid Pressure ............................................... 800-3,000 PSI
Air Pressure ........................................................... 8-10 PSI
EXTENSION CORDS
Use only 3-wire extension cords that have 3-prong grounding
plugs and 3-pole receptacles that accept the product’s plug.
When using a paint sprayer at a considerable distance from
the power source, use an extension cord heavy enough to
carry the current that the product will draw. An undersized
extension cord will cause a drop in line voltage, resulting in
a loss of power and causing the motor to overheat. Use the
chart provided below to determine the minimum wire size
required in an extension cord. Only round jacketed cords
listed by Underwriter’s Laboratories (UL) should be used.
**Ampere rating (on product data plate)
0-2.0 2.1-3.4 3.5-5.0 5.1-7.0 7.1-12.0 12.1-16.0
Cord Length Wire Size (A.W.G.)
25' 16 16 16 16 14 14
50' 16 16 16 14 14 12
100' 16 16 14 12 10 —
**Used on 12 gauge - 20 amp circuit.
NOTE: AWG = American Wire Gauge
When working with the product outdoors, use an extension
cord that is designed for outside use. This is indicated by
the letters “W-A” or “W” on the cord’s jacket.
Before using an extension cord, inspect it for loose or exposed
wires and cut or worn insulation.
WARNING:
Keep the extension cord clear of the working area.
Position the cord so that it will not get caught on lumber,
paint sprayer, or other obstructions while you are working
with a paint sprayer. Failure to do so can result in serious
personal injury.
WARNING:
Check extension cords before each use. If damaged
replace immediately. Never use the product with a
damaged cord since touching the damaged area could
cause electrical shock resulting in serious injury.
ELECTRICAL CONNECTION
This product is powered by a precision-built electric motor.
It should be connected to a power supply that is 120 V, AC
only (normal household current), 60 Hz. Do not operate
this product on direct current (DC). A substantial voltage
drop will cause a loss of power and the motor will overheat.
If the product does not operate when plugged into an outlet,
double check the power supply.
FEATURES
Input ..................................120 V, AC only, 60 Hz, 15 Amps
Weight .......................................................................41 lbs.
KNOW YOUR AIRLESS PAINT SPRAYER
See Figure 1, page 17.
The safe use of this product requires an understanding of
the information on the product and in this operator’s manual
as well as a knowledge of the project you are attempting.
Before use of this product, familiarize yourself with all op-
erating features and safety rules.
3000 PSI PISTON PUMP
Maintains pressure as needed for different applications.
50 FT. HIGH PRESSURE HOSE
The 50 ft. high pressure hose allows the user to spray a larger
area without moving the paint sprayer.
BUCKET TRAY
Compatible with up to a 5-gallon container.
CONTROL PANEL
Single interface with all controls conveniently located.
DUAL-ACTION™ PISTOL-GRIP SPRAYER
The DUAL-ACTION™ pistol-grip sprayer easily switches
between airless and fine finish applications.
ELASTIC STRAP
Helps to secure the paint bucket to the body of the sprayer.
FINISH SPRAY TECHNOLOGY
The two-stage turbine delivers high volume, low pressure
(HVLP) spray for fine finish applications.

Page 8 — English
UNPACKING
This product requires assembly.
Carefully lift the product from the carton and place on a
level work surface.
WARNING:
Do not use this product if any parts on the Loose Parts
List are already assembled to your product when you
unpack it. Parts on this list are not assembled to the
product by the manufacturer and require customer instal-
lation. Use of a product that may have been improperly
assembled could result in serious personal injury.
Inspect the tool carefully to make sure no breakage or
damage occurred during shipping.
Do not discard the packing material until you have care-
fully inspected and satisfactorily operated the tool.
If any parts are damaged or missing, please call
1-877-617-3501 for assistance.
ASSEMBLY
FEATURES
FOLDING HANDLE
The handle folds down for convenient storage.
INTAKE FILTER
The intake filter keeps debris from entering the paint system.
ON-BOARD ACCESSORY STORAGE
The removable storage bag provides convenient storage
for the pistol-grip sprayer, spray tips, hose adaptor, high
pressure hose, and other accessories.
RAPID VALVE RELEASE
Dried paint or other debris can clog the check valve and
prevent the unit from priming correctly. Pressing the Rapid
Valve Release button before each start keeps paint flowing
cleanly through the check valve and allows quick and easy
start-up of the unit.
REVERSIBLE SPRAY TIPS
The unit includes two reversible spray tips that clear paint
clogs quickly.
VARIABLE PRESSURE CONTROL
Lower pressure is for priming, cleaning, and for thinner
materials and finish spraying.
Higher pressure is ideal for latex and airless spraying
applications.
LOOSE PARTS LIST
See Figure 2, page 17.
Description Qty.
5 Gallon container lid ........................................................ 1
DUAL-ACTION™ pistol-grip sprayer with
nozzle tip guard ................................................................. 1
Wheel................................................................................. 2
Axle....... ............................................................................. 2
Hitch pin ............................................................................ 2
25 Ft. air hose .................................................................... 1
50 Ft. high pressure hose .................................................. 1
311 Reversible spray tip .................................................... 1
517 Reversible spray tip .................................................... 1
Garden hose attachment ................................................... 1
Elastic strap ....................................................................... 1
Operator’s Manual (Not Shown) ........................................ 1
WARNING:
If any parts are damaged or missing do not operate this
paint sprayer until the parts are replaced. Use of this
product with damaged or missing parts could result in
serious personal injury.

Page 9 — English
ASSEMBLY
WARNING:
Do not attempt to modify this paint sprayer or create
accessories not recommended for use with this paint
sprayer. Any such alteration or modification is misuse and
could result in a hazardous condition leading to possible
serious personal injury.
WARNING:
Do not connect to power supply until assembly is com-
plete. Failure to comply could result in accidental starting
and possible serious personal injury.
TOOLS NEEDED
Adjustable wrench
INSTALLING THE WHEELS
See Figure 3, page 18.
To attach the wheels to the base:
Locate the axle.
Slip the axle through the wheel hole.
Lifting the paint sprayer slightly, slide the axle and wheel
into the wheel mounting hole in the machine base.
Push the hitch pin into the hole on the end of the axle to
secure assembly.
Repeat with the second wheel assembly.
FOLDING THE HANDLE
See Figure 4, page 18.
To raise the handle: pull the handle up until the handle
release knob snaps through the locking hole to secure
the handle in place.
To lower the handle (for storing): pull the handle release
knob on the right side of handle and lower.
WARNING:
Never use the handle to lift the paint sprayer. Failure to
heed this warning could result in serious personal injury.
CONNECTING HIGH PRESSURE HOSE/
DUAL-ACTION™ PISTOL-GRIP SPRAYER
See Figure 5, page 18.
To connect the high pressure hose to the paint sprayer:
Screw the collar of the high pressure hose onto the paint
connect outlet located on the control panel.
Tighten securely with an adjustable wrench.
To connect the DUAL-ACTION™ pistol-grip sprayer to
the high pressure hose:
Screw the collar on the high pressure hose onto the
pistol-grip sprayer by turning the hose collar clockwise.
Use an adjustable wrench to turn and tighten the nut on
the hose end and tighten securely.
INSTALLING NOZZLE TIP GUARD ON
DUAL-ACTION™ PISTOL-GRIP SPRAYER
See Figures 6 - 7, page 18.
See operator’s instructions for flushing, priming, and clean-
ing before installing a spray tip. Note all warnings regarding
use of DUAL-ACTION™ pistol-grip sprayer and the possibility
of injection.
Push the lock-off lever down to lock the sprayer trigger.
Unscrew the nozzle tip guard.
NOTE: Small parts inside the tip guard can be easily
dropped and misplaced. Always remove the nozzle tip
guard carefully.
Insert the desired reversible spray tip into the nozzle tip
guard, locking the sleeve into place.
Insert metal saddle into the nozzle tip guard. The metal
saddle should be securely seated on the reversible spray
tip.
Insert the rubber seal ridged side down onto the saddle
in the nozzle tip guard.
Thread nozzle tip guard assembly onto sprayer and tighten
securely.
Push spray tip securely into nozzle tip guard.
Keep the sprayer trigger locked when not in use.

Page 10 — English
OPERATION
WARNING:
Do not allow familiarity with this product to make you
careless. Remember that a careless fraction of a second is
sufficient to inflict serious injury.
WARNING:
Always wear eye protection with side shields marked to
comply with ANSI Z87.1. Failure to do so could result
in fluids entering your eyes resulting in possible serious
injury.
WARNING:
Do not use any attachments or accessories not recom-
mended by the manufacturer of this product. The use of
attachments or accessories not recommended can result
in serious personal injury.
ACCESSORIES
All accessories used with this product must be rated a mini-
mum of 3,200 psi. Ensure compatibility and fit before using
any accessory with this product.
WARNING:
Risk of fire or explosion − spray area must be well venti-
lated and away from spark of flames. Failure to heed this
warning could result in serious personal injury.
APPLICATIONS
You may use this product for the purposes listed below:
Exterior painting and staining of decks, outdoor furniture,
fences, siding, and interior/exterior spray-painting of
walls, cabinets, and doors.
WARNING:
To reduce the risk of injection NEVER change spray tip
without setting the lock-off on the pistol-grip sprayer and
never point sprayer at any part of the body, persons, or
unit itself. In case of skin injection, seek medical attention
immediately. Failure to heed this warning could cause
serious personal injury.
LOCKING THE DUAL-ACTION™ PISTOL-GRIP
SPRAYER
See Figure 6, page 18.
Always lock the sprayer trigger when you have stopped
spraying to prevent the sprayer from being bumped or trig-
gered accidentally and causing injection.
Push the lock-off lever down to lock the sprayer trigger.
Push the lock-off lever toward the handle to unlock the
trigger.
RELEASE PRESSURE PROCEDURE
See Figure 8, page 18.
Always follow this procedure when shutting the airless/finish
paint sprayer OFF for any reason. This procedure releases
pressure in the high pressure hose.
Push the lock-off lever down to lock the sprayer trigger.
Turn HI/OFF/FINISH switch OFF.
Turn prime/spray lever to PRIME. This releases pump
pressure.
Push the lock-off lever up to unlock the sprayer trigger
and point to inside wall of paint container releasing unused
paint or stain back into container. This releases pressure
in the hose and pistol-grip sprayer.
Push the lock-off lever down to lock the sprayer trigger.
Leave prime/spray lever in the PRIME position until ready
to spray again.
FLUSHING THE AIRLESS PAINT SPRAYER
Before using the paint sprayer for the first time or before
beginning a new project or changing colors, it is important
to thoroughly flush the paint sprayer of any storage fluid,
previous cleaning fluid, or material left in the system. Follow
instructions for Cleaning the Airless Paint Sprayer before
beginning any project.
SET UP AND PRIMING
See Figures 8 - 10, pages 18 - 19.
User must prime the unit before operating the sprayer. The
high pressure fluid hose should already be attached as de-
scribed in the Assembly section of this manual.
Place desired paint container onto the paint tray.
Secure container with elastic strap. Place 5 gallon con-
tainer lid on container.
NOTE: This unit will hold a 5 gallon or 1 gallon paint
container.
Lock the sprayer trigger.
Remove nozzle tip guard and spray tip from pistol-grip
sprayer.
Place intake tube in paint container.
Set return tube into a waste container.
Turn prime/spray lever to PRIME.
Turn variable pressure control to PRIME.
Plug in the paint sprayer.
Press and release the Rapid Valve Release button to make
sure the check valve is clear.

Page 11 — English
OPERATION
Turn HI/OFF/FINISH switch to HI.
When clean paint or stain begins to flow through return
tube, turn HI/OFF/FINISH switch OFF. set return tube
into paint container and clip to intake tube; Turn HI/OFF/
FINISH switch to HI.
Point DUAL-ACTION™ pistol-grip sprayer (without guard
and spray tip in place) into waste container.
Turn prime/spray lever to SPRAY.
Unlock sprayer trigger.
Spray into waste container until all air, water, and cleaning
fluid is expelled and only paint or stain comes out.
NOTE: When the motor stops, this indicates that the pump
and hoses are under pressure. If the motor continues to
run, re-prime by turning the prime/spray lever to PRIME.
Lock the sprayer trigger.
Turn HI/OFF/FINISH switch OFF.
Replace nozzle tip guard and reversible spray tip onto
pistol-grip sprayer.
Unit is ready to spray.
SELECTING A SPRAY TIP
See Figure 11, page 19.
Spray tips come in a variety of hole sizes and fan widths.
Your unit includes two reversible spray tips with a hole size
of .010 in. and .019 in. that will work for a wide variety of
applications. The 310 spray tip has a fan width of 6-8 in.
and is best for fine finish applications. The 619 spray tip has
a fan width of 12-14 in. and is best for airless applications.
HOLE SIZE: Spray tip hole size determines the flow rate,
which is the amount of paint that is discharged from sprayer.
A larger hole size is best for thicker materials. A smaller hole
size is best for thinner materials.
FAN SIZE: Fan width determines the size of the spray pat-
tern when sprayer is held approximately 12 in. from surface
to be painted.
A narrow fan width will provide thicker coverage of material
and is better suited for small, tight areas.
A wide fan width will give thinner coverage of material and
provide better coverage on large, broad areas.
SPRAY TIP NUMBERS: When selecting a spray tip, the last
three numbers of the spray tip number contain information
on hole size and fan width.
For example, if the spray tip number is 1415, the 4, when
doubled is the approximate fan width of paint when applied
12 inches from surface. The last two numbers, 15, refer to
the hole size in inches. In this case .015 in.
Tip
hole
size
Coatings
Light Medium Heavy
Stains Enamels Primers Interior
Paints Exterior
Paints
0.011 •
0.013 • •
0.015 • • •
0.017 • • •
0.019 • • •
0.021 •
SPRAY TIP WEAR: It is important to replace spray tips when
they become worn. A worn spray tip will cause uneven ap-
plication and finish of material. Over time the spray tip hole
size increases and the width of the fan spray decreases.
Spray tips need to be replaced after 50 to 60 gallons of use.
To increase the life of your spray tips, use the lowest pres-
sure setting needed to apply an even coating of material.
WARNING:
This is a high pressure device. To reduce the risk of injury,
user must read and understand operator’s manual. To
reduce the risk of injection do not point sprayer at any
part of the body, persons, or unit itself. In case of skin
injection, seek medical attention immediately. Failure to
heed this may cause serious personal injury.
AIRLESS SPRAYING
See Figure 12, page 19.
Ensure surface to be painted is free of dust, dirt, and
grease.
Mask or cover any areas not intended to be painted or
stained. Be aware of wind that may cause your paint or
stain to spray into areas not desired. Always use drop
cloths or other cover to protect areas that are not intended
to be painted or stained.
Select spray tip and seat securely into nozzle tip guard.
Arrow on spray tip should face direction of spray.
Lock the sprayer trigger.
Plug in the paint sprayer.
Prime unit. Follow Set Up and Priming instructions.
Turn HI/OFF/FINISH switch to HI.
Turn PRIME/SPRAY lever to SPRAY.

Page 12 — English
OPERATION
Turn variable pressure control to HIGH pressure (+). Pres-
sure can be adjusted to reach desired spray pattern and
coverage.
Unlock the sprayer trigger. Begin spraying.
NOTE: If spray tip becomes clogged, lock the sprayer
trigger, turn 180°, unlock sprayer trigger and spray into
waste container to clear clog. Return spray tip to spray
position and continue spraying.
Lock the sprayer trigger and follow Release Pressure
Procedure when finished or stopping for any reason.
PAINTING TIPS
See Figures 13 - 14, page 19.
Practice spraying on a piece of scrap material to test your
spray pattern before beginning. If you cannot get a good
spray pattern, see Troubleshooting section.
To create an even coating over the entire surface:
• Keep the pistol-grip sprayer an even distance from the
area being sprayed, about 12 inches from the nozzle
tip guard to the surface being sprayed.
• Operate the pistol-grip sprayer in straight horizontal
strokes. Do not hold the pistol-grip sprayer at an angle.
This will result in uneven coverage.
• Depress the trigger to start the spray at the beginning
of the stroke and release the trigger as you end the
stroke. To prevent material build-up, do not keep the
trigger depressed as you proceed to the next stroke.
• Make one pass for each stroke. Overlap strokes in
halves for full coverage.
When finished, return any unused paint or stain to its
original container and thoroughly clean the sprayer.
WARNING:
To reduce the risk of fire or explosion: Do not use with
flammable liquids (i.e., paint stripper, paint remover,
brush cleaner, mineral spirits, lacquer thinner, turpentine,
acetone, gasoline, kerosene, etc.). Use only water (for
water-based paints) or Klean Strip® Green Safer Paint
Thinner (for oil-based paints or varnish).
FINE FINISH SPRAYING
See Figure 15, page 19.
In finish spray mode, pressurized air is introduced into the
paint stream, resulting in a finer finish.
To use finish spray mode:
Remove the cover from the air connect outlet on the
control panel.
Attach the 25-ft. air hose to the air connect outlet. See
Connecting High Pressure Hose/DUAL-ACTION™
Pistol-Grip Sprayer.
Attach the other end of the air hose to the DUAL-ACTION™
pistol-grip sprayer. See Connecting High Pressure Hose/
DUAL-ACTION™ Pistol-Grip Sprayer.
Plug in the paint sprayer.
Prime unit. Follow Set Up and Priming instructions earlier
in this manual.
Turn HI/OFF/FINISH switch to FINISH.
Turn prime/spray lever to SPRAY.
Turn variable pressure control to the FINISH setting (-).
Pressure can be adjusted to reach desired spray pattern
and coverage.
Unlock the sprayer trigger. Begin spraying.
NOTE: If spray tip becomes clogged, lock the sprayer
trigger, turn 180°, unlock sprayer trigger, and spray into
waste container to clear clog. Return spray tip to spray
position and continue spraying.
Lock DUAL-ACTION™ the sprayer trigger and follow Re-
lease Pressure Procedure when finished or stopping for
any reason.
OVERNIGHT STORAGE (UP TO 12 HOURS)
NOTE: These instructions are for latex paint and water-based
materials only. If you are using oil-based material, refer to
Cleaning the Paint Sprayer and Long Term Storage for
instructions. Stains and oil-based materials do not keep for
any extended period of time.
Lock DUAL-ACTION™ pistol-grip sprayer and follow
Release Pressure Procedure.
Turn HI/OFF/FINISH switch OFF.
Unplug the paint sprayer.
Leave intake tube and return tube in paint.
Gently pour 1/2 cup water over top of paint to prevent
drying.
Place the 5 gallon container lid on the paint container. Wrap
damp cloth around tubes and over opening of container.
Wrap pistol-grip sprayer with damp cloth and place in
plastic bag. Seal bag.
Store for short time out of sunlight. For longer storage,
follow instructions for Cleaning the Paint Sprayer.
CLEANING THE PAINT SPRAYER
See Figures 16 - 17, page 20.
The solution used to clean the sprayer is determined by the
type of material that has been sprayed. For anything other
than latex material use Klean Strip® Green Safer Paint Thin-
ner (for oil-based paints or varnish).

Page 13 — English
OPERATION
NOTICE:
It is important to thoroughly clean paint sprayer and
pistol-grip sprayer after each use or when changing paint
color. Allowing paint or stain to remain in an idle paint
sprayer for an extended period of time may cause its
hoses to clog and its moving parts to seize.
Always use drop cloths or other cover to protect areas
from possible spills.
Lock pistol-grip sprayer and follow Release Pressure
Procedure.
Unplug the paint sprayer.
Remove the spray tip and nozzle tip guard assembly from
sprayer.
Use cleaning brush (not included) to clean material from
spray tip holes.
Soak spray tip(s) and nozzle tip guard in water (for water
based paints) or Klean Strip® Green Safer Paint Thinner
(for oil-based paints or varnish), rinse.
Fill a bucket (waste container) with water (for water based
paints) or Klean Strip® Green Safer Paint Thinner (for oil-
based paints or varnish).
NOTE: If flushing or cleaning using water for water based
materials, It may be easier to use a garden hose and the
garden hose attachment (included). Remove filter from
intake tube and attach intake tube to garden hose with
attachment.
Place intake tube into the bucket of water (for latex
materials) or Klean Strip® Green Safer Paint Thinner (for
oil-based materials).
Place return tube into waste container.
Turn PRIME/SPRAY lever to PRIME.
Turn variable pressure control to PRIME.
Turn HI/OFF/FINISH switch to HI.
The paint sprayer will draw cleaning fluid up the intake tube
through the pump and out the return tube into the waste
container. Allow the cleaning fluid to run through the system
until it runs clear.
Turn prime/spray lever to SPRAY.
Unlock pistol-grip sprayer.
Point sprayer at the interior side of waste container to flush
out the high-pressure fluid hose and pistol-grip sprayer.
NOTE: If using the garden hose adapter, turn on garden
hose and run water through system until water runs clear.
Leave system running for approximately one minute or
until cleaning fluid runs clear.
Turn PRIME/SPRAY lever to PRIME.
Turn HI/OFF/FINISH switch to HI.
Unplug the paint sprayer.
Dispose of dirty water (or Klean Strip® Green Safer Paint
Thinner) in accordance with federal, state, and local or-
dinances.
CLEANING THE PAINT SPRAYER WITH
GARDEN HOSE (FOR LATEX MATERIAL ONLY)
See Figure 17, page 20.
Remove filter from intake tube.
Attach garden hose adaptor to garden hose.
Push garden hose adaptor onto the intake tube and secure
with butterfly clamp.
Turn PRIME/SPRAY to PRIME.
Turn variable pressure control to PRIME.
Turn on garden hose.
Turn HI/OFF/FINISH to HI.
Run water through system until clear water runs out of
the return tube.
Turn PRIME/SPRAY to SPRAY.
Unlock pistol-grip sprayer.
With the nozzle tip guard assembly removed, point the
pistol-grip sprayer at the interior side of waste container
to flush out the high-pressure fluid hose and pistol-grip
sprayer.
Leave the system running until clear water runs out of
the pistol-grip sprayer.
Turn PRIME/SPRAY lever to PRIME.
Turn HI/OFF/FINISH switch to OFF.
Unplug the paint sprayer.
Dispose of dirty water (or Klean Strip® Green Safer Paint
Thinner) in accordance with federal, state, and local or-
dinances.

Page 14 — English
MAINTENANCE
WARNING:
When servicing, use only identical replacement parts.
Use of any other parts may create a hazard or cause
product damage.
WARNING:
Always wear eye protection with side shields marked to
comply with ANSI Z87.1. Failure to do so could result in
objects being thrown into your eyes resulting in possible
serious injury.
GENERAL MAINTENANCE
Avoid using solvents when cleaning plastic parts. Most
plastics are susceptible to damage from various types of
commercial solvents and may be damaged by their use. Use
clean cloths to remove dirt, dust, oil, grease, etc.
WARNING:
Do not at any time let brake fluids, gasoline, petroleum-
based products, penetrating oils, etc., come in contact
with plastic parts. Chemicals can damage, weaken or
destroy plastic which may result in serious personal injury.
LONG-TERM STORAGE
When storing the paint sprayer for 16 hours or more, a thor-
ough cleaning is recommended.
Shut down the paint sprayer using Release Pressure
Procedure.
Thoroughly clean paint sprayer and DUAL-ACTION™
pistol-grip sprayer following the instructions in Cleaning
the Sprayer earlier in this manual.
Be sure that machine and tubes are clear of any water or
fluid, as these may freeze.
Store hoses, pistol-grip sprayer, nozzle and tips in the
storage bag, if desired.
Fold handle over front of tool.
CLEANING THE DUAL-ACTION™ PISTOL-
GRIP SPRAYER FILTER
See Figure 18, page 20.
Turn off the paint sprayer and relieve pump pressure.
Check that Dual-Action™ pistol-grip sprayer trigger is
locked off.
Remove the high pressure hose from the Dual-Action™
pistol-grip sprayer.
If attached, remove the air hose from the Dual-Action™
pistol-grip sprayer.
Using an adjustable wrench, turn the nut on the intake
tube counterclockwise.
Remove filter from the intake tube, noting direction of
filter.
Thoroughly clean filter container with water (for water
based paints) or Klean Strip® Safer Green Formula Paint
Thinner (for oilbased paints or varnish).
If filter has any holes, replace with new filter. NEVER
puncture filter with any object.
NOTE: If replacing, use the following recommended filters
or equivalent: ACPC050F; ACPC100F, and ACPC150F.
Replace filter in the intake tube, tapered end down facing
back of sprayer. Sprayer will not work if filter is improperly
inserted in the intake tube.
Reassemble Dual-Action™ pistol-grip sprayer in reverse
order, tighten securely.
Reattach high pressure hose to the Dual Action™ pistol
grip sprayer, tighten securely.
CALIFORNIA PROPOSITION 65
WARNING:
This product, and the paints designed to be applied with
this product, may contain chemicals, including lead,
known to the State of California to cause cancer, birth
defects, or other reproductive harm. Wash hands after
handling.

Page 15 — English
TROUBLESHOOTING
PROBLEM CAUSE POSSIBLE SOLUTION
Motor does not run. Paint sprayer is not plugged in
HI/OFF/FINISH switch in OFF position
Paint sprayer has shut off while under
pressure
No current coming from outlet
Extension cord is damaged or has low
voltage
A fuse has blown on paint sprayer
Motor is not working properly
Make sure unit is plugged in
Turn HI/OFF/FINISH switch to HI
Turn the variable pressure control to maxi-
mum pressure or release pressure by turn-
ing PRIME/SPRAY lever to PRIME
Test the power supply voltage
Replace extension cord
Contact Authorized Service Center
Contact Authorized Service Center
Pressure is too low Variable pressure control set too low Turn variable pressure control to a higher
setting
Pump does not prime Prime/Spray valve is in Spray position
Inlet screen is clogged or intake tube is
not immersed
Inlet valve check ball is stuck
Intake tube is loose
Turn Prime/Spray lever to Prime
Clean debris off inlet screen and make sure
intake tube is at bottom of paint bucket
Press Rapid Valve Release button
Remove intake tube and place a pencil
into the inlet section to dislodge the ball,
allowing pump to prime properly.
Tighten intake tube with flat-head
screwdriver
Motor seems to be running prop-
erly but pressure drops when
pistol-grip sprayer is triggered
Reversible spray tip is worn
Spray tip is clogged
Suction tube and filter are loose or dam-
aged
Pistol-grip sprayer filter is clogged
Material being sprayed is too thick
Inlet valve is damaged or worn
Intake tube is loose
Replace spray tip
Turn spray tip 180° and spray to clean
Reinstall or replace suction tube and filter
as needed
Clean or replace pistol-grip sprayer filter
Follow material manufacturer’s directions
and thin material as needed
Replace inlet valve
Tighten intake tube

Page 16 — English
TROUBLESHOOTING
PROBLEM CAUSE POSSIBLE SOLUTION
Prime/spray lever is set to spray
but there is flow through the prime
tube
PRIME/SPRAY lever is dirty or damaged Contact Authorized Service Center
Pistol-grip sprayer leaks Internal sprayer parts are worn or dam-
aged
Contact Authorized Service Center
Nozzle tip guard leaks Nozzle tip guard or spray tip were as-
sembled improperly
Reassemble according to nozzle tip guard
and Spray tip assembly instructions
Pistol-grip sprayer will not spray Spray tip is clogged
Pistol-grip sprayer filter is clogged
Spray tip is not fully seated into nozzle
tip guard
Turn spray tip 180° and spray to clean
Clean or replace pistol-grip sprayer filter
Reassemble according to nozzle tip guard
and Spray tip assembly instructions
Paint pattern is weak or uneven Pressure is set too low
Pistol-grip sprayer or intake tube filter is
clogged
Intake tube is loose at inlet valve
Spray tip is worn
Material being sprayed is too thick
Loss of pressure
Turn variable pressure control to a higher
setting
Clean or replace filters
Tighten tube fitting
Replace spray tip
Follow material manufacturer’s directions
and thin material as needed
See Cause/Possible solutions for Pressure
setting is too low, and Motor seems to
be running properly but pressure drops
when pistol-grip is triggered
NOTE: FIGURES (ILLUSTRATIONS) START ON PAGE 17
AFTER FRENCH AND SPANISH LANGUAGE SECTIONS.

Page 2 — Français
Introduction ..................................................................................................................................................................... 2
Garantie ........................................................................................................................................................................... 2
Instructions importantes concernant la sécurité .......................................................................................................... 3-4
Règles de sécurité particulières ...................................................................................................................................4-5
Symboles ......................................................................................................................................................................... 6
Caractéristiques électriques ............................................................................................................................................ 7
Caractéristiques ...........................................................................................................................................................7-8
Assemblage .................................................................................................................................................................. 8-9
Utilisation ..................................................................................................................................................................10-13
Entretien ........................................................................................................................................................................ 14
Dépannage ...............................................................................................................................................................15-16
Figure numéros (illustrations) .................................................................................................................................... 17-20
Commande de pièces / réparation .................................................................................................................Page arrière
Ce produit offre de nombreuses fonctions destinées à rendre son utilisation plus plaisante et satisfaisante. Lors de la
conception de ce produit, l’accent a été mis sur la sécurité, les performances et la fiabilité, afin d’en faire un outil facile à
utiliser et à entretenir.
PULVÉRISATEURS À PEINTURE SANS AIR POWERSTROKE — GARANTIE LIMITÉE DE DEUX ANS
Le pulvérisateur à peinture sans air de POWERSTROKE est garanti à l’acheteur d’origine être exempt de vice du matériau et de
fabrication. Sous réserve de certaines attentes, POWERSTROKE réparera ou remplacera la pièce du pulvérisateur à peinture sans air de
POWERSTROKE qui est défectueuse à cause du matériau ou de la fabrication pour une période de deux (2) ans après la date d’achat.
Le retour du produit et une copie de la preuve d’achat à un centre de services autorisé à réparer les pulvérisateurs à peinture sans air
de POWERSTROKE (« Centre de services autorisé pour les pulvérisateurs à peinture sans air de POWERSTROKE »), dont les frais de
transport ont été prépayés et assurés, sont nécessaire pour que cette garantie soit appliquée. Cette garantie ne s’applique pas aux
dommages causés par la tentative de réparations par quiconque autre qu’un centre de services autorisé pour les pulvérisateurs à peinture
sans air de POWERSTROKE, la mauvaise utilisation, les modifications, l’abus, l’usure normale, le manque d’entretien ou les accidents.
Il n’est pas nécessaire d’enregistrer la garantie pour profiter de la garantie applicable sur un pulvérisateur à peinture sans air de
POWERSTROKE. Toutefois, une preuve d’achat sous forme de facture ou d’autre information considérée acceptable par POWERSTROKE
est requise. On utilise la date de fabrication du produit pour déterminer la période de garantie si aucune preuve d’achat n’est fournie au
moment où le client fait une demande en vertu de la garantie.
L’ACCEPTATION DES RECOURS CONCERNANT LES RÉPARATIONS ET LE REMPLACEMENT DÉCRITS DANS LA PRÉSENTE EST
UNE CONDITION DU CONTRAT POUR L’ACHAT DE CHAQUE PRODUIT POWERSTROKE. SI VOUS N’ÊTES PAS D’ACCORD AVEC
CES CONDITIONS, VOUS NE DEVRIEZ PAS ACHETER CE PRODUIT. POWERSTROKE N’EST EN AUCUN CAS RESPONSABLE DE
TOUS DOMMAGES ACCIDENTELS, SPÉCIAUX, CORRÉLATIFS OU PUNITIFS, OU DE TOUS FRAIS, FRAIS D’AVOCATS, DÉPENSES,
PERTES OU DÉLAIS FIXÉS ALLÉGUÉ ÊTRE UNE CONSÉQUENCE DE TOUT DOMMAGE OU DÉFAUT D’UN PRODUIT, COMPRENANT
NOTAMMENT UNE RÉCLAMATION POUR PERTE DE PROFITS. CERTAINS ÉTATS NE PERMETTENT PAS L’EXCLUSION OU LA
RESTRICTION DES DOMMAGES ACCIDENTELS OU CORRÉLATIFS, LA RESTRICTION OU L’EXCLUSION CI-DESSUS NE S’APPLIQUE
DONC PEUT-ÊTRE PAS À VOUS. CETTE GARANTIE EST EXCLUSIVE ET REMPLACE TOUTES LES AUTRES GARANTIES EXPLICITES,
ÉCRITES OU ORALES. DANS LES LIMITES AUTORISÉES PAR LES LOIS, POWERSTROKE RENONCE À TOUTE AUTRE GARANTIE
IMPLICITE, Y COMPRIS, SANS RESTRICTIONS, TOUTES LES GARANTIES IMPLICITES DE COMMERCIALITÉ OU DE CONVENANCE
POUR UNE UTILISATION OU UN BUT EN PARTICULIER; DANS LA LIMITE OÙ UNE TELLE RESTRICTION N’EST PAS PERMISE PAR
LA LOI, UNE TELLE GARANTIE IMPLICITE EST RESTREINTE À LA PÉRIODE D’APPLICABILITÉ DE LA GARANTIE EXPLICITE DÉCRITE
CI-DESSUS. CERTAINS ÉTATS NE PERMETTENT PAS DE RESTRICTIONS SUR LA DURÉE DE L’APPLICATION D’UNE GARANTIE
IMPLICITE, LA RESTRICTION CI-DESSUS NE S’APPLIQUE DONC PEUT-ÊTRE PAS À VOUS. CETTE GARANTIE VOUS DONNE DES
DROITS SPÉCIFIQUES ET VOUS POUVEZ AUSSI AVOIR D’AUTRES DROITS QUI CHANGENT D’UN ÉTAT À L’AUTRE.
Cettre garantie s’applique aux produits vendus aux États-Unis, au Canada et au Mexique seulement.
POUR OBTENIR UN SERVICE : Retrounez votre pulvérisateur à peinture sans air de POWERSTROKE, emballé correctement et avec
les frais de poste prépayés, à un centre de service pour les pulvérisateurs à peinture sans air de POWERSTROKE pour des services en
vertu ou non de la garantie. Vous pouvez trouver le site du centre de services autorisé de POWERSTROKE le plus près de chez vous
en contactant un représentant chez One World Technologies inc. P.O. Box 1207, Anderson, SC 29622-1207, en téléphonant au 1-877-
617-3501 ou en visitant le www.powerstroketools.com
TABLE DES MATIÈRES
INTRODUCTION
GARANTIE

Page 3 — Français
INSTRUCTIONS IMPORTANTES CONCERNANT LA SÉCURITÉ
AVERTISSEMENT :
CONSERVER CES INSTRUCTIONS. Pour réduire les
risques d’incendie ou d’explosion, choc électrique, et la
blessure aux personnes lire et veiller à bien comprendre
toutes instructions incluses le manuel. Familarisez-vous
avec toutes les commandes et l’utilisation correcte de
l’équipement.
LIRE TOUTES LES INSTRUCTIONS
APPRENDRE À PULVÉRISATEUR À PEINTURE. Lire
attentivement le manuel d’utilisation. Apprendre les
applications et les limites de pulvérisateur à peinture,
ainsi que les risques spécifiques relatifs à son utilisation.
INSTRUCTIONS DE MISE À LA TERRE
Ce produit doit être fondé. En cas de problème de
fonctionnement ou de panne, la mise à la terre fournit un
chemin de résistance au courant électrique, pour réduire
le risque de choc électrique. Cet produit est équipé d’un
cordon électrique avec conducteur et fiche de mise à la
terre. Le cordon doit être branché sur une prise correctement
installée et mise à la terre conformément à tous les codes
et réglementations locaux en vigueur.
Ne pas modifier la fiche fournie. Si elle ne peut pas être insérée
dans la prise secteur, faire installer une prise adéquate par
un électricien qualifié.
AVERTISSEMENT :
L’usage d’un cordon prolongateur incorrect peut
présenter des risques de choc électrique. Si le cordon ou
la fiche doit être réparé ou remplacé, ne pas connecter
le fil de terre de l’outil sur une borne sous tension.Le fil à
gaine verte, avec ou sans traceur jaune est le fil de terre.
Consulter un électricien qualifié ou le personnel de service si
les instructions de mise à la terre ne sont pas bien comprises,
ou en cas de doute au sujet de la mise à la terre.
Tout cordon endommagé doit être réparé ou remplacé
immédiatement.
Ce produit est pour l’usage sur un nominal 120 circuit de
volt et a un fonder bouche similaire au bouchon illustré au
dessous. Seulement connecter le produit à une sortie ayant
la même configuration comme le bouchon. Ne pas utiliser
un adaptateur avec ce produit.
AVERTISSEMENT : Pour réduire les risques d’incendie ou
d’explosion :
Ne pas pulvériser de substances inflammables ou
combustibles à proximité des flammes vives ou des
sources d’inflammation comme les cigarettes, les
moteurs et l’équipement électrique.
Dans le cas des unités uniquement compatibles avec des
substances à base d’eau ou avec des essences minérale
ayant un point d’éclair de 60 °C (140 °F), ne pulvériser
aucun liquide ayant un point d’éclair inférieur à 60 °C (140
°F) et n’effectuer aucune opération de nettoyage avec ce
type de liquide.
La peinture ou le solvant qui circule dans l’équipement
peut créer de l’électricité statique. L’électricité statique
crée un risque d’incendie ou d’explosion en présence de
vapeurs de peinture ou de solvant. Toutes les pièces du
système de pulvérisation, y compris la pompe, le tuyau,
le pulvérisateur ainsi que les objets se trouvant dans
la zone de pulvérisation ou autour de celle-ci, doivent
être correctement mises à la terre afin d’assurer une
protection contre les décharges statiques et les étincelles.
Utiliser uniquement les tuyaux flexibles haute pression
conducteurs ou mis à la terre pour pulvérisateur de
peinture sans air recommandés par le fabricant
S’assurer que tous les contenants et les systèmes de
captage sont mis à la terre afin d’empêcher les décharges
statiques.
Brancher l’outil dans une prise de courant mise à la terre
et utiliser des cordons prolongateurs avec mise à la terre.
Ne pas utiliser un adaptateur 3 voies vers 2 voies.
Ne pas utiliser une peinture ou un solvant qui contient
des hydrocarbures halogénés (un solvant qui contient
du fluor, du brome, du chlore ou de l’iode), notamment
le bromométhane, le tétrachlorure de carbone et l’iodure
d’éthyle.
L’aire de pulvérisation doit être bien ventilée. S’assurer
que le lieu de travail comprend une bonne alimentation
en air frais. Garder l’ensemble de pompe dans un endroit
bien ventilé. Ne pas pulvériser la pompe elle-même.
Ne pas fumer à proximité du l’aire de pulvérisation.
Ne pas faire fonctionner les interrupteurs d’éclairage, les
moteurs ou d’autres dispositifs produisant des étincelles
à proximité du l’aire de pulvérisation.
Garder le lieu de travail propre et exempt de contenants
de peinture ou de solvant, de chiffons et d’autres
matériaux inflammables.
Bien connaître le contenu des peintures et des solvants
qui sont pulvérisés. Lire toutes les fiches signalétiques et
les étiquettes du contenant fournies avec les peintures
et les solvants. Suivre les instructions de sécurité du
fabricant concernant les peintures et les solvants.
BROCHE
DE TERRE
PRISE DU
DISJONCTEUR
DE FUITE
À LA TERRE

Page 4 — Français
RÈGLES DE SÉCURITÉ PARTICULIÈRES
Maintenir tous les dispositifs de protection en place
et en bon état de fonctionnement. Ne jamais utiliser
pulvérisateur à peinture avec des couvercles ou dispositifs
de protection retirés. S’assurer que tous les dispositifs
de protection fonctionnent correctement avant chaque
utilisation.
Pour réduire les risques de blessures, garder les enfants
et visiteurs à l’écart. Tous les visiteurs doivent porter des
lunettes de sécurité et se tenir à bonne distance de la
zone de travail.
Ne laisser personne approcher la zone de travail,
particulièrement les petits enfants et les animaux
domestiques.
Utiliser pulvérisateur à peinture approprié. Ne pas
utiliser pulvérisateur à peinture ou un accessoire pour
effectuer un travail pour lequel il n’est pas conçu. Ne ne
pas utiliser l’outil pour une application non prévue.
Ne pas faire fonctionner l’équipement pied-nu ou
en portant des sandales ou des chaussures légères
similaires. Porter des chaussures de sécurité protégeant
les pieds et améliorant l’équilibre sur des surfaces
glissantes.
Faire preuve de prudence pour éviter de glisser ou
tomber.
Toujours porter une protection oculaire avec écrans
latéraux certifiée conforme à la norme ANSI Z87.1.
Le non respect de cette règle peut faire en sorte que
des liquides soient projetés dans vos yeux, ce qui peut
entraîner des blessures graves.
INSTRUCTIONS IMPORTANTES CONCERNANT LA SÉCURITÉ
Toujours enclencher le verrou de la gâchette lorsqu’aucune
opération de pulvérisation n’est requise. S’assurer que le
verrou de la gâchette fonctionne correctement.
S’assurer que tous les raccords sont solides avant
d’utiliser cette unité.
Savoir comment arrêter rapidement l’unité. Se familiariser
avec toutes les commandes.
AVERTISSEMENT : Pour réduire les risques de blessure :
Toujours porter une protection oculaire certifiée con-
forme à la norme ANSI Z87.1, ainsi qu’un appareil
respiratoire ou un masque approprié au moment de
peinturer.
Ne pas utiliser ou pulvériser le produit à proximité des
enfants. Garder les enfants à l’écart de l’équipement
en tout temps.
Ne pas travailler hors de portée ou se tenir sur un
support instable. Se tenir bien campé et en équilibre
en tout temps.
Rester attentif et prêter attention au travail.
Ne pas utiliser cet appareil en cas de fatigue ou sous
l’influence de l’alcool ou de drogues.
Ne pas entortiller ou courber excessivement le tuyau
flexible.
Ne pas exposer le tuyau flexible à des températures ou
à des pressions qui dépassent celles recommandées
par le fabricant.
Ne pas utiliser le tuyau flexible comme élément de
renforcement pour tirer ou soulever l’équipement.
Si le tuyau haute pression est endommagé, le rem-
placer uniquement par un tuyau de rechange identique.
On doit retrouver un extincteur sur le lieu de travail et
celui-ci doit fonctionner.
AVERTISSEMENT : Pour réduire les risques d’injection:
Ne pas orienter la buse ou pulvériser en direction des
personnes ou des animaux.
Garder les mains et les autres parties du corps à l’écart
de la décharge. Par exemple, ne pas tenter de bloquer
une fuite avec une partie du corps.
Toujours utiliser le protecteur d’embout. Ne pas utiliser
l’outil si le protecteur d’embout n’est pas en place.
Utiliser seulement un embout de pulvérisation recommandé
par le fabricant.
Faire preuve de prudence au moment de nettoyer et de
changer les embouts de pulvérisation. Si l’embout de
pulvérisation s’encrasse pendant l’opération, suivre les
instructions du fabricant pour éteindre l’unité et relâcher
la pression avant de retirer l’embout pour le nettoyer.
Ne pas laisser l’unité sans surveillance lorsque celle-ci
est en marche ou sous pression. Lorsque l’unité n’est pas
utilisée, l’éteindre et relâcher la pression conformément
aux instructions du fabricant.
Le pulvérisateur haute pression peut injecter des
substances toxiques dans le corps et entraîner des
blessures graves. Au cas où ce genre d’injection
surviendrait, consulter immédiatement un médecin.
Vérifier les tuyaux flexibles et les pièces afin de s’assurer
qu’ils ne sont pas endommagés. Remplacer tout tuyau
flexible endommagé ou toute pièce endommagée.
Ce système peut produire une pression de 19 305,32 kPa
(2 800 psi). Utiliser uniquement des pièces de remplacement
ou des accessoires recommandés par le fabricant et
qui tolèrent une pression nominale de 22 063,22 kPa
(3 200 psi).

Page 5 — Français
RÈGLES DE SÉCURITÉ PARTICULIÈRES
N’utiliser que les accessoires recommandés. L’emploi
de tout accessoire inadapté peut présenter un risque de
blessure.
Suivre les instructions d’entretien spécifiées dans ce
manuel.
Vérifier l’état des pièces. Avant d’utiliser pulvérisateur à
peinturede nouveau examiner soigneusement les pièces
et dispositifs de protection qui semblent endommagés
afin de déterminer s’ils fonctionnent correctement et s’ils
remplissent les fonctions prévues. Vérifier l’alignement
des pièces mobiles, s’assurer qu’aucune pièce n’est
bloquée ou cassée, vérifier la fixation de chaque pièce et
s’assurer qu’aucun autre problème ne risque d’affecter le
bon fonctionnement de l’outil. Pour éviter les risques de
blessures, toute protection ou pièce endommagée doit
être correctement réparée ou remplacée dans un centre
de réparations agréé.
Ne jamais laisser un pulvérisateur à peinture en
fonctionnement sans surveillance. Ne pas s’éloigner
de l’outil avant qu’il soit parvenu à un arrêt complet.
Suivre les recommandations du fabricant pour
charger, décharger, transporter et entreposer l’unité
en toute sécurité.
Se familiariser complètement avec les commandes.
Veiller à savoir arrêter la machine et relâcher la pression
rapidement.
Garder pulvérisateur à peinture sec, propre et exempt
d’huile ou de graisse.Toujours utiliser un chiffon propre
pour le nettoyage. Ne jamais utiliser de liquide de freins,
d’essence ou de produits à base de pétrole pour nettoyer
pulvérisateur à peinture.
Ne pas utiliser pulvérisateur à peinture si le
commutateur ne permet pas de l’arrêter. Faire
remplacer les commutateurs défectueux dans un centre
de réparations agréé.
Avant de nettoyer, réparer ou inspecter, couper le
moteur, relâcher la pression et vérifier que toutes les
pièces en mouvement sont arrêtées.
Éviter les environnements dangereux. Ne pas utiliser
dans des endroits mouillés ou humides, ne pas exposer
à la pluie. Garder le lieu de travail bien éclairé.
Ne jamais diriger un jet de peinture vers des
personnes, des animaux et des appareils électriques.
Ne jamais mettre la machine en marche si de la glace
s’est formée sur quelque partie que ce soit.
AVERTISSEMENT : Les pulvérisateur à haute
pression peuvent être dangereux s’ils sont utilisés
incorrectement. Le pulvérisateur ne doit pas être dirigé
vers des personnes, animaux, dispositifs électriques ou
l’équipement lui-même.
Rester à l’écart des pièces brûlantes.
Vérifier le serrage de la boulonnerie avant chaque
utilisation. Un boulon ou écrou desserré peut causer de
sérieux problèmes de moteur.
Laisser le produit refroidir avant de remiser l’outil.
Remiser dans un endroit frais, bien aéré, à l’écart
d’étincelle et/ou d’appareils produisant des flammes.
Utiliser exclusivement des pièces identiques à celles
d’origine pour les réparations. L’usage de toute
autre pièce pourrait créer une situation dangereuse ou
endommager l’outil.
Ne pas utiliser l’outil si l’embout de pulvérisation n’est
pas en place.
Les conséquences d’une blessure par injection peu-
vent aller jusqu’à l’amputation. Consulter immédiate-
ment un médecin.
Ne jamais mettre les mains devant l’embout de pul-
vérisation pendant l’utilisation. Le fait de porter des
gants ne protège pas toujours l’utilisateur des blessures
par injection.
Porter des vêtements protégeant la peau et les
cheveux de la peinture, ainsi qu’un masque ou un
respirateur pendant l’utilisation. Les peintures, les
solvants et les autres substances peuvent être dangereux
s’ils sont inhalés ou s’ils entrent en contact avec le corps.
Toujours débrancher le pulvérisateur, éteindre l’unité
et relâcher la pression avant de procéder à l’entretien
ou au nettoyage de l’embout ou du dispositif de
protection de l’embout, de changer d’embout, ou de
laisser l’unité sans surveillance.
Le plastique peut provoquer des étincelles. Ne jamais
suspendre du plastique pour clôturer une aire de pul-
vérisation. Ne pas utiliser de toiles de peintre en plastique
au moment de pulvériser des substances inflammables.
Ne pas pulvériser à l’extérieur lors de journées ven-
teuses.
Ne pas tenter de nettoyer ou de décrasser l’embout
de pulvérisation avec son doigt.
S’assurer que le cordon prolongateur est en bon état.
Si un cordon prolongateur est utilisé, s’assurer que
sa capacité est suffisante pour supporter le courant
de fonctionnement de l’outil. Un calibre de fil (A.W.G)
d’au minimum 14 est recommandé pour un cordon
prolongateur de 15 m (50 pi) ou moins. L’usage d’un
cordon de plus de 30 m (100 pi) est déconseillé. En cas
de doute, utiliser un cordon du calibre immédiatement
supérieur. Moins le numéro de calibre est élevé, plus
la capacité du fil est grande. Un cordon de capacité
insuffisante causerait une baisse de la tension de ligne,
entraînant une perte de puissance et une surchauffe.
Conserver ces instructions. Les consulter fréquemment
et les utiliser pour instruire d’autres utilisateurs. Si cet
pulvérisateur à peinture est prêté, il doit être accompagné
de ces instructions.
La page est en cours de chargement...
La page est en cours de chargement...
La page est en cours de chargement...
La page est en cours de chargement...
La page est en cours de chargement...
La page est en cours de chargement...
La page est en cours de chargement...
La page est en cours de chargement...
La page est en cours de chargement...
La page est en cours de chargement...
La page est en cours de chargement...
La page est en cours de chargement...
La page est en cours de chargement...
La page est en cours de chargement...
La page est en cours de chargement...
La page est en cours de chargement...
La page est en cours de chargement...
La page est en cours de chargement...
La page est en cours de chargement...
La page est en cours de chargement...
La page est en cours de chargement...
La page est en cours de chargement...
La page est en cours de chargement...
La page est en cours de chargement...
La page est en cours de chargement...
La page est en cours de chargement...
La page est en cours de chargement...
La page est en cours de chargement...
La page est en cours de chargement...
La page est en cours de chargement...
La page est en cours de chargement...
La page est en cours de chargement...
-
 1
1
-
 2
2
-
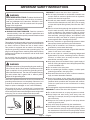 3
3
-
 4
4
-
 5
5
-
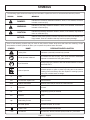 6
6
-
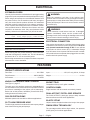 7
7
-
 8
8
-
 9
9
-
 10
10
-
 11
11
-
 12
12
-
 13
13
-
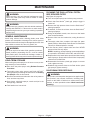 14
14
-
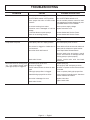 15
15
-
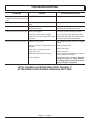 16
16
-
 17
17
-
 18
18
-
 19
19
-
 20
20
-
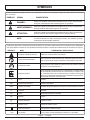 21
21
-
 22
22
-
 23
23
-
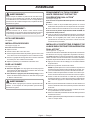 24
24
-
 25
25
-
 26
26
-
 27
27
-
 28
28
-
 29
29
-
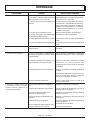 30
30
-
 31
31
-
 32
32
-
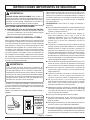 33
33
-
 34
34
-
 35
35
-
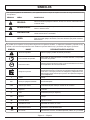 36
36
-
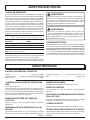 37
37
-
 38
38
-
 39
39
-
 40
40
-
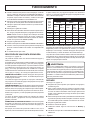 41
41
-
 42
42
-
 43
43
-
 44
44
-
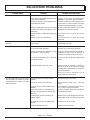 45
45
-
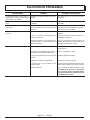 46
46
-
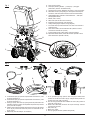 47
47
-
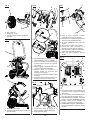 48
48
-
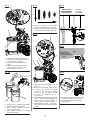 49
49
-
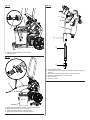 50
50
-
 51
51
-
 52
52


PowerStroke PSL1PS21 Le manuel du propriétaire
- Taper
- Le manuel du propriétaire
dans d''autres langues
Documents connexes
Autres documents
-
Milwaukee M4910-20 Manuel utilisateur
-
Ryobi RAP200 Manuel utilisateur
-
Titan Epic 660ex Le manuel du propriétaire
-
Campbell Hausfeld EZ5000 Series Manuel utilisateur
-
-
-
-
-
-