Epson WorkForce Pro WP-4540 Guide de démarrage rapide
- Catégorie
- Imprimer
- Taper
- Guide de démarrage rapide

1
WorkForce
®
Pro WP-4540
Quick Guide
Your WorkForce Pro WP-4540 . . . . . . . . . . . . . . . . . . . . . . . . . . . . . . . . . . . . . 2
Using Special Papers . . . . . . . . . . . . . . . . . . . . . . . . . . . . . . . . . . . . . . . . . . . . 3
Placing Originals for Copying, Scanning, or Faxing. . . . . . . . . . . . . . . . . . . . . . 5
Printing . . . . . . . . . . . . . . . . . . . . . . . . . . . . . . . . . . . . . . . . . . . . . . . . . . . . . . . 7
Faxing a Document. . . . . . . . . . . . . . . . . . . . . . . . . . . . . . . . . . . . . . . . . . . . . 10
Scanning a Document or Photo . . . . . . . . . . . . . . . . . . . . . . . . . . . . . . . . . . . 15
Maintaining Your Product . . . . . . . . . . . . . . . . . . . . . . . . . . . . . . . . . . . . . . . . 18
Solving Problems . . . . . . . . . . . . . . . . . . . . . . . . . . . . . . . . . . . . . . . . . . . . . . 23
Notices . . . . . . . . . . . . . . . . . . . . . . . . . . . . . . . . . . . . . . . . . . . . . . . . . . . . . . 29
Guide rapide
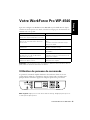
Votre WorkForce Pro WP-4540 . . . . . . . . . . . . . . . . . . . . . . . . . . . . . . . . . . . 37
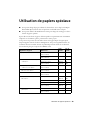
Utilisation de papiers spéciaux . . . . . . . . . . . . . . . . . . . . . . . . . . . . . . . . . . . . 39
Positionnement des originaux pour copier, numériser ou télécopier . . . . . . . 41
Impression . . . . . . . . . . . . . . . . . . . . . . . . . . . . . . . . . . . . . . . . . . . . . . . . . . . 44
Numérisation d’un document ou d’une photo . . . . . . . . . . . . . . . . . . . . . . . . 48
Télécopie d’un document . . . . . . . . . . . . . . . . . . . . . . . . . . . . . . . . . . . . . . . . 52
Entretien de votre produit. . . . . . . . . . . . . . . . . . . . . . . . . . . . . . . . . . . . . . . . 57
Résolution des problèmes . . . . . . . . . . . . . . . . . . . . . . . . . . . . . . . . . . . . . . . 63
Avis. . . . . . . . . . . . . . . . . . . . . . . . . . . . . . . . . . . . . . . . . . . . . . . . . . . . . . . . . 71

2
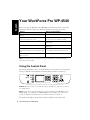
Your WorkForce Pro WP-4540
Your WorkForce Pro WP-4540
After you set up your WorkForce
®
Pro WP-4540 (see the Start Here sheet), turn to this
Quick Guide and your online User’s Guide for instructions on using your product.
Note: Your product may look different from the illustrations in this guide, but the
instructions are the same.
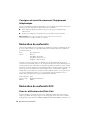
Using the Control Panel
The control panel makes it easy to use all the features of your product. To save energy, the
screen goes dark after several minutes of inactivity. Press any button to wake it up.
Caution: Press the touch screen with the tip of your finger. Do not press too hard or
use sharp objects.
Note: To turn off the “beep” heard when you press a button, press F
Setup
, select
Printer Setup
, select
Sound
, select
Button Press
, and select
Off
. If you turn off the
sound, the dialing sound made when you transmit a fax is also turned off.
The touch screen displays only the buttons that are available for the current task.
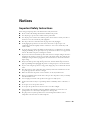
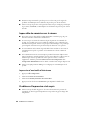
Features Where to find information
World’s fastest print speeds, including 2-sided
printing
See this Quick Guide for instructions.
Copy, scan, and fax from the easy-to-use
control panel with touch screen
See this Quick Guide for the basics.
See the online User’s Guide for details.
Easy networking—Wi-Fi and Ethernet
®
See the Start Here sheet and the online
User’s Guide.
Extra large ink cartridges See this Quick Guide for installation
instructions.
Advanced paper handling with two 250-sheet
cassettes and 80-sheet rear multipurpose (MP)
tray
See the Start Here sheet and the online
User’s Guide for paper loading instructions.
Wireless printing from mobile devices with
Epson Connect
See www.epson.com/connect.
English

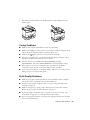
Using Special Papers
3
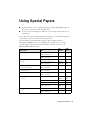
Using Special Papers
■
You can load letter-, A4-, or legal-size plain paper (or Epson Bright White paper) in
the cassettes, as described on the Start Here sheet.
■
You can use the rear multipurpose (MP) tray to load envelopes and various sizes of
special papers.
Epson offers a wide array of high quality papers, making it easy to maximize the impact of
your documents, photos, presentations, and other projects.
You can purchase genuine Epson ink and paper at Epson Supplies Central
®
at
www.epson.com/ink3 (U.S. sales) or www.epson.ca (Canadian sales). You can also
purchase supplies from an Epson authorized reseller. To find the nearest one, call
800-GO-EPSON (800-463-7766).
Paper name Size
Part
number
Sheet
count
Epson Presentation Paper Matte Letter (8.5 × 11 inches
[216 × 279 mm])
S041062 100
Legal (8.5 × 14 inches
[216 × 356 mm])
S041067 100
Epson Premium Presentation Paper
Matte
8 × 10 inches (203 × 254 mm) S041467 50
Letter (8.5 × 11 inches
[216 × 279 mm])
S041257
S042180
50
100
Epson Premium Presentation Paper
Matte Double-sided
Letter (8.5 × 11 inches
[216 × 279 mm])
S041568 50
Epson Brochure & Flyer Paper Matte
Double-sided
Letter (8.5 × 11 inches
[216 × 279 mm])
S042384 150
Epson Bright White Paper Letter (8.5 × 11 inches
[216 × 279 mm])
S041586 500
Epson Ultra Premium Photo Paper
Glossy
4 × 6 inches (102 × 152 mm) S042181
S042174
60
100
5 × 7 inches (127 × 178 mm) S041945 20
8 × 10 inches (203 × 254 mm) S041946 20
Letter (8.5 × 11 inches
[216 × 279 mm])
S042182
S042175
25
50
Epson Premium Photo Paper Semi-
gloss
4 × 6 inches (102 × 152 mm) S041982 40
Letter (8.5 × 11 inches
[216 × 279 mm])
S041331 20

4
Using Special Papers
Note: Media availability varies by country.
For detailed paper loading instructions, see the online User’s Guide.
For best results:
■
Fan and align the edges of the paper before loading.
■
Do not use paper with binder holes, except in the rear multipurpose (MP) tray.
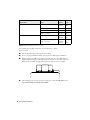
■
When using the rear MP tray, load paper printable side up; it is usually whiter or
brighter. Always load paper and envelopes short edge first, at the center of the tray.
Then squeeze and slide the edge guides against the paper, but not too tightly.
■
After loading paper, set the paper size for each paper source. Press F
Setup
, then
select
Printer Setup
and
Paper Size Loaded
.
Epson Premium Photo Paper Glossy 4 × 6 inches (102 × 152 mm) S041808
S041727
40
100
5 × 7 inches (127 × 178 mm) S041464 20
8 × 10 inches (203 × 254 mm) S041465 20
Letter (8.5 × 11 inches
[216 × 279 mm])
S042183
S041667
25
50
Epson Photo Paper Glossy 4 × 6 inches (102 × 152 mm) S041809
S042038
50
100
Letter (8.5 × 11 inches
[216 × 279 mm])
S041141
S041649
S041271
20
50
100
Paper name Size
Part
number
Sheet
count

Placing Originals for Copying, Scanning, or Faxing
5
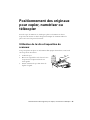
Placing Originals for Copying,
Scanning, or Faxing
Before you copy, scan, or fax, place your documents on the scanner glass or in the
Automatic Document Feeder (ADF). Place photos on the scanner glass.
Using the Scanner Glass
You can place a photo or a document up to letter-size (or A4-size) on the scanner glass.
1. Open the document cover.
2. Place your original face down on the scanner
glass, with the top against the back left corner.
3. Close the cover gently to keep your original in
place.
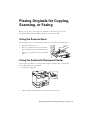
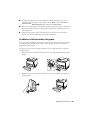
Using the Automatic Document Feeder
You can place up to 30 letter- or A4-size sheets (single- or double-sided), or 10 legal-size
sheets (single-sided only), in the ADF.
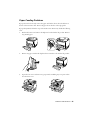
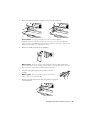
1. Slide out the edge guide.
2. Fan the originals, then tap them on a flat surface to even the edges.

6
Using the Automatic Document Feeder
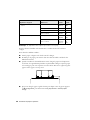
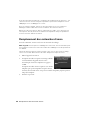
3. Insert the originals face up, top edge first. The
ADF
icon appears on the screen.
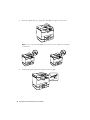
Note: If you’re using the 2-up Copy layout, make sure the originals are loaded as
shown below.
4. Slide the edge guide against the originals, but not too tight.

Printing
7
Printing
This section describes the basic steps for printing from a Windows
®
or Mac
®
computer.
For detailed instructions on printing, see the online User’s Guide.
Before you start, make sure you have installed your printer software and connected your
product to your computer, as described on the Start Here sheet.
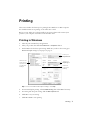
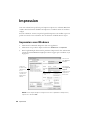
Printing in Windows
1. Select the print command in your application.
2. Select your product, then click the
Preferences
or
Properties
button.
3. On the Main tab, select basic print settings. Make sure you choose the correct paper
Source
and
Type
setting for your paper (see page 9).
Tip: For more information about print settings, click Help.
4. For automatic duplex printing, select
2-Sided Printing
, then select
Auto
if necessary.
5. For resizing and other print settings, click the
More Options
tab.
6. Click
OK
to save your settings.
7. Click
OK
or
Print
to start printing.
Select your
Paper Source
Click here
for 2-sided
printing
Click here for
quick access
to presets for
your favorite
settings
Select your
Paper Type

8
Printing With a Mac
Printing With a Mac
Follow the steps below to print from Mac OS
®
X 10.5 to 10.6.
Note: If you’re printing from Mac OS X 10.4, see your online User’s Guide for
instructions.
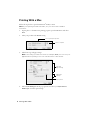
1. Open a photo or document in a printing program, open the
File
menu, and select
Print
.
2. Select your product as the
Printer
setting.
3. Select basic copy and page settings.
Note: If the setting you want isn’t shown (for example, Scale), check for it in your
application before printing or check for it at the bottom of this window.
4. Choose
Print Settings
from the pop-up menu, and select your
Paper Source
,
Media Type
, and other print settings.
Click to expand
Select your Epson product
Copy and
page settings
Application
settings
Pop-up menu

Selecting the Correct Paper Type
9
5. For automatic duplex printing, choose
Two-sided Printing Settings
from the pop-
up menu, and select the binding option you want.
6. Choose any other printing options you may need from the pop-up menu. See the
online User’s Guide for details, or click
?
when it appears on the screen.
7. Click
Print
.
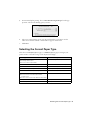
Selecting the Correct Paper Type
Select the correct
Paper
Type
(see page 7) or
Media Type
(see page 8) setting in your
printer software so the ink coverage can be adjusted accordingly.
For this paper/media Select this setting
Plain paper
Epson Bright White Paper
Epson Presentation Paper Matte
Plain Paper/Bright White Paper
Epson Ultra Premium Photo Paper Glossy Ultra Premium Photo Paper Glossy
Epson Premium Photo Paper Glossy Premium Photo Paper Glossy
Epson Photo Paper Glossy Photo Paper Glossy
Epson Premium Photo Paper Semi-gloss Premium Photo Paper Semi-Gloss
Epson Premium Presentation Paper Matte
Epson Premium Presentation Paper Matte
Double-sided
Epson Brochure & Flyer Paper Matte Double-sided
Premium Presentation Paper Matte
Envelopes Envelope
Card stock up to 68 lb Thick-Paper

10
Faxing a Document
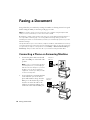
Faxing a Document
Your product lets you send faxes by entering fax numbers or selecting entries from a speed
dial list. Using the ADF, you can fax up to 30 pages at a time.
Note: You can also send or receive a fax from your computer using the Epson FAX
Utility. For more information, see the online User’s Guide.
Breakdown or repair of this product may cause loss of fax data and settings. Epson is
not responsible for backing up or recovering data and settings during or after the
warranty period. We recommend that you make your own backup or print out your fax
data and settings.
This product allows you to store names, telephone numbers, and fax data in its memory
even when the power is turned off. Use the following procedure to erase the memory if
you give away or dispose of the product: Select F
Setup
>
Restore Default Settings
>
All Settings.
This procedure will erase all of your network settings and fax data.
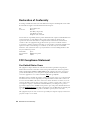
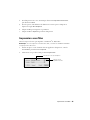
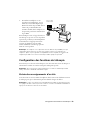
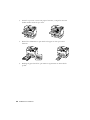
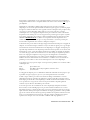
Connecting a Phone or Answering Machine
1. Connect the phone cable from the wall
jack to the
LINE
port on the back of the
product.
Note: If you’re connecting the product
to a DSL phone line, you must plug a
DSL filter into the wall jack or you won’t
be able to use the fax or telephone
equipment. Contact your DSL provider
for the necessary filter.
2. To use a telephone or answering machine
on the same line, you need a second
phone cable. Remove the cap from the
EXT.
port on the back of the product.
Connect one end of the cable to the
telephone or answering machine, and
connect the other end to the
EXT.
port.
T
e
l
ep
h
one
wall jack
Telephone
wall jack

Setting Up Fax Features
11
In Auto Answer mode, if the incoming call is a fax and you pick up the phone or the
answering machine answers, the product automatically begins receiving the fax. If the
other party is a caller, the phone can be used as normal or a message can be left on the
answering machine.
Note: Any phone or answering machine must be connected to the EXT. port for your
product to detect an incoming fax call when the phone is picked up. Epson cannot
guarantee compatibility with VoIP, cable phone systems, or fiberoptic digital services such
as FiOS™.
Setting Up Fax Features
Before sending or receiving faxes, you should create a fax header and select the number of
rings before the fax answers.
Note: To select other settings or use the Epson FAX Utility, see the online
User’s Guide.
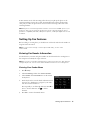
Entering Fax Header Information
You should enter your name and phone number in the fax header before sending faxes so
that recipients can identify the origin of the fax.
Note: If you leave your product unplugged for a long period of time, the date and time
settings may be lost. See the online User’s Guide for instructions on resetting them.
Entering Your Sender Name
1. Press F
Setup
.
2. Select
Fax Settings
. Then select
Communication
.
3. Select
Header
, then
Fax Header
. You see the virtual
fax keyboard.
4. Use the keyboard to enter the header information. You
can enter up to 40 characters or digits for your name
and other contact information.
Press repeatedly to scroll through characters. Press r to
move to the next character, and to delete a
character.
5. Press
OK
to return to the Header menu.

12
Sending a Fax From the Control Panel
Entering Your Phone Number
1. Select
Your Phone Number
from the Header menu.
2. Use the numeric buttons on the control panel to enter your phone number, up to 20
digits. You don’t need to use dashes. Use the # button to type the + symbol for an
international number.
Press to enter a space, and to delete.
3. Press
OK
to return to the Header menu.
Selecting the Number of Rings to Answer
If you connected an answering machine and it is set to pick up on the fourth ring, you
should set the product to pick up on the fifth ring or later:
1. Press F
Setup
.
2. Select
Fax Settings
.
3. Select
Communication
, then
Rings to Answer
.
4. Select the number of rings, then press
OK
. Select more rings than you use for the
answering machine.
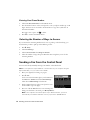
Sending a Fax From the Control Panel
You can send a fax by manually entering a fax number, as described below.
Note: To set up and use a speed dial list or send a fax from your computer using the
Epson FAX Utility, see your online User’s Guide.
1. Place your original(s) for faxing (see page 5).
2. Press K
Fax
.
To fax a two-sided document, place your document in
the ADF. Press x
Menu
and select
Send Settings
.
Then select
2-Sided Faxing
and select
On
.
3. Use the numeric buttons on the control panel to enter
the fax number (up to 64 digits).
4. Press one of the x
Start
buttons to start scanning and
faxing your document. (To cancel, press y
Stop/Reset
.)
Note: If the recipient’s fax machine prints only in black and white, your fax is
automatically sent in black and white even if you press the
x
Color button.

Receiving Faxes
13
■
If you are scanning with the ADF (see page 5), your document is automatically
scanned and faxed.
■
If you placed your document on the scanner glass, you can scan additional pages
after the first one is sent.
■
If the fax number is busy, you see a redialing message and the product redials
after one minute. To redial immediately, press
Redial
.
Note: If you turn off the product, the following data stored in the product’s temporary
memory will be lost: received faxes that haven’t yet been printed, faxes scheduled to
be sent later, and faxes being retransmitted automatically.
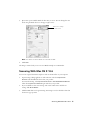
Receiving Faxes
Before receiving faxes, make sure you load plain paper and select the correct settings for the
paper you’ve loaded.
1. Press F
Setup
.
2. Select
Fax Settings
.
3. Select
Receive Settings
.
4. Select
Paper Source to Print.
5. Select the paper source.
Note: If the incoming fax is larger than the paper you loaded, it is reduced to fit or
printed on multiple pages, depending on the Auto Reduction setting you select.
6. To receive faxes automatically, make sure you see a green light next to (
Auto
Answer)
on the control panel. If the light is off, press .
Note: To change the number of rings before the product answers, see page 12.
If you run out of paper during printing, you see an error message. Load more paper and
press one of the x
Start
buttons to continue.

14
Receiving Faxes
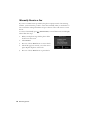
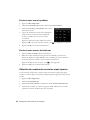
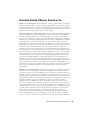
Manually Receive a Fax
If you use a voicemail service provided by the phone company instead of an answering
machine, you should set the product to receive faxes manually. Then you can check for a
fax tone from the sending fax machine and press a button on the touch screen to receive
the fax.
To receive a fax manually, press (
Auto Answer)
to turn off this feature (and the light).
Then follow these steps:
1. When your telephone rings, lift the phone off the
hook. You see this screen.
2. Select
Receive
.
3. Press one of the x
Start
buttons to receive the fax.
4. After all the pages are received, you see this screen
again. Replace the phone on the hook.
5. Press one of the x
Start
buttons to print the fax.

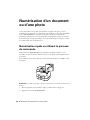
Scanning a Document or Photo
15
Scanning a Document or
Photo
You can use your product to scan original documents and photos and save them on your
computer or on a thumb drive or other USB device. The u
Scan
button lets you scan
quickly using preselected settings, or you can use the Epson Scan software to access more
advanced features. For example, you can use Epson Scan to restore faded colors in old
photos.
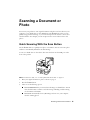
Quick Scanning With the Scan Button
Use the u
Scan
button to quickly scan a photo or document. You can even scan a photo
and have it automatically included in an email message.
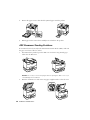
To scan to a thumb drive or other device, first insert the drive into the USB port on the
front of the product:
Note: For Mac OS X 10.6, see “Scanning With Mac OS X 10.6” on page 17.
1. Place your original document or photo as shown on page 5.
2. Press the u
Scan
button.
3. Select one of the following options:
■ Scan to USB Device
lets you scan and save the image on a thumb drive. You can
select the file format, resolution, and other settings, including 2-sided scanning
(for documents in the ADF).
■ Scan to PC
automatically creates a JPG image and saves it to your computer;
ideal for scanning photos.

16
Scanning With Epson Scan Software
■ Scan to PC (PDF)
automatically creates a PDF file and saves it to your computer;
ideal for scanning documents.
■ Scan to PC (Email)
automatically scans a photo, resizes it, launches your email
application, and attaches a JPG image to a new outgoing message. This works
with MAPI-type email such as Microsoft
®
Outlook, Windows Live Mail, Mac
Mail, and Entourage, but not web-based email such as Gmail.
■ Scan to PC (WSD)
lets you manage wireless scanning in Windows 7 or
Windows Vista
®
(English only). For more information, see your online
User’s Guide.
4. If you’re scanning to a USB device, select your scan settings, then press one of the
x
Start
buttons to begin scanning.
If you’re scanning to your computer, select
USB Connection
if your product is
connected by a USB cable, or select the name of your computer if your product is
connected over a network.
To select 2-sided scanning, press x
Menu
, then select
Scan Settings > 2 Sided
Scanning > On
.
Once your image is scanned, you see its icon in Windows Explorer or Mac Finder, or
as an attachment in your email application.
Scanning With Epson Scan Software
You can scan from any TWAIN-compliant application using Epson Scan. Or you can start
Epson Scan directly from your computer and save your image to a file.
Note: For detailed scanning instructions, see the online User’s Guide. For Mac OS X
10.6, see “Scanning With Mac OS X 10.6” on page 17.
1. Place your original document or photo as shown on page 5.
2. Do one of the following to start Epson Scan:
■
Windows: Double-click the
EPSON Scan
icon on your desktop.
■
Mac OS X 10.4 and 10.5: Double-click
EPSON Scan
in
Applications > Epson
Software
.
■
To scan from an application, start your application. Then open the
File
menu,
choose
Import
or
Acquire
, and select your product.

Scanning With Mac OS X 10.6
17
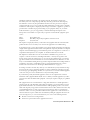
3. Epson Scan opens in Office Mode the first time you use it. (You can change the scan
mode using the Mode selector in the upper right corner.)
Note: You cannot use Home Mode to scan with the ADF.
4. Click
Scan
.
The image is scanned and you see its icon in Windows Explorer or Mac Finder.
Scanning With Mac OS X 10.6
You can scan original documents and photos and save them as files on your computer.
1. Open an image editing application, such as Preview, and select
Import From
Scanner
from the
File
menu, then select your product.
For network scanning, select
Import From Scanner > Include Networked Devices
.
Then select
Import From Scanner
again and select your product.
2. If you would like to select scan settings, such as Color Restoration and file save
settings, click
Show Details
.
3. Click the
Scan
button to begin scanning. Your image is saved to the folder selected in
the Scan To pop-up menu.
Click here to change
the scan mode

18
Maintaining Your Product
Maintaining Your Product
Follow the instructions in this chapter to check and clean the print head nozzles, check ink
levels, and replace ink cartridges. If you need to align the print head, or replace the
maintenance box, see the online User’s Guide.
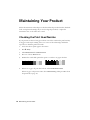
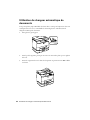
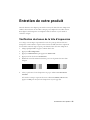
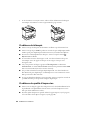
Checking the Print Head Nozzles
If your printouts are faint or have gaps in them, some of the nozzles in the print head may
be clogged or ink may be running low in one or more of the ink cartridges. Follow the
steps below to check the print head nozzles.
1. Load a few sheets of plain paper in the cassette.
2. Press F
Setup
.
3. Select
Maintenance
, then
Nozzle Check
.
4. Press one of the x
Start
buttons.
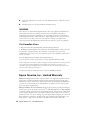
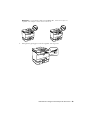
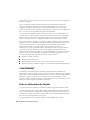
5. Examine the nozzle check pattern that prints to see if there are gaps in the lines.
6. If there are no gaps, the print head is clean. Select
Finish Nozzle Check
.
If there are gaps or the pattern is faint, select
Head Cleaning
. Then press
OK
to clean
the print head (see page 19).
Nozzles are clean
Nozzles need cleaning

Cleaning the Print Head
19
Cleaning the Print Head
If print quality has declined and the nozzle check indicates clogged nozzles, you can clean
the print head. Print head cleaning uses ink, so clean it only if necessary.
Note: You cannot clean the print head if an ink cartridge is expended, and may not be
able to clean it when a cartridge is low. You must replace the cartridge first (see
page 21).
1. Press F
Setup
.
2. Select
Maintenance
, then
Head Cleaning.
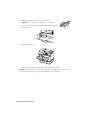
3. When you see the first screen, press
OK
, then choose the colors you want to clean.
Tip: Use the nozzle check pattern to determine which colors need cleaning. You
can save ink by cleaning only selected colors.
Cleaning takes a few minutes. When it’s finished, you see a message on the LCD
screen.
Caution: Never turn off the product during head cleaning or you may damage it.
4. Select
Nozzle Check
. Then press one of the x
Start
buttons to run a nozzle check
and confirm that the print head is clean.
Note: If you don’t see any improvement after cleaning the print head four times, leave
the product on and wait at least six hours to let any dried ink soften. Then try cleaning
the print head again. If quality does not improve, one of the ink cartridges may need to
be replaced. If that doesn’t help, contact Epson as described on page 28.
If you do not use your product often, it is a good idea to print a few pages at least once
a month to maintain good print quality.
Checking Ink Levels
If an ink cartridge is expended, you see a message on your printer’s LCD screen:
Note: You cannot print or copy when an ink cartridge is expended even if the other
cartridges are not expended. Replace any expended cartridges before printing or
copying.

20
Purchasing Epson Ink Cartridges
A window may also appear on your computer screen when you try to print when ink is
low. This window can optionally display ink offers and other updates from Epson.
Note: To disable checking for ink offers or updates from Epson, see the instructions in
your online User’s Guide.
Purchasing Epson Ink Cartridges
You can purchase genuine Epson ink and paper at Epson Supplies Central at
www.epson.com/ink3 (U.S. sales) or www.epson.ca (Canadian sales). You can also
purchase supplies from an Epson authorized reseller. To find the nearest one, call
800-GO-EPSON (800-463-7766).
Use the following list when you order or purchase new ink cartridges:
Note: We recommend that you use genuine Epson cartridges and do not refill them.
The use of other products may affect your print quality and could result in product
damage.
Yields vary considerably based on images printed, print settings, paper type, frequency
of use, and temperature. For print quality, a small amount of ink remains in the cartridge
after the “replace cartridge” indicator comes on. The included cartridges prime the
printer and print about 1000 black pages/900 color pages. Actual page count will vary.
For best printing results, use up a cartridge within six months of opening the package
and before the expiration date on the cartridge box.
Store ink cartridges in a cool, dark place. If cartridges have been exposed to cold
temperatures, allow them to warm up to room temperature for at least 3 hours before
using them.
Ink color Part number
Black 676XL
Cyan 676XL
Magenta 676XL
Yellow 676XL
La page est en cours de chargement...
La page est en cours de chargement...
La page est en cours de chargement...
La page est en cours de chargement...
La page est en cours de chargement...
La page est en cours de chargement...
La page est en cours de chargement...
La page est en cours de chargement...
La page est en cours de chargement...
La page est en cours de chargement...
La page est en cours de chargement...
La page est en cours de chargement...
La page est en cours de chargement...
La page est en cours de chargement...
La page est en cours de chargement...
La page est en cours de chargement...
La page est en cours de chargement...
La page est en cours de chargement...
La page est en cours de chargement...
La page est en cours de chargement...
La page est en cours de chargement...
La page est en cours de chargement...
La page est en cours de chargement...
La page est en cours de chargement...
La page est en cours de chargement...
La page est en cours de chargement...
La page est en cours de chargement...
La page est en cours de chargement...
La page est en cours de chargement...
La page est en cours de chargement...
La page est en cours de chargement...
La page est en cours de chargement...
La page est en cours de chargement...
La page est en cours de chargement...
La page est en cours de chargement...
La page est en cours de chargement...
La page est en cours de chargement...
La page est en cours de chargement...
La page est en cours de chargement...
La page est en cours de chargement...
La page est en cours de chargement...
La page est en cours de chargement...
La page est en cours de chargement...
La page est en cours de chargement...
La page est en cours de chargement...
La page est en cours de chargement...
La page est en cours de chargement...
La page est en cours de chargement...
La page est en cours de chargement...
La page est en cours de chargement...
La page est en cours de chargement...
La page est en cours de chargement...
La page est en cours de chargement...
La page est en cours de chargement...
La page est en cours de chargement...
La page est en cours de chargement...
La page est en cours de chargement...
La page est en cours de chargement...
La page est en cours de chargement...
La page est en cours de chargement...
-
 1
1
-
 2
2
-
 3
3
-
 4
4
-
 5
5
-
 6
6
-
 7
7
-
 8
8
-
 9
9
-
 10
10
-
 11
11
-
 12
12
-
 13
13
-
 14
14
-
 15
15
-
 16
16
-
 17
17
-
 18
18
-
 19
19
-
 20
20
-
 21
21
-
 22
22
-
 23
23
-
 24
24
-
 25
25
-
 26
26
-
 27
27
-
 28
28
-
 29
29
-
 30
30
-
 31
31
-
 32
32
-
 33
33
-
 34
34
-
 35
35
-
 36
36
-
 37
37
-
 38
38
-
 39
39
-
 40
40
-
 41
41
-
 42
42
-
 43
43
-
 44
44
-
 45
45
-
 46
46
-
 47
47
-
 48
48
-
 49
49
-
 50
50
-
 51
51
-
 52
52
-
 53
53
-
 54
54
-
 55
55
-
 56
56
-
 57
57
-
 58
58
-
 59
59
-
 60
60
-
 61
61
-
 62
62
-
 63
63
-
 64
64
-
 65
65
-
 66
66
-
 67
67
-
 68
68
-
 69
69
-
 70
70
-
 71
71
-
 72
72
-
 73
73
-
 74
74
-
 75
75
-
 76
76
-
 77
77
-
 78
78
-
 79
79
-
 80
80


Epson WorkForce Pro WP-4540 Guide de démarrage rapide
- Catégorie
- Imprimer
- Taper
- Guide de démarrage rapide
dans d''autres langues
Documents connexes
-
Epson Stylus NX230 Une information important
-
Epson XP-200 Une information important
-
-
Epson Stylus NX530 Manuel utilisateur
-
Epson WorkForce Pro WP-4530 Guide de démarrage rapide
-
-
Epson WorkForce 845 Guide de démarrage rapide
-
Epson C11CA96201 Guide de démarrage rapide
-
-
Epson 435 Manuel utilisateur