YOTRIO Set of 2 Wicker Padded Stool Assembly Instructions
- Taper
- Assembly Instructions

ASSEMBLY INSTRUCTIONS:
SET OF 2 WICKER PADDED STOOL
SKU#:68660031
COMPONENTS
PART
FIGURE
DESCRIPTION
QTY
A
SEAT CUSHION
1
B
CONNECTOR RING
1
C
LEG
4
HARDWARETOOLS
PART
FIGURE
DESCRIPTION
QTY

AA
M6*20 BOLT WITH WASHER
12
BB
ALLEN WRENCH
1
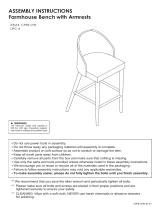
STEP
1
Place the Seat Cushion (A) on a flat, protected surface.
Attach the table Leg (B) to the Seat Cushion (A) by using
M6*20 Bolt with Washer (AA). Hands tighten only.
Use the Allen Wrench (BB) to tighten all bolts. Do not over
tighten. Over tightening may strip bolts and washes.

2
Attach the Connector Ring (C) to the table Leg (B) by using
M6*20 Bolt with Washer (AA). Hands tighten only.
3
Place the Seat in the upright position.
Assembly is Completed.

Cleaning and Maintenance
●Clean with mild soap and water, rinse thoroughly, and dry completely.
Do not use bleach, acid, or other solvents on this item
●We recommend the use of furniture covers to protect this item when not in use.
●Inspect and tighten all bolts on a regular basis to ensure proper performance and
safety.
●In order to prolong the life and beauty of your item,we recommend storing it in a
dry and protected area during off season periods.
PAGE 3 OF 3

DIRECTIVES D’ASSEMBLAGE :
ENSEMBLE DE 2 TABOURETS REMBOURRÉS EN OSIER
No d’UGS : 68660031
COMPOSANTES
PIÈCE
FIGURE
DESCRIPTION
QTÉ
A
COUSSIN DE SIÈGE
1
B
ANNEAU DE SOUTIEN
1
C
PIED
4

QUINCAILLERIE ET OUTILS
PIÈCE
FIGURE
DESCRIPTION
QTÉ
AA
BOULON M6 x 20 mm
AVEC RONDELLE
12
BB
CLÉ HEXAGONALE
1
ÉTAPE
1
Poser le coussin de siège (A) sur une surface plate et
protégée. Fixer le pied (B) au coussin de siège (A) à l’aide
d’un boulon M6 x 20 mm avec rondelle (AA). Serrer à la
main seulement.
Utiliser la clé hexagonale (BB) pour serrer tous les boulons.
Ne pas trop serrer. Trop serrer risque de détruire le pas des
boulons et des rondelles.

2
Fixer l’anneau de soutien (C) au pied (B) à l’aide d’un boulon
M6 x 20 mm avec rondelle (AA). Serrer à la main seulement.
3
Placer le siège en position verticale.
L’assemblage est terminé.

Nettoyage et entretien
● Nettoyer avec de l’eau et du savon doux, bien rincer et sécher complètement.
Ne pas utiliser de javellisant, de détergent acide ou d’autres solvants sur cet
article.
● Nous vous recommandons d’utiliser des housses à meubles pour protéger cet
article entre les utilisations.
● Vérifier l’état de tous les boulons et les serrer régulièrement pour garantir le bon
fonctionnement et l’aspect sécuritaire de l’article.
● Afin de prolonger la durée et la belle apparence de votre article, nous vous
recommandons de le ranger dans un endroit sec et protégé pendant les périodes
hors saison.
PAGE 4 DE 4

INSTRUCCIONES DE ENSAMBLAJE:
SET DE 2 BANCOS ACOJINADOS DE MIMBRE
SKU# 68660031
COMPONENTES
PARTE
IMAGEN
DESCRIPCIÓN
CANTIDAD
A
ASIENTO
1
B
MARCO CONECTOR
1
C
PATA
4
EQUIPO DE ENSAMBLAJE
PARTE
IMAGEN
DESCRIPCIÓN
CANTIDAD

AA
PERNO CON RONDANA
M6*20
12
BB
LLAVE ALLEN
1
PASO
1
Coloque el asiento (A) sobre una superficie plana y
protegida. Una las patas (B) del banco al asiento (A)
utilizando pernos con rondanas M6*20 (AA). Ténselos con
las manos.
Use la llave Allen (BB) para tensar los pernos. No los tense
de más. Tensarlos de más puede barrer los pernos y las
rondanas.
2
Una el marco conector (C) a las patas del banco (B) usando
pernos con rondanas M6*20 (AA). Ténselos con las manos.

3
Coloque la silla en posición vertical.
Ha finalizado el ensamblaje.

Limpieza y mantenimiento
●Limpie con agua y jabón suave, enjuague y seque por completo.
No use blanqueador, ácido u otros solventes para limpiar este artículo.
●Recomendamos el uso de fundas para proteger el artículo cuando no esté en
uso.
●Revise y tense periódicamente todos los pernos para garantizar un correcto
desempeño y seguridad.
●Para prolongar la vida y estética del artículo, recomendamos guardarlo en un
área seca y protegida durante largos periodos sin uso.
PÁGINA 3 DE 3

-
 1
1
-
 2
2
-
 3
3
-
 4
4
-
 5
5
-
 6
6
-
 7
7
-
 8
8
-
 9
9
-
 10
10
-
 11
11
-
 12
12
-
 13
13


YOTRIO Set of 2 Wicker Padded Stool Assembly Instructions
- Taper
- Assembly Instructions
dans d''autres langues
- English: YOTRIO Set of 2 Wicker Padded Stool
- español: YOTRIO Set of 2 Wicker Padded Stool
Documents connexes
Autres documents
-
 Delta Children Madisson Upholstered Glider & Ottoman Assembly Instructions
-
Century 1557 VersaFlex Le manuel du propriétaire
-
 Flexible Flyer 41550T Manuel utilisateur
-
 Silverwood Furniture Reimagined CPFB1709 Guide d'installation
-
Dorel Living FH7905 Manuel utilisateur
-
 Sunbrella Veranda Classic 6PC Woven Seating Set FG-MELSCT6PC Manuel utilisateur
-
 Delta Children Elite Glider & Ottoman Assembly Instructions
-
 Whalen 818177 / ERABST Manuel utilisateur
-
PowerSmart PSSMN24 Manuel utilisateur
-
 Dorel Home DA7509 Le manuel du propriétaire


