Danby DDW1804EB Le manuel du propriétaire
- Catégorie
- Lave-vaisselle
- Taper
- Le manuel du propriétaire
Ce manuel convient également à

DANBY PRODUCTS LIMITED, ONTARIO, CANADA N1H 6Z9
DANBY PRODUCTS INC., FINDLAY, OHIO, USA 45840
OWNER’S MANUAL
MANUEL DU PROPRIÉTAIRE
MANUAL DEL PROPIETARIO
www.Danby.com
2019.02.01
DISHWASHER
Owner’s Manual............................1 - 14
LAVE-VAISSELLE
Manuel du propriétaire................15 - 28
LAVAPLATOS
Manual del propietario................29 - 42
MODEL • MODÈLE • MODELO
DDW1804EW
DDW1804EB
DDW1804EBSS

1
Welcome
Welcome to the Danby family. We are proud of our quality products and we believe in
dependable service. We suggest that you read this owner’s manual before plugging in your new
appliance as it contains important operation information, safety information, troubleshooting and
maintenance tips to ensure the reliability and longevity of your appliance.
Visit www.Danby.com to access self service tools, FAQs and much more. For additional assistance
call 1-800-263-2629.
Note the information below; you will need this information to obtain service under warranty.
You must provide the original purchase receipt to validate your warranty and receive service.
Model Number: _________________________________________________
Serial Number: _________________________________________________
Date of Purchase: _______________________________________________
Need Help?
Before you call for service, here are a few things you can do to help us serve you better.
Read this owner’s manual:
It contains instructions to help you use and maintain your appliance properly.
If you receive a damaged appliance:
Immediately contact the retailer or builder that sold you the appliance.
Save time and money:
Check the troubleshooting section at the end of this manual before calling. This section
will help you solve common problems that may occur.
1-800-26- Danby
(1-800-263-2629)

Important Safety Information
READ AND FOLLOW ALL SAFETY INSTRUCTIONS
SAVE THESE INSTRUCTIONS!
2
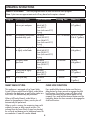
SAFETY REQUIREMENTS
• Children should be supervised to ensure that
they do not play with the appliance.
• Do not stand, sit or lean on the door or dish
rack. Do not place heavy items on the door
when it is open.
• Do not touch the heating element during or
immediately after use.
• Do not operate the appliance unless all
enclosure panels are properly installed.
• Open door carefully during operation, water
may leak. Proceed with caution as water may be
hot.
• Do not wash plastic items unless they are
marked dishwasher safe.
• Use only detergent and rinse additives that are
designed for an automatic dishwasher.
• Never use soap, laundry detergent or hand
washing detergent in the dishwasher.
• Keep detergent and rinse aid out of the reach of
children.
• Check that the detergent dispenser is empty after
completion of the wash cycle.
• Dishwasher detergents are strongly alkaline and
can be extremely dangerous if swallowed. Avoid
contact with the skin and eyes.
• Remove the door of the appliance when
removing from service or discarding.
• The hot water supply line pressure must be
between 0.04 - 1 MPa.
• The water supply inlet temperature should be
between 48 - 65°C (120 - 149°F).
GROUNDING INSTRUCTIONS
This appliance must be grounded. In the event of an
electrical short circuit, grounding reduces the risk of
electrical shock by providing an escape wire for the
electrical current.
This appliance is equipped with a cord that has a
grounding wire and grounding plug. The power
cord must be plugged into an outlet that is properly
grounded. If the outlet is a 2-prong wall outlet, it
is your responsibility to have it replaced with a
properly grounded 3-prong wall outlet. The serial
rating plate indicates the voltage and frequency the
appliance is designed for.
WARNING - Improper use of the grounding
plug can result in a risk of electric shock.
Consult a qualifi ed electrician or service agent
if the grounding instructions are not completely
understood, or if doubt exists as to whether the
appliance is properly grounded.
DO NOT USE AN EXTENSION CORD
Do not connect your appliance to extension cords
or together with another appliance in the same wall
outlet. Do not splice the power cord. Do not under
any circumstances cut or remove the third ground
prong from the power cord.
If the power supply cord is damaged, it must be
replaced by the manufacturer, its service agent or
similar qualifi ed person in order to avoid hazard.
Ensure that component parts are replaced with like
components and that servicing is done by factory
authorized service personnel to minimize the risk of
possible ignition due to incorrect parts or improper
service.
This appliance is not intended for use by persons
(including children) whose physical, sensory or
mental capabilities may be different or reduced,
or who lack experience or knowledge, unless such
persons receive supervision or training to operate
the appliance by a person responsible for their
safety.

3
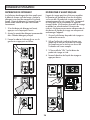
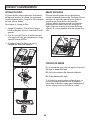
INSTALLATION INSTRUCTIONS
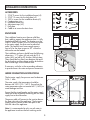
ACCESSORIES
1. ST3.5*9 screws for the installation brace (x2)
2. ST3.9*13 screws for the kick plate (x2)
3. ST4*14 screws for the installation brace (x2)
4. Condensation strip
5. Installation brace (x2)
6. Adjustment caps (x2)
7. Kick plate
8. Cable tie to secure the drain hose
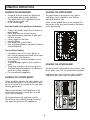
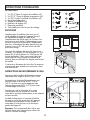
ENCLOSURE
The installation location must have a solid fl oor
that is able to support the appliance when it is fully
loaded and fi lled with water. The location must be
within 9.8 feet (3 meters) of a sink with easy access
to the water supply, the drain and an electrical
outlet. The location must have enough space in
front of it for the door to open to 90° so that the
dishwasher can be loaded.
The installation enclosure should have the following
dimensions: 17.7 inches (45 cm) wide by 32.5
inches (82.5 cm) tall by 22.8 inches (58 cm) deep.
There should be less than 5 mm between the top of
the dishwasher and the cabinet and the dishwasher
door should align with the cabinet face.
If necessary, cut holes in the surrounding cabinetry
to provide access the water and power connections.
WATER CONNECTION INSTRUCTIONS
The hot water supply line pressure must be between
0.04 - 1 MPa.
The water supply inlet temperature should be
between 48 - 65°C (120 - 149°F). Ensure that the
water temperature does not exceed 65°C (149°F) to
avoid damage to dishes.
Ensure that the circuit breaker and the water supply
valve are turned off before connecting the hot water
supply line to the dishwasher.
The power cable will connect to the junction box on
the front right side of the appliance. The hot water
supply line will connect to the water port on the
front left side of the appliance.
Note: It is recommended to only use soft water in
the appliance to achieve the best washing results.
1
2
3
5
6
7
4
8
90 r
17.7 inches
(45 cm)
90 r
32.5 inches
(82.5 cm)
22.8 inches
(58 cm)
Power cable
Hot water
supply line
135 - 185 mm
(5 1/3 - 7 1/3”)

4
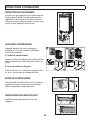
INSTALLATION INSTRUCTIONS
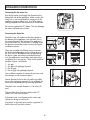
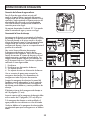
Connecting the hot water line
Run the hot water line through the channel on the
bottom left side of the appliance. Make sure the hot
water line is not twisted and then connect it to the
appliance using an elbow joint. Use Tefl on tape or
sealing compound on the connection to avoid leaks.
Do not over tighten the 90° elbow. This can damage
the water inlet and cause a leak.
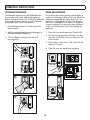
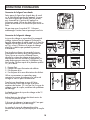
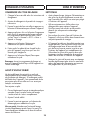
Connecting the drain line
The drain hose will connect to the drain pump on
the bottom of the appliance. Run the drain line in
the same channel on the bottom of the appliance
as the hot water line. Ensure there is nothing inside
the drain hose and that it does not tear during the
installation process.
There are a number of different ways to connect
the drain hose depending on the confi guration of
the sink. Review the different ways of connecting
the drain system and choose a method that best
suits the application. Local codes may require the
installation of an air gap kit. Check with a qualifi ed
plumber if there is any doubt.
1. Air gap
2. Air gap with garbage disposal
3. No air gap
4. No air gap with garbage disposal
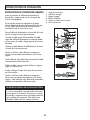
Use a rubber connector to connect drain hoses and
hose clamps on all connection points.
Secure the drain hose to the sink wall using cable
ties or other fastening materials. If not fastened, the
drain hose may bend causing drainage problems.
The drain hose internal diameter is 0.8 inches (21
mm).
The top of the drain hose must be less than 39
inches (100 cm) from the fl oor.
If the drain hose is not looped up the water may
siphon out during a wash cycle.
Any bends in the drain hose must be supported so
that the hose will not kink or bend.
1
2
3
4

INSTALLATION INSTRUCTIONS
5
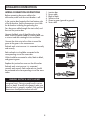
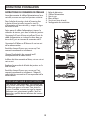
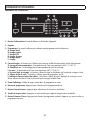
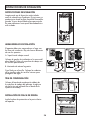
WIRING CONNECTION INSTRUCTIONS
Before connecting the power cable to the
dishwasher, make sure the circuit breaker is off.
In the junction box located at the front bottom right
of the dishwasher, fi nd the three power wires from
the dishwasher including the grounding line.
Pass the power cable through the strain relief, and
then into the junction box.
Connect the black wire of the dishwasher to the
black wire of the power cable by inserting both into
a wire nut and then rotating the wire connector.
Connect the white wire to the white wire and the
green to the green in the same manner.
Recheck each wire to ensure it is connected correctly
and securely.
Each colored wire should be connected to the
corresponding wire of the same color.
White should be connected to white, black to black,
and green to green.
Replace the junction box cover on the dishwasher.
Recheck each wire to ensure it is connected
correctly and securely. Each coloured wire should
be connected to the corresponding wire of the same
colour.
1
2
6
3
4
5
WARNING ELECTRICAL SHOCK HAZARD
To avoid electrical shock, do not work on an
energized circuit. Doing so could result in serious
injury or death. To avoid a fi re hazard, make sure
electrical work is properly installed. Only qualifi ed
electricians should perform electrical work.
1. Junction box
2. Power cable
3. Black to black
4. White to white
5. Green to green (ground to ground)
6. Strain relief

INSTALLATION INSTRUCTIONS
6
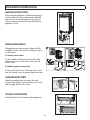
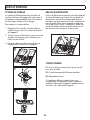
CONDENSATION STRIP
Attach the condensation strip under the work
surface of the cabinet. Ensure that the strip is fl ush
with the edge of the work surface.
LEVELING INSTRUCTIONS
Ensure that the appliance is level before placing it
into the enclosure. The rear foot can be adjusted
from the front of the dishwasher by turning. Use
a fl at screwdriver to adjust the front feet until the
appliance is level.
INSTALLATION BRACES
The appliance must be secured in place with the
installation braces. There are two different ways to
use the braces.
A. Normal work surface
Put the installation hook into the slot of the side
plane and secure it to the work surface with the
wood screws.
B. Marble or granite counter top
Fix the side with the screw. Place the screw covers
over the internal screws to protect them from water.
1
2
2
3
1
A
B
TOE KICK INSTALLATION
Install the toe kick on the bottom of the appliance.
1
2

OPERATING INSTRUCTIONS
7
1
2
3 4
5
6 7 8
9
A
B
C
D
E
F
G
H
I
J
K
L
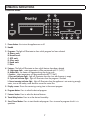
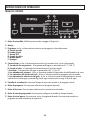
CONTROL PANEL
1. Power button: Use to turn the appliance on or off.
2. Handle
3. Programs: The light will illuminate to show which program has been selected.
A: Heavy wash
B: Normal wash
C: ECO wash
D: Glass wash
E: Rapid wash
F: Rinse
4. Features: The light will illuminate to show which features have been selected.
G: High temp wash - water temperature will be maintained at 60°C (140°F)
H: Heated dry - the heater will operate during the drying cycle
I: Sanitize - water temperature will be maintained at 69°C (156°F)
J: Rinse aid indicator light - light will illuminate when the rinse aid dispenser is empty
K: Cycle end indicator light - light will illuminate when the program is fi nished
L: Faucet warning indicator light - light will illuminate when the appliance is not receiving enough
water; turn on the nearby water faucet to correct the water fl ow
5. Display screen: Shows the remaining running time in the current program.
6. Program button: Press to select the desired program.
7. Features button: Press to select the desired features.
8. Timed delay button: Press to set the desired time delay.
9. Start/Cancel button: Press to start the desired program. Press to cancel a program which it is in
operation.

OPERATING INSTRUCTIONS
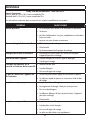
8
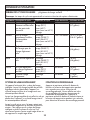
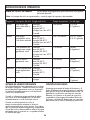
Program Cycle Description Cycle Breakdown Running Time Water Use
Heavy For heavily soiled loads
such as pots and pans
Pre-Wash
Wash (60°C)
Rinse (65°C)
Rinse (with sani 69°C)
Drying
155 minutes 21.5 litres
(5.7 gallons)
Normal For normally soiled loads;
standard daily cycle
Pre-Wash
Wash (50-55°C)
Rinse (58-60°C)
Rinse (with sani 69°C)
Drying
100~130 minutes 10.5~21.5 litres
(2.8~5.7 gallons)
ECO Energy conserving cycle
for lightly soiled loads
Pre-Wash
Wash (45-50°C)
Rinse (50-55°C)
Rinse (with sani 69°C)
Drying
115 minutes 18 litres
(4.8 gallons)
Glass For lightly soiled
glassware
Pre-Wash
Wash (48-50°C)
Rinse (50-55°C)
Drying
105 minutes 18 litres
(4.8 gallons)
Rapid A fast cycle for lightly
soiled loads
Pre-wash
Wash (50°C)
Rinse (50°C)
60 minutes 14 litres
(3.7 gallons)
Rinse Rinse cycle only Pre-Wash
Wash
20 minutes 7.5 litres
(2 gallons)
WASH CYCLE TABLE Press the program button to select the desired wash program.
Note: Cycle times are approximate and will vary based on the options selected.
SMART WASH SYSTEM
This appliance is equipped with a Smart Wash
System. When a partial load of lightly soiled dishes
is placed in the appliance, a wash cycle similar to a
short wash will automatically be performed.
When a full load of heavily soiled dishes is
placed in the appliance, a heavy wash cycle will
automatically be performed.
When a cycle is running, the remaining time could
suddenly increase or drop several minutes. This
indicates that the Smart Wash System has checked
the soil level and determined in additional water fi lls
are needed or if water fi lls can be deleted.
CHILD LOCK FUNCTION
Press and hold the features button and the time
delay button for three seconds to engage the child
lock function. The display screen will show a lock
icon and the buttons on the control panel will not
respond. Press and hold the features button and the
time delay button for three seconds to disengage the
child lock function.

OPERATING INSTRUCTIONS
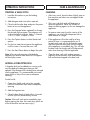
LOADING THE DISHWASHER
• Scrape all dishes to remove any large food
residue before placing in this appliance.
• Only place dishes in this appliance that are
marked as dishwasher safe.
• Use a mild detergent.
Items that should not be placed in a dishwasher
• Cutlery with wooden, bone china or mother-of-
pearl handles.
• Plastic items that are not heat resistant.
• Items that have been repaired with glue that is
not heat resistant.
• Pewter, copper or steel items.
• Wooden platters.
• Items made from synthetic fi bers.
• Items with glazed patterns may fade if machine
washed frequently.
Tips for effi cient loading
• Load hollow items such as cups, glasses or
pans with the opening downward so that water
cannot collect in the container.
• Items must not lie inside one another or cover
one another.
• To avoid damage to glasses, they should not
touch.
• Sharp items of cutlery such as carving knives
should be loaded horizontally in the basket to
avoid injury when unloading.
• Do not overload the appliance.
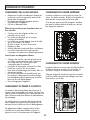
LOADING THE CUTLERY BASKET
Cutlery should be placed in the cutlery basket with
the handles facing down. Ensure that cutlery items
do not nest inside of one another as this can affect
cleaning performance.
Sharp or pointed items should be placed in the
cutlery basket with points facing down to avoid
injury when unloading.
Do not place excessively small items into the
dishwasher as they could fall through the basket
and impact the operation of the appliance.
9
LOADING THE UPPER BASKET
The upper basket is designed for cups, glasses,
small plates, bowls and plastic items that are
marked dishwasher safe.
Make sure the loaded dishes do not interfere with
the rotation of the spray arm located on the bottom
of the upper basket.
LOADING THE LOWER BASKET
The lower basket is designed for dinner dishes, soup
bowls, plates, pots, lids, casserole dishes and plates.
Load large items such as pans and pots should be
loaded with their open sides facing downwards.

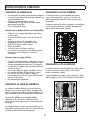
DETERGENT DISPENSER
The detergent dispenser must be fi lled before the
start of each wash cycle. Add the detergent just
before starting the wash cycle. Adding the detergent
to the appliance too soon can cause it to become
damp and it may not dissolve properly.
1. If the detergent dispenser is closed, press the
latch to open it.
2. Add the recommended amount of detergent to
the main detergent component.
3. Close the fl ap by sliding it to the left and
pressing down.
RINSE AID DISPENSER
Rinse aid can be used to prevent water droplets or
streaks from forming on dishes. The rinse aid will be
released automatically during the fi nal rinse. This
appliance is designed to use liquid rinse aid only.
Do not use a powdered rinse aid as it will clog the
reservoir opening. Do not put any other substance
in the rinse aid dispenser as this can damage the
appliance.
1. Open the rinse aid dispenser by lifting the lid.
2. Use the viewing port when fi lling the rinse aid
reservoir. Do not fi ll the reservoir above the full
level indicator.
3. If the display screen shows “LSb”, the rinse aid
dispenser is empty.
4. Close the rinse aid cap by pressing down.
OPERATING INSTRUCTIONS
1
2
3
1
2
3
4
10

STARTING A WASH CYCLE
1. Load the dishwasher as per the loading
instructions.
2. Add detergent and rinse aid as required.
3. Close the dishwasher door and press the power
button to turn on the appliance.
4. Press the Program button repeatedly to choose
the desired wash program. The programs will
cycle in the following order: Heavy -> Normal
-> ECO -> Glass -> Rapid -> Rinse
5. Press the Options button to select the desired
options.
6. Run the hot water faucet nearest the appliance
until the water is hot and then turn it off.
7. Press the Start/Pause button to begin the cycle.
Note: When a wash program is fi nished the
appliance will buzz 8 times and END will appear
on the display screen.
ADDING A FORGOTTEN DISH
A forgotten dish can be added to a running cycle
any time before the detergent dispenser has
opened. If the detergent has already been released
into the appliance, it is recommended not to add
more dishes as they will not receive adequate
cleaning.
To add a dish:
1. Open door slightly and wait a few seconds
until the wash action stops before completely
opening.
2. Add the forgotten item.
3. Close the door fi rmly to latch within 4 seconds
and the cycle will automatically resume.
Caution: Wait until wash action completely stops
before opening the door. Hot water may splash out
of the dishwasher and can cause injury.
OPERATING INSTRUCTIONS
11
CARE & MAINTENANCE
CLEANING
• After every wash, leave the door slightly open so
that moisture and odors are not trapped inside
the appliance.
• Only use a soft cloth and mild detergent to
clean the appliance. Never use solvents or
abrasive cleaning agents as this can damage the
appliance.
• To remove water spots from the interior of the
appliance, use a soft cloth dampened with a
small amount of vinegar.
• If the appliance will not be used for a long
period of time, it is recommended to run a
normal wash cycle with the dishwasher empty
and then leave the door open until the interior
of the appliance is completely dry. This will help
the door seals last longer and will help prevent
odors from forming inside the appliance.
• Clean the door seals with a damp sponge
regularly to prevent odors from food particles
that can become trapped in the door seal.

12
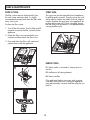
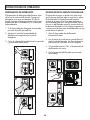
FILTER SYSTEM
The fi lter system removes food particles from
the wash water and traps them. It is highly
recommended to empty and clean the fi lters after
every wash cycle.
To clean the fi lter system:
1. Turn off the dishwasher. Turn the fi lter and lift
upwards to remove the fi lter system from the
appliance.
2. Rotate the fi lter insert counterclockwise to
unfasten and then detach the fi lter insert.
3. Rinse and clean the fi lters with water and
replace them inside the appliance.
1
2
3
CARE & MAINTENANCE
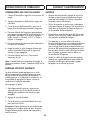
SPRAY ARM
The spray arm can be removed from the appliance
by pulling gently upwards. Rinse the spray arm with
warm water to remove any debris that can clog the
nozzles. Replace the spray arm in the appliance by
pushing downward until it clicks into place. Ensure
that the spray arm movement is not impeded before
running another cycle.
ERROR CODES
E1: Water intake is restricted or water pressure is
too low.
E3: Malfunction of heating element
E4: Water overfl ow
If the appliance displays any error code, a power
reset may resolve the issue. Unplug the appliance,
wait approximately 5 minutes and then plug the unit
back in.

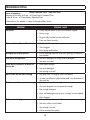
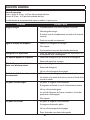
PROBLEM POSSIBLE CAUSE
No power • A fuse may be blown or the circuit breaker tripped
• Power surge
• Plug not fully inserted into the wall outlet
• Door not closed correctly
Water not drained from dishwasher • Kink in drain hose
• Filter clogged
• Drain pump malfunction
Detergent left in the dispenser • Dishes blocking dispenser from fully opening; unit may be
over loaded
Suds left in the appliance • Too much detergent or wrong kind of detergent
• Too much rinse aid
White fi lm or cloudiness on dishes or
interior tub
• Hard water minerals
• Too much detergent
• Not enough rinse aid
Noise inside the tub while running • The spray arm is hitting an item in the basket
• An item has fallen out of the basket and is on the bottom of
the wash tub
Dishes are not clean • Dishes were loaded incorrectly
• The wash program was not powerful enough
• Not enough detergent
• Items are blocking the spray arm; unit may be over loaded
• Filter clogged
Dishes are not drying • Dishes were loaded incorrectly
• Too many dishes were loaded
• Not enough rinse aid
• Dishes removed too quickly
Danby Consumer Care: 1-800-263-2629
Hours of operation:
Monday to Thursday 8:30 am - 6:00 pm Eastern Standard Time
Friday 8:30 am - 4:00 pm Eastern Standard Time
Information in this manual is subject to change without notice.
TROUBLESHOOTING
13

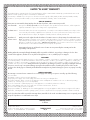
LIMITED IN-HOME APPLIANCE WARRANTY
This quality product is warranted to be free from manufacturer’s defects in material and workmanship, provided that the unit is used under the normal operating
conditions intended by the manufacturer.
This warranty is available only to the person to whom the unit was originally sold by Danby Products Limited (Canada) or Danby Products Inc. (U.S.A.) (hereafter
“Danby”) or by an authorized distributor of Danby, and is non-transferable.
TERMS OF WARRANTY
Plastic parts, are warranted for thirty (30) days only from purchase date, with no extensions provided.
First Year
During the rst twelve (12) months, any functional parts of this product found to be defective, will be repaired or replaced, at warrantor’s
option, at no charge to the ORIGINAL purchaser.
To obtain
Danby reserves the right to limit the boundaries of “In Home Service” to the proximity of an Authorized Service Depot. Any app liance
Service
requiring service outside the limited boundaries of “In Home Service” , it will be the consumer’s responsibility to transport the appliance (at
their own expense) to the original retailer (point of purchase) or a service depot for repair. See “Boundaries of In Home Serv ice” below.
Contact your dealer from whom your unit was purchased, or contact your nearest authorized Danby service depot, where service
must be performed by a qualied service technician.
If service is performed on the units by anyone other than an authorized service depot, or the unit is used for commercial appli cation, all
obligations of Danby under this warranty shall be void.
Boundaries of
If the appliance is installed in a location that is 100 kilometers (62 miles) or more from the nearest service center your unit must be
In Home Service
delivered to the nearest authorized Danby Service Depot, as service must only be performed by a technician qualied and certif ied for
warranty service by Danby. Transportation charges to and from the service location are not protected by this warranty and are t he
responsibility of the purchaser.
Nothing within this warranty shall imply that Danby will be responsible or liable for any spoilage or damage to food or other c ontents of this appliance, whether due
to any defect of the appliance, or its use, whether proper or improper.
EXCLUSIONS
Save as herein provided, Danby, there are no other warranties, conditions, representations or guarantees, express or implied, m ade or intended by Danby or its
authorized distributors and all other warranties, conditions, representations or guarantees, including any warranties, conditio ns, representations or guarantees
under any Sale of Goods Act or like legislation or statue is hereby expressly excluded. Save as herein provided, Danby shall no t be responsible for any damages
to persons or property, including the unit itself, howsoever caused or any consequential damages arising from the malfunction o f the unit and by the purchase of
the unit, the purchaser does hereby agree to indemnify and hold harmless Danby from any claim for damages to persons or propert y caused by the unit.
GENERAL PROVISIONS
No warranty or insurance herein contained or set out shall apply when damage or repair is caused by any of the following:
1) Power failure.
2) Damage in transit or when moving the appliance.
3) Improper power supply such as low voltage, defective house wiring or inadequate fuses.
4) Accident, alteration, abuse or misuse of the appliance such as inadequate air circulation in the room or abnormal operating con ditions
(extremely high or low room temperature).
5) Use for commercial or industrial purposes (ie. If the appliance is not installed in a domestic residence).
6) Fire, water damage, theft, war, riot, hostility, acts of God such as hurricanes, oods etc.
7) Service calls resulting in customer education.
8) Improper Installation (ie. Building-in of a free standing appliance or using an appliance outdoors that is not approved for out door application).
Proof of purchase date will be required for warranty claims; so, please retain bills of sale. In the event warranty service is required, present this document to our
AUTHORIZED SERVICE DEPOT.
Danby Products Limited
PO Box 1778, Guelph, Ontario, Canada N1H 6Z9
Telephone: (519) 837-0920 FAX: (519) 837-0449
Danby Products Inc.
PO Box 669, Findlay, Ohio, U.S.A. 45840
Telephone: (419) 425-8627 FAX: (419) 425-8629
04/09
1-800-263-2629
Warranty Service
In-home
Danby reserves the right to limit the boundaries of “In Home Service” to the proximity of an authorized service
depot. Any appliance requiring service outside the limited boundaries of “In Home Service”, will be the consumer’s
responsibility to transport at their own expense to the original point of purchase or a service depot for repair. If the
appliance is installed in a location that is 100 kilometers (62 miles) or more from the nearest service center, it must
be delivered to the nearest authorized Danby Service Depot by the purchaser.
Transportation charges to and from the service location are not protected by this warranty and are the
responsibility of the purchaser.
During the first twelve (12) months, any functional parts of this product found to be defective, will be repaired or
replaced, at warrantor’s option, at no charge to the original purchaser.
Contact the dealer where the unit was purchased, or contact the nearest authorized Danby service depot, where
service must be performed by a qualified service technician. If service is performed on the unit by anyone other
than an authorized service depot, all obligations of Danby under this warranty shall be void.
First 12 months
To obtain service
Boundaries of
in-home service
LIMITED “IN HOME” WARRANTY
This quality product is warranted to be free from manufacturer’s defects in material and workmanship, provided that the unit is used
under the normal operating conditions intended by the manufacturer.
This warranty is available only to the person to whom the unit was originally sold by Danby Products Limited (Canada) or Danby
Products Inc. (U.S.A.) (hereafter “Danby”) or by an authorized distributor of Danby, and is non-transferable.
TERMS OF WARRANTY
Plastic parts are warranted for thirty (30) days from the date of purchase, with no extensions provided.
Nothing within this warranty shall imply that Danby will be responsible or liable for any spoilage or damage to food or other
contents of this appliance, whether due to any defect of the appliance, or its use, whether proper or improper.
EXCLUSIONS
Save as herein provided, by Danby, there are no other warranties, conditions, representations or guarantees, express or implied, made
or intended by Danby or its authorized distributors and all other warranties, conditions, representations or guarantees, including any
warranties, conditions, representations or guarantees under any Sale of Goods Act or like legislation or statute is hereby expressly
excluded. Save as herein provided, Danby shall not be responsible for any damages to persons or property, including the unit itself,
howsoever caused or any consequential damages arising from the malfunction of the unit and by the purchase of the unit, the
purchaser does hereby agree to indemnify and hold harmless Danby from any claim for damages to persons or property caused by
the unit.
GENERAL PROVISIONS
No warranty or insurance herein contained or set out shall apply when damage or repair is caused by any of the following:
1) Power failure.
2) Damage in transit or when moving the appliance.
3) Improper power supply such as low voltage, defective house wiring or inadequate fuses.
4) Accident, alteration, abuse or misuse of the appliance such as inadequate air circulation in the room or abnormal operating
conditions (ie. extremely high or low room temperature).
5) Use for commercial or industrial purposes (ie. If the appliance is not installed in a domestic residence).
6) Fire, water damage, theft, war, riot, hostility, acts of God such as hurricanes, floods etc.
7) Service calls resulting in customer education.
8) Improper Installation (ie. Building-in of a free standing appliance or using an appliance outdoors that is not approved for outdoor
application, including but not limited to: garages, patios, porches or anywhere that is not properly insulated or climate controlled).
Proof of purchase date will be required for warranty claims; retain bills of sale. In the event that warranty service is required, present
the proof of purchase to our authorized service depot.
Warranty Service
In Home
Danby Products Limited
PO Box 1778, Guelph, Ontario, Canada N1H 6Z9
Telephone: (519) 837-0920 FAX: (519) 837-0449
Danby Products Inc.
PO Box 669, Findlay, Ohio, U.S.A. 45840
Telephone: (419) 425-8627 FAX: (419) 425-8629
1-800-263-2629
04/17

15
Bienvenue
Bienvenue à la famille Danby. Nous sommes fi ers de la qualité de nos produits et nous croyons
en le service fi able. Nous vous suggérons de lire ce manual d’utilisation avant de brancher
votre nouvel appareil car il contient des informations inportantes sur l’utilisation, la sécurité, le
dépannage et la maintenance, afi n d’assurer la fi abilité et la longévité de votre appareil.
Visitez www.Danby.com pour accéder aux outils d’autoservice, aux FAQ et bien plus encore. Pour
obtenir de l’aide supplémentaire, composez 1-800-263-2629.
Notez les informations ci-dessous; Vous aurez besoin de cette information pour obtenir un
service sous garantie.
Vous devez fournir le reçu d’achat original pour valider votre garantie et recevoir le service.
Numéro de modèle: _____________________________________________
Numéro de serie: _______________________________________________
Date d’achat: __________________________________________________
Besoin d’assistance?
Avant d’appeler pour service, voici quelques choses que vous pouvez faire pour nous
aider à mieux vous servir.
Lire ce manuel du propriétaire:
Il contient des instructions pour vous aider à utiliser et à maintenir votre appareil
correctement.
Si vous recevez un appareil endommagé:
Contactez immédiatement le revendeur ou l’entrepreneur qui vous a vendu l’appareil.
Gagnez du temps et de l’argent:
Avant d’appeler pour service, consultez la section de dépannage à la fi n de ce manuel.
Cette section vous aidera à résoudre les problèmes courants pouvant survenir.
1-800-26- Danby
(1-800-263-2629)

16
Consignes de sécurité importantes
LIRE ET SUIVRE TOUTES LES INSTRUCTIONS DE SÉCURITÉ
GARDER CES INSTRUCTIONS!
EXIGENCES DE SÉCURITÉ
• Les enfants devraient être surveillés pour
s’assurer qu’ils ne jouent pas avec l’appareil.
• Ne pas tenir debout, assis ou appuyer sur
la porte ou le porte-vaisselle. Ne placez pas
d’objets lourds sur la porte lorsqu’il est ouvert.
• Ne pas toucher l’élément chauffant pendant ou
immédiatement après l’utilisation.
• Ne faites pas fonctionner l’appareil à moins
que tous les panneaux de l’enceinte ne soient
correctement installés.
• Ouvrez la porte avec précaution pendant le
fonctionnement, l’eau peut fuir. Procéder avec
prudence car l’eau peut être chaude.
• Ne pas laver les articles en plastique à moins
qu’ils soient marqués comme étant au lave-
vaisselle.
• Utilisez uniquement des additifs de détergence
et de rinçage conçus pour un lave-vaisselle
automatique.
• N’utilisez jamais de savon, détergent à lessive
ou détergent à la main dans le lave-vaisselle.
• Garder le détergent et le rinçage hors de la
portée des enfants.
• Vérifi ez que le distributeur de détergent est vide
après la fi n du cycle de lavage.
• Les détergents de la lave-vaisselle sont fortement
alcalins et peuvent être extrêmement dangereux
en cas d’ingestion. Eviter le contact avec la peau
et les yeux.
• Retirez la porte de l’appareil en cas de
démontage ou de rejet.
• La pression maximale d’eau d’entrée autorisée
est de 0.04 - 1 Mpa.
• La température d’entrée d’alimentation en
eau doit être comprise entre 48 - 65°C (120 -
149°F).
INSTRUCTIONS DE MISE À LA TERRE
Cet appareil doit être mis à la terre. En cas de
courtcircuit, la mise à la terre réduit les risques de
décharge électrique en fournissant un échappatoire
au courant électrique.
Cet appareil est équipé d’un cordon doté d’un
fi l de mise à la terre et d’une prise de mise à la
terre. Le cordon d’alimentation doit être branché
sur une prise correctement mise à la terre. Si la
sortie est une prise murale à 2 broches, il est de
votre responsabilité de la remplacer par une prise
murale à 3 broches correctement mise à la terre. La
plaque signalétique en série indique la tension et la
fréquence auxquelles l’appareil est conçu.
AVERTISSEMENT - Une utilisation incorrecte de la
fi che de mise à la terre peut entraîner un risque de
choc électrique. Consultez un électricien qualifi é
ou un agent de service si les instructions de mise
à la terre ne sont pas complètement comprises, ou
s’il existe un doute quant à savoir si l’appareil est
correctement mis à la terre.
N’UTILISER JAMAIS DE FIL DE RALLONGE
Ne connectez pas votre appareil aux rallonges ou
avec un autre appareil dans la même prise murale.
Ne pas épisser le cordon d’alimentation. Ne coupez
ou retirez en aucun cas la troisième broche du
cordon d’alimentation.
Si le cordon d’alimentation est endommagé, il doit
être remplacé par le fabricant, son agent de service
ou une personne qualifi ée similaire afi n d’éviter tout
risque.
Assurez-vous que les composants sont remplacés
par des composants similaires et que l’entretien est
effectué par le personnel de maintenance autorisé
en usine pour minimiser le risque d’allumage
en raison de pièces incorrectes ou d’un service
incorrect.
Cet appareil n’est pas destiné à être utilisé par
des personnes (y compris des enfants) dont les
capacités physiques, sensorielles ou mentales
peuvent être différentes ou réduites, ou qui ont de
l’expérience ou des connaissances, à moins que
ces personnes ne soient surveillées ou formées
pour faire fonctionner l’appareil par une personne
responsable de leur sécurité.

17
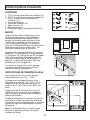
INSTRUCTIONS D’INSTALLATION
ACCESSOIRES
1. Vis ST3.5*9 pour le support d’installation (x2)
2. Vis ST3.9*13 pour la plaque de protection (x2)
3. Vis ST4*14 pour l’accolade d’installation (x2)
4. Bande de condensation
5. Support d’installation (x2)
6. Bouchons de réglage (x2)
7. Plaque de protection
8. Serre-câble pour fi xer le tuyau de vidange
ENCLOSURE
L’emplacement d’installation doit avoir un sol
solide capable de supporter l’appareil lorsqu’il
est complètement chargé et rempli d’eau.
L’emplacement doit être à moins de 3 mètres d’un
évier avec un accès facile à l’alimentation en eau,
au drain et à une prise électrique. L’emplacement
doit avoir suffi samment d’espace devant pour que
la porte s’ouvre à 90° afi n que le lave-vaisselle
puisse être chargé.
L’enceinte d’installation doit avoir les dimensions
suivantes: 23,6 pouces (60 cm) de largeur sur 32,5
pouces (82,5 cm) de hauteur sur 22,8 pouces (58
cm) de profondeur. Il doit y avoir moins de 5 mm
entre le haut du lave-vaisselle et le meuble et la
porte du lave-vaisselle doit être alignée avec la face
du meuble.
Si nécessaire, découpez des trous dans les armoires
environnantes pour accéder aux connexions d’eau
et d’alimentation.
INSTRUCTIONS DE RACCORDEMENT À L’EAU
La pression de la conduite d’alimentation en eau
chaude doit être comprise entre 0,04 et 1 MPa.
La température d’entrée d’alimentation en eau
doit être comprise entre 48 et 65°C (120 et
149°F). Assurez-vous que la température de
l’eau ne dépasse pas 65°C (149°F) pour éviter
d’endommager la vaisselle.
Assurez-vous que le disjoncteur et la vanne
d’alimentation en eau sont éteints avant de
raccorder la conduite d’alimentation en eau chaude
au lave-vaisselle.
Le câble d’alimentation se connecte à la boîte
de jonction sur le côté avant droit de l’appareil.
La conduite d’alimentation en eau chaude se
raccordera à l’orifi ce d’eau sur le côté avant
gauche de l’appareil.
Remarque: Il est recommandé de n’utiliser que
de l’eau douce dans l’appareil pour obtenir les
meilleurs résultats de lavage.
1
2
3
5
6
7
4
8
90 r
17.7 inches
(45 cm)
90 r
32.5 inches
(82.5 cm)
22.8 inches
(58 cm)
Câble
d'alimentation
Ligne d'alimentation
en eau chaude
135 - 185 mm
(5 1/3 - 7 1/3”)

18
INSTRUCTIONS D’INSTALLATION
Connexion de la ligne d’eau chaude
Faites passer la ligne d’eau chaude dans le canal
sur le côté inférieur gauche de l’appareil. Assurez-
vous que la ligne d’eau chaude n’est pas tordue,
puis connectez-la à l’arrière de l’appareil en
utilisant un coude. Utilisez du ruban téfl on ou un
produit d’étanchéité sur la connexion pour éviter les
fuites.
Ne pas trop serrer le coude à 90°. Cela peut
endommager l’entrée d’eau et provoquer une fuite.
Connexion de la ligne de vidange
Le tuyau de vidange se raccordera à la pompe de
vidange située au bas de l’appareil. Exécutez la
ligne de vidange dans le même canal sur le fond de
l’appareil que la ligne d’eau chaude. Assurez-vous
qu’il n’y a rien à l’intérieur du tuyau de vidange
et qu’il ne se déchire pas pendant le processus
d’installation.
Il existe plusieurs façons de raccorder le tuyau
d’évacuation en fonction de la confi guration de
l’évier. Passez en revue les différentes façons
de relier le système de vidange et choisissez la
méthode qui convient le mieux à l’application. Les
codes locaux peuvent nécessiter l’installation d’un
kit d’entrefer. Vérifi ez auprès d’un plombier qualifi é
s’il y a un doute.
1. Espace d’air
2. Espace d’air avec élimination des déchets
3. Pas d’espace d’air
4. Pas d’espace d’air avec élimination des déchets
Utilisez un connecteur en caoutchouc pour
connecter les tuyaux de vidange et les colliers de
serrage sur tous les points de connexion.
Fixez le tuyau de vidange au mur de l’évier
en utilisant des colliers de serrage ou d’autres
matériaux de fi xation. S’il n’est pas fi xé, le tuyau de
vidange risque de se plier, entraînant des problèmes
de drainage.
Le diamètre interne du tuyau de vidange est de 21
mm (0,8 pouce).
Le haut du tuyau de vidange doit être à moins de
100 cm (39 pouces) du sol.
Si le tuyau de vidange n’est pas enroulé, l’eau peut
siphonner pendant un cycle de lavage.
Les coudes du tuyau de vidange doivent être
soutenus de sorte que le tuyau ne plie pas ou ne plie
pas.
1
2
3
4

19
INSTRUCTIONS D’INSTALLATION
INSTRUCTIONS DE CONNEXION DE CÂBLAGE
Avant de connecter le câble d’alimentation au lave-
vaisselle, assurez-vous que le disjoncteur est éteint.
Dans la boîte de jonction située à l’avant en bas
à droite du lave-vaisselle, trouvez les trois fi ls
d’alimentation du lave-vaisselle, y compris la ligne
de mise à la terre.
Faites passer le câble d’alimentation à travers le
réducteur de tension, puis dans la boîte de jonction.
Connectez le fi l noir du lave-vaisselle au fi l noir du
câble d’alimentation en insérant les deux dans un
écrou de fi l, puis en tournant le connecteur de fi l.
Connectez le fi l blanc au fi l blanc et le vert au vert
de la même manière.
Revérifi ez chaque fi l pour vous assurer qu’il est
connecté correctement et solidement.
Chaque fi l coloré doit être connecté au fi l
correspondant de la même couleur.
Le blanc doit être connecté au blanc, noir au noir et
vert au vert.
Replacez le couvercle de la boîte de jonction sur le
lave-vaisselle.
Revérifi ez chaque fi l pour vous assurer qu’il est
connecté correctement et solidement. Chaque fi l
coloré doit être connecté au fi l correspondant de la
même couleur.
1
2
6
3
4
5
AVERTISSEMENT RISQUE DE CHOC ÉLECTRIQUE
Pour éviter les chocs électriques, ne travaillez pas
sur un circuit sous tension. Cela pourrait entraîner
des blessures graves ou la mort. Pour éviter les
risques d’incendie, assurez-vous que les travaux
électriques sont correctement installés. Seuls les
électriciens qualifi és doivent effectuer des travaux
électriques.
1. Boîte de dérivation
2. Câble d’alimentation
3. Noir à noir
4. Blanc à blanc
5. Vert à vert (terre à terre)
6. Soulagement des contraintes
La page est en cours de chargement...
La page est en cours de chargement...
La page est en cours de chargement...
La page est en cours de chargement...
La page est en cours de chargement...
La page est en cours de chargement...
La page est en cours de chargement...
La page est en cours de chargement...
La page est en cours de chargement...
La page est en cours de chargement...
La page est en cours de chargement...
La page est en cours de chargement...
La page est en cours de chargement...
La page est en cours de chargement...
La page est en cours de chargement...
La page est en cours de chargement...
La page est en cours de chargement...
La page est en cours de chargement...
La page est en cours de chargement...
La page est en cours de chargement...
La page est en cours de chargement...
La page est en cours de chargement...
La page est en cours de chargement...
La page est en cours de chargement...
-
 1
1
-
 2
2
-
 3
3
-
 4
4
-
 5
5
-
 6
6
-
 7
7
-
 8
8
-
 9
9
-
 10
10
-
 11
11
-
 12
12
-
 13
13
-
 14
14
-
 15
15
-
 16
16
-
 17
17
-
 18
18
-
 19
19
-
 20
20
-
 21
21
-
 22
22
-
 23
23
-
 24
24
-
 25
25
-
 26
26
-
 27
27
-
 28
28
-
 29
29
-
 30
30
-
 31
31
-
 32
32
-
 33
33
-
 34
34
-
 35
35
-
 36
36
-
 37
37
-
 38
38
-
 39
39
-
 40
40
-
 41
41
-
 42
42
-
 43
43
-
 44
44


Danby DDW1804EB Le manuel du propriétaire
- Catégorie
- Lave-vaisselle
- Taper
- Le manuel du propriétaire
- Ce manuel convient également à
dans d''autres langues
- English: Danby DDW1804EB Owner's manual
- español: Danby DDW1804EB El manual del propietario
Documents connexes
-
Danby DDW2404EBSS Le manuel du propriétaire
-
Danby DDW1805EWP Le manuel du propriétaire
-
Unbranded DDW18D1EW Le manuel du propriétaire
-
Danby DDW631SDB Le manuel du propriétaire
-
-
Danby Products DDW631SDB Le manuel du propriétaire
-
-