
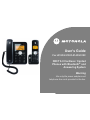
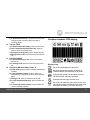
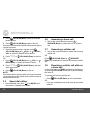
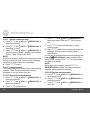
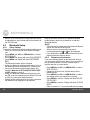
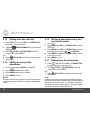
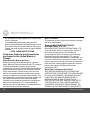
User’s Guide
For L512C/L513C/L514C/L515C
DECT 6.0 Cordless / Corded
Phones with Bluetooth
®
and
Answering System
Warning
Use only the power adapters and
telephone line cords provided in the box.

• 30 name and number phonebook for cordless handset and corded base respectively.
• Answering machine with 15 minutes digital recording time.*
• Caller ID shows you who's calling and you can see details of the last 30 callers in a calls list.**
Call log Capacity is 30, the same for cordless handset and corded base.
• Register up to 5 cordless handsets to the corded base.
• Make internal calls, transfer external calls, hold 3-way conversation between two internal callers and an
external caller.
*The recording time includes the pre-recorded voice menu and outgoing announcements.
**You must subscribe to your network provider's Caller ID or Call Waiting service for these features to work.
Please note that only the Corded phone operates during power outage (with limited functions).
Welcome...
to your new Motorola Phone!
Please retain your original dated sales receipt for your records. For warranty service of your Motorola product,
you will need to provide a copy of your dated sales receipt to confirm warranty status. Registration is not required
for warranty coverage.
For product-related questions, please call:
US and Canada: 1-888-331-3383
On the Web: www.motorola.com
This ENERGY STAR
®
program (www.energystar.gov) recognizes and encourages the use of
products that save energy and help protect our environment. We are proud to mark this product
with the ENERGY STAR
®
label indicating it meets the latest energy efficiency guidelines.

IMPORTANT
Only use the telephone line cords supplied.
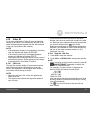
Got everything?
• Cordless handset
• Cordless charger
• NiMH rechargeable battery pack
• Power adapter for the cordless charger
• Corded base
• Corded handset
• Telephone line cords (one for connecting the corded base and handset)
• Power adapter for the corded base
• Quick start guide
• User’s guide
In multihandset packs, you will find one or more additional cordless handsets, cordless chargers with
power adapter units, additional rechargeable battery packs and battery doors.
This User’s Guide provides you with all the information you need to
get the most from your phone.
Before you make your first call you will need to set up your phone.
Follow the simple instructions in 'Getting Started', on the next few
pages.

4
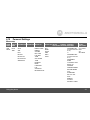
1. Getting started ......................................... 7
1.1 Install and charge the cordless handset
battery pack .................................................. 8
1.2 Install the cordless charger........................... 8
1.3 Connect the corded base ............................. 9
1.4 Wall mounting on corded base ..................... 9
1.5 Set the display language ............................ 10
1.6 Set date and time ....................................... 10
1.7 Your phone is now ready for use................ 10
2. Getting to know your phone................. 11
Enjoy your corded base phone.............. 19
3. Using the phone..................................... 19
3.1 Introducing Bluetooth.................................. 19
3.2 Bluetooth Setup .......................................... 20
3.2.1 Setup Cellular ................................ 20
3.2.2 Replace a paired device ................ 20
3.2.3 Paired Devices ............................... 21
3.3 Making a home call using your landline...... 21
3.4 Making a cellular call using your
corded base phone..................................... 21
3.5 Speed dial calling ....................................... 22
3.6 Answering a home call ............................... 22
3.7 Answering a cellular call ............................. 22
3.8 Receiving a cellular call while on a
home call ....................................................22
3.9 Receiving a home call while on a
cellular call.................................................. 23
3.10Ending a call ...............................................23
3.11Adjusting volume ........................................ 23
3.12Dialing from the redial list ...........................24
3.13Dialing from the calls list............................. 24
3.14Muting a call................................................24
3.15Adding an entry to the phonebook..............24
3.16Storing a phonebook entry as a
one touch number.......................................24
3.17Dialing from the phonebook........................25
3.18Caller ID......................................................25
3.18.1 Calls List ......................................... 25
3.18.2 View the calls list ............................ 26
3.18.3 Save a number from the calls list
to the phonebook ........................... 26
3.18.4 Delete a calls list entry ................... 26
3.18.5 Delete entire calls list ..................... 26
3.19Personal Settings........................................27
3.20To reset all settings.....................................28
3.21Using your answering machine...................28
3.21.1 Play messages ............................... 28
3.21.2 Turn on or off the answer machine .... 29
3.21.3 Set the announcement mode ......... 29

5
3.21.4 Set voicemail only ...........................29
3.21.5 Set the number of rings ..................30
3.21.6 Announcement ...............................30
3.21.7 Record a memo ..............................31
3.21.8 Call screening on/off .......................31
3.21.9 Delete all old messages .................31
3.21.10Remote access ...............................32
3.21.11Set the security code ......................32
Enjoy your cordless handset ................. 33
4. Using the phone .....................................33
4.1 Introducing Bluetooth ................................. 33
4.2 Bluetooth Setup.......................................... 34
4.2.1 Setup Cellular .................................34
4.2.2 Replace a paired device .................34
4.2.3 Paired Devices ...............................35
4.3 Making a home call using your landline ..... 35
4.4 Making a cellular call using your cordless
DECT handset............................................ 35
4.5 Speed dial calling ....................................... 36
4.6 Answering a home call ............................... 36
4.7 Answering a cellular call............................. 36
4.8 Receiving a cellular call while on a
home call.................................................... 36
4.9 Receiving a home call while on a
cellular call.................................................. 37
4.10Ending a call............................................... 37
4.11Adjusting volume ........................................ 37
4.12Muting a call ............................................... 37
4.13Dialing from the redial list ........................... 37
4.14Dialing from the calls list............................. 38
4.15Adding an entry to the phonebook ............. 38
4.16Storing a phonebook entry as a
one touch number ...................................... 38
4.17Dialing from the phonebook ....................... 38
4.18Caller ID ..................................................... 39
4.18.1 Calls List ........................................ 39
4.18.2 View the calls list ........................... 39
4.18.3 Save a number from the calls list
to the phonebook ........................... 40
4.18.4 Delete a calls list entry ................... 40
4.18.5 Delete entire calls list ..................... 40
4.19Personal Settings ....................................... 41
4.20Registration ................................................ 42
4.21To reset all settings .................................... 42
4.22Paging/Finding cordless handset ............... 43
4.23Using your answering machine .................. 43
4.23.1 Play messages .............................. 43
4.23.2 Turn on or off the
answer machine ............................. 44

6
4.23.3 Set the announcement mode ......... 44
4.23.4 Set voicemail only .......................... 44
4.23.5 Set the number of rings .................. 44
4.23.6 Announcement ............................... 45
4.23.7 Record a memo ............................. 45
4.23.8 Call screening on/off ...................... 46
4.23.9 Delete all old messages ................. 46
4.23.10Remote access .............................. 46
4.23.11Set the security code ..................... 47
5. Help......................................................... 48
6. General information............................... 50

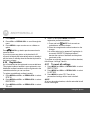
Getting started 7
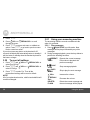
1. Getting started
WARNING
• Do not place your phone in the bathroom or other
humid areas.
Location
When choosing a location for your new phone, here are
some important guidelines you should consider:
• Avoid sources of noise and heat, such as motors,
fluorescent lighting, microwave ovens, heating
appliances and direct sunlight.
• Avoid areas of excessive dust, moisture and low
temperature.
• Avoid other cordless telephones or personal
computers.
• Never install telephone wiring during a lightning
storm.
• Never install telephone jacks in wet locations unless
the jack is specifically designed for wet locations.
• Never touch non-insulated telephone wires or
terminals unless the telephone line has been
disconnected at the network interface.
• Use caution when installing or modifying telephone
lines.
HANDSET RANGE
Optimal range is reached when there are no other
electrical appliances working within the range area. Any
obstruction between the corded base and cordless
handset will also reduce the range significantly.
SIGNAL STRENGTH
When out of range of the corded base, the screen shows
SEARCHING...
. If you are on a call, the line will hang up. Move
back within in range. The cordless handset will
automatically re-connect to the corded base.
Setting up
IMPORTANT
The corded base must be plugged into the electrical
outlet at all times. Do not connect the telephone line
cord into the wall jack until the cordless handset is fully
charged. Only use the power adapter and telephone
line cord supplied with the product.
WHICH POWER ADAPTER
The power adapter with the smaller pin plug is for the
corded base unit and the power adapter with the bigger
pin plug is for the cordless charger unit.

8 Getting started
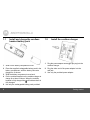
1.1 Install and charge the cordless
handset battery pack
1.
Slide out the battery compartment cover.
2.
Place the supplied rechargeable battery pack in the
battery compartment, with the battery connector
plugged in, as shown.
3.
Slide the battery compartment cover back.
4.
Put the cordless handset on the cordless charger to
charge for at least 24 hours. When the cordless
handset is fully charged the will indicate that it is
fully charged.
5.
Use only the rechargeable battery pack provided.
1.2 Install the cordless charger
1.
Plug the power adapter with bigger pin plug into the
cordless charger.
2.
Plug the other end of the power adapter into the
wall jack.
3.
Use only the provided power adapter.

Getting started 9
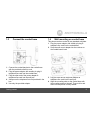
1.3 Connect the corded base
1.
Connect the corded handset to the corded base
with the provided coiled line cord.
2.
Plug the power adapter with smaller pin plug &
telephone line cord into the corded base.
3.
Plug the other end of the power adapter &
telephone line cord into the wall jack.
4.
Always use the telephone line cord provided in the
box.
5.
Use only the provided adapter.
1.4 Wall mounting on corded base
This phone can be mounted on any standard wall plate.
1.
Plug the power adapter with smaller pin plug &
telephone line cord into the corded base.
2.
Snap the wall mount adapter into the notches on
the corded base’s back.
3.
Plug the other end of the power adapter &
telephone line cord into the wall jack.
4.
Align the mounting slots on the corded base with
the mounting posts on the wall. Then push in and
down until the phone is firmly seated.

10 Getting started
1.5 Set the display language
On corded base:
1.
Press P and /VOL+ or /REDIAL/VOL- to
select
Settings
.
2.
Repeat to select Language.
3.
Repeat to select language.
4.
Press P to save.
On cordless handset:
1.
Press MENU and VOL+ or REDIAL/VOL- to select
SETUP HS
.
2.
Repeat to select Language.
3.
Repeat to select language.
4.
Press MENU to save.
1.6 Set date and time
On corded base:
1.
Press P to select
Date & Time
.
2.
Press P and edit the time in 12 hour format.
3.
Press /VOL+ or /REDIAL/VOL- to toggle
AM/
PM
settings.
4.
Press P to continue entering the date.
5.
Press P to save the settings.
On cordless handset:
1.
Press MENU to select
DATE & TIME
.
2.
Repeat to edit the year and date.
3.
Press VOL+ or REDIAL/VOL- to move between the
input fields
YEAR
and
DATE
.
4.
Press MENU and edit the time in 12 hour format.
Press VOL+ or REDIAL/VOL- to toggle
AM/PM
settings.
5.
Press MENU to save the settings.
NOTE
If you have subscribed to your network's Caller ID
service, the date and time is set automatically when a
call is received.
1.7 Your phone is now ready for use.

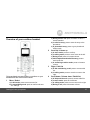
Getting to know your phone 11
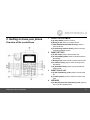
2. Getting to know your phone
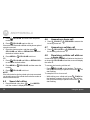
Overview of the corded base
1 SCROLL UP/ VOLUME UP
a) In menu mode: press to scroll up.
b) During a call: press to increase volume.
c) Calls list/phonebook/redial list entry: press to
scroll up the list.
d) In answering machine mode: press to increase
message playback volume.
2 RIGHT SOFT KEY
a) In idle mode: press to access menu list.
b) In menu/editing mode: press to confirm and save
the settings.
c) During a call: press to hold or make intercom call.
d) In calls list entry: press to save the entry to the
phonebook.
e) In phonebook entry: press to go to phonebook
editing mode.
3 RIGHT/ CALLS LIST
a) In idle mode/during a call: press to access calls
list.
b) In editing mode: press to move the cursor to the
right.
4 SPEAKER
a) In idle/menu/pre-dial mode/during a call: press to
turn on/off the speakerphone.

12 Getting to know your phone
b) Calls list/phonebook/redial list entry: press to
make a call with speakerphone.
c) During ringing: press to answer a call with
speakerphone.
d) In answering machine mode: press to make a call
with speaker
5 CELLULAR
a) In idle mode: press to make a cellular call.
b) During an incoming cellular call: press to answer
the cellular call.
6 DELETE/ FLASH
a) During message playback: delete the current
message.
b) In idle: press and hold to erase all read messages
(applicable only when all answering machine
messages are read, new message(s) will not be
deleted).
c) During a call: press to insert a flash.
7 SKIP/ MEMO
a) During message playback: press to skip to play the
next message.
b) In idle: press and hold to hear a voice prompt for
recording a memo and then start to record a memo.
Press
SAVE
key to stop memo recording.
8 SCROLL DOWN/ VOLUME DOWN/ REDIAL LIST
a) In idle: press to access redial list.
b) In menu mode: press to scroll down.
c) During a call: press to decrease volume.
d) Calls list/phonebook/redial list entry: press to
scroll down the list.
e) In answering machine mode: press to decrease
volume.
9 #/ PAUSE/ ABC/ FORMAT
a) In idle/pre-dial/number editing mode/during a
call: press to insert a "#", press and hold to insert a
pause.
b) In name editing mode: toggle ABC/Abc/abc.
c) In calls list entry: press to toggle the Caller ID
display format between 7, 8, 10 and 11 digits.
10 */ TONE
a) In idle/pre-dial/editing mode: press to insert a "*".
b) During a call: press to switch from pulse to tone
dialing temporarily if pulse mode was selected
before. After the call is ended, the dial mode will
change back to pulse.
11 ALPHANUMERIC KEYPAD
a) In idle/pre-dial/editing mode/during a call: press
to enter characters/numbers. Press and hold to
activate speed dial.

Getting to know your phone 13
12 PLAY/ STOP
a) In idle: press to playback answering machine
messages.
b) In message playback mode: press to stop playing
messages. Press again to resume message
playback.
13 REPEAT/ ANNC
a) In idle: short press to play the current
announcement or the current announcement mode.
b) In idle: press and hold to hear a voice prompt of how
to record the personalized announcement of the
current answer mode, press
SAVE
key to stop
recording.
c) During message playback mode: press to replay
current message from the beginning.
14 ANNOUNCE MODE
a) In idle: press to toggle between
Announce & Record
/
Announce Only
/
Answer Off
mode.
15 ANS ON / OFF
a) In idle mode: Press to turn on or off the answer
machine.
16 LEFT/ PHONEBOOK
a) In idle mode/during a call: press to access the
phonebook.
b) In editing mode: press to move the cursor to the left.
17 LEFT SOFT KEY
a) In idle mode: press to access intercom, press and
hold to enter registration mode.
b) In pre-dial/editing mode: press to delete one
character/digit. Long press to delete all characters/
digits.
c) During a call: press to mute/unmute the call.
d) In calls list/phonebook entry: press to back to the
previous level.
e) In answering machine mode: press to delete the
current message playback.
18 Base Cradle
19 BLUETHOOTH LED 1 and BLUETOOTH LED 2
a) On when Bluetooth device 1 or 2 is connected with
the telephone base.
b) Off when Bluetooth device(s) is (are) disconnected
with the telephone base.

14 Getting to know your phone
Corded base LCD display
Display icons
In idle mode, the current time is displayed.
In Caller ID mode, the time of call is displayed.
In idle mode the current date is displayed.
In Caller ID mode, the date of the call is
displayed.
On when there is new voice mail not yet listened
to. Off when new voice mail has been listened to.
On when answering machine is turned on.
Flashes when new answering machine
message is received.
On when a Bluetooth device is connected.
Off when Bluetooth feature is disabled.
/
On when Bluetooth device 1 or 2 is connected
with the telephone base.
Off When Bluetooth device(s) is (are)
disconnected with the telephone base.
On when the Cellular line is in use.
Flashes when the Cellular line is put on hold.
Off when the Cellular line is idle.
On when the Home line is in use.
Flashes when the Home line is put on hold.
Off when the Home line is idle.
On when ringer volume is turned off.
On when speakerphone is turned on.

Getting to know your phone 15
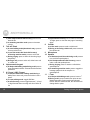
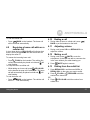
Overview of your cordless handset
Get acquainted with the following 14 buttons on your
handset and their multi-function tasks.
1 Menu / Select
a) In idle mode: press to access menu list.
b) In menu/editing mode: press to confirm and save
the settings.
c) During a home call: press to transfer a call to a
second handset.
d) In calls list entry: press to save the entry to the
phonebook.
e) In phonebook entry: press to go to phonebook
editing mode.
2 Scroll up / Volume up
a) In menu mode: press to scroll up.
b) In editing mode: press to move cursor to the left.
c) During a call: press to increase volume.
d) Calls list/phonebook/redial list entry: press to
scroll up the list.
e) In answering machine mode: press to increase
volume.
3 Right / Calls list
a) In idle mode/during a call: press to access calls
list.
b) In editing mode: press to move the cursor to the
right.
4 Scroll down / Volume down / Redial list
a) In idle/pre-dial mode: press to access redial list.
b) In menu mode: press to scroll down.
c) In editing mode: press to move cursor to the right.
d) During a call: press to decrease volume.

16 Getting to know your phone
e) Calls list/phonebook/redial list entry: press to scroll
down the list.
f) In answering machine mode: press to decrease
volume.
5 Talk off / Back
a) In menu/editing mode/phonebook entry: press to
exit to previous level.
b) In pre-dial mode/calls list/redial list entry/
answering machine mode: press to exit to idle.
c) During ringing: press to silent the incoming ringer
temporarily.
d) During a call: press to end a call, either home call
or cellular call.
6 Alphanumeric keypad
a) In idle/pre-dial/editing mode/during a call: press to
enter characters/numbers. Press and hold to activate
speed dial.
7 # / Pause / ABC / Format
a) In idle/pre-dial/number editing mode/during a
call: press to insert a #, press and hold to insert a
space.
b) In name editing mode: toggle ABC/abc.
c) In calls list entry: press to toggle between 7, 10 and
11 digit formats when returning calls from Caller ID
list.
d) In phonebook list entry: if the number is more than
15 digits, press to view the next page of remaining
digits.
8Cellular
a) In idle mode: press to make a cellular call.
b) During an incoming cellular call: press to answer
the cellular call.
9 Microphone
10 Speaker
a) In idle/menu/pre-dial mode/during a call: press to
turn on/off the speakerphone.
b) Call List/phonebook/redial list entry: press to
make a call with speakerphone.
c) During ringing: press to answer a call with the
speakerphone.
d) In answering machine mode: press to toggle the
message playback via the earpiece or
speakerphone.
11 * / Tone
a) In idle/pre-dial/editing mode: press to insert a *.
b) During a call: press to switch from pulse to tone
dialing temporarily if pulse mode was selected
before. After the call has ended, the dial mode will
change back to pulse.

Getting to know your phone 17
c) In phonbook list entry: if the number is more than
15 digits, press to view the previous page of
remaining digits.
12 Talk on/ Flash
a) In idle/menu/pre-dial mode: press to make a call.
b) Call List/phonebook/redial list entry: press to
make a call to the selected entry.
c) During an incoming call: press to answer the call.
d) During a home call: press flash to switch to another
call.
13 Left/ Phonebook
a) In idle mode/during a call: press to access the
phonebook.
b) In editing mode: press to move the cursor to the
left.
14 Answering Machine/ Mute/ Clear/ X
a) In idle mode: press to play the message in answering
machine.
b) In pre-dial/editing mode: press to delete one
character/digit. Long press to delete all characters/
digits.
c) During a call: press to mute/unmute the call.
d) In calls list/phonebook entry: press to delete the
entry.
e) In answering machine mode: press to delete the
current message playback.
Cordless handset LCD display
Display icons
On when speakerphone is turned on.
On when answering machine is turned on.
Flashes when a new message is received.
Indicates that a new call has been received.
Off after all new call been reviewed.
Indicates that the ringer volume is off.
If a voice mail service is being used, on for new
voice mail message. Off after all new voice mails
have been reviewed. (For home line only)

18 Getting to know your phone
On when a call is muted.
Full battery power level.
2/3 battery power level.
1/3 battery power level.
Flashes when low battery level is detected,
needs charging.
Animation in motion. Battery is
charging.
In idle mode, the current time is displayed.
In Caller ID mode, the time of call is displayed.
On when the Home line is in use.
Flashes when the Home line is put on hold.
Off when the Home line is idle.
On when the Cellular line is in use.
Flashes when the Cellular line is put on hold.
Off when the Cellular line is idle.
On when a Bluetooth device is
connected.
Off when Bluetooth feature is disabled.
/ On when Bluetooth device or is connected
with the telephone base.
Off When Bluetooth device(s) is (are)
disconnected with the telephone base.
In idle mode the current date is displayed.
In Caller ID mode, the date of the call is
displayed.

Using the phone 19
Enjoy your corded base phone
3. Using the phone
3.1 Introducing Bluetooth
Your new telephone system with Bluetooth wireless
technology has the following features:
• Pairing Bluetooth enabled mobile phone with the
telephone base. Two Bluetooth devices can be
paired up and connected in maximum.
• Connecting Bluetooth enabled mobile phone to
make and receive
CELLULAR
calls. Two mobile
phones can be connected but only one of them can
be used at a time.
• Making and receiving calls using your Bluetooth
enabled mobile phone plan while benefiting from the
ease and comfort of your home telephone system.
Glossary of terms
Below are some terms used in this user's guide to help
you become familiar with using your Bluetooth devices
and your new telephone system.
Bluetooth mobile phone
- Refers to a Bluetooth enabled
mobile telephone.
CELLULAR
line - The communications service provided
through your Bluetooth enabled mobile telephone.
HOME
line - Your conventional telephone land line.
Pairing
- This refers to the process of two Bluetooth
devices registering device information with each other.
The telephone base must be paired with a Bluetooth
enabled mobile phone before the Bluetooth device can
be used.
IMPORTANT INFORMATION
• Refer to your mobile phone user's guide for more
information about its Bluetooth function.
• Make sure that your Bluetooth enabled mobile
phone is between one to twelve feet away from the
telephone base in order to maintain a clear and
consistent connection between your Bluetooth
mobile phone, telephone base and cell tower.
• Make sure that your Bluetooth enabled mobile
phone has sufficient signal strength. You may need
to move the Bluetooth enabled mobile phone and
telephone base to a location where the cellular
signal may be stronger.
• Charge your Bluetooth mobile phone while it is
connected to the telephone base because your
mobile phone's battery will discharge faster while it
is connected wirelessly to the telephone base.

20 Using the phone
• Monitor your mobile phone's usage because airtime
is deducted from your cellular plan for the duration of
the
CELLULAR
calls.
3.2 Bluetooth Setup
3.2.1 Setup Cellular
To pair and connect a Bluetooth enabled mobile phone:
• Place your cell phone near the corded base phone.
• Press
P and /VOL+ or /REDIAL/VOL- to
select
Setup Cellular
.
• Press
P and display will show
Cellular Ready?
• Press P and display will show
Discoverable Mode
.
The Bluetooth feature will be activated.
• Using your Bluetooth enabled mobile phone, turn on
the Bluetooth feature and search for a new device.
• Once your Bluetooth enabled mobile phone has
found the Motorola L512CBT/L513CBT/L514CBT/
L515CBT telephone, select it.
• Using your Bluetooth enabled mobile phone, enter
the PIN code of the telephone (the default PIN code
is 0000) to continue the pairing process.
• Pairing will be confirmed when you hear a tone and
the Bluetooth icon appears on the handset. Refer to
the user’s manual of your Bluetooth enabled mobile
phone to learn how to search for or add new
Bluetooth devices.
NOTE
• Paired device(s) will be connected automatically and
stored into the Paired Devices list.
• When a device is successfully connected,
corresponding device or will be displayed.
• If you would like to pair up another Bluetooth device,
please repeat the steps as above.
3.2.2 Replace a paired device
If you have already paired up two Bluetooth devices,
you will need to replace one of them if you would like to
pair up another device. Follow the below steps to
replace and pair up a new device.
• Press
P and /VOL+ or /REDIAL/VOL- to
select
Setup Cellular
.
• Display will show the two Cellular names of the
paired devices.
• Press
P and /VOL+ or /REDIAL/VOL- to
select the cellular device you would like to replace.
• Press
P to confirm. Display will show
Replace the
Cellular?
• Press P to confirm. Display will show
Cellular
Ready?
.
• Refer to section 3.2.1 to proceed with the next steps.
La page est en cours de chargement...
La page est en cours de chargement...
La page est en cours de chargement...
La page est en cours de chargement...
La page est en cours de chargement...
La page est en cours de chargement...
La page est en cours de chargement...
La page est en cours de chargement...
La page est en cours de chargement...
La page est en cours de chargement...
La page est en cours de chargement...
La page est en cours de chargement...
La page est en cours de chargement...
La page est en cours de chargement...
La page est en cours de chargement...
La page est en cours de chargement...
La page est en cours de chargement...
La page est en cours de chargement...
La page est en cours de chargement...
La page est en cours de chargement...
La page est en cours de chargement...
La page est en cours de chargement...
La page est en cours de chargement...
La page est en cours de chargement...
La page est en cours de chargement...
La page est en cours de chargement...
La page est en cours de chargement...
La page est en cours de chargement...
La page est en cours de chargement...
La page est en cours de chargement...
La page est en cours de chargement...
La page est en cours de chargement...
La page est en cours de chargement...
La page est en cours de chargement...
La page est en cours de chargement...
La page est en cours de chargement...
La page est en cours de chargement...
La page est en cours de chargement...
La page est en cours de chargement...
La page est en cours de chargement...
La page est en cours de chargement...
La page est en cours de chargement...
-
 1
1
-
 2
2
-
 3
3
-
 4
4
-
 5
5
-
 6
6
-
 7
7
-
 8
8
-
 9
9
-
 10
10
-
 11
11
-
 12
12
-
 13
13
-
 14
14
-
 15
15
-
 16
16
-
 17
17
-
 18
18
-
 19
19
-
 20
20
-
 21
21
-
 22
22
-
 23
23
-
 24
24
-
 25
25
-
 26
26
-
 27
27
-
 28
28
-
 29
29
-
 30
30
-
 31
31
-
 32
32
-
 33
33
-
 34
34
-
 35
35
-
 36
36
-
 37
37
-
 38
38
-
 39
39
-
 40
40
-
 41
41
-
 42
42
-
 43
43
-
 44
44
-
 45
45
-
 46
46
-
 47
47
-
 48
48
-
 49
49
-
 50
50
-
 51
51
-
 52
52
-
 53
53
-
 54
54
-
 55
55
-
 56
56
-
 57
57
-
 58
58
-
 59
59
-
 60
60
-
 61
61
-
 62
62


Motorola L515C Manuel utilisateur
- Catégorie
- Répondeurs
- Taper
- Manuel utilisateur
dans d''autres langues
- English: Motorola L515C User manual
Documents connexes
-
Binatone Electronics International H202 Manuel utilisateur
-
Motorola L402C - DECT 6.0 Corded/Cordless Phone Manuel utilisateur
-
Motorola K305 Manuel utilisateur
-
-
-
Motorola B801 Manuel utilisateur
-
-
-
Autres documents
-
AEG Voxtel D220BT Le manuel du propriétaire
-
-
VTech CS6324 Manuel utilisateur
-
AEG Loop Le manuel du propriétaire
-
-
AEG Voxtel D550BT Mode d'emploi
-
VTech DS6291 Manuel utilisateur
-
VTech DS6672-4 Manuel utilisateur
-
-