Canvas Northfield 3-Light Le manuel du propriétaire
- Taper
- Le manuel du propriétaire

ASSEMBLY INSTRUCTIONS
HAVING TROUBLE?
TOLL-FREE:
1-888-670-6684
IMPORTANT:Pleasereadthismanualcarefully
beforebeginningassemblyofthisproduct.
Keepthismanualforfuturereference.
PRODUCT NO.
ASSEMBLY INSTRUCTIONS
HAVING TROUBLE?
TOLL-FREE:
1-888-670-6684
IMPORTANT: Please read this manual carefully
before beginning assembly of this product.
Keep this manual for future reference.
ASSEMBLY INSTRUCTIONS
HAVING TROUBLE?
TOLL-FREE:
1-888-670-6684
IMPORTANT:Pleasereadthismanualcarefully
beforebeginningassemblyofthisproduct.
Keepthismanualforfuturereference.
PRODUCT NO.
PRODUCT NO. 152-2613-8
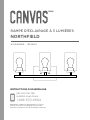
3-LIGHT VANITY
NORTHFIELD

We believe in the power of décor and its
ability to make up the fabric of your home.
That’s why CANVAS™ collections draw
inspiration from Canadians and the way
they live.
From on-trend furniture pieces to holiday
décor and all your outdoor living essentials,
CANVAS™ makes it easy to refresh your space
to reflect your unique style and the way you
live every day.
We would love to hear from you and welcome
your thoughtful feedback. Visit our website at
canadiantire.ca to tell us about your
experience, and share your photos with us
using #myCANVASstyle.
Show us how you bring CANVAS™ products
to life. We can’t wait to see!

WARNING! CONSULT A QUALIFIED ELECTRICIAN TO ENSURE
CORRECT BRANCH CIRCUIT CONDUCTOR.
TABLE OF CONTENTS
CLEANING: Before cleaning your fixture, turn off the switch or power source.
Wipe the fixture with a soft, damp cloth.
IMPORTANT: RETAIN FOR FUTURE REFERENCE, AND READ CAREFULLY.
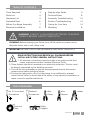
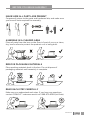
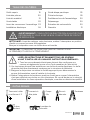
TOOLS REQUIRED
READ INSTRUCTIONS AND REVIEW ALL DIAGRAMS BEFORE
INSTALLING FIXTURE. GENERAL INSTRUCTIONS:
1. All electrical connections must be made in accordance with local
codes, ordinances and the Canadian Electrical Code.
2. These fixtures should be mounted on an electrical outlet box. The box must
be directly supported by the building structure.
3. Turn off the circuit breaker or remove the appropriate fuse to disconnect
power source before installing fixture.
4. Turning the light switch off to cut the power is not sufficient to prevent
electric shock. When in doubt about the safety of any electrical installation or
repair, consult a qualified electrician.
NORTHFIELD 3
Tools Required 3
Parts List 4
Hardware List 5
Exploded Parts 6
Before You Begin Assembly 7
Electrical Installation 8
Step-by-step Guide 9
Technical Data 13
Assembly Troubleshooting 14
Product Troubleshooting 14
Caring for Your Item 14
Warranty 15
No. 2 Cross-head
Screwdriver
Wire
Cutter
Wire
Stripper
Flathead
Screwdriver
Ladder
Safety
Goggles
Electrical
Tape

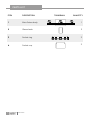
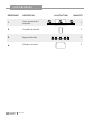
ITEM DESCRIPTION THUMBNAIL QUANTITY
1
3
2
4
PARTS LIST
Main fixture body 1
Socket ring 3
Glass shade 3
Socket cup 3
NORTHFIELD4

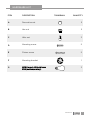
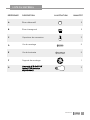
HARDWARE LIST
A
C
E
B
D
F
G
ITEM DESCRIPTION THUMBNAIL QUANTITY
2
3
2
2
2
1
60W (max.) A19 bulb base
E26 (sold separately) 3
NORTHFIELD 5
Decorative nut
Wire nut
Fixture screw
Hex nut
Mounting screw
Mounting bracket

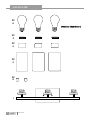
EXPLODED PARTS
NORTHFIELD6
3X
G
(sold separately)
3X
3
3X
4
3X
2
2X
A
1

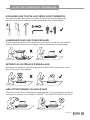
READ EACH STEP CAREFULLY
Make sure you understand each step. If you have any questions,
contact CANVAS™ customer service at 1-888-670-6684 (toll-free).
MAKE SURE ALL PARTS ARE PRESENT
Compare all pieces to the parts and hardware lists, and make sure
you have all tools required for assembly.
ASSEMBLE IN A CLEARED AREA
Place all parts from the box on the floor in front of you on a clean,
dry, level surface to protect the product as it is being built.
REMOVE PACKAGING MATERIALS
Place packing materials back in the box. Do not dispose of
packaging materials until assembly is complete.
BEFORE YOU BEGIN ASSEMBLY
NORTHFIELD 7

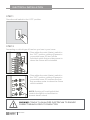
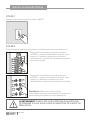
STEP 1
Place the wall switch to the “OFF” position.
WARNING! CONSULT A QUALIFIED ELECTRICIAN TO ENSURE
CORRECT BRANCH CIRCUIT CONDUCTOR.
•Place either the main (Master) switch to
the “OFF” position, cutting off power to
your entire home, OR turn off the
individual switch that provides power to
where the fixture will be installed.
•Place either the main (Master) switch to
the “OFF” position, cutting off power to
your entire home, OR unscrew the fuse
that provides power to where the fixture
will be installed.
NOTE: Shutting off a wall switch that
controls the light is not sufficient to
prevent electric shock.
STEP 2
Depending on which type of fuse box you have in your home:
ELECTRICAL INSTALLATION
NORTHFIELD8

STEP-BY-STEP GUIDE
NORTHFIELD 9
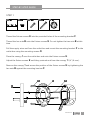
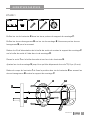
BX2 DX2 EX21X1 FX1
E
D
B
F
1
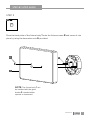
Thread the fixture screws E into the provided holes of the mounting bracket F.
Thread the hex nuts Bonto the fixture screws E. Do not tighten the hex nuts Bat this
time.
Pull the supply wires out from the outlet box and mount the mounting bracket F to the
outlet box using the mounting screws D.
Place the canopy 1over the outlet box and onto the fixture screws E.
Adjust the fixture screws E until they protrude out from the canopy 1 1/4” (6 mm).
Remove the canopy 1and secure the position of the fixture screws E by tightening the
hex nuts Bagainst the mounting bracket F.
STEP 1

STEP-BY-STEP GUIDE
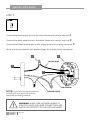
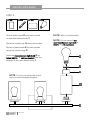
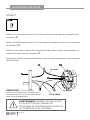
Connect the black supply wire to the black fixture wire using a wire nut C.
Connect the white supply wire to the white fixture wire using a wire nut C.
Connect the fixture ground wire to the supply ground wire using a wire nut C.
Wrap all wire connections with electrical tape for a more secure connection.
NORTHFIELD
STEP 2
10
CX3
1
F
E
C
GROUND WIRE
BLACK WIRE
WHITE WIRE
NOTE: If you have electrical questions,
consult your local electrical code for
approved grounding methods.
WARNING! MAKE SURE NO BARE WIRING IS
EXPOSED WHEN THE WIRE CONNECTORS ARE
INSTALLED (EXCEPT FOR THE GROUND WIRE).

STEP-BY-STEP GUIDE
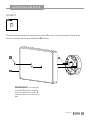
Place the back plate of the fixture body 1onto the fixture screws Eand secure it into
place by using the decorative nuts Aprovided.
NORTHFIELD
STEP 3
11
AX2
E
1
A
NOTE: The fixture body 1can
be installed with the glass
shades 2oriented either
upward or downward.
.

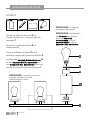
STEP-BY-STEP GUIDE
Slide a glass shade 2over each socket
on the main fixture body 1.
Place the socket cup 4over each socket.
Secure a glass shade 2to each socket
using the socket rings 3.
Install an incandescent light bulb Gor
listed SBCFL, or LED equivalent into the
sockets of the main fixture body 1.
NORTHFIELD
STEP 4
NOTE: Bulb is sold separately.
NOTE: Do not exceed a 60
watt incandescent light bulb or
SBCFL or LED equivalent.
12
4
3
2
1
G
3X3 4X3 GX32X3
NOTE: Do not over tighten the socket
cup to prevent damaging the glass.

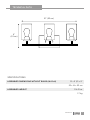
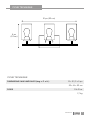
TECHNICAL DATA
SPECIFICATIONS
ASSEMBLED DIMENSIONS WITHOUT BULBS (W×D×H)
ASSEMBLED WEIGHT
NORTHFIELD
21 × 5 1/2 × 9”
53 × 14 × 23 cm
3 lb 12 oz
1.7 kg
13
21” (53 cm)
9”
(23 cm)

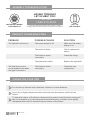
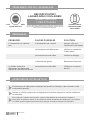
HAVING TROUBLE?
LET US HELP YOU!
BEFORE RETURNING
YOUR PRODUCT
CALL US;
WE CAN HELP
If you have questions regarding your product or require
warranty assistance, please call our customer service helpline.
TOLL-FREE:
1-888-670-6684
ASSEMBLY TROUBLESHOOTING
PRODUCT TROUBLESHOOTING
PROBLEM POSSIBLE CAUSES SOLUTION
CARING FOR YOUR ITEM
1
2
3
Make sure the power
supply is on.
The power supply is off.
Do not use any cleaners with chemicals, solvents, or harsh abrasives.
Use a dry or slightly dampened clean cloth and wipe the exterior surface of the
fixture.
To clean the interior of the fixture, disconnect the power to the fixture by turning off
the circuit breaker or by removing the fuse at the fuse box, and then use a slightly
dampened clean cloth to wipe the interior surface of the fixture.
NORTHFIELD
The light will not turn on.
Check the wire
connections.
The fixture is wired
incorrectly.
Replace the light bulb.The light bulb is dead.
Test or replace the
switch.
The switch is faulty.
Check the wiring.The fixture is wired
incorrectly.
The fuse blows or the
circuit breaker trips when
the light is turned on.
14

1-YEAR LIMITED WARRANTY*
This CANVAS™ product carries a one (1) year warranty against defects in workmanship and
materials. Trileaf Distribution agrees to replace the defective product free of charge within the
stated warranty period, when returned by the original purchaser with proof of purchase. This
product is not guaranteed against wear or breakage due to misuse and/or abuse.
Made in China
Imported by Trileaf Distribution Trifeuil Toronto, Canada M4S 2B8
PRODUCT NO.
WARRANTY INFORMATION
152-2613-8
NORTHFIELD 15


ASSEMBLY INSTRUCTIONS
HAVING TROUBLE?
TOLL-FREE:
1-888-670-6684
IMPORTANT:Pleasereadthismanualcarefully
beforebeginningassemblyofthisproduct.
Keepthismanualforfuturereference.
PRODUCT NO.
INSTRUCTIONS D’ASSEMBLAGE
DES DIFFICULTÉS?
NUMÉRO SANS FRAIS :
1-888 670-6684
IMPORTANT: Veuillez lire attentivement ce manuel
avant de commencer l’assemblage de ce produit.
Conservez ce guide aux fins de consultation ultérieure.
ASSEMBLY INSTRUCTIONS
HAVING TROUBLE?
TOLL-FREE:
1-888-670-6684
IMPORTANT:Pleasereadthismanualcarefully
beforebeginningassemblyofthisproduct.
Keepthismanualforfuturereference.
PRODUCT NO.
Nº DE MODÈLE :
NORTHFIELD
152-2613-8
RAMPE D’ÉCLAIRAGE À 3 LUMIÈRES

Nous croyons au pouvoir de la décoration
et à sa capacité de façonner votre maison.
C’est pourquoi nous nous inspirons des
gens du pays et de leur mode de vie pour
concevoir la collection de CANVASMC.
Qu’il s’agisse de meubles tendance, de
décorations pour les fêtes ou pour le plein air,
CANVASMC vous permet de rafraîchir
facilement votre espace pour qu’il reflète
votre style unique et votre mode de vie.
Nous serions ravis de connaître votre opinion
et nous vous invitons à nous faire part de vos
commentaires. Visitez notre site Web à
l’adresse canadiantire.ca pour nous faire part
de votre expérience et partagez vos photos
en utilisant le mot-clic #MonStyleCANVAS.
Montrez-nous comment vous donnez vie aux
articles CANVASMC. Nous avons hâte de les
voir!

AVERTISSEMENT! CONSULTEZ UN ÉLECTRICIEN QUALIFIÉ POUR
DÉTERMINER SI VOUS AVEZ LE BON CONDUCTEUR DE CIRCUIT
DE DÉRIVATION.
TABLE DES MATIÈRES
NETTOYAGE : Avant de nettoyer votre luminaire, mettez l’interrupteur en position
d’arrêt ou coupez la source d’alimentation.
Essuyez le lampadaire avec un chiffon doux et humide.
IMPORTANT : CONSERVEZ CE GUIDE AUX FINS DE CONSULTATION
ULTÉRIEURE, ET LISEZ-LE ATTENTIVEMENT.
OUTILS REQUIS
LISEZ LES INSTRUCTIONS ET EXAMINEZ TOUS LES SCHÉMAS
AVANT D’INSTALLER LE LUMINAIRE. INSTRUCTIONS GÉNÉRALES :
1. Tous les raccordements électriques doivent être conformes aux
normes et règlements locaux et au Code canadien de l’électricité.
2. Ces luminaires doivent être installés sur une boîte de sortie électrique. La boîte
de sortie doit être directement soutenue par la structure du bâtiment.
3. Éteignez le disjoncteur ou retirez le fusible approprié pour déconnecter la
source d’alimentation avant d’installer le luminaire.
4. Mettre l’interrupteur de lumière en position d’arrêt pour couper l’alimentation
n’est pas suffisant pour éviter un choc électrique. En cas de doute sur la sécurité
d’une installation ou d’une réparation électrique, consultez un électricien qualifié.
Outils requis 19
Liste des pièces 20
Liste du matériel 21
Vue éclatée 22
Avant de commencer l’assemblage 23
Installation électrique 24
Guide étape par étape 25
Fiche technique 29
Problèmes lors de l’assemblage 30
Dépannage 30
Entretien de votre article 30
Garantie 31
19NORTHFIELD
Tournevis à tête
cruciforme nº 2
Coupe
-fils
Pince à
dénuder
Tournevis à
tête plate
Escabeau
Lunettes de
sécurité
Ruban
isolant

RÉFÉRENCE DESCRIPTION ILLUSTRATION QUANTITÉ
1
3
2
4
LISTE DES PIÈCES
Corps principal du
luminaire 1
Bague de douille 3
Coupelle de douille 3
Diffuseur en verre 3
20 NORTHFIELD
La page est en cours de chargement...
La page est en cours de chargement...
La page est en cours de chargement...
La page est en cours de chargement...
La page est en cours de chargement...
La page est en cours de chargement...
La page est en cours de chargement...
La page est en cours de chargement...
La page est en cours de chargement...
La page est en cours de chargement...
La page est en cours de chargement...
La page est en cours de chargement...
-
 1
1
-
 2
2
-
 3
3
-
 4
4
-
 5
5
-
 6
6
-
 7
7
-
 8
8
-
 9
9
-
 10
10
-
 11
11
-
 12
12
-
 13
13
-
 14
14
-
 15
15
-
 16
16
-
 17
17
-
 18
18
-
 19
19
-
 20
20
-
 21
21
-
 22
22
-
 23
23
-
 24
24
-
 25
25
-
 26
26
-
 27
27
-
 28
28
-
 29
29
-
 30
30
-
 31
31
-
 32
32


Canvas Northfield 3-Light Le manuel du propriétaire
- Taper
- Le manuel du propriétaire
dans d''autres langues
Documents connexes
-
Canvas Northfield 3-Light Le manuel du propriétaire
-
-
-
-
-
-
-
-
-
Autres documents
-
for Living Caged Ceiling Le manuel du propriétaire
-
-
YOTRIO Spadina 3 Piece Folding Bistro Set – Table Assembly Instructions
-
-
NOMA Protino 3-Light Track Light Fixture Le manuel du propriétaire
-
Vermont Castings Merrimack Non-Catalytic Wood Burning Insert Manuel utilisateur