Moulinex YOGURTEO YG231E32 Le manuel du propriétaire
- Taper
- Le manuel du propriétaire

www.moulinex.com
FR
EN
DE
NL
IT
ES
PT
TR
EL
DA
SV
NO
FI
RU
UK
PL
LT
LV
ET
AR
FA
Notice_YOGURTEO_2550769-03_Mise en page 1 13/04/11 09:58 Pagea1

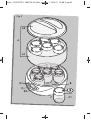
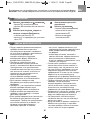
fig.1
A
A2
A1
E1
D
E2
C
C2
C1
B
Notice_YOGURTEO_2550769-03_Mise en page 1 13/04/11 09:58 Pagea2

1
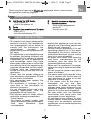
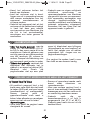
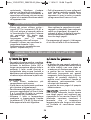
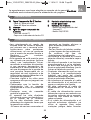
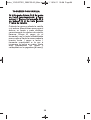
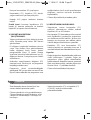
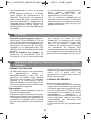
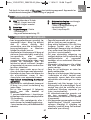
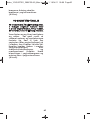
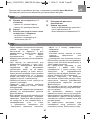
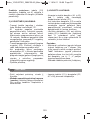
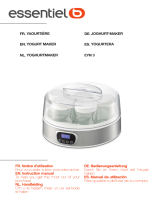
DESCRIPTION
A Couvercle composé de 2 parties :
- Couvercle A1 : Couvercle principal
- Couvercle A2 : Couvercle secondaire
B
Corps
C
Pots de yaourt composés de 2 parties
- Pot en verre C1
- Couvercle dateur C2
CONSEILS DE SECURITE
•
Lisez attentivement le mode d’emploi
avant la première utilisation de votre
appareil et conservez-le pour les
utilisations futures : une utilisation
non-conforme au mode d’emploi
dégagerait Moulinex de toute
responsabilité.
• Cet appareil n’est pas prévu pour
être utilisé par des personnes (y
compris des enfants) dont les
capacités physiques, sensorielles ou
mentales sont réduites, ou des
personnes dénuées d’expérience ou
de connaissance, sauf si elles ont pu
bénéficier, par l’intermédiaire d’une
personne responsable de leur
sécurité, d’une surveillance ou
d’instructions préalables concernant
l’utilisation de l’appareil.
• Il convient de surveiller les enfants
pour s’assurer qu’ils ne jouent pas
avec l’appareil.
•
Vérifiez que la tension d’alimentation
de votre appareil correspond bien à
celle de votre installation électrique.
• T
oute erreur de branchement
annule la garantie.
• Votre machine a été conçue pour un
usage domestique et à l’interieur de
la maison seulement. Elle n’a pas été
conçue pour être utilisée dans les
cas suivants qui ne sont pas
couverts par la garantie :
- Dans des coins de cuisines réservés
au personnel, dans des magasins,
bureaux et autres environnements
professionnels,
- Dans des fermes,
Nous vous remercions d’avoir choisi un appareil de la gamme
M
oulinex qui est exclusivement prévu pour la fabrication de yaourts.
D
Ecran électronique avec retro
éclairage
E
Boutons de commande :
- Bouton de programmation du
réglage du temps E1
- Bouton marche/arrêt E2
- Par les clients des hôtels, motels et
autres environnements à caractère
résidentiel,
- Dans des environnements de type
chambres d’hôtes.
• Débranchez votre appareil dès que
vous cessez de l’utiliser et lorsque
vous le nettoyez.
• N’utilisez pas votre appareil s’il ne
fonctionne pas correctement ou s’il
a été endommagé. Dans ce cas,
adressez-vous à un centre service
agréé Moulinex (voir liste dans le
livret service).
• Toute intervention autre que le
nettoyage et l’entretien usuel par le
client doit être effectuée par un
centre service agréé Moulinex.
• Ne mettez pas l’appareil, le câble
d’alimentation ou la fiche dans l’eau
ou tout autre liquide.
• Ne laissez pas pendre le câble
d’alimentation à portée de mains
des enfants.
• Le câble d’alimentation ne doit
jamais être à proximité ou en
contact avec les parties chaudes de
votre appareil, près d’une source de
chaleur ou sur un angle vif.
• Si le câble d’alimentation ou la fiche
sont endommagés, n’utilisez pas
l’appareil. Afin d’éviter tout danger,
faites-les obligatoirement remplacer
par un centre service agréé
Moulinex (voir liste dans le livret
service).
• Pour votre sécurité, n’utilisez que des
accessoires et des pièces détachées
FR
Notice_YOGURTEO_2550769-03_Mise en page 1 13/04/11 09:58 Page1

2
Moulinex adaptés à votre appareil.
• Tous les appareils sont soumis à un
contrôle qualité sévère. Des essais
d’utilisation pratiques sont faits avec
des appareils pris au hasard, ce qui
explique d’éventuelles traces
d’utilisation.
RECOMMANDATIONS
CONSEILS PRATIQUES POUR LE CHOIX DU LAIT ET DU FERMENT
• Avant la première utilisation :
Nettoyez les pots (C1) et les
couvercles (C2, A1 et A2) à l’eau
chaude savonneuse ou au lave-
vaisselle. Pour nettoyer l’intérieur de
la cuve (B), un simple coup
d’éponge suffit. Ne trempez jamais
le corps de l’appareil dans l’eau.
•
En cours d’utilisation :
Ne déplacez pas la yaourtière
pendant son fonctionnement,
n’ouvrez surtout pas le couvercle
(A1).
Ne placez pas la yaourtière dans
des endroits soumis à des
vibrations (par exemple au dessus
d’un réfrigérateur), ou exposés à
des courants d’air. Le respect de
ces recommandations permet la
réussite de vos yaourts.
Pour préparer les yaourts, vous aurez
besoin d’un litre de lait et d’un
ferment.
1
) CHOIX DU LAIT
- Pour des raisons pratiques,
choisissez un lait de préférence
entier ne nécessitant pas
d’ébullition (lait UHT de longue
conservation ou lait en poudre). Les
laits crus (frais) ou pasteurisés
doivent être portés à ébullition puis
refroidis et passés au tamis pour
éliminer les peaux.
R
emarques :
- Le lait entier donne plus de fermeté
et plus d’arôme.
- Les laits frais ou pasteurisés
contiennent plus de vitamines et
d’oligo-éléments.
- Pour obtenir des yaourts plus
consistants, vous pouvez ajouter au
litre de lait 2 ou 3 cuillères à soupe
de lait en poudre en mélangeant
soigneusement.
- Utiliser le lait à température
ambiante ou légèrment tiède
(chauffer à 37°C ou 40°C). Ne pas
utiliser de lait sortant directement
du réfrigérateur.
2
) CHOIX DU FERMENT
Il se fait soit :
- à partir d’un yaourt nature du
commerce (à base de lait entier de
préférence) avec une date limite de
consommation la plus éloignée
possible.
- à partir d’un ferment sec lyophilisé
(acheté en grandes surfaces, dans
les pharmacies, dans certains
magasins de produits diététiques).
Dans ce cas, respectez le temps
d’activation préconisé sur la notice
du ferment.
- à partir d’un yaourt de votre
fabrication.
Important : quand on a fait une
première fournée, il suffit de garder
l’un des yaourts de celle-ci pour
ensemencer les suivants. Au bout de
5 fournées, il convient de renouveler
le ferment, qui s’appauvrit
légèrement à la longue et donne
alors un résultat de consistance
moins solide.
Notice_YOGURTEO_2550769-03_Mise en page 1 13/04/11 09:58 Page2

3
RÉALISATION DES YAOURTS
NETTOYAGE
1)
PRÉPARATION DU MÉLANGE :
- Mélangez très soigneusement un
litre de lait avec le ferment de votre
choix (yaourt ou ferment sec
lyophilisé) dans un récipient muni
d’un bec verseur. Evitez de faire
mousser la préparation.
- Pour obtenir un bon mélange,
battez le yaourt à l’aide d’une
fourchette pour le transformer en
une pâte bien lisse et ajoutez
ensuite le lait, tout en continuant de
mélanger. Si vous utilisez un ferment
lyophilisé, incorporez le ferment au
lait et mélangez très soigneusement.
- Répartissez le mélange dans les
pots (C1).
- Placez les pots (C1), sans leur
couvercle (C2), dans la yaourtière.
- Posez le couvercle (A1) sur la
yaourtière.
C
onseil pratique : rangez les
couvercles des pots (C2) sur le
couvercle A1 puis recouvrez avec le
couvercle A2 (voir schéma).
2) MISE EN MARCHE DE LA
YAOURTIÈRE :
Branchez alors la yaourtière. L'écran
affiche "00" en clignotant.
-
Selectionnez le temps de
préparation à l'aide du bouton E1.
Maintenez appuyé jusqu'à ce que le
temps souhaité s'affiche. Le temps
maximal de programmation est de
15 heures. Pour accélérer le réglage
du temps, appuyez 2 secondes en
continu sur le bouton E1.
- Appuyez ensuite sur le bouton
marche/arrêt (E2). L'écran s'allume
et indique le départ du programme.
- Lorsque le temps de votre
programmation est terminé, l'écran
lumineux s'éteint, affiche '00' avec
clignotement et un signal sonore,
répété 5 fois, vous prévient. Le signal
sonore peut s'arrêter avant, en
appuyant sur le bouton marche/
arrêt.
- Débranchez l'appareil.
3) RANGEMENT DES YAOURTS
:
- Soulevez les couvercles (A1 et A2),
en prenant soin d'éviter l'écoulement
de la condensation dans les pots
(C1).
- Indiquez à l’aide du dateur manuel,
situé sur chaque couvercle (C2), la
date limite de consommation des
yaourts, par simple rotation de la
partie supérieure du couvercle sur
le chiffre souhaité.
- Vissez les couvercles (C2) sur les
pots en verre (C1) et placez-les au
réfrigérateur au moins 6 heures
avant de les savourer. Si vous
attendez 24 heures, ils seront plus
fermes.
R
emarques :
- La durée de conservation des
yaourts nature au réfrigérateur est
de 7 jours maximum. Les autres
types de yaourts sont à consommer
plus rapidement. La date limite de
consommation à indiquer sur les
couvercles sera par conséquent
J+7 pour un yaourt nature, J étant le
jour de fabrication des yaourts.
- Ne mettez jamais l’appareil au
réfrigérateur.
- Débranchez toujours l’appareil
avant de le nettoyer.
- Ne trempez jamais le corps de
l’appareil dans l’eau. Nettoyez-le
avec un chiffon humide et de l’eau
chaude savonneuse. Rincez et
séchez.
- Les pots de yaourt (C1) et les
couvercles (C2, A1 et A2) passent
au lave-vaisselle.
Notice_YOGURTEO_2550769-03_Mise en page 1 13/04/11 09:58 Page3

4
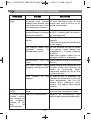
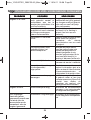
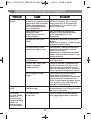
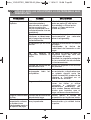
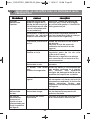
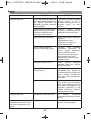
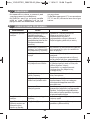
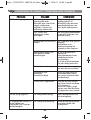
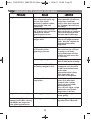
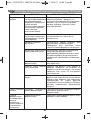
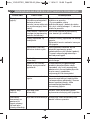
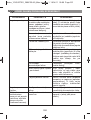
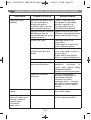
PROBLEMES CAUSES SOLUTIONS
Yaourts trop liquides. Utilisation de lait demi-
écrémé ou écrémé sans
ajout de poudre de lait
(le lait utilisé seul n’est
alors pas assez riche en
protéines).
Ajouter 1 pot de yaourt
de lait en poudre (2 avec
du lait écrémé) ou utiliser
du lait entier et ½ pot de
lait entier en poudre.
Déplacements, chocs ou
vibrations de la
yaourtière pendant la
fermentation.
Ne pas bouger la
yaourtière pendant son
fonctionnement (ne pas la
poser sur un réfrigérateur).
Le ferment n’est plus actif. Changer de ferment ou
de marque de yaourt.
Vérifier la date de péremption
de votre ferment ou de votre
yaourt.
La yaourtière a été
ouverte pendant le cycle.
Ne pas sortir les pots ni ouvrir
la yaourtière avant la fin du
cycle (environ 8 heures).
Maintenir la yaourtière
à l’abri des courants d’air
pendant son fonctionnement.
Temps de fermentation
trop court.
Lancer un deuxième
cycle à la fin du premier.
Les pots n’ont pas été
bien nettoyés/rincés.
Avant de verser votre
préparation dans les
pots, vérifier qu’il n’y a
aucune trace de liquide
vaisselle, de produit
nettoyant ou de saletés
sur la partie intérieure des
pots.
Fruits ajoutés au yaourt.
Penser à faire cuire les
fruits, ou préférer l’utilisation
de compotes ou confitures
(à température ambiante).
Les fruits crus libèrent des
éléments acides qui
empêchent le yaourt de
bien se former.
Yaourts trop acides. Temps de fermentation
trop long.
Veiller à réduire le temps
de fermentation lors de la
prochaine fournée.
Un liquide visqueux (appelé
serum) s’est formé à la
surface du yaourt en fin de
fermentation.
Fermentation trop
importante.
Diminuer le temps de
fermentation et/ou
rajouter du lait en poudre.
QUELLES SOLUTIONS A VOS PROBLÈMES FRÉQUENTS ?
Notice_YOGURTEO_2550769-03_Mise en page 1 13/04/11 09:58 Page4

5
SI VOTRE APPAREIL NE FONCTIONNE PAS, QUE FAIRE ?
RECETTES
- Vérifiez tout d’abord le branchement.
Vous avez suivi toutes les instructions
et votre appareil ne fonctionne
toujours pas ?
Adressez-vous à votre revendeur, ou
à un centre service agréé Moulinex
(voir liste dans le livret “Moulinex
service”).
YAOURTS AROMATISÉS
YAOURTS AUX SIROPS
1 litre de lait, 1 yaourt nature ou
1
sachet de ferment.
• sirops de fruits (grenadine,
orange, cassis, citron,
mandarine, fraise, groseille,
orgeat, framboise, fraise des
bois, banane, myrtille, cerise...):
5 cuillérées à soupe.
• sirops de fleurs (rose, violette,
jasmin, santal) : 4 cuillérées à
soupe.
• sirop de menthe : 4 cuillérées à
soupe.
Versez le yaourt ou le contenu du
sachet de ferment dans un
récipient. Ajoutez-y le sirop et versez-
y peu à peu le lait en ne cessant de
mélanger la préparation avec une
fourchette. Versez le mélange dans
les pots et placez-les dans la
yaourtière (8 heures).
Y
AOURTS AUX FRUITS CUITS
YAOURT À LA CONFITURE
1 litre de lait, 1 yaourt nature ou
1
sachet de ferment, 4 cuillérées à
soupe d’une confiture pas trop
épaisse et contenant des petites
baies ou des petits morceaux de
fruits: airelles, myrtilles, rhubarbe,
gingembre, fraise, marmelade
d’oranges.
Fouettez la confiture avec un peu de
lait. Ajoutez le yaourt ou le ferment.
Mélangez bien, puis versez le reste
du lait.
Versez le mélange dans les pots et
placez-les dans la yaourtière
(8 heures).
V
ariante : si vous souhaitez faire un
yaourt bicouche, il vous suffit de
mettre dans le fond des pots de la
confiture. Versez ensuite très
soigneusement le mélange
lait/yaourt ou lait/ferment dans les
pots. Placez-les ensuite dans la
yaourtière (8 heures).
PRODUIT ÉLECTRIQUE OU ÉLECTRONIQUE EN FIN DE VIE
Votre appareil contient de nombreux matériaux valorisables ou recyclables.
Confiez celui-ci dans un point de collecte ou à défaut dans un centre service
agrée pour que son traitement soit effectué.
Participons à la protection de l’environnement !
i
Notice_YOGURTEO_2550769-03_Mise en page 1 13/04/11 09:58 Page5

6
Y
AOURTS A LA VANILLE
70 cl de lait entier, 20 g de lait en
poudre demi-écrémé, 1 yaourt
nature ou 1 sachet de ferment,
8
0 g de sucre, 30cl de crème
liquide, 1 gousse de vanille.
Chauffez la crème puis ajoutez la
vanille et le sucre. Mélangez bien
pour que le sucre fonde et pour bien
répartir les graines de vanille.
Réservez. Détendez le yaourt (ou le
ferment) avec le lait que vous
ajouterez petit à petit. Versez la
crème sur le mélange lait/yaourt ou
lait/ferment tout en mélangeant, et
incorporez la poudre de lait. Versez
cette préparation dans les pots et
placez-les dans la yaourtière
(8 heures).
Notice_YOGURTEO_2550769-03_Mise en page 1 13/04/11 09:58 Page6

7
DESCRIPTION
SAFETY INSTRUCTIONS
A Lid made up of 2 parts:
- Lid A1: Main lid
- Lid A2: Secondary lid
B
Body
C
Yoghurt jars made up of 2 parts:
- Glass jar C1
- Lid with date display C2
Thank you for choosing a Moulinex appliance which is exclusively
designed for making yoghurts.
D
Backlit electronic display
E Control buttons:
- Time setting programme
button E1
- On/off switch E2
• This product has been designed for
domestic use only. Any commercial
use, inappropriate use or failure to
comply with the instructions, the
manufacturer accepts no
responsibility and the guarantee will
not apply.
• This appliance is not intended for use
by persons (including children) with
reduced physical, sensory or mental
capabilities, or lack of experience
and knowledge, unless they have
been given supervision or instruction
concerning use of the appliance by
a person responsible for their safety.
• Children must be supervised to
ensure that they do not play with the
appliance.
• Check that the power voltage for
your appliance corresponds to that
of your mains installation.
• Any connection error renders the
guarantee invalid.
• This appliance is intended to be
used only in the household, for
domestic purposes.
It is not intended to be used in the
following applications, and the
guarantee will not apply for:
• Staff kitchen areas in shops, offices
and other working environments,
-
Farm houses,
- By clients in hotels, motels and
other residential type environments,
-
Bed and breakfast type
environments.
• Unplug the appliance if you are not
going to use it for a long period and
when you are cleaning it.
• Do not use your appliance if it is not
operating correctly or if it has been
damaged. If this occurs, contact an
authorised Moulinex service centre
(see list in service booklet).
• All repair work other than cleaning
and basic maintenance by the
customer must be done by an
approved Moulinex centre.
• Never put the appliance, the power
cord or the plug in water or any other
liquid.
• Do not leave the power cord within
reach of children.
• The power cord must never be close
to or in contact with the hot parts of
your appliance or close to a heat
source or a sharp edge.
• If the power cord or the plug is
damaged, do not use your
appliance. In order to avoid any
danger, have them replaced by an
approved Moulinex service centre
(see the list in the service booklet).
• For your safety, only use Moulinex
accessories and spare parts that
correspond to your appliance.
• All appliances are subject to strict
quality control. These include actual
usage tests on randomly selected
appliances, which would explain any
traces of use.
EN
Notice_YOGURTEO_2550769-03_Mise en page 1 13/04/11 09:58 Page7

8
place the yoghurt maker in any
place where there may be vibrations
(for example above a refrigerator)
or which is exposed to draughts.
Complying with these
recommendations will ensure
successful yoghurts.
To make your yoghurt, you will need
one litre of milk and a ferment.
• B
efore using for the first time: clean
the jars (C1) and the lids (C2, A1
and A2) using warm soapy water or
in the dishwasher. To clean inside the
body (B), simply use a damp cloth.
Never plunge the body of the
appliance into water.
• W
hile in use: do not move the
appliance during use, in particular,
do not open the lid (A1). Do not
RECOMMENDATIONS
TIPS FOR CHOOSING YOUR MILK AND FERMENT
MAKING THE YOGHURTS
1) CHOOSING YOUR MILK
- For good results and ease of pre
paration, use whole or semi-skimmed
UHT milk or reconstituted milk
powder. Fresh milk (untreated) or
pasteurised milk needs to be boiled
and then cooled and sieved in order
to remove the skin.
N
otes:
- Whole milk makes for a firmer and
more flavoursome yoghurt.
- Raw untreated or pasteurised milk
contains more vitamins and trace
elements.
- To make yoghurts with a better
consistency, you can add one or two
jars of skimmed milk powder to your
litre of milk, stirring carefully.
- Use the milk at room temperature or
slightly warm (heat to 37°C or 40°C
and measure using a thermometer).
Do not use milk straight out of the
refrigerator.
2) CHOOSING YOUR FERMENT (CULTURE)
Your ferment can be made either:
- using one individual pot (150 g size)
1) MAKING THE MIXTURE
- Mix the litre of milk very carefully with
the ferment you have chosen
(yoghurt or lyophilised dry ferment/
yoghurt culture) in a container with a
spout. Be careful not to froth this
mixture up.
- For the best results, if using a pot of
yoghurt mix it using a fork in order to
make it into a smooth paste and then
add the milk, stirring all the time. If
you are using a dry ferment/ culture,
fold it into the milk gently and mix
very carefully.
- Divide your mixture into the jars (C1).
natural unflavoured fresh yogurt
found in the shops (preferably made
from whole milk), with the longest
best before date possible.
- using lyophilised dry ferment or dried
yoghurt culture (bought in super-
markets, pharmacies and certain
health food shops) (Note: in the UK
only available in certain health food
shops or online). Use the activation
time and quantity of ferment/starter
recommended in the manufacturers
instructions.
- use one pot of plain yoghurt you
have already made in your youghurt
maker.
I
mportant: when you have made your
first set of yoghurts, you simply need to
keep one jar by in order to serve as the
ferment for the others. After 5 sets, the
ferment should be renewed because
after a while it becomes weaker and
provides for a less solid consistency.
Only used plain unflavoured yoghurts
as a ferment.
Notice_YOGURTEO_2550769-03_Mise en page 1 13/04/11 09:58 Page8

9
- Place the jars (C1), without their lid
(C2), into the yoghurt maker.
- Put the lids (A1) on the yoghurt
maker.
P
ractical tip: you can also place the
lids of the jars (C2) on the lid A1 and
then cover with the lid A2 (see
illustration).
N
otes: You can sweeten your yoghurts
either when you eat them or when you
make them. To do this add sugar to
the milk (no more than 80 g sugar for
1 Litre of milk) at the same time as you
add the ferment/culture and beat
with a whisk until the sugar dissolves
or dissolve the sugar when heating the
milk. Honey or artificial sweeteners
may also be used. If sweetening
yoghurts when you eat them, add
sugar or honey to your taste, generally
one or two teaspoons per pot is
sufficient.
2)
SWITCHING THE YOGHURT MAKER
ON
- Plug the yoghurt maker in. The screen
flashes "00".
-
Choose the preparation time using the
button E1. Keep your finger on the
button until the desired time is
displayed. The maximum programming
time is 15 hours. To rapidly advance the
time, keep your finger on the button E1
for 2 seconds.
- Then press the on/off button (E2). The
screen lights up and shows that the
CLEANING
- Always unplug the appliance before
cleaning it.
- Never plunge the body of the
appliance into water. Clean it with a
damp cloth and warm water and
washing-up liquid. Rinse and dry.
- The yoghurt jars (C1) and the lids
(C2, A1 and A2) are all dishwasher
safe.
CARE & HYGIENE WHEN MAKING YOGHURT
- All the equipment used in the
yoghurt making process - jars, jar lids
and if used saucepan, jug, sieve, and
spoons - should be sterilized either by
using Milton sterilizing solution or
cleaning in a dishwasher.
- Sterilising the jars and lids is
important to prevent the introduction
of any undesirable airborne
organisms which could interfere with
the incubation of the fement/
culture, and result in runny yoghurt
which will not set.
program has started.
- When the programming time has
finished "00" flashes on the display
and then a beep, which is repeated
5 times, informs you that the
programme has finished. The beep
can be stopped by pressing the
on/off button.
- Unplug the appliance.
3) STORING YOUR YOGHURTS:
- Lift the lids (A1 and A2), taking care
to prevent any condensation from
dripping into the jars (C1).
- Using the manual date display,
located on each lid (C2), set the best
before date of your yoghurts by
simply rotating the upper part of the
lid to the required number.
- Tighten the lids (C2) onto the glass
jars (C1) and place them in the
refrigerator for at least 6 hours before
enjoying them. If you wait 24 hours,
they will be even firmer.
N
otes:
- Plain yoghurts can be kept in the
refrigerator for a maximum of 7 days
days, depending on the freshness of
the milk. The best before date for
natural yoghurts will be the date the
yoghurts were made plus 7 days.
- Never put the appliance in the
refrigerator.
- Other types of flavoured yoghurts,
must be eaten more quickly. Use
within to 5 days.
Notice_YOGURTEO_2550769-03_Mise en page 1 13/04/11 09:58 Page9

10
SOLUTIONS TO FREQUENT PROBLEMS
PROBLEMS CAUSES SOLUTIONS
Yoghurts are too
runny.
Use of semi-skimmed or
skimmed milk without
adding milk powder (the
milk used on its own is not
rich enough in proteins).
Add 1 yoghurt jar of milk powder
(2 with skimmed milk) or use
whole milk and a half a jar of
whole milk powder.
The yoghurt maker was
moved, bumped or vibrated
during fermentation.
Do not move the yoghurt maker
while it is working (do not place it
on a refrigerator).
The ferment is no longer
active.
Change ferment or brand of
yoghurt.
Check the use-by-date of your ferment
or your yoghurt.
The yoghurt maker was
opened during its
fermentation cycle.
Do not remove the jars or open
the yoghurt maker before the
programme is finished (around
8 hours).
Keep the yoghurt maker out of
draughts while it is operating.
Fermentation time too
short.
Start a second cycle at the end of
the first.
The pots haven’t been
properly cleaned/rinsed.
Before pouring your preparation into
the pots, check that there are no
traces of washing-up liquid,
household cleaner or dirt on the
inside of the pots.
Fruit added to the
yoghurt.
Try cooking fruits, or preferably use
commercial stewed fruits or jams (at
room temperature). Raw fruits will
release acidic substances which
prevent the yoghurt from forming
correctly.
Yoghurts too
acidic.
Fermentation time too
long.
Reduce the fermentation time next
time you use the yoghurt maker.
A viscous liquid
(called serum)
has formed on
the yoghurt’s
surface at the
end of
fermentation.
Too much fermentation. Reduce the fermentation time
and/or add some powdered milk.
Notice_YOGURTEO_2550769-03_Mise en page 1 13/04/11 09:58 Page10

11
WHAT DO I DO IF MY APPLIANCE DOESN'T WORK?
END-OF-LIFE ELECTRONIC PRODUCT
- Start by checking the power cord
and plug.
Y
ou have carefully followed all
these instructions, and yet your
appliance still does not work? In
this case, contact your dealer or an
approved Moulinex Centre (see the
list in the "Moulinex Service" booklet).
RECIPES
FLAVOURED YOGHURTS
YOGHURTS WITH FLAVOURED SYRUPS
The syrups used are the type used
in cocktails.
1 litre of milk, 1 jar plain yoghurt
o
r 1 sachet of ferment.
• Fruit syrups (grenadine, orange,
blackcurrant, lemon, mandarin,
strawberry, redcurrant, barley
water, raspberry, wild strawberry,
banana, blueberry, cherry, etc):
5
tablespoons
• Flower syrups (rose, violet,
jasmine, sandalwood):
4
tablespoons.
• Mint syrup: 4 tablespoons.
Pour the yoghurt or the ferment into
a container. Add the cordial and
gradually pour the milk in, mixing all
of the time with a fork. Pour the
mixture into the jars and place them
in the yoghurt maker (8 hours)
without the lids.
YOGHURT WITH COOKED FRUIT
JAM YOGHURT
1 litre of milk, 1 jar plain yoghurt or
1 sachet of ferment, 4 tablespoons
of jam which is not too thick and
which contains small berries or
small pieces of fruit: cranberries,
blueberries, rhubarb, ginger,
strawberry, orange marmalade.
Whip the jam with a little bit of milk.
Add the yoghurt or ferment. Mix well,
then pour in the rest of the milk.
Pour the mixture into the jars and
place them in the yoghurt maker
(8 hours) without the lids.
V
ariation: if you want to make a two-
layer yoghurt, simply put the jam at
the bottom of the jars. Then pour the
If you have any problems or queries
please call our Customer Relations
Team first for expert help and advice:
Helpline:
0
845 602 1454 - UK
(01) 677 4003 -
ROI or contact us
via our website: www.moulinex.co.uk
Environmental protection first!
Your appliance contains valuable materials which can be recovered
or recycled.
Leave it at a local civic waste collection point.
i
Notice_YOGURTEO_2550769-03_Mise en page 1 13/04/11 09:58 Page11

12
milk/yoghurt or milk /ferment
mixture very carefully into the jars.
Then place them in the yoghurt
maker (8 hours) without the lids.
V
ANILLA YOGHURTS
700 ml of whole milk, 20 g of semi-
skimmed milk powder, 1 jar plain
yoghurt or 1 sachet of ferment,
8
0 g of caster sugar, 300 ml of
single cream, 1 vanilla pod (cut
lengthways to expose seeds).
Warm the cream up and then add
the vanilla pod and sugar. Mix well
so that the sugar melts and the
vanilla seeds are well distributed. Put
to one side. Dilute the yoghurt (or the
ferment) with the milk, which you
add little by little. Pour the cream into
the milk/yoghurt or milk/ ferment
mixture, and then mix in the milk
powder. Pour the mixture into the jars
and place them in the yoghurt
maker (8 hours) without the lids.
Notice_YOGURTEO_2550769-03_Mise en page 1 13/04/11 09:58 Page12

13
BESCHREIBUNG
SICHERHEITSHINWEISE
A
Aus zwei Teilen bestehender Deckel:
- Deckel A1: Hauptdeckel
- Deckel A2: Nebendeckel
B
Gehäuse
C
Aus zwei Teilen bestehende
Joghurtgläschen:
- Gläschen C1
- Datumsdeckel C2
Wir freuen uns, dass Sie sich für ein ausschließlich zur Zubereitung von
Joghurt bestimmtes Gerät von M
oulinex entschieden haben.
D
Elektronisches Display mit
Hintergrundbeleuchtung
E Bedienungsknöpfe:
- Knopf zum Einstellen der Zeit E1
- An/Aus Knopf E2
• L
esen Sie die
Gebrauchsanweisung vor der
ersten Inbetriebnahme des
Geräts aufmerksam durch und
heben Sie sie für später auf:
bei unsachgemäßem Gebrauch
entgegen der
Gebrauchsanweisung
übernimmt Moulinex keine
Haftung.
• Dieses Gerät darf nicht von
Personen (inbegriffen Kindern) mit
eingeschränkten körperlichen,
sensorischen oder geistigen
Fähigkeiten benutzt werden. Das
Gleiche gilt für Personen, die keine
Erfahrung mit dem Gerät besitzen
oder sich mit ihm nicht auskennen,
außer wenn sie von einer für ihre
Sicherheit verantwortlichen Person
beaufsichtigt werden oder von
dieser mit dem Gebrauch des
Gerät vertraut gemacht wurden.
• Kinder müssen beaufsichtigt
werden, damit sie nicht mit dem
Gerät spielen.
• Vergewissern Sie sich, dass die
Betriebsspannung Ihres Geräts mit
der Spannung Ihrer
Elektroinstallation übereinstimmt.
• B
ei falschem Anschluss erlischt
die Garantie.
• Ihr Gerät ist ausschließlich für den
Hausgebrauch und den Betrieb in
geschlossenen Räumen bestimmt.
Die Garantie gilt nicht für die
Benutzung des Geräts in folgenden
Bereichen:
- In Kochecken für das Personal in
Geschäften, Büros und sonstigen
Arbeitsumfeldern,
- auf ländlichen Anwesen,
- für den Gebrauch durch Gäste
von Hotels, Motels und sonstigen
Umfeldern mit
Beherbergungscharakter,
- in Umfeldern wie Gästezimmern.
• Trennen Sie das Gerät nach der
Benutzung und vor der Reinigung
vom Stromnetz.
Ziehen Sie den Stecker nie am
Kabel aus der Steckdose.
Stellen Sie das Gerät nicht in der
Nähe von Wärmequellen wie Herd
oder Gasflammen ab.
• Das Gerät darf nicht benutzt
werden, wenn es nicht richtig
funktioniert oder beschädigt
wurde. Wenden Sie sich in diesem
Fall an ein autorisiertes
Servicecenter von Moulinex (siehe
Liste im Serviceheft)
DE
Notice_YOGURTEO_2550769-03_Mise en page 1 13/04/11 09:58 Page13

14
• Alle Eingriffe, die über die
Reinigung und die normale
Wartung durch den Kunden
hinausgehen, müssen von einem
autorisierten Servicecenter von
Moulinex vorgenommen werden.
• Tauchen Sie das Gerät, das
Stromkabel und den Stecker nicht
ins Wasser oder sonstige
Flüssigkeiten.
• Lassen Sie das Stromkabel nicht in
Reichweite von Kindern
herunterhängen.
• Das Stromkabel darf nicht in die
Nähe der heißen Teile des Gerätes
geraten oder mit ihnen in
Berührung kommen; es muss von
Hitzequellen und scharfen Kanten
fern gehalten werden.
• Wenn das Stromkabel oder der
Stecker beschädigt sind, darf das
Gerät nicht benutzt werden. Um
jedwede Gefahr auszuschließen,
muss das Stromkabel in einem
autorisiereten Servicecenter von
Moulinex ausgetauscht werden
(siehe Liste im Serviceheft).
• Verwenden zu Ihrer eigenen
Sicherheit nur für Ihr Gerät
geeignete Zubehör- und Ersatzteile
von Moulinex.
• Alle Geräte werden einer strengen
Qualitätskontrolle unterzogen. Es
werden Gebrauchstests an zufällig
ausgewählten Geräten
durchgeführt, was eventuelle
Benutzungsspuren erklärt.
EMPFEHLUNGEN
PRAKTISCHE TIPPS ZUR AUSWAHL VON MILCH UND
FERMENT
• Vor der ersten Inbetriebnahme:
Reinigen Sie die Gläschen (C 1)
und die Deckel (C 2, A1 und A2) mit
heißem Seifenwasser oder in der
Spülmaschine. Die Heizplatte des
Behälters (B) sollte nur mit einem
Schwamm gereinigt werden.
• W
ährend des Betriebs:
Transportieren Sie das Gerät nicht,
wenn sie in Betrieb ist und öffnen
Sie auf keinen Fall den Deckel (A1).
Stellen Sie das Gerät nicht an Orten
mit starken Vibrationen. (zum
Beispiel einen Kühlschrank) und
achten es darauf, dass sie keinem
Luftzug ausgesetzt ist. Die
Beachtung dieser Empfehlungen
gewährleistet das Gelingen Ihrer
Joghurts.
Zur Zubereitung von Joghurt
benötigen Sie einen Liter Milch und
ein Ferment.
1) WAHL DER MILCH
• Wählen Sie aus praktischen
Gründen bevorzugt Vollmilch, die
nicht gekocht werden muss (lang
haltbare UHT-Milch oder
Milchpulver). Rohmilch
(Frischmilch) und pasteurisierte
Milch müssen abgekocht werden;
danach abkühlen lassen und
durch ein Sieb laufen lassen, um
die Milchhaut auszufiltern.
B
itte beachten:
• Bei Verwendung von Vollmilch wird
Notice_YOGURTEO_2550769-03_Mise en page 1 13/04/11 09:58 Page14

15
der Joghurt fester und hat mehr
Aroma.
• Frischmilch und pasteurisierte
Milch enthalten mehr Vitamine und
Oligoelemente.
• Wenn Sie besonders festen Joghurt
zubereiten wollen: Geben Sie dem
Liter Milch 2 oder 3 Esslöffel
Milchpulver bei und mischen Sie
dieses gründlich unter.
• Verwenden Sie Milch mit
Zimmertemperatur oder leicht
angewärmte Milch (37°C bis
40°C). Verwenden Sie keine Milch,
die direkt aus dem Kühlschrank
kommt.
2
) WAHL DES FERMENTS
Das Ferment gewinnt man entweder:
• aus einem möglichst frischen
handelsüblichen Naturjoghurt
(bevorzugt auf Basis von Vollmilch).
•
aus einem lyophilisierten
Trockenferment (erhältlich in
Supermärkten, Apotheken und
vielen auf gesunde Ernährung
spezialisierten Geschäften). Halten
Sie sich in diesem Fall an die in der
Gebrauchsanweisung des Ferments
angeführte Aktivierungszeit.
• oder aus einem hausgemachten
Joghurt.
W
ichtig: Nach der Zubereitung der
ersten Joghurts brauchen Sie nur
einen dieser Joghurts aufzuheben,
um die folgenden Joghurts mit
Ferment zu versorgen. Nach
5 Zubereitungen sollte ein neues
Ferment verwendet werden, da
dessen Wirkung mit der Zeit
nachlässt, was negative
Auswirkungen auf die Konsistenz der
Joghurts hat.
ZUBEREITUNG VON JOGHURT
1) ZUBEREITUNG DER MISCHUNG:
• Vermischen Sie in einer Schüssel
mit Ausgießtülle sehr sorgfältig
einen Liter Milch mit dem Ferment
Ihrer Wahl (Joghurt oder
lyophilisiertes Trockenferment). Die
Zubereitung darf nicht schäumen.
• Schlagen Sie den Joghurt mit einer
Gabel, um ihn gut
durchzumischen, zu einer glatten
Masse und geben Sie danach
unter ständigem Rühren die Milch
hinzu. Bei Verwendung von
lyophilisiertem Trockenferment
muss das Ferment in die Milch
gegeben und gut untergemischt
werden.
• Geben Sie die Mischung in die
Gläschen (C1).
• Geben Sie die Gläschen (C1) ohne
ihren Deckel (C2) in die
Joghurtmaschine.
• Setzen Sie den Deckel (A1) auf das
Gerät.
E
in praktischer Tipp: Legen Sie die
Deckel der Gläschen (C2) auf den
Deckel A1 und legen Sie den Deckel
A2 darauf (siehe Abbildung).
2
) INBETRIEBNAHME DES GERÄTES:
• Schließen Sie das Gerät an. Auf
dem Display wird "00" angezeigt
und die Anzeige blinkt.
• Stellen Sie die Zubereitungszeit am
Knopf E1 ein. Drücken Sie diesen so
lange, bis die gewünschte
Zeitspanne angezeigt wird. Die
Notice_YOGURTEO_2550769-03_Mise en page 1 13/04/11 09:58 Page15

16
maximale Zeitspanne beträgt
15 Stunden. Zum schnelleren
Einstellen der Zeitspanne: Drücken
Sie den Knopf E1, 2 Sekunden lang.
• Drücken Sie anschließend den
An/Aus Knopf (E2). Die Anzeige
leuchtet auf und zeigt den
Programmstart an.
• Sie werden über die Fertigstellung
des Joghurts, am Ende der
programmierten Zeit durch ein
Blinken im Display "00“ und einen
5-maligen Signalton informiert.
Der Signalton kann durch einen
Druck auf den An/Aus Knopf
ausgeschaltet werden.
• Ziehen Sie den Netzstecker aus der
Steckdose.
3
) AUFBEWAHRUNG DER JOGHURTS:
• Nehmen Sie die Deckel (A1 und
A2) ab und achten Sie dabei
darauf, dass die Kondensation in
den Gläschen (C1) nicht
herausläuft.
• Geben Sie mit der auf den Deckeln
(C2) befindlichen manuellen
Dateneingabe das Verfallsdatum
der Joghurts ein; drehen Sie dazu
einfach den oberen Teil des
Deckels auf die gewünschte Zahl.
• Schrauben Sie die Deckel (C2) auf
die Gläschen (C1) und stellen Sie
diese vor dem Verzehr mindestens
6 Stunden lang in den Kühlschrank.
Nach 24 Stunden erreichen die
Joghurts ihre maximale Festigkeit.
B
itte beachten:
- Naturjoghurt hält sich im
Kühlschrank höchstens 7 Tage. Die
anderen Joghurtarten sind
schneller zu konsumieren. Das auf
den Deckeln anzugebende
Haltbarkeitsdatum beläuft sich bei
Naturjoghurt also auf T+7. T ist der
Tag der Herstellung der Joghurts.
- Stellen Sie das Gerät nicht in den
Kühlschrank.
REINIGUNG
• Trennen Sie das Gerät vor der
Reinigung stets vom Stromnetz.
• Tauchen Sie das Gehäuse des
Geräts nicht ins Wasser. Reinigen
Sie es mit einem feuchten Tuch
und heißem Seifenwasser.
Spülen Sie es anschließend ab
und trocknen Sie das Gerät.
• Die Joghurtgläschen (C1) und die
Deckel (C2, A1 und A2) sind
spülmaschinenfest.
Notice_YOGURTEO_2550769-03_Mise en page 1 13/04/11 09:58 Page16

17
WELCHE LÖSUNGEN GIBT ES FÜR HÄUFIG AUFTRETENDE
PROBLEME?
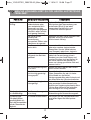
PROBLEM MÖGLICHE URSACHEN LÖSUNGEN
Joghurt ist zu
flüssig.
Sie haben
halbentrahmte oder
ganz entrahmte Mich
verwendet und kein
Milchpulver beigegeben
(die Milch allein enthält
nicht genug Proteine).
Geben Sie 1 Joghurtbecher
Milchpulver (bei Verwendung von
entrahmter Milch 2) bei oder
verwenden Sie Vollmilch und
1/2 Becher Vollmilchpulver.
Das Gerät wurde
während der
Fermentierung
transportiert, Stößen oder
Vibrationen ausgesetzt.
Bewegen Sie das Gerät während des
Betriebs nicht (nicht auf den
Kühlschrank stellen).
Das Ferment ist nicht
mehr aktiv.
Verwenden Sie ein anderes Ferment
oder eine andere Joghurtmarke.
Überprüfen Sie das Verfallsdatum
Ihres Ferments oder Ihres Joghurts.
Das Gerät wurde
während des Betriebs
geöffnet.
Nehmen Sie die Gläschen nicht vor
Ablauf der Fermentierung (etwa 8
Stunden) aus dem Gerät heraus und
machen Sie diese nicht auf. Stellen Sie
das Gerät während des Betriebs an
einem vor Luftzug geschützten Platz auf;
wenn es kalt ist.
Die Fermentierungszeit
ist zu kurz.
Starten Sie nach Ablauf des ersten
Zyklus einen zweiten.
Die Gläschen wurden
nicht richtig gereinigt
/ausgespült.
Bevor Sie Ihre Masse in die Gläschen
füllen, überprüfen Sie, ob sich keine
Rückstände von Spülmittel,
Reinigungsprodukten oder Schmutz auf
der Innenseite der Gläschen befinden.
Früchte zum Joghurt
hinzugefügt.
Denken Sie daran, die Früchte zu kochen,
oder verwenden Sie lieber Kompott oder
Konfitüre (auf Umgebungstemperatur). Rohe
Früchte setzen Säuren frei, die verhindern,
dass der Joghurt sich richtig ausbildet.
Die Joghurts sind
zu säurehaltig.
Die Fermentierungszeit
ist zu lang.
Reduzieren Sie bei der nächsten
Zubereitung die Fermentierungszeit.
Eine dickflüssige
Flüssigkeit (Serum
genannt) bildet sich
nach der Fermentation
auf der Oberseite des
Joghurts.
Zu starke Fermentation. Verringern Sie die Fermentationszeit
und/oder fügen Sie Milchpulver
hinzu.
Notice_YOGURTEO_2550769-03_Mise en page 1 13/04/11 09:58 Page17

18
DAS GERÄT FUNKTIONIERT IMMER NOCH NICHT, WAS TUN?
REZEPTE
ENTSORGUNG VON ELEKTRISCHEN UND
ELEKTRONISCHEN GERÄTEN
- Überprüfen Sie zunächst den Anschluss.
S
ie haben alle Anweisungen genau eingehalten und Ihr Gerät
funktioniert immer noch nicht? Wenden Sie sich in diesem Fall an Ihr
Fachgeschäft oder an ein autorisiertes Servicecenter von Moulinex (siehe
Liste im „Moulinex“-Serviceheft).
D
enken Sie an den Schutz der Umwelt!
Ihr Gerät enthält zahlreiche Rohstoffe, die wieder verwertet
oder recycelt werden können.
Bringen Sie das Gerät zur Entsorgung zu einer Sammelstelle
Ihrer Stadt oder Gemeinde.
A
ROMATISIERTE JOGHURTS
JOGHURT MIT SIRUP
1 Liter Milch, 1 Naturjoghurt oder
1 Päckchen Ferment
• Verschiedene Fruchtsirups
(Granatapfel, Orange,
Johannisbeere; Zitrone,
Mandarine, Erdbeere,
Brombeere, Mandelsirup,
Himbeere, Walderdbeere,
Banane, Blaubeere, Kirsche…):
5
Esslöffel.
• Verschiedene Blütensirups
(Rose, Veilchen, Jasmin,
Sandelholz): 4 Esslöffel.
• Minzsirup: 4 Esslöffel.
Geben Sie den Joghurt oder den
Inhalt des Ferment-Päckchens in
einen Behälter. Geben Sie den Sirup
dazu und gießen Sie die Milch
unter ständigem Rühren mit einer
Gabel langsam dazu. Gießen Sie
die Mischung in die Gläschen und
stellen Sie diese in das Gerät
(8 Stunden).
J
OGHURT MIT GEKOCHTEM
OBST
JOGHURT MIT KONFITÜRE
1 Liter Milch, 1 Naturjoghurt oder
1
Päckchen Ferment, 4 Esslöffel
einer nicht allzu dickflüssigen
Konfitüre mit kleinen Beeren oder
kleinen Fruchtstückchen:
Blaubeeren, Heidelbeeren,
Rhabarber, Ingwer, Erdbeeren,
Orangenmarmelade.
Schlagen Sie die Konfitüre mit ein
wenig Milch auf. Geben Sie den
Joghurt oder das Ferment dazu.
Gut vermischen und die restliche
Milch hinzugeben. Gießen Sie die
Mischung in die Gläschen und
stellen Sie diese in das Gerät
(8 Stunden).
V
ariante: Zur Zubereitung eines
Zwei-Schichten-Joghurts wird die
Konfitüre auf den Boden der
Gläschen gegeben. Gießen Sie
anschließend die Milch / Joghurt
oder Milch/Ferment Mischung
besonders vorsichtig in die
Gläschen. Stellen Sie sie dann in
das Gerät (8 Stunden).
i
Notice_YOGURTEO_2550769-03_Mise en page 1 13/04/11 09:58 Page18
La page est en cours de chargement...
La page est en cours de chargement...
La page est en cours de chargement...
La page est en cours de chargement...
La page est en cours de chargement...
La page est en cours de chargement...
La page est en cours de chargement...
La page est en cours de chargement...
La page est en cours de chargement...
La page est en cours de chargement...
La page est en cours de chargement...
La page est en cours de chargement...
La page est en cours de chargement...
La page est en cours de chargement...
La page est en cours de chargement...
La page est en cours de chargement...
La page est en cours de chargement...
La page est en cours de chargement...
La page est en cours de chargement...
La page est en cours de chargement...
La page est en cours de chargement...
La page est en cours de chargement...
La page est en cours de chargement...
La page est en cours de chargement...
La page est en cours de chargement...
La page est en cours de chargement...
La page est en cours de chargement...
La page est en cours de chargement...
La page est en cours de chargement...
La page est en cours de chargement...
La page est en cours de chargement...
La page est en cours de chargement...
La page est en cours de chargement...
La page est en cours de chargement...
La page est en cours de chargement...
La page est en cours de chargement...
La page est en cours de chargement...
La page est en cours de chargement...
La page est en cours de chargement...
La page est en cours de chargement...
La page est en cours de chargement...
La page est en cours de chargement...
La page est en cours de chargement...
La page est en cours de chargement...
La page est en cours de chargement...
La page est en cours de chargement...
La page est en cours de chargement...
La page est en cours de chargement...
La page est en cours de chargement...
La page est en cours de chargement...
La page est en cours de chargement...
La page est en cours de chargement...
La page est en cours de chargement...
La page est en cours de chargement...
La page est en cours de chargement...
La page est en cours de chargement...
La page est en cours de chargement...
La page est en cours de chargement...
La page est en cours de chargement...
La page est en cours de chargement...
La page est en cours de chargement...
La page est en cours de chargement...
La page est en cours de chargement...
La page est en cours de chargement...
La page est en cours de chargement...
La page est en cours de chargement...
La page est en cours de chargement...
La page est en cours de chargement...
La page est en cours de chargement...
La page est en cours de chargement...
La page est en cours de chargement...
La page est en cours de chargement...
La page est en cours de chargement...
La page est en cours de chargement...
La page est en cours de chargement...
La page est en cours de chargement...
La page est en cours de chargement...
La page est en cours de chargement...
La page est en cours de chargement...
La page est en cours de chargement...
La page est en cours de chargement...
La page est en cours de chargement...
La page est en cours de chargement...
La page est en cours de chargement...
La page est en cours de chargement...
La page est en cours de chargement...
La page est en cours de chargement...
La page est en cours de chargement...
La page est en cours de chargement...
La page est en cours de chargement...
La page est en cours de chargement...
La page est en cours de chargement...
La page est en cours de chargement...
La page est en cours de chargement...
La page est en cours de chargement...
La page est en cours de chargement...
La page est en cours de chargement...
La page est en cours de chargement...
-
 1
1
-
 2
2
-
 3
3
-
 4
4
-
 5
5
-
 6
6
-
 7
7
-
 8
8
-
 9
9
-
 10
10
-
 11
11
-
 12
12
-
 13
13
-
 14
14
-
 15
15
-
 16
16
-
 17
17
-
 18
18
-
 19
19
-
 20
20
-
 21
21
-
 22
22
-
 23
23
-
 24
24
-
 25
25
-
 26
26
-
 27
27
-
 28
28
-
 29
29
-
 30
30
-
 31
31
-
 32
32
-
 33
33
-
 34
34
-
 35
35
-
 36
36
-
 37
37
-
 38
38
-
 39
39
-
 40
40
-
 41
41
-
 42
42
-
 43
43
-
 44
44
-
 45
45
-
 46
46
-
 47
47
-
 48
48
-
 49
49
-
 50
50
-
 51
51
-
 52
52
-
 53
53
-
 54
54
-
 55
55
-
 56
56
-
 57
57
-
 58
58
-
 59
59
-
 60
60
-
 61
61
-
 62
62
-
 63
63
-
 64
64
-
 65
65
-
 66
66
-
 67
67
-
 68
68
-
 69
69
-
 70
70
-
 71
71
-
 72
72
-
 73
73
-
 74
74
-
 75
75
-
 76
76
-
 77
77
-
 78
78
-
 79
79
-
 80
80
-
 81
81
-
 82
82
-
 83
83
-
 84
84
-
 85
85
-
 86
86
-
 87
87
-
 88
88
-
 89
89
-
 90
90
-
 91
91
-
 92
92
-
 93
93
-
 94
94
-
 95
95
-
 96
96
-
 97
97
-
 98
98
-
 99
99
-
 100
100
-
 101
101
-
 102
102
-
 103
103
-
 104
104
-
 105
105
-
 106
106
-
 107
107
-
 108
108
-
 109
109
-
 110
110
-
 111
111
-
 112
112
-
 113
113
-
 114
114
-
 115
115
-
 116
116
-
 117
117
-
 118
118


Moulinex YOGURTEO YG231E32 Le manuel du propriétaire
- Taper
- Le manuel du propriétaire
dans d''autres langues
Documents connexes
Autres documents
-
Tefal YG100111 Manuel utilisateur
-
-
Adler AD 4476 Manuel utilisateur
-
ARIETE 85/1 Yogurella Manuel utilisateur
-
 ESSENTIELB EYM 3 Le manuel du propriétaire
-
-
-
UFESA YG3000 Le manuel du propriétaire
-
LAGRANGE YAOURTIERE Manuel utilisateur
-
