Roborock S7 MaxV Manuel utilisateur
- Catégorie
- Aspirateurs robotiques
- Taper
- Manuel utilisateur

Roborock S7 MaxV
Read this user manual with diagrams carefully before using
this product and store it properly for future reference.
Robotic Vacuum Cleaner User Manual

English 03
Français 15
Español 27

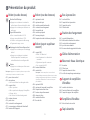
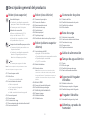
03
Contents
04 Safety Information
04 Battery and Charging
04 International Symbols Explanation
05 FCC/IC Statement
06 Product Overview
07 Installation
09 Instructions
10 Routine Maintenance
11 Basic Parameters
12 Errors
13 Common Issues

04
Safety Information
•For use only with roborock CDZ11RR, CDZ12RR, AED01LRR, AED02LRR, EWFD01LRR or EWFD02LRR charger.
•Place the cords from other appliances out of the area to be cleaned.
•Do not operate the vacuum in a room where an infant or child is sleeping.
•Do not operate the vacuum in an area where there are lit candles or fragile objects on the floor to be cleaned.
•Do not operate the vacuum in a room that has lit candles on furniture that the vacuum may accidentally hit or bump into.
•Do not allow children to sit on the vacuum.
Battery and Charging
•Keep the charging dock away from heat (such as radiators).
•Do not wipe the charging contacts with wet cloth or wet hands.
•Turn the robot off and use original packaging for shipment.
•If placing the robot into storage, charge it fully and turn if off before placing it in a cool dry place. Recharge it at least
every three months to prevent the battery over discharging.
•Do not use the product when the temperature is higher than 40°C (104°F) or lower than 4°C (39°F), or there is any liquid
or sticky substance on the floor.
International Symbols Explanation
~ – ALTERNATING CURRENT symbol [symbol IEC 60417-5032 (2009-02)]
– DIRECT CURRENT symbol [symbol IEC 60417-5031 (2009-02)]

05
FCC/IC Statement
Compliance Information
Product Name Robotic Vacuum Cleaner with Charging Dock
Robotic Vacuum Cleaner Model: S270RR
Dock Charger Model: CDZ11RR or CDZ12RR
Auto-Empty Dock Model: AED01LRR, AED02LRR
Empty Wash Fill Dock: EWFD01LRR, EWFD02LRR
Product Model
Compliance Statement
Correspondence of the responsible party in USA
Roborock Technology Co.
108 West 13th Street, Wilmington, Delaware 19801.
support@roborock.com
Company
Address
Email
This device complies with Part 15 of the FCC Rules.
Operation is subject to the following two conditions:
(1) this device may not cause harmful interference, and
(2) this device must accept any interference received, including interference that may
cause undesired operation.
This device contains licence-exempt transmitter(s)/receiver(s) that comply with
Innovation, Science and Economic Development Canada’s licence-exempt RSS(s).
Operation is subject to the following two conditions:
(1) This device may not cause interference.
(2) This device must accept any interference, including interference that may cause
undesired operation of the device.

06
Remove this piece if using the Roborock
Auto-Empty Dock or Empty Wash Fill Dock. Available
for purchase separately. Visit www.roborock.com
for details.
Press any button to stop the robot during cleaning
or docking.
Dock
Spot Clean/Child Lock
Product Overview
A
A1 Robot (Top View) A2 Robot (Bottom View) A4 Dustbin
A5 Charging Dock
A6 Power Cable
A7 Electric Water Tank
A8 VibraRise Mop Bracket
A9 VibraRise Mop Cloth
A10 Moisture-proof Mat
A3 Robot (Upper Cover Open)
A3-1—WiFi Indicator Light
A3-3—Air Inlet
A8-1—Vibration Module
A8-2— Mop Cloth Attachment Slot
A8-3—Mop Bracket Latch
A9-1—Hook and loop pads
A2-1—Cliff Sensors
A2-2—Carpet Sensor
A2-3—Omni-Directional Wheel
A2-4—Charging Contacts
A2-5—Side Brush
A2-6—Main Wheel
A2-7—Main Brush
A2-8—Main Brush Cover Latches
•Press to return to dock
Note:
Note:
A5-1—Power Indicator
A5-2—Dock Location Beacon
A5-3—Charging Contacts
A5-4—Power Socket
A5-5—Electrode Brushes
A1-1—Vertical Bumper
A1-2—Microphone
A1-3—Status Indicator Light
A1-4—Wall Sensor
A1-5—Bumper
A1-6—Charging Contacts
A1-7—ReactiveAI Obstacle Recognition
A1-8—LED Fill Light
•Off: WiFi disabled
•Flashing slowly: Waiting for
connection
•Flashing quickly: Connecting
•Steady: WiFi connected
•Press to Spot clean
•Press and hold for 3 seconds to
turn on/off the child lock
•For use with Video Calls
A7-1—Stopper
A7-2—Water Filter
A7-3—Water Tank Latch
A7-4—Self-Filling Port
•White: Vacuuming
•Blue: Vacuuming and Mopping
•Orange: Alert
•Green: Docking/Recharging
A4-1—Filter Cover
A4-2—Dustbin Latch
A4-3—Cover Latch
A4-4—Washable Filter
A3-2—Reset Button
A3-4—LiDAR Sensor
A3-5—Mop Wash Sensor
A3-6—Water Tank Latch
A3-7—Positioning Button
A3-8—Water Tank
A3-9—VibraRise Module
A3-10—Air Outlet
•White: Battery level ≥ 20%
•Red: Battery level < 20%
•Pulsing: Charging or starting up
•Flashing red: Error
Power Indicator
Power/Clean
•Press and hold to turn the robot
on or off
•Press to start cleaning

07
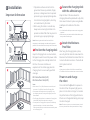
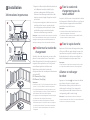
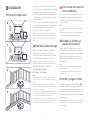
Installation
B
B1 Position the charging dock
B2 Secure the charging dock
with the adhesive tape
B3 Attach the Moisture-
Proof Mat
Important Information
1. Tidy cables and loose items from the
ground and move any unstable, fragile,
precious, or dangerous items to prevent
personal injury or property damage due
to items becoming tangled in, struck by,
or knocked over by the robot.
2. When using the robot in a raised area,
always use a secure physical barrier to
prevent accidental falls that may result in
personal injury or property damage.
Wipe the floor of the area where the
charging dock will be placed with a dry cloth,
then secure the dock in place using double-
sided tape at the bottom of the dock.
Notes:
•Use of the double-sided tape to secure the charging dock
is optional.
•When necessary, remove the double-sided adhesive tape
slowly to reduce residue glue.
Press and hold the button to power on
the robot. When the power light goes on,
place it on the dock to charge. To maintain
the performance of the high-performance
lithium-ion rechargeable battery pack, keep
the robot charged.
The robot may not turn on when the battery is low. In
this case, place the robot directly onto the dock to charge.
Note:
Power on and charge
the robot
Note: When using the robot for the first time, follow it
throughout its whole cleaning route and watch for potential
problems. The robot will be able to clean by itself in future uses.
Keep the Charging Dock on a level surface,
flat against a wall. Connect the power cable
to the Charging Dock and tidy cables from
the floor. To ensure a better user
experience of the mobile app, place the
Charging Dock in an area with good WiFi
coverage.
B1-1 More than 0.5m (1.6ft)
B1-2 More than 1.5m (4.9ft)
After fixing the Charging Dock in place,
use a dry cloth to clean the area where the
Moisture-Proof Mat will be located. Slot the
mat onto the dock as shown. The teeth will
click in place to attach.
Notes:
•Always place the Moisture-Proof Mat on wooden floors.
•The Moisture-Proof mat attaches best to smooth surfaces.
•Allow at least 0.5m (1.6ft) of clearance on each side, and
more than 1.5m (4.9ft) in front of the Charging Dock.
•If the power cable hangs vertical to the ground, it may
be caught by the robot, causing the Charging Dock to be
disconnected.
•The Charging Dock indicator is on when the Charging Dock
is electrified, and off when the robot is charging.
•Do not place the Charging Dock in places that are directly
exposed to sunlight, or block the Location Beacon.
Otherwise the robot may not be able to automatically return
to the Charging Dock.
Notes:

08
•Wash the VibraRise mop cloth after each use, and regularly
empty the water tank of unused water.
•Remove the mop bracket when not mopping. The water
tank can stay in place.
When the robot returns to the dock after
cleaning, press the latches on both sides,
and slide the mop bracket backwards to
remove it.
Note:
B4-6—Remove the mop bracket
B4-7— WARNING
Risk of injury. Do not place your finger
between VibraRise mop bracket and water
tank.
Notes:
•To prevent corrosion or damage, only use the Roborock
branded floor cleaner in the water tank.
•Do not use hot water as this may cause the tank to deform.
Slide the water tank into the robot until you
hear it lock with a click.
B4-3—Reinstall the water tank
Slide the bracket forwards under the water
tank. A click indicates that it is locked in
place.
B4-5—Install the mop bracket
Dampen the mop cloth and wring it until it
stops dripping. Insert it into the bottom
along the attachment slot and stick it firmly
in place.
B4-4—Install the VibraRise mop cloth
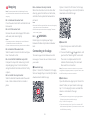
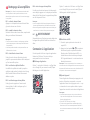
Option 2: Search for “Mi Home” in the App
Store or Google Play or scan the QR code to
download and install the app.
❷ Reset WiFi
1. Open the top cover and find the WiFi
indicator.
2. Press and hold the and buttons until
you hear the “Resetting WiFi” voice alert.
The reset is complete when the WiFi
indicator flashes slowly. The robot will
then wait for a connection.
If you cannot connect to the robot due to your router
configuration, a forgotten password, or any other reason, reset
the WiFi and add your robot as a new device.
Note:
Open the Roborock App, tap the “Search for
device” button, or open Xiaomi Home app,
tap “+” in the top right corner and add the
device as instructed in the app.
Notes:
•The actual process may vary due to ongoing app updates.
Follow the instructions provided in the app.
•Only 2.4 GHz WiFi is supported.
•If the robot waits more than 1 hour for a connection, WiFi
will be automatically disabled. If you want to reconnect, reset
the WiFi before proceeding.
❸ Add device
Connecting to the App
Option 1: Search for “Roborock” in the App
Store or Google Play or scan the QR code to
download and install the app.
❶ Download App
This robot supports both Roborock and Mi
Home apps. Choose the one that best meets
your needs.
Note: To prevent excessive dirt buildup during first-time
use, floors should be vacuumed at least three times before
mopping.
Press the water tank latch and slide the tank
backwards.
B4-1—Remove the water tank
Remove the water tank stopper, fill the tank
with water, and close it tightly.
B4-2—Fill the water tank
B4 Mopping

09
Note: The robot cannot be turned off when it is being
charged.
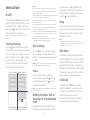
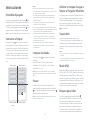
Instructions
Press and hold the button to turn on the
robot. The power indicator will turn on and
the robot will enter standby mode. Press
and hold the button to turn off the robot
and complete the cleaning cycle.
On/Off
Press the butto nto start cleaning. The
robot will plan its cleaning route according
to its scan of the room. It splits a room into
zones, first draws out zone edges, and then
fills the zone in a zigzag pattern. In so
doing, the robot cleans all zones one by
one, efficiently cleaning the house.
Starting Cleaning
Note: After spot cleaning, the robot will automatically return
to the starting point and enter Standby mode.
Press the button to start spot cleaning.
Cleaning range: The robot cleans a 1.5 m
(4.9 ft) x 1.5 m (4.9 ft) square area centered
on itself.
Spot Cleaning
Note: Placing a paused robot on the dock manually will end
the current cleanup.
When the robot is running, press any
button to pause it, press the button to
resume cleaning, press the button to
send it back to the dock.
Pause
Notes:
•To allow the robot to automatically vacuum and return to
the dock, start the robot from the dock. Do not move the
dock during WashVac.
•Cleaning cannot start if the battery level is too low. Allow the
robot to charge before starting cleanup.
•If cleaning is completed in less than 10 minutes, the area
will be cleaned twice.
•If the battery runs low during the cleaning cycle, the robot
will automatically return to the dock. After charging, the
robot will resume where it left off.
•When the mop bracket is attached, the robot will retract it
when cleaning the carpet. You can also set the carpet as a
no-go zone in the app to avoid it.
•Before starting each WashVac task, make sure that the
VibraRise mop has been properly installed.
If the robot is paused for over 10 minutes, it
will go to sleep, and the power indicator will
flash every few seconds. Press any button
to wake the robot up.
Sleep
Notes:
•The robot will not go to sleep when it is charging.
•The robot will automatically shut down if left in sleep mode
for more than 12 hours.
The default Do Not Disturb (DND) period is
from 22:00 to 08:00. You can use the app to
disable the DND mode or modify the DND
period. When DND mode is activated, the
robot will not automatically resume cleanup,
the power indicator light will dim, and the
volume of the voice prompts will lower.
DND Mode
Child Lock
Press and hold the button to enable/
disable the child lock. You can also set it in
the app. Once enabled, the robot will not
react to button presses when it is
stationary. When the robot is cleaning or
docking, press any button to stop it.
Zone 1 – Cleaned
Zone 4 – Next Zone
Zone 2 – Cleaned
Zone 3 – In Progress
To add water or clean the VibraRise mop
cloth, press any button to stop the robot
Refilling the Water Tank or
Cleaning the VibraRise Mop
Cloth
and remove the mopping module. After
adding water or cleaning the VibraRise mop
cloth, reinstall the mopping module and
press the button to continue.

10
Note: Functions and details of the app may vary slightly due
to the continuous app development and updates.
* Clean every 2 weeks and replace every 6-12 months.
* Clean monthly and replace every 3-6 months.
C1-1—Main Brush Cover
C1-2—Latch
C1-3—Main Brush
C1-4—Main Brush Cap
C1-5—Main Brush Bearing
C1-6—Turn over the robot and press the
latches to remove the main brush
cover.
Pull out the main brush and remove
the main brush bearing.
Rotate the main brush caps in the
indicated unlock direction to remove
the caps.
After removing the tangled hair or
dirt at both ends of the main brush,
reinstall it, press on the main brush
cover to lock it in place.
App Features
Restore Factory Settings
If the robot does not function properly after
a system reset, switch it on. Press and hold
the button and at the same time press
Reset button until you hear the “Restoring
factory settings” voice prompt.
System Reset
If the robot does not respond when a
button is pressed or cannot be turned off,
reset the system. Press the Reset button,
and the robot will reset automatically.
Note: After resetting the system, scheduled cleaning, WiFi,
etc. will be restored to factory settings.
C1-8—
C1-9—
Notes:
•Main brush should be wiped down with wet cloth and left to
dry away from direct sunlight.
•Do not use corrosive cleaning fluids or disinfectants to
clean the main brush.
1. Unscrew the side brush screw.
2. Remove and clean the side brush.
Reinstall the brush and tighten the screw.
C1-7—
Error
If an error occurs, the power indicator will
flash red and a voice alert will sound. See
“Errors” for solutions.
Notes:
•The robot will go to sleep automatically if left in a
malfunctioning state for over 10 minutes.
•Placing a malfunctioning robot on the dock manually will
end the current cleanup.
Charging
After cleaning, the robot will automatically
return to the dock to charge.
In Pause mode, press the button to send
the robot back to the dock. The power
indicator will pulse as the robot charges.
Note: If the robot fails to find the dock, it will automatically
return to its starting location. Place the robot on the dock
manually to recharge.
•Multi-map management
•Real-time WashVac route
•Carpet display
•Map zoning
•Map editing
•Scheduled
•Selective Room
•Zone
•No-Go Zones, No-Mop Zones, and
Invisible Wall
•Custom
•Carpet Boost
•5 Suction Power Levels
•3 Mop Intensity Levels
•Custom
•Cleaning History
•Battery Level
•Care & Maintenance
•Firmware Update
•Video Call
•Volume Adjustment
•Language Selection
•Do Not Disturb mode
•Voice Assistant Support
Cleaning Map
Custom Cleaning Modes
Cleaning Mode Switch
Robot Information
More Features
Routine Maintenance
C
C1 Main Brush
C2 Side Brush

11
Do not touch the surface of the filter with your hands,
brush, or hard objects to avoid potential damage.
* Clean as required.
* Clean monthly.
* Clean as required.
* Clean after each use and replace every 3-6 months.
* Clean monthly.
* Clean monthly.
* Clean as required.
* Clean every 2 weeks and replace every 6-12 months.
Open the top cover of the robot and
take out the dustbin.
Open the water tank and fill it with
clean water.
Close the water tank and shake it
gently.
Pour out the remaining water as
shown.
Remove the VibraRise mop cloth
from the VibraRise mop bracket.
Clean the VibraRise mop cloth and
air-dry it.
ReactiveAI Obstacle Recognition
Wall Sensor
Mop Wash Sensor
Carpet Sensor, six Cliff Sensors
Open the filter cover and remove
the filter.
Rinse the filter repeatedly and tap it
to remove as much dirt as possible.
Allow 24 hours for the filter to dry
thoroughly and reinstall it.
Open the dustbin cover and remove
the filter, then empty the dustbin.
Fill the dustbin with clean water and
close the cover. Gently shake the
dustbin, and then pour out the dirty
water.
Leave the dustbin and the washable
filter to dry.
Use a tool, such as a small
screwdriver, to pry out the axle and
take out the wheel.
The omni-directional wheel bracket cannot be removed.
Note:
C3-1—
Note: If the robot will be left unused for a long period, turn it
off and charge it at least every three months to avoid battery
damage caused by over-discharge.
Clean the main wheels with a soft, dry cloth.
C5-2—
C5-1—
Note:
Note: Purchase an additional filter and alternate if necessary.
C7-1—
C6-3—
Note: To prevent blockage, only use clean water without any
cleaning liquid.
C5-3—
C5-4—
C6-2—
C6-1—
Basic Parameters
Robot
Note: The serial number is on a sticker on the underside of
the robot.
< 6 hoursCharging Time
S270RRModel
14.4V/5200mAh lithium-ion battery
Battery
Approx. 4.7kgWeight
Rated Input
Charging Dock
14.4V/5200mAh lithium-ion batteryCharging Battery
CDZ11RR or CDZ12RR
Model
28WRated Power
100-240V~
Rated Input
20V 1.2A
Rated Output
50-60HzRated Frequency
C8-1—
Note: A dirty VibraRise mop will affect the mopping
performance. Clean it before use.
Use a soft, dry cloth to wipe and clean all
sensors, including:
C9-1—
C9-2—
C9-3—
C9-4—
Use a soft dry cloth to wipe the charging
contacts on the charging dock and the
robot.
Battery
The robot is equipped with a built-in
high-performance lithium-ion rechargeable
battery pack. To maintain battery
performance, keep the robot charged
during normal use.
C7-2—
C7-3—
20V 1.2A
C3 Omni-Directional Wheel
C4 Main Wheels
C7 Water Tank
C8 VibraRise Mop Cloth
C9 Robot Sensors
C10 Charging Contact Areas
C5 Dustbin
C6 Washable Filter
Rinse the wheel and the axle with
water to remove any hair and dirt.
Dry and reattach the wheel, pressing
it firmly in place.
C3-2—

12
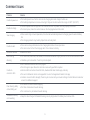
Errors
If an error occurs while the robot is cleaning, the power indicator
will flash red quickly, and a voice alert will sound. Refer to the
following table for troubleshooting.
1. After resolving any of the following errors, relocate your robot and
restart cleaning.
2. After any sensor errors, clean the sensor and retry.
3. If the battery is at an abnormal temperature, wait for it to return
to normal before use.
If the problem persists after using the recommendations in the table above,
contact our support team at:
[email protected] (United States/Canada/Non-Europe)
1-855-960-4321 (United States only)
1-833-421-1915 (Canada only)
Note: A system reset may resolve some problems.
Error 1: LiDAR turret or laser blocked. Check for obruction and
retry.
Error 2: Bumper uck. Clean it and lightly tap to release it.
Error 3: Wheels suspended. Move robot and reart.
Error 4: Cli sensor error. Clean cli sensors, move robot away
from drops and reart.
Error 5: Main brush jammed. Clean main brush and bearings.
Error 6: Side brush jammed. Remove and clean side brush.
Error 7: Wheels jammed. Move the robot and reart.
Error 8: Robot trapped. Clear obacles surrounding robot.
Error 9: No dubin. Inall dubin and lter.
Error 12: Low battery. Recharge and retry.
Error 13: Charging error. Clean charging contacts and retry.
Error 14: Battery error.
Error 15: Wall sensor dirty. Clean wall sensor.
Error 16: Robot tilted. Move to level ground and reart.
Error 17: Side brush error. Reset robot.
Error 18: Fan error. Reset robot.
Error 21: Vertical bumper pressed. Move robot and retry.
Error 22: Dock locator error. Clean and retry .
Error 23: Could not return to dock. Clean dock location beacon
and retry.
Error 27: VibraRise syem jammed. Check for obructions.
Error 28: Robot on carpet. Move robot to oor and retry.
Filter blocked or wet. Clean, dry, and retry.
No-go zone or Invisible Wall detected. Move robot from this area.
Cannot cross carpet. Move robot across carpet and reart.
Internal error. Reset the robot.

13
Common Issues
Unable to power on •The battery level is low. Put the robot on the charging dock and charge it before use.
•The battery temperature is too low or too high. Only use the robot within the range of 4-40°C (39-104°F).
Unable to charge •Check the power indicator light turns on and both ends of the power cabel are properly connected.
•If contact is poor, clean the contact areas on the charging dock and the robot.
Slow charging •When used at high or low temperatures, the robot will automatically reduce its charging speed to extend battery
life.
•The charging contacts may be dirty. Wipe them with a dry cloth.
Unable to dock •There are too many obstacles near the charging dock. Move it to an open area.
•The robot is too far from the charging dock. Place it closer and retry.
Abnormal behavior •Restart the robot.
Noise during
cleaning
•The main brush, side brush, main wheels, or omni-directional wheel may be jammed. Turn off the robot and clean them.
•VibraRise system abnormal. Check for jammed objects.
Unable to
connect to WiFi
•WiFi is disabled. Reset the WiFi and try again.
•The WiFi signal is poor. Move the robot to an area with good WiFi reception.
•Abnormal WiFi connection. Reset the WiFi, download the latest mobile app, and retry.
•The current Roborock robot is not supported. You can find supported models in the app.
•Unable to connect to WiFi abruptly. There may be an error with your router settings. Contact Roborock customer
service for additional support.
Problem Solution
Scheduled cleaning
is not working •Keep the robot charged. Scheduled cleaning can only begin when the battery level is above 20%.
Poor cleaning ability
or dust falling out
•The dustbin is full and needs emptying.
•The filter is blocked and needs cleaning.
•The main brush is jammed and needs cleaning.

14
Common Issues
Is power always being drawn when the
robot is on the charging dock?
•The robot will draw power while it is docked to maintain battery performance, but power
consumption is minimal.
Does the robot need to be charged
for at least 16 hours the first three
times it is used?
•No. The robot can be used any time after it has been fully charged.
Problem Solution
No or little water during
mopping
Cleaning does not
resume after recharging
•Check whether there is water in the water tank and use the mobile app to set the scrub
intensity or check the manual for full instructions on how to correctly install the mop cloth
and mop bracket.
•Make sure that the robot is not in DND mode. DND mode will prevent cleanup. When
cleaning a space requiring a top-up charge, if the robot was placed manually on the charging
dock before it returned to the dock automatically, it will not be able to continue cleanup.
The robot has begun to
miss certain spots
It takes a long time to fill the water tank
•The wall sensor or cliff sensors may be dirty. Wipe them with a soft dry cloth.
•The filter may be blocked and need cleaning.
The robot cannot return to the
charging dock after Spot cleaning or
when it has been moved manually
•After spot cleaning or a significant position change, the robot will re-generate the map. If the
charging dock is too far away, it may not be able to return to recharge and must be placed
on the charging dock manually.

15
Lisez attentivement ce manuel d’utilisation et ses schémas avant d’utiliser le produit et
rangez-le soigneusement pour référence future.
Roborock S7 MaxV
Manuel d’utilisation de l’aspirateur robot
Français
Contenu
16 Consignes de sécurité
16 Batterie et rechargement
16 Explication des symboles internationaux
17 Déclaration FCC/IC
18 Présentation du produit
19 Installation
21 Instructions
22 Entretien de routine
23 Paramètres de base
24 Erreurs
25 Problèmes courants

16
Explication des symboles internationaux
~ : symbole de COURANT ALTERNATIF [symbole IEC 60417-5032 (02/2009)]
: symbole de COURANT CONTINU [symbole IEC 60417-5031 (02/2009)]
Consignes de sécurité
•Utilisez uniquement l’appareil avec le chargeur Roborock CDZ11RR, CDZ12RR, AED01LRR ou AED02LRR.
•Placez les cordons des autres appareils hors de la zone à nettoyer.
•N’utilisez pas l’aspirateur dans une pièce où dort un bébé ou un enfant.
•N’utilisez pas l’aspirateur dans une zone avec des bougies allumées ou des objets fragiles sur le sol à aspirer.
•N’utilisez pas l’aspirateur dans une pièce où des bougies allumées se trouvent sur des meubles que l’aspirateur pourrait
bousculer ou heurter accidentellement.
•Ne laissez pas les enfants s’asseoir sur l’aspirateur.
Batterie et rechargement
•Conservez la station de rechargement à l’écart des sources de chaleur (par ex. des radiateurs).
•N’essuyez pas les broches de chargement avec un tissu humide ou si vos mains sont mains mouillées.
•Éteignez le robot et utilisez l'emballage d'origine pour l'expédition.
•Si vous rangez le robot, chargez-le complètement et éteignez-le avant de le placer dans un endroit frais et sec. Rechargez-le au
moins tous les trois mois pour éviter un déchargement excessif de la batterie.
•N’utilisez pas le produit lorsqu’il fait plus de 40 °C (104 °F)ou moins de 4 °C (39 °F), ou lorsqu’il y a du liquide ou une substance
collante sur le sol.

17
Déclaration FCC/IC
Informations de conformité
Nom du produit Robot aspirateur-laveur avec station de charge
Modèle du robot aspirateur : S270RR
Modèle de la station de rechargement : CDZ11RR ou CDZ12RR
Station à vidage automatique, modèle : AED01LRR, AED02LRR
Modèle du produit :
Société
Adresse
E-mail
Coordonnées de la partie responsable aux USA
Roborock Technology Co.
108 West 13th Street, Wilmington, Delaware 19801.
support@roborock.com
Déclaration de
conformité
Cet appareil est conforme à l’article 15 de la réglementation de la FCC.
Son utilisation est soumise aux deux conditions suivantes :
(1) cet appareil ne doit pas causer d’interférences nuisibles, et
(2) cet appareil doit accepter toute interférence reçue, y compris toute interférence
susceptible d’occasionner un fonctionnement non souhaité.
L’émetteur/récepteur exempt de licence contenu dans le présent appareil est conforme
aux CNR d’Innovation, Sciences et Développement économique Canada applicables
aux appareils radio exempts de licence.
L’exploitation est autorisée aux deux conditions suivantes :
(1) L’appareil ne doit pas produire de brouillage;
(2) L’appareil doit accepter tout brouillage radioélectrique subi, même si le brouillage
est susceptible d’en compromettre le fonctionnement.

18
Retirez cette pièce si vous utilisez la
station de vidage automatique Roborock ou la station
de vidage/lavage/remplissage Roborock. Achetables
séparément. Rendez-vous sur roborock.com pour
plus de détails.
Appuyez sur n’importe quel bouton pour arrêter
le robot lorsqu’il nettoie ou revient à la station.
Station
Nettoyage localisé/Verrouillage enfant
Présentation du produit
A
A1 Robot (vue de dessus) A2 Robot (vue de dessous) A4 Bac à poussière
A5 Station de chargement
A6 Câble d’alimentation
A7 Réservoir d’eau électrique
A8 Support de serpillière
VibraRise
A9 Serpillière VibraRise
A10 Tapis étanche
A3 Robot (capot supérieur
ouvert)
A3-1 : voyant WiFi
A3-3 : entrée d’air
A8-1 : module de vibration
A8-2 : fente de fixation de la serpillière
A8-3 : loquet du support de serpillière
A9-1 : blocs à boucle et crochet
A2-1 : capteurs de vide
A2-2 : capteur de tapis
A2-3 : roulette omnidirectionnelle
A2-4 : contacts de rechargement
A2-5 : brosse latérale
A2-6 : roulette principale
A2-7 : brosse principale
A2-8 : loquets du cache de la brosse principale
•Appuyez sur ce bouton pour faire revenir
le robot à la station
Remarque : Remarque :
A5-1 : voyant d’alimentation
A5-2 : balise de localisation de la station
A5-3 : contacts de rechargement
A5-4 : port de raccordement
A5-5 : brosses de nettoyage des électrodes
A1-1 : pare-chocs vertical
A1-2 : microphone
A1-3 : voyant d’état
A1-4 : capteur de murs
A1-5 : pare-chocs
A1-6 : contacts de rechargement
A1-7 : reconnaissance d’obstacles ReactiveAI
A1-8 : lumière LED d’appoint
•Éteint : WiFi désactivé
•Lent clignotement : en attente de
connexion
•Clignotement rapide : connexion
•Fixe : connecté au WiFi
•Appuyez sur ce bouton pour un nettoyage
localisé
•Appuyez sur ce bouton et maintenez-
le enfoncé pendant 3 secondes pour
activer/désactiver le verrouillage enfant
•Pour une utilisation lors des appels vidéo
A7-1 : bouchon
A7-2 : filtre à eau
A7-3 : loquet du réservoir d’eau
A7-4 : orifice de remplissage automatique
•Blanc : aspiration
•Bleu : aspiration et nettoyage à la serpillière
•Orange : alerte
•Vert : retour à la station/rechargement
A4-1 : cache du filtre
A4-2 : loquet du bac à poussière
A4-3 : loquet du cache
A4-4 : filtre lavable
A3-2 : bouton Réinitialiser
A3-4 : capteur LiDAR
A3-5 : capteur de lavage de la serpillière
A3-6 : loquet du réservoir d’eau
A3-7 : bouton de positionnement
A3-8 : réservoir d’eau
A3-9 : module VibraRise
A3-10 : sortie d’air
•Blanc : niveau de batterie ≥ 20 %
•Rouge : niveau de batterie < 20 %
•Pulsation : rechargement ou démarrage
•Clignotement rouge : erreur
Voyant d’alimentation
Marche/Arrêt/Nettoyer
•Appuyez sur ce bouton et maintenez-le
enfoncé pour allumer ou éteindre le robot
•Appuyez sur ce bouton pour démarrer un
nettoyage

19
Installation
B
B1 Positionner la station de
chargement
B2 Fixer la station de
chargement avec du
ruban adhésif
B3 Fixer le tapis étanche
Informations importantes
1. Rangez les câbles et objets détachés présents au
sol et déplacez tout objet instable, fragile,
précieux ou dangereux afin d’éviter toute
blessure et tout dommage matériel dus à des
objets qui seraient happés, frappés ou heurtés
par le robot.
2. Lorsque vous employez ce robot dans une zone
surélevée, utilisez toujours une barrière de
sécurité physique pour empêcher les chutes
accidentelles qui pourraient entraîner des
blessures ou des dommages matériels.
Essuyez le sol de la zone où vous placerez la station
de chargement à l’aide d’un chiffon sec, puis fixez la
station en place en apposant du ruban adhésif
double face au bas de la station.
Remarques :
•L’utilisation de ruban adhésif double face pour fixer la
station de chargement est facultative.
•Si nécessaire, retirez lentement le ruban adhésif double
face pour réduire les résidus de colle.
Appuyez sur le bouton et maintenez-le enfoncé
pour allumer le robot. Lorsque le voyant
d’alimentation s’allume, placez le robot sur la
station pour le recharger. Pour conserver les
hautes performances de la batterie lithium-ion
rechargeable, gardez le robot chargé.
Il est possible que le robot ne s’allume pas
lorsque la batterie est faible. Dans ce cas, placez directement
le robot sur la station pour le recharger.
Remarque :
Allumer et recharger
le robot
Remarque : Lorsque vous utilisez votre robot pour la première
fois, suivez-le attentivement tout au long de son parcours de
nettoyage en prenant garde aux problèmes potentiels. Le
robot pourra nettoyer seul lors des prochaines utilisations.
Gardez la station de chargement sur une surface
plane et à niveau contre un mur. Connectez le
câble d’alimentation à la station de chargement et
rangez les câbles présents au sol. Pour garantir
une meilleure expérience utilisateur avec
l’application mobile, placez la station de
chargement dans une zone disposant d’une bonne
couverture WiFi.
B1-1 Plus de 0,5 m (1,6 pi)
B1-2 Plus de 1,5 m (4,9 pi)
Après avoir fixé la station de chargement en place,
utilisez un chiffon sec pour nettoyer la zone où le
tapis étanche sera placé. Insérez le tapis dans la
fente présente sur la station comme illustré. Les
dents s’encliquetteront en place pour le fixer.
Remarques :
•Placez toujours le tapis étanche lorsque le sol est en bois.
•Le tapis étanche adhère mieux aux surfaces régulières.
•Laissez au moins 0,5 m (1,6 pi) d’espace de chaque côté et
plus de 1,5 m (4,9 pi) devant la station de chargement.
•Si le câble d’alimentation est vertical par rapport au sol, il
risque d’être happé par le robot, ce qui peut entraîner un
débranchement de la station de chargement.
•Le voyant de la station de chargement est allumé lorsqu’il
est alimenté et éteint lorsque le robot charge.
•Ne placez pas la station de chargement à un endroit
directement exposé à la lumière du soleil et ne masquez
pas la balise de localisation. Sinon, le robot risque de ne
pas réussir à revenir automatiquement à la station de
chargement.
Remarques :

20
•Lavez la serpillière VibraRise après chaque utilisation, et
évacuez régulièrement l’eau inutilisée du réservoir d’eau.
•Retirez le support de serpillière lorsque vous n’utilisez pas
cette fonction. Le réservoir d’eau peut rester en place.
Une fois que le robot est revenu à la station après
avoir nettoyé, appuyez sur les loquets présents des
deux côtés et faites glisser le support de serpillière
vers l’arrière pour le retirer.
Remarque :
B4-6 : retirer le support de serpillière
B4-7 : AVERTISSEMENT
Risque de blessure. Ne placez pas votre doigt entre
le support de serpillière VibraRise et le réservoir
d’eau.
Remarques :
•Pour éviter toute corrosion ou tout dommage, n’utilisez
que du nettoyant pour sol de marque Roborock dans le
réservoir d’eau.
•N’utilisez pas d’eau chaude car cela peut entraîner une
déformation du réservoir.
Faites glisser le réservoir d’eau dans le robot
jusqu’à ce que vous entendiez un déclic indiquant
qu’il est verrouillé en place.
B4-3 : réinstaller le réservoir d’eau
Faites glisser le support vers l’avant sous le
réservoir d’eau. Un déclic indiquera qu’il est
verrouillé en place.
B4-5 : installer le support de serpillière
Humidifiez la serpillière et tordez-la jusqu’à ce
qu’elle cesse de goutter. Insérez-la en bas le long
de la fente de fixation et faites-la fermement
adhérer en place.
B4-4 : installer la serpillière VibraRise
Option 2 : recherchez « Mi Home » sur l’App Store
ou sur Google Play ou scannez le code QR pour
télécharger et installer l’application.
❷ Réinitialiser le WiFi
1. Ouvrez le capot supérieur et recherchez le
voyant WiFi.
2. Appuyez sur les boutons et et maintenez-
les enfoncés jusqu’à ce que vous entendiez
l’alerte vocale « Réinitialisation du WiFi ». La
réinitialisation est terminée lorsque le voyant
WiFi clignote lentement. Le robot sera alors en
attente de connexion.
Si vous ne parvenez pas à vous connecter au
robot en raison de la configuration de votre routeur, d’un mot
de passe oublié ou de toute autre raison, réinitialisez le WiFi
et ajoutez le robot comme nouvel appareil.
Remarque :
Ouvrez l’application Roborock puis appuyez sur le
bouton « Rechercher un appareil », ou ouvrez
l’application Xiaomi Home, appuyez sur le « + » qui
se trouve dans le coin supérieur droit et ajoutez
l’appareil en suivant les instructions de l’application.
Remarques :
•Le véritable processus peut varier en raison des mises
à jour continues de l’application. Suivez les instructions
fournies dans l’application.
•Seul le WiFi 2,4 GHz est pris en charge.
•Si le robot est en attente d’une connexion depuis plus
d’une heure, le WiFi sera automatiquement désactivé. Si
vous voulez vous reconnecter, réinitialisez le WiFi avant de
continuer.
❸ Ajouter l’appareil
Connexion à l’application
Option 1 : recherchez « Roborock » sur l’App Store
ou sur Google Play ou scannez le code QR pour
télécharger et installer l’application.
❶ Télécharger l’application
Ce robot prend à la fois en charge les applications
Roborock et Mi Home. Choisissez celle qui
correspond le mieux à vos besoins.
Remarque : Pour éviter l’accumulation excessive de saleté
sur la serpillière lors de la première utilisation, les sols
devraient être aspirés au moins trois fois avant le nettoyage
à la serpillière.
Appuyez sur le loquet du réservoir d’eau et faites
glisser le réservoir vers l’arrière.
B4-1 : retirer le réservoir d’eau
Retirez le bouchon du réservoir d’eau, remplissez-le
d’eau, puis refermez-le fermement.
B4-2 : remplir le réservoir d’eau
B4 Nettoyage à la serpillière
La page est en cours de chargement...
La page est en cours de chargement...
La page est en cours de chargement...
La page est en cours de chargement...
La page est en cours de chargement...
La page est en cours de chargement...
La page est en cours de chargement...
La page est en cours de chargement...
La page est en cours de chargement...
La page est en cours de chargement...
La page est en cours de chargement...
La page est en cours de chargement...
La page est en cours de chargement...
La page est en cours de chargement...
La page est en cours de chargement...
La page est en cours de chargement...
La page est en cours de chargement...
La page est en cours de chargement...
La page est en cours de chargement...
La page est en cours de chargement...
La page est en cours de chargement...
La page est en cours de chargement...
La page est en cours de chargement...
La page est en cours de chargement...
La page est en cours de chargement...
La page est en cours de chargement...
La page est en cours de chargement...
La page est en cours de chargement...
La page est en cours de chargement...
La page est en cours de chargement...
La page est en cours de chargement...
La page est en cours de chargement...
La page est en cours de chargement...
-
 1
1
-
 2
2
-
 3
3
-
 4
4
-
 5
5
-
 6
6
-
 7
7
-
 8
8
-
 9
9
-
 10
10
-
 11
11
-
 12
12
-
 13
13
-
 14
14
-
 15
15
-
 16
16
-
 17
17
-
 18
18
-
 19
19
-
 20
20
-
 21
21
-
 22
22
-
 23
23
-
 24
24
-
 25
25
-
 26
26
-
 27
27
-
 28
28
-
 29
29
-
 30
30
-
 31
31
-
 32
32
-
 33
33
-
 34
34
-
 35
35
-
 36
36
-
 37
37
-
 38
38
-
 39
39
-
 40
40
-
 41
41
-
 42
42
-
 43
43
-
 44
44
-
 45
45
-
 46
46
-
 47
47
-
 48
48
-
 49
49
-
 50
50
-
 51
51
-
 52
52
-
 53
53


Roborock S7 MaxV Manuel utilisateur
- Catégorie
- Aspirateurs robotiques
- Taper
- Manuel utilisateur
dans d''autres langues
- English: Roborock S7 MaxV User manual
- español: Roborock S7 MaxV Manual de usuario
Documents connexes
-
Roborock Q7 Robotic Vacuum Cleaner Manuel utilisateur
-
Roborock Q5 PRO ROBOTSTØVSUGER, SVART Le manuel du propriétaire
-
Roborock Q7 Max Manuel utilisateur
-
-
-
-
Roborock Q Revo Manuel utilisateur
-
Roborock S7 Max Ultra Manuel utilisateur
-
Roborock S8 Pro Ultra Manuel utilisateur
-
Roborock S8 Pro Manuel utilisateur
Autres documents
-
DREAME ot L10s Ultra Robot Vacuum and Mop Self Cleaner Manuel utilisateur
-
Kyvol L20 Manuel utilisateur
-
DREAME RLS3D Manuel utilisateur
-
-
Mi Mi Robot Vacuum-Mop 2 Pro Manuel utilisateur
-
Shark AI VACMOP Manuel utilisateur
-
Xiaomi SKV4136GL Manuel utilisateur
-
-
NARWAL YJCC012 Manuel utilisateur
-