Tascam Mixcast 4 Le manuel du propriétaire
- Taper
- Le manuel du propriétaire

D01382200C
Podcast Recording Console
OWNER’S MANUAL
MODE D’EMPLOI
MANUAL DEL USUARIO
BEDIENUNGSANLEITUNG
MANUALE DI ISTRUZIONI
取扱説明書
Please see the Reference Manual for information about all the unit’s functions. You can
download the Reference Manual from the TASCAM website.
Veuillez consulter le manuel de référence pour des informations sur toutes les fonctions de
l’unité. Vous pouvez télécharger le manuel de référence depuis le site de TASCAM.
Consulte en el Manual de referencia la información completa acerca de todas las funciones
de esta unidad. Puede descargar el Manual de referencia desde la página web de TASCAM.
Links zur digitalen Version dieser Anleitung und des Referenzhandbuchs finden Sie auf der
deutschen Website (https://tascam.de/downloads/).
Consultare il manuale di riferimento per informazioni su tutte le funzioni dell’unità. È possibile
scaricare il manuale di riferimento dal sito TASCAM.
各機能の詳細については、リファレンスマニュアルをご覧ください。
リファレンスマニュアルは、TASCAMのウェブサイトからダウンロードすることができます。
Mixcast 4
https://tascam.jp/int/product/mixcast_4/docs
ENGLISHFRANÇAISESPAÑOLDEUTSCHITALIANO

oTASCAM is a registered trademark of TEAC Corporation.
oSDXC Logo is a trademark of SD-3C, LLC.
oThe Bluetooth® word mark and logo are the property of
Bluetooth SIG, Inc. and are used by TEAC Corporation with
permission.
oMicrosoft and Windows either registered trademarks or
trademarks of Microsoft Corporation in the United States
and/or other countries.
oApple, Mac, macOS, iPad, iPadOS and iTunes are trademarks
of Apple Inc. in the United States and other countries.
oLightning is a trademark of Apple Inc.
oApp Store is a service mark of Apple Inc.
oIOS is a trademark or registered trademark of Cisco in the U.S.
and other countries and is used under license.
oAndroid, Google Play and Google Play logo are trademarks of
Google Inc.
oASIO is a trademark and software of Steinberg Media
Technologies GmbH.
oOther company names, product names and logos in this
document are the trademarks or registered trademarks of
their respective owners.
2 TASCAM Mixcast 4

TASCAM Mixcast 4 3
ENGLISH
Owner's Manual
Introduction
Thank you very much for purchasing the TASCAM Mixcast 4.
This USB audio interface designed for podcasting includes built-in sound
pad functions and allows effect sounds, for example, to be added to
conversations with multiple participants. This model can also be used for
recording and editing.
Before using this unit, read this Owner's Manual carefully so that you will
be able to use it correctly and enjoy working with it for many years. After
you have finished reading this manual, please keep it in a safe place for
future reference.
This document (the Owner's Manual) explains the main functions of the
unit. Please see the Reference Manual for information about all the unit's
functions.
You can also download this Owner’s Manual and the Reference Manual
from the TASCAM website.
Mixcast 4
https://tascam.jp/int/product/mixcast_4/docs
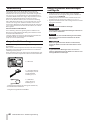
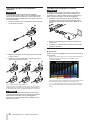
Included items
This product includes the following items.
Take care when opening the package to avoid damaging the items.
Keep the box and packing materials for transportation in the future.
Please contact the store where you purchased this unit if any of these
items are missing or have been damaged during transportation.
Mixcast 4 × 1
Dedicated AC adapter
(PS-P1220E NUT)
p 1.5m cable length
× 1
USB cable
(Type-C to Type-C)
p 1m cable length
× 1
Owner's Manual (this document) including warranty × 1
TASCAM ID registration guide × 1
Information is given about products in this manual only for
the purpose of example and does not indicate any guarantees
against infringements of third-party intellectual property
rights and other rights related to them. TEAC Corporation will
bear no responsibility for infringements on third-party intel-
lectual property rights or other liabilities that occur as a result
of the use of this product.
Properties copyrighted by third parties cannot be used for any
purpose other than personal enjoyment and the like without
the permission of the right holders recognized by copyright
law. Always use this equipment properly. TEAC Corporation
will bear no responsibility for rights infringements committed
by users of this product.
Contents
Introduction ........................................................................................... 3
Included items ....................................................................................... 3
Names of Parts ....................................................................................... 7
Top ..................................................................................................................................7
Back ................................................................................................................................8
Preparation ............................................................................................ 9
Connecting audio equipment ..............................................................................9
Connecting the power ............................................................................................9
Turning the power on and off............................................................................10
Tutorial overview .................................................................................................... 10
Loading SD cards ....................................................................................................10
Setting the language, date and time ..............................................................11
Touchscreen overview .......................................................................................... 12
Making mic settings .............................................................................................. 12
Connecting with Bluetooth devices ................................................................13
Connecting iOS/iPadOS/Android devices and computers .....................14
Making settings to use with Podcast Editor for Windows ....................... 14
Recording (basic operation) ............................................................... 15
Playing recordings (basic operation) ................................................. 15
TASCAM Podcast Editor overview ...................................................... 16
Installing TASCAM Podcast Editor .................................................................... 16
SOUND PAD button overview ............................................................. 17
Assigning sounds to SOUND PAD buttons ...................................................17
Troubleshooting .................................................................................. 18
Bluetooth® ............................................................................................ 19
Transmission security ........................................................................................... 19
About SD cards .................................................................................... 19
Precautions for use ................................................................................................ 19
SD card write protection......................................................................................19
Note about formatting ......................................................................................... 19
Beware of condensation ..................................................................... 19
Cleaning the unit ................................................................................. 19
Precautions for placement and use ....................................................19
About TASCAM customer support service ......................................... 19
Specifications/rated values ................................................................ 20
Recorder specifications ........................................................................................ 20
Analog audio input ratings .................................................................................20
Analog audio output ratings ..............................................................................20
Control input/output ............................................................................................ 20
Audio performance ............................................................................................... 20
Recording times (in hours: minutes) ...............................................................20
Bluetooth ..................................................................................................................20
Computer system requirements ......................................................... 21
Windows .................................................................................................................... 21
Mac .............................................................................................................................. 21
iOS/iPadOS devices ............................................................................................... 21
Android devices ...................................................................................................... 21
Other ..................................................................................................... 21
Dimensional drawings ........................................................................22

4 TASCAM Mixcast 4
IMPORTANT SAFETY INSTRUCTIONS
WARNING: TO PREVENT FIRE OR SHOCK HAZARD, DO NOT EXPOSE
THIS APPLIANCE TO RAIN OR MOISTURE.
For U.S.A.
Supplier's Declaration of Conformity
Model Number: Mixcast 4
Trade Name: TASCAM
Responsible party: TEAC AMERICA, INC.
Address: 10410 Pioneer Blvd. Suite #1 Santa Fe Springs, California
90670, U.S.A.
Telephone number: 1-323-726-0303
This device complies with Part 15 of the FCC Rules. Operation is
subject to the following two conditions: (1) this device may not cause
harmful interference, and (2) this device must accept any interference
received, including interference that may cause undesired operation.
INFORMATION TO THE USER
This equipment has been tested and found to comply with the limits
for a Class B digital device, pursuant to Part 15 of the FCC Rules. These
limits are designed to provide reasonable protection against harmful
interference in a residential installation. This equipment generates,
uses, and can radiate radio frequency energy and, if not installed and
used in accordance with the instruction manual, may cause harmful
interference to radio communications. However, there is no guarantee
that interference will not occur in a particular installation. If this
equipment does cause harmful interference to radio or television
reception, which can be determined by turning the equipment o and
on, the user is encouraged to try to correct the interference by one or
more of the following measures.
a) Reorient or relocate the receiving antenna.
b) Increase the separation between the equipment and receiver.
c) Connect the equipment into an outlet on a circuit dierent from
that to which the receiver is connected.
d) Consult the dealer or an experienced radio/TV technician for help.
CAUTION
Changes or modications to this equipment not expressly approved
by TEAC CORPORATION for compliance could void the user’s authority
to operate this equipment.
For Canada
THIS CLASS B DIGITAL APPARATUS COMPLIES WITH CANADIAN ICES-003.
CET APPAREIL NUMERIQUE DE LA CLASSE B EST CONFORME A LA NORME
NMB-003 DU CANADA.
This product complies with the European Directives
request and the other Commission Regulations.
This product complies with applicable UK regulations.
1. Read these instructions.
2. Keep these instructions.
3. Heed all warnings.
4. Follow all instructions.
5. Do not use this apparatus near water.
6. Clean only with dry cloth.
7. Do not block any ventilation openings. Install in accordance with
the manufacturer’s instructions.
8. Do not install near any heat sources such as radiators, heat registers,
stoves, or other apparatus (including ampliers) that produce heat.
9. Do not defeat the safety purpose of the polarized or grounding-
type plug. A polarized plug has two blades with one wider than the
other. A grounding type plug has two blades and a third grounding
prong. The wide blade or the third prong are provided for your
safety. If the provided plug does not t into your outlet, consult an
electrician for replacement of the obsolete outlet.
10. Protect the power cord from being walked on or pinched
particularly at plugs, convenience receptacles, and the point where
they exit from the apparatus.
11. Only use attachments/accessories specied by the manufacturer.
12. Use only with the cart, stand, tripod, bracket, or table specied by
the manufacturer, or sold with the apparatus. When a cart is used,
use caution when moving the cart/apparatus combination to avoid
injury from tip-over.
13. Unplug this apparatus during lightning storms or when unused for
long periods of time.
14. Refer all servicing to qualied service personnel. Servicing
isrequired when the apparatus has been damaged in any way, such
as power-supply cord or plug is damaged, liquid has been spilled
or objects have fallen into the apparatus, the apparatus has been
exposed to rain or moisture, does not operate normally, or has been
dropped.
oThe apparatus draws nominal non-operating power from the AC
outlet with its POWER or STANDBY/ON switch not in the ON position.
oThe mains plug is used as the disconnect device, the disconnect
device shall remain readily operable.
oCaution should be taken when using earphones or headphones
with the product because excessive sound pressure (volume) from
earphones or headphones can cause hearing loss.
oIf you are experiencing problems with this product, contact TEAC for a
service referral. Do not use the product until it has been repaired.

TASCAM Mixcast 4 5
ENGLISH
IMPORTANT SAFETY INSTRUCTIONS
WARNING
oTo prevent possible hearing damage, do not listen at high
volume levels for long periods.
CAUTION
oDo not expose this apparatus to drips or splashes.
oDo not place any objects lled with liquids, such as vases, on the
apparatus.
oDo not install this apparatus in a conned space such as a book case
or similar unit.
oThe apparatus should be located close enough to the AC outlet so
that you can easily grasp the power cord plug at any time.
oIf the product uses batteries (including a battery pack or installed
batteries), they should not be exposed to sunshine, re or excessive
heat.
oCAUTION for products that use replaceable lithium batteries: there
is danger of explosion if a battery is replaced with an incorrect type
of battery. Replace only with the same or equivalent type.
oInstalled battery subjected to extremely low air pressure that may
result in an explosion or the leakage of ammable liquid or gas.
For European Customers
Disposal of electrical and electronic equipment and batteries and/
or accumulators
(a) All electrical/electronic equipment and waste batteries/
accumulators should be disposed of separately from the municipal
waste stream via collection facilities designated by the government
or local authorities.
(b) By disposing of electrical/electronic equipment and waste
batteries/accumulators correctly, you will help save valuable
resources and prevent any potential negative eects on human
health and the environment.
(c) Improper disposal of waste electrical/electronic equipment
and batteries/accumulators can have serious eects on the
environment and human health because of the presence of
hazardous substances in the equipment.
(d) The Waste Electrical and Electronic Equipment (WEEE)
symbols, which show wheeled bins that have been
crossed out, indicate that electrical/electronic equipment
and batteries/accumulators must be collected and
disposed of separately from household waste.
If a battery or accumulator contains more than the
specied values of lead (Pb), mercury (Hg), and/
or cadmium (Cd) as dened in the Battery Directive
(2006/66/EC, 2013/56/EU), then the chemical symbols
for those elements will be indicated beneath the WEEE
symbol.
(e) Return and collection systems are available to end users. For more
detailed information about the disposal of old electrical/electronic
equipment and waste batteries/ accumulators, please contact your
city oce, waste disposal service or the shop where you purchased
the equipment.
Pb, Hg, Cd
For China
Mixcast 4

6 TASCAM Mixcast 4
Wireless equipment precautions
Compliance of radio transmitter and
interference
This product has the function of broadband transmitter using 2.4GHz
Band.
Use frequency range: 2402 MHz - 2480 MHz
Maximum output power: Bluetooth® Class 2 (less than 2.5 mW) Please
use only in the country where you purchased the product. Depending
on the country, restrictions on the use of Bluetooth wireless technology
might exist.
Model for USA
Declaration of Conformity
Responsible party: TEAC AMERICA, INC.
Address: 10410 Pioneer Blvd. Suite #1 Santa Fe Springs,
California 90670, U.S.A.
Telephone number: 1-323-726-0303
This device complies with Part.15 of FCC Rules. Operation is subject
to the following two conditions: (1) this device may not cause
harmful interference, and (2) this device must accept any interference
received, including interference that may cause undesired operation.
Labeling of authorization
Contains FCC ID: XEG-AKBT10
Model for Canada
Compliance of radio transmitter
This device complies with Innovation, Science and Economic
Development Canada's licence-exempt RSSs.
Operation is subject to the following two conditions:
1) This device may not cause interference
2) This device must accept any interference, including interference
that may cause undesired operation of the device.
Labeling of authorization
Contains IC: 1559C-AKBT10
Model for EEA (European Economic Area)
Hereby, TEAC CORPORATION declares that the
radio equipment type Mixcast 4 is in compliance
with Directive 2014/53/EU, and the other European
Directives, or Commission Regulations.
Hereby, TEAC CORPORATION declares that the radio
equipment type Mixcast 4 is in compliance with UK
Radio Equipment Regulations.
The full text of the EU or UK declaration of conformity is available at the
following internet address: Please contact us by e-mail.
https://tascam.eu/en/contact.html
Radiation Exposure requirements
This equipment meets the regulation, which is recognized
internationally, for the case of human exposure to radio waves
generated by the transmitter.
Statement of compliance
Model for USA
This equipment complies with FCC radiation exposure limits set forth
for an uncontrolled environment and meets the FCC radio frequency
Exposure Guidelines.
Model for Canada
This equipment complies with IC RSS-102 radiation exposure limits set
forth for an uncontrolled environment.
Model for USA/Canada
This equipment complies with FCC/IC radiation exposure limits set forth
for an uncontrolled environment and meets the FCC radio frequency
(RF) Exposure Guidelines and RSS-102 of the IC radio frequency (RF)
Exposure rules. This equipment has very low levels of RF energy that it
deemed to comply without maximum permissive exposure evaluation
(MPE). But it is desirable that it should be installed and operated
keeping the radiator at least 20 cm or more away from person’s body
(excluding extremities: hands, wrists, feet and ankles).
Model for EEA (European Economic Area)
This equipment complies with EN 62479; Assessment of the compliance
of low power electronic and electrical equipment with the basic
restrictions related to human exposure to electromagnetic elds; the
harmonised standard of DIRECTIVE 2014/53/EU.

TASCAM Mixcast 4 7
ENGLISH
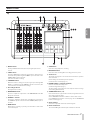
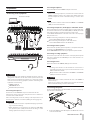
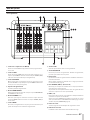
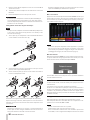
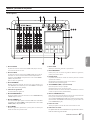
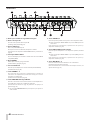
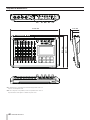
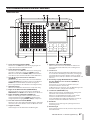
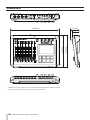
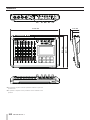
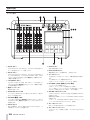
Names of Parts
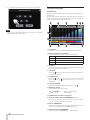
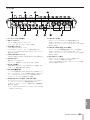
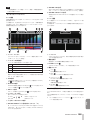
Top
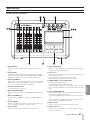
1 MUTE buttons
Pressing a MUTE button mutes (silences) the signal input on that
channel.
2 SOLO buttons
Pressing a SOLO button enables the signal input on that channel to
be monitored by itself through the PHONES 1 jack on the back or the
PHONES (TRRS) 1 jack on the front.
(This does not affect recording.)
3 TALKBACK button
While this button is being pressed, the signal input through MIC
INPUT 1 is output through the PHONES 2–4 jacks on the back. (This
sound will not be recorded when recording.)
4 Recording indicator
This lights when recording.
5 MONITOR OUT knob
Use this to adjust the output level of the MONITOR OUT and LINE
OUT jacks on the back.
6 PHONES 1–4 knobs
Use these to adjust the output levels of headphones connected to
the PHONES 1–4 jacks on the back and the PHONES (TRRS) 1 jack on
the front.
7 MARK button
When playing, recording or paused, press this button to add a mark
at the current point.
8 STOP button
Press this to stop playback or recording.
9 REC/PAUSE button
Press this to start recording. When recording, press this to pause.
0 Touchscreen
This allows input signals to be monitored and shows the operation
status of the unit.
Various settings can be made by touch operation.
(See Touchscreen overview page 12.)
q PHONES (TRRS) 1 jack (CTIA standard)
Connect a headset, for example, here.
(See Connecting headset page 9.)
The input signals of a headset mic can be input on channel 1 using a
menu setting. (CTIA standard)
w SOUND PAD buttons (1-8)
Press these buttons to play the effect sounds, background music and
other audio assigned to them.
Use the TASCAM Podcast Editor software to set the audio sources.
(See TASCAM Podcast Editor overview page 16 and SOUND PAD
button overview page 17.)
e Channel faders
Use these to adjust the send levels of channel signals.
r Channel indicators
The channel LEDs light red when input overloads are detected.

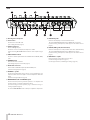
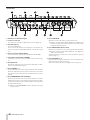
8 TASCAM Mixcast 4
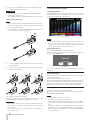
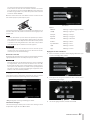
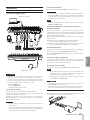
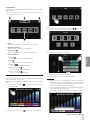
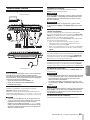
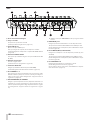
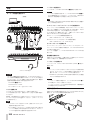
Back
t Kensington Security Slot
y SD card slot
Use this slot to insert SD cards.
(See Loading SD cards page 10.)
u USB port (Type-C)
This is a USB Type-C port.
Use this to connect a computer, smartphone or tablet.
(See Connecting iOS/iPadOS/Android devices and computers page
14.)
i INPUT SELECT switch
Use this to switch input between the LINE IN L/R and LINE IN (TRRS)
jacks.
o POWER button
This turns the unit on and off
(See Turning the power on and off page 10.)
p DC IN 12V connector
Connect the included AC adapter (PS-P1220E NUT) here.
(See Connecting the power page 9.)
a PHONES 1–4 jacks
Use these standard 6.3mm stereo jacks to connect headphones. Use
adapters (3.5mm stereo mini jack) to connect headphones with mini
plugs.
(See Connecting headphones page 9.)
s MONITOR OUT L/R and LINE OUT jacks
Connect monitor speakers (powered speakers or an amplifier and
speaker system) or recording equipment to these.
(See Connecting monitor speakers page 9 and Connecting re-
cording equipment page 9.)
o Use the MONITOR OUT knob on the top to adjust the output level.
d LINE IN L/R jacks
Connect a media player or other audio device here.
o Set the INPUT SELECT switch to the LINE IN side to use these.
(See Connecting smartphones, media players and similar devices
page 9.)
f LINE IN (TRRS) jack (CTIA standard)
Connect a smartphone or other portable device here. (CTIA standard)
o Set the INPUT SELECT switch to the (TRRS) side to use this.
(See Connecting smartphones, media players and similar devices
page 9.)
g MIC INPUT 1–4 jacks
Connect dynamic and condenser mics to these.
(See Connecting microphones page 9.)
(For mic type selection, see Making mic settings page 12.)

TASCAM Mixcast 4 9
ENGLISH
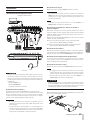
Preparation
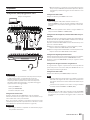
Connecting audio equipment
Front
Back
Connection example
V CAUTION
Before connecting audio equipment, minimize the values of the fol-
lowing knobs and faders on this unit and the operation knobs and
faders on the connected devices. Failure to do so could cause sudden
loud noises from monitoring equipment, and this could damage the
equipment or harm hearing.
i PHONES 1–4 knobs
i MONITOR OUT knob
i Channel faders (all channels)
Connecting microphones
Connect mics to the MIC INPUT 1–4 jacks on the back of the unit.
Point the mics at the sound sources and place the unit in a stable loca-
tion where there is little vibration.
After connecting them, use the mic settings on the Input Screen to set
the mic types to dynamic or condenser. (Making mic settings page 12)
ATTENTION
i Do not connect mics that are compatible with plug-in power. Do-
ing so could cause damage.
i When “Condenser” is selected as the mic setting for a MIC INPUT
jack, phantom power (+48V) will be turned on. Doing so could
damage dynamic mics if they are connected.
Connecting headphones
Connect headphones to the PHONES 1–4 jacks on the back.
V CAUTION
Before connecting headphones, minimize the volumes with the
PHONES 1-4 knobs. Failure to do so might cause sudden loud noises
from the headphones, which could harm hearing or result in other
trouble.
NOTE
Output volume could be reduced if both PHONES 1 and PHONES
(TRRS) are used at the same time.
Connecting smartphones, media players and similar devices
Connect smartphones and other portable devices as well as media play-
ers and other audio devices to the LINE IN (TRRS) or LINE IN jacks on the
back of the unit. Doing so allows input of these sound sources.
Set the INPUT SELECT switch on the back of the unit to the input type
that you want to use.
p When connecting a smartphone or other portable device:
Set the INPUT SELECT switch to the TRRS side.
p When connecting a media player or other audio device:
Set the INPUT SELECT switch to the LINE IN side.
Connecting monitor speakers
Connect monitor speakers (powered speakers or an amplifier and speak-
er system) to the MONITOR OUT jacks on the back.
Use the MONITOR OUT knob on the top to adjust the speaker volume.
Connecting recording equipment
Sound sources input into this unit as well as sound played back by this
unit can be output from the LINE OUT jack on its back and sent to re-
cording equipment.
Connecting headset
Connect a headset to the PHONES (TRRS) 1 jack on the front.
NOTE
i A setting can be made to use the headset mic as the channel 1
input when the Input Screen is open on the touchscreen. See the
Reference Manual for details.
i Output volume could be reduced if both PHONES 1 and PHONES
(TRRS) are used at the same time.
V CAUTION
Before connecting a headset, minimize the level of the PHONES 1
knob on the top.
Failure to do so might cause sudden loud noises from the headset,
which could harm hearing or result in other trouble.
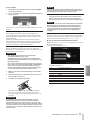
Connecting the power
Use the included AC adapter (PS-P1220E NUT) to connect a power sup-
ply to the unit as shown below.
1. Connect the DC plug of the AC adapter to the DC IN 12V connector
on the back of the unit.

10 TASCAM Mixcast 4
2. Turn the nut on the DC plug to secure it to the DC IN 12V connector.
3. Connect the AC adapter to an outlet.
V CAUTION
Always connect the included AC adapter (PS-P1220E NUT), which is
specified for use with this unit.
Use of a different adapter could cause malfunction, fire or electric shock.
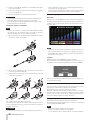
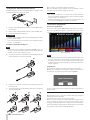
Changing the outlet plug
NOTE
When purchased new, the included PS-P1220E NUT AC adapter speci-
fied for this unit already has an outlet plug (A) attached. There should
be no need to change the plug.
1. Move the knob (1) on the PS-P1220E NUT AC adapter in the direc-
tion of the arrow and pull out the plug (A).
1
2. Select the plug that matches the AC outlet from the 3 other types
included (B, C or D).
3. Move the knob (1) in the direction of the arrow again, and attach
the plug to the AC adapter.
111
This completes changing the outlet plug.
After changing the outlet plug, confirm that it is not loose or crooked
and that everything is normal before plugging it into an outlet.
V CAUTION
Do not use the adapter if there is anything abnormal about the plug
after changing it. Use when the plug is abnormal could cause fire or
electric shock.
Contact the retailer where you purchased the unit or a TASCAM cus-
tomer support service.
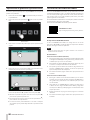
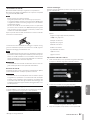
Turning the power on and off
Turning the power on
Press the POWER button on the back of the unit once to turn it on. After
the Mixcast 4 logo appears on the touchscreen and startup completes,
the Home Screen will appear as shown below.
Home Screen
NOTE
A tutorial that explains the unit simply will appear the first time it is
turned on after purchase. Then, the Others Screen will open on the
touchscreen so that language and date/time settings can be made.
(See Setting the language, date and time page 11.)
Turning the power off
Press and hold the POWER button to turn the unit off.
When a pop-up appears on the touchscreen to confirm turning the pow-
er off, release the POWER button.
Pop-up Screen
Tap “Yes” on the touchscreen to run the shutdown procedure and turn
the unit off.
Tutorial overview
When the unit is turned on, a tutorial screen will open to explain the ba-
sics of operating the unit.
If the tutorial is unnecessary, tap 5 to close it.
Put a check in the “Hide Tutorial” checkbox before closing the message to
prevent it from being shown in the future. (This message will be shown
again if the unit is restored to its default settings. See the Reference
Manual for the procedures to restore the unit to its default settings.)
Loading SD cards
This unit uses SD cards for recording and playback.
This unit can use SD cards that are Class 10 or higher and compatible
with SD, SDHC or SDXC standards.
NOTE
This product does not include an SD card.
Please purchase any that you need for your uses.
We recommend using SD cards with capacities of at least 64 GB be-
cause multitrack recordings of all channel inputs use large amounts of
space.
A list of SD cards that have been confirmed for use with this unit can
be found by accessing the TEAC Global Site (http://teac-global.com).
Check the page for this product. You can also contact TASCAM cus-
tomer support service.

TASCAM Mixcast 4 11
ENGLISH
Open the SD card slot cover on the back and insert the card in the slot
until it clicks into place.
If a pop-up message suggesting formatting appears on the touchscreen
when an SD card is inserted, follow the instructions in the message to
format the card.
NOTE
SD cards formatted by this unit are optimized to improve performance
during recording. Use this unit to format the SD cards to be used with
it. Errors might occur when recording with this unit using an SD card
formatted by a computer or other device.
ATTENTION
Formatting an SD card will erase all the data on it. Make a backup of
any needed data before formatting.
Removing SD cards
First, turn the unit off or stop operation. Then, gently press the SD card in
to eject it, and remove it
ATTENTION
Never remove an SD card when the unit is operating (including re-
cording, playing back, or writing data to the SD card). Doing so could
cause proper recording to fail, data to be lost, and sudden loud noises
from monitoring equipment, which might damage the equipment,
harm hearing or cause other trouble.
Setting the language, date and time
The Others Screen will open the first time the unit is turned on after pur-
chase and whenever the internal clock has been reset.
Others Screen
p English is the default display language.
Selecting the language
Select the language to use for menus and messages with the Language
item on the Others Screen.
Others Screen
Options
English: Use English (default setting)
: Use Japanese
: Use French
: Use Spanish
: Use German
: Use Italian
: Use Russian
: Use Chinese
: Use Korean
Setting the date and time
1. On the Others Screen, tap the Date/Time Adjust button to open the
Date Time Adjust Screen.
Others Screen
2. Swipe the date and time items up and down to set them.
Date Time Adjust Screen
3. After completing the settings, tap the OK button.

12 TASCAM Mixcast 4
NOTE
The Others Screen can be opened from Home Screen > MENU Screen >
Hardware Settings Screen.
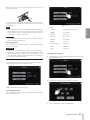
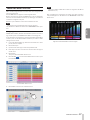
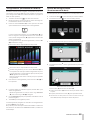
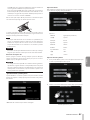
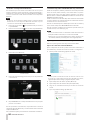
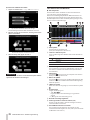
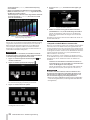
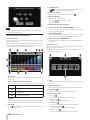
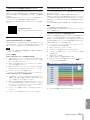
Touchscreen overview
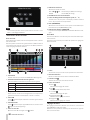
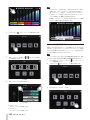
Home Screen
When the unit is turned on, the Home Screen appears on the touch-
screen as shown below.
This screen allows input signals to be monitored and shows the opera-
tion status of the unit. In addition, tapping the Menu icon allows access
to various function settings.
1 Menu icon
Tap this icon to open the MENU Screen. (Menu Screen page 12)
2 Recorder operation status
This icon shows the recorder operation status.
Indicator Meaning
8Stopped
0Recording
09 Recording paused
3 Counter
This shows the current elapsed time when recording or the remain-
ing recordable time on the SD card (hours: minutes: seconds).
4 USB icon
The icon appears when a computer or other external device is
connected.
5 Bluetooth icon
The icon appears when a Bluetooth device is connected. The
icon blinks when waiting to pair.
6 SD card icon
When an SD card is loaded, the icon appears.
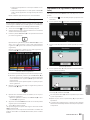
7 Level meters
These show the levels of the channels.
o À - Ã, , , , 7: Levels sent to 2MIX
o ô, ü: 2MIX levels
8 Input channel identifiers
9 SOUND PAD bank switch (/) icons
Tap the icon to switch to the lower bank. Tap the icon to
switch to the higher bank.
0 SOUND PAD buttons
These show the names of the sound files that have been assigned to
them. (See SOUND PAD button overview page 17.)
q SOUND PAD bank indicator
The position of the SOUND PAD bank currently shown is highlighted.
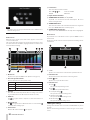
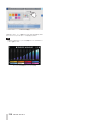
Menu Screen
Tap the Menu icon on the Home Screen to open the MENU Screen as
shown below.
Tap the icons on the screen to access the operations and settings of vari-
ous functions.
1 l icon
Tap this icon to return to the screen that was open before this one.
2 Function name
This shows the function name of the screen being shown.
3 Home ( ) icon
Tap this icon to open the Home Screen.
4 Function icons
o Input ( )
This opens the Input Settings Screen.
o Play ( )
This opens the podcast PLAY Screen.
o Sound pad settings ( )
This opens the Sound Pad Settings Screen.
o Hardware settings ( )
This opens the Hardware Settings Screen.
o SD card settings ( )
This opens the SD Card Settings Screen.
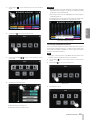
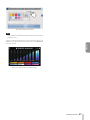
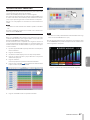
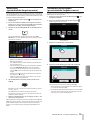
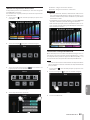
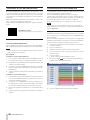
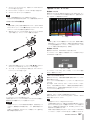
Making mic settings
Settings can be made for mics connected to the MIC INPUT 1–4 jacks on
the back.
Refer to the following procedures to select mic types on the touch-
screen.

TASCAM Mixcast 4 13
ENGLISH
1. Tap the Menu ( ) icon on the Home Screen to open the Menu
Screen.
Home Screen
2. Tap the Input ( ) icon to open the Input Screen.
Menu Screen
3. Tap the input number – icon for a connected mic to open its
Level Screen.
Input Screen
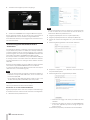
4. Tap the type for the selected mic.
Level Screen
o Dynamic: Connect a dynamic mic.
o Condenser: Connect a condenser mic.
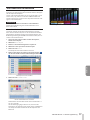
ATTENTION
i When “Condenser” is selected, +48V power is provided to that MIC
input. Before disconnecting a condenser mic, change the setting
to “Dynamic” to turn +48V power off.
i Connecting a dynamic mic to a MIC INPUT jack set to “Condenser”
could damage the mic.
Red dots will appear on the Home Screen next to the channel num-
bers of MIC inputs set to “Condenser” on the previous screen.
Screen with condenser indicator
“Condenser” selected for mic type
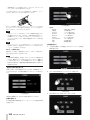
Connecting with Bluetooth devices
This unit has a built-in Bluetooth audio module. This allows input of
sound played on Bluetooth devices—computers and portable audio
devices that support Bluetooth (A2DP)—as well as output of sound from
this unit to other Bluetooth devices.
NOTE
Pairing also requires operation of the Bluetooth device. Refer to the
operation manual of the Bluetooth device for procedures.
1. Tap the Menu ( ) icon on the Home Screen to open the Menu
Screen.
2. Tap the Input ( ) icon to open the Input Screen.
Menu Screen
3. Tap the Bluetooth icon.
Input Screen

14 TASCAM Mixcast 4
4. Tap the Pairing button to start pairing.
Pairing button on Level Screen
5. Select “TASCAM Mixcast” on the Bluetooth device to be paired.
After pairing completes, inputting sound from the Bluetooth device and
outputting sound from the unit to the Bluetooth device will be possible.
See the Reference Manual for audio settings and details about operation.
Connecting iOS/iPadOS/Android devices and computers
Connected smartphones, tablets and computers can be used to add
effect sounds, background music and other audio to the pads. They can
also be used to edit podcasts recorded on the unit. (The TASCAM Pod-
cast Editor software must be installed. See Installing TASCAM Podcast
Editor page 16.)
USB mass storage and USB audio functions can be used by connecting
the unit to a computer. See the Reference Manual for information about
USB mass storage and USB audio functions.
Connect a USB cable to the USB port on the back of the unit and connect
it to an iOS/iPadOS/Android device or computer.
When connected, the USB icon on the Home Screen will appear bright
(see “Home Screen” 4 USB icon on page 12).
NOTE
The unit should be connected using the included USB cable* directly
to the smartphone/tablet or computer, not through a USB hub.
* When using a USB cable purchased elsewhere, use a high-quality
cable (that has USB certification) of the shortest length possible.
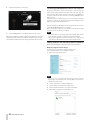
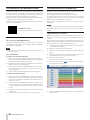
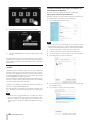
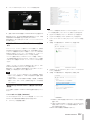
Making settings to use with Podcast Editor for Windows
Conduct the following procedures before launching Podcast Editor.
Windows computer sound settings
Set the input and output device, sampling frequency, bit
rate, and number of channels according to the setup.
1. Open the Sound Settings screen.
NOTE
This can also be opened by right-clicking the sound icon at the
bottom right of the desktop screen, selecting “Open Sound settings”
and then selecting “Sound”.
2. Set the output device to “Speakers (Mixcast 4) ”.
3. Set the input device to “Microphone (Mixcast 4) ”.
4. Click “Sound Control Panel” to open the Sound window.
5. Open the Recording tab, and select “Mixcast 4”.

TASCAM Mixcast 4 15
ENGLISH
6. Click “Properties” for “Mixcast 4” to open the Microphone Properties
screen.
7. Open the Advanced tab, and set the Default Format.
iSelect a 14-channel setting to use it with Podcast Editor.
iSelect a 2-channel setting when using OBS Studio or another
application that supports 2-channel audio devices.
This completes preparation to use with Podcast Editor.
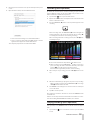
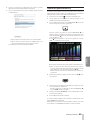
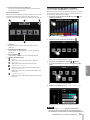
Recording (basic operation)
By default, 14 channels will be recorded, including all input channels
and the 2MIX. (Recording only the stereo 2MIX is also possible. See the
Reference Manual for details about operation.)
1. Tap the Home ( ) icon to open the Home Screen.
2. Operate the channel faders and adjust the mix levels with the level
meters on the Home Screen.
3. Press the REC/PAUSE (0) button on the top when stopped to start
recording.
When recording starts, the REC/PAUSE (0) button will light red,
and files will begin to be saved to the SD card. (The recording (0)
icon will appear on the Home Screen during recording.)
When recording and while recording is paused, the STOP (8) but-
ton will light orange.
Screen while recording
o The counter will show the elapsed time on the Home Screen.
o When recording, press the REC/PAUSE (0) button on the top to
pause recording. The button will blink red while paused. (The
paused (09) icon will appear on the Home Screen.)
Press this button again when paused to resume recording.
4. When ready to stop recording, press the STOP (8) button on the
top.
5. When the confirmation pop-up appears, tap “Yes” to stop recording.
When recording is stopped, the red REC/PAUSE (0) and orange
STOP(8) buttons will become unlit.
6. The RENAME Screen will appear so the name of the recorded pod-
cast can be edited.
7. Tap OK to save the podcast.
Files (podcasts) recorded on this unit are saved in the PODCAST folder
on the SD card.
Podcasts can be imported into Podcast Editor and edited. For instruc-
tions about editing with TASCAM Podcast Editor, see its manual.
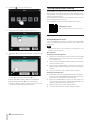
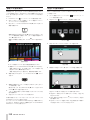
Playing recordings (basic operation)
Files (podcasts) in the PODCAST folder on the SD card can be played
back.
1. Tap the Menu ( ) icon on the Home Screen to open the MENU
Screen.

16 TASCAM Mixcast 4
2. Tap the Play ( ) icon to open the Play Screen.
Menu Screen
3. Tap the name of the podcast you want to play to select it.
Play Screen
4. Tap the Play (t) icon at the bottom left of the screen to start play-
back.
Play button on Play Screen
The Play (t) icon will change to the Pause (9) icon.
o Tap the Pause (9) icon during playback to pause playback.
o When paused, tap the Play (t) icon to resume playback.
o Selecting a different podcast or opening any screen other than
the Play Screen will stop playback of the podcast.
TASCAM Podcast Editor overview
Using TASCAM Podcast Editor (hereafter “Podcast Editor”), which is soft-
ware designed to work with this unit, effect sounds, background music
and other audio can be assigned to the pads. It can also be used to edit
podcasts recorded on this unit.
Use Podcast Editor by installing it on a smartphone, tablet or computer
and connecting that device to this unit.
See the TASCAM Podcast Editor manual for details about operation.
TASCAM Podcast editor
https://tascam.jp/int/product/tascam_podcast_editor/docs
Installing TASCAM Podcast Editor
On iOS/iPadOS/Android devices
Search for “TASCAM Podcast Editor” on the App Store for iOS/iPadOS
devices and on Google Play for Android devices. Then, download and
install the app.
NOTE
Please be aware that you are responsible for any transmission costs
related to Internet connection.
On computers
Installing Podcast Editor (Windows)
1. Download the latest Windows dedicated software from the TEAC
Global Site (http://teac-global.com/) and save it on the computer to
be used with the unit.
2. Uncompress the saved Windows software (zip file) on the computer
desktop or another location.
3. Double-click the “TASCAM_Mixcast_Installer_x.xx.exe” file in the
folder that appears after uncompression to launch the installation
software.
4. Follow the instructions in the installer to install the software.
Installing Podcast Editor (Mac)
1. Download the latest version of Podcast Editor for the operating sys-
tem being used from the TEAC Global Site (http://teac-global.com/)
and save it on the computer to be used with the unit.
2. Double-click “TASCAM_Mixcast_Installer_x.xx.dmg”, which is the
saved disk image file for the Mac Podcast Editor, and double-click
“Mixcast_Installer.pkg” inside the folder that opens.
3. When the installer starts, click the “Continue” button.
4. Follow the instructions in the installer to install the software.

TASCAM Mixcast 4 17
ENGLISH
SOUND PAD button overview
Effect sounds, background music and other audio can be assigned to the
pads on top of the unit.
Press the PAD buttons to play the sounds assigned to them.
Groups of sound source settings for PAD buttons (1–8) are called banks.
This unit can switch between 9 banks (0–8), allowing up to 8 different
sounds to be assigned to each pad.
Bank zero is preset with the sound sources included in the unit.
NOTE
The sound sources included in the unit cannot be changed.
See the Reference Manual for details about SOUND PAD button opera-
tion.
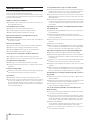
Assigning sounds to SOUND PAD buttons
TASCAM Podcast Editor (hereafter “Podcast Editor”) must be used to as-
sign sounds to pads. (See TASCAM Podcast Editor overview page 16.)
In this document, we explain how to assign Podcast Editor default effect
sounds to pads. See the Podcast Editor manual for procedures to make
settings for other sounds.
1. Launch the Podcast Editor app that has been installed on a smart-
phone, tablet or computer.
2. Click “New Project”.
3. Input the name of the project in the “Project Name” field.
4. Click “Project Location” and select the location where the project
will be saved.
5. Click “Create”.
This opens the Podcast Editor Home Screen.
6. Click the PAD ( ) icon on the Podcast Editor Home Screen to open
the Sound Pad Screen.
Podcast Editor Home Screen
7. Click “Default Sounds” on the Sound Pad Screen.
Pad Sounds Screen
NOTE
The Podcast Editor default effect sounds are assigned to the Bank 1
PAD buttons (1–8).
After completing the assignments, the names of the files assigned to
each pad will appear on the buttons in the SOUND PAD section of the
Home Screen.
Appearance with default effect sounds assigned

18 TASCAM Mixcast 4
Troubleshooting
If you are having trouble with the operation of this unit, please try the
following before seeking repair.
If these measures do not solve the problem, please contact the store
where you bought the unit or TEAC customer support service.
Power will not turn on
p Confirm that the power plug and other connectors are inserted com-
pletely.
The SD card is not recognized
p Confirm that the SD card is inserted completely.
p Is an SD card supported by the unit loaded?
p Check the format (file system) of the SD card.
Sometime after connecting an SD card, the unit stopped
responding to operations
p A problem has occurred with the connection of the SD card. Eject
and re-insert the SD card.
No sound is output
p Are the faders and knobs raised to suitable levels?
p Check the settings of the connected equipment again.
p Are the PHONES knobs raised to suitable levels?
p Are the channel MUTE buttons on?
The sound I am trying to record is distorted
p Are the input level settings of the unit suitable?
p Is the output level of a connected input source too high?
Recording is not possible
p Confirm that the SD card has enough open space.
p Recording becomes impossible when the total number of files reach-
es 5000.
Playback is not possible
p Confirm that it uses the sampling frequency (48 kHz) and bit depth
(24-bit) supported by this unit.
There is noise
p Confirm that the connection cables do not have contact issues.
p If this unit is near a TV, radio, power amplifier or other device with a
large transformer, noise could occur with this unit or other devices
nearby. (See Precautions for placement and use page 19.)
Sound via Bluetooth breaks up or is noisy
p Are there any wireless LAN devices, other Bluetooth devices, micro-
wave ovens or similar equipment nearby?
Keep such devices as far away as possible during use.
p Try reducing the distance between this unit and the other Bluetooth
device. Try changing the positions of this unit and the other Blue-
tooth device.
p The operation of apps other than for music playback on the smart-
phone could cause the sound to break up. In this case, stop operation
of apps other than the one used for music playback.
Cannot connect or communication is interrupted when us-
ing Bluetooth
p Confirm that the other Bluetooth device power is on and that its
Bluetooth function is on.
p Confirm that the other Bluetooth device is not too far away.
Are there walls or other obstacles, for example, between this unit and
the other Bluetooth device?
p Try changing the positions of this unit and the other Bluetooth de-
vice.
p Turn the unit off once and restart it.
p Remove the “TASCAM Mixcast” pairing record from the other Blue-
tooth device, and try pairing the unit with that Bluetooth device
again. (see "Connecting with Bluetooth devices" on page 13)
Cannot pair with another Bluetooth device
p Confirm that the other Bluetooth device supports A2DP.
p Confirm that the other Bluetooth device is in a state that allows trans-
mission. For details, check the operation manual of that Bluetooth
device.
p Turn the power off for both this unit and the other Bluetooth device
once. Then, turn them both on and try pairing them again.
p Turn off Bluetooth devices other than the one that you are trying to
pair with.
p Remove the “TASCAM Mixcast” pairing record from the other Blue-
tooth device, and try pairing the unit with that Bluetooth device
again. (see "Connecting with Bluetooth devices" on page 13)
A computer does not recognize the unit when connected by
USB
p This unit cannot be used with USB 1.1. Use a USB 2.0 or USB 3.0 port.
p Do not use a USB hub with this unit. Always connect the unit directly
to a USB port on the computer.
p If the above methods do not resolve the problem, connect the unit
to a different USB port on the computer.
When connected by USB, sound breaks up or noise occurs
p The processing load on the computer causes sound to break up and
noise to occur.
p If a wireless LAN or background software, including antivirus soft-
ware, is running, turn it off during use of this unit. In addition, set the
PC Control Panel "Power Options" to "High performance".
p Use the included USB cable.*
* When using a USB cable purchased elsewhere, use a high-quality
cable (that has USB certification) of the shortest length possible.
p Use a USB port built into the computer because that affects the USB
connection on the computer end.

TASCAM Mixcast 4 19
ENGLISH
Bluetooth®
This unit has a built-in Bluetooth audio module. This allows input of
sound played on Bluetooth devices—computers and portable audio
devices that support Bluetooth (A2DP)—as well as output of sound from
this unit to other Bluetooth devices.
ATTENTION
The Bluetooth function of this unit is not guaranteed to enable con-
nection or operation with all Bluetooth devices.
Transmission security
This unit supports security functions during Bluetooth transmission in
accordance with the Bluetooth standard specifications, but it does not
guarantee the privacy of such transmissions. TEAC CORPORATION will
bear no responsibility should an information leak occur during transmis-
sion by Bluetooth.
About SD cards
Precautions for use
SD cards are delicate media.
In order to avoid damaging SD cards, please take the following precau-
tions when handling them.
p Do not leave them in extremely hot or cold places.
p Do not leave them in extremely humid places.
p Do not let them get wet.
p Do not put things on top of them or twist them.
p Do not hit them.
p Do not remove or insert them during recording, playback, data trans-
mission or other access.
p When transporting them, put them into cases, for example.
SD card write protection
This unit writes track information to the media in order to improve op-
eration performance. Since, for example, setting information cannot be
written to SD cards that are write-protected, settings will not be retained
when the unit is restarted and performance will be otherwise affected.
Note about formatting
SD cards formatted by this unit are optimized to improve performance
during recording. Use this unit to format the SD cards to be used with it.
Errors might occur when recording with this unit using an SD card for-
matted by a computer or other device.
Beware of condensation
Condensation could occur if the unit is moved from a cold place to a
warm place, it is used immediately after a cold room has been heated or
it is otherwise exposed to a sudden temperature change. If this occurs,
let the unit sit for one to two hours before turning it on.
Cleaning the unit
Use a dry soft cloth to wipe the unit clean. Do not wipe with chemical
cleaning cloths, thinner, alcohol or other chemical agents.
Doing so could damage the surface or cause discoloration.
Precautions for placement and use
p The operating temperature range of this unit is 0–40 °C.
p Do not install this unit in the following types of locations. Doing so
could degrade the sound quality and/or cause malfunctions.
Places with significant vibrations
Next to a window or in another location exposed to direct sunlight
Near heaters or other extremely hot places
Extremely cold places
Very humid or poorly ventilated places
Very dusty places
Places exposed directly to rain or other water
p To enable good heat dissipation, do not place anything on top of the
unit.
p Do not place this unit on top of a power amplifier or other device
that generates heat.
About TASCAM customer support service
TASCAM products are supported and warrantied only in their country/
region of purchase.
To receive support after purchase, on the TASCAM Distributors list page
of the TEAC Global Site (https://teac-global.com/), search for the local
company or representative for the region where you purchased the
product and contact that organization.
When making inquiries, the address (URL) of the shop or web shop
where it was purchased and the purchase date are required. Moreover,
the warranty card and proof of purchase might also be necessary.

20 TASCAM Mixcast 4
Specifications/rated values
Recorder specifications
Recording media
SD cards (64 MB–2 GB)
SDHC cards (4 GB–32 GB)
SDXC cards (48 GB–512 GB)
Recording/playback formats
WAV: 48 kHz, 24-bit, 2-channel stereo/14-channel poly (BWF for-
mat)
Analog audio input ratings
Mic input jacks (1-4)
Connectors: XLR/TRS combo jacks
XLR: XLR-3-31 (1: GND, 2: HOT, 3: COLD)
TRS: 6.3mm (1/4") standard TRS jacks
(Tip: HOT, Ring: COLD, Sleeve: GND)
Maximum input level:+10dBu(when LEVEL at min.)
Nominal input level: −10 dBu (when LEVEL at min.)
Minimum input level: −76.5 dBu (when LEVEL at max.)
Gain range: 66.5 dB
Input impedance: 2.1 kΩ
PHONES (TRRS) 1 jack (CTIA standard)
Connector: 3.5 mm (1/8") 4-pole mini jack
Maximum input level:+4 dBV(when LEVEL at min.)
Nominal input level: −16 dBV (when LEVEL at min.)
Minimum input level: −82.5 dBV (when LEVEL at max.)
Gain range: 66.5 dB
Input impedance: 2 kΩ
LINE IN (TRRS) jack (CTIA standard)
Connector: 3.5 mm (1/8") 4-pole mini jack
Maximum input level: +8 dBV
Nominal input level: −12 dBV
Input impedance: 12 kΩ
LINE IN L/R (balanced) jacks
Connectors: 6.3mm (1/4") standard TRS jacks
(Tip: HOT, Ring: COLD, Sleeve: GND)
Maximum input level: +24 dBu
Nominal input level: +4 dBu
Input impedance: 11 kΩ
Analog audio output ratings
PHONES jacks (1-4)
Connectors: 6.3mm (1/4") standard stereo jacks
Maximum output: 45 mW + 45 mW (0.1% THD+N or less, into 32Ω load)
PHONES (TRRS) 1 jack (CTIA standard)
Connector: 3.5 mm (1/8") 4-pole mini jack
p PHONES (TRRS) 1 output splits from PHONES 1 output
LINE OUT (TRRS) jack (CTIA standard)
Connector: 3.5 mm (1/8") 4-pole mini jack
Maximum output level: −25 dBu
Nominal output level: −45 dBu
Output impedance: 100 Ω
MONITOR OUT L/R (balanced) jacks
Connectors: 6.3mm (1/4") standard TRS jacks
(Tip: HOT, Ring: COLD, Sleeve: GND)
Maximum output level: +20 dBu
Nominal output level: +0 dBu
Output impedance: 200 Ω
LINE OUT jack
Connector: 3.5mm (1/8") stereo mini jack
Maximum output level: +6 dBV
Nominal output level: −14 dBV
Output impedance: 200 Ω
Control input/output
USB port
Connector: USB Type-C
Formats: USB2.0 HIGH SPEED
USB AUDIO CLASS 2.0
USB MASS STORAGE CLASS
Audio performance
Mic amp EIN (equivalent input noise)
−125 dBu or less (150Ω termination, LEVEL at max.)
Frequency response
Mic input jacks (1-4)
20 Hz – 20 kHz: +0.3 dB/−0.3 dB (JEITA)
S/N ratio
101 dB
( Mic input jacks (1-4), channel faders at 0, 20kHz SPCL LPF +
A-Weight)
Distortion
0.003%
( Mic input jacks (1-4), 1kHz sine wave, channel faders at 0, 20kHz
SPCL LPF)
Crosstalk
95 dB or more
Note: Measurement conditions conform to JEITA CP-2905B.
Recording times (in hours: minutes)
Recording format SIZE
4 GB 8 GB
24-bit/48kHz WAV 14 ch. 0:35 1:10
2 ch. 4:07 8:15
p The recording times shown above are not continuous recording
times. They are total recordable times for SD/SDHC/SDXC cards.
Bluetooth
Output class: 2 (about 10m* unobstructed transmis-
sion distance)
Supported profile: A2DP
Supported A2DP codecs: SBC, AAC
Supported A2DP content protection: SCMS-T
* The transmission distance is an estimate. The transmission distance
may vary depending on the surrounding environment and radio
wave conditions.
La page charge ...
La page charge ...
La page charge ...
La page charge ...
La page charge ...
La page charge ...
La page charge ...
La page charge ...
La page charge ...
La page charge ...
La page charge ...
La page charge ...
La page charge ...
La page charge ...
La page charge ...
La page charge ...
La page charge ...
La page charge ...
La page charge ...
La page charge ...
La page charge ...
La page charge ...
La page charge ...
La page charge ...
La page charge ...
La page charge ...
La page charge ...
La page charge ...
La page charge ...
La page charge ...
La page charge ...
La page charge ...
La page charge ...
La page charge ...
La page charge ...
La page charge ...
La page charge ...
La page charge ...
La page charge ...
La page charge ...
La page charge ...
La page charge ...
La page charge ...
La page charge ...
La page charge ...
La page charge ...
La page charge ...
La page charge ...
La page charge ...
La page charge ...
La page charge ...
La page charge ...
La page charge ...
La page charge ...
La page charge ...
La page charge ...
La page charge ...
La page charge ...
La page charge ...
La page charge ...
La page charge ...
La page charge ...
La page charge ...
La page charge ...
La page charge ...
La page charge ...
La page charge ...
La page charge ...
La page charge ...
La page charge ...
La page charge ...
La page charge ...
La page charge ...
La page charge ...
La page charge ...
La page charge ...
La page charge ...
La page charge ...
La page charge ...
La page charge ...
La page charge ...
La page charge ...
La page charge ...
La page charge ...
La page charge ...
La page charge ...
La page charge ...
La page charge ...
La page charge ...
La page charge ...
La page charge ...
La page charge ...
La page charge ...
La page charge ...
La page charge ...
La page charge ...
La page charge ...
La page charge ...
La page charge ...
La page charge ...
La page charge ...
La page charge ...
La page charge ...
La page charge ...
-
 1
1
-
 2
2
-
 3
3
-
 4
4
-
 5
5
-
 6
6
-
 7
7
-
 8
8
-
 9
9
-
 10
10
-
 11
11
-
 12
12
-
 13
13
-
 14
14
-
 15
15
-
 16
16
-
 17
17
-
 18
18
-
 19
19
-
 20
20
-
 21
21
-
 22
22
-
 23
23
-
 24
24
-
 25
25
-
 26
26
-
 27
27
-
 28
28
-
 29
29
-
 30
30
-
 31
31
-
 32
32
-
 33
33
-
 34
34
-
 35
35
-
 36
36
-
 37
37
-
 38
38
-
 39
39
-
 40
40
-
 41
41
-
 42
42
-
 43
43
-
 44
44
-
 45
45
-
 46
46
-
 47
47
-
 48
48
-
 49
49
-
 50
50
-
 51
51
-
 52
52
-
 53
53
-
 54
54
-
 55
55
-
 56
56
-
 57
57
-
 58
58
-
 59
59
-
 60
60
-
 61
61
-
 62
62
-
 63
63
-
 64
64
-
 65
65
-
 66
66
-
 67
67
-
 68
68
-
 69
69
-
 70
70
-
 71
71
-
 72
72
-
 73
73
-
 74
74
-
 75
75
-
 76
76
-
 77
77
-
 78
78
-
 79
79
-
 80
80
-
 81
81
-
 82
82
-
 83
83
-
 84
84
-
 85
85
-
 86
86
-
 87
87
-
 88
88
-
 89
89
-
 90
90
-
 91
91
-
 92
92
-
 93
93
-
 94
94
-
 95
95
-
 96
96
-
 97
97
-
 98
98
-
 99
99
-
 100
100
-
 101
101
-
 102
102
-
 103
103
-
 104
104
-
 105
105
-
 106
106
-
 107
107
-
 108
108
-
 109
109
-
 110
110
-
 111
111
-
 112
112
-
 113
113
-
 114
114
-
 115
115
-
 116
116
-
 117
117
-
 118
118
-
 119
119
-
 120
120
-
 121
121
-
 122
122
-
 123
123
-
 124
124


Tascam Mixcast 4 Le manuel du propriétaire
- Taper
- Le manuel du propriétaire
dans d''autres langues
- italiano: Tascam Mixcast 4 Manuale del proprietario
- English: Tascam Mixcast 4 Owner's manual
- 日本語: Tascam Mixcast 4 取扱説明書
Documents connexes
-
Tascam Portacapture X6 Manuel utilisateur
-
Tascam D01404800B Le manuel du propriétaire
-
Tascam US-4x4HR Le manuel du propriétaire
-
Tascam 102i Series Le manuel du propriétaire
-
-
-
-
-
-
Tascam Model 16 Le manuel du propriétaire
