Dash DEM001H Manuel utilisateur
- Catégorie
- Petits appareils de cuisine
- Taper
- Manuel utilisateur

DEM001H
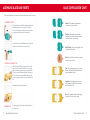
7 Included Blades | 1 Touch Functionality | 150 Watts
Recipe
ideas
I
N
S
I
D
E
!
Electric mandoline

table of contents ∙ 3
Important Safeguards ....................................................................4-7
Parts & Features ..............................................................................8-9
Using Your Electric Mandoline ................................................ 10-11
Assembling Blades and Inserts ..................................................... 12
Blade Conguration Chart ............................................................. 13
Cleaning & Maintenance ............................................................... 14
Troubleshooting .............................................................................. 15
Recipes ....................................................................................... 17-29
Customer Support .......................................................................... 30
Warranty ........................................................................................... 31
Electric mandoline

4 ∙ important safeguards
important safeguards
• PLEASE READ AND SAVE THIS INSTRUCTION
MANUAL
• When using electrical appliances, basic safety
precautions should be followed including:
• Read all instructions.
• Remove all bags and packaging from appliance
before use.
• Do not use appliance outdoors or for commercial
purposes.
• Never leave appliance unattended when in use.
• Only use the appliance on a stable, dry surface.
• Make sure the appliance is cleaned thoroughly
before using.
• Do not use appliance for other than its intended
use. For household use only. Do not use outdoors.
• Close supervision is necessary when any appliance
is used by or near children. Children should be
supervised to ensure that they do not play with the
appliance.
• Do not operate this appliance with a damaged cord,
damaged plug, after the appliance malfunctions,
is dropped, or damaged in any manner. Return
appliance to the nearest authorized service facility
for examination, repair, or adjustment.
• For maintenance other than cleaning, please
contact StoreBound directly at 1-800-898-6970
from 7AM-7PM PT Monday-Friday or by email at
support@storebound.com.
• Do not place appliance on or near a hot gas burner,
hot electric burner, or in a heated oven. Extreme
caution must be used when moving an appliance
containing hot oil or other hot liquids. Always attach
plug to appliance rst, then plug cord into the wall
outlet. To disconnect, turn any control to “off”, then
remove plug from wall outlet. Do not use appliance
for other than intended use.
• Refrain from using attachments that are not
recommended by the appliance manufacturer, as
this may result in re, electric shock, or personal
injury.
• Do not let the cord touch hot surfaces, or hang over
the edges of tables or counters.
• This appliance is not intended for use by persons
(including children) with reduced physical, sensory,
or mental capabilities, or lack of experience
and knowledge unless they are provided with
supervision and instruction concerning use of the
appliance by a person responsible for their safety.
• Always be sure to unplug the appliance from the
outlet prior to moving, cleaning, storage, and when
not in use.
• StoreBound shall not accept liability for damages
caused by improper use of the appliance.
• Improper use of the appliance can result in property
damage or even in personal injury.
• This appliance has a polarized plug (one blade is
wider than the other). To reduce the risk of electric
shock, this plug will t in a polarized outlet only
IMPORTANT SAFEGUARDS
IMPORTANT SAFEGUARDS: PLEASE READ AND
SAVE THIS INSTRUCTION AND CARE MANUAL.
IMPORTANT SAFEGUARDS: PLEASE READ AND
SAVE THIS INSTRUCTION AND CARE MANUAL.
When using electrical appliances, basic safety precautions should be followed, including:
one way. If the plug does not completely t in the
outlet, reverse the plug. If it still does not t, contact
a qualied electrician. Do not attempt to modify the
plug in any way.
• Turn the appliance OFF, then unplug from the
outlet when not in use, before assembling or
disassembling parts and before cleaning. To
unplug, grasp the plug and pull from the outlet.
Never pull from the power cord.
• A short power supply cord is to be provided to
reduce the risk resulting from becoming entangled
in or tripping over a longer cord. An extension
cord may be used if care is exercised in its use. If
an extension cord is used, the marked electrical
rating of the extension cord should be at least as
great as the electrical rating of the appliance. The
extension cord should be arranged so that it will
not drape over the countertop or tabletop where
it can be pulled on by children or tripped over
unintentionally. If the appliance is of the grounded
type, the cord set or extension cord should be a
grounding-type 3-wire cord.
• Do not shred, grate, or slice raw/cooked meat. Do
not use appliance with hard foods such as sugar, ice
cubes, or coffee.
• Never use ngers, utensils, or other objects
to remove food from Processing Chute while
appliance is plugged in. If food must be removed
from the Processing Base or chute, turn off and
unplug Electric Mandoline before attempting to
remove it.
• Check that the Electric Mandoline is off and
unplugged before and after each use.
• When using any extension cords, make sure the
electrical rating of the wire is compatible with the
Electric Mandoline.
• Avoid contact with moving parts. To reduce the
risk of injury to persons and/or damage to the
appliance, do not put your hands, hair, clothing, or
other objects in the Processing Chute during use.
• Do not use hands or other objects to push food into
Processing Chute. Only insert the Pusher into the
Processing Chute.
• Only use Electric Mandoline on a stable surface.
• Handle the Blades and Inserts carefully as the
blades are sharp and can cause injury.
• Always make sure the voltage used is consistent
with the nominal voltage of the Electric Mandoline.
• Unplug cord from outlet before changing or
removing Blades and Inserts.
• Do not use the Electric Mandoline for more
than 90 seconds at a time. Allow the motor to
rest for at least 2 minutes between cycles. All
components included with the Electric Mandoline
are compatible with this product only. Do not use
these parts on other similar products.
• Do not use this appliance to make crushed ice. It
is recommended that the accessories are hand
washed with the Brush for best results.
• WARNING: the Processing Base, Pusher,
Container, Blades, and Inserts are top shelf
dishwasher safe only if cleaned on the “light”
setting.
important safeguards ∙ 5

important safeguards
• Lisez toutes les instructions.
• Enlevez tous les sacs et emballages de
l’appareil avant utilisation.
• Assurez-vous que l’appareil est soigneusement
nettoyé avant utilisation.
• Ne pas déchiqueter, râper ni trancher viande
crue / cuite. Ne pas utiliser appareil avec
aliments durs tels sous forme de sucre, de
glaçons ou de café.
• Ne jamais utiliser les doigts, les ustensiles
ou autres objets pour enlever la nourriture
de traitement chute tandis que l’appareil est
branché.
• Si la nourriture doit être retirée de la base de
traitement ou goulotte, éteindre et débrancher
électrique mandoline avant d’essayer de la
retirez.
• Cet appareil n’est pas destiné à l’usage des
personnes (y compris enfants) avec une
réduction physique, capacités sensorielles
ou mentales, ou manque d’expérience et
connaissances à moins qu’ils ne soient pourvu
de surveillance et instructions concernant
l’utilisation de l’appareil par une personne
responsable de leur sécurité.
• Vériez que l’électricité de la mandoline est
éteinte et débranchée avant et après chaque
utilisation.
• Lors de l’utilisation de rallonges, assurez-
vous que le courant électrique de le l est
compatible avec le mandoline électrique.
• Évitez le contact avec le déplacement les
pièces. Réduire le risque de blessure aux
personnes et / ou des dommages à l’appareil,
ne mettez pas votre les mains, les cheveux, les
vêtements ou autres objets dans la goulotte
de traitement pendant l’utilisation.
• Ne pas utiliser les mains ou autres objets pour
pousser la nourriture dans traitement de la
chute. Seulement insérer le pousseur dans le
traitement chute.
• Utilisez uniquement la mandoline électrique
sur un surface stable.
• Ne placez pas l’appareil sur ou près d’un
brûleur à gaz chaud, chaud brûleur électrique,
ou dans un chauffé four.
• Manipuler les lames et les inserts
soigneusement que les lames sont tranchantes
et peut causer des blessures.
• Assurez-vous toujours que la tension utilisé
est compatible avec le tension nominale de
l’électrique mandoline.
• Assurez-vous toujours de débrancher le
appareil de sortie avant montage, démontage,
nettoyage, et stockage.
• Débranchez le cordon de la prise avant de
changer ou enlever les lames et inserts.
• En cas de dysfonctionnement de l’appareil,
cessez d’utiliser jusqu’à ce que le problème
soit résolu.
• N’utilisez aucun accessoire les pièces jointes
qui ne sont pas recommandé par l’appareil
fabricant, car cela pourrait entraîner en cas de
feu, de choc électrique ou personnel blessure.
• Pour prévenir les risques d’incendie, les
appareils électriques choc, ou blessure
corporelle, ne pas placez le cordon, la che
ou l’unité près de l’eau ou d’autres liquides
lorsque l’appareil est branché.
• Cet appareil est destiné à usage domestique
seulement.
• Ne pas utiliser l’électrique mandoline pour
plus de 90 secondes à la fois. Autoriser le
moteur à reposer pendant au moins 2 minutes
entre les cycles.
• Tous les composants inclus avec la mandoline
électrique sont compatible avec ce produit
seulement. Ne pas utiliser ces pièces sur
autres produits similaires.
• N’utilisez pas l’appareil si des pièces sont
endommagées.
• N’utilisez aucun appareil avec un cordon ou
une che endommagé.
• Ne pas utiliser à l’extérieur.
• Ne laissez pas l’appareil sans surveillance
lorsqu’il est branché.
• N’utilisez pas cet appareil pour faire de la
glace pilée.
• Il est recommandé que le les accessoires
sont lavés à la main avec le pinceau pour de
meilleurs résultats.
• ATTENTION: la base de traitement, poussoir,
conteneur, lames et les inserts sont des lave-
vaisselles sûr que si nettoyé à la «lumière»
réglage.
• Cet appareil ne doit pas être utilisé par ou près
des enfants. Garder le appareil et son cordon
sur portée des enfants.
• Cet appareil est conforme à normes
applicables et les règlements.
• L’appareil doit être utilisé sur un plan de travail
écurie, loin de l’eau éclaboussures.
• Ne retournez pas l’appareil.
• Ne pas utiliser à l’extérieur.
• Ne poussez jamais de nourriture avec votre les
mains, venez toujours le poussoir.
• Ne laissez pas le cordon pendre du bord de
table ou de comptoir.
• L’appareil doit être débranché:
• Si vous remarquez des anomalies pendant le
fonctionnement.
• Avant garder ou nettoyage.
• Après chaque utilisation.
• Cet appareil a une polarisation prix (une lame
est plus grand que l’autre). Pour réduire le
risque de choc électrique, cette che ira dans
un prix polarisée dans un sens. Si la che
n’est pas complètement insérer dans la prise,
inversez la che. Si cela ne vous convient
toujours pas, contactez un électricien qualié.
Ne pas essayer de modier la che dans tout
façon.
MESURES DE SÉCURITÉ IMPORTANTES: VEUILLEZ
LIRE ET CONSERVER CE MANUEL D’UTILISATION
MESURES DE SÉCURITÉ IMPORTANTES: VEUILLEZ
LIRE ET CONSERVER CE MANUEL D’UTILISATION
Lors de l’utilisation d’appareils électriques, des précautions élémentaires de sécurité doivent
être respectées, notamment:
MESURES DE SÉCURITÉ IMPORTANTES MESURES DE SÉCURITÉ IMPORTANTES
6 ∙ mesures de sécurité importantes mesures de sécurité importantes ∙ 7
MESURES DE SÉCURITÉ IMPORTANTES

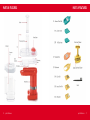
parts & features ∙ 9 8 ∙ parts & features
PARTS & FEATURES parts & features
C

using your electric mandoline ∙ 11 10 ∙ using your electric mandoline
using your electric mandoline using your electric mandoline
1
2
2a
3
4
5
Set Motor Base on stable surface and place Processing Base
on top. Processing Base is a necessary part when using the
mandoline. Make sure to place the Processing Base on motor
unit before placing the Blade on base.
Clean the Electric Mandoline and all of its components prior to assembly and use.
Remove any stickers and packaging before rst-time use.
DO NOT use the appliance to shred tough or hard foods such as meat or ice cubes. You
may need to cut larger foods into pieces so that they can t inside the Processing Chute.
Assemble Blade of choice (see Assembling Blades and Inserts
on page 12 for instructions).
Set Blade on Processing Base, ensuring that the tab
under the Blade is inserted into notch in the Motor
Base.
NOTE: This notch will be in a different place each time
you stop the Mandoline. Pay careful attention to make
sure that the tab is inserted INTO the notch and not in
front of or behind the notch.
Place Lid over Processing Base, matching up notches on Lid
with the slots on the Motor Base.
Once notches are aligned, place hand on the back of
the Lid (near the Power Button) and push Lid forwards
while stabilizing the Mandoline with your other hand to
lock the Lid into place.
Slide Container under the Motor Base, making sure to align
the sides of the Container with slots under the Motor Base until
the red arrow on the Container lines up with the red arrow on
the underside of the Motor Base.
NOTE: There is a micro-switch under the Mandoline that will
not be activated if the Container is not inserted properly.
Plug in Electric Mandoline. Place food in Processing Chute and
use Pusher to press food into Chute. Hold down Power Button
to begin slicing food. Release Power Button to stop.

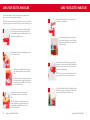
blade conguration chart ∙ 13 12 ∙ assembling blades and inserts
assembling blades and inserts BLADE CONFIGURATION CHART
Julienne/Slicer Disk
cube/large cube/wavy disk
shredder disk
When handling Blades and Inserts, be very careful as their blades are sharp and can cause injury.
To assemble the Julienne / Slicer Disk, select appropriate Insert
(see Blade Conguration Chart on page 13) and slide into
Julienne / Slicer Disk until the Insert locks into place. Now you
are ready to place the Disk onto the Processing Base.
To remove the Insert, carefully lift Blade Insert up and slide it off
of the Disk. For extra thick slices, do not use an Insert.
Slide Cube Insert into Disk by lining up the sides of the Cube
Insert with the slots under the Disk. The arrows on the Cube
Insert should be pointing outward (away from the Blade Disk).
TIP: If you are having difcult assembling the Cube Insert, turn
the Disk and Insert over so that the Blade is facing away from
you as it may be easier to see the slots on the underside of the
Disk.
To disassemble, slide Cube Insert outwards.
No assembly required. Simply place on Processing Base and
put the Lid on top.
Julienne – Slice potatoes, sweet potatoes,
carrots, celery, onion, and radish.
Thin Slice – Make potato chips and salads.
Slices potatoes, radishes, mushrooms, carrots,
cucumbers, fennel, nuts, and celery.
Extra Thick Slice - Slice carrots, eggplant, melon,
and beets. Make fruit salad.
Shred – Shred chocolate, hard cheeses, radishes,
carrots, turnips, and more.
Cube – Use for potatoes, carrots, onions, sweet
potatoes, and beets. Make breakfast hash and
cubing vegetables for soup.
Large Cube – Cube potatoes, carrots, onions,
sweet potatoes, and beets. Perfect for soups,
stews, broth, and stir fry.
Wavy – Prep potatoes and other softer veggies
for soups, crinkle fries, and fun salads.

troubleshooting ∙ 15 14 ∙ cleaning & maintenance
CLEANING & MAINTENANCE troubleshooting
Thoroughly clean the Electric Mandoline and its components prior to first–time use. Always unplug
the appliance before cleaning. Your Electric Mandoline and its Blades and Inserts must be properly
cleaned after each use. It is recommended that the accessories are hand washed with the Brush for
best results.
WARNING: DO NOT SUBMERGE MOTOR BASE IN WATER OR OTHER LIQUIDS. THE MOTOR BASE IS
NOT DISHWASHER SAFE.
1. Always unplug the appliance before cleaning.
2. Do not submerge the Motor Base in water or other liquids. Instead, wipe down the Motor Base with
a damp cloth and then wipe dry.
3. To avoid staining the Blades and Inserts, rub them with a cloth dipped in cooking oil prior to
cleaning.
4. Clean the Lid and Container with warm water and mild soap.
5. The Processing Base, Pusher, Container, Blades, and Inserts should be washed with warm water and
mild soap or they can be placed in the top rack of your dishwasher on the “LIGHT”, “ECO”, or “LESS
DIRTY” functions. Be sure to handle the Blades and Inserts with care as their blades are sharp and
can cause injury. If there is food left in the Cube Insert, use the Cube Insert Cleaner to push out food
residue before cleaning.
6. Do not use corrosive or abrasive cleaning agents to clean the device or its accessories as this could
damage the appliance.
7. Dry all parts thoroughly before storing. Store the Electric Mandoline in a dry place that is not
accessible to children or animals. Store Disks and Inserts with covers to prevent injury when
removing Inserts from storage.
If your Electric Mandoline fails to function properly, first check whether you are able to correct the
problem yourself using the checklist below. If your problem is not resolved in the instructions listed,
please contact StoreBound Customer Support at 1-800-898-6970 from 7AM - 7PM PT Monday - Friday,
or by email at support@storebound.com.
Do not attempt to repair the appliance yourself under any circumstances.
1. The Electric Mandoline will not turn on.
• Ensure that the power cord is plugged into the power outlet.
• Check to make sure the power outlet is operating correctly.
• Firmly press and hold down the Power Button located on the top of the Lid.
• Check to make sure Blades and Inserts have been inserted correctly.
• Make sure the Container is under the Motor Base. There is a small switch on the
underside of the Motor Base that will be activated once the Container is in the correct position.
If the switch is not activated, the Electric Mandoline will not turn on.
• Unplug the appliance, remove the Blades and Inserts and clean thoroughly. Reassemble your
Electric Mandoline and try again.
• Determine if a power failure has occurred in your home, apartment, or building.
2. I can’t close the lid securely over the Motor Base.
• Check to make sure that the Blade (and Insert) is placed correctly on the Processing Base.
3. I can’t unlock the Lid from the Motor Base.
• Turn the appliance on for one second in order to move the Blade, then try to unlock the Lid again.
4. Food is stuck in the Blades and the Electric Mandoline will not start.
• Unplug the Electric Mandoline, disassemble the appliance, and clean all parts and accessories.
Reassemble and plug back into outlet.

RECIPE
BOOK
electric mandoline
Check out our Instagram
@unprocessyourfood
for more recipes and videos.

2 large carrots
1 small white cabbage, cored and cut
handful of microgreens
2 tbsp pomegranate seeds
1 tsp fresh ginger, minced
1 tbsp peanut oil
¼ cup rice vinegar
1 tbsp lime juice
2 tsp fresh mint, chopped
½ tsp black sesame seeds
salt, to taste
INGREDIENTS:
thai style
s l aw
18
DIRECTIONS:
Using the Julienne/Slicer Disk and Julienne Insert, shred the carrots.
Switch to the Julienne Insert and process the cabbage. In a large bowl,
mix all ingredients except microgreens, pomegranate seeds, and sesame
seeds.
Toss until shredded vegetables are completely coated in dressing.
Garnish with microgreens, pomegranate seeds, and black sesame seeds.

2 cups (16 oz) Greek yogurt
1 cucumber
2 tbsp olive oil
½ lemon, juiced
2 tbsp dill, nely chopped
1 tsp garlic powder
salt and pepper, to taste
INGREDIENTS:
tzatziki
dip
20
DIRECTIONS:
Halve the cucumber lengthwise. With a spoon, scoop out the seeds. Shred the seeded cucumber with
either the Shredder Disk or the Julienne / Slicer Disk with the Julienne Insert, depending on how
chunky you want your dip. In a medium bowl, combine all ingredients except the cucumber.
Mix until well-combined.
Stir in the shredded cucumber. The dip should be chunky and thick. Chill in the fridge until ready to
serve.
Garnish with a sprig of dill or a few mint leaves and enjoy!

2 cups unbleached,
all-purpose our
½ cup brown sugar
1 tsp baking soda
1 tsp baking powder
½ tsp salt
1 tsp vanilla extract
½ cup vegetable or canola oil
2 medium zucchinis
2 very ripe bananas, mashed
1 egg
½ tbsp cinnamon
½ cup walnuts, chopped
INGREDIENTS:
22
DIRECTIONS:
Preheat the oven to 350°F. Prepare two 8” x 4” loaf pans by rubbing them with
melted butter. Sprinkle a thin layer of our over the pans, turn upside down and
lightly tap to remove the excess our.
Shred the zucchini into ne pieces with the Shredder Disk. In a mixing bowl, stir
together all of the dry ingredients until well-combined. In another bowl, add
the egg and liquid ingredients. Whisk until blended, then stir in the shredded
zucchini. Make a well in the dry ingredients with your nger and pour in the
liquid mixture. Mix well. Stir in the walnuts and mashed banana.
Divide the batter evenly between the two loaf pans. Bake in the oven for
approximately 50-60 minutes or until a toothpick inserted into the bread’s center
comes out clean. Let bread cool for 15 minutes. Carefully turn out the loaves
onto a wire rack to nish cooling.
zucchini
banana nut bread

1 lb yukon gold potatoes
2 cloves garlic, minced
2 cups milk
½ cup Greek yogurt
½ medium onion, nely chopped
2 tbsp unbleached, all-purpose our
½ cup Parmigiano-Reggiano cheese, grated
1 tsp salt
ground black pepper, to taste
INGREDIENTS:
p otato es
au gratin
24
DIRECTIONS:
Thoroughly clean potatoes and then peel. Slice potatoes with the
Julienne/Slicer Disk and the Thin Slice Insert. In a bowl, combine all
ingredients except the potatoes, Greek yogurt and cheese and whisk
until well-combined. Pour mixture into a medium saucepan and add the
potatoes. Cook over low heat, stirring occasionally.
Once the potatoes are tender, remove from heat. Rub an 8” square baking
dish with a little olive oil, butter, or non-stick cooking spray. Use a slotted
spoon to transfer potatoes and onion bits to the dish, layering them evenly.
In a bowl, mix together the Greek yogurt with 1/2 cup of the milk mixture,
then pour over the potatoes.
Sprinkle the Parmigiano-Reggiano evenly over the potatoes. Bake under
the broiler for a few minutes or until the top is browned. Serve hot with your
favorite meat and vegetables.

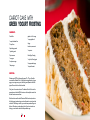
Carrot Cake
1 cup whole wheat our
1½ cups our
½ tsp baking powder
1 tsp baking soda
2 tsp cinnamon
1 cup sugar
½ cup brown sugar
1 tbsp vinegar
grated rind of 1 orange
1 cup vegetable oil
4 eggs
6 medium, raw carrots
1 cup raisins
Greek Yogurt Frosting
1 cup (6 oz.) Greek yogurt
½ cup powdered sugar
1 tsp vanilla extract
INGREDIENTS:
carrot cake with
greek yogurt frosting
26
DIRECTIONS:
Preheat oven to 350°F and thoroughly grease a 9” x 13” pan. Shred the
carrots with the Shredder Disk. In a large bowl, mix together the oil, sugars,
eggs, spices, vinegar, orange rind, and baking soda & powder. Add both
types of our and whisk until well-combined.
Finally, mix in the carrots and raisins. The batter will be thick. Pour into the
prepared pan and bake for 50-60 minutes or until a toothpick inserted into
the cake’s center comes out clean.
Allow the cake to cool for about 30 minutes. While the cake sits, combine
the Greek yogurt, powdered sugar, and vanilla extract in a mixing bowl and
whisk well. If the frosting is too thin, you can add more powdered sugar to
thicken it. Place cake on a cake plate and frost. If you do not want to use
frosting, you can dust the cake with a little powdered sugar.

2 sweet potatoes
1 cup coconut oil
salt and pepper, to taste
INGREDIENTS:
sweet potato
chips
28 29
DIRECTIONS:
Peel and slice sweet potatoes with the Julienne/Slicer Disk and the Thin
Slicer Insert. Add coconut oil to a shallow pan and heat over medium high
heat.
When the oil is hot (it should sizzle when you add a sweet potato slice), add
sweet potatoes in small batches, trying not to overlap the chips. Let fry for
3-5 minutes, turning about halfway through. Use a slotted spoon to remove
chips from oil and lay out on a paper towel to soak up any extra coconut oil.
Sprinkle with salt and pepper and enjoy!
2 lbs stew beef, cut into 1” cubes
¼ cup our
salt and pepper, to taste
4 cloves garlic, minced
1 tbsp tomato paste
1 bay leaf
1 tsp smoked paprika
1 tsp Worcestershire sauce
1 onion
1½ cups beef broth
3 potatoes
4 carrots
2 stalks celery
INGREDIENTS:
slow cooker
beef stew
DIRECTIONS:
Using your Electric Mandoline with the Cube Disk, cube onion, potatoes,
carrots, and celery. Add meat to slow cooker. In a small bowl, mix together
our, salt, and pepper and then pour over meat, tossing to coat meat in
our mixture. Add remaining ingredients to slow cooker.
Cover and cook on low for 8-12 hours, stirring occasionally until beef is
tender and easily pierced with a fork.

30 ∙ customer support
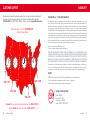
CUSTOMER SUPPORT
We welcome and value all concerns and questions from our customers. Please do not hesitate
to contact us for product support, warranty, and maintenance related questions directly at:
1(800)-898-6970 from 7AM - 7PM PST, Monday - Friday, or by email at support@storebound.com.
Hey Hawaii! You can reach our customer service team from 5AM to 5PM HAST.
And also, Alaska, feel free to reach out from 6AM to 6PM UTC.
7AM to 7PM
8AM to 8PM
9AM to 9PM
10AM to 10PM
Feel free to give us a call at 1 (800) 898-6970
during the hours below
warranty ∙ 31
STOREBOUND, LLC – 1 YEAR LIMITED WARRANTY
Your StoreBound product is warranted to be free from defects in material and workmanship for a period of
one (1) year from the date of the original purchase when utilized for normal and intended household use.
Should any defect covered by the terms of the limited warranty be discovered within one (1) year, StoreBound,
LLC will repair or replace the defective part. To process a warranty claim, contact Customer Support at
1-800-898-6970 for further assistance and instruction. A Customer Support agent will assist you by troubleshooting
minor problems. If troubleshooting fails to x the problem, a return authorization will be issued. Proof of purchase
indicating the date and place of purchase is required and should accompany the return. You must also include
your full name, shipping address, and telephone number. We are unable to ship returns to a PO box. StoreBound
will not be responsible for delays or unprocessed claims resulting from a purchaser’s failure to provide any or all
of the necessary information. Freight costs must be prepaid by the purchaser.
Send all inquiries to support@storebound.com.
There are no express warranties except as listed above.
REPAIR OR REPLACEMENT AS PROVIDED UNDER THIS WARRANTY IS THE EXCLUSIVE REMEDY OF THE
CUSTOMER. STOREBOUND SHALL NOT BE LIABLE FOR ANY INCIDENTAL OR CONSEQUENTIAL DAMAGES
OR FOR BREACH OF ANY EXPRESS OR IMPLIED WARRANTY ON THIS PRODUCT EXCEPT TO THE EXTENT
REQUIRED BY APPLICABLE LAW. ANY IMPLIED WARRANTY OF MERCHANTABILITY OR FITNESS FOR A
PARTICULAR PURPOSE ON THIS PRODUCT IS LIMITED IN DURATION TO THE DURATION OF THIS WARRANTY.
Some states do not allow the exclusion or limitation of incidental or consequential damages, or limitations on
how long an implied warranty lasts. Therefore, the above exclusions or limitations may not apply to you. This
warranty gives you specic legal rights and you may also have other rights, which vary from state to state.
REPAIRS
DANGER! Risk of electric shock! The Dash Electric Mandoline is an electrical appliance.
Do not attempt to repair the appliance yourself under any circumstances.
Contact Customer Support regarding repairs to the appliance.
warranty
FDA
SAFE
TECHNICAL SPECIFICATIONS
Model: DEM001H
Voltage: 120V ~ 60Hz
Power Rating: 150W MAX
Stock#: DEM001H_20190228_V5

Designed in NYC | 1-800-898-6970 | @unprocessyourfood | bydash.com
-
 1
1
-
 2
2
-
 3
3
-
 4
4
-
 5
5
-
 6
6
-
 7
7
-
 8
8
-
 9
9
-
 10
10
-
 11
11
-
 12
12
-
 13
13
-
 14
14
-
 15
15
-
 16
16
-
 17
17


Dash DEM001H Manuel utilisateur
- Catégorie
- Petits appareils de cuisine
- Taper
- Manuel utilisateur
dans d''autres langues
- English: Dash DEM001H User manual
Documents connexes
Autres documents
-
Buyer 001150 Manuel utilisateur
-
Weston 16-0501-W Mode d'emploi
-
-
-
-
Weston 01-0008-W Le manuel du propriétaire
-
Breville the Breville Sous Chef 16 Peel & Dice Manuel utilisateur
-
 Trudeau 5060051 Fiche technique
-
-
