Pioneer VSX-529 Manuel utilisateur

Taper
Manuel utilisateur

Ce manuel convient également à

VSX-824-K
VSX-529-K/-S
VSX-424-K
VSX-329-K
AV Receiver
Amplificateur AV
AV Receiver
Sintoamplificatore AV
AV Receiver
Receptor AV
AV-ресивер
Quick Start Guide
Guide rapide
Kurzanleitung
Guida di avvio rapido
Snelstartgids
Guía de inicio rápido
Краткое руководство пользователя
Дополнительная информация для клиентов в Российской Федерации
Информация о сертификации
Для моделей
VSX-824-K и VSX-529-K/S
Для моделей
VSX-424-K и VSX-329-K
What’s in the box
Contenu du carton d’emballage
Lieferumfang
Contenuto della confezione
Inhoud van de doos
Contenido de la caja
Комплект поставки
Thank you for buying this Pioneer product. This Quick Start
Guide includes instructions for basic connections and operations
to allow simple use of the receiver. For detailed descriptions of
the receiver, see the “Operating Instructions” provided on the
included CD-ROM ( ).
Merci pour l’achat de ce produit Pioneer. Ce guide rapide
contient les instructions relatives aux raccordements et
opérations de base permettant une utilisation simple de ce
récepteur. Pour des descriptions plus détaillées du récepteur,
référez-vous au “Mode d’emploi” sur le CD-ROM ( ) fourni.
Vielen Dank, dass Sie sich für dieses Pioneer-Produkt entschieden
haben. Die Kurzanleitung enthält Anweisungen für grundlegende
Verbindungen und Bedienvorgänge, um eine einfache Bedienung
des Receivers zu ermöglichen. Detaillierte Beschreibungen des
Receivers finden Sie in der „Bedienungsanleitung“ auf der
mitgelieferten CD-ROM ( ).
Vi ringraziamo per avere acquistato questo prodotto Pioneer.
Questa Guida di avvio rapido comprende istruzioni per i
collegamenti fondamentali e per le operazioni essenziali di
questo ricevitore. Per una descrizione dettagliata del ricevitore,
vedere le “Istruzioni per l’uso” contenute nel CD-ROM ( )
accluso.
Hartelijk dank voor de aanschaf van dit Pioneer product. In deze
snelstartgids vindt u de instructies voor de basisaansluitingen en
de basisbediening voor een eenvoudig gebruik van de receiver.
Voor meer gedetailleerde informatie wordt u verwezen naar de
“Handleiding” die op de bijgeleverde CD-ROM ( ) staat.
Muchas gracias por haber adquirido este producto de Pioneer.
Esta Guía de inicio rápido incluye instrucciones para hacer las
conexiones y operaciones básicas que le permitirán hacer un uso
sencillo del receptor. Para conocer una descripción detallada del
receptor, consulte el “Manual de instrucciones” suministrado con
el CD-ROM ( ) incluido.
Благодарим вас за приобретение данного изделия Pioneer.
В данном Кратком руководстве пользователя содержатся
инструкции по основным подключениям и операциям для
упрощенного использования ресивера. Подробное
описание ресивера см. в «Инструкции по эксплуатации»,
содержащихся на поставляемом CD-ROM ( ).
Remote Control
Télécommande
Fernbedienung
Telecomando
Afstandsbediening
Mando a distancia
Пульт дистанционного
управления
Setup microphone (not included for VSX-329)
Microphone de configuration
(non inclus pour le modèle VSX-329)
Mikrofon für die Einstellung (nicht enthalten für VSX-329)
Impostazione microfono (non incluso per VSX-329)
Microfoon voor instellen (niet meegeleverd voor de VSX-329)
Micrófono de configuración (no incluido para VSX-329)
Установочный микрофон
(не входит в комплект поставки для VSX-329)
AAA size IEC R03 dry cell batteries x2
Piles à anode sèche AAA IEC R03 x 2
AAA/IEC/R03 Trockenbatterien x2
Pile a secco AAA IEC R03 x2
AAA/IEC/R03 drogecelbatterijen x2
Pilas secas AAA, IEC R03 x 2
Сухие батарейки размера AAA IEC R03, 2 шт.
AM loop antenna
Antenne cadre AM
MW-Rahmenantenne
Antenna AM a telaio
AM-raamantenne
Antena de cuadro de AM
Рамочная антенна АМ
FM wire antenna
Antenne filaire FM
UKW-Drahtantenne
Antenna FM a filo
FM-draadantenne
Antena de hilos de FM
Проволочная антенна FM
These quick start guide
Le présent Guide de démarrage
Diese Kurzanleitung
Guida per l’avvio rapido
Deze Quick Start-gids
Esta guía de inicio rápido
Это краткое руководство пользователя
Power cord
Cordon d’alimentation
Netzkabel
Cavo di alimentazione
Netsnoer
Cable de alimentación
Кабель питания
Warranty card
Carte de garantie
Garantiekarte
Tarjeta de garantía
Documento di garanzia
Garantiebewijs
Гарантийный сертификат
Safety Brochure
Brochure sur la Sécurité
Sicherheritsbroshüre
Volantino sulla sicurezza
Veiligheidsbrochure
Folleto de Seguridad
Брошюра по безопасноти
CD-ROM (Operating instructions)
CD-ROM (Mode d’emploi)
CD-ROM (Bedienungsanleitung)
CD-ROM (Istruzioni per l’uso)
CD-ROM (Handleiding)
CD-ROM (Manual de instrucciones)
CD-ROM (Инструкции по эксплуатации)
VSX-824-K
VSX-529-K/-S
VSX-424-K
VSX-329-K
SPEAKER CAUTION Sheet (English only)
Note d’avertissement relative aux enceintes (en anglais uniquement)
Lautsprecher-Sicherheitshinweise (nur Englisch)
Scheda PRECAUZIONI ALTOPARLANTI (solo inglese)
Informatieblad over SPEAKER CAUTION (alleen Engels)
Hoja de PRECAUCIONES ACERCA DE LOS ALTAVOCES (solo en inglés)
Лист SPEAKER CAUTION (МЕРЫ ПРЕДОСТОРОЖНОСТИ ДЛЯ
ГРОМКОГОВОРИТЕЛЕЙ) (только на английском языке)
VSX-824/
VSX-529
SLEEP
INPUT
MUTE
CTRL
BD
AUTOSURR ADV
DVD
iPod
TUN
GAME
SAT
CD
TV
HDMI
MHL
BT
NET
S.SEL ECO
STANDBY/ON
ENTER
CLR
SB CH
CH SEL
SP-A/B
Fav
RETURN
AUDIO P.
TOP
MENU
HOME
MENU
RECEIVER
RECEIVER SIGNAL SEL
SOURCE
TOOLS
MENU
SHIFT
BASS
BASS
TRE TRE
BAND PTY
2
Connecting up
Connecting the speakers
The receiver will work with just two stereo speakers (the front speakers in the diagram) but using
at least three speakers is recommended, and a complete setup is best for surround sound.
To achieve the best possible surround sound, install your speakers as shown below.
5.1 channel surround system:
After installing the speakers, connect them as shown below.
LINE LEVEL
INPUT
L
– Front Left
C
– Center
R
– Front Right
SL
– Surround Left
SR
– Surround Right
SW
– Subwoofer
Connecting the speaker cables
Make sure you connect the speaker on
the right to the right (
R
) terminal and the
speaker on the left to the left (
L
) terminal.
Also make sure the positive and negative
(
+/–
) terminals on the receiver match those
on the speakers.
CAUTION
Before making or changing
connections, switch off the power and
disconnect the power cord from the AC
outlet.
These speaker terminals carry
HAZARDOUS LIVE
voltage. To prevent
the risk of electric shock when
connecting or disconnecting the
speaker cables, disconnect the power
cord before touching any uninsulated
parts.
1
Twist exposed wire strands together.
2
Loosen terminal and insert exposed wire.
3
Tighten terminal.
12 3
10 mm
Connect the center and surround speaker
terminals of VSX-424/VSX-329 as shown below:
1
Twist exposed wire strands together.
2
Push open the tabs and insert exposed
wire.
3
Release the tabs.
12 3
10 mm
R
SL
L
SW
C
SR
Subwoofer
(
SW
)
Front Right (
R
)
Surround Right
(
SR
)
Surround Left
(
SL
)
Front Left (
L
)Center (
C
)
VSX-824
The type of center and surround speaker terminals for VSX-424/VSX-329 is different from this
diagram.
You can use speakers with a nominal impedance between 6
W
and 16
W
.
English
3
English
Français
Italiano
Español
Nederlands
Deutsch
Connecting a TV and playback
components
Note
Refer to the operating instructions in the included CD-
ROM if you wish to connect a TV or playback component
in a method other than an HDMI connection.
Refer to the operating instructions in the included CD-
ROM for other device connections.
CAUTION
Handle the power cord by the plug part. Do not pull out
the plug by tugging the cord, and never touch the power
cord when your hands are wet, as this could cause a short
circuit or electric shock. Do not place the unit, a piece of
furniture, or other object on the power cord or pinch the
cord in any other way. Never make a knot in the cord or tie
it with other cables. The power cords should be routed so
that they are not likely to be stepped on. A damaged power
cord can cause a fire or give you an electric shock. Check
the power cord once in a while. If you find it damaged,
ask your nearest Pioneer authorized independent service
company for a replacement.
VENTILATION CAUTION
When installing this unit, make sure to leave space around the
unit for ventilation to improve heat radiation (at least 40 cm at
top, 20 cm at rear, and 20 cm at each side).
WARNING
Slots and openings in the cabinet are provided for ventilation
to ensure reliable operation of the product, and to protect it
from overheating. To prevent fire hazard, the openings should
never be blocked or covered with items (such as newspapers,
table-cloths, curtains) or by operating the equipment on thick
carpet or a bed.
D3-4-2-1-7b*_A1_En
Connecting up (continued)
Connecting antennas
21
AM loop antenna
FM wire antenna
VSX-824
Connecting to the network through
LAN interface
VSX-824/VSX-529 only
WAN
3
2
1
LAN
LAN cable (sold separately)
Router
Modem
Computer
Internet
HDMI IN
HDMI OUT
DIGITAL AUDIO OUT
OPTICAL
B
VIDEO IN
A
HDMI/DVI-compatible TV
VSX-824
VSX-424/VSX-329 only: Composite video cable (
A
)
connection is necessary in order to see the OSD of the
unit on the TV.
VSX-824/VSX-529 only: The OSD will only be output from the
HDMI OUT terminal.
If the TV does not support the HDMI Audio Return Channel
function, optical digital cable (
B
) connection is required to
listen to the TV sound over the receiver.
If the TV supports the HDMI Audio Return Channel
function, the sound of the TV is input to the receiver via the
HDMI terminal, so there is no need to connect an
optical
digital cable
(
B
). In this case, set
ARC
at
HDMI Setup
to
ON
l
“The HDMI Setup menu” on page 36 (VSX-424/VSX-
329), “HDMI Setup” on page 56 (VSX-824/VSX-529).
Please refer to the TV’s operation manual for directions on
connections and setup for the TV.
VSX-824
HDMI/DVI-compatible
Blu-ray Disc player, etc.
4
Initial Setup
Before you start
1
Put the batteries in the remote control.
The batteries included with the unit are to check initial
operations; they may not last over a long period. We
recommend using alkaline batteries that have a longer life.
2
Switch on the receiver and your TV.
BD DVD
INPUT SELECT
SOURCESLEEP
TV
CONTROL
CD
INPUT
RECEIVER
RECEIVER
SLEEP
CTRL
BD GAME HDMI
S.SEL ECO
STANDBY/ON
RECEIVER SIGNAL SEL
SOURCE
INPUT
3
Switch the TV input so that it connects to the
receiver.
4
Turn the subwoofer on and turn up the
volume.
CAUTION
Do not use or store batteries in direct sunlight or other
excessively hot place, such as inside a car or near a
heater. This can cause batteries to leak, overheat, explode
or catch fire. It can also reduce the life or performance of
batteries.
When inserting the batteries, make sure not to damage
the springs on the battery’s
*
terminals. This can cause
batteries to leak or overheat.
When disposing of used batteries, please comply with
governmental regulations or environmental public
institution’s rules that apply in your country/area.
Automatically setting up for surround sound (MCACC)
(VSX-824/VSX-529/VSX-424)
The Auto Multi-Channel ACoustic Calibration (MCACC) setup
uses the supplied setup microphone to measure and analyze
the test tone that is outputted by the speakers. This setup
enables automatic high precision measuring and settings;
utilizing it will create an optimum user listening environment.
Important
Measure in a quiet environment.
If you have a tripod, use it to place the microphone so
that it’s about ear level at your normal listening position.
Otherwise, place the microphone at ear level using a table
or a chair.
Accurate measurements may not be possible if there are
obstacles between the speakers and the listening position
(microphone).
When measuring, step away from the listening position,
and operate using the remote control from the external
side of all the speakers.
1
Connect the supplied setup microphone.
MCACC
SETUP
MIC
2
Press BD button on the remote control to
switch to BD entry.
3
Press RECEIVER CTRL (VSX-824/VSX-529),
RECEIVER
(VSX-424/VSX-329) on the remote
control, then press the HOME MENU button.
The Home Menu appears on your TV.
4
Select ’Auto MCACC’ from the Home Menu,
then press ENTER.
Automatic measuring will start.
Home Menu
1
. Auto MCACC
2
. Manual SP Setup
3
. Input Assign
4. Auto Power Down
5. HDMI Setup
6. Network Standby
7. MHL Setup
8. OSD Setup
1
. Auto MCACC
Now Analyzing
Surround Analyzing
Speaker System
X.Over
Speaker Distance
Channel Level
Acoustic Cal EQ
Return
Measuring will take about 3 to 12 minutes.
5
Follow the instructions on-screen.
Automatic setting is complete when the Home Menu
screen appears.
If the power is cut off, the protection circuit that activates
when the naked wires of the cable cord is touching the
rear panel or when the naked
and
*
cords are touching
each other may be activated.
Twist back the cable cords of the speakers to the normal
position, and connect, making sure that the naked cable
cord cannot be seen from outside the terminal. Do the
same for the connections on the speaker side.
If
ERR
is displayed, check to make sure that the speakers
are connected correctly.
6
Make sure the setup microphone is
disconnected.
Tripod
Microphone
VSX-824
VSX-424/VSX-329 VSX-824/VSX-529
5
English
Français
Italiano
Español
Nederlands
Deutsch
Basic playback
Multichannel playback
BD DVD
INPUT SELECT
SOURCESLEEP
TV
CONTROL
CD
INPUT
1
4
7
MIDNIGHT
CH
RECEIVER
TUNER
iPod/USB SAT/CBL
GAMETV
SIGNAL SEL
Acous.EQ
PHASE
S.RETRIEVER
ENTER
ADV SURR
AUTO/
DIRECT
VOL
+
10
2
5
8
SPEAKERS
DIMMER
LEV
LEV
SB CH
DISP
CLR
3
6
9
0
ENTER
CH
CH
CH SELECT
MUTE
RETURN
AUDIO
PARAMETER
TOOLS
VOLUME
BAND
MENU
HOME
MENU
iPod CTRL
PTY
TRE
BASS
TOP
MENU
RECEIVER
T
U
N
E
T
U
N
E
P
R
E
S
E
T
P
R
E
S
E
T
RECEIVER
ALC/
STANDARD
STEREO
SLEEP
MUTE
CTRL
BD
AUTO SURR ADV
DVD
USB
TUNER
ADPT
iPod
TUN
GAME
CBL ROKU
SAT
CD
TV
CH LEVEL
HDMI
MHL
BT
NET
S.SEL ECO
STANDBY/ON
ENTER
CLR
SB CH
CH SEL
SP-A/B
Fav
RETURN
BAND
POP UP SUB TITLE DISP
DIMMER STATUS
AUDIO
PRESET TUNE
PTY
AUDIO P.
TOP
MENU
HOME
MENU
RECEIVER
LISTENING MODE
RECEIVER SIGNAL SEL
SOURCE
TOOLS
MENU
SHIFT
BASS
BASS
TRE TRE
INPUT
CH
VOL
2
3
5
1
Switch on the playback component.
E.g. Turn the Blu-ray Disc player connected to the
HDMI BD IN
terminal on.
2
Switch the input of the receiver.
E.g. Press
BD
to select the
BD
input.
3
Press AUTO (VSX-824/VSX-529),
AUTO/DIRECT (VSX-424/VSX-329) to select
’AUTO SURROUND’.
Also press
SURR
(VSX-824/VSX-529),
ALC/STANDARD
(VSX-424/VSX-329) or
ADV
(VSX-824/VSX-529),
ADV SURR
(VSX-424/VSX-329) for multichannel playback. Select your
preferred listening mode.
4
Start the playback component’s playback.
E.g. Start playback of the Blu-ray Disc player.
5
Use VOLUME +/– to adjust the volume level.
If no sound comes out of the center speaker or surround
speaker, change the listening mode by pressing
SURR
(VSX-824/VSX-529),
ALC/STANDARD
(VSX-424/VSX-329) or
ADV
(VSX-824/VSX-529),
ADV SURR
(VSX-424/VSX-329).
E.g. Repeatedly press
ADV
(VSX-824/VSX-529),
ADV SURR
(VSX-424/VSX-329) to select [
EXT.STEREO
].
If there is no sound from the subwoofer
Cause:
The front speaker is set to
LARGE
.
(During 2ch audio input, the low frequency sound is
output not from the subwoofer but the front speaker)
How to x:
If you want the sound to come from the subwoofer, please
change the speaker setup.
(There are 2 following methods)
Method 1:
Change the front speaker to
SMALL
.
The low frequency sound will be output not from the front
speaker but the subwoofer.
We recommend not changing this if the low frequency
function of the front speaker is high.
Method 2:
Change the subwoofer to
PLUS
.
The low frequency sound will output from both the front
speaker and the subwoofer.
This may lead to excessive low frequency sound.
If that happens, we suggest you do not change the setting
or change to Method 1.
l
Speaker Setting” on page 33 (VSX-424/VSX-329),
“Speaker Setting” on page 52 (VSX-824/VSX-529).
Note
If not using the remote control to operate:
– When operating the receiver, press
RECEIVER CTRL
(VSX-824/VSX-529),
RECEIVER
(VSX-424/VSX-329) and then
operate.
– When operating devices such as
NETWORK
(VSX-
824/VSX-529 only),
TUNER
, and
iPod
, press the various
function button (
NET
(VSX-824/VSX-529 only),
TUNER
,
iPod USB
(VSX-824/VSX-529),
iPod/USB
(VSX-424/VSX-
329), etc.) before operating.
In order to listen to the audio from the source component
that is connected to this receiver using a coaxial or an
optical cable, choose the
C1
(coaxial) or
O1
(optical) input.
(Press
SIGNAL SEL
.)
VSX-424/VSX-329 VSX-824/VSX-529
6
Basic playback (continued)
Listening to the radio
1
Press TUNER to select the tuner.
If necessary, press
BAND
to change the band (FM or AM).
2
Press TUNE +/– (VSX-824/VSX-529), TUNE
/
(VSX-424/VSX-329) to tune to a station.
Press and hold
TUNE +/–
(VSX-824/VSX-529),
TUNE
/
(VSX-424/VSX-329) for about a second. The receiver will
start searching for the next station.
If you’re listening to an FM station but the reception
is weak, press
BAND
to select FM MONO and set the
receiver to the mono reception mode.
Saving station presets
If you often listen to a particular radio station, it’s convenient to
have the receiver store the frequency for easy recall whenever
you want to listen to that station.
1
Press TOOLS while receiving a signal from the
station you want to store.
The preset number is blinking.
2
Press PRESET +/– (VSX-824/VSX-529), PRESET
/l
(VSX-424/VSX-329) to select the station
preset you want, then press ENTER.
The preset number stop blinking and the receiver stores
the station.
Listening to station presets
You will need to have some presets stored to do this.
Press PRESET +/– (VSX-824/VSX-529), PRESET
/l
(VSX-424/VSX-329) to select the station
preset you want.
Playing an iPod
About one minute is required between turning the power
on and completion of startup.
1
Connect your iPod.
2
Press iPod USB (VSX-824/VSX-529), iPod/USB
(VSX-424/VSX-329) to select the iPod/USB
input.
When the display shows the names of folders and files,
you’re ready to play music from the iPod.
3
Use
/
to select a category, then press
ENTER to browse that category.
• To return to the previous level any time, press
RETURN
.
4
Use
/
to browse the selected category (e.g.,
albums).
• Use
/l
to move to previous/next levels.
5
Continue browsing until you arrive at what
you want to play, then press
to start
playback.
USB cable that
comes with the iPod
iPod/iPhone
Listening to Internet radio stations
VSX-824/VSX-529 only
About one minute is required between turning the power
on and completion of startup.
Important
When using a broadband Internet connection, a contract
with an Internet service provider is required. For more
details, contact your nearest Internet service provider.
To listen to Internet radio stations, you must have high-
speed broadband Internet access. With a 56 K or ISDN
modem, you may not enjoy the full benefits of Internet
radio.
Access to content provided by third parties requires a
high speed internet connection and may also require
account registration and a paid subscription. Third
party content services may be changed, suspended,
interrupted, or discontinued at any time without notice,
and Pioneer disclaims any liability in connection with such
occurrences. Pioneer does not represent or warrant that
content services will continue to be provided or available
for a particular period of time, and any such warranty,
express or implied, is disclaimed.
1
Press NET repeatedly to select the NETRADIO
input.
It may take several seconds for this receiver to access the
network.
2
Use
/
to select the Internet radio station to
play back, and then press ENTER.
7
English
Français
Italiano
Español
Nederlands
Deutsch
Basic playback (continued)
To enjoy the many functions of the
unit to the fullest extent
Load the CD-ROM into your computer and download the
Operating Instructions (PDF) from the menu screen to
read.
Functions
Playing a USB device
l
page 25 (VSX-424/VSX-329), page 28 (VSX-824/VSX-529)
Music playback using Bluetooth wireless technology
l
page 31 (VSX-824 only)
Bluetooth ADAPTER for Wireless Enjoyment of Music
l
page 33 (VSX-529 only)
Playback with NETWORK features
l
page 41 (VSX-824/VSX-529 only)
Setting the Audio options
l
page 31 (VSX-424/VSX-329), page 39 (VSX-824/VSX-529)
Using the Home Menu
l
page 33 (VSX-424/VSX-329), page 52 (VSX-824/VSX-529)
Troubleshooting
l
page 37 (VSX-424/VSX-329), page 58 (VSX-824/VSX-529)
Note
VSX-824/VSX-529 only: This unit supports AirPlay. For
details, see page 41 of the operating instructions and the
Apple website (http://www.apple.com).
VSX-824/VSX-529 only: This unit’s software can be updated
(page 46 of the operating instructions). With Mac OS, it
can be updated using Safari (page 47 of the operating
instructions).
© 2014 PIONEER HOME ELECTRONICS CORPORATION.
All rights reserved.
2
Raccordements
Raccordement des enceintes
Le récepteur fonctionnera avec seulement deux enceintes stéréo (les enceintes avant sur le schéma), mais il est
recommandé d’en utiliser au moins trois ; une configuration complète de huit enceintes est cependant idéale
pour la production du son surround.
Pour obtenir le meilleur son surround possible, installez vos enceintes conformément à l’illustration ci-dessous.
Système surround à 5.1 canaux :
Après avoir installé les enceintes, connectez-les comme indiqué ci-dessous.
LINE LEVEL
INPUT
L
– Avant-gauche
C
– Centre
R
– Avant-droit
SL
– Surround gauche
SR
– Surround droit
SW
– Caisson de graves
Raccordement des câbles d’enceintes
Vérifiez que l’enceinte droite est raccordée
à la borne droite (
R
) et que l’enceinte
gauche est raccordée à la borne gauche
(
L
). Assurez-vous également que les bornes
positive et négative (
+/–
) du récepteur sont
reliées aux bornes positive et négative des
enceintes.
ATTENTION
Avant un raccordement ou une
modification de raccordement, mettez
l’appareil hors tension et débranchez
le cordon d’alimentation de la prise
secteur.
Les bornes des haut-parleurs sont sous
une tension
DANGEREUSE
. Pour éviter
tout risque de décharge électrique lors
du branchement et du débranchement
des câbles de haut-parleur, débranchez
le cordon d’alimentation avant de
toucher des parties non isolées.
1
Torsadez ensemble les brins de l dénudés.
2
Libérez la borne de l’enceinte et insérez-y
le l.
3
Refermez la borne.
12 3
10 mm
Raccordez les bornes de l’enceinte centrale et
des enceintes surround du système VSX-424/
VSX-329, comme indiqué ci-dessous :
1
Torsadez ensemble les brins de l dénudés.
2
Poussez sur les languettes pour les
ouvrir et insérez le l dénudé.
3
Relâchez les languettes.
12 3
10 mm
R
SL
L
SW
C
SR
Caisson de
basses (
SW
)
Avant-droit (
R
)
Surround droit
(
SR
)
Surround gauche
(
SL
)
Avant-gauche (
L
)Centre (
C
)
VSX-824
Le type des bornes de l’enceinte centrale et des enceintes surround du système VSX-424/
VSX-329 est différent des bornes illustrées dans diagramme ci-dessus.
Vous pouvez utiliser des enceintes ayant une impédance nominale comprise entre 6
W
et 16
W
.
Français
3
English
Français
Italiano
Español
Nederlands
Deutsch
Raccordement d’un téléviseur et de
périphériques de lecture
Remarque
Reportez-vous au Mode d’emploi inclus dans le CD-ROM
fourni si vous souhaitez connecter un téléviseur ou un
lecteur en utilisant une autre méthode que la connexion
HDMI.
Reportez-vous au Mode d’emploi inclus dans le CD-ROM
fourni si vous souhaitez connecter d’autres équipements.
ATTENTION
Tenez le cordon d’alimentation par sa prise lorsque vous
le manipulez. Ne débranchez pas l’appareil en tirant sur
le cordon et ne touchez jamais le cordon d’alimentation
avec les mains mouillées ; vous pourriez provoquer un
court-circuit ou prendre un choc électrique. Ne placez
pas l’appareil, un meuble ou tout autre objet sur le
cordon d’alimentation, et évitez de le pincer de toute
autre manière. Ne faites jamais de nœud dans le cordon
et ne le liez jamais avec d’autres câbles. Les cordons
d’alimentation doivent être acheminés de façon à ce qu’on
ne puisse pas marcher dessus. Un cordon d’alimentation
endommagé peut provoquer un incendie ou un choc
électrique. Vérifiez l’état du cordon de temps à autre. Si le
cordon est endommagé, demandez-en le remplacement
auprès du service après-vente agréé Pioneer le plus
proche.
PRÉCAUTION DE VENTILATION
Lors de l’installation de l’appareil, veillez à laisser un
espace suffisant autour de ses parois de manière à
améliorer la dissipation de chaleur (au moins 40 cm sur
le dessus, 20 cm à l’arrière et 20 cm de chaque côté).
AVERTISSEMENT
Les fentes et ouvertures du coffret sont prévues pour la
ventilation, pour assurer un fonctionnement stable de
l’appareil et pour éviter sa surchauffe. Pour éviter les
risques d’incendie, ne bouchez jamais les ouvertures et
ne les recouvrez pas d’objets, tels que journaux, nappes
ou rideaux, et n’utilisez pas l’appareil posé sur un tapis
épais ou un lit.
D3-4-2-1-7b*_A1_Fr
Raccordements (suite)
Raccordement des antennes
21
Antenne cadre AM
Antenne FM à fil
VSX-824
Raccordement au réseau par
l’interface LAN
VSX-824/VSX-529 uniquement
WAN
3
2
1
LAN
Câble LAN (vendu
séparément)
Routeur
Modem
Ordinateur
Internet
HDMI IN
HDMI OUT
DIGITAL AUDIO OUT
OPTICAL
B
VIDEO IN
A
Téléviseur compatible HDMI/DVI
VSX-824
VSX-424/VSX-329 uniquement : La connexion doit être réalisée via un câble
vidéo composite (
A
) afin de faire apparaître l’affichage OSD de l’appareil
sur le téléviseur.
VSX-824/VSX-529 uniquement : Le signal de l’affichage OSD est envoyé
uniquement sur la prise de sortie HDMI OUT.
Si le téléviseur ne prend pas en charge la fonction HDMI Audio Return
Channel, la connexion doit être réalisée via un câble optique numérique
(
B
) pour écouter le son du téléviseur par l’intermédiaire du récepteur.
Si le téléviseur prend en charge la fonction HDMI Audio Return Channel,
le son du téléviseur est envoyé vers le récepteur via la prise HDMI et il n’est
alors pas nécessaire de connecter un câble optique numérique
(
B
). Dans ce cas, activez (
ON
) l’option
ARC
dans le menu de
configuration
HDMI Setup
l
« Menu HDMI Setup » à la page 36 (VSX-
424/VSX-329), « Menu HDMI Setup » à la page 56 (VSX-824/VSX-529).
Veuillez vous reporter au Guide d’utilisation du téléviseur pour consulter les
instructions concernant les connexions et la configuration du téléviseur.
VSX-824
Lecteur de Blu-ray Disc
compatible HDMI/DVI etc.
4
Initial Setup
Préparatifs
1
Insérez les piles dans la télécommande.
Les piles de la télécommande fournies avec l’appareil
permettent d’effectuer les premières opérations ; il est
possible qu’elles ne durent pas très longtemps. Nous
recommandons l’usage de piles alcalines, dont la durée
de vie est supérieure.
2
Allumez le récepteur et votre téléviseur.
BD DVD
INPUT SELECT
SOURCESLEEP
TV
CONTROL
CD
INPUT
RECEIVER
RECEIVER
SLEEP
CTRL
BD GAME HDMI
S.SEL ECO
STANDBY/ON
RECEIVER SIGNAL SEL
SOURCE
INPUT
3
Sélectionnez l’entrée TV de sorte que le
téléviseur se connecte à l’appareil.
4
Mettez le caisson de basse sous tension et
augmentez le volume.
ATTENTION
N’utilisez ni ne conservez les piles sous la lumière directe
du soleil ou dans un endroit excessivement chaud, comme
une voiture ou à proximité d’un appareil de chauffage. Les
piles risqueraient de fuir, de surchauffer, d’exploser ou de
s’enflammer. Leur durée de vie et/ou leur performance
pourrait également être réduite.
Lors de l’insertion des piles, veillez à ne pas endommager
les ressorts des bornes
*
de chaque pile. Les piles risque-
raient de fuir ou de surchauffer.
Lorsque vous éliminez des piles / batteries usées, veuillez
vous conformer aux normes gouvernementales ou aux
règles des institutions publiques environnementales en
vigueur dans votre pays ou région.
Conguration automatique du son surround (MCACC)
(VSX-824/VSX-529/VSX-424)
Le système de calibrage acoustique multicanaux (Multi-
Channel Acoustic Calibration, MCACC) utilise le microphone
de configuration fourni pour mesurer et analyser la tonalité de
test émise par les enceintes. Cette fonction permet de mesurer
et de configurer automatiquement les paramètres avec
précision. En l’utilisant, vous bénéficierez d’un environnement
d’écoute optimal.
Important
La procédure doit être effectuée dans un environnement
calme.
Si vous avez un trépied, utilisez-le pour y placer le
microphone afin qu’il soit au niveau des oreilles à votre
position d’écoute normale. Sinon, placez le microphone au
niveau des oreilles en utilisant une table ou une chaise.
Les mesures risquent d’être impossibles si un ou plusieurs
obstacles se trouvent entre les enceintes et la position
d’écoute (microphone).
Pendant la procédure de mesure, éloignez-vous de la
position d’écoute et utilisez la télécommande en vous
plaçant à l’extérieur de la zone des enceintes.
1
Branchez le microphone de conguration
fourni.
MCACC
SETUP
MIC
2
Appuyez sur la touche BD de la télécommande
pour passer sur l’ntrée BD.
3
Appuyez sur la touche RECEIVER CTRL (VSX-
824/VSX-529) ou
RECEIVER
(VSX-424/VSX-
329) de la télécommande, puis appuyez sur
HOME MENU.
Le menu d’accueil (Home) s’affiche sur le téléviseur.
4
Sélectionnez ‘Auto MCACC’ dans le menu
d’accueil (Home), puis appuyez sur ENTER.
La procédure de mesure automatique commence.
Home Menu
1
. Auto MCACC
2
. Manual SP Setup
3
. Input Assign
4. Auto Power Down
5. HDMI Setup
6. Network Standby
7. MHL Setup
8. OSD Setup
1
. Auto MCACC
Now Analyzing
Surround Analyzing
Speaker System
X.Over
Speaker Distance
Channel Level
Acoustic Cal EQ
Return
Les mesures prennent entre 3 et 12 minutes.
5
Suivez les instructions à l’écran.
La configuration automatique est terminée lorsque l’écran
revient au menu « Home Menu ».
En cas de coupure de l’alimentation, si les extrémités
dénudées des fils d’enceintes
ou
*
viennent en contact
avec le panneau arrière ou créent un court-circuit entre-
elles, le circuit de protection peut se déclencher.
Torsadez les extrémités des fils d’enceintes et connectez-
les correctement, en veillant à ce que les parties dénudées
des fils d’enceintes ne dépassent pas à l’extérieur des
bornes. Faites la même chose pour les connexions sur les
enceintes.
Si l’indication
ERR
s’affiche, vérifiez que les enceintes sont
correctement connectées.
6
Assurez-vous de débrancher le microphone de
configuration.
Trépied
Microphone
VSX-824
VSX-424 / VSX-329 VSX-824 / VSX-529
5
English
Français
Italiano
Español
Nederlands
Deutsch
Lecture de base
Lecture multicanaux
BD DVD
INPUT SELECT
SOURCESLEEP
TV
CONTROL
CD
INPUT
1
4
7
MIDNIGHT
CH
RECEIVER
TUNER
iPod/USB SAT/CBL
GAMETV
SIGNAL SEL
Acous.EQ
PHASE
S.RETRIEVER
ENTER
ADV SURR
AUTO/
DIRECT
VOL
+
10
2
5
8
SPEAKERS
DIMMER
LEV
LEV
SB CH
DISP
CLR
3
6
9
0
ENTER
CH
CH
CH SELECT
MUTE
RETURN
AUDIO
PARAMETER
TOOLS
VOLUME
BAND
MENU
HOME
MENU
iPod CTRL
PTY
TRE
BASS
TOP
MENU
RECEIVER
T
U
N
E
T
U
N
E
P
R
E
S
E
T
P
R
E
S
E
T
RECEIVER
ALC/
STANDARD
STEREO
SLEEP
MUTE
CTRL
BD
AUTO SURR ADV
DVD
USB
TUNER
ADPT
iPod
TUN
GAME
CBL ROKU
SAT
CD
TV
CH LEVEL
HDMI
MHL
BT
NET
S.SEL ECO
STANDBY/ON
ENTER
CLR
SB CH
CH SEL
SP-A/B
Fav
RETURN
BAND
POP UP SUB TITLE DISP
DIMMER STATUS
AUDIO
PRESET TUNE
PTY
AUDIO P.
TOP
MENU
HOME
MENU
RECEIVER
LISTENING MODE
RECEIVER SIGNAL SEL
SOURCE
TOOLS
MENU
SHIFT
BASS
BASS
TRE TRE
INPUT
CH
VOL
2
3
5
1
Mettez le lecteur sous tension.
Exemple : Mettez sous tension le lecteur de Blu-ray Disc
connecté à la prise d’entrée
HDMI BD IN
.
2
Sélectionnez l’entrée sur le récepteur.
Exemple : Appuyez sur la touche
BD
pour sélectionner
l’entrée
BD
.
3
Appuyez sur la touche AUTO (VSX-824/VSX-
529) ou AUTO/DIRECT (VSX-424/VSX-329) pour
sélectionner ’AUTO SURROUND’.
Appuyez aussi sur la touche
SURR
(VSX-824/VSX-529),
ALC/STANDARD
(VSX-424/VSX-329) ou
ADV
(VSX-824/
VSX-529),
ADV SURR
(VSX-424/VSX-329) pour la lecture
multicanal. Sélectionnez le mode d’écoute désiré.
4
Lancez la lecture sur le lecteur.
Exemple : Lancez la lecture sur le lecteur de Blu-ray Disc.
5
Utilisez le bouton rotatif VOLUME +/– pour
régler le volume sonore.
Si aucun son n’est émis par l’enceinte centrale ou par
les enceintes surround, changez de mode d’écoute en
appuyant sur
SURR
(VSX-824/VSX-529),
ALC/STANDARD
(VSX-424/VSX-329) ou
ADV
(VSX-824/VSX-529),
ADV SURR
(VSX-424/VSX-329).
Exemple : Appuyez à plusieurs reprises sur
ADV
(VSX-824/
VSX-529),
ADV SURR
(VSX-424/VSX-329) pour sélectionner
[
EXT.STEREO
].
Si aucun son n’est émis du caisson de graves.
Cause :
L’enceinte avant est réglée sur
LARGE
.
(Avec une entrée audio à 2 canaux, les signaux de basses
fréquences ne sont pas restitués par le caisson de graves
mais par l’enceinte avant)
Pour modier cette conguration :
Si vous souhaitez que les signaux de basses fréquences
soient restitués par le caisson de graves, il est nécessaire
de modifier la configuration des enceintes.
(Vous pouvez utiliser l’une des deux méthodes suivantes)
Méthode 1 :
Changez le réglage de l’enceinte avant sur
SMALL
.
Les signaux de basses fréquences seront restitués non
pas par l’enceinte avant mais par le caisson de graves.
Nous recommandons de ne pas modifier le réglage si la
fonction basses fréquences de l’enceinte avant est élevée.
Méthode 2 :
Changez le réglage du caisson de graves sur
PLUS
.
Les signaux de basses fréquences seront restitués à la fois
par l’enceinte avant et par le caisson de graves.
Ceci peut provoquer un excès de sons graves.
Dans ce cas, nous recommandons de ne pas modifier la
configuration ou bien d’utiliser la Méthode 1.
l
« Réglage des enceintes » à la page 33 (VSX-424/VSX-
329),
« Réglage des enceintes » à la page 52 (VSX-824/
VSX-529).
Remarque
Si vous ne souhaitez pas utiliser la télécommande :
– Pour contrôler l’appareil, appuyez d’abord sur la touche
RECEIVER CTRL
(VSX-824/VSX-529),
RECEIVER
(VSX-424/
VSX-329) de la télécommande.
– Pour contrôler des équipements connectés aux entrées
NETWORK
(VSX-824/VSX-529 uniquement),
TUNER
, ou
iPod
, appuyez d’abord sur les touches correspondantes
de la télécommande (
NET
(VSX-824/VSX-529 uniquement),
TUNER
,
iPod USB
(VSX-824/VSX-529),
iPod/USB
(VSX-424/
VSX-329), etc.)
Pour écouter le son d’un composant source connecté à
ce récepteur via un câble coaxial ou un câble optique,
sélectionner le signal d’entrée
C1
(coaxial) ou
O1
(optique). (Appuyez sur
SIGNAL SEL
.)
VSX-424 / VSX-329 VSX-824 / VSX-529
6
Lecture de base (suite)
Ecoute de la radio
1
Appuyez sur TUNER pour sélectionner le
syntoniseur.
Appuyez sur la touche
BAND
pour changer de bande de
fréquences (FM ou AM), si nécessaire.
2
Pour rechercher une station de radio, appuyez
sur TUNE +/– (VSX-824/VSX-529), TUNE
/
(VSX-424/VSX-329).
Pressez sans relâcher la touche
TUNE +/–
(VSX-824/VSX-
529),
TUNE
/
(VSX-424/VSX-329) pendant environ une
seconde. Le récepteur lance la recherche de la station
suivante dans la direction correspondant à la touche.
Si la réception du signal radio FM est faible, appuyez sur
la touche
BAND
pour sélectionner FM MONO, et réglez le
récepteur en mode de réception mono.
Mémorisation de stations préréglées
Si vous écoutez souvent une station de radio, il peut être
pratique d’enregistrer sa fréquence dans le récepteur afin de
pouvoir y accéder facilement lorsque vous le souhaitez.
1
Pour mémoriser une station de radio que vous
êtes en train d’écouter, appuyez d’abord sur la
touche TOOLS.
Le numéro de préréglage clignote.
2
Appuyez sur la touche PRESET +/– (VSX-824/
VSX-529), PRESET
/l
(VSX-424/VSX-329)
pour choisir le numéro de présélection que
vous souhaitez attribuer à cette station, puis
appuyez sur ENTER.
Le numéro préréglé cesse de clignoter et le récepteur
mémorise la station.
Écoute des stations préréglées
Vous devez mémoriser des stations préréglées pour avoir accès
à cette fonction.
Appuyez sur la touche PRESET +/– (VSX-824/
VSX-529), PRESET
/l
(VSX-424/VSX-329)
pour sélectionner le numéro de la station
présélectionnée que vous souhaitez écouter.
Lecture à partir d’un iPod
L’opération de démarrage prend environ une minute à
partir de la mise sous tension.
1
Connectez votre iPod.
2
Appuyez sur la touche iPod USB (VSX-824/
VSX-529), iPod/USB (VSX-424/VSX-329) pour
sélectionner l’entrée iPod/USB.
Lorsque l’affichage indique les noms de dossiers et de
fichiers, le récepteur est prêt à lire le contenu audio stocké
sur l’iPod.
3
Utilisez
/
pour sélectionner une catégorie,
puis appuyez sur ENTER pour naviguer dans
cette catégorie.
• Pour revenir au niveau précédent à tout moment,
appuyez sur
RETURN
.
4
Utilisez
/
pour naviguer dans la catégorie
sélectionnée (par exemple, albums).
• Utilisez
/l
pour passer au niveau précédent/suivant.
5
Poursuivez votre navigation jusqu’à atteindre
les éléments que vous souhaitez lire, puis
appuyez sur
pour lancer la lecture.
Câble USB fourni
avec l’iPod
iPod/iPhone
Ecoute des stations radio Internet
VSX-824/VSX-529 uniquement
L’opération de démarrage prend environ une minute à
partir de la mise sous tension.
Important
L’utilisation d’une connexion Internet haut-débit nécessite
un contrat auprès d’un fournisseur d’accès Internet. Pour
plus d’informations, contactez votre fournisseur d’accès
Internet local.
Pour écouter les stations radio Internet, vous devez avoir
un accès haute vitesse à Internet par une large bande.
Avec un modem de 56 K ou ISDN, vous ne pourrez pas
profiter pleinement de la radio Internet.
L’acces a du contenu Web requiert un acces internet
haut debit et peut aussi necessiter l’enregistrement de
vos coordonnees et le paiement d’un abonnement sur
un site. Le contenu du site peut etre change, suspendu,
interrompu sans aucun avertissement, Pioneer declinant
toute responsabilite quant a d’eventuels changements.
Pioneer decline toute responsabilite quant au contenu, a
sa disponibilite et quant a la continuite du service.
1
Appuyez sur la touche NET pour sélectionner
l’entrée NETRADIO.
Il faut quelques secondes au récepteur pour accéder au
réseau.
2
Utilisez les touches
/
pour sélectionner la
station radio Internet voulue, puis appuyez
sur ENTER.
7
English
Français
Italiano
Español
Nederlands
Deutsch
Lecture de base (suite)
Pour proter entièrement de toutes
les fonctions du récepteur
Insérez le CD-ROM dans votre ordinateur et ouvrez le
Mode d’emploi (PDF) à partir du menu d’accueil pour le
lire.
Fonctions
Lecture à partir d’un périphérique USB
l
page 25 (VSX-424/VSX-329), page 28 (VSX-824/VSX-529)
Lecture de musique à partir dun périphérique sans l
Bluetooth
l
page 31 (VSX-824 uniquement)
ADAPTATEUR Bluetooth pour proter de la musique
sans l
l
page 33 (VSX-529 uniquement)
Utilisation des fonctions de lecture réseau (NETWORK)
l
page 41 (VSX-824/VSX-529 uniquement)
Réglage des options audio
l
page 31 (VSX-424/VSX-329), page 39 (VSX-824/VSX-529)
Utilisation du menu d’accueil HOME
l
page 33 (VSX-424/VSX-329), page 52 (VSX-824/VSX-529)
Guide de dépannage
l
page 37 (VSX-424/VSX-329), page 58 (VSX-824/VSX-529)
Remarque
VSX-824/VSX-529 uniquement : Cet appareil prend en
charge le protocole AirPlay. Pour plus d’informations,
consultez le Mode d’emploi page 41 et visitez le site Apple
(http://www.apple.com).
VSX-824/VSX-529 uniquement : Le micrologiciel de cet
appareil peut être mis à jour (voir le Mode d’emploi, page
46). Avec un ordinateur fonctionnant sous Mac OS, la
mise à jour peut être téléchargée via Safari (voir le Mode
d’emploi, page 47).
© 2014 PIONEER HOME ELECTRONICS CORPORATION.
Tous droits de reproduction et de traduction réservés.
2
Anschlüsse
Anschluss der Lautsprecher
Der Receiver funktioniert auch bei Verwendung von nur zwei Stereolautsprechern (die Front-Lautsprecher
in der Abbildung), aber wir empfehlen Ihnen die Verwendung von mindestens drei Lautsprechern, wobei
ein vollständiges Setup immer noch den besten Raumklang liefert.
Stellen Sie Ihre Lautsprecher wie unten dargestellt auf, um den bestmöglichen Surroundklang zu erzielen.
5.1-Kanal-Surround-System:
Schließen Sie die Lautsprecher, nachdem Sie sie installiert haben, wie unten dargestellt an.
LINE LEVEL
INPUT
L
– Front links
C
– Center
R
– Front rechts
SL
– Surround links
SR
– Surround rechts
SW
– Subwoofer
Anschließen der Lautsprecherkabel
Stellen Sie sicher, dass Sie die rechten
Lautsprecher am rechten (
R
) Anschluss
und die linken Lautsprechern am linken
(
L
) Anschluss anschließen. Stellen Sie
außerdem sicher, dass die positiven und
negativen (
+/–
) Anschlüsse am Receiver
denen an den Lautsprechern entsprechen.
ACHTUNG
Bevor Sie Anschlüsse vornehmen
oder ändern, schalten Sie die
Stromversorgung aus und ziehen Si das
Netzkabel aus der Steckdose.
An den Lautsprecherklemmen
dieses Gerätes liegt eine potentiell
GEFÄHRLICHE
Spannung an. Zur
Vermeidung von Stromschlaggefahr
ist unbedingt darauf zu achten, den
Netzstecker beim Anschließen und
Abtrennen der Lautsprecherkabel von
der Netzsteckdose zu trennen, bevor
irgendwelche nicht isolierten Teile
berührt werden.
1
Verdrillen Sie die hervorstehenden
Drahtstränge miteinander.
2
Lösen Sie den Anschluss und setzen Sie
den hervorstehenden Draht ein.
3
Ziehen Sie den Anschluss wieder an.
12 3
10 mm
Schließen Sie den Center- und die
Surroundlautsprecher- Anschlüsse der Geräte
VSX-424/VSX-329 an wie unten dargestellt.
1
Verdrillen Sie die hervorstehenden
Drahtstränge miteinander.
2
Öffnen Sie die Klemmen und schieben
Sie den hervorstehenden Draht ein.
3
Lassen Sie die Klemmen los.
12 3
10 mm
R
SL
L
SW
C
SR
Subwoofer
(
SW
)
Front rechts (
R
)
Surround rechts
(
SR
)
Surround links
(
SL
)
Front links (
L
)Center (
C
)
VSX-824
Der Typ der Center- und Surround- Lautsprecheranschlüsse für die Einheit VSX-424/VSX-329
unterscheidet sich von dem in dieser Abbildung dargestellten Typ.
Sie können Lautsprecher mit einer Nennimpedanz zwischen 6
W
und 16
W
verwenden.
Deutsch
3
English
Français
Italiano
Español
Nederlands
Deutsch
Anschließen eines Fernsehers und
von Wiedergabe-Geräten
Hinweis
Informieren Sie sich in den Bedienungsanweisungen auf
der mitgelieferten CD-ROM, wenn Sie einen Fernseher
oder ein Wiedergabegerät mit einer anderen Methode als
einem HDMI-Anschluss anschließen wollen.
Informieren Sie sich in den Bedienungsanweisungen auf
der mitgelieferten CD-ROM über andere Geräteanschlüsse.
ACHTUNG
Beim Anschließen und Trennen des Netzkabels immer
den Stecker anfassen. Ziehen Sie den Stecker nicht durch
Ziehen am Kabel heraus, und berühren Sie das Netzkabel
niemals mit nassen Händen, da dies einen Kurzschluss
oder einen elektrischen Schlag verursachen könnte.
Das Gerät, Möbelstücke oder andere Gegenstände nicht
auf das Netzkabel stellen und jegliches Einklemmen
des Netzkabels vermeiden. Niemals einen Knoten ins
Netzkabel machen oder es an anderen Kabeln festbinden.
Das Netzkabel sollte so verlegt werden, dass niemand
darauf treten kann. Ein beschädigtes Netzkabel kann
einen Brand oder einen elektrischen Schlag verursachen.
Überprüfen Sie das Netzkabel hin und wieder. Bei
Beschädigung wenden Sie sich bitte wegen Ersatz an die
nächste Pioneer-Kundendienststelle.
VORSICHTSHINWEIS ZUR BELÜFTUNG
Bei der Aufstellung dieses Gerätes muss für einen
ausreichenden Freiraum gesorgt werden, um eine
einwandfreie Wärmeabfuhr zu gewährleisten
(mindestens 40 cm oberhalb des Gerätes, 20 cm hinter
dem Gerät und jeweils 20 cm an der Seite des Gerätes).
WARNUNG
Im Gerätegehäuse sind Ventilationsschlitze und andere
Öffnungen vorgesehen, die dazu dienen, eine
Überhitzung des Gerätes zu verhindern und einen
zuverlässigen Betrieb zu gewährleisten. Um
Brandgefahr auszuschließen,rfen diese Öffnungen
auf keinen Fall blockiert oder mit Gegenständen (z.B.
Zeitungen, Tischdecken und Gardinen) abgedeckt
werden, und das Gerät darf beim Betrieb nicht auf
einem dicken Teppich oder Bett aufgestellt sein.
D3-4-2-1-7b*_A1_De
Anschlüsse (Fortsetzung)
Anschluss der Antennen
21
MW-Rahmenantenne
UKW-Drahtantenne
VSX-824
Herstellen der Verbindung
zum Netzwerk über die LAN-
Schnittstelle
Nur VSX-824/VSX-529
WAN
3
2
1
LAN
LAN-Kabel (getrennt erhältlich)
Router
Modem
Computer
Internet
HDMI IN
HDMI OUT
DIGITAL AUDIO OUT
OPTICAL
B
VIDEO IN
A
HDMI-/DVI-kompatibler Fernseher
VSX-824
Nur VSX-424/VSX-329: Das Composite-Videokabel-
(
A
)-Anschluss ist erforderlich, um OSD der Einheit auf dem Fernseher
zu sehen.
Nur VSX-824/VSX-529: OSD wird nur vom Anschluss HDMI OUT
ausgegeben.
Wenn der Fernseher die HDMI-Audiorückkanal-Funktion (ARC, Audio
Return Channel) nicht unterstützt, ist der optische Digitalkabel-(
B
)-
Anschluss erforderlich, um den Fernsehton über den Receiver zu hören.
Wenn der Fernseher die HDMI-Audiorückkanal-Funktion unterstützt, wird
der Fernsehton über den HDMI-Anschluss in den Receiver eingegeben,
so dass es nicht erforderlich ist, ein optisches Digitalkabel (
B
)
anzuschließen. Stellen Sie in diesem Fall
ARC
in
HDMI Setup
auf
ON
ein
l
„Das HDMI-Einrichtungsmenü auf Seite 36 (VSX-424/VSX-329),
„HDMI Setup“ auf Seite 56 (VSX-824/VSX-529).
Zu Richtungen an Anschlüssen und die Einrichtung des Fernsehers siehe
die Bedienungsanleitung für den Fernseher.
VSX-824
HDMI-/DVI-kompatibler
Blu-ray-Disc-Player, usw.
4
Initial Setup
Vor der Inbetriebnahme
1
Legen Sie die Batterien in die Fernbedienung ein.
Die mit der Einheit mitgelieferten Batterien sind dafür
vorgesehen, die Anfangsoperationen zu überprüfen. Sie
können nicht über längere Zeit verwendet werden. Der
Gebrauch von Alkalibatterien mit längerer Lebensdauer
wird empfohlen.
2
Schalten Sie den Receiver und Ihr Fernsehgerät ein.
BD DVD
INPUT SELECT
SOURCESLEEP
TV
CONTROL
CD
INPUT
RECEIVER
RECEIVER
SLEEP
CTRL
BD GAME HDMI
S.SEL ECO
STANDBY/ON
RECEIVER SIGNAL SEL
SOURCE
INPUT
3
Den Eingang des Fernsehers so umschalten,
dass er mit dem Receiver verbunden ist.
4
Schalten Sie den Subwoofer ein und drehen
Sie die Lautstärke lauter.
ACHTUNG
Verwenden oder lagern Sie Batterien nicht bei direkter
Sonneneinstrahlung oder in übermäßig warmen
Umgebungen wie zum Beispiel in Fahrzeugen oder in der
Nähe von Heizungen. Dies kann zu Leckage, Überhitzung,
Explosion oder Brand der Batterien führen. Außerdem
kann sich die Lebensdauer der Batterien verringern.
Achten Sie beim Einlegen der Batterien sorgfältig darauf,
die Federn der negativen (
*
) Pole nicht zu beschädigen.
Dies kann dazu führen, dass Batterien auslaufen oder
überhitzt werden.
Bitte beachten Sie bei der Entsorgung von gebrauchten
Batterien die geltenden staatlichen Regelungen oder die
in Ihrem Land/Gebiet geltenden Umweltvorschriften der
Umweltbehörden.
Automatische Einstellung des Surroundklangs (MCACC)
(VSX-824/VSX-529/VSX-424)
Die Auto-Mehrkanal-Akustik- Kalibrierungseinrichtung
(MCACC) verwendet das mitgelieferte Einrichtungsmikrofon,
um den von den Lautsprechern gesendeten Testton zu
messen und zu analysieren. Diese Einrichtung ermöglicht die
automatische Messung und Einstellung mit hoher Genauigkeit.
Ihre Verwendung schafft ein optimales Hörumfeld für den
Nutzer.
Wichtig
Messen Sie in einer ruhigen Umgebung.
Wenn ein Stativ zur Verfügung steht, stellen Sie das
Mikrofon bitte in der Höhe auf, in der Sie Ihr System
normalerweise hören. Stellen Sie das Mikrofon ansonsten
in Ohrhöhe auf einen Tisch oder Stuhl.
Wenn es zwischen den Lautsprechern und der Hörposition
Hindernisse gibt, kann es sein, dass genaue Messungen
nicht möglich sind.
Treten Sie beim Messen von der Hörposition weg und
operieren Sie mit der Fernbedienung von der Außenseite
aller Lautsprecher aus.
1
Schließen Sie das mitgelieferte
Einrichtungsmikrofon an.
MCACC
SETUP
MIC
2
Drücken Sie die BD-Taste auf der
Fernbedienung, um auf den BD-Eingang
umzuschalten.
3
Drücken Sie auf der Fernbedienung
RECEIVER CTRL (VSX-824/VSX-529) bzw.
RECEIVER
(VSX-424/VSX-329) und drücken Sie
dann die Taste HOME MENU.
Auf Ihrem Fernseher erscheint das Home-Menü.
4
Wählen Sie die Option „Auto MCACC“
aus Home-Menü aus, und drücken Sie
anschließend ENTER.
Das automatische Messen beginnt.
Home Menu
1
. Auto MCACC
2
. Manual SP Setup
3
. Input Assign
4. Auto Power Down
5. HDMI Setup
6. Network Standby
7. MHL Setup
8. OSD Setup
1
. Auto MCACC
Now Analyzing
Surround Analyzing
Speaker System
X.Over
Speaker Distance
Channel Level
Acoustic Cal EQ
Return
Das Messen dauert 3 bis 12 Minuten.
5
Folgen Sie den Anweisungen auf dem Bildschirm.
Die automatische Einstellung ist abgeschlossen, wenn der
Bildschirm Home-Menü erscheint.
Wenn der Strom ausgeschaltet ist, kann es vorkommen,
dass der Schutzkreis, der anspricht, wenn die blanken
Drähte des Kabels das hintere Bedienfeld berühren oder
die blanken
- und
*
-Kabel einander berühren, aktiviert
wird.
Drehen Sie die Kabel der Lautsprecher in ihre
Normalposition zurück und schließen Sie sie an. Achten
Sie darauf, dass die blanken Kabel außerhalb des
Anschlusses nicht zu sehen sind. Führen Sie dasselbe
auch bei Anschlüssen auf der Lautsprecherseite aus.
Überprüfen Sie, wenn
ERR
(Fehler) angezeigt wird, ob die
Lautsprecher korrekt angeschlossen sind.
6
Stellen Sie sicher, dass das Setup-Mikrofon
nicht angeschlossen ist.
Tripod
Mikrofon
VSX-824
VSX-424/VSX-329 VSX-824/VSX-529
5
English
Français
Italiano
Español
Nederlands
Deutsch
Grundlegende Wiedergabe
Mehrkanal-Wiedergabe
BD DVD
INPUT SELECT
SOURCESLEEP
TV
CONTROL
CD
INPUT
1
4
7
MIDNIGHT
CH
RECEIVER
TUNER
iPod/USB SAT/CBL
GAMETV
SIGNAL SEL
Acous.EQ
PHASE
S.RETRIEVER
ENTER
ADV SURR
AUTO/
DIRECT
VOL
+
10
2
5
8
SPEAKERS
DIMMER
LEV
LEV
SB CH
DISP
CLR
3
6
9
0
ENTER
CH
CH
CH SELECT
MUTE
RETURN
AUDIO
PARAMETER
TOOLS
VOLUME
BAND
MENU
HOME
MENU
iPod CTRL
PTY
TRE
BASS
TOP
MENU
RECEIVER
T
U
N
E
T
U
N
E
P
R
E
S
E
T
P
R
E
S
E
T
RECEIVER
ALC/
STANDARD
STEREO
SLEEP
MUTE
CTRL
BD
AUTO SURR ADV
DVD
USB
TUNER
ADPT
iPod
TUN
GAME
CBL ROKU
SAT
CD
TV
CH LEVEL
HDMI
MHL
BT
NET
S.SEL ECO
STANDBY/ON
ENTER
CLR
SB CH
CH SEL
SP-A/B
Fav
RETURN
BAND
POP UP SUB TITLE DISP
DIMMER STATUS
AUDIO
PRESET TUNE
PTY
AUDIO P.
TOP
MENU
HOME
MENU
RECEIVER
LISTENING MODE
RECEIVER SIGNAL SEL
SOURCE
TOOLS
MENU
SHIFT
BASS
BASS
TRE TRE
INPUT
CH
VOL
2
3
5
1
Schalten Sie das Wiedergabegerät ein.
Beispiel: Schalten Sie den an den Anschluss
HDMI BD IN
angeschlossenen Blu-ray-Disc-Player ein.
2
Schalten Sie den Eingang des Receivers um.
Beispiel: Drücken Sie
BD
, um den
BD
-Eingang zu wählen.
3
Drücken Sie AUTO (VSX-824/VSX-529) bzw.
AUTO/DIRECT (VSX-424/VSX-329) und wählen
Sie ’AUTO SURROUND’.
Drücken Sie ferner für die Mehrkanal-Wiedergabe
SURR
(VSX-824/VSX-529) bzw.
ALC/STANDARD
(VSX-424/VSX-
329) oder
ADV
(VSX-824/VSX-529) bzw.
ADV SURR
(VSX-
424/VSX-329). Wählen Sie Ihren bevorzugten Hör-Modus.
4
Starten Sie die Wiedergabe mit dem
Wiedergabegerät.
Beispiel: Starten Sie die Wiedergabe mit dem Blu-ray-Disc-
Player.
5
Zur Einstellung der Lautstärke VOLUME +/–
verwenden.
Ändern Sie, wenn kein Ton aus dem Center-Lautsprecher
oder den Surround-Lautsprechern kommt, den Hörmodus
durch Drücken von
SURR
(VSX-824/VSX-529) bzw.
ALC/STANDARD
(VSX-424/VSX-329) oder
ADV
(VSX-824/
VSX-529) bzw.
ADV SURR
(VSX-424/VSX-329).
Beispiel: Drücken Sie beispielsweise wiederholt
ADV
(VSX-824/VSX-529) bzw.
ADV SURR
(VSX-424/VSX-329), um
[
EXT.STEREO
] zu wählen.
Aus dem Subwoofer kommt kein Ton.
Ursache:
Die Front-Lautsprecher sind auf
LARGE
eingestellt.
(Während der Zweikanal-Eingabe werden die niedrigen
Frequenzen nicht vom Subwoofer, sondern von den
Frontlautsprechern ausgegeben)
Vorgehensweise bei der Festlegung:
Wenn Sie möchten, dass der Ton aus dem Subwoofer
kommt, dann ändern Sie die Lautsprecher- Einstellung.
(Es gibt hierfür die zwei folgenden Methoden)
Methode 1:
Ändern Sie die Frontlautsprecher-Einstellung
auf
SMALL
.
Die niedrigen Tonfrequenzen werden nicht von den
Frontlautsprechern, sondern vom Subwoofer ausgegeben.
Wir empfehlen, diese Änderung nicht vorzunehmen,
wenn die Funktion der niedrigen Frequenzen der
Frontlautsprecher hoch ist.
Methode 2:
Ändern Sie den Subwoofer auf
PLUS.
Der Ton mit den niedrigen Frequenzen wird sowohl
von den Frontlautsprechern als auch vom Subwoofer
ausgegeben.
Dies kann zu einem zu starken Ton mit niedrigen
Frequenzen führen.
Wir schlagen, wenn dies geschieht, vor, die Einstellung
nicht zu ändern oder eine Änderung nach Methode 1
vorzunehmen.
l
Lautsprechereinstellung“ auf Seite 33 (VSX-424/VSX-
329),
„Lautsprechereinstellung“ auf Seite 52 (VSX-824/
VSX-529).
Hinweis
Wenn der Betrieb nicht mit der Fernbedienung erfolgt:
– Drücken Sie bei der Bedienung mit dem Receiver
RECEIVER CTRL
(VSX-824/VSX-529) bzw.
RECEIVER
(VSX-
424/VSX-329) und nehmen Sie dann die Bedienung vor.
– Drücken Sie bei der Bedienung von Geräten wie
NETWORK
(nur VSX-824/VSX-529),
TUNER
und
iPod
vor
dem Betreiben die verschiedenen Funktionstasten (
NET
(nur VSX-824/VSX-529),
TUNER
,
iPod USB
(VSX-824/VSX-
529) bzw.
iPod/USB
(VSX-424/VSX-329) usw.)
Wählen Sie, um Audiosignale vom Quellgerät zu hören,
das mit einem Koaxialkabel oder einem optischen Kabel
an diesen Receiver angeschlossen ist, den
C1
-Eingang
(koaxial) oder den
O1
-Eingang (optisch). (Drücken Sie
SIGNAL SEL
.)
VSX-424/VSX-329 VSX-824/VSX-529
6
Grundlegende Wiedergabe (Fortsetzung)
Empfang von Rundfunksendungen
1
Drücken Sie TUNER, um den Tuner zu wählen.
Drücken Sie, wenn erforderlich, die Taste
BAND
, um das
Band (FM oder AM) zu ändern.
2
Drücken Sie TUNE +/– (VSX-824/VSX-529)
bzw. TUNE
/
(VSX-424/VSX-329), um einen
Sender einzustellen.
Drücken Sie
TUNE +/–
(VSX-824/VSX-529) bzw.
TUNE
/
(VSX-424/VSX-329) und halten Sie die betreffende Taste
etwa 1 Sekunde lang gedrückt. Der Receiver beginnt mit
der Suche nach dem nächsten Sender.
Drücken Sie, wenn Sie sich einen FM-Sender anhören,
der Empfang aber schwach ist,
BAND
, um FM MONO
zu wählen, und stellen Sie den Receiver auf den
Monoempfangs-Modus ein.
Speichern voreingestellter Sender
Wenn Sie oft einen bestimmten Radiosender hören, ist es
praktisch, die Frequenz zu speichern, um en Sender später
immer dann einfach aufrufen zu können, wenn Sie ihn hören
möchten.
1
Drücken Sie, während Sie ein Signal von dem
Sender erhalten, den Sie speichern möchten,
die Taste TOOLS.
Die Voreinstellungsnummer blinkt.
2
Drücken Sie PRESET +/– (VSX-824/VSX-529)
bzw. PRESET
/l
(VSX-424/VSX-329), wählen
Sie den gewünschten voreingestellten Sender
und drücken Sie dann ENTER.
Die Voreinstellung stoppt das Blinken, und der Receiver
speichert den Sender.
Abrufen von Festsendern
Damit Sie dies tun können, müssen zunächst einige Sender
voreingestellt worden sein.
Drücken Sie PRESET +/– (VSX-824/VSX-529)
bzw. PRESET
/l
(VSX-424/VSX-329) und
wählen Sie den gewünschten voreingestellten
Sender.
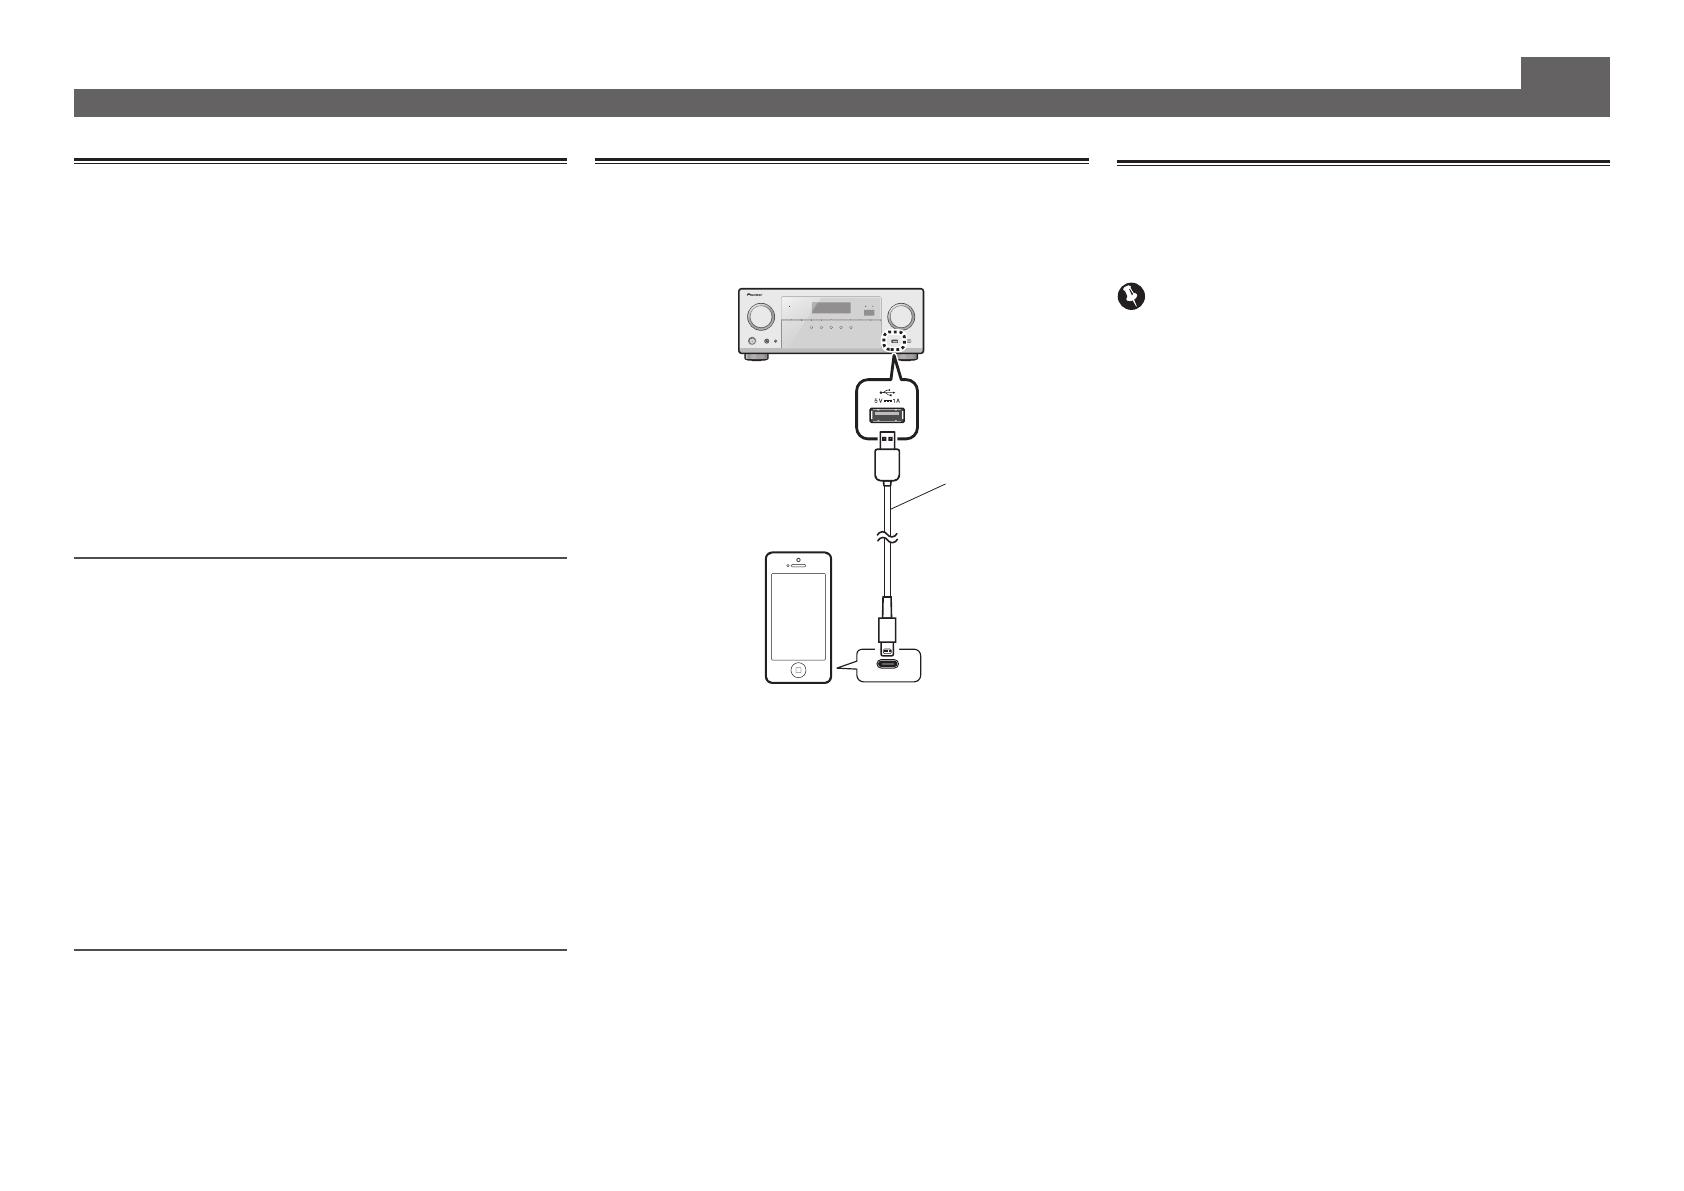
Abspielen eines iPod
Der Vorgang des Hochfahrens nach dem Einschalten
beansprucht ca. eine Minute.
1
Schließen Sie Ihr iPod an.
2
Drücken Sie iPod USB (VSX-824/VSX-529) bzw.
iPod/USB (VSX-424/VSX-329) und wählen Sie
den Eingang iPod/USB.
Wenn das Display die Namen von Verzeichnissen und
Dateien anzeigt, sind Sie bereit für die Wiedergabe von
Musik vom iPod.
3
Mit
/
können Sie eine Kategorie
auswählen. Drücken Sie anschließend ENTER,
um diese Kategorie zu durchsuchen.
• Durch Drücken von
RETURN
können Sie jederzeit zur
vorherigen Ebene zurückzukehren.
4
Mit
/
können Sie die ausgewählte
Kategorie durchsuchen (z. B. Alben).
• Drücken Sie
/l
, um auf die vorherige/nächste Ebene
zu gehen.
5
Fahren Sie mit dem Durchsuchen fort, bis Sie
die gewünschte Musik gefunden haben, und
drücken Sie zum Wiedergeben die Taste
.
USB-Kabel, das mit
dem iPod mitgeliefert
wird.
iPod/iPhone
Internet-Radiosender hören
Nur VSX-824/VSX-529
Der Vorgang des Hochfahrens nach dem Einschalten
beansprucht ca. eine Minute.
Wichtig
Bei Verwendung eines Breitband- Internetanschlusses
ist ein Vertrag mit einem Internetanbieter erforderlich.
Wenden Sie sich zu Einzelheiten an Ihren nächsten
Internetanbieter.
Zum Hören von Internet-Radiosendern ist Highspeed-
Broadband-Internetzugang erforderlich. Mit einem 56-K-
oder ISDN-Modem können Sie möglcherweise die Vorteile
von Internet-Radio nicht voll nutzen.
Dienste von Drittanbietern können eine High-Speed-
Internet- Verbindung sowieIhre Registrierung voraussetzen
und ggfs. Gebühren nach sich ziehen. Dienste von
Drittanbietern können ohneInkenntnissetzung verändert,
ausgesetzt, gestört oder beendet werden. Pioneer schließt
jede Haftung in Verbindung mit solchen Ereignissen
aus. Pioneer gibt keine Gewähr auf die Dauer der
Aufrechterhaltung der Dienstleistungen von Drittanbietern
und weist jede Art von Garantie hierauf von sich.
1
Drücken Sie wiederholt NET, um den
NETRADIO-Eingang zu wählen.
Es kann einige Sekunden dauern, bevor dieser Receiver
auf das Netzwerk zugreift.
2
Verwenden Sie
/
, um den Bildschirm mit
der Liste der Internet-Radiosender, die Sie
editieren möchten, zu wählen, und drücken
Sie dann ENTER.
7
English
Français
Italiano
Español
Nederlands
Deutsch
Grundlegende Wiedergabe (Fortsetzung)
Um sich an vielen Funktionen der
Einheit in vollstem Maße zu erfreuen
Legen Sie die CD-ROM in Ihren Computer ein und laden
Sie die Bedienungsanleitung (PDF) vom Menü-Bildschirm
aus herunter und lesen Sie sie.
Funktionen
Abspielen mit einem USB-Gerät
l
Seite 25 (VSX-424/VSX-329), Seite 29 (VSX-824/VSX-529)
Musik-Wiedergabe mit der drahtlosen Bluetooth-
Technologie
l
Seite 31 (nur VSX-824)
Bluetooth ADAPTER zum kabellosen Musikgenuss
l
Seite 33 (nur VSX-529)
Wiedergabe mit NETWORK-Funktionen
l
Seite 41 (nur VSX-824/VSX-529)
Einstellen der Audio-Optionen
l
Seite 31 (VSX-424/VSX-329), Seite 39 (VSX-824/VSX-529)
Verwendung des Home-Menüs
l
Seite 33 (VSX-424/VSX-329), Seite 52 (VSX-824/VSX-529)
Fehlersuche
l
Seite 37 (VSX-424/VSX-329), Seite 58 (VSX-824/VSX-529)
Hinweis
Nur VSX-824/VSX-529: Diese Einheit unterstützt AirPlay. Zu
Einzelheiten siehe Seite 41 der Bedienungsanleitung und
die Apple-Website (http://www.apple.com).
Nur VSX-824/VSX-529: Die Software dieser Einheit kann
aktualisiert werden (Seite 46 der Bedienungsanleitung).
Bei Mac OS kann sie mit Safari aktualisiert werden (Seite
47 der Bedienungsanleitung).
© 2014 PIONEER HOME ELECTRONICS CORPORATION.
Alle Rechte vorbehalten.
2
Collegamento
Collegamento degli altoparlanti
Il ricevitore funziona anche con due soli altoparlanti stereo (gli altoparlanti anteriori dello
schema); si consiglia tuttavia di utilizzare almeno tre altoparlanti. Una configurazione completa
risulta ottimale per il suono surround.
Per ottenere il miglior suono surround possibile, installare gli altoparlanti come segue.
Sistema surround a 5.1 canali:
Dopo aver installato gli altoparlanti, connetterli come mostrato qui sotto.
LINE LEVEL
INPUT
L
– Anteriore sinistro
C
– Centrale
R
– Anteriore destro
SL
– Surround sinistro
SR
– Surround destro
SW
– Subwoofer
Connettere i cavi degli altoparlanti
Assicurarsi di collegare gli altoparlanti
di destra al terminale di destra (
R
) e
l’altoparlante di sinistra al terminale
di sinistra (
L
). Inoltre, assicurarsi che i
terminali positivo e negativo (
+/–
) del
ricevitore corrispondano a quelli degli
altoparlanti.
ATTENZIONE
Prima di effettuare o modificare i
collegamenti, spegnere l’alimentazione
e scollegare il cavo di alimentazione
dalla presa CA.
I terminali degli altoparlanti sono
sotto tensione, la stessa
PERICOLOSA
tensione della corrente di rete. Per
prevenire rischi di folgorazioni nel corso
delle operazioni di collegamento o di
distacco dei cavi degli altoparlanti,
staccare il cavo di alimentazione
principale prima di toccare qualsiasi
parte non isolata.
1
Attorcigliare i trefoli esposti.
2
Allentare il terminale e inserire il lo
esposto.
3
Serrare il terminale.
12 3
10 mm
Connettere i terminali degli altoparlanti centrali
e surround del VSX-424/VSX-329 come mostrato
qui di seguito:
1
Attorcigliare i trefoli esposti.
2
Premere le linguette per aprirle e inserire
la parte scoperta del cavo.
3
Rilasciare le linguette.
12 3
10 mm
R
SL
L
SW
C
SR
Subwoofer
(
SW
)
Anteriore destro
(
R
)
Surround destro
(
SR
)
Surround sinistro
(
SL
)
Anteriore sinistro
(
L
)
Centrale (
C
)
VSX-824
Il tipo di terminali degli altoparlanti centrali e surround del VSX-424/VSX-329 è diverso da questo
diagramma.
Si possono usare gli altoparlanti con una normale impedenza di 6
W
e 16
W
.
Italiano
  • Page 1 1
  • Page 2 2
  • Page 3 3
  • Page 4 4
  • Page 5 5
  • Page 6 6
  • Page 7 7
  • Page 8 8
  • Page 9 9
  • Page 10 10
  • Page 11 11
  • Page 12 12
  • Page 13 13
  • Page 14 14
  • Page 15 15
  • Page 16 16
  • Page 17 17
  • Page 18 18
  • Page 19 19
  • Page 20 20
  • Page 21 21
  • Page 22 22
  • Page 23 23
  • Page 24 24
  • Page 25 25
  • Page 26 26
  • Page 27 27
  • Page 28 28
  • Page 29 29
  • Page 30 30
  • Page 31 31
  • Page 32 32
  • Page 33 33
  • Page 34 34
  • Page 35 35
  • Page 36 36
  • Page 37 37
  • Page 38 38
  • Page 39 39
  • Page 40 40
  • Page 41 41
  • Page 42 42
  • Page 43 43
  • Page 44 44
  • Page 45 45
  • Page 46 46
  • Page 47 47
  • Page 48 48

Pioneer VSX-529 Manuel utilisateur

Taper
Manuel utilisateur
Ce manuel convient également à