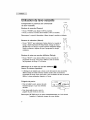
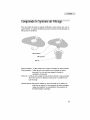
Haier Esd200 Manuel utilisateur
- Catégorie
- Lave-vaisselle
- Taper
- Manuel utilisateur

Haier
• • • • •
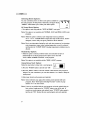
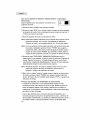
What The World Comes Home To _'
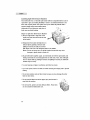
Built°in Dishwasher
©
UserManudo
Model#
GuidedeI'UdlisateuroMode_e
Manualdd Usuarioo Modelo#

IMPORTANTSAFETYINSTRUCTIONS
Warning - To reduce the risk of fire, electric shock, or injury
to persons when using your appliance, follow basic
precautions, including the following:
1. Read all instructions before using the appliance.
2. Use this appliance only for its intended purpose as described in this use and
care guide.
3. Use only automatic dishwashing detergent and rinse agent recommended for
use in this appliance and keep them out of the reach of children because they
are corrosive and can be harmful.
4.
5.
6.
7.
8.
This appliance must be properly installed in accordance with the installation
instructions before it is used.
Never unplug your appliance by pulling on the power cord. Always grasp the
plug firmly and pull straight out from the outlet.
Replace immediately worn power cords, looseplugs/power outlets.
Unplug your appliance before cleaning or before making any repairs.
Do not open the dishwasher door immediately after completionof wash process
or during the operation as hot air/steam may cause personal injury. Pressthe
door latch, wait few seconds by allowing cold air to go in and then open the
door.
9. Do not operate your appliance in the presence of explosive fumes.
10. Do not add or mix any flammable or explosive substances to the wash.
11. Appliance loading door must be closed during the operation of the machine.
12. Do not operate your appliance when parts are missing or broken.
13. Do not use this appliance for commercial dishwashing purpose.
14. Do not operate this appliance unless all enclosure panels are properly in place.
15. Do not tamper with controls.
16. To reduce risk of injury do not allow children to play in or on the appliance.
Close supervision of children is necessary when the appliance is used
near children.
17. This appliance mustbe connectedto proper electrical outletwith the correct
electricalsupply.
18. Proper grounding mustbe ensured to reduce the risk of shock and fire. DO
NOT CUT OR REMOVE THE GROUNDING PLUG. If you do not have a
three-prong electric receptacleoutletin the wall, have a certified electrician
installthe proper receptacle. The wall receptacleMUST be properly grounded.

19. Hydrogen gas may be produced if the water heater has not been used in more
then 2 weeks. This could be explosive and can explode under certain
circumstances. If this is the case, turn on all the hot faucets and let the hot water
run for a few minutes before using this appliance. This will let the trapped
hydrogen escape. To avoid an accident, as hydrogen gas is flammable and can
explode, do not turn on an electric appliance, smoke, light a match/lighter or
use a flame.
20. Do not repair or replace any part of the appliance or attempt any servicing
unless specifically recommended in the user-repair instructions that you
understand and have skills to carry out.
21. To reduce the risk of electric shock or fire, do not use extension cords or
adapters to connect the unit to electrical power source.
22. Do not wash any heat sensitive or any other items that are not designed for
automatic dishwasher. Items not dishwasher safe could become deformed or melt
and create a potential fire hazard.
23. Do not use this dishwasher outdoors.
24. Do not leave the dishwasher door open to dry dishware while children are
around the counter top. Close supervision and observation needed when
children are around the dishwasher.
25. Do not abuse, sit on or stand on the door or dish rack of the dishwasher.
26. Do not touch the heating element during or immediately after use, as it may be
very hot.
27. Load sharp objects such as knives and forks upside down to reduce the risk of
cut type injuries.
28. Do not wash plastic items unless they are marked dishwasher safe. Check the
manufacturer's recommendations for items not marked.
29. Do not load sharp items near the door; you could damage the door seal.
30. When removing an old dishwasher from service or discarding it, remove the
front door.
31. Disconnect electrical power and water inlet hose to dishwasher before servicing.
SAVETHESEINSTRUCTIONS

PAGE
SAFETY INSTRUCTIONS .................................................................... 1-2
Knowing Your Dishwasher ............................................................ 4-6
Using Your Dishwasher ................................................................ 7-20
Understanding The Filtration System ............................................ 21
Dishwasher Safe or Hand Wash .............................................. 22-24
Care & Cleaning Of Your Dishwasher ............................................ 25
Troubleshooting ............................................................................ 26-29
Warranty .............................................................................................. 30
Thank you for purchasing our Haier
product. This easy-to-use manual will
guide you in getting the best use of
your dishwasher,
Remember to record the model and
serial number, They are labeled on
the back of the dishwasher,
Model number
Serial number
Date of purchase
Staple your receipt to your manual. You will need it to obtain
warranty service.
All figures in this use & care manual are for illustration purposes only. The
illustrated parts shown in figures may be different on the actual unit.
Specifications and features are subject to change without prior notice.

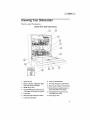
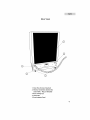
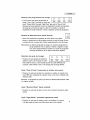
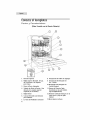
Parts and Features
(Front View with Open Door)
®
1. Upper Sprayer
2. Deluxe 2 Position Adjustable Upper
Rack with Stemware Holders
3. Middle Spray Arm
4. Pressure Relief Valves (One located
at the upper left corner) (not shown)
5. Lower Rack
6. Removable Split Silverware Basket
7. Convection Fan Intake
8. Rinse Aid Compartment
9. Pre-Wash Detergent Compartment
10. Main Wash Detergent Compartment
11. Triple Filtration System (Located at
the bottom under Lower Rack)
12. Heating Element (Located at rear
and under lower rack)
13. Lower Spray Arm

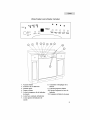
(Front View with Door Closed)
_.,_ • • •
oom
Haler
• • • •
0 0 0 0 0
\
@
@
1. Power Button
2. Power Indicator Light
3. Select Button
4. Delay Button
5. High-Temp Wash Indicator Light
6. Heated Dry Indicator Light
5
7. Upper Wash Indicator Light
8. Time Delay Display
9. Wash Programs Button
lO.Wash Programs IndicatorLights
11 .Start/Pause Button

iiiiiiiiiiiiiiiiiiiiiiiiiiiiiiiiiiiiiiiiiiiiiiiiiiiiiii_!_i_!!!!i_i!
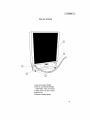
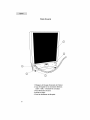
(Rear View)
G
1. Drain Hose (Factory Attached)
2. Electrical Connection Junction Box
(120v/60Hz - Plug not Included)
3. Rear leveling legs
4. Water Inlet
5. Rear Insulation Panel

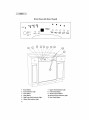
Understanding the Dishwasher Control Panel:
Power Button:
• Press "POWER" button"In" to turn the power "ON".
• Pressthis buttonagain to turn the power "OFF".
Note: Youwill see the "Power On Indicator Light" lit when the unit ison.
Select Button:
• Press"SELECT"buttonto selectyour desired option: Hi-Temp
Wash, Heated Dry or Upper Wash. Selected option(s) indicator
light(s)will be blinking at the startof the wash program.
SF2_?T
Delay Button:
• Press"DELAY" button if you want to delay the starting time for a
wash program. You can delay the starting time for a wash
program from 1-9 hours.
DELAY
Time Delay Display (LCD): i
• The timer display which islocated next to the delay buttonshowsthe number of
hours the starting timefor a wash program is delayed. Once the delay timer is
set, the settime will start blinking in the LCD.
Door Latch: ...., --+"e'_ . + " " ° •
Note: DO NOT open the dishwasherdoor right away because the moisthot air
stillmay be presentinside the tub and causeharm.
• Tolockthe door, pushthe door with light
force untilyou hear the "Click."
• Tounlockthe door, squeeze the door latch
and pull towards you.
Wash Program Buttons: I 0 0 0 0
• There are four wash programs thatyou can I POT__ IP+C_'_L LIGHT I_.IP_E_
FJO,_ W.O,_H _h.o,;_H HGWLZ_
selectfrom: Pots& Pans, Normal Wash, Light
Wash, and Rinse& Hold. Simply presswash program button based on the load
and soiltype. Theselectedwash program indicator light will be blinking at the
start of the wash program.
7

Start/Pause Button:
• After selecting your desired wash program and its option, press
this button once to start the wash process. Pressing this button
once more during the wash process will "Pause" the activity.
Note: At the start of the wash program, the selected wash program and option(s)
indicator light(s) will start blinking. When the wash process is paused, the
selected wash program and option(s) indicator light(s) will remain
unblinking.
Selecting Wash Program:
• Select the appropriate program based on the load and soil level. For your
convenience, the dishwasher has Pots & Pans, Normal, Light and Rinse & Hold
wash programs that you can select from. (_ O (_ O
p_,_. i'_Ot*_'-Aj0,L LIGHT KIP_ P._
_j_f_:d W_H J_,_ H HC_LD
Pots & Pans Wash:
• This program is used for heavily soiled pots & pans, cookware, dishware, silver-
ware and glassware items with dried-on or baked-on soils.
Note: This program will not remove burned-on foods.
Normal Wash:
• This program isusedfor medium or heavily soiled dishware, glassware and
silverware.
Light Wash:
• This program is used for lightly soiled glassware, chinaware, pre-rinsed dishes
and silverware.
Rinse & Hold:
• This program isusedfor rinsing partial loads that will be washed later.
Note: DO NOT usedetergent with thisprogram.

Selecting Wash Options:
For your convenience, there are three wash options available for
the wash programs: Hi-Temp Wash, Heated Dry and Upper Wash.
"SELECT" button allows you to select your desire options.
Hi-Temp Wash Option:
• Thisoptionisusedonly withthe"POTS & PANS" washcycle.
N."rl_,,IP _ lUP,_
Q g
©
Note: Thisoption is not available with "NORMAL, LIGHTand RINSE& HOLD wash
programs.
Note: When thisoption is selected,water temperature boostsup between
161 °F - 167°F. "HI-TEMP WASH" temperature helpsto kill bacteria, dissolve
detergents,remove stickyand greasy substancesoff the dishware.
Note: Due to any interruption during the wash and rinse program or low incoming
water temperature, proper water heating temperature can not be achieved
and thereforethe "HI-TEMP WASH" (heating temperature) conditionsmay be
affected.
Heated Dry Option:
• When this option isselected,both the heater and convectionfan turn on
automatically for fast drying purposes.This option can be usedwith
"POTS & PANS, NORMAL and LIGHT"wash programs.
Note: Thisoption is not available with the "RINSE & HOLD" program.
Using Delay Start Option:
Followthestepsbelowto delaystarta washprogram.
1) Pressthe "POWER" buttonto turn the unit "ON".
O
2) Pressthe "DELAY" buttonto selectthe amount of time thatthe wash program is
delayed. Foryour convenience,you can selectbetween 1 to 9 hours to delay the
wash process.
3) Select your desired wash program and option(s).
Note: Some restrictionsmay apply when selectingwash option(s)with wash
programs. Read "Wash Option Selecting Procedure"sectionon page
numbers10-11 for more details.
Note: If you are not satisfiedwith the wash program and wash option(s) thatyou
have selected,simply pressthe "POWER" buttonto turn off the unit. To
reselectnew wash program and option(s),press"POWER" buttonagain to
turnthe unit "ON". Reselectthe new wash program and wash option(s).

4) Press the "START/PAUSE" button to start the timer. At this time, all the selected:
Wash Program, Wash Option(s) and Delay Time Display with selected "Hours"
lights will blink. The wash process will begin automatically after an hourly delay
countdown.
Note: At the end of the wash program the machine will beep for few times to
indicate that the wash process has been completed. All the lights except for
the power indicator light will turn off
5) Remove all washed items and reload if you would like to start a new wash process
or press the "POWER" button to turn the unit "OFF" at the end of wash process.
Once the unit is in the "OFF" position, the power indicator light shuts off.
Understanding the Convection Fan Dry Process:
• The convectionfan activates automatically after each wash program to start the
drying cycle. During the drying processthe fan removeshot moist air to
condensationchamber. The condensedhotmoist air coolsdown ito form water and
isexhaustedthrough the drainpipe.
• With this type of exhaust design in your dishwasher, there is no need to worry
about your cabinets getting damaged, unlike other conventional dishwashers with a
front vent opening to exhaust hot moist air which may easily spread around the
cabinets and cause damage.
Upper Wash Option:
Thisoption can be usedwith ALL wash programs.
Note: You can select this option when you want to wash small load of dishware
and glassware. You must load items in the "UPPER RACK ONLY." The lower
rack must be completely empty when using this option. During the wash
process, the water flow from the upper sprayer is concentrated only on the
wash load in the upper rack.
Note: You must use "ONE HALF" the amount of detergent that you would normally
use for full a load. This option saves detergent, water and energy. Follow the
steps below to select the wash option for each program.
WASH OPTION SELECTING PROCEDURE
Pots & Pan Wash
Selected Wash Option(s) Type
Hi-Temp Wash
Heated Dry
Upper Wash
Hi-TempWash & Heated Dry
Hi-Temp Wash & Upper Wash
Heated Dry & Upper Wash
Hi-Temp Wash, Heated Dry & Upper Wash
Procedure
PressSELECTbutton 1 time
PressSELECTbutton2 times
PressSELECTbutton3 times
PressSELECTbutton4 times
PressSELECTbutton 5 times
PressSELECTbutton6 times
PressSELECTbutton7 times
10

iiiiiiiiiiiiiiiiiiiiiiiiiiiiiiiiiiiiiiiiiiiiiiiiiiiiiii ! ! ! ! IIIIIIIIIIIIIIII iiiiiiiiili
Normal Wash
Selected wash Option(s) Type
Heated dry
Upper Wash
Heated Dry & Upper Wash
Procedure
PressSELECTbutton 1 time
PressSELECTbutton2 times
PressSELECTbutton3 times
Note: Hi-TempWash option is not available under Normal Wash.
Liqht Wash
Selected Wash Option(s) Type
Heated Dry
Upper Wash
Heated Dry & Upper Wash
Procedure
Press SELECT button 1 time
Press SELECT button 2 times
Press SELECT button 3 times
Note: Hi-TempWash option isnot available under LightWash.
Rinse & Hold
Selected Wash Option(s) Type
Upper Wash
Procedure
Press SELECT button 1 Time
Note: Hi-Temp Wash & Heated Dry options are not available under Rinse & Hold.
Check List for Wash Process:
1) Make sure all items are loaded in the racks and silverware basket properly.
Note: Do not load tall dishware or cookware items near the middle spray arm
because it may block the spray arm from rotating.
2) Pour the proper detergent into the detergent dispenser.
Note: If rinse aid compartment is empty, add "Rinse Aid" agent at this time.
3) Close the door and latch properly.
4) Turn on the power button.
5) Select your desired wash program and option(s) based on the load and soil type.
6) Press the "START/PAUSE" button once to start the wash process. Press this button
once again if you want to "Pause" the activity during the wash process in order
to add or remove items.
Note: Selected wash program and option(s) blinking light(s) will indicate that the
wash process has begun and is running. When paused, the selected wash
program and option(s) light(s) will be still. This indicates that wash
process is paused.
11

iiiiiiiiiiiiiiiiiiiiiiiiiiiiiiiiiiiiiiiiiiiiiiiiiiii iii! ! !i !i !i !i !i !i !i !i !i !i !i !i !i !i !i !i !i !i !i !i !i !i !i !
7) At the end of the wash program, the machine will beep a few limes to indicate
thal the wash process has finished. Simply shut off the unit by pressing the
"POWER" button.
Note: DO NOT open the dishwasher door immediately because the moist hot
air remaining inside the tub may cause harm.
Warning: Keep children away from the machine when the door is
left to dry the dishware because the moist hot air is
exiting out of the door may cause harm.
Canceling or Resetting Wash Cycle
Note: The dishwasher will automatically release detergent within a few minutes
after the start of the wash program. To avoid the "release of detergent"
before you cancel or reset the wash program, you must press the
"START/PAUSE" button right away.
• Once you have reset to a new wash cycle, you must refill the detergent
compartment if it is open and empty because the detergent from previous wash
cycle may have already been released.
Follow the steps below to cancel or reset a wash program:
1) Press "START/PAUSE" button to pause the wash program.
2) Turn "OFF" the dishwasher power by pressing the "POWER" button to cancel the
program.
3) Turn the dishwasher back "ON" again by pressing the "POWER" button.
4) Reset by reselecling the porper wash program.
5) Reselecl the proper wash option(s) with the selected wash program.
6) Press the "START/PAUSE" button to begin the wash process.
12

Pausing aWash Program:
Ifyou need to pause in the middle of the cycleto add or remove any items,follow
the stepsbelow:
1) Pressthe "START/PAUSE" buttonto pause the wash process during the program.
When the wash processispaused, the selected wash program and option(s)
indicator light(s)will stay still.
2) Open the door by squeezing the door latch slowly.
Note: DO NOT open the door until the water spray action has stopped. Be
careful of moist hot air that may rise out of the dishwasher.
3) Add or remove items. Once you are finished adding or removing, simply close
the door properly.
4) Press "START/PAUSE" to resume the program. You will notice that the power
indicator display light turns on.
Understanding The Open Door Protection:
Your dishwasherwill stop and beep automatically if the door is opened during the
operation. The dishwasherwill not start and the beep will not shut off untilthe door
is closedagain. Once the door is closed,the program will resumeautomatically.
Warning: The dishwasher door must be closed at all times during
the operation.
13

Preparing to wash dishes:
Forbestresults,practicethefollowing
before you put dishware in the dishwasher:
• Discard big chunksof food from the plate
before loading.
• Remove sticky foods and loosen
burned-on foods before loading.
• Empty liquids such as Juice, soup, soda,
coffee or tea from glasses and cups
before loading.
• Rinse off acid based liquid, such as vinegar or lemon juice right a way. This may
cause discoloration over time to your plates, food containers or internal cabinet.
• Always check manufacturer's recommendations before you start washing items.
Tips to avoid stains and films:
The following suggestions are recommended to prevent stains and films
from dishware and utensils items:
• You must rinse all dishware, silverware, glassware and food containers right a
way after use. Some citric based food products, coffee, tea and iron deposits in
water can cause yellow or brown film on inside surface when left on for a long
time and not rinsed immediately.
• You must check your water hardness to see whether you need to use more or less
detergent to wash. If water is extremely hard then it may be causing stains on
items. You may need to use water softener.
• Do not over load the dishwasher.
• Avoid improper loading.
• Make sure there is a proper water temperature that is recommended to
wash dishware.
• Do not use too little detergent.
• Do not use old or damp powder detergent.
• Do not load aluminum utensils improperly. Aluminum utensils can cause gray or
black marks to porcelain utensils if touching during wash cycle.
14

Loading the Lower & Upper Rack:
Toget maximum cleaning results,follow the
recommendationsbelow before you start
the dishwasher:
Note: Do not wash any heat sensitive or any other
itemsthat are not designed for automatic
dishwashers.
(upper rack)
• Keepall tall dishware and food containers away from the spray arm rotation.
• Place food containers such as cups, glasses, bowls, saucepans and casserole
dishes with soiled surface facing in the downward position.
• Toavoid any type of damage to glassware suchas
coffee/tea cups, beverage, wine and champagne
glasses,do not load them on the bottom rack. Place
theseitemson the upper rack.
(lower rack)
• Putcupsupside down on the top of the
cup/stemware rack and put wine or
champagne glassesupside down between the divided segmentsof the
cup/stemware rack to securethem properly.
• Do not load dishware or food containersthat are made of wood or iron. These
itemsare notconsidereddishwasher safe.(See chart on p.22 for details.)
• Do not jam the glassware items together when loading.
• Place delicate items on the upper rack.
• Do not load tall dishware or cookware items near the middle spray arm.
• Move racks slowly in and out to avoid slamming the dishware items together.
• Make sure all dishware and glassware items are securely in place when loading
to avoid falling over or striking against each other.
15

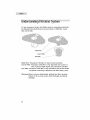
AdJustable Upper Rack System:
The upper rack hastwo positions, which allows you to modify the rack system
according to your current spaceneeds. The flexibility of the upper rack is ideal for
washing tall dishware and glassware items.
For Example: AdJusting the Rack to the Lower Position:
Allows you the flexibility to load taller wine or champagne glasses in the upper
rack. Simply remove the rack and bring it to the lower position.
For Example: AdJusting the Rack to Upper Position:
Allows you the flexibility to load tall dishes on the lower rack.
Steps to Remove the Rack
1) Open both sidesof the rail guards from the upper rack.
2) Slide the rack out.
3) Placethe rack to your desiredposition.
4) Close both sidesof the rail guards so rack will not slideout.
16

Loading Split Silverware Basket:
Yourdishwasherhasaremovablesplitbasketwithtwocompartmentsthatcanbe
separatedtogiveyou loading flexibility in order to accommodate flatware and
lower rack capacity needs. Thisoption savesspace when only half the unit is
needed. Simply remove the basketfrom the
dishwasher to load silverware and place it
back once you finish loading.
Steps to Split the Silverware Basket
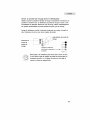
1) Put your right hand in right side of the
basket and your lefthand in the left side .,_,,,,,,,,,_
of the basket. "-' 1_
2) Simply slidethe basketwith light force to
unlock/split by pushing it forward and
pulling ittowards you until you see that
both hookscome out of the elongated holesin the middle.
Note: Do not useheavy force to splitthe basket becausethis may cause
damage to plastichooks to break off.
3) To put both halvestogether again, use both hands to level the split basketsand
sliding each hook intoeach elongated hole on both sides. Now, slide with light
force to attach/lock by pushingit forward and pulling it towards you until both
basketssnaps in easily.
• To avoid any typeof injury, load knivesand forks face down.
• Tryto mix spoons,knivesand forks for better cleaning and drying and to prevent
nesting.
• Do not mix stainless steel and silver itemsbecauseyou may damage the silver
finish on silver items.
Do not load tall itemsnext tothe upper spray arm because it
may block the rotation.
Do not load tin, pewter and non-dishware filters. Theseitems
are not considereddishwasher safe.
17

iiiiiiiiiiiiiiiiiiiiiiiiiiiiiiiiiiiiiiiiiiiiiiiiiiiiUi ii !i!i!i!i!i!i!i!i!i!i!i!i!i!i!i!i!i!i!i!i!i!i!!;i !
Proper Use of Detergent:
• The amount of detergentto usedepends on the type of water in your living area
whether it is hard or softand whether itemsare lightly or heavily soiled.
• Water softness or hardness is measured in grains content per gallon (gpg). You
can find out the gpg level by calling your local Environmental Protection Agency
(EPA) in your county.
• If you find that the gpg level ishigher in the water, thenthe water will be harder
in your living area. You will need more detergentto clean. If gpg level islower,
then the water will be softer in your living area so you will need less
detergentto clean.
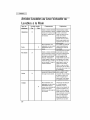
See the following table to understand the "water hardnesstype" and gpg level.
Water HardnessType
Hard
Medium
Soft
,qP,q
lO+
4-9
0-3
Note: If gpg level isover 12, then water isvery hard. You may need water
softener to improve the water quality and the performance of
your dishwashing.
Note:
The quality of the detergentwill make a big difference in the cleaning of
dishes.Detergent that isdamp or too old will not be as effectivetoclean
becausethe activeingredients will be phased off. Detergentwill not work
properly.
Note:
Useonly "Automatic Dishwasher Detergent" for your
dishwasher. Other typesof detergentsthat are not for dishwasher usemay
causeoversudsingand foaming. Do not usedetergentsthat are dried, caked
or moist.Thesetypes of detergentswill not dissolveproperly and and will
cleaneffectively.
18

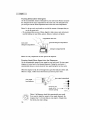
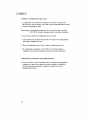
Pouring DishwasherDetergent:
Usetherecommendedamountofdetergentfor your wash loads. Measure and pour
the detergent intothe large compartmentfor the main wash. The detergent for the
pre-wash goes into the smallcompartmentnext to the main wash compartment.
Note: For the pre-wash you should use one-half the amount of detergent that you
use for the main wash.
• We recommend that you use a Rinse Agent to help remove spots and prevent
new film build-up on your dishes, glasses, flatware, cookware and plastic.
compartmentdoor lever
rewash detergent compartment
detergentcompartmentlid
Note: Use only a liquid form of rinse agent in the dispenser.
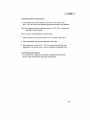
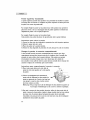
Pouring Liquid Rinse Agent into the Dispenser:
Usethe recommended amountof rinse agent for your wash loads. The rinse agent
dispenserislocated nexttothe detergent dispenser. During the wash cycle, it
automatically releasesa preset amount of rinse agent during the lastrinse cycle.
When the dispenser is full, the see through rinse agent level indicator will be dark.
When it is empty, it will be clear which means you need to pour in more.
19
rinse agent
level indicator
rinse agent compartment
Full O
3/4 Full O
(at this time you 1/2 Full
should refill to "_ 1/4 Full_
eliminate spotting) Empty O
Note: A full dispenser should last approximately one month.
If you want to adjust the amount of rinse agent dispensed, the
dispenser has 1 to 6 levels that you can adjust to. Simply rotate
the dial to your desire settings.
La page charge ...
La page charge ...
La page charge ...
La page charge ...
La page charge ...
La page charge ...
La page charge ...
La page charge ...
La page charge ...
La page charge ...
La page charge ...
La page charge ...
La page charge ...
La page charge ...
La page charge ...
La page charge ...
La page charge ...
La page charge ...
La page charge ...
La page charge ...
La page charge ...
La page charge ...
La page charge ...
La page charge ...
La page charge ...
La page charge ...
La page charge ...
La page charge ...
La page charge ...
La page charge ...
La page charge ...
La page charge ...
La page charge ...
La page charge ...
La page charge ...
La page charge ...
La page charge ...
La page charge ...
La page charge ...
La page charge ...
La page charge ...
La page charge ...
La page charge ...
La page charge ...
La page charge ...
La page charge ...
La page charge ...
La page charge ...
La page charge ...
La page charge ...
La page charge ...
La page charge ...
La page charge ...
La page charge ...
La page charge ...
La page charge ...
La page charge ...
La page charge ...
La page charge ...
La page charge ...
La page charge ...
La page charge ...
La page charge ...
La page charge ...
La page charge ...
La page charge ...
La page charge ...
La page charge ...
La page charge ...
La page charge ...
La page charge ...
La page charge ...
La page charge ...
La page charge ...
La page charge ...
La page charge ...
La page charge ...
La page charge ...
La page charge ...
-
 1
1
-
 2
2
-
 3
3
-
 4
4
-
 5
5
-
 6
6
-
 7
7
-
 8
8
-
 9
9
-
 10
10
-
 11
11
-
 12
12
-
 13
13
-
 14
14
-
 15
15
-
 16
16
-
 17
17
-
 18
18
-
 19
19
-
 20
20
-
 21
21
-
 22
22
-
 23
23
-
 24
24
-
 25
25
-
 26
26
-
 27
27
-
 28
28
-
 29
29
-
 30
30
-
 31
31
-
 32
32
-
 33
33
-
 34
34
-
 35
35
-
 36
36
-
 37
37
-
 38
38
-
 39
39
-
 40
40
-
 41
41
-
 42
42
-
 43
43
-
 44
44
-
 45
45
-
 46
46
-
 47
47
-
 48
48
-
 49
49
-
 50
50
-
 51
51
-
 52
52
-
 53
53
-
 54
54
-
 55
55
-
 56
56
-
 57
57
-
 58
58
-
 59
59
-
 60
60
-
 61
61
-
 62
62
-
 63
63
-
 64
64
-
 65
65
-
 66
66
-
 67
67
-
 68
68
-
 69
69
-
 70
70
-
 71
71
-
 72
72
-
 73
73
-
 74
74
-
 75
75
-
 76
76
-
 77
77
-
 78
78
-
 79
79
-
 80
80
-
 81
81
-
 82
82
-
 83
83
-
 84
84
-
 85
85
-
 86
86
-
 87
87
-
 88
88
-
 89
89
-
 90
90
-
 91
91
-
 92
92
-
 93
93
-
 94
94
-
 95
95
-
 96
96
-
 97
97
-
 98
98
-
 99
99


Haier Esd200 Manuel utilisateur
- Catégorie
- Lave-vaisselle
- Taper
- Manuel utilisateur
dans d''autres langues
- English: Haier Esd200 User manual
- español: Haier Esd200 Manual de usuario
Documents connexes
-
Haier ESD100 Manuel utilisateur
-
-
-
-
-
-
-
-
-