Jenn-Air JED8130ADB16 Manuel utilisateur
- Catégorie
- Barbecues
- Taper
- Manuel utilisateur

JENN-AIR ELECTRICDOWNDRAFT
JED8130, JED8230, JED8345
COOKTOP
,-_ABLE OF CONTENTS
important Safety instructions ................................................1-2
Ducting information ......................................................................2
Using Your Cooktop .................................................................3-8
Care & Cleaning .............................................................................9
Accessories & Cartridges .........................................................10
Before You Call for Service ......................................................10
Warranty ..........................................................................................11
Guide de I'utilisateur ..................................................................12
Gufa del Usuario ..........................................................................24
JENN-AIR
Form No. A/01/08 Part No. 8111P529-60
@2006 Maytag Appliances Sales Co. All rights reserved.
Litho U.S.A.

PORTANT
NSTRUCTIONS
Installer: Please leavethis manual
with this appliance.
Consumer: Please read and keep
this manual for future reference.
Keep sales receipt and/or can-
celled check as proof of purchase.
Model Number
Serial Number
Date of Purchase
If you have questions, caB:
Jenn-Air Customer Assistance
1-800-JENNAIR(1-800-536-6247)
1-800-688-2080 ( U.S.TTY for
hearing or speech impaired)
(Mon.-Fri., 8 am-8 pm Eastern
Time)
Internet: http://www.jen nair.com
For service information, see
page I I.
Read and follow all instructions
before using this appliance to prevent
the potential risk of fire, electric shock,
personal injury or damage to the appliance
as a result of improper usage of the
appliance. Use appliance only for its
intended purpose as described in this
guide.
To ensure proper and safe
operation: Appliance must be properly
installed and grounded by a qualified
technician.
Turn off appliance and ventilating hood to
avoid spreading the flame. Extinguish
flame then turn on hood to remove smoke
and odor.
• Smother fire or flame in a pan with a lid
or cookie sheet.
NEVER pick up or move a flaming pan.
Do not usewater on grease fires. Use
baking soda, a dry chemical or foam-type
extinguisher to smother fire or flame.
If appliance is installed near a window,
precautions should be taken to prevent
curtains from blowing over surface
elements.
NEVER use appliance to warm or heat
the room. Failure to follow this instruction
can lead to possible burns, injury, fire, or
damage to the appliance.
NEVER wear loose-fitting or hanging
garments while using the appliance.
Clothing could catch utensil handles or
ignite and cause burns if garment comes
in contact with hot heating elements.
To ensure proper operation and to avoid
damage to the appliance or possible
injury, do not adjust, service, repair or
replace any part of the appliance unless
specifically recommended in this guide.
Refer all other servicing to a qualified
technician.
NEVER store or use gasoline or other
combustible or flammable materials near
i
surface units or in the vicinity of this
appliance as fumes could create a fire
hazard or an explosion.
To prevent grease fires, do not let cooking
grease or other flammable materials
accumulate in or near the appliance.
Use only dry potholders. Moist or damp
potholders on hot surfaces may result in a
steam burn. Do not let potholders touch
hot heating elements. Do not use a towel
or other bulky cloth which could easily
touch hot heating elements and ignite.
Always turn off all controls when cooking
iscompleted.
This appliance has been tested for safe
performance using conventional cookware.
Do not use any devices or accessories that
are not specifically recommended in this
manual. Do not use eyelid covers or stove
top grills. The use of devices or accesso-
ries that are not expressly recommended
in this manual can create serious safety
hazards, result in performance problems,
and reduce the life of the components of
this appliance.
NEVER use aluminum foil or foil contain-
ers on the cooktop. These may become
very hot. Use foil only as directed in this
guide.
Aerosol-type cans are EXPLOSIVEwhen
exposed to heat and may be highly
flammable. Do not use or store near
appliance.
Clean only parts listed in this guide and
use procedures recommended.
NEVER leave surface units unattended
especially when using high heat. An
unattended boilover could cause smoking
and a greasy spillover can cause a fire.
This appliance is equipped with different
size surface elements. Select pans with flat
bottoms large enough to cover element.
Fitting pan size to element will improve
cooking efficiency.
If pan is smaller than element, a portion of
the element will be exposed to direct
contact and could ignite clothing or
potholder.

Onlycertaintypesofglass,glass/ceramic,
ceramic,earthenware,orotherglazed
utensilsaresuitableforcooktopservice
withoutbreakingduetothesudden
changeintemperature.Followutensil
manufacturer'sinstructionswhenusing
glass.
Turnpanhandletowardcenterofcooktop,
notoutintotheroomoroveranother
surfaceelement.Thisreducestheriskof
burns,ignitionofflammablematerials,or
spillageifpanisaccidentlybumpedor
reachedbysmallchildren.
Makesuredripbowls(selectmodels)are
inplace.Absenceofthesebowlsduring
cookingmaysubjectwiringorcomponents
underneathtodamage.
Protectiveliners- Donotusealuminumfoil
tolinesurfaceunitdripbowls.Improper
installationoftheselinersmayresultina
riskofelectricshockorfire.
towelisusedonahotcookingarea,be
carefultoavoidsteamburn.
DEEPFAT FRYERS
Use extreme caution when moving the
grease pan or disposing of hot grease.
Allow grease to cool before attempting to
move pan.
HEATING ELEMENTS
NEVER touch surface elements or
areas near elements.
Heating elements may be hot even though
they are dark in color. Areas near surface
elements may become hot enough to
cause burns.
During and after use,do not touch or let
clothing or other flammable materials
contact heating elements or areas near
elements until they have had sufficient
time to cool.
NEVER cook on broken cooktop. If cooktop
should break, cleaning solutions and
spillovers may penetrate the broken
cooktop and create a risk of electric shock.
Contact a qualified technician immediately.
Clean cooktop with caution. Some cleaners
can produce noxious fumes if applied to a
hot surface. If a wet sponge, cloth, or paper
THESE
Do not soak removeable heating elements.
Heating elements should never be im-
mersed in water.
Other potentially hot surfaces include:
Cooktop and areas facing the cooktop.
CHmLD SAFETY
NEVER leave children alone or unsuper-
vised in area where appliance is in use or
is still hot.
NSTRUOTJONS FOR
NEVER allow children to sit or stand on
any part of the appliance as they could
be injured or burned.
CAUTION: NEVER store items of interest
to children in cabinets above an appli-
ance or on backguard of a cooktop.
Children climbing on appliance to reach
items could damage the appliance or be
burned or seriously injured.
Children must be taught that the appli-
ance and utensils in or on it can be hot.
Let hot utensils cool in a safe place, out
of reach of small children. Children
should be taught that an appliance is not
a toy. Children should not be allowed to
play with controls or other parts of the
unit.
JM PORTANT SAFETY
NOTICE AND WARNING
IMPORTANT NOTICE
REGARDING PET BIRDS: Never keep
pet birds in the kitchen or in rooms
where the fumes from the kitchen could
reach. Birds have a very sensitive respira-
tory system. Fumes released during an
oven self-cleaning cycle may be harmful
or fatal to birds. Fumes released due to
overheated cooking oil, fat, margarine
and overheated non-stick cookware may
be equally harmful.
RE REFERENCE
l
CTING NFORMATION
]
Jenn-Air's ventilation system is designed
to capture both cooking fumes and smoke
from the cooktop surface. If the system
does not, these are some ducting installa-
tion situations to check:
* 6" diameter round or3 1/J'x 10"
rectangular ducting should be used for
duct lengths 10'-60'. Note: 5"
diameter round ducting may be
used if the duct length is 10' or
less.
* No more than three 90° elbows should
be used. Distance between elbows
should be at least 18".
Recommended Jenn-Air wall cap
MUSTbe used. Make sure damper
moves freely when ventilation system is
operating.
* There should be a minimum clearance
of 6" for cooktop installed near a side
wall.
2
If there is not an obvious improper
installation, there may be a concealed
problem such as a pinched joint, obstruc-
tion in the pipe, etc. Installation isthe
responsibility of the installer ,_o_;_,,:_,
and questions should be
addressed first by the
installer. The installer
should very carefully check
the ducting installation
instructions.
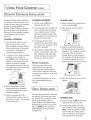
• Use the Flow Tester Card
.......... .......
,_,,.................. ,........

R
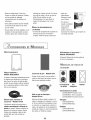
ISURFACE CONTROLS
Use to turn on the surface elements. An
infinite choice of heat settings is
available from Lo to Hi. The knobs can
be set on or between any of the set-
tings.
SETTING THE
1. Place pan on surface element.
2. Push in and turn the knob in either
direction to the desired heat setting.
3. After cooking, turn knob to OFF.
Remove pan.
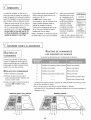
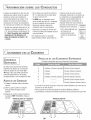
SURFACE OONTROL KNOBS
Refer to illustrations for knob placement.
A
B
C
D
E
F
Exhaust Fan& Element (left)
Exhaust Fan
Exhaust Fan
Exhaust Fan& Element (right)
Left Rear Element
Left Front Element
Right Rear Element
Right Front Element
Far Right Rear Element
Far Right Front Element
• The function of the left and center bays ofthe JED8345is the same asdescribed in
the above chart.
• There is no grilling on the right side of the JED8345 or JED8130.
• Knobs B& C control the fan only and are not required for grilling.
MODEl. JED8 i 30 & JED8230
A C
B D
MODEL JED8345
!°i
ir
A C
B D
3

SUGGESTED _T
The size,type of cookware and cooking
operation will affect the heat setting.
Hi: Use to bring liquid to a boil. Always
reduce setting to a lower heat when
liquids begin to boil or foods begin to
cook.
Meal. Hi: Use to brown meat, heat oil
for deep fat frying or sauteing. Maintain
fast boil for large amounts of liquids.
Medium: Use to maintain slow boil for
large amounts of liquids and for most
frying operations.
Meal. Lo: Use to continue cooking
covered foods or steam foods.
Lo: Use to keep foods warm and melt
chocolate and butter.
Medium
Med.Lo Med.Hi
Lo i Hi
4

[O00KTOP
R KTOP, coNY. 1
OAITII DG E
N STA LLATI 0 N 1
Cooktop cartridges, either conventional
coil, halogen or radiant element, can be
installed on either side of the downdraft
air grille on models JED8230 and
JED8345.Model JED8130will accept an
optional cartridge on the left side only.
(See page 10 for all available cartridges
and accessories, and their model
numbers.)
TO iNSTALL CARTRIDGES
=
if the grill grates, element, and/or
basin pan are in place, remove
before installing a cooktop cartridge.
Clean porcelain basin of any grease
accumulation. (See page 9 for
cleaning recommendations.:)
2. To install any of the optional cooktop
cartridges, be sure controls are
turned Off and the cartridge iscool.
Position the cartridge terminal plug
towards the terminal receptacle.
This receptacle is located at the front
of the left side and at the back of the
right side of the cooktop.
3. With the back raised, slide the
cartridge towards the receptacle
until the cartridge terminal plug is
completely engaged.
=
Lower the opposite end of the
cartridge into the cooktop until it is
flush with the surface. Your cooktop
is now ready to use.
TO REMOVE CARTRIDGES
=
=
=
=
Controls must be Off and the
cartridge should be cool.
Lift up the edge of the cartridge until
top of cartridge clears the opening
on the cooktop by about 2 inches.
_Lifting the cartridge too high while
still engaged in the receptacle could
damage the terminal plug.)
To disengage terminal, hold
cartridge by the sides and pull away
from the terminal receptacle. Lift out
when fully unplugged.
Do not stack cartridges where they
may fall or be damaged. Never store
other materials on top of the glass-
ceramic cartridges since this could
damage or scratch the surface.
HOME CANNmNQ
Canningshouldbe done on the
conventional coil cartridge only.
Canning element accessory, Model
A145A, makes it possible to use large
oversized canners with the conventional
coil cartridge.
For additional information, refer to the
user'sguide packaged with your
cartridge.
[ IILL INSTALLATION
The grill accessory consists of two black
grill grates, a grill element and a basin
pan. The grill can be installed on either
side of the downdraft air grille on
models JED8230 and JED8345.Model
JED8130will accept the grill on the left
side only. NOTE:The far right bay on
Model JED8345will accept cooktop
cartridges only.
]
TO iNSTALL GRILL
1. Before installing grill components, be
certain controls are Off.
2. Placethe basin liner pan into the
empty basin.
=
=
Position the grill element with the
terminal plug towards the terminal
receptacle. This receptacle is located
at the front of the left side of the
cooktop. Slide the element towards
the receptacle until the terminal plug
iscompletely engaged and all four
supports rest on the sides of the basin.
i!l!!!!lI
Placethe grill grates on the top of the
cooktop.
TO REMOVE GRILL
=
=
Be sure controls are Off. Remove grill
components when they are cool.
To remove grill element, pull away
from receptacle until it is unplugged.
(Nete: Lifting the element more than
2 inches above the cooktop surface
while it is engaged in the receptacle
could damage the terminal plug.)

[_S_NG THE _RmLL 1
Before the first use, wash your new
grill grates in hot soapy water, rinse
and dry. Then "season" the surface
by wiping on a thin coating of
cooking oil. Remove excess oil by
wiping with paper towel.
This procedure should be repeated
when either: a) cleaning in the
dishwasher since the detergent may
remove seasoning or b:) anytime a
sugar-based marinade (for example,
barbecue sauce) is going to be used.
Preheat the grill on Hi for 5 minutes.
Preheating improves the flavor and
appearance of meats and quickly
sears the meat to help retain the
juices.
Use nonmetallic spatulas or utensils
to prevent damagbg the nonstick grill
grate finish.
Excessiveamounts of fat should be
trimmed from meats. Only a normal
amount is necessary to produce the
smoke needed for that smoked,
"outdoor" flavor. Excessivefat can
create cleaning and flare-up prob-
lems.
Allowing excessiveamounts of grease
or drippbgs to constantly flare-up
voids the warranty on the grill grates.
Excessiveflare-ups indicate that
either the grill interior needs to be
cleaned or that excessive amounts of
fat are in the meat or the meat was
not properly trimmed.
Grease drippings will occasionally
ignite to produce harmless puffs of
flame for a second or two. This is a
normal part of the cooking process.
NEVER LEAVE GRILL
UNATTENDED DURING GRILL
OPERATION.
SHOULD EXCESSGREASE CAUSE
SUSTAINED
FLARE-UPS:
1. Turn on the fan manually.
2. Immediately turn grill controls to
Off.
3. Remove meat from grill.
iMPORTANT
Do not use aluminum foil inside
the grill area.
Do not use charcoal or wood chips
in the grill area.
Do not allow grill basin pan to
become overloaded with grease.
Clean frequently.
Do not cover grates completely
with meat. Leave air space
between each steak, etc. to allow
proper ventilation aswell as
_RmLLmNG _mPS
* Be sure to follow directions for using
the grill.
Suggested cooking times and control
settings (see page 7) are approximate
due to variations in the foods and
electrical voltage.
For best results, buy top grade meat.
Meat that is at least 3/4inch thick will
grill better than thinner cuts.
Score fat on edges of steak, but do
not cut into meat, to prevent curling
while cooking.
For the attractive "branded" look on
steaks, be sure grill is preheated.
Allow one side of meat to cook to
desired doneness, or until juices
appear on the top surface, before
turning. Turn steaks and hamburgers
just once. Manipulating food causes
loss of juices.
When basting meats or applying
sauces to foods, remember that
excessive amounts accumulate inside
your grill and do not improve the
food flavor.
Apply sauces during the last 15 to 20
minutes of cooking time unless
recipe specifies otherwise. Plus,
anytime a sugar-based marinade (for
example barbecue sauce) is going to
be used, the grates should be
"seasoned" prior to preheating. (See
Using the Grill section.)
There are many meat marinades
which will help tenderize less
expensive cuts of meat for cooking
on the grill.
Certain foods, such as poultry and
non-oily fish, may need some extra
fat. Brush with oil or melted butter
occasionally while grilling.
Use tongs with long handles or
spatulas for turning meats. Do not
use forks asthese pierce the meat,
allowing juices to be lost.
6

R
DE
KTOP, CONT°
]
Preheat grill on Hi 5 minutes, for best flavor.
Steak (1 - 11/J'):
Rare
Medium
Well
Hamburgers (3-4 oz.)
Pork Chops (1/2- 3/4")
Ham Slices (1//,)
Fully=cooked Sausages: Hot Dogs
Polish
Fresh Sausage: Links
Patties
Chicken: Boneless:
Breasts
Bone-in:
Breasts, Drum-
sticks & Thighs
Fish: Steaks (1")
Shrimp: (skewered)
Garlic Bread, Bruschetta
Hot Dog Buns, Hamburger Buns
Fruits & Vegetables: Pineapple Rings
Pepper Rings
(1//, rings)
Summer Squash
(1//, lengthwise
slices)
Hi
Hi
Hi
9
9
9
Hi
Hi
9
9
9
9
Hi
9
Hi
Hi
Hi
10to 17 minutes
19to 26 minutes
24 to 32 minutes
15to 25 minutes
30 to 40 minutes
15to 20 minutes
5 to 10 minutes
10to 20 minutes
10to 15 minutes
15to 20 minutes
25 to 35 minutes
45 to 60 minutes
20 to 30 minutes
8 to 12 minutes
2 to 4 minutes
2 to 3 minutes
8 to 10 minutes
7 to 9 minutes
8 to 12 minutes
Turn after 5 to 8 minutes.
Turn after 9 to 12 minutes.
Turn after 12to 16 minutes.
Turn after half the time.
Turn occasionally.
Turn once.
Turn occasionally.
Turn once.
Turn occasionally.
Turn occasionally.
Turn occasionally.
Turn occasionally. Brush
with marinade or glaze during
last 10 minutes.
Brush with butter. Turn after
half the time.
Turn and brush with butter or
marinade frequently.
Turn after half the time.
Turn after half the time.
Brush with oil. Turn after half
the time.
Brush with butter. Turn
occasionally.
Note: This chart is a suggested guide. Cooking times and control settings are approximate due to variations in meats, control
switches, and voltage.
7

IVENTmLATmON SYSTEM
The built-in ventilation system removes
cooking vapors, odors and smoke from
foods prepared on your cooktop and
grill.
"T°° ° teth°tllllllllJ
ventilation
system O Lo1_._
manually, :€
push the vent fan
switch located in front of the air grille.
Push to the right for high or push to
the left for low.
* The ventilation system will operate
automatically on high when the grill
element is in use.
* The fan can be used to remove strong
odors from the kitchen aswhen
chopping onions near the fan.
CARE AND CLEANING OF THE
VENTI LATION SYSTEM
* Air Grille: The air grille lifts off easily.
Wipe clean or wash in dishwasher or
sink with mild household detergents.
To prevent scratching the surface, do
not use abrasive cleaners or
scrubbing pads.
Filter: Turn off ventilation system
before removing. The filter isa
permanent type and should be
cleaned when soiled. Clean in sink
with warm water and detergent or in
dishwasher.
]
FILTER
<
iMPORTANT: DO NOT OPERATE
SYSTEMWITHOUTFILTER.Filter
should always be placed at an angle.
As you face the front of the cooktop,
the top of the filter should rest against
the left side of the vent opening. The
bottom should rest against the right
side of the vent chamber at the
bottom. CNote: if filter is fiat
against the fan wail, ventilation
effectiveness is reduced.)
Ventilation Chamber: Thisarea,
which houses the filter, should be
cleaned in the event of spills or
whenever it becomes coated with a
film of grease. It can be cleaned with
paper towel, damp cloth, or sponge
and mild household detergent or
cleanser.
OO_L ELEMENTS
(MODEL JED8130}
* When an element is turned on, itwill
cycle on and off to maintain the heat
setting.
* Coil elements are self-cleaning.
* Do not immerse in water.
TO REMOVE: When cool, raise
element. Carefully pull out and away
from receptacle.
TO REPLACE: Insert terminals on the
element into receptacle. Guide the
element into place. Gently press down
on the outer
edge of the
element until it
sits level on the
drip bowl.
TERMINALS
DRI P BowLs
The drip bowls, located under each
surface element, are designed to catch
boilovers and must always be used.
Absence of these bowls during cooking
may damage wiring or other parts
underneath the cooktop.
To prevent the risk of electric shock or
fire, never line drip bowls with alumi-
num foil.
Drip bowls will discolor (blue/gold
stains) over time, if overheated. This
discoloration is permanent. However, it
will not affect cooking performance.
TO PROTECT DRIP BOWL
FINISH:
* Avoid using high heat settings for
long periods of time.
* Do not use oversized cookware.
Pansshould not extend more
than 1-2 inches beyond the
element.
When home canning, use the
Canning Element (Model Ala5A).
To order call 1-800-JENNAIR
(1-800-536-6247}.
Clean frequently. (See cleaning
section, page 90
8

ING
CLEANmNG PROCEDURES
CONTROL KNOBS
• Removeknobsin the OFFposition by
pulling up.
• Wash,rinse anddry. Do not use
abrasive cleaning agents asthey may
scratch the finish.
• Turn on eachelement to be surethe
knobs havebeen correctly replaced.
COOKTOP-PORCELAIN ENAMEL
Porcelainenamel is glassfused on metal
and maycrack or chip with misuse. It is
acid resistant,not acid proof. All
spillovers,especiallyacidic or sugary
spillovers,should bewiped up
immediately with a dry cloth.
• When cool,wash with soapywater,
rinse and dry.
• Neverwipe off a warm or hot surface
with a damp cloth.This maycause
cracking or chipping.
• Never useoven cleaners,abrasiveor
caustic cleaning agents on exterior
finish of cooktop.
[}RIP BOWLS - CHROME
[SELECT MODELS[}
• When cool,wash after each use,rinse
and dryto prevent staining and
discoloration.
• Toclean heavysoil, soak in hot, sudsy
water,then usea mild abrasive cleaner
such as Soft Scrub* and a plastic
scouring pad. Do not useabrasive
cleaning agents.
STAI N LESS STEEL
[SELECT MODELS}
• DO NOT USEANY CLEANING
PROOUCTCONTAINING CHLORINE
BLEACH.
• ALWAYS WIPE WITH THEGRAIN
WHEN CLEANING.
• Daily Cleaning/Light Soil -- Wipe
with one of the following - soapy water,
white vinegar/water solution, Formula
409 Glassand Surface Cleaner*or a
similar glass cleaner - using a sponge or
soft cloth. Rinseand dry.To polish and
help prevent fingerprints, follow with
StainlessSteelMagic Spray (Jenn-Air
Model A912,Part No. 20000008)**.
• Moderate/Heavy Soil -- Wipewith
one of the following - Bon Ami*, Smart
Cleanser*,or Soft Scrub* - using a damp
sponge or soft cloth. Rinse and dry.
Stubborn soils may be removedwith a
dampScotch-Brite* pad; rub evenlywith
the grain. Rinseand dry. To restore luster
and remove streaks,follow with Stainless
Steel Magic Spray.
• Discoloration -- Using a damp sponge
or soft cloth, wipe with CameoStainless
Steel Cleaner*.Rinse immediately and
dry.To removestreaks and restore luster,
follow with StainlessSteel Magic Spray.
_R_LL ASSEMBLY --
BASIN AND BASIN PAN -
PORCELAIN
The basin pan and basinare located under
the grill element and/or cartridges. Clean
after each useof the grill.
• To removelight soil, clean with soapy
water or spraywith cleanserssuch as
Fantastik*or Formula409". Foreasier
cleanup: a) spray with a household
cleanser;b) cover with paper towels; c)
add small amount of hotwater to keep
the paper towels moist; d) cover and
wait 15 minutes; and e) wipe clean.
• To removemoderatesoil, scrub with Bon
Ami*, a soft scrub cleanser or plastic
scrubber.
• Basinliner pan can be cleaned in the
dishwasher.
Note: Checkthe greasedrain after each
useof the grill. To clean: Pourabout %
cup of very hot tap water mixed with 1
teaspoon dish detergent down the drain.
ELEMENT
Never immersein water. Most soil will
burn off during use. Theterminal block
may be wiped with warm soapywater.
Do not use abrasivecleaners or
materials. Dry thoroughly before
reinserting in the cooktop.
GRATES - CAST ALUMINUM
COATED WITH NON-STICK FINISH
• Washcool grates (DO NOTIMMERSE
HOTGRILLGRATESIN WATER)with
detergent in hot water in the sink or
wash them in the dishwasher. Besure to
remove all food residuebefore cooking
on the grill grates again.
• Removestubborn soils with a plastic
mesh puff or pad. Useonly those
cleaning products which state they are
recommendedfor usewhen cleaning
nonstick surfaces.
• If grateswere washed in the dishwasher,
seasonwith oil prior to grilling.
• Do not use metal brushes or abrasive
scouring padsor other scrubbers
intended to clean outdoor charcoal grills.
Thesewill removethe finish aswell as
scratch the grates. Do not clean in self-
cleaning ovenor use ovencleanerson
the grates.
GREASE [}RAIN .JAR
• A drain jar is located below the grill basin
pan under the countertop. Check
periodically to preventspillovers. Unscrew
to remove.
• Ifjar is broken,replacewith any heat
tempered jar, such asa canning jar,
hasa standard
screw neck.
* Brand names for cleaning products are registered trademarks of the respective manufacturers.
**To order direct, call 1-800-JENNAIR(1-800-536-6247).
9

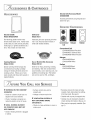
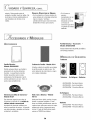
, CCESSOR! ES
&
DGES
ACCESSORIES
Electric Griddle
Model JEA82OOADX
Self-draining griddle makes many
favorite foods easier to fix. Family-sized
surface lets you cook several pancakes,
hamburgers, or grilled sandwiches at a
time. Has a black non-stick finish.
Canning Element
Model A145A
Special canning element plugs into
conventional coil cooktop cartridge
raising the heating element above the
cooking surface. Allows use of over-
sized utensils and those with warped or
rippled bottoms.
Grill Cover
IVlodelA341
Attractive grill cover protects grill when
not in use. Textured steel in black or
white with molded handles.
Gas or Electric Wok Accessory
IVlodel A0142
Ideal for stir frying, steaming, braising,
and stewing. Wok has nonstick finish,
wood handles, cover, steaming rack, rice
paddles and cooking tips. Flat bottom
wok can be used on ALL cartridges.
Electric GriBAccessory IVlodel
JEA8000ADB
Includes grill element,two grill grates and
basin liner pan.
OOOKTOP OARTRm DGES
Conventional Halogen
Coil
Radiant
Conventional CoB
JEA7000ADB-Black Porcelain
JEAT000ADS- Stainless Steel
JEAT000ADW-White Porcelain
Halogen
JEA8130ADB-Black
JEA8130ADW-White
Radiant
JEA8120ADB-Black
JEA8120ADW-White
[
EFOREYOU
JF NOTHING ON THE COOKTOP
OPERATES:
• Check for a blown circuit fuse or a
tripped main circuit breaker.
• Check if cooktop is properly con-
nected to electric circuit in house.
JF GRILL HEATING ELEMENT
OR COOKTOP DOES NOT GET
HOT ENOUGH:
* Check if heating element is plugged
in solidly.
FOR CE
• Surface controls may not be
properly set.
• Voltage to house may be low.
JFVENTiLATiON SYSTEM iS
NOT CAPTURING SMOKE
EFFiCiENTLY:
* Check on cross ventilation in room or
make up air.
* Excessiveamount of smoke is being
created; check instructions for grilling,
trimming meats. (See pg. 6.)
* Outside wall cap may be trapped shut.
* Cooktop may be improperly installed;
check ducting information. (See pg. 2.)
* Filter may be improperly installed. (See
pg. 8.)
10

JENN-AIR COOKING APPLIANCEWARRANTY
LIM ITED WARRANTY
For one year from the date of purchase, when this major appliance is operated and maintained according to instructions attached to or
furnished with the product, Jenn-Air brand of Whirlpool Corporation or Whirlpool Canada LP (hereafter "Jenn-Air") will pay for factory
specified parts and repair labor to correct defects in materials or workmanship. Service must be provided by a Jenn-Air designated
service company. This limited warranty is valid only in the United States or Canada and applies only when the major appliance is used
in the country in which it was purchased. Outside the 50 United States and Canada, this limited warranty does not apply. Proof of
original purchase date is required to obtain service under this limited warranty.
SECOND THROUGH FIFTH YEAR LIMITED WARRANTY ON CERTAIN COMPONENT PARTS
In the second through fifth years from the date of purchase, when this appliance is operated and maintained according to instructions
attached to or furnished with the product, Jenn-Air will pay for factory specified parts for the following components (if applicable to the
product) if defective in materials or workmanship:
• Electric element • Electronic controls
• Touch Pad and microprocessor
• Glass ceramic cooktop: if due to thermal breakage
• Magnetron tube
• Sealed gas burners
ITEMS EXCLUDED FROM WARRANTY
This limited warranty does not cover:
1. Service calls to correct the installation of your major appliance, to instruct you on how to use your major appliance, to replace or
repair house fuses, or to correct house wiring or plumbing.
2. Service calls to repair or replace appliance light bulbs, air filters or water filters. Consumable parts are excluded from warranty
coverage.
3. Repairs when your major appliance is used for other than normal, single-family household use or when it is used in a manner that is
contrary to published user or operator instructions and/or installation instructions.
4. Damage resulting from accident, alteration, misuse, abuse, fire, flood, acts of God, improper installation, installation not in
accordance with electrical or plumbing codes, or use of consumables or cleaning products not approved by Jenn-Air.
5. Cosmetic damage, including scratches, dents, chips or other damage to the finish of your major appliance, unless such damage
results from defects in materials or workmanship and is reported to Jenn-Air within 30 days from the date of purchase.
6. Any food loss due to refrigerator or freezer product failures.
7. Costs associated with the removal from your home of your major appliance for repairs. This major appliance is designed to be
repaired in the home and only in-home service is covered by this warranty.
8. Repairs to parts or systems resulting from unauthorized modifications made to the appliance.
9. Expenses for travel and transportation for product service if your major appliance is located in a remote area where service by an
authorized Jenn-Air servicer is not available.
10. The removal and reinstallation of your major appliance if it is installed in an inaccessible location or is not installed in accordance
with published installation instructions.
11. Major appliances with original model/serial numbers that have been removed, altered or cannot be easily determined. This warranty
is void if the factory applied serial number has been altered or removed from your major appliance.
The cost of repair or replacement under these excluded circumstances shall be borne by the customer.
DISCLAIMER OF IMPLIED WARRANTIES; LIMITATION OF REMEDIES
CUSTOMER'S SOLE AND EXCLUSIVE REMEDY UNDER THIS LIMITED WARRANTY SHALL BE PRODUCT REPAIR AS PROVIDED
HEREIN. IMPLIED WARRANTIES, INCLUDING WARRANTIES OF MERCHANTABILITY OR FITNESS FOR A PARTICULAR PURPOSE,
ARE LIMITED TO ONE YEAR OR THE SHORTEST PERIOD ALLOWED BY LAW. JENN-AIR SHALL NOT BE LIABLE FOR INCIDENTAL
OR CONSEQUENTIAL DAMAGES. SOME STATES AND PROVINCES DO NOT ALLOW THE EXCLUSION OR LIMITATION OF
INCIDENTAL OR CONSEQUENTIAL DAMAGES, OR LIMITATIONS ON THE DURATION OF IMPLIED WARRANTIES OF
MERCHANTABILITY OR FITNESS, SO THESE EXCLUSIONS OR LIMITATIONS MAY NOT APPLY TO YOU. THIS WARRANTY GIVES
YOU SPECIFIC LEGAL RIGHTS, AND YOU MAY ALSO HAVE OTHER RIGHTS WHICH VARY FROM STATE TO STATE OR PROVINCE
TO PROVINCE.
If outside the 50 United States and Canada, contact your authorized Jenn-Air dealer to determine if another warranty applies.
If you need service, first see the "Troubleshooting" section of the Use & Care Guide. After checking "Troubleshooting," you may find
additional help by checking the "Assistance or Service" section or by calling Jenn-Air. In the U.S.A., call 1-800-688-1100. In Canada,
call 1-800-807-6777. 9/07

A
,F
TABLE DE CUISSON ELECTRIQUE
J
EVACUATIONDES ENN-AIR
JED8130, JED8230, JED8345
_ABLE DES MAT|ERES
instructionsde s6curit6 importantes.............................13-14
Conduits ..........................................................................................15
Cuisson sur la surface ........................................................15-20
Entretien et Nettoyage ........................................................21-22
Accessoires et modules ............................................................22
Avant de contacter un r@arateur .........................................23
Garantie ...........................................................................................25
Gu[a del Usuario ..........................................................................26
JENN-AIR

DE
SECUR
Installateur: Remettrece manuelau
proprietaire.
Consommateur: Lire le manuel; le
conserverpour consultation
ulterieure.Conserverla facture
d'achat oulecheque encaisse
commepreuvede I'achat.
Numero de module
Numero de serie
Date d'achat
Pourroute question, contacter:
Service-client Jenn-Air
1-800-JENNAIR (1-800-536-6247)
(Lundi - vendredi, 8 h - 20 h --
heure de I'Est)
Site Internet: http://
www.jennair.com
Pour le service apres=vente,
voir page 25.
Life routes los instructionsavant d'utiliser
cotappareil; observertoutes lesinstructions
pour eliminerlesrisquesd'incendie,choc
electrique,dommagesmaterielset corporels
que pourraitsusciterune utilisationincorrecte
de I'appareil.UtiliserI'appareiluniquement
pour lesfonctionsprevues,decritesdunsce
guide.
Pourune utilisation adequate et en
s_curit_, il faut que I'appareilsoit
convenablementinstallepar untechnicien
qualifi& et relic_ laterre.
EN CAS D_NCENDIE
Interrompreralimentationelectriquede
I'appareiletde la hottede ventilationpour
minimiserle risqued'extensiondesflammes.
l_teindrelesflammes,puis mettrela hotteen
marchepourevacuerlafumee et I'airvicie.
• Utiliserun couvercleou une plaque
biscuitspour etoufferlesflammesd'unfeu
qui sedeclaredansun ustensilede cuisson.
• NEJAMAIS saisirou d@lacerun ustensile
de cuissonenflamm&
Nepusprojeterde I'eausur un feu de
graisse.Utiliserdu bicarbonatedesodium,ou
un extincteur8 mousseou_ produitchimique
sec pour eteindrelesflammes.
_NSTRUCT_ONS _ENERALES
Si I'appareilestinstalleprosd'unefenetre,
veiller_ ceque lesrideauxne puissent
atteindrela surfacede cuissonsousI'effet
d'un courantd'air.
NEJAMAIS utiliser la cuisinierepour
chaufferla piece.Le non-respectde cette
instructionpeutetrela causede blessures,
brOlures,incendieou deteriorationde
I'appareil.
NEJAMAIS porterdesvetementsamples
Iorsde I'utilisationdeI'appareil.Unvetement
trop amplepeutaccrocherla poigneed'un
ustensileou s'enflammeret provoquerdes
brQluress'iltouche un elementchauffant.
Pourgarantirun fonctionnementadequatet
poureviterdesdommagesmaterielsou
corporels,n'executeraucuneoperationde
reglage,reparationou remplacementde
piecede I'appareilqui n'estpas
specifiquementrecommandeedansceguide.
13
Confiertoute autreintervention_untechnicien
qualifie.
NEJAMAIS remiserou utiliserde I'essenceou
un autre produitcombustibleou inflammable
proximitede la cuisiniere,carlesvapeursemises
peuventsusciter un risqued'incendieou
d'explosion.
Pourempecherqu'un feu degraissesedeclare,
evitertoute accumulationde graisseou autres
matieresinflammablesdansI'appareilouau
voisinage.
Utiliseruniquementdesmaniquesseches.
L'applicationd'une maniquehumidesur une
surfacechaudepeut provoquerI'emissionde
vapeurbrQlante.Ne paslaisserlesmaniques
toucher leselementschauffantschauds.Nepas
utiliser uneservietteou un autretextile
volumineuxqui pourraitfacilements'enflammer
au contact d'un elementchauffant.
Ramenerchaquebouton de commandea la
positiond'arretapresI'achevementd'une
cuisson.
La securitede fonctionnementde cet appareila
etetestee_ I'aided'ustensilesde cuisson
conventionnels.Ne pusutiliserun ustensileou
accessoirequi n'estpasspecifiquement
recommandedansce manuel.Ne pasutiliserde
couvre-element,gril placesur la surfacede
cuissonou systemede convectionadditionnel.
L'utilisationd'un dispositifou accessoirequi
n'estpasexpressementrecommandedansce
manuelpeutdegraderla securitede I'appareil
ou saperformance,ou reduirela Iongevitedes
composants.
NF JAMAIS utiliserde feuilled'aluminiumou
descontenantsen aluminiumsur latable de
cuisson.IIspeuventdevenirtres chauds.Utiliser
seulementde lafeuille d'aluminiumcommeil est
indique dunsce guide.
Lesflaconsd'aerosolpeuventEXPLOSER
Iorsqu'onlosexpose_ lachaleur,et ilspeuvent
contenir un produittres inflammable.I_viter
d'utiliserou re-miser un flacond'aerosol
proximitede I'appareil.
Nettoyerseulementlespiecesindiqueesdunsce
guide et observerlesmethodesrecommandees.
SURFACE DE CU_SSON
NEJAMAIS laisserun elementde lasurfacede
cuissonallumesanssurveillance,particulierement

avecchauffage61ev&Ledebordementdu
contenudeI'ustensilepourraitprovoquerla
generationderum@abondanteet
I'inflammationdelagraisse.
Cetappareilcomportedeselements
chauffantsdedifferentestailles.Utiliser
toujoursunustensile_fondplat,detaille
suffisantepourqu'ilpuisserecouvrir
completement[element.Pouroptimiser
I'efficacit&choisirunustensiledememetaille
que[element.
Siunustensileestpluspetitque[element
utilis&unepattiede[elementchauffantest
exposeeetpeutprovoquerI'inflammationd'un
vetementoudesmaniques.
Seulscertainsmateriauxdeverre,
vitroceramique,ceramique,gr_s,oucertains
ustensilesvitrifies/emaillespeuvent6tre
utilisessurlasurfacedecuissonoudansle
foursansrisquedebrissousI'effetduchoc
thermique.Observerlesinstructionsdu
lubricantIorsdeI'utilisationd'unustensilede
verre.
Orienterlapoigneedechaqueustensilevers
lecentredelasurfacedecuissonetnonpas
versI'exterieurouversunautreelement;ceci
re@iralerisquedebrOlure,inflammationde
matiereinflammableourenversement(un
jeuneenfantpourraitsaisiretrenverserun
ustensiledontlemancheestorientevers
I'exterieur).
S'assurerqueloscuvettes(certainsmodeles)
depropret6sontbienenplacesurles
surfacesdecuisson_elementsclassiques.
L'absencedecescuvettespendantlacuisson
pourraitendommagerlec_blageetlespieces
setrouvantendessous.
NEJAMAISutiliserdefeuilled'aluminium
pourgarnirloscuvettesdepropreteoula
cavit6dugril.L'installationdecerevetement
poutentrainerdesdecharges61ectriquesou
risquesdefeu.
SURFACE O£ OUISSON EN
NEJAMAIS utiliserune surfacede cuisson
casseeou felee:lessolutionsde nettoyageet
renversementspeuventpenetrerdansla
surfacede cuissonen entrainantun risquede
choc 61ectrique.Prendreimmediatement
contact avecun technicienqualifie.
Nettoyerprudemmentla surfacede cuisson.
Certainsproduitsdonnentdesfum@s nocives
s'ilssont appliquessur unesurfacechaude.Si
I'onutiliseun linge,une@onge humideou
du papieressuie-toutsur une surfacede
cuissonchaude,fairepreuvede prudenceafin
d'eviterde sebrQlerpar lavapeur.
Exercerune prudence extreme Iors du
d@lacement du recipient de graisse ou Iors
de I'elimination de graisse chaude. Laisser
la graisse refroidir avant de d@lacer
I'ustensile.
ELEM ENTS CHAUFFANTS
NEJAMAIS toucher los 616meats
chauffantsdufour ou de la surface de
cuisson,ni los surfaces voisinesdes
616meritsou los surfacesint6rieures
du four.
Unelementchauffantpout6treencorechaud
memeIorsquesateinte est sombre.Unezone
voisined'un elementchauffant,_I'interieurdu
four ou sur lasurfacede cuisson,peut6tre
suffisammentchaudepour provoquerune
br_lure.
Pendantet apresI'utilisation,nejamais
toucher un elementchauffantou laisserun
vetementou autremateriauinflammablevenir
au contact d'un elementou d'unesurface
voisine,ou d'unesurfaceinternedu four,
avantque le refroidissementcompletait puse
produire.
Nepastremper leselementschauffants
amovibles.Leselementschauffantsne
doiventjamais6treimmergesdunsI'eau.
Autres zonespotentiellementchaudes:surface
de cuisson,zonesvoisinesde lasurfacede
cuisson,eventdu four,surfacesprochesde
I'ouverturede[event,portedu four, surfaces
voisinesde la porteet du hublot.
SECURITE POUR LES ENFANTS
NEJAMAIS laisserdesenfantssoulsou sans
supervisionIorsquerappareilest en serviceou
chaud.
NEJAMAIS laisserun enfants'asseoirou se
tenir sur une partiequelconquede I'appareil.II
pourraitseblesserou se brOler.
MISE ENGARDE:NEJAMAIS remisersur le
dosseretd'une cuisiniereou dansunearmoire
au-dessusdesarticlesauxquelslesenfants
peuvents'interesser.Unenfanttentant de
grimpersurI'appareil,sur la porteou sur le
tiroir pour atteindreun objet,pourrait
endommagerI'appareilou subir de graves
brQluresou autresblessures.
II estimportantd'enseignerauxenfantsque la
cuisiniereet lesustensilesplacesdessusou
dedanspeuvent6trechauds.Laisserrefroidir
lesustensilesen un lieusOr,horsd'atteintedes
enfants.II est importantd'enseigneraux
enfantsqu'un appareilmenagern'est pasun
jouet, etqu'ils ne doiventtoucher aucune
commandeou autrecomposantde I'appareil.
AVERT_SSEMENT ET AVIS
IMPORTANT POUR LA
SECUR TE
AVIS IMPORTANT =OISEAUXFAMILIERS:
Lesoiseauxont un syst_merespiratoiretres
sensible. Nepasgarderun oiseaufamilier
dansla cuisineou dansune pieceoOil pourrait
6treexposeauxfumees. Lesfumees6mises
durantune operationd'autonettoyagepeuvent
6tredangereusesou mortellespour un oiseau,
de memeque lesfumees6misesIorsdu
chauffageexcessifde graisse,huile,margarine,
par exempledansun ustensile8 garnissage
anti-adhesion.
SERVERCES NSTRUOTIONS POUR
CONSULTATIONULTERIEURE
14

@NDUITS
Lesyst_medeventilationdeJenn-Airest
con% pourcapterlesvapeursdecuissonet la
fumees'echappantdelasurfacede latablede
cuisson.Si rinstallationn'a pasere prevuepour
cetteventilation,verifierleselementssuivants:
• Utiliserun conduit rondde 15,2cm (6po) de
dia-metreou rectangulairede 8,3x 25,4cm
(3-1/4x 10po) pour desIongueursde
conduit de3 b 18m (10b 60pi). Remarque:
Onpeut utiliser un comduit rend de 12,7
cm (5 po) dediam_tresi laIongueur du
conduit est infdrieure _ 3 m (10 pi).
• Ne pasutiliserplusdetrois coudesb 90°.La
distanceentreces coudesdoitetred'au
moins46cm (18po).
• On DOlT utiliserun eventmural
recommandeparJenn-Air.S'assurerque le
clapetsed@lacelibrementIorsquele
systemedeventilationfonctionne.
• II doity avoirundegagementminimumde
15cm (6po) pour unetablede cuisson
installeepresd'un tourlateral.
Memesi rinstallationne semblepaspresenter
de ddaut evident,il peuty avoirun probleme
cachecommejoint ecras&
obstructiondansletuyau,
etc.L'installationestbla
chargede I'installateuret
lesdifferentsproblemes
doiventetred'abord
presentesb cedernier.
L'installateurdoitverifier
tressoigneusementles
instructionsd'installation
desconduits.
FLOW TESTER
t
Th_senao_te_er_obe
positioned ove_ air Irtlake.
..-%;:;;,;.;;.;:&..
• Utiliserla carteci-dessousfournieavec
I'appareilpourverifierlacirculationde I'air.
[(-;;U SSON SUR LA SURFACE
OUTONS DE
CO ANDE
S'utilisentpour allumer leselementsde
surface.Le reglage est continu entre les
positionsextremes Lo (min.) et Hi (max.).
II est possiblede regler un bouton _ toute
position entre ces deuxextremes.
RE@LAG£ DES COW.ANDES
1. PlacerI'ustensilesur I'element.
2. Enfonceret faire tourner le bouton
jusqu'b la position desiree (rotation dans
un sensou dansI'autre).
3. Apres une cuisson,ramener le bouton
la position OFF(d'ARRI_]-).Retirer
I'ustensile.
HOD#LE$ JEDS| 30 ET JED8?.30
_OUTONS DE COW.ANDES
DES ELEMENTS DE SURFACE
SereporterauxillustrationspourI'emplacementdesboutons.
A Ventilateurd'@acuationetelement(gauche) l_lementar@regauche
B Ventilateurd'@acuation Elementavantgauche
C Ventilateurd'@acuation Elementar@redroit
D Ventilateurd'@acuationet_l_ment(droit) Elementavantdroit
E EI6mentar@reb I'extremedroite
.... F"........................ Elementavani_ I'ex{r_medroite "
• Lafonction dessections centrale et gauchedu modeleJED8345est la meme que celle
decrite dansle tableau ci-dessus.
• IIn'y a pasde gril sur le cete droit du mo@leJED8345ou JED8130.
• Lesboutons Bet Ccommandent le ventilateur seulementet ne sont pasnecessaires
I'utilisation dugril.
HODELE JED8345
A C
B D
A C
B D
E
F
15

SUGGESTmONSPOUR
LE REGLAG£
On doit choisir la puissancede chauffage
en fonction de diversfacteurs:taille,type
de I'ustensile,et operation decuisson.
Hi (max.): Pour I'ebullition d'un liquide.
On doit toujours reduire la puissancede
chauffage desque la temperature
d'ebullition est atteinte ou pour la cuisson
du mets.
Med. Hi (moyen max.): Pour rissoler les
viandes,chauffer I'huile (grande friture ou
alimentssautes)et pour le maintien de
I'ebullition rapided'une grande quantite
de liquide.
Meal. (moyen): Pourle maintien de
I'ebullition lented'une grandequantite de
liquide ou pour la plupart desoperations
de friture.
Med. Lo (meyen rain.): Pourcontinuer la
cuissonde metsen casserolesfermees
par couvercleou pour cuire b la vapeur.
Lo (mira): Pourfusion de chocolat ou
beurre,ou le maintien de la temperature
d'un mets.
Moyen
Moyen _ Moyen
Min. " . Max.
Minl i Max.
16

I I ;UISSON SUR LA SURFAC£o SUITE ]
IINSTALLATION DU MODULE
Lesmodulesdetable de cuisson,qu'ils
soient conventionnelsen spirale,aux
halogenesou radiants,peuvent6treinstalles
sur n'importequel cotede lagrille
d'evacuationdescendantedesmodeles
JED8230etJED8345,Le modeleJED8130
accepteun modulefacultatif surle cote
gaucheseulement.07oirpage22 pourtous
lesaccessoiresetmodulesdisponibleset
leursnumerosde modeled
iNSTALLATiONDESMODULES:
1. Si lesgrillesdu gril,1'elementet/ou le bac
de recuperationsont en place,lesenlever
avantd'installerun modulepourtable de
cuisson,Nettoyerla cavit66mailleede
toute accumulationde graisse(Voirpage
21 lesrecommandationsde nettoyage).
2. PourinstallerI'undesmodulesen option,
s'assurerquelescommandessont
I'arretet quelemoduleestfroid. Placerla
fiche du modulevers la prise.Cetteprise
estsitueeb ravant du cote gaucheet
I'arrieredu cotedroit de la cuisiniere.
....
!lfllllllli
i
3, La partiearriereetantsoulevee,ooulisser
le moduleversla prisejusqu'_ oeque la
fiche du modulesoit parfaitement
engagee.
4. Baisserle c0t6opposedu moduledans la
pattiesuperieurede la cuisinierejusqu'_
cequ'il soitdeniveauavecla surface.La
cuisiniereest maintenantprete_ I'emploi.
ENLI:VEMENTDES MODULES:
1. Lescommandesdoiventetre_ I'arretet le
moduledoltetrefroid.
2. Souleverle bord du modulejusqu'bce
que la pattiesuperieuresortede
I'ouverturedelacuisiniered'environ5cm
(2 po).(SiI'on soulevetrop hautle
modulealorsqu'il estencoreengage
.
,
dansla prise,celapourraitendommager
la fiche.)
Pourdegagerla prise,tenir le module
desdeuxcoteset letirer de la prise.Le
sortir Iorsqu'ilestcompletement
debranch6.
Ne pasempilerlesmodulesIbo_ ils
pourraienttomber ou etre endommages.
Nejamais rangerd'autresarticlesau-
dessusdesmodulesenvitroceramique,
ceci pourraitendommagerou rayerla
surface.
La preparationde conservesdolt etrefaite
seulementsur un moduleb elements
classiquesen spirale.L'elementpour
marmitesde conserves,modeleA145A,
permetI'utilisationde grandsrecipients
avecle module_ elementsclassiquesen
spirale.
Pourobtenirdesrenseignements
suppbmentaires,sereporterau manuel
d'utilisationfoumiaveclemodule.
IINSTALLATIONOUGRIL
Legril consisteen deuxgrillesnoires,un
elementde gril et un bac. Legril peutetre
install6sur n'importequel descotesde la
grille _ evacuationdescendantesur les
modelesJED8230etJED8345.Le modele
JED8130acceptele gril sur le cOt6gauche
seulement.REMAROUE:La baletout _fait
droitedu modeleJED8345n'accepteque
lesmodulesde tablede cuisson.
INSTALLATION DU GRIL:
1. Avant d'installerlesdifferentespiecesdu
gril,s'assurerquelescommandessont
I'arret.
2. Placerle bacde recuperationdansla
cavit6.
]
3.Placer1'elementgrilloir avecsafichevers
la prise.Cettepriseestsitueeb I'avant
gauchede lacuisiniere.Coulisser
1'elementversla prisejusqu'b ce que la
fiche soit completementengageeet que
tousles quatresupportsreposentsur les
cotesde la cavit6.
//IIIII
/iuI!mi
4. Placerlesgrillessur le dessusde latable
de cuisson.
ENLI:VEMENTDU GRIL:
,
.
S'assurerquelacommandeest surOff
(,ARRI_T'J.Retirerlesdifferentespiecesdu
gril Iorsqu'ellessontfroides.
Pourretirer1'elementgrilloir,le tirer de
la prisepour le debrancher.
(REMARO.UE:Si I'onsouleve1'element
de plusde 5 cm(2po) au-dessusdela
table de cuissonalorsqu'il estengage
dansla prise,celapourraitendommager
la fiche.)
17

I UTILISATiON #U GRIL
• Avant le premieremploi,laverlesgrilles
du nouveaugril dansde I'eausavonneuse
tres chaude,rinceretsecher.Puis,
preparerlasurfaceen appliquantune
mincecouche d'huilede cuisson.Retirer
I'excesavecdu papieressuie-tout.
• RepetercettemethodeIorsquea) les
grillessont nettoyeesdansle lave-
vaisselle,le detergentrisquantde retirer
I'huileensurfaceou b) touteslesfois
qu'unemarinade_ basedesucre (par
exemplesaucebarbecue)va 6treutilisee.
• Prechaufferle gril sur puissanceHi (Max.)
pendant5 minutes.Le prechauffage
ameliorela saveuret I'apparencedes
viandesetsaisit rapidementla viande
pour qu'elleretiennesesjus.
• Utiliserdesustensileset spatulesnon
m6talliquespourne pasendommagerle
fininonadherentdugril.
• L'exc_sdegraissedoit_treen/ev_des
viandes.Seuleune quantitenormaleest
n_cessairepour produirela fumee
donnantcettesaveurfumee,commeune
cuisson_ I'exterieur.L'excesde graisse
peutentrainerdesproblemesde
nettoyageet de formationde flammes.
• Sidesquantit4sexcessivesdegraisse
s_coulent,risquantconstammentde
s'enflammer,b garantieestannube surles
grillesdugril.
• Desflammesindiquentque I'interieurdu
gril doit 6trenettoyeou que la viandeest
particuli_rementgrasseou encoreque la
vianden'a pasetedegraisseeau
pr_alable.
• Les_coulementsde graissevont
occasionnellements'enflammeren
produisantdespetitesflammessans
dangerpour une secondeou deux.Ceci
est normal.
• NEJAMAIS LAISSERLEGRIL
SANS SURVEILLANCELORS
DESON FONCTIONNEMENT.
• SI LA GRAISSEENEXCl:S
ENTRA|NAITLA FORMATION
DEFLAMMES ENCONTINU:
1. Allumerleventilateur_ la main.
2. Tournerimmediatementlescommandes
du gril 8 Off (l'arr6t).
3. Retirerlaviandedu gril.
|MM)RTANT
• Ne pasutiliserdefeuille d'aluminium
I'interieurdu gril.
• Ne pasutiliserde charbonde boisou
copeauxde boisdansla zonedu gril.
• Ne paslaisserle bacde recuperation
du gril surchargede graisse.Le
nettoyerfrequemment.
• Ne pasrecouvrirlesgrilles
completementavecla viande.Laisser
de I'espaceentrechaquemorceaude
viandepour permettreune bonne
ventilationainsique pour eviterla
formationsoudainedeflammes.
CONSEILS DECUISSON AU GRIL
• S'assurerde suivrelesinstructions
d'utilisationdu gril.
• Lesreglageset dureesde cuisson
sugger_s(page 19)sont approximatifsen
raisondesvariationsdetension etde type
d'aliments.
Pourde meilleursresultats,acheterune
viandede qualitesuperieure.Laviande
qui a une @aisseurd'aumoins 19mm (3/
4 po)va mieuxgriller que lescoupes plus
minces.
Entaillerla graissesur lescotesd'un
steak,maissanscouperdansla viande
pour eviterque le steaknes'enroulesur
lesbordsIorsde la cuisson.
• Pourque lessteaksprennentI'empreinte
du gril,s'assurerque le gril est prechauff&
Laisserun cOtede la viandecuire
jusqu'audegr_de cuissondesire,ou
jusqu'_ce quelesjus apparaissentsurla
surfacesuperieure,avantde retournerle
steak.Retournersteakset hamburgers
seulementunelois. La manipulationde la
nourritureentrainela pertedesjus.
• Pourbadigeonnerlesviandesou
appliquerdessauces,se rappelerquedes
quantitesexcessivesde saucese
retrouvent_ I'interieurdu gril et
n'ameliorentpasla saveurde I'aliment.
• Appliquer dessaucesdurant les15_20
derni_resminutesde cuisson_ moins
d'autresindicationsdansla recette.Aussi,
touteslesfoisqu'une marinadeabasede
sucre (commesaucebarbecue)va 6tre
utilisee,lesgrillesdoivent6trepr@arees
avantle prechauffage(voirUtilisationdu
gril).
• II existede nombreusesmarinadespourla
viandequi aident_ attendrirdescoupes
moinscheresdeviande pour la cuisson
sur legril.
• Certainsalimentscommelavolailleet le
poissonnon graspeuventavoir besoin
d'un surplusdegraisse.Badigeonneravec
de I'huileou du beurrefondu detemps
autreIorsdu gril.
• Seservirdespatuleou de pinces8 long
manchepour retournerlaviande.Nepas
seservirde fourchettesqui percentla
viandeet entrainentla pertedesjus.
|8

DE CUJSSON AU GRIL
Prechaufferle gril surreglageHi (Max.)pendant5 minutespour
obtenir la meilleuresavour.
Steak (2,5 _ 3 cm) (1_ 1-1/4po):
Saignant Hi (Max.)
/_point Hi (Max.)
Biencult Hi (Max.)
Hamburgers 85g b 115g (3b 4 oz) 9
CStelettes de pore (15b 20 mm) (1/2b 3/4 po) 9
Tranehes de jambon (15mm) (1/2po) Hi (Max.)
Saueisses enti6rement euites:
HotDogs Hi (Max.)
Saucissepolonaise Hi (Max.)
Saueisse fraiehe: Saucissesen chapeletet plates 9
Pealer: D_soss_:
Poitrines 9
Avecos:
Poitrines,pilons 9
etcuisses
Poisson: Dames(2,5cm) (1po) 9
Crevettes: (on brochette) 9
Pain _ I'ail, brusehetta, pains_ hot dog, Hi(Max.)
pains_ hamburger 9
Fruitset legumes: Tranches d'ananas Hi (Max.)
Tranches de poivron Hi (Max.)
(15 mm) (1/2 po)
Courge d'6t6 Hi (Max.)
(tranches de 15 mm
(1/2 po) de Iongueur)
10_ 17minutes
20_ 25 minutes
25_ 32 minutes
15_ 25 minutes
25_ 40 minutes
10_ 15minutes
5 _ 15 minutes
10_ 20 minutes
15_ 20 minutes
25b 35 minutes
45b 60 minutes
20_ 30 minutes
8 _ 12 minutes
2 b 4 minutes
2 b 3 minutes
8 b 10 minutes
7 _ 9 minutes
8 _ 12 minutes
Retournerapr_s8 b 10minutes.
Retournerapr_s13b 15 minutes.
Retournerapres15b 17 minutes.
Retournerapresla moitie du temps.
Retournerdetemps entemps.
Retournerune lois.
Retournerdetemps entemps.
Retournerune lois.
Retournerdetemps entemps.
Retournerdetemps entemps.
Retournerdetemps entemps.
Badigeonnerde marinadeou dejus
les10dernieresminutes.
Badigeonnerde beurre.Retourner
apresla moitie du temps.
Retourneret badigeonner%quem-
mentde beurreou de marinade.
Retournerapresla moitie du temps.
Retournerapresla moiti_ du temps.
Badigeonnerd'huile.Retourner
apr_sla moitie du temps.
Badigeonnerde beurre.Retourner
detempsen temps.
Remarque: Ce tableau n'est qu'un guide. Les dur6es de cuisson et r6glages sont approximatifs et varient selon la viande, los
commandos et la tension.
19
La page charge ...
La page charge ...
La page charge ...
La page charge ...
La page charge ...
La page charge ...
La page charge ...
La page charge ...
La page charge ...
La page charge ...
La page charge ...
La page charge ...
La page charge ...
La page charge ...
La page charge ...
La page charge ...
La page charge ...
La page charge ...
La page charge ...
La page charge ...
-
 1
1
-
 2
2
-
 3
3
-
 4
4
-
 5
5
-
 6
6
-
 7
7
-
 8
8
-
 9
9
-
 10
10
-
 11
11
-
 12
12
-
 13
13
-
 14
14
-
 15
15
-
 16
16
-
 17
17
-
 18
18
-
 19
19
-
 20
20
-
 21
21
-
 22
22
-
 23
23
-
 24
24
-
 25
25
-
 26
26
-
 27
27
-
 28
28
-
 29
29
-
 30
30
-
 31
31
-
 32
32
-
 33
33
-
 34
34
-
 35
35
-
 36
36
-
 37
37
-
 38
38
-
 39
39
-
 40
40


Jenn-Air JED8130ADB16 Manuel utilisateur
- Catégorie
- Barbecues
- Taper
- Manuel utilisateur
dans d''autres langues
- English: Jenn-Air JED8130ADB16 User manual
- español: Jenn-Air JED8130ADB16 Manual de usuario
Documents connexes
-
Jenn-Air JED8230ADW Le manuel du propriétaire
-
Jenn-Air 20" Manuel utilisateur
-
-
-
-
-
-
-
-
Jenn-Air JEA7000ADB Manuel utilisateur