Jenn-Air Expressions JEA8120ADB Manuel utilisateur
- Taper
- Manuel utilisateur

Important Safety Instructions ................................................1-2
Cooktop Cartridges ...................................................................3-5
Cleaning ........................................................................................6-7
Accessories ..................................................................................7-9
Warranty ..........................................................................................11
Guide de I'utilisateur ..................................................................12
Gufa del Usuario ..........................................................................24
JENN-AIR
Form No. A/06/06 Part No. 8111P499-60
@2006 Maytag Appliances Sales Co. All rights reserved.
Litho U.S.A.

PORTANT SAF Y NSTRU IONS I
Installer: Pleaseleave this manual
with this appliance.
Consumer: Please read and keep
this manual for future reference.
Keep sales receipt and/or cancelled
check as proof of purchase.
Model Number
Serial Number
Date of Purchase
If you have questions, call:
Jenn-Air Customer Assistance
1-800-JENNAIR 0-800-536-6247)
1-800-688-2080 ( U.S.TTY for
hearing or speech impaired)
(Mon.-Fri., 8 am-8 pm Eastern Time)
Internet: http://www.m aytag.com
Forservice information, see
page 1I.
iiiiiiiiiiiiiiiiiiiiiiiiiiiiiiiiiiiiiiiiiiiii_!i:i_:i_i!_i_!i!!i!!i!!i!!i!!i!!i!!i!!i!!i!!i!_iii_i_i_i_iii_iiiiiiiiiiiiiiiiiiiiiiiiiiiiiiiii_i_i_iiiiiiiiiiiiiiiiiiii!i_!i!!i!!i!!i_!i!!i!i_!i_!!!i!!i!!i!!i!!i!_i!!i!!i!!i!!i!!i_!i_!i_!_¸i_,i_i_i!;_ii!i'ii!i'ii!i_i_!i_!i_!i_!i_!i_!i_!i_!i_!i_!_!_!_!i_i_ii_ii_i_ii_ii_ii_ii_!_!_i_!_i!i!i_ii_ii_ii_ii_iiiiiiiiiiii_iiiiiiiiiiiiiiiiiiiiiiiiiiiiiiiiiiiiiiiiiiiiiiiiiiiiiiiiiiiiiiiiiiiiiiiiiii
i
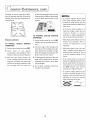
READ BEFORE OPERATING
All appliances = regardless of the
manufacturer = have the potential
through improper or careless use to
create safety problems. Therefore the
following safety precautions should be
observed when operating your Jenn=
Air accessories and cartridges:
NEVER use your appliance for warming
or heating the room.
Wear proper apparel. Loose-fitting or
hanging garments should never be worn
while using the appliance.
Do not repair or replace any part of the
appliance unless specifically
recommended in this manual. All other
servicing should be referred to an
authorized Jenn-Air Servicer.
Flammable materials should not be stored
near surface units.
Use only dry potholders. Moist or damp
potholders on hot surfaces may result in
burns from steam. Do not let potholder
touch hot heating elements. Do not use a
towel or other bulky cloth.
NEVER leave surface units unattended at
high heat settings. Boil over causes
smoking and greasy spillovers that may
ignite.
Keep all switches "OFF" when unit is not
in use.
INCASEOFFmRE
Turnoff appliance and ventilating hood to
avoid spreading the flame. Extinguish
flame then turn on hood to remove smoke
and odor.
• Smother fire or flame in a pan with a lid
or cookie sheet.
NEVER pick up or move a flaming pan.
YOUR COOKTOP OR RANGE
Do not use water on grease fires. Use
baking soda, a dry chemical or foam-type
extinguisher to smother fire or flame.
CHILD SAFETY
NEVER leave children alone or
unsupervised near the appliance when it
is in use or is still hot.
NEVER allow children to sit or stand on
any part of the appliance as they could
be injured or burned.
NEVER store items of interest to children
in cabinets above an appliance. Children
climbing on the appliance to reach items
could be seriously injured.
COiL ELEMENTS
On conventional element cooktops, make
sure that drip pansare in place. Absence
of these pansduring cooking maysubject
wiring or components underneath to
damage.
NEVER usealuminum foil to line surface
unit drip pans or grill basin. Installation
of these liners may result in an electric
shock or fire hazard.
Glazed cookware - only certain types of
glass, glass-ceramic, ceramic,
earthenware, or other glazed cookware
are suitable for cooktop surface without
breaking due to the sudden change in
temperature. Follow utensil
manufacturer's instructions when using
glass.
Cookware handles should be turned
inward and not extend over adjacent
surface heating elements to avoid burns,
ignition of flammable materials and
spillage due to unintentional contact with
the cookware.
Do not soak or immerse removable
heating elements in water.

RADIANT AND
HALOGEN ELEMENTS
NEVER cook on glass-ceramic cooking
surface if the cooktop isbroken. Cleaning
solutions and spillovers maypenetrate the
broken cooktop and create a shock
hazard. Contact a qualified technician
immediately.
Clean glass-ceramic cooktops with
caution. If wet sponge or cloth is used to
wipe spills on a hot cooking area, be
careful to avoid steam burns. Some
cleansers can produce noxious fumes if
applied to a hot surface.
UTENSIL SAFETY
Use proper pan size. Many appliances
are equipped with one or more surface
units of different size. Select cookware
having flat bottoms large enough to cover
the surface unit heating element. The
use of undersized cookware will expose
a portion of the heating element to direct
contact and may result in ignition of
clothing. Proper relationship of cookware
to heating element will also improve
efficiency and performance.
GAS BURNERS
Have the installer show you the location
of the gas shut off valve and how to shut
it off in an emergency.
A faint gas odor may indicate a gas leak.
If a gas odor is detected, shut off gas
supply to the appliance. Callyour installer
or local gascompany to havethe possible
leak checked. Never use a match or
other flame to locate a gas leak.
WARNING: ff the
information in this manual is
not followed exactly, a fire or
explosion may result causing
property damage, personal
injury or death.
Do not store or use gasoline or
other flammable vapors and
liquids in the vicinity of this or
any appliance.
IF YOU SMELL GAS:
• Do not try to light any
appliance.
• Do not touch any electrical
switch.
• Do not use any phone in your
building.
• Immediately call your gas
supplier from a neighbor's
phone. Follow the gas
supplier's instructions.
• If you cannot reach your gas
supplier, call the fire
department.
Installation and service must be
performed by a qualified
installer, service agency or the
gas supplier.
COOKmNG SAFETY
Always place a pan on a surface burner
before turning it on. Be sure you know
which knob controls which surface
burner. Make sure the correct burner is
turned on and that the burner has ignited.
When cooking is completed, turn burner
off before removing pan to prevent
exposure to burner flame.
Alwaysadjust surface burner flame sothat
it does not extend beyond the bottom
edge of the pan. An excessive flame is
hazardous, wastes energy and may
damage the appliance, pan or cabinets
above the appliance.
_MPORTANT SAFETY
NOTICE AND
WARNmNG
The California Safe Drinking Water and
Toxic Enforcement Act of 1986
(Proposition 65:)requires the Governor of
California to publish a list of substances
known to the State of California to cause
cancer or reproductive harm,and requires
businesses towarn customers of potential
exposures to such substances.
Usersofthis appliance are herebywamed
that the burning of gas can result in low-
level exposure to some of the listed
substances, including benzene,
formaldehyde and soot, due primarily to
the incomplete combustion of natural gas
or liquid petroleum (LP) fuels. Properly
adjusted burnerswill minimize incomplete
combustion. Exposure to these
substances can also be minimized by
properly venting the burners to the
outdoors.
IMPORTANT NOTICE REGARDING
PET BIRDS: Never keep pet birds in the
kitchen or inrooms where thefumes from
the kitchen could reach. Birds havea very
sensitive respiratory system. Fumes
released during an oven self-cleaning
cycle may be harmful or fatal to birds.
Fumes released due to overheated
cooking oil,fat, margarine and overheated
non-stick cookware may be equally
harmful.
NSTRUOTIONS FOR
THESE
RE EFERENOE
2

CCoo
KTOP
CONVENTIONALCOIL:
JEA7000ADB (black)
JEA7000ADW (white)
JEAT000ADS (stainless}
Expressions®Collection:
AC110B/W
HALOGEN:
JEA8130ADB (black}
JEA8130ADW {white}
Expressions® Collection:
AH151B/W
O
RADIANT:
JEA8120ADB {black}
JEA8120ADW {white}
Expressions® Collection:
AR141B/W
SELECTING PROPER
Select heavy gauge cookware.
Generally, heavy gauge cookware wiii
not change shape when heated.
Use cookware with fiat, smooth
bottoms. Todetermine ifthe cookware
is flat, place the edge of a ruler on the
bottom. Hold up to the light. No light
should be visible between the edge of
the ruler and the pan. Rejectany pans
that do notfit flush against ruler'sedge.
Match the size of the cookware to
the size of the element. Cookware
should be the same size or slightly
larger.
OOIL _LEMENTS
Theconventional coil cartridge isthe most
versatile of the cartridges. When an
element is on, it will cycle on and off to
maintain the heat setting.
DmANT AN D
HALOGENELEMENTS
The two cooking areas are identified by
circles on the glass-ceramic cooktop.
When an element is turned on, the
cooktop will heat up and the red glow of
the heating element can be seenthrough
the glass-ceramic top. _NOTE: On
halogen model, a circular halogen bulb
will glow instantly.:)It is normal to seethe
red glow ofthe element whenever it cycles
on. The element will cycle on and off for
all control settings except Hi. However, it
mayalso cycleon Hi if improper cookware
is used.
iIvIPROPE R COO KWARE
• DO NOT use cookwarethatextends
more than one inch beyondthe cooking
area.
Cookware that is smaller in diameter
than the cooking area should not be
used. Not only can this cause the
element to require more energy and
time, but can also result in spillovers
burning onto the cooking arearesulting
in a cleaning chore.
DO NOT use specialty items that are
nonfiat, oversized, uneven or do not
meet proper cookware specifications
such as round bottom woks with rings,
griddles, rippled bottom canners,
lobster pots, large pressure canners,
etc. Large utensils, such as pressure
canners or oversizedskillets, should be
used only on conventional coil
cartridges.
Glass-ceramic, earthenware, heat proof
glass or glazed cookware may scratch
the glass-ceramic cooktop and
therefore are not recommended.
NOTE: On halogen cartridge only,
aluminum pans may cause the element
to cycle even when the control setting
is Hi.

COOKING PROCEDURES
All Cartridges:
• Beforefirst useclean cooktop cartridge.
(Seedetailed instructions, pg. 6.)
• For best results, always use
recommended cookware.
• Different cooktops and different
amounts of food being prepared will
influence the control settings needed
for best results. (See cooktop or range
use and care manual for typical control
settings.) Forfastest cooking, start with
the surfacecontrol on Hifor one minute;
then turn the control to the desired
setting. Covering pans, whenever
possible, speeds cooking and is more
energy efficient.
Radiant and Halogen Cartridges:
• Theglass-ceramic cooking area retains
heat for a period of time after the
elements have been turned off. Putthis
retained heat to good use. Turn
elements off afew minutes before food
is completely cooked and use the
retained heat to complete the cooking.
Because of this heat retention
characteristic, the elements will not
respond to changes in heat settings as
quickly as coil elements. In the event
of a potential boilover, remove the pan
from the cooking area.
• When preparing foods which can be
easily scorched or over-cooked, start
cooking at a lower temperature setting
and gradually increase temperature as
needed.
• A higher setting than normal may be
necessary when using cookware made
with material that is slow to conduct
heat, such as cast iron.
• A lower setting can be used when
cooking small quantities of foods or
when using a pan that conducts heat
quickly.
To AVOID DAMAGE TO THE
GLASS=CERANIIC COOl(TOP -
Radiant and Halogen Cartridges Only:
• Do not useglass pans.They may scratch
the surface.
Do not allow plastic, sugar or foods with
high sugar content to melt onto the hot
cooktop. Should this happen, clean
immediately. (See Cleaning, pages 6
& 7.]
• Never let a pan boil dry as this will
damage the surface and pan.
• Never use cooktop as a work surface or
cutting board. Never cook food directly
on the surface.
• Do not slide aluminum pansacross a hot
surface.The pansmay leavemarkswhich
need to be removed promptly. (See
Cleaning, pages 6 & 7]
• Make sure the surface and the pan
bottom are clean before turning on to
prevent scratches.
• Toprevent scratching or damage to the
glass-ceramic top, do not leave sugar,
salt or fats on the cooking area. Wipe
the cooktop surface with a clean cloth
or paper towel before using.
• Do not slide heavy metal pans acrossthe
surface since these may scratch.
• Do not use foil or foil-type containers.
Foil may melt onto the glass. If metal
melts on the cooktop, do not use. Call
an authorized Jenn-Air Servicer.
If a spillover occurs while cooking,
immediately clean the spill from the
cooking area while it is hot to prevent a
tough cleaning chore later. Using
extreme care, wipe spill with a clean dry
towel.
• Do not use abrasive cleansing powders
or scouring pads which will scratch the
cooktop.
• Do not use chlorine bleach, ammonia or
other cleansers not specifically
recommended for useon glass-ceramic.
4
Sealed Burner Cartridge =
Model JGA8100ADB (black)
Model JGA8100ADW (white)
The sealed burners of your cartridge are
secured to the cartridge and are not
designed to be removed. Since the
burners are sealed into the cartridge,
boilovers or spills will not seepunderneath
the cooktop. However, the burner heads
should be cleaned after each use. (See
page 7 for cleaning directions.)
TO PREVENT THE COOKTOP
FROM DISCOLORING OR
STAINING:
e
e
Clean cooktop after each use.
Wipe acidic or sugary spills as soon
as the cooktop has cooled as these
spills may discolor the porcelain.
_URNER _RATES
The grates must be properly positioned
before cooking, Improper installation of
the grates may result in chipping of the
cooktop.
Do not operate the burners without a
pan on the grate. The grate's
porcelain finish may chip without a
pan to absorb the heat from the burner
flame.

KTOP
Although the burner grates are durable,
they will gradually lose their shine and/or
discolor, due to the high temperatures of
the gas flame.
TO iNSTALL SEALED BURNER
CARTRIDGE:
1. Be sure control knobs are turned OFF.
2. Clean basin of any grease
accumulation. (See appliance User's
Guide for cleaning recommendations.)
3. With the back raised, position the
burner cartridge with the mixer tube
openings and ignitor rods toward the
orifices and terminal receptacle. Slide
the cartridge until the tubes and
ignitors start to engage,then lower the
cartridge sothat itrestson the cooktop
surface. Gently slide forward to fully
engage.
TO REMOVE SEALED BURNER
CARTRI DGE:
1. Control knobs should be in the OFF
position and the cooktop should be
cool.
2_
3_
4_
Lift up the edge of the cartridge until
the bottom of the cartridge clears the
basin. (Lifting the cartridge too high
while still engaged could damage the
ignitor rods and mixer tubes.:)
Todisengage the cartridge, hold bythe
sides and pull away from the terminal
receptacle and orifices. Lift out when
fully unplugged.
Do not stack cartridges where they
may fall or be damaged.
A properly adjusted burner with
clean ports will light within a few
seconds. If using natural gas, the
flame will be blue with adeeper blue
inner cone.
If the burner flame is yellow or is
noisy, the air/gas mixture may be
incorrect. Contact a service
technician to adjust. (Adjustments
are not covered by the warranty.)
With LPgas,some yellow tips onthe
flames are acceptable. Th_s _s
normal and adjustment is not
necessary.
With some types of gas, you may
hear a "popping" sound when the
surface burner is turned off. This is
a normal operating sound of the
burner.
If the control knob is turned very
quickly from hi to Io, the flame may !:
go out, particularly if the burner is ;_i
cold. If this occurs, turn the knob to
the OFF position, wait several ,:
seconds and relight the burner.
To improve cooking efficiency and
to prevent possible damage to the
cooktop or pan, the flame must be
adjusted so it does not extend i
%
beyond the edge of the pan.
5

ING
]
• Be sure appliance is off and all
parts are cool before handling or
cleaning. This is to avoid damage
and possible burns.
• The cooktop cartridge DOES NOT
need to be removed for normal
cleaning.
, NEVER immerse cartridge in water to
clean. This can damage wiring. A
drain hole within the cartridge permits
drainage of normal spills into the
porcelain basin pan where they will
drain into the grease container. The
bottom of the cartridge may bewiped
clean with detergent solution if
necessary.
CONVENTIONAL OO_L
CARTmDGE --
H EATING ELENIENTS
• Under normal conditions, most soil will
burn off elements.The heatingelements
unplug for your convenience in cleaning
the drip pans. Lift slightly and pull away
from receptacle. DO NOTIMMERSE IN
WATER. To replace elements, push
completely into the receptacle. Make
sure the elements fit flat.
DRIP PANS
* Tokeep the like-new appearance, clean
frequently and never allow anything to
burn on twice. Removesoiled pans (first
remove heating element). Clean lightly
soiled pans with soap and water or
clean in dishwasher.
• Difficult to remove spotscan be cleaned
by rubbing lightly with soapy S.O.S._
pads or nonabrasive cleaners such as
Bon AmP. To help release burned on
soil, soak in a solution of 1/2 cup
ammonia and 1 gallon warm water or
boil in 2 quarts of water for 20 minutes.
(All drip pans cannot be boiled at once
because element being used must have
a drip pan in place.)
Do not use abrasive cleansers, steel
wool or cleansersnot recommended for
use on chrome. Blue/gold staining of
the drip pans indicates improper
cookware selection and/or using
excessively high heat and cannot be
removed.
PORCELAIN COOKTOP
• The porcelain enamel used on your
cooktop is acid resistant, not acid proof.
Therefore,acidic foods (such asvinegar,
tomato, milk, etc.)spilled onthe cooktop
should be wiped up immediatelywith a
dry cloth.
• Wash cool cooktop with warm soapy
water and rinse. Polishwith a dry cloth.
• Do not useabrasive or caustic cleaning
agents which maypermanently damage
the finish.
• NEVER wipe off a warm or hot
porcelain enamel surface with a damp
cloth.
STAINLESS STEEL COOKTOP
* Before using the cooktop, remove all
pieces of plastic covering the top. Use
a glass cleaner to remove any film
residue from the top and inside the rim
area supporting the drip pan. If residue
is left on cooktop, it can be burned onto
cooktop and be difficult to remove.
* DO NOT USE ANY CLEANING
PRODUCT CONTAINING
CHLORINE BLEACH.
* ALWAYS WIPE WITH THE GRAIN
WHEN CLEANING.
Daily Cleaning/Light Soil == Wipe
with one of the following - soapywater,
white vinegar/water solution, Formula
409 Glass and Surface Cleaner* or a
similar glass cleaner - using a sponge
or soft cloth. Rinse and dry. To polish
and help prevent fingerprints, follow
with Stainless SteelMagic Spray (Jenn-
Air Model A912, Part No. 20000008)**.
Moderate/Hea_ Soil == Wipe with
one of the following - Bon AmP, Smart
Cleanse€, or SoftScrub* - usinga damp
sponge or soft cloth. Rinse and dry.
Stubborn soils may be removed with a
damp Scotch-Brite* pad; rub evenly
with the grain. Rinseand dry. Torestore
luster and remove streaks, follow with
Stainless Steel Magic Spray.
Discoloration -- Using a damp
sponge or soft cloth, wipe with Cameo
Stainless Steel Cleaner*. Rinse
immediately and dry.Toremove streaks
and restore luster, follow with Stainless
Steel Magic Spray.
RADIANT AND HALOGEN
OARTmDGE--
GLASS=CERAM IC Su RFACE
Never use oven cleaners,chlorine bleach,
ammonia or glass cleaners with ammonia.
NOTE. Call an authorized servicer if the
glass-ceramic top should crack, break or if
metal or aluminum foil should melt on the
cooktop.
• Aflow the cooktop to cool before
cleaning.
• General - Clean cooktop after each
use, or when needed, with a damp
paper towel and Cooktop Cleaning
Creme* (Part No. 20000001)**. Then,
buff with a clean dry cloth.
NOTE: Permanent stains will develop if
soilis allowed to cook on by repeatedly
using the cooktop when soiled.
• Heavy Soils or Metal Marks -
Dampen a "scratchless" or "never
scratch" scrubber sponge. Apply
Cooktop Cleaning Creme* (Part No.
20000001)** and scrub to remove as
much soilaspossible.Apply a thin layer
of the creme overthe soil, cover with a
* Brand names for cleaning products are registered trademarks of the respective manufacturers.
**Toorder direct, call 1-800-JENNAIR (1-800-536-6247).
6

OONTo
damp paper towel and let stand 30 to
45 minutes (2-3 hours for very heavy
soil). Keep moist bycovering the paper
towel with plastic wrap. Scrub again,
then buff with a clean dry cloth.
NOTE: Only use a CLEAN, DAMP
"scratchless" pad that is safe for non-
stick cookware. Thepattern and glass
will be damaged if thepad isnot damp,
ff the pad b soiled, or ff another type of
pad is used.
Burned=on or Crusty Soils - Scrub
with a "scratchless" or "never scratch"
scouring pad and Cooktop Cleaning
Creme*.
Do not use the razor blade for daily
cleaning as it may wear the pattern on
the gbss.
Melted Sugar or Plastic - Immediately
turn element to LOW and scrape sugar
or plasticfrom hot surface to a cool area.
Thenturn element OFFand allow to cool.
Clean residue with razor blade scraper
and Cooktop Cleaning Creme*.
SEALED GAS BU RN ERS/GRATES
• Allow burnerand grates to cool.Washwith
soapy water and a plastic scouring pad. For
stubborn soils, clean with a soap-filled,
nonabrasive pad or a sponge and a
commercial Cooktop Cleaning Creme (Part
#20000001)**.
• Clean gas ports with a soft bristle brush or
a straight pin especially the port below the
ignitor. Do not enlarge or distort holes.
• Becareful not toget water into burner ports.
• Whencleaning, usecare topreventdamage
to the ignitor. If the ignitor is soiled, wet or
damaged the surface burner will not light.
* Brand names for cleaning products are registered trademarks of the respective manufacturers.
**Toorder direct, call 1-800-JENNAIR (1-800-536-6247).
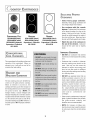
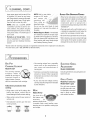
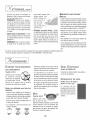
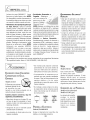
I, CCESSOR! ES
Bm PoT
OANNING ELEMENT
Model A145A
The canning element ;_ .-.,,., ,
accessory makes itS.,
possible to use large or
oversized flanged or
rippled bottom canners
ii
with the conventional coil cartridge.
Follow these procedures when
canning:
* Bring water to boil at Hi setting; after
boiling has begun, reduce heat to
lowest setting that will maintain boiling.
* Make certain canner fits over center of
surface unit.
* Flat-bottomed canners give the best
canning results.
RIGHT WRONG WRONG
Use canning recipes from a reputable
source such as the manufacturer of
your canner and manufacturers of
canning jars.
Canning isa process that creates large
amounts of steam. Follow equipment
instructions to avoid burns from steam
or hot canners.
If your area has low voltage at times,
canning maytake longer than indicated
by the directions.
Model AO142
Use Jenn-Air's
flat bottom wok
accessory for
optimum results.It has
a nonstick finish, wood handles, cover,
steaming rack, rice paddles, cooking tips
and recipes.
ELEOTRmO _RMLL
Model JEASOOOADB
Includes grill element, twogrill gratesand
basin liner pan.
GRILL COVER
Model A341 (electric)
Model AG341 (gas)
The grill cover protects
the grill when not in use.
It is available in textured
steel in black or white
with molded handles.
7

GRIDDLE ACCESSORY
EXPRESS|ONS '_;'COLLECTION_
MODEL A0310 (ELECTRIC)
1. Make sure controls are in the OFF
position. The basin should be empty
and clean.
2. Slidethe griddle towards the receptacle
until the terminal plug is completely
engaged.Thegriddle should rest on the
basin.
NOTE: The liner pan may remain in
place but is not necessary.
MODELJEA8200ADX (ELECTRIC)
1. Make sure controls are in the OFF
position. The basin should be empty
and clean. Insert basin pan and grill
element.
2. Placegriddle over grill element sodrain
holes are in front. This will permit
excess grease to drain into the grease
container.
MODELJGA8200ADX (GAS)
1. Make sure controls are in the OFF
position.
2. insert grill burner. DO NOT use grill
grates.
3. Place griddle over burner so that the
drain holes are infront. This will permit
excess grease to drain intothe grease
container.
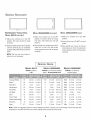
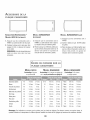
_RIDDLE A0310
Preheat5 minutes
on Hi.
GRmDDLE _U_DE ]
6RIDDLE JEAB200ADX
Preheat5-10 minutesatspecified
setting- De netpreheat en Hi.
_RIDDLE JGA8200ADX
Preheat 5-10minutesat
specifiedsetting.
Sausage Patties
Bacon
Ham Slice
Hamburgers
Fish Sticks
Hot Dogs
Buns
French Toast
Grilled Sandwiche_
Pancakes
Eggs
Hi
Hi
Hi
Hi
Hi
10
Hi
10
10
10
6-7
4-5 min.
3-5 min.
4min.
5-6 min.
5 min.
5-6 min.
2-3 min.......
3-4 min.
4-5 min.
2-3 min.
2-3 min.
2-4 min.
2-3 min.
4 min.
5-6 min.
4-5 min.
4-5 min.
2-3 min.
3-4 min.
1-2 min.
(1) min.
9-10
10
9
9
8
10
9
10
9
10
7
4-5 min. . 2-4 min.
3-5 min. ' 2 min.
4min.. 2min.
6min.. 5min.
5-7 min. i 5-6 min.
5-6 min. i 4-5 min.
3 min.
2-3 min. i 2-3 min.
4min.. 3min.
2 min.. 1-2 min.
2-3 min. i (1) min.
Med
Med
Med
Med
Med
Hi
Hi
Hi
Hi
Hi
Med
6-8 min.
4-5 min.
6-7 min.
5-7 min.
7-8 min.
5 min.
2-3 min.. .....
2-4 min.
2-3 min.
1-2 min.
2-3 min.
4-5 mm.
3-4 mm.
5-6 mm.
4-6 mm.
5-7 mm.
5 mm.
2-3 min.
2-3 min.
1-2 min.
(1) min.
Note: These are suggested guides for control settings and times. Factors,such as low voltage, size of food and food
temperature, may affect the times and control settings which provide the best results.
8

C ooossoo0os,oooTo]
_S|NG THE _RIDDLE _LEAN ING
1. Before the first use, wash your new
griddle in hot soapy water, rinse and
dry. Then "condition" the surface by
wiping on a thin coating of cooking oil
or shortening. Remove excess oil or
shortening by wiping again with
another paper towel. DO NOT use
cooking sprays on the griddle surface.
2. Preheat the griddle as noted in the
charts.
3. Use nonmetallic spatulas or utensils
while cooking to prevent damaging the
finish.
4. When cooking meats, use the
downdraft fan or range hood to capture
smoke.
NOTE: DO NOT IMMERSE THE
TERMINAL PLUG IN WATER (MODEL
A0310 ONLY). SEE BOTTOM OF
GRIDDLE FOR FURTHER
INSTRUCTIONS.
.
.
Once the griddle has cooled (DO NOT
IMMERSE A HOTGRIDDLE IN COLD
WATER),wash with soap or detergent
in hot water in the sink, Be sure to
removeall food residue beforecooking
on the griddle again.
Remove stubborn spots with a plastic
mesh puffor pad. Forbest results, use
only those cleaning products which
state they are recommended for use
when cleaning nonstick surfaces. De
not use steel wool or coarse
scouring pads.
3. DO NOT wash in dishwasher
9

iO

NN AIR WARRANTY
CUSTOMER'S SOLE AND EXCLUSIVE REMEDY UNDER THIS
WARRANTY SHALL BE PRODUCTREPAIRAS PROVIDED HEREIN.
IMPLIED WARRANTIES, INCLUDING WARRANTIES OF
MERCHANTABILITYOR FITNESSFORA PARTICULARPURPOSE,ARE
LIMITEDTOONEYEARORTHESHORTESTPERIODALLOWEDBYLAW.
MAYTAGCORPORATIONSHALL NOTBELIABLEFORINCIDENTALOR
CONSEQUENTIALDAMAGES.SOMESTATESAND PROVINCESDONOT
ALLOW THE EXCLUSION OR LIMITATION OF INCIDENTAL OR
CONSEQUENTIALDAMAGES,ORLIMITATIONSONTHEDURATIONOF
IMPLIEDWARRANTIESOF MERCHANTABILITYORFITNESS,SOTHESE
EXCLUSIONS OR LIMITATIONS MAY NOT APPLYTO YOU. THIS
WARRANTYGIVESYOUSPECIFICLEGALRIGHTSANDYOUMAYALSO
HAVEOTHERRIGHTS,WHICHVARYSTATETOSTATEORPROVlNCETO
PROVINCE.
What is Not Covered By TheseWarranties
1.Conditions and damages resulting from any of the following:
a. Improper installation, delivery, or maintenance.
b. Any repair, modification, alteration, or adjustment not authorized by
the manufacturer or an authorized servicer.
c. Misuse, abuse, accidents, unreasonable use, or acts of God.
d. Incorrect electric current, voltage, or supply.
e. Improper setting of any control.
2. Warranties are void if the original serial numbers have been removed,
altered, or cannot be readily determined.
3. Light bulbs.
4. Products purchased for commercial or industrial use.
5.The cost of service or service call to:
a. Correct installation errors.
b. Instruct the user on the proper use of the product.
c. Transport the appliance to the servicer and back.
6.Consequential or incidental damages sustained by any person as a result
of any breach of these warranties. Somestates do not allow the exclusion
or limitation ofconsequential or incidental damages,sothe aboveexclusion
may not apply.
if You Need Service
First see the Troubleshooting section in your Use and Care Guide or call
Maytag Services, LLC, Jenn-Air Customer Assistance at 1-800-JENNAIR
0-800-536-6247) U.S.A.and Canada.
To Obtain Warranty Service
To locate an authorized service company in your area, contact the dealer
from whom your appliance was purchased or call Maytag Services, LLC,
Jenn-Air Customer Assistance. Should you not receive satisfactory warranty
service, call or write:
Maytag Services, LLC
Attn: CAIR:RCenter
P.O.Box2370, Cleveland,TN 37320-2370
U.S. and Canada 1=800=JENNAI R (1 =800=536=6247)
U.S. customers using TTY for deaf, hearing impaired or speech
impaired, call 1=800=688=2080.
Note: When contacting Maytag Services, LLC,Jenn-Air Customer
Assistance about a service problem, please include the following:
a.Your name, address and telephone number;
b. Model number and serial number of your appliance;
c. Name and address of your dealer and date appliance was purchased;
d. A clear description of the problem you are having;
e. Proof of purchase.
Use and Care guides, service manuals and parts information are available
from Maytag Services, LLC,Jenn-Air Customer Assistance.
ii

_ABLE DES JV_AT|EF{ES
Instructions de s6curit6 importantes ............................13-14
Modules de table de cuisson ............................................15-17
Nettoyage ................................................................................18-19
Accessoires .............................................................................19-21
Garantie ...........................................................................................23
Gu[a del Usuario ..........................................................................24
JENN-AIR

DESECUmTE
IM PO RTANTES
Installateur: Remettre ce manuel
au propri6taire.
Consommateur: Lire le manuel; le
conserver pour consultation
ult6rieure. Conserver la facture
d'achat ou le cheque encaiss6
comme preuve de I'achat.
Num6ro de modele
Num6ro de s6rie
Date d'achat
Pour toute question, contacter:
Service-client Jenn-Air
1-800-JENNAIR(1-800-536-6247)
(Lundi - vendredi, 8 h - 20 h --
heure de I'Est)
Site Internet: http://
www.jennair.com
Pour le service aprbs-vente, voir
page 23.
LIBE ATTENTIVENIENT AVANT D_UTILISER
LA TABLE DE CUISSON OU LA CUISIINII_BE
I='utilisationinappmpri6eou inattentivede
tout appareil m6nager (quel que soit le
fabricant) peut entrainer des
pm=bl_mesde s_curit& Parcons6quent,
les pr6cautions suivantes doivent 6tre
respect6es lots de I'utilisation des
modules et accessoires Jenn=Air:
NepasprojeterdeI'eausurunfeudegraisse.
Utiliser du bicarbonate de sodium, ou un
extincteur_ mousseou bproduitchimiquesec
pour eteindrelesflammes.
SECUR_TE POUR LES
PRECAUTIONS GENERALES
BE JAMAIS utiliser I'appareilcommesource
de chaleurpour lechauffagede la piece.
Porterdesvetementsappropries.Lesvetements
amples ou b Iongues manches ne doivent
jamais etre portes Iors de I'utilisation de
I'appareil.
Ne pas r@arer ou remplacer une piece de
I'appareilb moinsque celasoit specifiquement
recommandedanscemanuel.Toutentretienet
reparation doivent etre executes par un
r@arateuragreeJenn-Air.
IInefaut pasrangerde materiauxinflammables
presde cet appareil.
Utiliserdes maniquessechesseulement.Des
maniques humides peuvent provoquer la
formation de vapeur br01ante.Ne pas laisser
lesmaniquestoucher leselementschauds.Ne
pasutiliseruneservietteouautrechiffon@ais.
BE JAMAIS laisser les appareils sans
surveillance Iorsqu'ils sont b une puissance
maximale. Les debordements peuvent
provoquerde la fumee et des projectionsde
graissequi peuventprendrefeu.
Laisser toutes les commandes sur <_0FF)_
(ARRI_-FJquand I'appareiln'estpasutilis&
EN gAS D_NCEND_£
Interromprele fonctionnementde rappareilet
de la hotte de ventilation pour minimiser le
risque d'extensiondes flammes. I_teindreles
flammes,puismettrela hotteen marchepour
evacuerla fumeeet I'airvici&
• Utiliserun couvercleouuneplaquebbiscuits
pour etouffer les flammes d'un feu qui se
declaredansun ustensilede cuisine.
• NEJAMAIS saisir ou d@lacer un ustensile
de cuisineenflamme.
NEJAMAIS laisserdesenfantsseulsousans
supervisionIorsquerappareil est en service
ou encorechaud.
NEJAMAIS laisserun enfants'asseoirouse
tenirsur une partiequelconquede rappareil.
II pourraitse blesserou se br01er.
NE JAMAIS ranger des articles pouvant
interesserrenfantdansunearmoireau-dessus
de I'appareil. Un enfant qui grimpe sur
I'appareil pour atteindre un objet pourrait
gravementse blesser.
ELEM£NTS EN SP_RALE
S'assurerque les cuvettesde propretesont
bien en placesur lessurfaces de cuisson
elementsclassiques.Eabsencedecescuvettes
pendant la cuissonpourrait endommagerle
cbblageet lespiecessetrouvantendessous.
NE JAMAIS utiliser de feuille d'aluminium
pour garnir les cuvettes de proprete ou la
cavitedu gril. L'installationdece revetement
peut entrafnerdesdechargeselectriquesou
risquesde feu.
Seuls certains materiaux en verre,
vitroceramique, ceramique ou certains
ustensilesvitrifies/emaillespeuventetreutilises
surlatabledecuissonsansrisquedebrissous
I'effet du choc thermique. Observer les
instructions du fabricant lots de I'utilisation
d'un ustensileenverre.
Pour eviter les risques de br01ure,
d'inflammationdematieresetde renversement
parcontactnonintentionnelavecun ustensile,
ne pasorienterla poigneed'un ustensilevers
un br01eur adjacent; orienter toujours la
poigneeversI'interieurdelatabledecuisson.
Ne pas tremper ou immerger les elements
chauffantsamoviblesdansI'eau.
13

ELEMENTS RAOIANTS ET
ELENENTS AU×
NEJAMAIS cuire sur unetable de cuisson
en vitroc6ramiquesi celle-ci est cass6e.Les
solutions de nettoyage et les produits
d6vers6speuventp6n6trerdanslasurfaceet
entrainer une d6charge 61ectrique.
Imm6diatement contacter un technicien
competent.
Prendredesprecautionslotsdunettoyagedes
surfacesen vitroc6ramique.Faireattention
ne passe br01erpar de la vapeur produite
avecune6pongeouun chiffonmouill6,utilis6
pouressuyerdesrenversementssurunezone
de cuisson chaude. Certains produits de
nettoyage donnent des vapeurs nocives
Iorsqu'ils sent appliques sur une surface
chaude.
SECURITE DES
USTENSILES
Utiliserdesustensilesdelabonnedimension.
Denombreuxappareilsm6nagerscomportent
unou plusieurselementsdetalliesdiff6rentes.
Choisir un ustensile b fond plat, de taille
suffisante afin qu'il recouvretout 1'616ment
chauffant.L'emploid'ustensilesdetrop petite
taille expose une partie de 1'616mentqui
pourraitalorsmet[rele feubun vetement.Le
bon rapportentre lasurfacede I'ustensileet
de 1'616mentam6 liore 6galementrefficacit6
et lesrendements.
BROLEURSA GAZ
Demander_ rinstallateurde montrer oQse
trouvelerobinetd'arretdegazet commentle
fermeren cas d'urgence.
Une faible odeur de gaz peut indiquer une
fuite de gaz.Si I'ond6celeuneodeurdegaz,
fermer I'arriv6edegaz 8 I'appareil. Appeler
I'installateurou la compagnie de gazde la
regionpour verifierlesfuites 6ventuelles.Ne
jamais identifier de fuite de gaz _ I'aide
d'uneallumette ou d'uneflamme.
MISE £N GARDE: $i
les directives donn#es duns le
pr6sent guide ne sent pas
respectees Dla lettre, il y a risque
d'incendieeu d'explesienpouvant
causer des demmages, des
ble_sureset m#me la morL
=Nepasranger ni utiliser de gazou autre
matiere inflammable_ proximit_de cot
appareil ou detout autre appareiL
=QUE FAIRESI L'ONSENTUNE ODEUR
DEGAZ:
• Ne mettre aucun appareil en marche.
• Ne pustoucher _ un interrupteur
61ectrique.
• N'utiliser aucun t_16phone de
I'immeuble.
• Se rendre chezunvoisinet t616phoner
imm6diatement _ la compagnie de
gaz.Suivre los directivesdonn6es par
le pr6pos6 de la compagniede gaz.
• S'il est impossibledejoindre la
compagniede gaz, t616phonerau
service desincendies.
=L'installationet les r6parations doivent
_tre confi_es _ un installateur
comp6tent, _ une entreprise deservice
ou _ la compagniede gaz.
OUISSONETSECURITE
Placertoujours un ustensilesur un brOleurde
surfaceavantdeI'allumer.Veiller8bienconnaitre
la correspondance entre les boutons de
commandeet les br01eurs.Veiller8 allumer le
br01eurcorrectetverifierque lebr01eurs'allume
effectivement.,_lafin de la p6riodede cuisson,
6teindre le br01euravant de retirer I'ustensile,
pour 6viter une exposition aux flammes du
br01eur.
Veiller_ toujours ajustercorrectementla taille
desflammespourqu'ellesned6passentpassur
la p6riph6riede I'ustensile.Des flammesde
trop grande taille sur un br01eur sont
dangereuses,elles suscitent un gaspillage
d'6nergie et elles peuvent faire subir des
dommages 8 I'ustensile, 8 I'appareil ou
I'armoiresitu6eau-dessus.
_VERTISSEMENT ET
LaIoicalifornienne<{SafeDrinkingWaterand
ToxicEnforcementAcb>de 1986(proposition
65) stipule la publication par le gouverneur
delaCalifornied'unelistedessubstancesque
1'6tat de Californie considere comme
canc6rigenes ou dangereuses pour le
systeme reproducteur, et impose aux
entreprises commerciales I'obligation de
signaler8leursclientslesrisquesd'exposition
de tellessubstances.
Nousinformonslesutilisateursdecetappareil
qu'ils peuvent etre exposes _ une faible
concentration de certaines substances
figurant dunsla liste mentionn6eci-dessus,
dont benzene,formaldehydeet suie, du fait
de la combustionincompletedu gaznaturel
ou du gazde p6troleliqudi6. Pourminimiser
lacombustionincomplete,veiller8cequeles
br01eurssoient parfaitement r6gl6s. Pour
minimiserI'exposition_cessubstances,veiller
bien 6vacuer les gaz de combustion
I'ext6rieur.
AVIS IMPORTANT - OISEAUX
FAMILIERS: Les oiseaux ont un systeme
respiratoiretres sensible. Nepas garderun
oiseaufamilier dansla cuisineou dans une
pieceoQil pourraitetre exposeauxfum6es.
Les fum6es 6mises durant une operation
d'autonettoyagepeuventetredangereusesou
mortellespour un oiseau,de memeque les
fum6es6miseslotsdu chauffageexcessifde
graisse,huile,margarine,par exempledans
un ustensile8 garnissageanti-adhesion.
POUR
;ERVER CES INSTRUCTIONS
CONSULTATION ULTERI£URE
14

DE TABLE DE CUISSON
_HOIX D_USTENSILES
ELI_MENTCONVENTIONNEL
ENSPIRALE:
JF_7/00ADB {noir)
JF.A7000ADW{blanc)
JF.A7000ADS{acier inoxydable)
Collection Expressions(R):
AC11OB/W
HALOGENES:
JEAI13OADB{heir)
JEAI130ADW{white)
Coilecton Expressions_:
AH151B/W
R_DIANTS:
JEA8120ADB[heir)
JEAI120ADW {blanc)
CollectionExpressions_R_:
AR141B/W
_LEMENTS O01VEl =
TIONNELS El SPI/ALE
Lemoduleavec616mentsconventionnelsen
spirale est le plus polyvalent. O,uand un
61ementest alum& il s'allumeets'eteintpar
intermittencepour maintenir la temperature
au reglagevoulu.
iMENTS OWANTS
AUX HALOGfNES
Lesdeux zones de cuissonsont identifi6es
par des cercles sur la surface en
vitroc6ramique,Quandunelementestalum&
la surface devient chaude et une lueur
rougeoyantede1'616mentchauffantestvisible.
(REMARQUE:Sur le mo@leaux halogenes,
lalampecirculaireluit instantan6ment,)IIest
normaldevoir la lueur rougede 1'616ment£
chaqueloisqu'ilserallume.[elements'allume
ets'6teintpourtouslesr6glages£ I'exception
du r6glage I-li (max,). Cependant, si un
ustensileinappropri6est utilis& il peutaussi
s'6teindreet s'allumeren alternancesur ce
r6glageHi (max.).
15
Choisir des ustensiles_ patois6paisses.
Normalement, les ustensiles en mat6riau
@ais ne se ddorment pas Iorsquils sont
chauff6s.
• Utiliserdes ustensiles_ fond platet lisse.
Mettre une regle contre le dessous de
I'ustensilepouretablirsilefondestplat.Puis,
tenir I'ustensiledevantunesourcedelumiere.
Lalumierenedevraitpasetrevisibleentrele
bord de la regleetI'ustensile.Nepasutiliser
d'ustensiledont le fond n'est pas rectiligne
commele bordde la regle.
• Fairecerrespendrela taille deI'ustensile
la dimensionde1'616merit.Lesustensiles
doivent etre de la meme dimension ou
16gerementplus grands.
USTENS| LES INAPPROPR|ES
• NEPASutiliserd'ustensilesdont lediametre
est sup6rieur £ celui de lazonede cuisson
par plusde un pouce.
• Lesustensilesdontle diametreest pluspetit
que celui de la table de cuisson ne doivent
pasetre utilis6s.Sinon,en plus de 1'6nergie
et du temps gaspill6s, un nettoyage
suppl6mentairesera n6cessaireen cas de
renversement, pour 61iminerles aliments
br016s.
• NEPASutiliserd'articlessp6ciauxqui nesont
pas plats, de configuration irr6guliere,
surdimensionn6sou ne re pondantpasaux
specificationsd'ustensilesappropriescomme
woks £ fond rondavecanneaux,plaquesde
cuisson,marmites£conserves£fondondule,
marmitesb homard,grandsfait-tout,etc.Les
gros ustensilescomme lesautocuiseursou
les po61essurdimensionnees doivent etre
utilisees seulement sur les modules
conventionnelsen spirale.
• Lesustensilesenvitroceramique,ceramique,
gres,ouvitrifies/emaillesouenverreresistant
b la chaleur peuvent rayer la surface
vitroceramique et par consequent,ne sont
pasrecommandes.
• REMARQUE:Les ustensilesen aluminium
peuvent {sur le module aux halogenes
seulement:} faire s'allumer et s'eteindre
I'elementdefa%n intermittente,memesi le
reglageestsur Hi (max.:}.

METHODES DE CU_SSON
Tousles modules:
• Avantd'utiliserun modulede cuissonpour
lapremierefois,lenettoyer.(Voirinstructions
detailleespage 18.)
• Pourde meilleursresultats,utilisertoujours
lesustensilesrecommandes.
• Letypedetabledecuissonetlesdifferentes
quantitesd'aliments_preparer,affecteront
les reglagesne cessairespour obtenirles
meilleurs resultats. (Voir le manuel
d'entretienet d'utilisation de la cuisiniere
ou de la table de cuissonpour obtenirles
reglagestypiques.)Pourunecuissonrapide,
commenceren mettant la commandesur
Hi pendant une minute; puis baisser la
commande au reglage voulu. Mettre un
couverclesur los ustensilestant que cola
est possible,la cuissonseraplusrapide et
plusefficaceen energie.
Modules radiants et aux halogenes
• La zone de cuisson en vitroceramique
conserve la chaleur pendant un certain
temps une fois I'elementeteint.Tenterde
faire bonemploide cettechaleur, l_teindre
lese lementsquelquesminutesavantlafin
de la cuissontotale desaliments.Puisque
ceselementsretiennentla chaleurpendant
un certaintemps,ils ne r@gissentpasaux
changementsde reglageaussirapidement
que los elements en spirale. Retirer
I'ustensilede lazonedecuissons'ily a un
risquede debordement.
• Lors de la preparationde nourritures qui
peuvent etre facilement br01eesou trop
cuites, commencer la cuisson _ basse
temperatureetaugmentergraduellementla
temperature.
• Unreglagepluselevequenormalpeutetre
necessairesi I'onutilisedesustensilesfaits
de materiauxpeu conducteurs comme la
fonte.
• Un reglage inferieurpeut etre utilise pour
la cuissonde petitesquantites d'aliments
ou si I'ustensileutiliseest tres conducteur.
TABLE DECUmSSONEN
POuR NE PAS ENDOMMAGER LA
TABLE DE CU|SSON EN
V|TROCI__RANiIQUE -- Hodulesradiants
et aux halog_nes seulement:
• Ne pas utiliser de recipients en verre. IIs
risquentde rayerlasurface.
• Nepaslaisserde plastique,sucreoualiments
contenueleveen sucre,fondresur latable
de cuisson chaude. Si cola se produisait,
nettoyer immediatement. (Voir nettoyage,
pages18et 19.)
• Ne jamais laisserle liquide s'evaporerduns
un ustensile, au risque d'endommager la
surfaceet I'ustensile.
Nejamaisutiliser latable de cuissoncomme
plan de travail ou planche _ decouper. Ne
jamaiscuiredirectementlanourrituresurcette
surface.
• Nepasfaireglisserde recipientsenaluminium
sur lasurface.Cesrecipientspeuventlaisser
des marques qui devront etre enlevees
rapidement.(Voirnettoyage,pages18et 19.)
• S'assurerque la surface et que le fond de
I'ustensilesont propres avant de mettre en
marche,afind'eviterde rayerlasurface.
• Pour @iter de rayer ou d'endommager la
surface en vitroceramique, ne pas laisser
dessus,desucre,selougraisse.L:essuyeravec
unlingoou unpapieressuie-toutpropreavant
de I'utiliser.
• Nepasfaireglisserd'ustensilesen metalIourd
surla surfacecar ceci risquede la rayer.
• Ne passe servir de recipient en papier
aluminiumoumateriauidentique.Cemateriau
risquedefondresurleverre.Sidu metalfond
sur la table de cuisson, ne pas s'en servir.
Appeler un r@arateuragreeJenn-Air.
• Si un renversement se produit Iors de la
cuisson,lenettoyerimmediatementalorsque
lasurfaceestencorechaudeafind'eviterplus
de deg_ts par la suite.Userde prudence,et
essuyerlerenversementavecun linge propre
etsec.
• Ne pas utiliser de poudres de nettoyage
abrasivesnidetamponsrecureursqui risquent
de rayerla tablede cuisson.
|6
• Ne pasutiliser de produitsde blanchiment
chores,ammoniaqueouautresproduitsde
nettoyagenon recommandesspecialement
pour la vitroceramique.
MODULE A BROLEURS
SCELLES
Module _ br_leurs scell_s =
JGA8100ADB (noir)
JGA810OADW [blanc)
Losbr01eursscellesde lacuisinieresontfixes
au moduleet ne sont pas prevuspour etre
enleves.Commelesbr01eurssontscellesdans
le module, les debordements ou
renversementsnevont puss'infiltrer sous la
table de cuisson. Cependant, los totes de
brQleurdoiventetrenettoyeesapreschaque
utilisation. (Voir les recommandations de
nettoyage_ la page 19.)
POUR i'-:VITER LA FORMATION DE
TACHES OU UN CHANGEMENT DE
COULEUR DELA TABLEDECUISSON:
• Nettoyerlatable de cuissonapreschaque
utilisation.
• Enleverlos residus renversesde produits
acidesousucresdesquelatabledecuisson
a refroidi; cos produits renversespeuvent
faire changerla couleurde I'email.
_R_LLES DU BROLEUR
Avantune operationde cuisson,verifierque
la grille est correctementplacee.Unegrille
de brOleur incorrectement installee peut
ecaillerI'emaildelatablede cuisson.
Ne pasfaire fonctionner un br_leur sans
qu'un ustensile soit plac_ sur la grille.
UBmail de la grillepouts'_caiBers'il n'ya
aucun ustensile capable d'absorber la
chaleur 6raise par le br_leur.

DE TABLE DE
CUJSSON, SUmTE
MOme si les grilles de brOleur sont tres
durables,ellesperdrontprogressivementleur
lustre et changeront de couleur,du fait des
tempOratureselevOesauxquelleslesbrOleurs
lesexposent.
POUR INSTALLER LE MODULE A
BROLEURSSCELLES:
1. S'assurerque les boutonsde commande
sont surOFF (ARRI_T'J.
2. Enleverdelacavit6toute accumulationde
graisse. (Voir les recommandations de
nettoyage_ la Guidede I'utilisateur.)
3. La partiearri_re etant souleveeplacer le
module _ brOleurs de sorte que les
ouvertures destubes melangeurset les
tiges d'allumagesoientdirigees versles
orifices et la prise. Coulisser le module
jusqu'_ enclenchementdestubes et des
allumeurs,puisbaisserlemodulepourqu'il
s'appuiesur lasurfacede la cuisiniere.
POUR ENLEVER LE MODULE A
BROLEURSSCELLES:
1. Lesboutonsde commandedoivent6tre
la position OFF (,ARRI_T'Jet la cuisiniere
doit avoirrefroidi.
2. Souleverleborddu modulejusqu'bceque
lebasdu modulesortedelacavit& (SiI'on
soulevele moduletrop hautalorsqu'il est
toujours engage, cela risque
d'endommagerlestigesd'allumageetles
tubes melangeurs.)
3. Pourdegager le module, le tenir par les
cotesetlesortir de la priseetdesorifices.
Sortir le module une lois qu'il est
totalementdebranche.
4. Ne pas empiler les modules I_ oQ ils
risquentdetomberoud'etreendommages.
............................................................................................................................................................................................................................................................................................................................................m_
REIVlARQUES=
* Un br_leur convenablement regle et !i
dont lesorificessontpropress'allume !i_
en quelques secondes. Lors de i
I'alimentation au gaz naturel les
flammessont bleues,avecun conein-
ternebleu intense.
Silesflammesd'un brOleursontjaunes _i,
ousi lacombustionestbruyante,le ra- !:i
tio air/gaz peut 6tre incorrect. De-
mander_un technicien d'effectuerle
reglage.(Lagarantiene couvrepasce i:
reglage.)
LorsdeI'alimentationaugazde petrole
liqudie,il estacceptablequeI'extremite
desflammes soit jaune.Ceciest nor-
mal;aucun reglagen'estnecessaire.
* Avec certains types de gaz, on peut !i
percevoirun petitbruit d'explosionIors
de I'extinctiond'un brQleurde surface.
Ceciest normal.
* Sion fait passerrapidementle bouton iI
decommandedela positionhi (max.)
la position Io (rain.), les flammes
peuvents'eteindre,particulierementsi
le brOleurest froid.Si ceci seproduit,
placer le bouton de commande b la i:
position OFF (ARRI_T) et attendre
quelquessecondesavantd'allumerde
nouveaule brQleur.
PourameliorerI'efficacitedecuissonet
pourempecherd'_ventuelsdommages
de la cuisiniereoude I'ustensile,il faut i:
regler la flamme de sorte qu'elle ne
d@assepasdu bord de I'ustensile.
|7

ETTOYAQ E 1
° S'assurerque I'appareil esl arr_t_ et
queloutes lespibcesont refroidiavant
teute manipulation aunettoyage,afin
d'_viter tout dommage et risque de
br_lures.
•Lemodulen'APASbesoind'I_TREenlev6
pour 6trehabituellementnettoy&
• NEJAMAIS tremperlemoduledansl'eau
pour le nettoyer. Cela pourrait
endommager le c_blage. Un trou
d'evacuation dans le module permet
d'evacuertout pmduit renvers6dansle
bac de recuperation o0 les produits
6coulesseregroupentdanslecontenant
graisse.Le fond du module peut 6tre
nettoy6au besoinavec une solution de
detergent.
_OOUL£ CONVENTIONNEL A
ELEM£NTS £N SPIRAL£
ELE.MENTS CHAU FFANTS
*Dans desconditionsnormales,laplusgrande
partie de la salet6s'61imineen brQlant.Les
elementschauffantsse d6 branchent pour
permettre le nettoyage des cuvettes de
propret& Soulever 16gerement 1'616ment
chauffant et le tirer de la prise.NE PASLE
TREMPERDANS L'EAU.Pour remettreen
place les elements, les enfoncer
completementdans la prise.S'assurerque
leselementssent bien_ plat.
CUVETTES DE PROPRETE
* Pour qu'elles restent comme neuves, les
nettoyerfrequemmentet nejamaisy laisser
des produits brQler deux lois. Retirer les
cuvettessalies(enenlevantd'abord1'616ment
chauffant).Nettoyer16gerementlescuvettes
salies avec de I'eau et du savon ou les
nettoyerau lave-vaisselle.
. Lestaches difficiles _ enleverpeuventetre
nettoy6esen frottant 16gerementavecdes
tamponsS.O.S.*savonneuxou des produits
denettoyagenonabrasifscommeBenAmi*.
Pouraider8libererlasalet6attachee,tremper
les cuvettesde propret6dans une solution
composee¢1/2 tassed'ammoniaqueetd'un
gallon d'eautiede, ou lesfaire bouillir dans
deuxlitresd'eaupendant20minutes.0outes
lescuvettesde propret6ne peuventpasetre
mises _ bouillir en meme temps parce que
1'616mentutilis6 dolt avoir une cuvette en
place.)
• Ne pas utiliser de produits de nettoyage
abrasifs, laine d'acier ou produits non
recommandes pour le chrome. Des taches
bleues/doreessur les cuvettesindiquent un
mauvais choix des ustensiles ou bien une
chaleurexcessive,etnepeuventetreenlevees.
SURFACE EN I_IVlAILV|TRIFil_
° L'6mail utilis6 sur cette table de cuisson
possedeunecertaineresistance8I'acidemais
qui n'est pas illimit6e. Par consequent, des
nourritures acides (commevinaigre,tomate,
lait,etc.)renvers6essurlasurfacedoiventetre
nettoy6esimm6diatementavecun lingesec.
* Laverlasurfacerefroidieavecde I'eausavon-
neusetiede et rincer. La polir avec un linge
sec.
* Ne pasutiliserd'agentsdenettoyageabrasifs
ou caustiquesqui pourraientendommagerle
fini de fa%n permanente.
* NE JAMAIS essuyer une surface 6maillee
chaudeou tie de avecun lingehumide.
SURFACE EN ACIER INOXYDABLE
*Avantd'utiliserlatabledecuisson,enlevertout
leplastiquerecouvrantledessus.Seservird'un
produitde nettoyagedu verrepour retirerles
r6sidussetrouvantsurledessuset_I'int6rieur
du rebordsupportant la cuvette de propret&
S'ilrestaitdu plastiquesurlatabledecuisson,
il pourraitbrQleret seraitdifficile_ enlever.
* NE PAE UT/LISER DE PRODUITE DE
NETTOYAGE CONTENANT DU 2,4I/EL=
LIEANT.
* POUR NETTOYER L'AC/ER, EEEUYER
TOUJOURE DANE LE EENE DE LA
TEXTURE.
•Nettoyage journalier/salet6 I_gere =
Essuyeravec I'un des produitssuivants:eau
savonneuse,vinaigre blanc/eau, produit de
nettoyagepourverreetsurfaceFormula409*
ouun produitsemblable-avecun lingesouple
et une 6ponge.Rinceretsecher.Pourpolir et
enleverlesmarquesdedoigts,fairesuivrepar
StainlessSteelMagicSpray(Jenn-Airmodele
A912,piecen° 20000008)**.
* Salet6 mod_r6e/epaisse = Essuyeravec
I'un des produitssuivants:BonAmi*, Smart
Cleanser*ou SoftScrub*- 8 I"aided'un linge
souple ou d'une 6ponge humide. Rincer et
s6cher. Lestaches rebelles peuvent 6tre
enlev6es avec un tampon Scotch-Brite*
humidifi& Frotteruniform6mentdansle sens
du metal.Rincerets6cher.Pourredonnerdu
lustre et enleverlesrayures,fairesuivre par
StainlessSteelMagic Spray.
* D_coloration=A I'aided'uneepongehumide
ou d'un linge souple,essuyeravec Cameo
Stainless Steel Cleaner*. Rincer
immediatement et secher. Pour retirer les
marques et redonner du lustre,faire suivre
par StainlessSteelMagic Spray.
MODULE A ELEMENTS
RADIANTS ET AU× HALOGEN£S
SURFACE EN V|TROCERAMIQUE
Nejamais utiliserde produits de nettoyagedu
four,javellisant, ammoniaqueou produits de
nettoyagedu verrecontenantdeI'ammonbque.
REMAROUE : Prendre contact avec un
r_parateuragre_sib surfaceenvitroc_ramique
sefendille,secasseou side I'alumbiumoudu
m_talfondsurb surface.
* Laisserb surfacede cuissonrefroidiravant
dela nettoyer.
* G_n_ralit_s =Nettoyerlasurfacedecuisson
apreschaqueemploiou au besoin,avecdu
papier essuie-tout humidifi6 et Cooktop
CleaningCreme*(n° de piece20000001)**.
Puis,essuyeravec un lingesec et propre.
REMARQUE: Des marquespermanentes
vontseproduiresi /asa/et_restesur/a sur-
facede cuissonetestcuitedefagonr_p_t_e.
* Salet6 6paisse ou marques m6talliques
- Humidifierune@onge_recurer<<nerayant
pas_).AppliquerduCooktopCleaningCreme*
et frotter pour retirer autant de salet6 que
possible. Appliquer une mince Cooktop
CleaningCreme*,recouvrir avecdu papier
essuie-tout humidifi6 et laisserpendant30
45 minutes(2 _ 3 heurespour le sol tres
Iourd). Conservez moite en couvrant la
*Les nomsde marquedes produitsde nettoyagesent desmarquesd@oseesdesdifferentsfabricants.
** Pourcommanderdirectement,composerle 1-800-JENNAIR (1-800-536-6247).
i8

£TTOYAG£, SUmTE]
serviette de papier d'enveloppe en
plastique.Frotter8 nouveau,puisessuyer
avecun linge propreetsec.
REMARQUE: N'utiliser qu'un tampon
r_curer<<herayantpus>>,propre ethumide,
sansdangerpour lesustensilesde cuisine
non adherents.Le verreet le motif seront
endommag_ssile tamponn'estpushumide,
s'ilestsouill_ou dun autretypedetampon
estutilise.
Saletes cuites ou dessechees - Frotter
avecun 6ponge_ recurer<{nerayantpas>>
et CooktopCleaningCreme*(n° depiece
20000001)**.
REMARQUE: Tenirune lamede rasoir
un angle de 30° et gratter pour enlever
toute salet6 restante.
nettoyercomme il est
decrit ci-dessus. Ate
pus se servir de la
lame de rasoir
tousles jours,
celapourrait user le
motif du verre.
Plastique ou sucre fondu - Regler
immediatementI'elementsurLOWetgratter
lesucreet leplastiquede lasurfacechaude
pour les pousser vers une zone moins
chaude. Puis I_TEINDREI'element et le
laisserrefroidir.Nettoyer le residu avecun
grattoir8lamederasoiretCooktopCleaning
Creme*.
BROLEURS A GAZ SOELLF.S/
GRILLES
• Laisserlebr01euretlesgrillesrefroidir.Leslaver
I'eausavonneuseetavecuntamponrecureur
en plastique.Pourlestachesrebelles,nettoyer
avec un tampon non abrasif,remplide savon
ou avecuneepongeetunproduitde nettoyage
pourtable de cuisson(piecen°20000001)**.
• Nettoyerlesorificesde gazavecune brosse
soles douces ou une aiguille,surtout I'orifice
sousI'allumeur.Nepaselargirou ddormer les
orifices.
Faireattention de ne pas laisserpenetrerde
reaudanslesorificesde br01eur.
Lorsdunettoyage,userdeprudencepoureviter
d'endommagerI'allumeur.Sicedernierestsail,
mouilleouendommage,lebr01eurnes'allumera
pus.
*Lesnomsde marquedesproduitsde nettoyagesont desmarquesd@oseesdes differentslubricants.
** Pourcommanderdirectement,composerle 1-800-JENNAI R (1-800-536-6247).
[ ccEssom RES
ELEMENT POUR MARM_TES
DE CONSERVES
ModNe A145A
L'element pour marmites
de conserves permet
I'utilisa-tion de recipients
de grande taille, 8 fond
nervure ou _ rebords, avec le module
conventionnel8 elementsen spirale.
Suivez ces m6thodes pour faire des
conserves:
•Amener I'eau_ ebullition sur le reglageHi
(max.);uneloisque1'ebullitionacommence,
reduirelapuissancedechauffageau reglage
le plusfaible pour maintenir%bullition.
• S'assurerque le recipients'adaptebiensur
le centrede 1'element.
• Les recipients 8 fond plat donnent les
meilleursresultats.
OUI NON NON
* Choisirdes recettesd'une sourceconnue
commelelubricant devotre recipientet les
fabricants desbocauxde conserves.
• La preparation de conserves est un
processusqui produitde grandesquantites
de vapeur.Suivrelesinstructionsdonnees
aveclesustensilespour eviterdese br01er
par lavapeurou parles recipientschauds.
• Silaregionconnaitdesbaissesdetension,
la preparation des conserves risque de
prendre plusIongtempsqu'il n'estindique
dunslesinstructions.
Modde A0142
Utiliser le wok _ fond
plat de Jenn-Air pour
obtenirlesmeilleursresultats.Lewok modele
A0142 comporte un fini non adherent,des
poigneesen bois, un couvercle,un support
pour cuisson8 la vapeur,des spatules,des
recettesetconseilsde cuisson.
19
GRmLL ELECTRmQU E
ModNe ]EA8OOOADB
Comprendon elementgrilloir,deuxgrilleset
un bacde recuperation.
OOUVERCLE BE GR_L
Modde A341 (detrique)
Modde AG341 (gaz)
Le couvercle de gril
protegelegril Iorsqu'iln'est
pusutilise.IIexisteen acier
texturedecouleurnoireou
blanche avec poignees
moulees.
La page charge ...
La page charge ...
La page charge ...
La page charge ...
La page charge ...
La page charge ...
La page charge ...
La page charge ...
La page charge ...
La page charge ...
La page charge ...
La page charge ...
La page charge ...
La page charge ...
La page charge ...
La page charge ...
-
 1
1
-
 2
2
-
 3
3
-
 4
4
-
 5
5
-
 6
6
-
 7
7
-
 8
8
-
 9
9
-
 10
10
-
 11
11
-
 12
12
-
 13
13
-
 14
14
-
 15
15
-
 16
16
-
 17
17
-
 18
18
-
 19
19
-
 20
20
-
 21
21
-
 22
22
-
 23
23
-
 24
24
-
 25
25
-
 26
26
-
 27
27
-
 28
28
-
 29
29
-
 30
30
-
 31
31
-
 32
32
-
 33
33
-
 34
34
-
 35
35
-
 36
36


Jenn-Air Expressions JEA8120ADB Manuel utilisateur
- Taper
- Manuel utilisateur
dans d''autres langues
Documents connexes
-
Jenn-Air Cooktop CARTRIDGES AND ACCESSORIES Manuel utilisateur
-
Maytag Jenn-Air Two-Element Cooktop Manuel utilisateur
-
-
Jenn-Air JEC8430ADS Manuel utilisateur
-
-
-
Jenn-Air JEC9530BDB Manuel utilisateur
-
-
-