
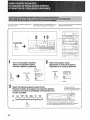
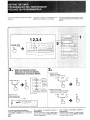
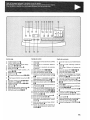
NSX-D939
COMPACT DISC STEREO SYSTEM
STEREO INTEGRATED AMPLIFIER/STEREO
TUNER
RX”N939 u
STEREO CASSEllE DECWCOMPACT DISC PLAYER
FD-N939
SPEAKER SYSTEM
SX-N939
1
~~
.$. ,,. ,>
,.:,: .- .; :.
WARNING: TO REDUCE THE RISK OF FIRE OR ELECTRIC SHOCK, DO NOT EXPOSE THIS APPLIANCE TO
1’..;“,-
,,. ;
., ----,:
RAIN OR MOISTURE.

OWNER’S RECORD
NOTE
For your convenience, record the model number and serial number (you
This equipment has been tested and found to comply with the limits for a
will find them on the rear of your set) in the space provided below. Please
Class B digital device, pursuant to Part 15 of the FCC Rules. These limits
refer to them when you contact your AIWA dealer in case of difficulty.
aredesignedto provide reasonable protection against harmful interference
Model No.
RX-N939U
Serial No.
[
Model No.
FD-N939
Serial No.
Model No.
SX-N939
Serial No.
1
“CAUTION:TO REDUCE THE RISK OF
ELECTRIC SHOCK,
DO NOT REMOVE COVER (OR BACK).
NO USER-SERVICEABLE PARTS INSIDE.
REFER SERVICING TO QUALIFIED
SERVICE PERSONNEL.”
Explanation of Graphical Symbols:
A
A
●
The lightning flash with arrowhead symbol, wlthm an
equilateral triangle, ISintended to alerl the user to the
presence of uninsulated ‘(dangerous voltage” within
the product’s enclosure that may be of sufficient
magnitude to constitute a risk of electric shock to
persons,
The exclamation point within an equilateral triangle IS
intended to alert the user to the presence of important
operating and maintenance (serwcmg) instructions in
the literature accompanying the appliance.
in a residential installation.
This equipment generates, uses, and can radiate radio frequency energy
and, if not installed and used in accordance with the instructions, may
cause harmful interference to radio communications. However, there is no
guarantee that interference will not occur in a particular installation. If this
equipment does cause harmful interference to radio or television reception,
which can be determined by turning the equipment off and on, the user IS
encouraged totryto correct the interference by one or more of the following
measures:
– Reorient or relocate the receiving antenna.
– Increase the separation between the equipment and receiver.
– Connect the equipment into an outlet on cwcuit different from that to
which the receiver is connected.
– Consult the dealer or an experienced radio~V technician for help.
CAUTION
Modifications or adjustments to this product, which are not expressly
approved by the manufacturer, may void the user’s right or authority to
operate this product.

FEATuREs ..............................................4
Precautions .......................................5
CONNECTIONS ......................................6
USING THE SYSTEM ...........................12
SETTING THE CLOCK ..........................13
ADJUSTING THE SOUND ....................15
PLAYING COMPACT DISCS ................16
PLAYING BACK TAPES ........................22
TUNING INTO A STATION
MANUALLY .......................................26
PRESETTING STATIONS .....................28
RECORDING TO TAPE ........................30
RECORDING FROM COMPACT
DISCS ...............................................32
ACTIVE EDIT RECORDING ..................34
DUBBING TAPES ..................................4O
USING GRAPHIC EQUALIZER .............42
PROCESSING SURROUND SOUND ...48
USING DOLBY SURROUND
SOUND .............................................50
MEMORIZING THE SYSTEM
SETTINGS ........................................56
SETTING THE TIMER ...........................58
SETTING THE WAKE UP SOUND .......61
SETTING THE SLEEP TIMER ..............62
KARAOKE ............
.................................64
LISTENING TO OTHER SOURCES .....66
MAINTENANCE ....
.................................67
sPEclFlcATloNs .................................68
TROUBLESHOOTiNG GUIDE ..............71
PART IDENTIFICATION ........................74
CARACTERkTICAS ...............................4
PRECAUCIONES ....................................5
CONEXIONES .........................................6
UTILIZATION DEL SISTEMA ................I2
PUESTA EN HORA DEL RELOJ ..........13
AJUSTE DEL SONIDO ..........................15
REPRODUCTION DE DISCOS
COMPACTOR ...................................16
REPRODUCTION DE CINTAS .............22
SINTONiA MANUAL DE EMISORAS ....26
MEMORIZATION DE EMISORAS ........28
GRABACION DE CINTAS .....................30
GRABACION DE DISCOS
COMPACTOS ...................................32
GRABAC16N CON EDICION
ACTIVA .............................................34
DUPLICATION DE CINTAS ..................40
UTILIZATION DE
ECUALIZADOR GRAFICO ...............42
PROCESADOR DE
SONIDPERIMETRICO .....................48
UTILIZATION DE SONIDO
PERIMETRICO DOLBY ....................50
MEMORIZATION DE LOS AJUSTES
DEL SISTEMA ..................................56
PROGRAMACION DEL
TEMPORIZADOR ..............................58
PROGRAMACION DEL
DESPERTADOR ................................61
PROGRAMACION DEL CRONODES-
CONECTADOR
.................................62
KARAOKE ..............................................64
ESCUCHA DE OTRAS FUENTES ..........66
MANTENIMIENTO ..................................67
ESPECIFICACIONES
.............................69
GU[A PARA LA SOLUCION DE
PROBLEMAS ...72................................72
IDENTIFICATION DE PARTES ...............74
CARACTERISTIQUES ............................4
Precautions .......................................5
RACCORDEMENTS ...............................6
UTILISATION DE LA CHAINE ..............12
REGLAGE DE L’HORLOGE .................13
REGLAGE DU SON ..............................15
LECTURE DE DISQUES
COMPACTS .....................................16
LECTURE DE CASSETTES .................22
ACCORD MANUEL D’UNE
STATION ..........................................26
PREREGLAGE DES STATIONS ..........28
ENREGISTREMENT SUR
CASSETTE .......................................30
ENREGISTREMENT DE DISQUES
COMPACTS .....................................32
ENREGISTREMENT PAR
MONTAGE ACTIF ............................34
COPIE DE CASSETTES .......................40
UTILISATION DE L’EGALISEUR
GRAPHIQUE ....................................42
TRAITEMENT DU SON SURROUND ...48
UTILISATION DU DOLBY
SURROUND .....................................50
MEMORISATION DES REGLAGES
DE LA CHAINE .................................56
REGLAGE DU PROGRAMMATEUR ....58
REGLAGE DU SON DU REVEIL ..........61
REGLAGE DU TEMPORISATEUR .......62
KARAOKE .................
.............................64
AUTRES SOURCES .............................66
ENTRETIEN ..........................................67
sPEclFlcATloNs .................................7o
GUIDE DE DEPANNAGE ......................73
NOMENCLATURE ................................74
3

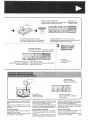
Dolby Pro Logic Surround System
Byaddingcenterand surround speakers in addition
to the main speakers, you can enjoy Dolby Pro
Logic Surround on this system.
Three CD changer system
Up to three compact discs can be loaded for
continuous playback. Without interrupting
playback, two of the discs can also be changed.
Active CD-edit functions
Two active edit functions are provided to easily
record compact discs and to make original tapes.
CD-synchronized recording
When recording compact discs, CD playback and
tape recording begin simultaneously.
Karaoke functions
Vocals on regular compact discs orcassettetapes
can be faded, making your discs karaoke music.
DSP (Digital Signal Processor) system
A DSP system produces surround effects to
emulate different environments. Audio signals are
converted into digital ones and processed digitally
within the DSPcircuitry. The system can reproduce
them in 6 different presences. DSP-produced
sound can be recorded onto tape as well,
Timer and sleep functions
Wake up to music in the morning, and fall asleep
to it at night.
Features in amplifier section
*
*
0
BBE for clear and vivid high-frequency sound.
AIWA is the world’sfirst manufacturer to employ
the BBE sound system in consumer audio
equipment. -
The feature also helps your voice to be clearer
when singing with the Karaoke function.
T-13ASS for realistic reproduction of low-
frequency sound with compact speakers.
Sixeasilyselectable, preset equalization curves
to match the playing music.
Sistema perimetrico Dolby Pro Logic
At7adiendo altavoces central y perimetricos
ademas de Ios principals, podra disfrutar de
sonido perimetrico Dolby Pro Logic con este
sistema.
Cambiador de tres discos compactos
Podran cargarse hasta tres discos compactos
para reproduction continua. Tambi6n podran
cambiarse dos de Ios discos sin interrumpir la
reproduction.
Funciones de edition activa de discos
compactos
Existen dos funciones de edition activa para
grabar facilmente discos compactos y
confeccionar cintas originals.
Grabacion sincronizada con discos comuactos
Cuando grabe discos compactor, la reproduction
del disco y la grabacion de la cinta se iniciaran
simultaneamente.
Funciones de Karaoke
La parte vocal de Ios discos compactos normales
o cintas podra eliminarse para utilizarlos como
mtisica de Karaoke.
Sistema procesador de sehales digitales
(DSP: Digital Signal Processor)
El sistem DSP produce efectos perimetricos para
emular distintos ambientes. Las seiiales de audio
se convierten a digital y se procesan digitalmente
dentro del circuito DSP, El sistema puede
reproducirlas despues con 6 diferentesambientes
actisticos. El sonido procesado con el DSP podra
grabaras tambien en cintas.
Funciones de temporizador y cronodes-
conectador
Permiten despertarse con mtisica por la maiiana,
y dormirse con ells por la noche.
Caracterksticas de la seccion del am~lificador
●
●
●
BBE para un sonido claro y vfvido con alta
frecuencia. AIWA es el primer fabricate del
mundo en emplear el sistema de sonido BBE
en equipamientos deaudio parael consumidor.
Esta caracteristica tambien ayuda a que su voz
sea mas clara cuando canta con la funcion de
Karaoke.
T-BASS para una reproduction realistic del
sonido de baja frecuencia con altavoces
compactos.
Seis curvas de ecualizacion preprogramadas,
faciles de seleccionar para adecuarse a la
mtisica reproducida.
Systeme de surround Dolby Pro Logic
En ajoutant une enceintecentrale et des enceintes
de surround aux enceintes principals, vous
pouvez beneficier d’un son surround Dolby Pro
Logic.
Lecteur a changeur trois CD
Vous pouvez charger trois disques compacts
pour la lecture continue. Vous pouvez egalement
changer deux disques saris interrompre la lecture
du troisieme.
Fonctions de montage actif de CD
Deux fonctions de montage actif permettent
d’enregistrer facilement des disques compacts et
de realiser des bandes originals.
Enregistrement synchronise de CD
Lors de I’enregistrement d’un disque compact,
vous pouvez faire demarrer simultanement la
lecture du CD et I’enregistrement sur cassette,
Fonctions de karaoke
Vous pouvez attenuer Ies parties vocales des
disques compacts ou des cassettes ordinaires
pour obtenir des musiques de karaoke et chanter
vous-m~me.
Systeme DSP(processeurde signal num&ique)
Le processeurde signal numerique DSP cr6e des
effetssurround qui simulentdifferentes ambiances.
Les signauxaudio sent numerisesdans Ies circuits
du processeur DSP, qui peut Ies restituer selon 6
ambiances differences. Vous pouvez egalement
enregistrer sur cassette Ie son ainsi produit,
Fonctions radio-reveil et temporisateur
Reveillez-vous Ie matin en musique et endormez-
vous en ecoutant vos morceaux preferes.
Caracteristiques de la section de I’amplificateur
●
●
●
Le systeme BBE assure une reproduction claire
et vivante des hautes frequencies, AIWA est Ie
premier fabricant au monde a appliquer Ie
systeme BBEdans Iesequipementsaudio grand
public.
Quand vous chantez en karaoke, Ie systeme
BBE rend aussi votre voix plus claire.
Le systeme T-BASS assure une reproduction
realiste des basses frequencies avec des
enceintes compactes.
Six prereglages de courbe d’egalisation faciles
a selectionner en fonction de la musique.
4

Follow the advice below for safe and correct
operation:
On AC voltage
Before use, check that the rated voltage of your
system matches your local voltage.
Fan on the rear panel
❑
The system can output greatly, If this happens,
the internal temperature increases and then the
fan on the rear panel moves and emits the heat,
Do not unreasonable stop the fan and do not insert
foreign objects into the fan.
When placing the unit, be careful not to cover the
fan with anything,
On safety
●
●
●
When plugging and unplugging the AC cord,
grip the plug and not the cord itself. Pulling the
cord may damage it and create hazards.
When you are not going to use the system for a
long period of time, disconnect the AC cord. If
thecordisplugged in, asmallamountofcurrent
continues to flow to the system, even if the
power button is set to off.
If the AC cord is broken or damaged, or if the
wires are exposed, contact your dealer or an
AIWA service center and have it replaced or
repaired immediately,
On placement
●
●
●
Do not use the system in places which are
extremely hot, cold, dusty, or humid.
Place the system on a flat, level surface.
Be careful not to obstruct the ventilation holes
on the rear panel of the amplifier, since increased
internal temperature may affect the electrical
parts. In particular, do not place the system in
an air-tight rack.
On condensation
When moving the system from a cold to warm
room, or immediately after turning on a heater in
a cold room, condensation may form on the lens
of the CD player, causing irregular operation. If
this happens, remove any CD from the player, and
with the power left on, leave the system as it is.
Regular operation will return once the
condensation has evaporated.
To reset
If an unusual condition occurs in the display
window or on the CD/cassette player, reset the
unit as follows:
1 Press the POWER button to turn off the power.
2 With the MEMORY button pressed down, press
the POWER button to turn the power back on.
3 Reset the clock, timer, color format, and preset
the stations, etc.
Should any trouble occur, unplug the AC cord and
refer servicing to qualified personnel only.
Para obtener una operation segura y apropiada,
siga Ios consejos ofrecidos a continuation:
Tension de CA
Antes de utilizar el sistema, compruebe si su
tension de alimentacion coincide con lade la red
local,
Ventilator en el panel posterior
❑
El sistema puede ofrecer una salida muy grande,
Cuando suceda esto la temperature interna
aumentara, y el ventilator del panel posterior se
pondra en funcionamiento y emitira calor.
No pare a la fuerza el ventilator ni Ie inserte
objetos extraiios.
Cunado coloque la unidad, tenga cuidado de no
cubrir el ventilator con nada.
Seguridad
●
●
●
Para conectar y desconectar el cable de CA,
sujete el enchufe, no el propio cable. Si tirase
del cable podria daharlo, 10 que resultarfa
peligroso.
Cuando no vaya a utilizar el sistema durante
mucho tiempo, desconecte et cable de
alimentacion de CA. Cuando el cable de
alimentacion este conectado, circulara una
pequeria cantidad de corriente incluso aunque
el boton de alimentacion se haya puesto en
OFF.
Si el cable de alimentacion de CA se romoe o
daila, osi Ios hilosestan al descubierto, pongase
en contacto con un centro de reparaciones
AIWA para que se 10reparen o cambien inme-
diatamente.
Ubicacion
●
●
●
No utiliceel sistemaen Iugaresextremadamente
calidos, fries, polvorientos, ni htimedos,
Coloque el sistema sobre una superficie
nivelada.
Tenga cuidado de no obstruir Ios orificios de
ventilation del panel posterior del amplificador,
ya que el aumento de la temperature interna
podria afectar Ios components electronics.
En particular, no coloque el sistema en un
armario cerrado.
Condensation de humedad
Si traslada el sistema de un Iugar fr[o a una sala
calida, o inmediatamente despuesde haberpuesto
en funcionamiento un aparato de calefaccion en
una salafrfa, esposibleque recondense humedad
en el objetivo del reproductor de discos compactos,
haciendo que funcione irregularrnente. Cuando
suceda esto, extraiga Ios discos compactos del
reproductor y deje asi el sistema con la alimen-
tacion conectada. Unavez evaporada la humedad,
el reproductor funcionara correctamente.
Para reponerlo
Si ocurre alguna conditional anormal en el
visual izador o en el reproductor de discos
compactos/casete, reponga la unidad del modo
siguiente:
1 Presione el boton POWER para desconectar la
alimentacion.
2 Con el boton MEMORY presionado, presione
el boton POWER para conectar de nuevo la
alimentacion.
3 Ajuste otra vez el reloj, temporizadorj formato
de colores, y preajuste Ias emisoras, etc.
Si se produce algtin problems, desconecte el
cable de alimentacion de CA ysolicite Ios servicios
de personal cualificado solamente.
Veuillez respecter Ies consignes ci-dessous
concernant I’utilisation correcte et la securite:
Tension secteur
Avant utilisation, verifiez que la tension nominale
de cet appareil correspond a la tension du secteur
local.
Ventilateur sur Ie panneau arriere
❑
La puissance de sortie de la cha~ne peut etre
elevee, et clans ce cas, la temperature interne
augmente, Le ventilateur sur Ie panneau arriere
tourne pour expulser la chaleur,
Pour cette raison, ne bloquez pas Ie ventilateur et
n’inserez pas d’objets etrangers dedans.
Quand vous installez la chalne, prenez soin de ne
pas recouvrir Ie ventilateur.
Securite
●
●
●
Lorsquevous branchez et debranchez Iecordon
secteur, saisissez-le par la fiche et non par Ie
cordon proprement alit, pour eviter
d’endommager Ie cordon et de creer une
situation dangereuse.
Si vous ne devez pas utiliser la chahe pendant
Iongtemps, d6branchez Ie cordon secteur. S’il
reste connecte, une petite quantite de courant
continue de circuler clans la cha?ne, m~me si
elle est eteinte.
Si Ie cordon d’alimentation secteur est couDe
ou endommage, ou si Iesfils sent a nu, contactez
votre revendeurou un service apres-vente Aiwa
pour Ie faire immediatement remplacer.
Emplacement
●
●
●
N’utilisez pas la cha~ne clans un endroit
extrsmement chaud, froid, poussiereux ou
humide.
Posez la chalne sur une surface plane et
horizontal,
Faites attention a ne pas obstruer Ies orificesde
ventilation sur Ie panneau arriere de
I’amplificateur,
car une elevation de la
temperature interne pourrait affecter Ies
composantselectriques. En particulier, lachalne
ne doit pas etre installee clans un meuble
hermetiquement ferme.
Condensation
Si vous deplacez la chalne d’un endroit froid vers
un endroit chaud, ou Iorsque vous chauffez
rapidement une piece froide, de I’humidite risque
de secondensersur la Ientille du lecteur CD et de
provoquer des anomalies de fonctionnement.
Dans ce cas, sortez tous Ies CD du Iecteur et
laissez la cha~ne allumee saris I’utiliser. Le
fonctionnement normal sera retabli des que la
condensation sera evaporee.
Reinitialisation
Sides indications inhabituelles sent affichees ou
si le Iecteur de CD/Cassette ne fonctionne pas
normalement, reinitialisez-le de la maniere
suivante:
1 Appuyez sur la touche POWER pour mettre
hors tension.
2 Tout en tenant la touche MEMORY enfoncee,
appuyez sur la touche POWER pour remettre
sous tension.
3 Remettez I’horlogeal’heure, reglez la minuterie,
Iacouleurde I’eclairageet prereglez Iesstations.
En cas de probleme, debranchez Ie cordon
secteur et faites appel a un technician qualifie
uniquement.
5

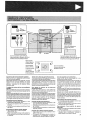
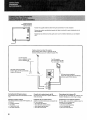
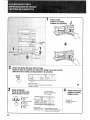
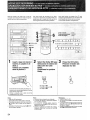
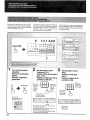
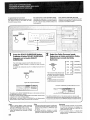
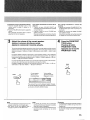
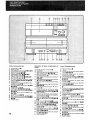
There are two ways to set up the system:
Existen dos formas de instalar el sistema:
II y a deux manieres cf’installer la cha~ne:
Vertically Amplifier/tuner on top
Verticalmente: Amplificador/sintonizador en la
Verticalement: Amplificateur/tuner au-dessus
Horizontally: Amplifier/tuner to the right (when
parte superior
Horizontalement: Amplificateur/tuner a droite
looking from the front)
Horizontalmente: Amplificador/sintonizador a la
(vu de face)
derecha (Mirando desde la parte frontal)
=%
+-
%
tJ
I
Cbnnect the striped leads to @.
Q
+“
Conecte Ios conductors con raya a @.
o
0
Brancher Ie fit raye sur @.
To an AC outlet@=
A un tomacor-
riente de CA
Vers une prise
secteur
To connect, push in until it clicks.
To disconnect, pull out while pressing both sides in.
Para conectar, presione hasta que chasquee.
Para desconectar, tire hacia afuera presionando
Pour brancher, enfoncez jusqu’au dec!ic,
ambos Iados.
Pour debrancher, tirez en appuyant de chaque cde.
*
Making the connections
Conexiones
En ce qui concerne Ies raccordements
s Plug in the AC power cord only after making the
● Enchufeel cable dealimentacion de CAdespues
● Branchez Ie cordon secteur en dernier, Iorsque
system connections.
de haber realizado Ias conexiones del sistema.
tous Ies elements sent raccordes.
● Connect correctly. If the + and – leads are
● Conecte correctamente. Si invierte 10s con-
● Raccordez Ies cordons correctement. Si Ies fils
reversed, the sound wavers.
ductores + y –, el sonido fluctuara.
+ et – sent inverses, Ie son presentera des
fIuctuations.
Speaker connections
Notas sobre la conexion de Ios altavoces
●
●
●
“Speaker impedance is as follows:
●
Left and right: 6 ohms
Centec 8 ohms
Surround: 16 ohms
The speaker system is magnetically shielded. .
However, if the speakers should affect the color
on a TV screen, turn off the TV, and turn it on
again 15–30 minutes later. If the TV screen still
has poor color, move the speakers away from
the TV.
Do not leave magnets or objects generating
magnetism near the speaker system.
●
6
La impedancia de Ios altavoces es la siguiente:
En ce qui concerne Ies enceintes
Izquierdo y derecho: 6 ohmios -
●
Central: 8 ohmios
Perimetricos: 16 ohmios
Este sistema de altavoces esta magneticamente
apantallado. Sin embargo, si Ios altavoces .
afectan el color de la pantalla de un televisor,
desconecte la alimentacion de este y vuelva a
conectarla despues de 15 a 30 minutes. Si el
colorde Iapantallasigue siendode malacalidad,
aparte Ios altavoces del televisor.
No deje imanes ni objetos que generen
●
magnetism cerca del sistema de altavoces.
Impedance des enceintes:
Gauche et droite: 6 ohms
Centrale: 8 ohms
Surround: 16 ohms
Elles sent blindees contre Ie magnetism.
Cependant, si Ies enceintes affectent Iacouleur
d’un ecran TV, eteignez Ie televiseur, puis
remettez-le sous tension au bout de 15 a 30
minutes. Si la couleur est toujours mauvaise,
eloignez Ies enceintes du televiseur.
Ne laissez pas d’aimant ou autre objet
produisant un champ magnetique pres des
enceintes.

W
..
.
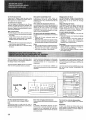
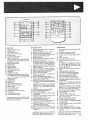
&iim-
0
Surround speaker (right) SX-R21 O
Surround speaker (left) SX-R21 O
Altavoz perimetrico (derecho) SX-R21 O
Altavoz perimetrico (izquierdo) SX-R21 O
Enceinte surround (droite) SX-R21 O
Enceinte surround (gauche) SX-R21 O
Right speaker
Altavoz derecho
Enceinte droite
Center speaker
Altavoz centrico
Enceinte centrale
Left speaker
Altavoz izquierdo
Enceinte gauche
Surround speakers
Altavoces perimetricos
Enceites surround
Sound from the surroundlcenter s~eakers
Sonido de Ios altavoces uerimetricos/central
Son des enceintes surround/centraie
When the DSP is on (page 48), souhd is heard
from the surround speakers.
When Dolby Surround is on (page 50), sound is
heard from the surround speakers, the center
speaker or from the both surround and center
speakers, depending on the selected Dolby
Surround mode.
To adjust the volume of the surround/center
speakers
When the DSP/Dolby Surround mode is selected,
the volume of the surround/center speaker can be
adjusted.
Press the VOLUME SELECT button on the remote
control to select the speakers to be adjusted. Press
the VOLUME buttons on the remote control within
four seconds. S (Surround) orC (Center) isdisplayed
in the display window during those four seconds.
Connecting surround speakers
● Connect only surround speakers to the
SURROUND SPEAKERS jacks.
● Use surround speakers with an impedance of
16 ohms.
● Connect surround speakers to both the left and
right jacks.
Connecting an optional woofer speaker
● Use a woofer with an internal amplifier
(AIWA TS-W5, etc.).
Q Refer to the owner’s manual of the woofer for
further details on how to connect to and use with
an amplifier.
Cundo este activado el DS~ (pagina 48), el sonido se
oira a traves de Ios altavoces perim&ricos.
Cuandoeste activadoel sistemade sonido perimetrico
Dolby (pagina 50), el sonido se oira a traves de Ios
altavoces perimetricos, el central, o a traves de Ios
perimetricos y el central, dependiendo del mode del
sistema de sonido perimetrico Dolby.
Para ajustar el volumen de Ios altavoces
perimetricos/central
Cuando haya seleccionado e! modo DSP/sonido
perimetrico Dolby, podra ajustar el volumen de Ios
altavoces peri perimetricos/central.
Presione el boton VOLUME SELECTdel controlador
remoto para elegir Ios altavoces que desee ajustar,
Presione Iosbotones VOLUME del controladorremoto
antes de cuatro segundos. En el visualizador
aparecera S (altavoces perim&ricos) o C (altavoz
central) durante cuatro segundos.
Conexion de aitavoces perimletricoa
6 Conecte solamente altavoces perimetricos a Ias
tomas SURROUND SPEAKERS.
. Utilice altavoces perimetricoscon una impedancia
de 16 ohmios,
● Conecte altavoces perimetricos a ambas tomas,
izquierda y derecha.
Conexion de un altavoz de graves optional
. Utilice unaltavoz degravesconamplificadorinterno
(AIWA TS-W5, etc.)
. Con respecto a Ios detalles sobre la conexion y la
utilization con un amplificador, consulte Ias
instrucciones de manejo del altavoz de graves.
Quand Ie DSP est en service (page 48), Ie son
provient des enceintes surround,
Quand IeDolby Surround est en service (page 50), Ie
son provient des enceintes surround, de I’enceinte
centrale ou des enceintes surround et de I’enceinte
centrale, selon Ie mode Dolby Surround selectionne.
Pour regler Ie volume des enceintes surround/
centrale
Quand Iemode DSP Dolby Surround est selectionne,
vous pouvez regler Ievolume des enceintessurround
et de I’enceinte centrale.
Appuyez sur la touche VOLUME SELECT de la
telecommande pour s~lectionner Ies enceintes que
vousvoulez regler. Appuyezsur Iestouches VOLUME
de Iatelecommande en I’espace dequatresecondes,
S (Surround) ou C (Center) est affiche pendant ces
quatre secondes,
Raccordement des enceintes surround
● Ne raccordez que des enceintes surround aux
prises SURROUND SPEAKERS.
* Prenez soin de raccordez [es enceintes surround
aux deux prises droite et gauche.
Raccordement d’une enceinte de graves
optionnelle
. Utilisez unwoofer avecamplificateur interne (AIWA
TS-W5, par exemple)
● Pour Ies details concemant Ie raccordement et
I’utilisation avec un amplificateur, consultez Ie
mode d’emploi de I’enceinte de graves.
7

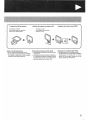
Antenna terminals
Terminals de antenas
Bornes dantenne
Position the supplied antennas after finding the best direction for radio reception.
Coloque Ias antenas sumistradas despues de haber encontrado la mejor orientation para la
radiorrecepcion.
Positionnez Ies antennes fournies aprbs avoir trouve la meilleure direction pour la reception
radio.
Outdoor antenna for better FM reception
Antena exterior para mejorar la recepcion de FM
Antenne exterieure pour une meilleure reception FM
%5
For FM reception
Para la recepcion de FM
For AM reception
Pour la reception FM
Para la recepcion de AM
II
Pour la reception PO/GO
FM feeder antenna (supplied)
Antena interior de FM (suministrada)
Antenne FM (fournie)
~[Kq
I
,‘
AM loop ani
1’s
~ Antena de c
i ~ A1-.+aht-.*r.-,
WI1
tenna (supplied)
:uadro de AM (suministrada)
L
fi,
,,-
“~dre PO/GO (fournie)
L
7
Connecting the FM feeder antenna
Do not bring the ends near metal objects or curtain
rods.
Placing an outdoor antenna
If an outdoor antenna is used for FM reception, do
not place it:
● in building shadows
. near traffic
. on galvanized roofs
● near other antennas
Conexion de la antena interior de FM
No acerque Ios extremes a objetos metalicos ni
rieles de cortinas.
Instalacion de una antena exterior
Si utiliza una antena exterior para la recepcion de
FM, no la coloque:
● en sombras de edificios
. cerca del trafico automovil istico
● sobre tejados galvan izados
● cerca de otras antenas
Raccordement da I’antenne FM
Ne fixez pas Ies extremities de I’antenne pres
d’objets metalliques ou d’une tringle a rideau.
Emplacement d’une antenne exteriaure
Si vous utilisez une antenne exterieure pour la
reception FM, ne I’installez pas:
● a I’ombre d’un b&iment
. pres d’une route frequented
● sur un toit galvanise
● Pres d’une autre antenne
8

To position the AM loop antenna
Ubicacion de la antena de cuadro de AIM
Installation de I’antenne cadre PO/GO
To stand on a surface
To hang on a wall
Para colarla sobre una superficie
Para colgarla de una pared
Pose sur une surface plane
Pose sur un mur
Notes on the AM loop antenna Notas sobre la antena de cuadro de AM Remarques sur I’antenne cadre POIGO
. Do not unwind the 1000ed antenna wire.
● No desbobine el conductor en forma de cuadro
● Ne deroulez pas Ie fil de I’antenne cadre.
● Do not bring the loop antenna near a turntable
de la antena.
. N’installez pas I’antennecadre presd’une platine
or CD player, or close to the AC cord or speaker
● Noacerque Iaantenadecuadroa un giradiscos,
tourne-disque, d’un Iecteur CD, du cordon
cords since noise will be picked up.
a un reproductorde discos compactos, al cable secteur ou des cordons d’enceinte, car elle
de alimentacion de CA, ni a Ios cables de Ios
pourrait capter des interferences.
altavoces, porque podr~a captar ruido.
9
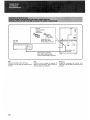
—

m
I #
@@l
@@
P
b
Tapa guardapolvo
u
ere@%
Digital optical link
DAT deck
Enlace optico digital
Deck DAT
Entree optique numerique
Platine a cassette audio numerique
P
❑ TO
$ OPTICAL
Digital optical link (optional)
&
Enlace optico digital (optional)
—
Cordon numerique optique (optionnel)
k
?#
Note
Nota
Remaraue
When the CD DIGITAL OUT (OPTICAL)
Cuando no vaya a emplear el conector CD
Lorsqu& Ie connecter CD DIGITAL OUT
connector is not used, keep the supplied dust cap
DIGITAL OUT (OPTICAL), dejele colocado el
(OPTICAL) n’est pas utilise, fixer dessus Ie cache
attached,
tapon guardapolvo suministrado.
protecteur.
10

1
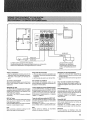
TV
Televisor
Turntable system/LD player/VCR for playback LD player/VCR for playback
Giradiscos/reproductor de videodiscos/magnetoscopio para reprocuccion Reproductor de videodiscs/
Platine tourne-disque/lecteur LD/magnetoscope pour la lecture
magnetoscopio para reprocuccion
Lecteur LD/magnetoscope pour la
lecture
Notes on connections
Notas sobre Ias conexiones
Remarques sur Ies raccordements
● Use the appropriate connecting cords for the
● Utilice Ios cables conectores apropiados para
● Utilisez Ies cordons de liaison appropries aux
equipment. Refer to the operating instructions.
Ios equipos. Consulte Ios manuales de manejo
different appareils. Reportez-vous a Ieurmode
● The jacks of this system are RCA-type pin
jacks.
To connect a record player
When connecting turntables, use one which has a
built-in phono equalizer amplifier to adjust the
output level.
MONITOR OUT jack
The MONITOR OUT jack outputs the video signal
coming from eitherthe VIDEO l/DATIN or VIDEO
2/AUX IN jack, according to the selection of the
FUNCTION select buttons.
The “VIDEO 1” or’’Vl DEO 2 indicator is displayed
respect ively.
REC OUT jacks
The AUDIO jacks output the audio signal coming
from the source selected by the amplifier
FUNCTION select buttons.
When the VIDEO l/DATfunction button is pressed,
however, no audio signal is output.
Note
When connecting a television, placing it to the
right of the system is recommended.
respectivos.
. Las tomas de este sistema son de tipo RCA.
Para conectar un giradiscos
Para conectar otro giradiscos, utilice uno que
posea amplificador-ecualizador incorporado a fin
de ajustar el nivel de salida.
Toma de salida para monitor (MONITOR OUT)
La toma MONITOR OUT da salida a Ias sehales
dev[deo procedentesde latoma VIDEO l/DAT IN
o VIDEO 2/AUX IN, de acuerdo con 10que haya
elegido con Ios botones selectors FUNCTION.
Se encendera, respectivarnente, el indicador
“VIDEO 1“ O“VIDEO 2.
Tomas de salida para grabacion (REC OUT)
Las tomas AUDIO dan salida a la seiial de audio
procedente de la fuente elegida con Ios botones
selectors FUNCTION.
Sin emtJargo, si presiona el bottm selector de
funcion VIDEO l/DAT, no saidra sefial de audio.
Nota
Cuando conecte un televisor, se recomienda
colocarlo a la derecha del sistema.
d’emploi respectif.
● Les prises de cette cha~ne sent de type Cinch-
RCA.
Pour raccorder une platine tourne-disque
Utilisez une platine tourne-disque equipee d’un
amplificateur egaliseur pour ajuster Ie niveau de
sortie.
Prise MONITOR OUT
La prise MONITOR OUT sort Ie signal video
provenant de la prise VIDEO l/DAT IN ou VIDEO
2/AUX IN, suivant la source selectionnee par Ies
touches de fonction de I’amplificateur.
L’indicateur “VIDEO 1” ou “VIDEO 2“ apparalt
respectivement.
Prises REC OUT
Les prises AUDIO sortent Iesignal audio provenant
de la source selectionnee par Ies touches de
fonction de I’amplificateur.
Cependant, si la touche VIDEO l/DAT est
enclenchee, aucun signal ne sort de ces prises.
Remarque
Si vous raccordez un televiseur, nous vous
recommandons de Ie placer a droite de la chalne.
11

To turn on the power
Plug in the AC cord and press the POWER button.
To select a source
After turning on the power, press one of the
FUNCTION select buttons,
The CD or TAPE function is also selected and
playback started by pressing the respective PLAY
button. However, if a CD or tape is not inserted,
playback does not begin.
The TUNER function can also be selected by
pressing the BAND button, followed by one of the
STATION PRESET buttons. The previous station
of the last band is selected.
To listen through headphones
Plug in headphones with a standard 6.30 plug into
the PHONES jack.
Using the control stage
In addition to the buttons and switches on the main
unit and remote control, there is also a retractable
control panel on the amplifier.
To extend the control stage
Press the OPEN/CLOSE button to extend the
stage. The stage also opens when the DOLBY
SURROUND or DSP button is pressed. However,
if no operation is activated after about 10 seconds,
the stage automatically closes.
To close the control stage
Press the OPEN/CLOSE button again toclosethe
stage, or lightly push in the stage, The stage
retracts into the amplifier.
Para conectar la alimentacion
Enchufe el cable de alimentacion de CA ypresione
el boton POWER.
Para seleccionar una fuente
Despues de haber conectado la alimentacion,
presione uno de Ios botones FUNCTION.
La funcion del reproductor de discos compactos
(CD) o de) deck de casetes (TAPE) tambien se
seleccionara y se iniciara la reproduction
presionando el boton PLAY respective. Sin
embargo, si no hay disco compacto o cinta
insertado, la reproduction no se iniciara.
La funcion del sintonizador (TUNER) tambien
podra seleccionarse presionando el boton BAND
ydespues unode Ios botones STATION PRESET.
Se seleccionara la ultima emisora de la banda
previamente emisoras.
Para escuchar con auriculares
Enchufe unos auriculares con clavija estandar de
6,3 mm de diametro en la toma PHONES.
Utilization de la bandeja de control
Ademas de Ios botones y controles de la unidad
principal ydel controlador remoto, existe un panel
de control replegable en el amplificador.
Para desplegar la bandeja de control
Presione el boton OPEN/CLOSE para desplegar la
bandeja. La bandeja tambien se abrira cuando
presione el boton DOLBY SURROUND o DSP. Sin
embargo, si no realiza ninguna operation durante
unos 10 segundos, la bandeja se replegara
automaticamente.
Para replegar la bandeja de control
Vuelva a presionar el boton OPEN/CLOSE para
replegar la bandeja, o presione esta Iigeramente
hacia adentrol. La bandeja se replegara dentro
del amplificador.
Pour allumer la chaine
Branchez Ie cordon secteur et appuyez sur
POWER.
Pour selectionner une source
Apres avoir allume la chalne, appuyez sur une
des touches de selection de fonction.
La fonction CD ou TAPE est selectionnee et la
lecture commence si vous appuyez sur la touche
de lecture correspondante. La lecture ne peut
cependant pas commencer si aucun CD ou
cassette n’est en place.
Vous pouvez 6galement selectionner la fonction
TUNER en appuyant sur BAND puis sur une des
touches STATION PRESET. La derniere station
de la derniere gamme d’ondes est selectionnee.
Pour ecouter au casque
Branchez un casque avec une fiche standard
6,3 mm sur la prise PHONES.
Utilisation du pupitre de commande
En plus des touches et des commandes de
I’appareil principal et de la telecommande, vous
avez egalement acces a un panneau de
commande retractable sur I’amplificateur.
Pour ouvrir Ie pupitre de commande
Appuyez sur OPEN/CLOSE pour sortir Ie pupitre
de commande. IIs’ouvre egalement Iorsque vous
appuyez sur la touche DOLBY SURROUND ou
touche DSP. Cependant, si vous n’actionnez
aucune commande pendant environ 10 secondes,
Ie pupitre se referme automatiquement.
Pour fermer Ie pupitre de commande
Appuyez de nouveau sur OPEN/CLOSE pour
fermer Ie pupitre, ou poussez-le Iegerement. Le
pupitre rentre clans I’amplificateur.
%+
STATION PRESET
\l /
TUNER
o
\/’-~~
o
—v—-/l%
, I,DOWN
Illumination guide
❑
Guia de iluminacion ❑
Assistance Iumineuse ❑
When one of the FUNCTION buttons is pressed,
Cuando presione uno de Ios botones FUNCTION,
Lorsque vous actionnez une touche de fonction,
other buttons light or blink to make the sequence
se encenderan o parpadearan otros botones para
d’autres touches s’allument ou clignotent pour
of steps easy to follow.
facilitar el seguir la secuencia de pasos.
vous guider clans Ies differences manipulations a
Example: Listening to the tuner
effectuer.
Ejemplo: Escucha del sintonizador
When the TUNER button is pressed, the STATION
Cuando presioneel boton TUNER, seencenderan
Exemple: Pour ecouter Ie tuner
PRESET buttons light.
Ios botones STATION PRESET.
Lorsque vous appuyez sur TUNER, Ies touches
STATION PRESET s’allument.
12

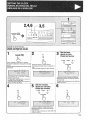
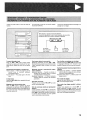
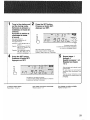
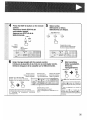
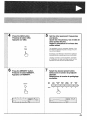
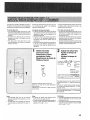
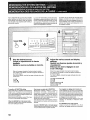
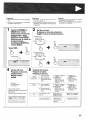
Example: To set to 10:35 am
Ejemplo: Para ajustar Ias 10:35 AM
Exemple: Pour regler sur 10:35 AM
1
~~ TIMER
CHECK
Cl
b
Press repeatedly until the time is displayed.
‘resionelo repetidamente hasta que se visualicl
a hors.
4ppuyez de fagon repetee jusqu’a ce que I’heur
;oit affichee,
If the power is off, or if the time is already
displayed, skip this step.
Si la alimentacion esta desconecta, o si ya se ha
visualizado la hors, salte este paso,
Si la chahe est hors tension ou si I’heure est
affichee, omettez cette etape.
4
SET
o
F1
2
SET
o
ffh
Press and hold for 2 or more seconds.
Mantengalo presionado durante 2 segundos o
mas,
Tenez enfoncee pendant plus de 2 secondes,
5
Set the minutes.
Ajuste Ios minutes.
Posez Ies minutes
V
DOWN
TUNING
UP
A
o
0
CLOCK/TIMEFl
R
Hold down a button to change continuously.
Mantenga presionado un bot6n para cambiar
:ontinuamente.
Tenez la touche enfoncee pour faire defiler let
~hiffres en continu.
3
Set the hour.
Ajuste la hors.
Posez Ies heures.
T DOWN
TUNING
UP
A
o
0
Hold down a button to change continuously.
Mantenga presionado un boton para cambiar
continuamente.
Tenez la touche enfoncee pour faire defiler Ies
chiffres en continu.
6
13

To set the time precisely
Press the SET button to start the clock at the
desired point, as indicated by another clock or
time signal from an external source.
To switch the time display
The time display is factory-set to the 12-hour
standard, To switch to the 24-hour standard, hold
down the TUNER FUNCTION button and turn on
the power. Repeat the same procedure to return
to the 12-hour standard.
After a power failure
The time indication blinks. [f the power failure was
● Less than 24 hours, only the current time needs
to be reset.
● Longer than 24 hours, the current time, radio
station preset, manual-presets of the graphic
equalizer and timer need to be reset.
Notes
. Ifthe timer ON-time is reached while setting the
clock, the timer does not activate.
● The power can either be on or off when setting
the clock.
Para ajustar exactamente la hors
Presione el boton SET para poner en
funcionamiento el reloj en et punto deseado,
indicado por otro reloj o la sefial horaria de una
fuente externa.
Para cambiar la visualization de la hors
La visualization de la hors ha sido ajustada en la
fabrica al sistema de 12 horas. Para cambiarla al
sistema de 24 horas, conecte la alimentacion
manteniendo presionado el boton TUNER
FUNCTION. Para volver al sistema de 12 horas,
repita el mismo procedimiento.
En caso de torte del suministro electrico
La indication de la hors parpadeara. Si el torte ha
durado
● Menos de 24 horas, solamente tendra que
reajustar el reloj.
● Mas de 24 horas, tendra que reajustar el reloj,
memorizar Ias emisoras, preajuste manual del
ecualizadorgrafico y programarel temporizador.
Notaa
● Si la hors de activation se presenta durante el
ajuste del reloj, el temporizador no se activara.
● Para poner en hors el reloj, la alimentacion
podra estar conectada o desconectada.
Reglage precis de I’heure
Pour faire demarrer I’horloge a la seconde pres,
appuyez sur SET au moment indique par une
autre horloge ou au top horaire de I’horloge
parlante.
Mode d’affichage de I’heure
L’affichage de I’heure est regle en usine sur un
cycle de 12 heures. Pour passer au mode 24
heures, allumez la chalne en tenant la touche
TUNER FUNCTION enfoncee, Repetez cette
operation pour repasser au mode 12 heures.
En cas de panne de secteur
L’indication de I’heure clignote. Si la panne de
secteur dure:
● Moins de 24 heures, vous n’avezque [e reglage
de I’heure a refaire.
● Plus de 24 heures, vous devez refaire [es
reglages de I’heure, des preselections,
prereglees manual mente d’eglasation
graphique et du programmateur.
Remarques
● Si I’heure de mise en service de la minuterie est
atteinte pendant Ie reglage de I’horloge, la
minuterie ne se declenche pas.
● Vous n’avez ~as besoin d’allumer la chalne
pour regler I’horloge.
When the power is turned on, information about
Cuando conecte la alimentacion, la information
Au moment de la mise sous tension, Ies
the system features is automatically displayed in
sobre Ias funciones del sistema se visualizara
information concernant Ies fonctions du systeme
the display window of the amplifier.
automaticamente en el visual izador del
sent automatiquement affichees sur I’afficheurde
amplificador.
I’amplificateur,
This demonstration (DEMO) function is canceled
when one of the operation button is pressed. Esta funcion de demostracion (DEMO) se
Lafonction de demonstration (DEMO) est annulee
cancelara cuando presione uno de Ios botones de
des qu’une des touches d’exploitation est
operation,
actionnee.
To return to the demonstration mode
Para volver al modo de demostracion
Press the DEMO button to display “DEMO.
Presione el boton DEMO de forma quesevisualice
Note
“DEMO.
Turning the power on after the AC cord is Nota
disconnected or after a power failure automatically
Si conecta la alimentacion despues de haber
activates the DEMO function.
desconectado el cable de alimentacion de CA, o
despues de una interruption del suministro
electrico, la funcion de demostracion se activara
automaticamente.
14
Pour revenir au mode de demonstration
Appuyez sur la touche DEMO pour afficher
“DEMO,
Remarques
Lorsque vous allumez la chalne apres que Ie
cordon secteur a ete debranche ou apres une
Iongue panne de secteur, la fonction DEMO se
declenche automatiquement.

T-BASS
BBE
DIRECT
T-BASS
For enhanced, deep bass
Para reforzar IOS graves profundos
Pour des graves renforces
T-BASS
T-BASS.
~
p,:lll
Press repeatedly to adjust the
level.
presione rePetidamente Para T-BASS indicator(4variable levels)
ajustar el nivel.
Indicador T-BASS (4 niveles
Appuyezde fagon repetee pour variables)
ajuster Ie niveau.
Indicateur T-BASS (4 niveaux
variables)
To chanae the Iefth’iaht balance
BBE
For a clear and vivid high-definition sound
Para obtener un sonido degran definition, claro yvivido
Per potenziare i bassi profondi
Pour un son bien defini, clair et vivant
BBE
BBE
-#
—
\
J
Press repeatedly to adjust the level.
F>resione repetidamente para
I
ajustar el nivei.
BBE indicator (4 variable levels)
Appuyez de fagon repetee pour Indicador BBE (4 niveles
ajuster Ie niveau.
variables)
Indicateur T-BASS (4 niveaux
variables)
The BAL~NCE contro~can usually be kept in the center for equal Ieft/right sound output. However,
depending upon the position of the speakers to the listener or the recording balance of the playback
source, slide the BALANCE control to change the left/right balance,
Para cambiar @lequilibria entre Ios altavoces izquierdo/derecho
El control BALANCE normalmente debera mantenerse en el centro para que el sonido salga por
igual a traves de Ios altavoces izquierdo/derecho. Sin embargo, dependiendo cle la position de Ios
altavoces y el oyente, o del equilibria de grabacion de la fuente de reproduction, deslice el control
BALANCE para cambiar el equilibria entre Ios altavoces izquierdo/derecho.
Pour changer la balance gauche-droite
Laissez normalement la commande BALANCE au centre pour assurer une sortie egale du son sur
Ie canal gauche et droit. Mais selon la position des enceintes et de la personne qui ecoute, ou de
la balance d’enregistrement de la source reproduite, vous devrez regler cette commande pour
modifier la balance gauche-droite.
1
Ill
I
LEFT●
●
●RIGHT
BALANCE
To adjust the volume
To increase the volume, turn the VOLUME control
knob clockwise.
To decrease, turn counterclockwise.
To mute the eound temporarily
Press the MUTE button on the remote control. The
VOLUME indicator blinks. To restore the sound,
press MUTE again.
To clear the sound settings
Press the DIRECT button. All sound settings
(BBE, T-BASS, graphic equalizer, DSP, surround,
and vocal fader) are cleared.
Para ajustar el volumen
Paraaumentarelvolumen, gire el control VOLUME
hacia la derecha.
Para reducirlo, girelo hacia la izquierda.
Para silenciar temporalmente el aonido
Presione el bot6n MUTE del controlador remoto.
Los indicadores VOLUME parpadeara. Para
restablecer el sonido, vuelva a presionar MUTE.
Para cancelar Ios ajustes del sonido
Presione el boton DIRECT. Se cancelaran todos
Ios ajustes del sonido (BBE, T-BASS, ecualizador
grafico, DSP, sonido perimetrico, y reduccion de
la parte vocal).
Recilage du volume
Po;r ~ausser Ie volume,. tournez la commande
rotative VOLUME vers la droite.
Pour Ie baisser, tournez vers la gauche,
Pour attenuer temporairement Ie son
Appuyez surlatouctle MUTE de Iatelecommande.
L’indicateurVOLUME clignotesurl’afficheur, Pour
retablir Ie son, appuyez de nouveau sur MUTE.
Pour annuler Ies reglages du son
Appuyez sur DIRECT. Tous Ies reglages du son
(BBE, T-BASS, egaliseur graphique, DSP,
surround, atk%uation des voix) sent annules.
15

‘,
,,
,.
,,
1
Insert a disc.
Inserte un disco.
Inserez un disque.
Begin playback.
Inicie la reproduction.
Declenchez la lecture.
Playback starts from the first track.
La reproduction comenzara desde la primers cancion.
La lecture commence sur la premiere piage.
When inserting discs
. Do not place more than one CD in each disc
compartment.
. Place 8 cm discs on the inner circle of the
compartment.
To stop play
Press the ■ STOP/CLEAR button,
To pause
Press the ➤ PLAY/PAUSE button (or ➤ 11on the
remote control). To resume play, press the button
again.
To remove discs
Press the A OPEN/CLOSE button,
Playback stops and the disc tray opens.
Notes
● The music calendar shows up to 20 tracks.
Tracks after that are not displayed.
● Playing CDs may distort television reception. If
this happens, separate the player and TV.
● If the E PLAY/PAUSE button is pressed while
listening to another source, the CD function is
selected, and playback begins.
Cuando inserte discos
. No coloque mas de un disco en cada
compartimiento de disco,
● Coloque el disco de 8 cm en el circulo interior
del compartimiento.
Para parar la reproduction
Presione el boton ■ STOP/CLEAR.
Para realizar una pausa
Presione el boton > PLAY/PAUSE (o ➤ II del
controlador remoto). Para reanudar la reproduc-
tion, vuelva a presionar el boton.
Para extraer discos
Presione el boton S OPEN/CLOSE.
Cesara la reproduction y se abrira la bandeja de
discos.
Notas
●
✎
✎
El calendario musical mostrara hasta 20
canciones, Las canciones posteriors a la 20’.
no se visual izaran.
La reproduction de discos compactos puede
perturbar la recepcion de television. Cuando
suceda esto, separe el reproductordel televisor.
Si presiona ➤ PLAY/PALISE durante la
escucha de otra fuente, se seleccionara la
funcion del reproductor de discos compactos y
se iniciara la reproduction.
Lorsque vous inserez des disques
● Ne posez qu’un seul CD “clans chaque
compartment de disque.
. Posez Ies CD de 8 cm clans Ie renfoncement du
compartment de disque.
Pour arreter la lecture
Appuyez sur la touche ■ STOP/CLEAFf.
Pour faire une pause
Appuyez sur la touche ➤ PLAY/PAUSE (OUHI
sur la telecommande). Pour reprendre la lecture,
appuyez de nouveau sur la touche.
Pour sortir Ies disaues
Appuyez sur la to;che A OPEN/CLOSE. La
lecture s’arr&e et Ie plateau de disque s’ouvre.
Remarques
.
.
●
Lecalendriermusical indique jusqu’a 20 plages.
Les plages au-dela de 20 ne sent pas affichees.
La lecture d’un CD peut provoquer des
distortions sur la reception TV. Dans ce cas,
eloignez Ie Iecteur du televiseur,
Si vous appuyez sur ➤ PLAY/PAUSE tout en
ecoutant un autre source, la fonction CD est
choisie et la lecture commence.
16

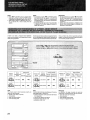
Total track number and play time
Music calendar
Numero total de canciones y tiempo de reproduction Calendario musical
\
Nombre de plages et temps de lecture total
Calendrier musical
To insert more than one disc, see below,
The display appears only in the CD function mode,
Para insertar mas de un disco, realice 10siguiente.
La visualization solamente aparecera en el modo de funcion C
Pour inserer plusieurs disques, voir ci-dessous.
L’affichage appara~t uniquement en mode CD.
Track being played blinks.
El numero de la cancion en reproduction parpadeara.
Le numero de la plage en tours de lecture clignote.
Number of track being played Elapsed play time of track
Nfimero de la cancion en reproduction
Tiempo de reproduction transcurrido de la cancion
Plage en tours de lecture Temps de lecture ecoule
3
Adjust the sound.
Ajuste el sonido.
Ajustez Ie son.
See page 15.
Consulte la pagina 15.
Voir page 15.
Disc numbers
Numeros de discos
Numeros des disques
Disc being played
Disco en reproduction
Disque en tours de lecture
Next disc to be played
Disco a reproducirse a continuation
Disque suivant
After inserting two discs, press the DISC CHANGE
button to rotate the disc tray, and insert the third
disc.
Press the ➤ PLAY/PAUSE button to begin
playback, All discs are played once, then the
player stops.
To play only one disc
From the DISC DIRECT PLAY buttons, press the
number of the disc to play.
Playback begins, and the dotted triangle-shaped
line around o @ @ disappears.
Despu@s de haber inserfado dos discos, presione
el boton DISC CHANGE a fin de que gire la
bandeja de discos e inserte el tercero,
Presione el boton ➤ PLAY/F’AUSE para incitar la
reprod uccion. Todos Ios discos se reproduciran
una vez y despues el reproductor se parara.
Para reproducer un solo disco
Presione el boton numerico de DISC DIRECT
PLAY correspondiente al disco que desee
reproducer.
La reproduction se iniciar~, y el triangulo de Ifnea
discontinue alrededordeo @ @ desaparecera.
Apres avoir mis deux disques en place, appuyez
sur la touche DISC CHANGE pour faire tourner Ie
plateau, et posez Ie troisieme disque.
Appuyez sur la touche ➤ PLAY/PAUSE pour
declencher la lecture. Le Iecteur lit chaque disque
une fois, puis s’arr&e.
Pour Iire un seul disque
Actionnez une des touches DISC DIRECT PLAY
pour choisir Ie numero du disque a Iire.
La lecture commence et Ie triangle en pointilles
autour de @) @ @ dispara~t.
17

To select the first disc to be plsyed
Press the DISC SKIP button on the remote control
to light the desired disc number in red. When the
➤ PLAY/PAUSE button is pressed, all discs are
played, beginning with the selected disc.
To select a track directly
Tracks can be directly chosen with the numeric
and +1O buttons on the remote control.
1 Press the CD button.
2 Select the disc number with the DISC DIRECT
PLAY buttons.
3 Select the track number.
For tracks 1 through 9, select directly.
Example: For track 3, press 3.
For tracks 10 and over, use the +1Obutton,
Example: For track 10, press +1O,0.
For track 23, press +10, +1O, 3.
To change discs during playback
While one disc is playing, the other discs can be
changed.
1 While a disc is playing or paused, press the
DISC CHANGE button.
2 Change the discs.
3 Press DISC CHANGE again to close the disc
tray.
To display the remaining playback time
During playback, press the DISPLAY button. The
amount of playback time left on the current disc is
displayed. To return to the original display, press
DISPLAY again.
18
Para seleccionar el primer disco que desee
reproducer
Presione el boton DISC SKIP del controlador
remoto de forma que se encienda en rojo el
ntimero del disco deseado. Cuando presione el
boton ➤ PLAY/PAUSE, se reproduciran todos Ios
discos, comenzando por el seleccionado.
Para seleccionar directamente una cancion
Las canciones podran elegirse directamente
utilizando Ios botones numericos y +10 del
controlador remoto.
1 Presione el boton CD.
2 Seleccione el numero de disco con Ios botones
DISC DIRECT PLAY.
3 Seleccione el numero de la cancion.
Para Ias canciones 1 a 9, seleccionelas
directamente.
Ejemplo: Para la cancion 3, presione 3.
Para Ias canciones 10 y superiors, utilice el
boton +1O.
Ejemplo: Para la cancion 10, presione +1O
y
o.
Para Iacancion 23, presione+l O,
+10, y 3.
Para cambiar Ios discos durante la repro-
duction
Mientras este reproduciendose un disco, podra
cambiar Ios otros.
1 Mientras un disco seencuentre en reproduction
o en el modo de pausa, presione el boton DISC
CHANGE.
2 Cambie Ios discos.
3 Vuelva a presionar DISC CHANGE para cerrar
la bandeja de discos.
Para hater que se visualice el tiempo de
reproduction restante
Durante la reproduction, presione el boton
DISPLAY. Se visualizara el tiempo de repro-
duction restante del disco actual. Para volver a la
visualization original, presione de nuevo
DISPLAY.
Pour selectionner Ie premier disque a Iire
Appuyez sur la touche DISC SKIP de la
telecommande pour allumer Ie numero du disque
souhaite en rouge. Lorsque vous actionnez la
touche ➤ PLAY/PAUSE, la lecture de tous Ies
disquescommencea partirdu disque selectionne.
Pour selectionner une plage directement
Vous pouvez selectionner directement Ies plages
avec Ies touches numeriques et +10 de la
telecommande.
1 Appuyez sur la touche CD.
2 Selectionnez Ie numero du disque avec Ies
touches DISC DIRECT PLAY.
3 Selectionnez Ie numero de la plage.
Pour selectionner une plage entre 1 et 9,
appuyez directement sur Ie numero.
Exemple: Pour la plage 3, appuyez sur 3.
Pour selectionner une plage au-dessus de 10,
utilisez la touche +1O.
Exemple: Pour la plage 10, appuyez +1Oet
o.
Pour la plage 23, appuyez sur
+10, +10 et 3.
Pour changer Ies disques pendant la lecture
Pendant la lecture d’un disque, vous pouvez
changer Ies deux autres.
1 Pendant la lecture ou la pause d’un disque,
appuyez sur la touche DISC CHANGE.
2 Changez Ies disques.
3 Appuyez de nouveau sur la touche DISC
CHANGE pour refermer Ie plateau de disque,
Pour afficher Ie temps de lecture restant
Pendant la lecture, appuyez sur la touche
DISPLAY. Le temps de lecture restant sur Ie
disque en coursapparalt. Pour revenira I’affichage
original, appuyez de nouveau sur DISPLAY.

Tracks and points within a track can easily be
Las canciones y puntos de una cancion podran
Vous pouvez Iocaliserfacilement une plage ou un
located.
Iocalizarse facilmente.
passage sur une plage.
To search through a track
Keep the - or - button pressed. While
watching the display and listening to the high-
speed sound, release the button at the desired
point.
Searching during program or random play
Reverse search — When the beginning of the
current track is reached, playback
automatically begins.
Forward search — The player goes to the next
track.
To skip tracks
Press the 44 or > button repeatedly for each
track to skip.
Skipping tracks during random play
When the - button is pressed, the player
searches for the next track. When the - button
is pressed, the player returns to the beginning of
the current track only, Previously played tracks
cannot be returned to.
Para buscar dentro de una cancion
Mantenga presionado el boton - 0 -.
Observando el visualizador y escuchando el sonido
a gran velocidad, suelte el boton en el punto
deseado.
Busqueda durante la reproduction progra-
mada o aleatoria
Btisqueda regresiva — Cuando se alcance el
comienzo de la cancion actual, se iniciara
automaticamente la reproduction.
Busqueda progresiva — E3 disco compacto
avanzara hasta el comienzo de canciones
posteriors.
Para saltar canciones
Presione una vez el boton ●t4 o _ por cada
cancion que desee saltar, .
Salto de canciones durarde la reproduction
aleatoria
Cuando presione el boton 1-, el reproductor
buscara la cancion siguiente. Cuando presione el
boton -, el reproductor volvera al comienzo de
la cancion actual solarnente. No sera posible
Pour Iocaliser un passage sur une plage
Appuyez surlatouche - ou ~ en continu tout
en regardant I’affichage et en ecoutant Ie son
accelere. Rel~chez la touche au point souhaite.
Recherche pendant la lecture programmed ou
aleatoire
Recherche vers I’arriere — Lorsque I’appareil
atteint Ie debut de la plage en tours, la lecture
commence automatiquement.
Recherche vers I’avant — Le Iecteur passe a la
plage suivante.
Pour sauter des plages
Appuyez de fa~on repetee sur la touche + ou
* pour chaque plage a sauter.
Pour sauter des plages pendant la lecture
aleatoire
Lorsque vous appuyez sur la touche *, Ie
Iecteur recherche la plage ,suivante. Si vous
appuyez sur la touche -, Ie Iecteur revient au
debut de la plage en tours uniquement. II ne peut
pas revenir aux plages precedences.
volver a canciones ya reproducidas.
19

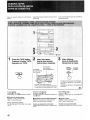
Up to 30 tracks can be programmed from any of
Usted podra programar hasta 30 canciones de
Vous pouvez programmer jusau’a 30 plactes de
the inserted discs,
cualquiera de Ios discos insertados.
n’importe quel disque en p(ace: -
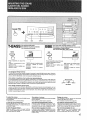
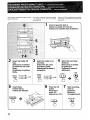
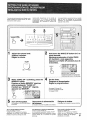
2
Press the PRGM button.
Presione el boton PRGM.
Appuyez sur PRGM.
&d)
b
ary.
seleccionarlo.
n’est pas necessaire.
4
Select the tracks.
Example: To choose tracks 3, 12 and 6 from the
Seleccione Ias canciones.
same disc
Ejemplo: Para elegir Ias canciones 3, 12, y 6 del
Selectionnez [es plaqesm
mismo disco
.-
Exemple: Pour choisir Ies plages 3, 12 et 6 sur Ie
m~me disque
:i,,,,:,es=-
‘123z:
Wmber of programmed
,“
wogrammees
Total program time
Current disc
Tiempo total del programa
Disco actual
Temps total du programme
Disque actuel
DISC DIRECT PLAY
5
Begin playback.
Inicie la reproduc-
tion.
Demarrez la lecture.
m
b
To select tracks from other discs,
repeat steps 3 and 4 before playback.
Para seleccionar otras canciones, repita
Ios pasos 3 y 4 antes de la reproduction.
Pourselectionnez dautres plages, repetez
Ies etapes 3 et 4 avant la lecture.
La page charge ...
La page charge ...
La page charge ...
La page charge ...
La page charge ...
La page charge ...
La page charge ...
La page charge ...
La page charge ...
La page charge ...
La page charge ...
La page charge ...
La page charge ...
La page charge ...
La page charge ...
La page charge ...
La page charge ...
La page charge ...
La page charge ...
La page charge ...
La page charge ...
La page charge ...
La page charge ...
La page charge ...
La page charge ...
La page charge ...
La page charge ...
La page charge ...
La page charge ...
La page charge ...
La page charge ...
La page charge ...
La page charge ...
La page charge ...
La page charge ...
La page charge ...
La page charge ...
La page charge ...
La page charge ...
La page charge ...
La page charge ...
La page charge ...
La page charge ...
La page charge ...
La page charge ...
La page charge ...
La page charge ...
La page charge ...
La page charge ...
La page charge ...
La page charge ...
La page charge ...
La page charge ...
La page charge ...
La page charge ...
La page charge ...
La page charge ...
La page charge ...
La page charge ...
La page charge ...
-
 1
1
-
 2
2
-
 3
3
-
 4
4
-
 5
5
-
 6
6
-
 7
7
-
 8
8
-
 9
9
-
 10
10
-
 11
11
-
 12
12
-
 13
13
-
 14
14
-
 15
15
-
 16
16
-
 17
17
-
 18
18
-
 19
19
-
 20
20
-
 21
21
-
 22
22
-
 23
23
-
 24
24
-
 25
25
-
 26
26
-
 27
27
-
 28
28
-
 29
29
-
 30
30
-
 31
31
-
 32
32
-
 33
33
-
 34
34
-
 35
35
-
 36
36
-
 37
37
-
 38
38
-
 39
39
-
 40
40
-
 41
41
-
 42
42
-
 43
43
-
 44
44
-
 45
45
-
 46
46
-
 47
47
-
 48
48
-
 49
49
-
 50
50
-
 51
51
-
 52
52
-
 53
53
-
 54
54
-
 55
55
-
 56
56
-
 57
57
-
 58
58
-
 59
59
-
 60
60
-
 61
61
-
 62
62
-
 63
63
-
 64
64
-
 65
65
-
 66
66
-
 67
67
-
 68
68
-
 69
69
-
 70
70
-
 71
71
-
 72
72
-
 73
73
-
 74
74
-
 75
75
-
 76
76
-
 77
77
-
 78
78
-
 79
79
-
 80
80


Aiwa RX-N939U Le manuel du propriétaire
- Catégorie
- Récepteurs AV
- Taper
- Le manuel du propriétaire
dans d''autres langues
- English: Aiwa RX-N939U Owner's manual
- español: Aiwa RX-N939U El manual del propietario
Documents connexes
-
Aiwa NSX-AV900 Manuel utilisateur
-
-
-
-
-
-
-
-
-
Aiwa RX-N737 U Le manuel du propriétaire