

English
FCC NOTICE
This device has been tested and found to comply with the limits for a Class B digital device, pursuant to Part 15 of the
FCC Rules. These limits are designed to provide reasonable protection against harmful interference in a commercial,
industrial or business environment. This equipment can generate, use and radiate radio frequency energy and, if not
installed and used in accordance with the instruction, may cause harmful interference to radio communications.
However, there is no guarantee that interference will not occur in a particular installation. If this equipment does cause
harmful interference to radio or television reception, which can be determined by turning the equipment off and on, the
user is encouraged to try to correct the interference by one or more of the following measures :
• Reorient or relocate the receiving antenna.
• Increase the separation between the equipment and receiver.
• Connect the equipment into an outlet on a circuit different from that to which the receiver is connected.
• Consult the dealer or an experienced radio/TV technician for help.
This device complies with Part 15 of the FCC Rules. Operation is subject to the following two conditions: (1) this device
may not cause harmful interference, and (2) this device must accept any interference received, including interference
that may cause undesired operation.
CAUTION ON MODIFICATIONS
To comply with the limits for the Class B digital device, pursuant to Part 15 of the FCC Rules, this device must be
installed in computer equipment certified to comply with the Class B limits. All cables used to connect the computer and
peripherals must be shielded and grounded. Operation with non-certified computers or non-shielded cables may result in
interference to radio or television reception.
Any changes or modifications not expressly approved by the grantee of this device could void the user's authority to
operate the equipment.
CE NOTICE
This is a Class B product.
DISCLAIMER
No warranty or representation, either expressed or implied, is made with respect to the contents of this documentation,
its quality, performance, merchantability, or fitness for a particular purpose. Information presented in this documentation
has been carefully checked for reliability; however, no responsibility is assumed for inaccuracies. The information
contained in this documentation is subject to change without notice.
In no event will AVerMedia be liable for direct, indirect, special, incidental, or consequential damages arising out of the
use or inability to use this product or documentation, even if advised of the possibility of such damages.
TRADEMARKS
AVerMedia and AVerVision are registered trademarks of AVerMedia TECHNOLOGIES, Inc. IBM PC is a registered
trademark of International Business Machines Corporation. Macintosh is a registered trademark of Apple Computer, Inc.
Microsoft is a registered trademark and Windows is a trademark of Microsoft Corporation. All other products or corporate
names mentioned in this documentation are for identification and explanation purposes only, and may be trademarks or
registered trademarks of their respective owners.
COPYRIGHT
© 2004 by AVerMedia TECHNOLOGIES, Inc. All rights reserved. No part of this publication may be reproduced,
transmitted, transcribed, stored in a retrieval system, or translated into any language in any form by any means without
the written permission of AVerMedia TECHNOLOGIES, Inc.

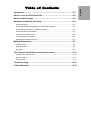
English
T
T
a
a
b
b
l
l
e
e
o
o
f
f
C
C
o
o
n
n
t
t
e
e
n
n
t
t
s
s
Introduction .............................................................................................. E-1
Where to use the AVerVision280 ............................................................ E-2
What’s in the Package ............................................................................. E-3
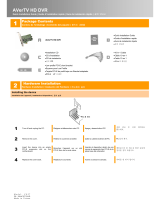
Hardware Installation and Setup ............................................................ E-4
Connection Ports ........................................................................................................... E-4
Connecting an IBM Compatible PC or Macintosh Computer ....................................... E-4
Connecting a VGA, Mac or LCD/DLP Projector ........................................................... E-5
Connecting the Power Adapter...................................................................................... E-5
Connecting to a Microscope .......................................................................................... E-6
Connecting the Light Module......................................................................................... E-6
Installing the Optional Light Box .................................................................................... E-7
Making Adjustments ................................................................................E-7
Camera Head ................................................................................................................ E-8
Mechanical Arm ............................................................................................................ E-8
Anti-glare ....................................................................................................................... E-9
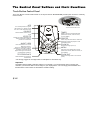
The Control Panel Buttons and their Functions ...................................E-10
Touch Button Control Panel ......................................................................................... E-10
Menu Functions ............................................................................................................. E-11
Timer Function............................................................................................................... E-13
Troubleshooting ......................................................................................E-14
Limited Warranty .....................................................................................E-15

E-1
English
Thank you for purchasing the
. This document camera
displays any document or 3D objects onto a
LCD or DLP projector making product demos
a snap. You can even switch between camera
or PC mode anytime. is so
powerful that it allows you to work in low-light
conditions ,
and it can also digitally zoom an image
up to 800%.
can also be connected to a
microscope or used to display transparencies
and negatives making it useful not just in the
corporate environment but also making it an
indispensable tool to the academic, medical
and scientific community.
AVerMedia®
AVerVision280
AVerVision280
AVerVision280
even without turning on the LED
light,

E-2
W
W
h
h
e
e
r
r
e
e
t
t
o
o
u
u
s
s
e
e
t
t
h
h
e
e
A
A
V
V
e
e
r
r
V
V
i
i
s
s
i
i
o
o
n
n
2
2
8
8
0
0
A
A
c
c
t
t
u
u
a
a
l
l
P
P
r
r
o
o
d
d
u
u
c
c
t
t
D
D
e
e
m
m
o
o
N
N
o
o
m
m
o
o
r
r
e
e
c
c
r
r
o
o
w
w
d
d
e
e
d
d
c
c
o
o
u
u
n
n
t
t
e
e
r
r
s
s
!
!
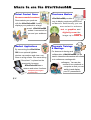
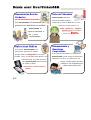
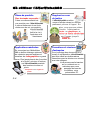
Demonstrate your products
with the
A
A
V
V
e
e
r
r
V
V
i
i
s
s
i
i
o
o
n
n
2
2
8
8
0
0. It easily
displays your products
to a large
crowd.
A
A
V
V
e
e
r
r
V
V
i
i
s
s
i
i
o
o
n
n
2
2
8
8
0
0
makes it convenient for
you and your audience.
C
C
o
o
u
u
r
r
t
t
r
r
o
o
o
o
m
m
M
M
e
e
d
d
i
i
u
u
m
m
A
A
V
V
e
e
r
r
V
V
i
i
s
s
i
i
o
o
n
n
2
2
8
8
0
0 provides a
way to display courtroom proofs and
evidences. Additionally you can
even select to enhance
t
t
e
e
x
x
t
t or
g
g
r
r
a
a
p
p
h
h
i
i
c
c
s
s, and
d
d
i
i
g
g
i
i
t
t
a
a
l
l
l
l
y
y
z
z
o
o
o
o
m
m the
image up to
8
8
0
0
0
0
%
%.
M
M
e
e
d
d
i
i
c
c
a
a
l
l
A
A
p
p
p
p
l
l
i
i
c
c
a
a
t
t
i
i
o
o
n
n
s
s
By connecting the
A
A
V
V
e
e
r
r
V
V
i
i
s
s
i
i
o
o
n
n
2
2
8
8
0
0
to an optional lightbox
doctors can analyze and view x-ray
films on a big screen. Plus never worry
if the sheet * is placed on the
wrong side, because
A
A
V
V
e
e
r
r
V
V
i
i
s
s
i
i
o
o
n
n
2
2
8
8
0
0 has a
reverse and mirror functions.
T
T
r
r
a
a
n
n
s
s
p
p
a
a
r
r
e
e
n
n
c
c
y
y
a
a
n
n
d
d
n
n
e
e
g
g
a
a
t
t
i
i
v
v
e
e
t
t
o
o
p
p
o
o
s
s
i
i
t
t
i
i
v
v
e
e
f
f
i
i
l
l
m
m
s
s
C
C
o
o
r
r
p
p
o
o
r
r
a
a
t
t
e
e
T
T
r
r
a
a
i
i
n
n
i
i
n
n
g
g
s
s
&
&
M
M
e
e
e
e
t
t
i
i
n
n
g
g
s
s
For document sharing and
collaboration,
A
A
V
V
e
e
r
r
V
V
i
i
s
s
i
i
o
o
n
n
2
2
8
8
0
0
can be
used in interactive discussions with clients
or in conference meetings with
colleagues. You can also
connect it to a notebook or
computer so that you can
switch to and display
your PC presentation.

E-3
E
E
n
n
g
g
l
l
i
i
s
s
h
h
W
W
h
h
a
a
t
t
’
’
s
s
i
i
n
n
t
t
h
h
e
e
P
P
a
a
c
c
k
k
a
a
g
g
e
e
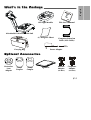
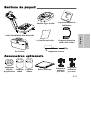
LED Light Module
D
o
c
u
m
e
n
t
C
a
m
e
r
a
This User’s Manual
(1) Anti-glare Sheet
Computer Extension
Cable (VGA Cable)
AVerMedia® AVerVision280 Unit
Carrying Bag
Power Adapter
O
O
p
p
t
t
i
i
o
o
n
n
a
a
l
l
A
A
c
c
c
c
e
e
s
s
s
s
o
o
r
r
i
i
e
e
s
s
Protective
Lens
Adapter
34mm
Coupler
28mm
Coupler
Light box
Monitor
Adapter
(for MAC)
Computer
Adapter
(for MAC)

E-4
H
H
a
a
r
r
d
d
w
w
a
a
r
r
e
e
I
I
n
n
s
s
t
t
a
a
l
l
l
l
a
a
t
t
i
i
o
o
n
n
a
a
n
n
d
d
S
S
e
e
t
t
u
u
p
p
C
C
o
o
n
n
n
n
e
e
c
c
t
t
i
i
o
o
n
n
P
P
o
o
r
r
t
t
s
s
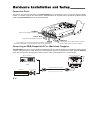
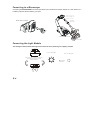
The ports on the back and side panel of the
A
A
V
V
e
e
r
r
V
V
i
i
s
s
i
i
o
o
n
n
2
2
8
8
0
0
are for connecting the unit to a computer, graphics display
monitor or LCD/ DLP projector and other devices. Illustrated below are the ports that are located at the back and side
panel of the
A
A
V
V
e
e
r
r
V
V
i
i
s
s
i
i
o
o
n
n
2
2
8
8
0
0
with their corresponding labels.
VGA IN
This port allows you to input computer signal and pass it out through the
VGA OUT port that allows you to switch between camera or PC presentations.
VGA OUT
This port allows you to output camera or computer
signal to a VGA monitor or LCD/DLP projector.
LIGHT BOX
Plug the optional Light Box in to this port
POWER
Plug the Power Adapter in to this port
P
A
S
S
T
H
R
U
C
C
o
o
n
n
n
n
e
e
c
c
t
t
i
i
n
n
g
g
a
a
n
n
I
I
B
B
M
M
C
C
o
o
m
m
p
p
a
a
t
t
i
i
b
b
l
l
e
e
P
P
C
C
o
o
r
r
M
M
a
a
c
c
i
i
n
n
t
t
o
o
s
s
h
h
C
C
o
o
m
m
p
p
u
u
t
t
e
e
r
r
A
A
V
V
e
e
r
r
V
V
i
i
s
s
i
i
o
o
n
n
2
2
8
8
0
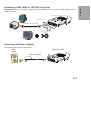
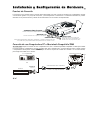
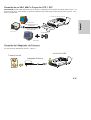
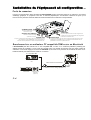
0 allows you to connect an IBM compatible PC, Mac, or notebook (laptop) to it to display the image from the
computer. Using the VGA OUT port allows you to switch between camera or computer mode. Simply press the SOURCE
button found on the unit’s control panel or remote control in order to select between PC or camera output.
IBM Compatible PC
Macintosh
Computer Adapter
(optional)
OR
AVerMedia AVerVision280
V
GA OUTVGA IN
LIGHT
BOX
DC6V
Computer Extension Cable
Plug to Display Card

E-5
E
E
n
n
g
g
l
l
i
i
s
s
h
h
C
C
o
o
n
n
n
n
e
e
c
c
t
t
i
i
n
n
g
g
a
a
V
V
G
G
A
A
,
,
M
M
A
A
C
C
o
o
r
r
L
L
C
C
D
D
/
/
D
D
L
L
P
P
P
P
r
r
o
o
j
j
e
e
c
c
t
t
o
o
r
r
A
A
V
V
e
e
r
r
V
V
i
i
s
s
i
i
o
o
n
n
2
2
8
8
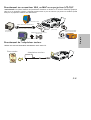
0
0 allows you to display camera and computer presentations on a VGA or graphic display monitor, or
LCD/DLP projector.
AVerMedia AVerVision280
LCD/DLP
Projector
Mac Monitor
Monitor Adapter
(optional)
VGA Monitor
O
R
Computer Extension Cable
Plug to VGA or RGB IN
C
C
o
o
n
n
n
n
e
e
c
c
t
t
i
i
n
n
g
g
t
t
h
h
e
e
P
P
o
o
w
w
e
e
r
r
A
A
d
d
a
a
p
p
t
t
e
e
r
r
Use a standard 100V~240V AC power source.
A
VerVision280
Power Adapter
Wall
Outlet

E-6
C
C
o
o
n
n
n
n
e
e
c
c
t
t
i
i
n
n
g
g
t
t
o
o
a
a
M
M
i
i
c
c
r
r
o
o
s
s
c
c
o
o
p
p
e
e
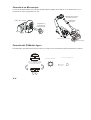
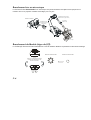
Connecting the
A
A
V
V
e
e
r
r
V
V
i
i
s
s
i
i
o
o
n
n
2
2
8
8
0
0
to a microscope allows you to examine microscopic objects on a VGA monitor or a
LCD/DLP projector without straining your eyes.
Microscope
A
VerMedia AVerVision280
Coupler
(optional)
Protective
Lens Adapter
(optional)
Camera Head
S
C
R
E
W
C
C
o
o
n
n
n
n
e
e
c
c
t
t
i
i
n
n
g
g
t
t
h
h
e
e
L
L
i
i
g
g
h
h
t
t
M
M
o
o
d
d
u
u
l
l
e
e
T
T
h
h
e
e
L
L
E
E
D
D
l
l
i
i
g
g
h
h
t
t
m
m
o
o
d
d
u
u
l
l
e
e
p
p
r
r
o
o
v
v
i
i
d
d
e
e
s
s
w
w
h
h
i
i
t
t
e
e
l
l
i
i
g
g
h
h
t
t
a
a
n
n
d
d
i
i
t
t
i
i
s
s
b
b
e
e
s
s
t
t
u
u
s
s
e
e
w
w
h
h
e
e
n
n
p
p
r
r
e
e
s
s
e
e
n
n
t
t
i
i
n
n
g
g
i
i
n
n
l
l
o
o
w
w
l
l
i
i
g
g
h
h
t
t
i
i
n
n
g
g
c
c
o
o
n
n
d
d
i
i
t
t
i
i
o
o
n
n
.
.
Turn off LED Light
Turn on LED Light
Press the latch here to detach
the light module from the
camera head.

E-7
E
E
n
n
g
g
l
l
i
i
s
s
h
h
I
I
n
n
s
s
t
t
a
a
l
l
l
l
i
i
n
n
g
g
t
t
h
h
e
e
O
O
p
p
t
t
i
i
o
o
n
n
a
a
l
l
L
L
i
i
g
g
h
h
t
t
B
B
o
o
x
x
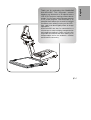
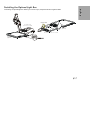
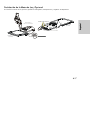
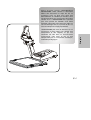
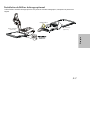
Connecting an optional light box allows you to view x-rays, transparencies and negative slides.
PLUG IT HERE
Light Box
(optional)
Light Box
(optional)
AVerMedia
AVerVision280
AVerMedia AVerVision280

E-8
M
M
a
a
k
k
i
i
n
n
g
g
A
A
d
d
j
j
u
u
s
s
t
t
m
m
e
e
n
n
t
t
s
s
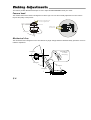
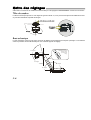
This section provides illustrated useful tips on how to adjust the AVerVision280 to meet your needs.
C
C
a
a
m
m
e
e
r
r
a
a
h
h
e
e
a
a
d
d
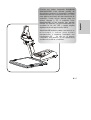
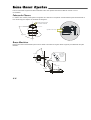
The camera head can be rotated 135 degrees from left to right. You can also manually adjust the focus from here to
improve the quality of the pictures.
Adjust the
focus here
FOCUS
Camera Head
Adjust the angle here
at the ridged side
45 degrees
90 degrees
M
M
e
e
c
c
h
h
a
a
n
n
i
i
c
c
a
a
l
l
A
A
r
r
m
m
The mechanical arm is designed to move from almost any angle. Simply follow the illustrated safety procedure on how to
make the adjustment.
92 degrees
60 degrees
120 degrees
75 degrees
Extendable up
to 122mm
(4.8 in) long

E-9
English
A
A
n
n
t
t
i
i
-
-
g
g
l
l
a
a
r
r
e
e
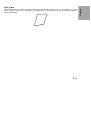
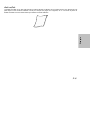
The anti-glare sheet is a special coated film that helps eliminate the light reflection when you are displaying very shiny
object or glossy surfaces such as magazines, etc. Simply place the anti-glare sheet on top of the shiny document to
reduce reflected light.

E-10
T
T
h
h
e
e
C
C
o
o
n
n
t
t
r
r
o
o
l
l
P
P
a
a
n
n
e
e
l
l
B
B
u
u
t
t
t
t
o
o
n
n
s
s
a
a
n
n
d
d
t
t
h
h
e
e
i
i
r
r
F
F
u
u
n
n
c
c
t
t
i
i
o
o
n
n
s
s
T
T
o
o
u
u
c
c
h
h
B
B
u
u
t
t
t
t
o
o
n
n
C
C
o
o
n
n
t
t
r
r
o
o
l
l
P
P
a
a
n
n
e
e
l
l
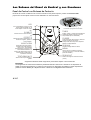
The Touch Button Control Panel located on the top and side of AVerVision280 provides quick access to commonly
used functions.
AVerM edia
TIMER
ZO OM
MENU
SO UR CE
NIGHT VIEW
EFFE CTS
F REEZE
+
-
A Ver Vi sio n 280
SOURCE
Switch between camera or PC
mode
LED
On normal operations a green
LED will be lit, in standby mode
the color of the LED will be red.
EFFECTS
Display the image captured by the
camera into either a negative,
positive or monochrome
TEXT/GRAPHICS
Switch between text or graphic
enhancement
ZOOM IN
Enlarge the image up to 800%
ZOOM OUT
Reduce the image down to normal size
(100%)
MENU
Opens the menu with all the functions.
(Refer to the section, Menu Functions, for
more details.)
TIMER
Display, start, and hide the OSD timer
(Refer to the section, Timer Function,
for more details.)
NIGHT VIEW
Press this button to turn on/off
Night View function.
This is very useful when you are
presenting in a low-light condition,
the image of the object would
appear as though it is under the
normal lighting conditions.
FREEZE
Uuser can press this button to freeze the
displaying picture and prepare to next
presented pictures.
A
V
e
r
M
e
d
i
a
Power
Turn the AVerVision280 on/off
* We strongly suggest to use “Night View” for still objects or documents only.
Important:
The default camera display resolution setting is on 1024x768. If your output device does not support this
resolution you will not be able to see an image on your display device. You can simply press the MENU and
►or◄ buttons to the increase or decrease the resolution setting.

E-11
English
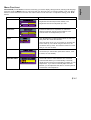
M
M
e
e
n
n
u
u
F
F
u
u
n
n
c
c
t
t
i
i
o
o
n
n
s
s
A
A
V
V
e
e
r
r
V
V
i
i
s
s
i
i
o
o
n
n
2
2
8
8
0
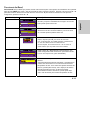
0 provides MENU functions for fine-tuning your screen display, setting the timer, selecting OSD language
and more. Press the MENU button to call up and exit from the main menu or sub-menu display. Then use ▲or▼
buttons to select the items in the menu list. Use ► button to enter sub-menu. To adjust the setting, press ◄or►
buttons.
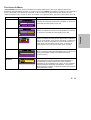
Main Menu Sub-Menu OSD Description
BRIGHTNESS
Press ►or◄ buttons to increase or decrease the
brightness level and improve the visibility. The
brightness level can be adjusted up to ±50.
CONTRAST
Press ►or◄ buttons to emphasize or reduce the
difference between light and dark conditions. The
contrast level can be adjusted up to ±50.
ZOOM
Use ▲or▼buttons to select between linear or fast zoom
then press ► to make the selection.
Using the linear zoom you can increase or decrease the
zoom values by 10%. While using the fast zoom, the
increments are by 100%. The maximum amount of zoom
that you can view is 800%.
TIMER
Press ►or◄ buttons to set a time value. The time value
can be set up to 120 minutes. (Refer to the section, Timer
Function, for more details.)
WHITE BALANCE
Use ▲or▼ buttons to select between Auto or Manual.
AVerVision280 allows you to automatically or manually
adjust the CCD camera to suit the lighting condition or color
temperature. If you select to manually adjust the white
balance, you can adjust the Red, Blue or use the system to
measure the color temperature.

E-12
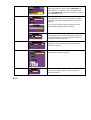
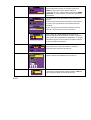
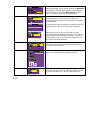
To obtain a more accurate color balance, place a sheet of
white paper under the camera. Select MEASURE then
press ► button to calibrate the color temperature. Wait
until a "MEASURE OK" appears at the lower left corner of
the presentation screen.
Use ▲or▼ buttons to select between Auto or Manual.
AVerVision280 allows you to automatically or manually
adjust the CCD camera to determine how much light is
required.
If you choose to manually adjust the exposure, press
►or◄ buttons to adjust the exposure level.
EXPOSURE
Use ▲or▼ buttons to select between 50Hz or 60Hz.
Some display devices can not handle high refresh rates.
The image will flicker a couple of times as the output is
switched to another refresh rate.
RESOLUTION
Use ▲or▼ buttons to choose from 1024x768,
800x600 or 640x480 display resolution then press ►
to make the selection.
LANGUAGE
Use ▲or▼ buttons to select from nine different languages
then press ► to make the selection.
DEFAULT
Use ▲or▼ buttons to select YES to restore to original
factory default setting or NO to exit then press ► to
make the selection.

E-13
English
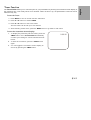
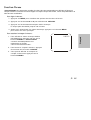
0:00:30
T
T
i
i
m
m
e
e
r
r
F
F
u
u
n
n
c
c
t
t
i
i
o
o
n
n
The
A
A
V
V
e
e
r
r
V
V
i
i
s
s
i
i
o
o
n
n
2
2
8
8
0
0 allows you to control the pace of your presentation by showing the countdown screen display of
the remaining time. This merely serves as a reminder. When the time is up, the presentation screen will not be
affected in any way.
T
T
o
o
S
S
e
e
t
t
t
t
h
h
e
e
T
T
i
i
m
m
e
e
r
r
:
:
1.
Press MENU to view on screen function selections.
2. Press ▲or▼ buttons to select TIMER.
3. Press ►or◄ buttons to set a time value.
The time value can be set up to 120 minutes.
4. After selecting a time value, press the MENU button to go back to main menu.
T
T
o
o
V
V
i
i
e
e
w
w
t
t
h
h
e
e
C
C
o
o
u
u
n
n
t
t
d
d
o
o
w
w
n
n
S
S
c
c
r
r
e
e
e
e
n
n
D
D
i
i
s
s
p
p
l
l
a
a
y
y
:
:
1.
To display the previously set time value, press the
TIMER button once.
A
A
V
V
e
e
r
r
V
V
i
i
s
s
i
i
o
o
n
n
2
2
8
8
0
0 automatically
converts your settings to “hours:minutes:seconds”
format.
2. To start the countdown, press the TIMER button
again.
3. You can toggle the countdown screen display on
and off by pressing the TIMER button.

E-14
T
T
r
r
o
o
u
u
b
b
l
l
e
e
s
s
h
h
o
o
o
o
t
t
i
i
n
n
g
g
This section provides many useful tips on how to solve common problems while using the
A
A
V
V
e
e
r
r
V
V
i
i
s
s
i
i
o
o
n
n
2
2
8
8
0
0.
There is no picture on the presentation screen.
1. Check all the connectors again as shown in this manual.
2. Check your display output device remote control’s on/off switch.
3. Verify the setting of the display output device.
4. If you are to present using a notebook or computer, you may have to switch the source to
VGA.
I have set up the
A
A
V
V
e
e
r
r
V
V
i
i
s
s
i
i
o
o
n
n
2
2
8
8
0
0 and checked all the connections as
specified in the manual, but I can not get a picture on the preferred
presentation screen.
-
A
A
V
V
e
e
r
r
V
V
i
i
s
s
i
i
o
o
n
n
2
2
8
8
0
0
is in the "Standby" mode once power is connected. You need to switch
A
A
V
V
e
e
r
r
V
V
i
i
s
s
i
i
o
o
n
n
2
2
8
8
0
0
"ON", either from the remote control or from its touch button control panel to display the picture on the
presentation screen.
- The default camera display resolution setting is on 1024x768. If your output device does not support
this resolution you will not be able to see an image on your display device. You can simply press the
MENU and RIGHT or LEFT button to the increase or decrease the resolution setting.
The picture on the presentation screen is distorted or the image is blurry.
1. Before doing any adjustments, reset all the picture attributes to the factory default setting
(Refer to the Menu Functions, for more details).
2. Use the Brightness and Contrast menu functions to reduce the distortion.
3. If you discover that the camera picture seems a little blurry or out of focus. Adjust the focus
found at the side of the camera head.
There is no computer signal on presentation screen.
When you turn on the computer, it will first auto-detect the type of monitor you have. During auto-detection, there
won't be any display on your presentation screen. To avoid this problem, connect your computer, and all the
necessary cables to the
A
A
V
V
e
e
r
r
V
V
i
i
s
s
i
i
o
o
n
n
2
2
8
8
0
0
first before you power on your computer.

E-15
English
1. Limited Warranty:
For a period of time beginning on the date of purchase of the applicable product and extending as set forth in Section
6 of this Limited Warranty (the “Warranty Period”), AVerMedia Technologies, Inc. (“AVerMedia”) warrants that the
applicable product (“Product”) substantially conforms to AVerMedia’s documentation for the product and that its
manufacture and components are free of defects in material and workmanship under normal use. “You” as used in
this agreement means you individually or the business entity on whose behalf you use or install the product, as
applicable. This limited warranty extends only to You as the original purchaser. Except for the foregoing, the Product
is provided “AS IS.” In no event does AVerMedia warrant that You will be able to operate the Product with-out
problems or interruptions, or that the Product is suitable for your purposes. Your exclusive remedy and the entire
liability of AVerMedia under this paragraph shall be, at AVerMedia’s option, the repair or replacement of the Product
with the same or a comparable product. This warranty does not apply to (a) any Product on which the serial number
has been defaced, modified, or removed, or (b) car-tons, cases, batteries, cabinets, tapes, or accessories used with
this product. This warranty does not apply to any Product that has suffered damage, deterioration or malfunction due
to (a) accident, abuse, misuse, neglect, fire, water, lightning, or other acts of nature, commercial or industrial use,
unauthorized product modification or failure to follow instructions included with the Product, (b) misapplication of
service by someone other than the manufacturer’s representative, (c) any shipment damages (such claims must be
made with the carrier), or (d) any other causes that do not relate to a Product defect. The Warranty Period of any
repaired or replaced Product shall be the longer of (a) the original Warranty Period or (b) thirty (30) days from the
date of delivery of the repaired or replaced Product.
2. Limitations of Warranty:
AVerMedia makes no warranties to any third party. You are responsible for all claims, damages, settlements,
expenses, and attorneys’ fees with respect to claims made against You as a result of Your use or misuse of the
Product. This warranty applies only if the Product is installed, operated, maintained, and used in accordance with
AVerMedia specifications. Specifically, the warranties do not ex-tend to any failure caused by (i) accident, unusual
physical, electrical, or electro-magnetic stress, neglect or misuse, (ii) fluctuations in electrical power beyond
AVerMedia specifications, (iii) use of the Product with any accessories or options not furnished by AVerMedia or its
authorized agents, or (iv) installation, alteration, or repair of the Product by anyone other than AVerMedia or its
authorized agents.
3. Disclaimer of Warranty
EXCEPT AS EXPRESSLY PROVIDED OTHERWISE HEREIN AND TO THE MAXIMUM EXTENT PERMITTED
BY APPLICABLE LAW, AVERMEDIA DIS-CLAIMS ALL OTHER WARRANTIES WITH RESPECT TO THE
PRODUCT, WHETHER EXPRESS, IMPLIED, STATUTORY OR OTHERWISE, INCLUDING WITHOUT
LIMITATION, SATISFACTORY QUALITY, COURSE OF DEALING, TRADE USAGE OR PRACTICE OR THE
IMPLIED WARRANTIES OF MER-CHANTABILITY, FITNESS FOR A PARTICULAR PURPOSE OR NONIN-
FRINGEMENT OF THIRD PARTY RIGHTS.
4. Limitation of Liability
IN NO EVENT SHALL AVERMEDIA BE LIABLE FOR INDIRECT, INCIDENTAL, SPECIAL, EXEMPLARY,
PUNITIVE, OR CONSEQUENTIAL DAMAGES OF ANY NATURE INCLUDING, BUT NOT LIMITED TO, LOSS OF

E-16
PROFITS, DATA, REVENUE, PRODUCTION, OR USE, BUSINESS INTERRUPTION, OR PROCUREMENT OF
SUBSTITUTE GOODS OR SERVICES ARISING OUT OF OR IN CONNECTION WITH THIS LIMITED
WARRANTY, OR THE USE OR PERFORMANCE OF ANY PRODUCT, WHETHER BASED ON CON-TRACT OR
TORT, INCLUDING NEGLIGENCE, OR ANY OTHER LEGAL THEORY, EVEN IF AVERMEDIA HAS ADVISED
OF THE POSSIBILITY OF SUCH DAMAGES. AVERMEDIA’S TOTAL, AGGREGATE LIABILITY FOR DA-MAGES
OF ANY NATURE, REGARDLESS OF FORM OF ACTION, SHALL IN NO EVENT EXCEED THE AMOUNT PAID
BY YOU TO AVERMEDIA FOR THE SPECIFIC PRODUCT UPON WHICH LIABILITY IS BASED.
5. Governing Law and Your Rights
This warranty gives You specific legal rights; you may also have other rights granted under state law. These rights
vary from state to state.
Section 6
Warranty Period of AVerMedia Product Purchased:
AVerVision110: 2 Year Limited Parts and Labor.
All other AVerVision Products*: 3 Year Limited Parts and Labor.
All other AVerMedia Products: 1 Year Limited Parts and Labor.
All AVerVision Accessories: 1 Year Parts and Labor.
* Except AVerVision DL, 100, 100 Pro – 1 Year Parts and Labor.
CONTACT INFORMATIONS:
http://www.avermedia.com

i
Español
NOTIFICACIÓN FCC
Se ha comprobado que este dispositivo cumple los límites para dispositivos digitales de Clase B según el Apartado 15
de la normativa FCC. Estos límites están diseñados para proporcionar una protección razonable contra las
interferencias perniciosas en entornos comerciales, industriales u empresariales. Este equipo puede generar, utilizar y
emitir energía de radiofrecuencias y, si no se instala y se utiliza de acuerdo con sus instrucciones, puede causar
interferencias perniciosas a las comunicaciones por radio. Sin embargo, no hay garantía alguna de que no se
produzcan interferencias en una instalación concreta. Si este equipo causa interferencias no deseadas a la recepción
de radio o de televisión, lo cual puede determinarse apagando y encendiendo el equipo, se recomienda al usuario
corregir la interferencia tomando estas posibles medidas:
• Cambiar la orientación o la posición de la antena receptora.
• Aumentar la separación entre el equipo y el receptor.
• Conectar el equipo a un enchufe eléctrico que esté en un circuito diferente del receptor.
• Consultar al distribuidor o a un técnico de radio y TV.
Este dispositivo cumple el Apartado 15 de las normas FCC. Su funcionamiento está sujeto a estas dos condiciones: (1)
este dispositivo no puede causar interferencias no deseadas y (2) este dispositivo debe aceptar todas las interferencias
recibidas, incluidas las interferencias que puedan causar un funcionamiento no deseado.
ADVERTENCIA SOBRE MODIFICACIONES
Para cumplir los límites para dispositivos digitales de Clase B, de acuerdo con el Apartado 15 de las normas FCC, este
dispositivo debe instalarse en un sistema informático que garantice el cumplimiento de los límites de la Clase B. Todos
los cables utilizados para conectar el equipo informático y los periféricos deben ser apantallados y estar conectados a
tierra. La utilización de este dispositivo con equipos no garantizados o con cables no apantallados puede causar
interferencias en la recepción de radio y televisión.
Cualquier cambio o modificación no aprobado expresamente por el fabricante de este dispositivo podría invalidar el
derecho del usuario a utilizarlo.
NOTA DE CE
Este es un producto de Clase B.
DECLINACIÓN DE RESPONSABILIDAD
No se ofrece garantía alguna, ni implícita ni explícita, en relación con el contenido de esta documentación, su calidad,
sus prestaciones, su comerciabilidad ni su adecuación para un propósito particular. Se ha verificado cuidadosamente la
información presentada en esta documentación para garantizar su fiabilidad pero, sin embargo, no se asume
responsabilidad alguna por las posibles imprecisiones que pueda contener. La información contenida en esta
documentación está sujeta a cambio sin aviso previo.
Bajo ninguna circunstancia será AVerMedia
responsable por daños directos, indirectos, especiales, resultantes
causados por la utilización, correcta o incorrecta, de este producto o su documentación, incluso aunque se avisara
previamente del riesgo de que se causaran estos daños.
MARCAS COMERCIALES
AVerMedia y AVerVision son marcas registradas de AVerMedia TECHNOLOGIES, Inc. PC IBM es una marca
registrada de International Business Machines Corporation. Macintosh es una marca registrada de Apple Computer, Inc.
Microsoft es una marca registrada y Windows es una marca de Microsoft Corporation. Todos los otros productos o
nombres corporativos mencionados en este documento están sólo para propósitos identificativos y explicativos, y son
marcas o marcas registradas de sus respectivos propietarios.
La page est en cours de chargement...
La page est en cours de chargement...
La page est en cours de chargement...
La page est en cours de chargement...
La page est en cours de chargement...
La page est en cours de chargement...
La page est en cours de chargement...
La page est en cours de chargement...
La page est en cours de chargement...
La page est en cours de chargement...
La page est en cours de chargement...
La page est en cours de chargement...
La page est en cours de chargement...
La page est en cours de chargement...
La page est en cours de chargement...
La page est en cours de chargement...
La page est en cours de chargement...
La page est en cours de chargement...
La page est en cours de chargement...
La page est en cours de chargement...
La page est en cours de chargement...
La page est en cours de chargement...
La page est en cours de chargement...
La page est en cours de chargement...
La page est en cours de chargement...
La page est en cours de chargement...
La page est en cours de chargement...
La page est en cours de chargement...
La page est en cours de chargement...
La page est en cours de chargement...
La page est en cours de chargement...
La page est en cours de chargement...
La page est en cours de chargement...
La page est en cours de chargement...
La page est en cours de chargement...
La page est en cours de chargement...
La page est en cours de chargement...
La page est en cours de chargement...
-
 1
1
-
 2
2
-
 3
3
-
 4
4
-
 5
5
-
 6
6
-
 7
7
-
 8
8
-
 9
9
-
 10
10
-
 11
11
-
 12
12
-
 13
13
-
 14
14
-
 15
15
-
 16
16
-
 17
17
-
 18
18
-
 19
19
-
 20
20
-
 21
21
-
 22
22
-
 23
23
-
 24
24
-
 25
25
-
 26
26
-
 27
27
-
 28
28
-
 29
29
-
 30
30
-
 31
31
-
 32
32
-
 33
33
-
 34
34
-
 35
35
-
 36
36
-
 37
37
-
 38
38
-
 39
39
-
 40
40
-
 41
41
-
 42
42
-
 43
43
-
 44
44
-
 45
45
-
 46
46
-
 47
47
-
 48
48
-
 49
49
-
 50
50
-
 51
51
-
 52
52
-
 53
53
-
 54
54
-
 55
55
-
 56
56
-
 57
57
-
 58
58


dans d''autres langues
- English: AVer AVerVision 280 User manual
- español: AVer AVerVision 280 Manual de usuario
Documents connexes
Autres documents
-
Elmo TT-02U Manuel utilisateur
-
-
Avermedia A200P Manuel utilisateur
-
-
-
BenQ S30 Manuel utilisateur
-
Toshiba TLPC001 Le manuel du propriétaire
-
-
 AVerTV C027 Quick Installation Manual
-
Avermedia F200 spécification
