Avermedia A200P Manuel utilisateur
- Catégorie
- Téléviseurs LCD
- Taper
- Manuel utilisateur
Ce manuel convient également à

English
Français
User Manual
AVerTV Hybrid TVBox 13
A200P


i
Disclaimer
All the screenshots in this documentation are only example images. The images may vary depending
on the product and software version. Information presented in this documentation has been carefully
checked for reliability; however, no responsibility is assumed for inaccuracies. The information
contained in this documentation is subject to change without notice.
Copyright
© 2015 by AVerMedia Technologies, Inc. All rights reserved. No part of this publication, in whole or in part,
may be reproduced, transmitted, transcribed, altered or translated into any language in any form by any
means without the written permission of AVerMedia Technologies, Inc. Information and specification
contained in this manual are subject to change without notice and do not represent a commitment on the
part of AVerMedia.
For more information, please refer to www.avermedia.com.
"AVerMedia" is a trademark or registered trademark of AVerMedia Technologies, Inc.
The pictures contained in this manual are provided for reference purposes only. Made in Taiwan (Except
Accessories).
International Headquarters
Address No.135, Jian 1st Rd., Zhonghe Dist., New Taipei City 23585, Taiwan
Website www.avermedia.com
Telephone +886-2-2226-3630
Support www.avermedia.com/support
US Office
Address 47358 Fremont Blvd., Fremont, CA 94538, USA
Website www.avermedia-usa.com
Telephone (408)-263-3828
V 1.0
07/2015

ii
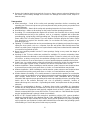
Important Safety Instructions and Disclaimer
WARNING: Failure to follow these safety instructions could result in fire, electric shock, other
injury or damage to device or other property, and/or loss of life. AVerMedia is not responsible
for damage or injury arising from failure to follow safety instructions relating to the product’s
use.
General Guidelines and Warning
Read and follow these instructions.
Do not use the device on uneven or unstable surfaces.
Do not use this device in a wet environment or near water.
Unplug the device before cleaning. Clean only with a dry cloth.
Use in a well ventilated environment. Do not block any ventilation openings.
Use the device within the specified temperature range.
Use power sources within the specified voltage range.
Do not place heavy objects on the device.
Do not install near heat sources such as radiators or stoves.
Do not defeat the safety purposes of the polarized or grounding-type plug.
Protect the power cord from being walked on or pinched, particularly where the cord connects with
plugs or adapters.
Only use the attachments and accessories specified by the manufacturer.
Unplug this device during lightning storms or when unused for prolonged time.
Do not modify or disassemble the device in any way.
Refer all servicing to qualified personnel.
Do not dispose the device as general household waste. Dispose in accordance with local
environmental laws.
General Battery Instructions
Never short circuit the battery terminals.
Store the batteries in a cool dry place.
Keep the battery away from children.
Keep the battery away from fire.
Stop using or charging the battery immediately if the battery becomes or appears damaged, gives
off an odor, becomes discolored or deformed, starts to balloon or swell, leaks.
Never store or charge the battery inside your car or in extreme temperature. Extreme
temperatures might ignite the battery and cause fire.
Do not dispose of used batteries in domestic waste. Dispose of batteries at special collection
points or return to point of sale if applies.
Removable Battery for Remote Control
Do not charge the batteries.
Do not mix old with new batteries.
Do not attempt to disassemble the battery.
Do not expose the battery to water or rain.
Use of carbon-zinc battery for remote control is strongly recommended. Use of other types of
batteries, such as alkaline or rechargeable (nickel-cadmium) may cause battery current overload
or battery leakage and corrosion which can damage the remote control.
Do not mix different types of batteries: alkaline, standard (carbon-zinc) or rechargeable
(nickel-cadmium).

iii
Remove the batteries during long periods of non-use. Always remove exhausted batteries from
the remote control. Battery leakage and corrosion can damage the remote control, dispose of
batteries safely.
Tuner product
Read Instructions - Read all the safety and operating instructions before connecting and
operating your TV tuner to help ensure your own personal safety and to protect your product from
potential damage.
Retain Instructions - Retain all the safety and operating instructions for future reference.
Heed Warnings - Adhere to all warnings on the product and the operating instructions.
Grounding - For continued protection against risk of electric shock and fire, this accessory should
be installed/connected only to the products, such as a computer, equipped with a three-wire
grounding plug, a plug having a third (grounding) pin. This plug will only fit into a grounding-type
power outlet. This is a safety feature. If you are unable to insert the plug into the outlet, contact
your electrician to replace the obsolete outlet. Do not defeat the safety purpose of the
grounding-type plug.
Lightning - For added protection and to prevent damage due to lightning and power-line surges,
unplug the host system, such as a computer, from the wall power outlet and disconnect the
antenna or cable system. Unplug the host system from the wall power outlet when left unattended
or unused for long periods of time.
Never insert anything metallic into the TV tuner openings. Doing so may create the danger of
electric shock.
Openings in the TV tuner cabinet are provided for ventilation. To prevent overheating, these
openings should not be blocked or covered. Avoid using the TV tuner on a bed, sofa, rug, or other
soft surface, as doing so may block the ventilation openings in the cabinet. If you place the TV
tuner in a bookcase or an enclosed space, be sure to provide adequate ventilation and air flow.
Power Lines - An outside antenna system should not be located in the vicinity of overhead power
lines or other light or power circuits, or where it can fall into such power lines or circuits.
Antenna Installation - When installing an outside antenna system, extreme care should be taken
to prevent it from touching such power lines or circuits, as contact with them may be fatal.
Antenna Installation - When installing an outside antenna system, extreme care should be taken
to prevent it from touching such power lines or circuits, as contact with them may be fatal.
Outdoor Antenna Grounding - If an outside antenna is connected to the product, be sure that the
antenna system is grounded so as to provide some protection against voltage surges and built up
static charges. Article 810.21 of the National Electric Code, ANSI/NFPA No.70, provides
information with regard to proper grounding of the mast and supporting structure, grounding of the
lead-in wire to the antenna discharge unit, size of grounding conductors, location of
antenna-discharge unit, connection of grounding electrodes, and requirements for the grounding
electrode.
Caution for users/installers in Norway - In Norway, there exists a possibility of a hazardous
situation due to voltage difference between the screen of the coaxial cable of the cable distribution
system and the local equipment earth (typically, earthed chassis of the PC system). To avoid any
hazards, antenna/cable input connection from the TV tuner card to a Cable Distribution System
must be provided through a galvanic isolator (not included).
NOTE to CATV System Installer-This reminder is provided to call the CATV systems installer's
attention to Section 820.93 of the National Electric Code, ANSI/NFPA 70:2005 (for US/Canada)
and/or EN60728-11:2005 standard (for Europe), which provide guidelines for proper grounding
and, in particular, specify that the Coaxial cable shield shall be connected to the grounding system
of the building, as close to the point of cable entry as practical.

iv
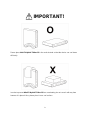
IMPORTANT!
Please place AVerTV Hybrid TVBox 13 in the vertical stand so that the device can cool down
efficiently.
In order to prevent AVerTV Hybrid TVBox 13 from overheating, do not cover it with any item
however it is placed. Also, please place it on a cool surface.

v
Limited Warranty
AVerMedia warrants that the Product is free from defects in material and/or workmanship under normal
use.
AVerMedia does not warrant that the operation of the Product will be uninterrupted or error-free. The
Limited Warranty does not cover:
The warranty period has expired;
Product that has (a) serial numbers or the warranty sticker that have been removed tampered,
damaged or altered, or (b) nonconforming.
Product purchased from an unauthorized distributor;
Product has been tested, altered, modified, repaired or serviced by someone other than
AVerMedia (or its authorized service centers);
Failure to adhere to user’s manual.
Product that are operated in combination with third party’s software which may be obtained by user
or provided by AVerMedia in the product packaging.
Product that are operated in combination with third party’s device(s)/equipment(s), or the
damage is caused from computer viruses
Damage caused by (a) misuse, abuse, neglect, improper use of the physical or operating
environment (such as the exterior ruptures, moisture, exposure to temperature, high or low
humidity, power overload, placement subject to extreme environments that include a lack of
ventilation or stacking, throwing, soakage, etc.) or modification; (b) improper or unauthorized
installation, wiring, repair, testing; (c) use of the Product outside AVerMedia published guidelines;
(d) accident, fire, acts of God or force majeure such as natural disasters, environmental distress,
or lightning; power surges; (e)improper maintenance or failure to use the information content in
accordance with the Product.
Other than the above, similar circumstances not attributable to AVerMedia.
Warranty Period
The term of the warranty begins from the date of purchase. Your dated sales receipt showing the date
of purchase is the proof of purchase. The warranty period varies by product and is generally 1 or 2
years; consult your original AVerMedia product packaging or user information provided by AVerMedia
and local in-country distributor at the time of purchase for the warranty term specific to your product
("Warranty Period").
How to Obtain Warranty Service – Contact your local in-country distributor
To obtain warranty service, an original or copy of the sales receipt from the original retailer is
required.
A separate warranty may be provided by international distributors. This warranty is provided by the
local in-country distributor and this distributor provides local service for your device. Distributor
warranties are only valid in the area of intended distribution.
When a Product or part is replaced, the replacement item becomes your property and the returned
product or part becomes the property of AVerMedia or its distributor.

vi
Usage of Personal Contact Information
If you obtain service under this warranty, you agree to and fully authorize AVerMedia or its distributor to
store, use, and handle information related to the warranty service, as well as your personal contact
information, including but not limited to your name, phone number, address, and email. AVerMedia or
its distributor requires this information to perform the necessary service set forth by this warranty. For
warranty service and outcome satisfaction, AVerMedia reserves the right to contact you in order to
understand the problems that occur during usage of the product; the company may also notify you
about any product recalls or safety issues. To achieve satisfactory results, you agree to fully license
AVerMedia to transfer his/her customer information to the country or region of the original purchase.
This allows AVerMedia to undertake the scope of product or parts maintenance of the warranty service.
AVerMedia may also disclose this information under certain legal requirements.
How to provide Warranty Service
Services may vary by geographic region, please contact AVerMedia or its distributor for a response
regarding the appropriate services for your Product. The Warranty Service may be provided by the
following types.
a. Customer Delivery Service
According to “Customer Delivery Service,” the customer must pay for their own product to be delivered
to a designated service center for repair or replacement, and all risks are borne by the customer. The
customer may retrieve the product after the repair or replacement process has been completed. Should
the customer fail to collect the product, the company will handle the product as it sees fit without
incurring any liability.
b. Mail-In Service
According to “Mail-In Service,” customers will be required to pay for their own products to be mailed to a
designated service center for repair or replacement, and all the risks are borne by the customer. After
the product has been repaired or replaced, AVerMedia will send the product back to the customer at
their own expense and bear all risks, except where otherwise specified by service dealers.
c. Customers’ Two-Way Mail Service
According to “Customers’ Two-Way Mail Service,” customers will be required to pay for their own
product to be delivered to a designated service center for repair or replacement, and all the risks are
borne by the customer. After the product has been repaired or replaced, the product will be returned to
the customer, for which all delivery and other risks are borne by the customer. If the customer fails to
arrange for the return transport of the product, the company will handle the product as it sees fit without
incurring any liability.
No On-Site Service
AVerMedia and its distributor do not provide on-site service, including but not limited to, installation,
maintenance, instructing, troubleshooting problems, the usage of the product or the warranty service. In

vii
the event that calling, updating software, or other means fail to resolve the issue, AVerMedia and its
distributor will arrange warranty service as specified under “Scope of Warranty Services (a).”
Limitation of Liability
AVerMedia accepts responsibility for the damage of loss of products only under the following
circumstances: when the company has a product in store or when a product is being transported by the
company.
If any information contained in the product (including confidential information, proprietary information, or
personal information) is missing or revealed, AVerMedia or its service dealers are without responsibility.
Under any circumstances, if the solutions proposed under the warranty have not fulfilled its basic
purpose, AVerMedia, its subsidiaries, suppliers, and dealers do not assume any burden of liability: (a)
loss, damage, or disclosure of client data; (b) special damages, incidental damages, punitive damages,
or consequential damages, including but not limited to loss of profits, loss of business revenue, goodwill,
or anticipated damage to balance loss, and even if the possibility has been raised, whether the claim is
based on contract, warranty, negligence, strict liability, or other liability. Under the circumstances that
AVerMedia, its subsidiaries, suppliers and distributors assumes responsibility for damages caused by
any reason, the amount of its total liability shall not exceed the actual payable of direct damages, nor
shall it exceed the amount paid by the customer for the product.
Prejudice to the foregoing restriction does not apply to personal injury or death caused by injury, nor
does it apply to the compensation required by law for AVerMedia to assume with regards to real or
tangible property.
Where the law does not exclude or limit incidental or consequential damages, the above limitations or
exclusions may not apply to the customer.
Other rights
This warranty provides the customer with specific legal rights. The customer may be subject to
jurisdiction in accordance with the relevant laws in his or her district, but the customer is subject to the
laws and regulations that govern the country or state where the product was originally purchased. This
warranty does not affect any legal rights, including the limitations or exclusions laid out by this contract;
instead, the control of the consumer goods sold is governed by the relevant laws or regulations born of
consumer rights.

User’s Manual
English-1
Table of Content
Chapter 1 What’s in the Package ............................................. 2
Chapter 2 The Unit Parts ........................................................... 3
2.1 Touch Button Control Panel ............................................................ 3
2.2 Infrared Sensor .............................................................................. 3
2.3 Connection Ports ............................................................................ 3
Chapter 3 Installation and Setup .............................................. 4
3.1 The Remote Control ....................................................................... 5
3.2 Supported Display Setting .............................................................. 6
Chapter 4 OSD Menu Settings .................................................. 7
4.1 Calling Up a Menu Display ............................................................. 7
4.2 Menu .............................................................................................. 7
4.3 Channel Menu ................................................................................ 8
4.4 Picture Menu .................................................................................. 8
4.5 Time Menu ..................................................................................... 9
4.6 Setup Menu .................................................................................... 9
4.7 Lock Menu .................................................................................... 10

AVerTV Hybrid TVBox 13
English-2
English
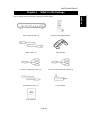
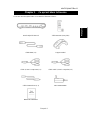
Chapter 1 What’s in the Package
AVerTV Hybrid TVBox 13 package contains the following items:
AVerTV Hybrid TVBox 13
Remote Control (with batteries)
HDMI Cable (x 1)
Vertical Stand
3.5 mm to Component Cable (x 1)
3.5 mm to Composite/Audio Cable (x 3)
IR Extender Cable (x 1)
Power Adapter
User’s Manual

User’s Manual
English-3
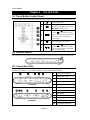
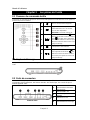
Chapter 2 The Unit Parts
2.1 Touch Button Control Panel
The Touch Button Panel found on the top side of the unit provides quick access to commonly used functions.
1
Turn the unit on/off
2
Press this button to switch between TV,
PC and other available video sources.
OSD Menu: Function as OK
3
/
Press Channel to go up and
Channel to go down to the next
active TV channel. Use these buttons to
make the selection in the menu or
picture setting
4
Call up/close the menu display
5
/
Press Volume to increase and
Volume to decrease the volume
level. Use these buttons to adjust the
menu or picture setting
2.2 Infrared Sensor
When using the remote control, aim it at the Infrared Sensor which is located at the front panel of the unit.
2.3 Connection Ports
The port connectors allow connection of your TV Signal, PC, VGA Monitor, LCD Monitor or Projector,
speakers, DVD Players, Camcorders, Gaming Console, or other Video Devices.
Front Panel
1
USB port
(for firmware upgrade)
2
HDMI input 1 and 2
3
Component (YPbPr) input
4
A/V input 1 and 2
5
IR extender port
Back Panel
6
DC port
7
Audio input
8
A/V output
9
VGA input
10
VGA output
11
HDMI output
12
TV antenna port (75)

AVerTV Hybrid TVBox 13
English-4
English
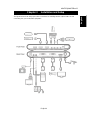
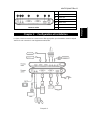
Chapter 3 Installation and Setup
The figure below shows the proper cable connections for installing AVerTV Hybrid TVBox 13 and
connecting it to your audio/video equipment.

User’s Manual
English-5
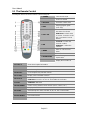
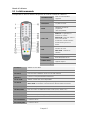
3.1 The Remote Control
The diagram below shows the remote control unit layout.
1. POWER
Turn the unit on/off
2.Number Buttons
Enter TV channel
3. Dot/Dash
Dot mark or dash mark
4. EPG
Display program guide
(DTV only)
5. VOL ◄/►
TV Mode: Increase or
decrease the volume
OSD Menu: Switch menu
or modes. Function as the
LEFT and RIGHT arrow
buttons.
6. OK
TV Mode: Confirm the
channel number
OSD Menu: Confirm the
selection
7. MENU
Enter or exit the OSD
menu
8. MUTE
Turn off/on the sound
9. ZOOM MODE
Switch among different
aspect ratios
10. Red Button
Display the Favorite List
11. TXT/C.C
View closed caption information
12. Green Button
On-screen function
13. Source
Switch among TV or external video sources
14. RECALL
Go to the previously selected channel
15. CH LIST
Display a list of available channels
16. CH▲/▼
TV Mode: Go to next or previous program.
OSD Menu: Function as the UP and DOWN arrow button
17. EXIT
OSD Menu: Exit menu
18. MTS/AUDIO
Switch among different audio modes (mono, stereo, etc.)
19. INFO
Display channel number and name
20. SLEEP
Automatically turn off the unit after 30, 60, 90, 120 or 150 minutes
21. DEFAULT RES.
Switch between 1024x768 60 Hz and 1280x720 60Hz
22. Blue Button
On-screen function
23. Yellow Button
On-screen function

AVerTV Hybrid TVBox 13
English-6
English
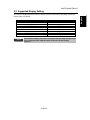
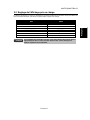
3.2 Supported Display Setting
The reference table below lists the monitor display resolution and refresh rate settings that AVerTV
Hybrid TVBox 13 supports.
VGA
HDMI
640X480 60Hz
480p 60Hz
800x600 60Hz
720p 60Hz
1024x768 60Hz
1080i 60Hz
1280x720 60Hz
1080p 60Hz
1280x1024 60Hz
576p 50Hz
1600x1200 60Hz
720p 50Hz
1920x1080 60Hz
1080i 50Hz
1080p 50Hz
If the resolution setting is not in 4:3 or 16:9 aspect ratio, the image will still be kept
in 4:3 or 16:9 aspect ratio (with black bars on sides) for the best viewing
experience.
NOTE

User’s Manual
English-7
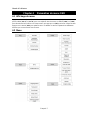
Chapter 4 OSD Menu Settings
4.1 Calling Up a Menu Display
Press [MENU] on the remote control to call up the main menu display. Then, you can use [Vol◄] or
[Vol ►] to move among menus; and use [CH▲] or [CH▼] to select functions under each menu, and
then press [OK] to enter each function. Press [Exit] to exit the menu. The table below lists the different
functions you will find in the menu.
4.2 Menu

AVerTV Hybrid TVBox 13
English-8
English
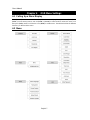
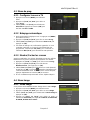
4.3 Channel Menu
4.3.1 Setup the TV Source
1. Press [MENU] to display the menu.
2. Press [Vol◄] or [Vol►] to go to the Channel
menu.
3. Use [CH▲] or [CH▼] to select Air/Cable and
press [OK] to switch between Air and Cable.
4.3.2 Auto Scan
1. After finishing setting TV source, press [MENU] to display the
menu.
2. Press [Vol◄] or [Vol►] to go to the Channel menu.
3. Use [CH▲] or [CH▼] to select Auto Scan and press [OK].
4. A confirmation dialog will appear. If you want to scan or
overwrite the previous program list, select Yes [Vol►] to confirm
or select No [Vol◄] to abort this operation.
4.3.3 Show/Hide Channels
After scanning, available channels will then be listed. Now you can
hide the unwanted programs.
1. Press [Vol◄] or [Vol►] to go to the Channel menu.
2. Press [CH▲] or [CH▼] to select Show/Hide and press [OK].
3. Use [CH▲] or [CH▼] to highlight a listed channel and press [OK].
The mark will appear, indicating that the channel has been
hidden. To show the hidden channels, simply press [OK] again.
4. If you want to hide more channels, repeat step 3.
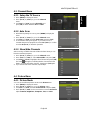
4.4 Picture Menu
4.4.1 Picture Mode
You can choose different picture modes in the Picture menu.
1. Press [MENU] to display the menu.
2. Press [Vol◄] or [Vol►] to go to the Picture menu.
3. Use [CH▲] or [CH▼] to select Picture Mode and press [OK].
4. Press [Vol◄] or [Vol►] to choose a mode or choose Personal to
adjust Contrast, Brightness, Sharpness, Tint, and Color.

User’s Manual
English-9
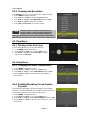
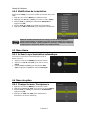
4.4.2 Changing the Resolution
In the Picture menu, you can change the video output resolution.
1. Press [MENU] to display the menu.
2. Press [Vol◄] or [Vol►] to go to the Picture menu.
3. Use [CH▲] or [CH▼] to select Resolution and press [OK].
4. Use [CH▲] or [CH▼] to select the resolution.
5. Press [OK] and Yes [Vol►] to save the change.
Check the maximum resolution supported by your
LCD/CRT monitor or projector before adjusting the
resolution. If the screen cannot display images for
extremely high resolutions, please reset resolution to 1024x768 or
1280x720 by pressing DEFAULT RES. button on the remote control.
4.5 Time Menu
4.5.1 Turning on the Auto Sync
You can automatically sync the unit time with EPG.
1. Press [MENU] to display the menu.
2. Press [Vol◄] or [Vol►] to go to the Time menu.
3. Use [CH▲] or [CH▼] to select Auto Sync and press
[OK] to turn on Auto Sync.
4.6 Setup Menu
4.6.1 Changing the Menu Transparency
1. Press [MENU] to display the menu.
2. Press [Vol◄] or [Vol►] to go to the Setup menu.
3. Use [CH▲] or [CH▼] to select Transparent and press [OK].
4. Press [CH▲] or [CH▼] to select the on-screen-display’s
transparency.
4.6.2 Enabling/Disabling Closed Caption
Function
This product has the ability to decode and display closed caption
content. You can enable/disable closed caption function and select a
closed caption service from the Closed Caption menu.
1. Press [MENU] to display the menu.
2. Press [Vol◄] or [Vol►] to go to the Setup menu.
3. Use [CH▲] or [CH▼] to select Closed Caption and press [OK].
4. Press [Vol◄] or [Vol►] to turn the closed caption on, off, or on
when mute.
NOTE

AVerTV Hybrid TVBox 13
English-10
English
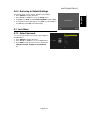
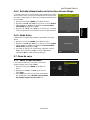
4.6.3 Restoring to Default Settings
This feature allows you to revert to default factory settings
1. Press [MENU] to display the menu.
2. Press [Vol◄] or [Vol►] to go to the Setup menu.
3. Use [CH▲] or [CH▼] to select Restore Default and press [OK].
4. A confirmation dialog will appear. Use [Vol►] to select YES, or
use [Vol◄] to select No and exit the dialog.
4.7 Lock Menu
4.7.1 Enter Password
You can change password and access other settings in
the Lock menu.
1. Press [MENU] to display the menu.
2. Press [Vol◄] or [Vol►] to go to the Lock menu.
3. Key in 0000 to enter the menu for more settings like
Change Password, System Lock, Input Block,
etc.

Manuel de l'utilisateur
Français-1
Table des Matières
Chapter 1 Ce qui est dans la trousse ....................................... 2
Chapter 2 Les pièces de l'unité ................................................ 3
2.1 Panneau de commande tactile ....................................................... 3
2.2 Capteur infrarouge ......................................................................... 3
2.3 Ports de connexion......................................................................... 3
Chapter 3 Configuration et installation .................................... 4
3.1 La télécommande ........................................................................... 5
3.2 Réglage de l'affichage pris en charge ............................................ 6
Chapter 4 Paramètres du menu OSD ....................................... 7
4.1 Affichage du menu ......................................................................... 7
4.2 Menu .............................................................................................. 7
4.3 Menu de prog. ................................................................................ 8
4.4 Menu Image ................................................................................... 8
4.5 Menu Heure ................................................................................... 9
4.6 Menu de option .............................................................................. 9
4.7 Menu de verro .............................................................................. 10
La page est en cours de chargement...
La page est en cours de chargement...
La page est en cours de chargement...
La page est en cours de chargement...
La page est en cours de chargement...
La page est en cours de chargement...
La page est en cours de chargement...
La page est en cours de chargement...
La page est en cours de chargement...
La page est en cours de chargement...
La page est en cours de chargement...
La page est en cours de chargement...
La page est en cours de chargement...
La page est en cours de chargement...
La page est en cours de chargement...
La page est en cours de chargement...
-
 1
1
-
 2
2
-
 3
3
-
 4
4
-
 5
5
-
 6
6
-
 7
7
-
 8
8
-
 9
9
-
 10
10
-
 11
11
-
 12
12
-
 13
13
-
 14
14
-
 15
15
-
 16
16
-
 17
17
-
 18
18
-
 19
19
-
 20
20
-
 21
21
-
 22
22
-
 23
23
-
 24
24
-
 25
25
-
 26
26
-
 27
27
-
 28
28
-
 29
29
-
 30
30
-
 31
31
-
 32
32
-
 33
33
-
 34
34
-
 35
35
-
 36
36


Avermedia A200P Manuel utilisateur
- Catégorie
- Téléviseurs LCD
- Taper
- Manuel utilisateur
- Ce manuel convient également à
dans d''autres langues
- English: Avermedia A200P User manual
Documents connexes
-
Avermedia AVerTV DVI Box 1080i Manuel utilisateur
-
-
-
Avermedia F200 spécification
-
Avermedia AVerTV Express mini Guide d'installation
-
-
-
-
-