La page est en cours de chargement...

Please read these instructions carefully before using this product, and save this manual for future use.
M101RK Series
10.1” Rugged Android Tablet
Dual-core ARM A72 up to 2.0 GHz + Quad-core ARM A53 up to 1.5 GHz
Android 7.1.2
Quick Start Guide
Version 1.3
Document Part Number: 9152111K1057

2
10.1" Rugged Android Tablet M101RK Series
❶ Getting Started
Congratulations on purchasing Winmate® M101RK Rugged Android Tablet Computer. The rugged
design allows you to use it in harsh outdoor environments.
The M101RK is a rugged tablet PC with a
robust set of features designed to withstand industrial use while providing high tech solutions that
increase productivity, improve safety, and reduce operational costs. The processing power comes from
a Dual-core ARM A72 + Quad-core ARM A53 processor for high performance. The tablet features a
brilliant in-plane switching with direct optical bonding projected capacitive touch screen, which is sunlight
readable and offers a 1920 x 1200 pixel resolution. Weighing at just 2.2 pounds (990 grams), the
M101RK delivers lightweight mobility in a rugged tablet.
This quick start guide tells you step by step how to get the Tablet Computer up and running. You will find
instructions for the following procedures:
1. Getting Started
2. Unpacking
3. Description of Parts
4. First Time Operations
5. Turning On/Off the Device
6. Using the Touch Screen
7. Changing Touch Screen Modes
8. Winmate Home Manager
9. Winmate Data Capture
10. Basic Troubleshooting
❷ Unpacking
Check and identify the standard supplied accessories.
Standard factory shipment list:
• Tablet Computer
• Standard Battery
Part No. 98K000A0003T
• Power Adapter
Part No. 922D065W19V1
• Power Cord and Plugs
• Capacitive Touch Stylus
Part No. 9B000000001D
• Quick Start Guide

3
Quick Start Guide
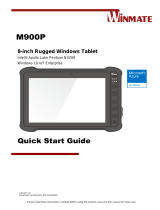
❸ Description of Parts
Front:
Right:
No
Item
Description
1
Front
Camera
2 Megapixel Webcam
2
LED
Indicators:
Show the current status of
the Tablet Computer Red:
Charging / Hot-swap battery
Green: Full Charge Blue:
Turning on
3
Touch
Screen
Display and act as one of the
inputs for the Tablet
Computer
4
Back
Button
Back to previous page
5
Home
Button
Back to Desktop
6
Power
Button
Power on/off
7
I/O Cover Protects I/O ports
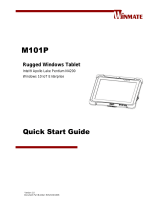
Front LED Indicators Details:
Front Button Details:
No
Item
Description
8
Micro
HDMI
HDMI Output
9
Micro
SD Card
Reader
Memory card reader
port for Micro SD
Card
10
USB
Type C
High speed USB port
connects to PC or
USB devices such as
mouse, keyboard, etc.
Note: The USB Type-
C connector follows
USB 3.0 standard and
support Dual Role
port (DRP), which
does not support
Alternate Mode (ALT)
or USB Power
Delivery (USB-PD).
11
USB 3.0
Host
High speed USB port
connects to PC or
USB devices such as
mouse, keyboard, etc.
Note: This USB port
won’t work when the
tablet is connected to
the optional docking.
Please use the USB
ports on the docking.
12
Mic
In/Line
Out
Headset or
headphone can be
connected
13
Power
Jack
DC-IN power input
jack
Side I/O Details:

4
10.1" Rugged Android Tablet M101RK Series
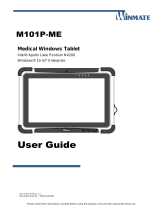
Rear:
No
Item
Description
14
NFC
Optional NFC reader for
reading of NFC tags.
15
Kensington
Lock Port
Provide lock access for
Kensington Lock.
16
Expansion
Port
Provide optional
connectivity to custom
modules for special
application (USB2.0,
RS232).
17
Rear
Camera
8MP Autofocus Camera.
Captures photos and
videos.
18
Optional
Barcode
Barcode Scanner for
reading of 1D / 2D
barcode.
19
Fn Button Menu.
20
Volume
Control or
Scan
Buttons
Volume Control
(+) Raise volume,
(-) Lower volume.
Scan Button
Use WDC to change
button definition (+)/(-)
for scanning
21
Speakers
Emits sounds
22
3G / LTE
Module
(Optional) /
SIM card
slot
Service window to insert
Micro SIM card. Also
provide access to 3G /
LTE Module.
Bottom:
No
Item
Description
23
Battery Lock
Latch
Latch to lock the battery
in place once battery is
inserted. No spring
loaded.
24
Touch Pen
Slot
Pen holder slot to store
touch pen.
25
Battery
Release
Slider
Spring-loaded slider
that latches the battery
in.
26
Docking
Connector
Port to docking
solutions such as
vehicle docking to
provide power and
external antenna.
❹ First-Time Operation
To get started:
1. Install SIM-card (For WWAN equipped devices).
2. Insert Micro SD card.
3. Install the battery.
4. Charge your tablet.
5. Start the tablet.

5
Quick Start Guide
Installing SIM Card (For WWAN Equipped Devices)
The Tablet Computer supports WWAN data connection and fits a Micro-SIM card.
To install the SIM card:
Tools Needed:
Service Windows
Screw: M2x5, 4 pc
Screwdriver: Philips Type , Size #0 ,
for M2 screws, torque: 2.0 ± 0.5
kgf.cm
3G/ LTE Module
Screw: M2x3.5, 1 pc
Screwdriver: Philips Type , Size #0 ,
for M2 screws, torque: 2.0 ± 0.5
kgf.cm
❶ Remove four screws and remove the service
window.
❷ Remove the one screw that secures the 3G/
LTE module. Carefully lift the module up. Do not
damage the connected cables!
❸ Carefully flip and move the 3G/ LTE module
and to the right. Do not disconnect cables!
❹ Insert SIM-Card in. Chip/ contact facing
down.
❺ Use your hand to pull the cable outside the
module card carefully. Re-insert the WWAN
module and fasten one screw. Accurately route
the cables. Do not bend cables! Do not pinch/
squeeze the cable!
❻Re-insert the service window and fasten with the
four screws.

6
10.1" Rugged Android Tablet M101RK Series
Caution When re-inserting WWAN module, please pay attention to cable routing. Make
sure the cable module does not get squeezed.
Attention Lors de la réinsertion du module WWAN, veuillez faire attention à
l'acheminement des câbles. Assurez-vous que le module de câble n'est pas écrasé.
Inserting MicroSD Card
Your tablet supports Micro SD card.
To install Micro SD card:
1. Open I/O protective cover by pulling out the latch.
2. Insert micro SD card into the slot with contacts facing down.
3. Press the card to ensure that it is seated properly.
4. Close I/O protective cover.
To remove Micro SD Card:
1. Open I/O protective cover by pulling out the latch.
2. Push and release the micro SD card to unlock it.
3. Pull out the micro SD card.
Inserting Battery Pack
Warning!
Discontinue using the device immediately if you notice the battery is swelling or
looks puffy or misshapen. Do not attempt to charge or use the device. Do not handle a
damaged or leaking battery. Do not let leaking battery fluid come into contact with your eyes,
skin, or clothing.
Avertissement! Arrêtez immédiatement d'utiliser l'appareil si vous remarquez que la
batterie gonfle ou semble gonflée ou déformée. N'essayez pas de charger ou d'utiliser
l'appareil. Ne manipulez pas une batterie endommagée ou qui fuit. Ne laissez pas le liquide
de batterie qui fuit entrer en contact avec vos yeux, votre peau ou vos vêtements.
Caution
To keep battery health and prevent possible issues from battery over-discharged,
please charge the tablet built-in back-up battery once every two months.
Attention Pour préserver la santé de la batterie et éviter d'éventuels problèmes dus à une
batterie trop déchargée, veuillez charger la batterie de secours intégrée de la tablette une
fois tous les deux mois.
To insert the standard battery pack into the Tablet Computer:
1. Disconnect AC adapter and power cord from the tablet computer.
2. Turn the tablet computer over, back facing up.
3. Locate the Battery Lock Latch and push it to the “Unlocked” position.
4. Locate the Battery Release Slider that is spring-loaded. Pull back and hold.
5. Insert the battery on the connector-pins side first, and then lower the battery into the battery
compartment. Continue to hold the Battery Release Slider before the battery is fully inserted.
6. Make sure the battery is completely lowered into the compartment before letting go of the Battery
Release Slider. The battery will be flat against the housing once fully inserted.

7
Quick Start Guide
To remove the standard battery pack into the Tablet Computer:
1. Power off the tablet computer (or set to a sleep mode). Disconnect any cords.
2. Turn the tablet computer over, back facing up.
3. Locate the Battery Lock Latch and push it to the “Unlocked” position.
4. Locate the Battery Release Slider that is spring-loaded. Pull back and hold.
5. Lift the battery out using the opening on the side of battery compartment.
Connecting to Power Supply
The Tablet Computer operates either on external AC power or internal battery power. It is recommended to
use AC power when you start up the Tablet Computer for the first time.
Caution Use only the AC adapter included with your Tablet Computer. Using other AC
adapters may damage the Tablet Computer and the Battery.
Attention N'utilisez que l'adaptateur secteur fourni avec votre tablette. L'utilisation
d'autres adaptateurs secteur peut endommager la tablette et la batterie.
Caution
For users start up the Tablet Computer for the first time with internal battery
power, please make sure the battery is fully charged before using.
Attention Pour les utilisateurs qui démarrent le Tablet PC pour la première fois avec une
batterie interne, veuillez vous assurer que la batterie est complètement chargée avant de
l'utiliser.
To connect the Tablet computer to AC Power:
1. On the side of the Tablet computer, lift the I/O protective cover by pulling on the latch
2. Plug the DC cord of the AC adapter into the Power Jack of the tablet computer.
3. Plug the AC power cord into the AC adapter.
4. Finally,plug the AC power cord into the electrical outlet.
When the AC Adapter is connected, the battery pack starts charging. The battery LED indicator on the
tablet computer would show different states. Please refer Description of Parts
for information about LED
indicators.
Standard Battery
Battery Operating Time
8 Hours
Battery Charging Time
2.5 Hours

8
10.1" Rugged Android Tablet M101RK Series
❺ Turning On and Off the Device
To turn on the device:
1. Press and hold the power button for 3 seconds, located on the top side of the unit.
2. When the device vibrates, release the power button.
3. The desktop screen is displayed.
To turn off the device:
1. To turn off the device, press and hold the power button until the phone options menu appears, tap
the Power Off .
2. Users can also use the Phone options menu to put the device into silent or airplane mode.
❻ Using the Touch Screen
The touchscreen supports the core gestures for Android.
Gesture
Action
Description
Tap
To select or activate something
Tap & Hold
Touch and hold an item on the screen by touching it and not
lifting your finger until it respond
Touch, H
old &
Drag
Touch and hold an item for a moment and then without
lifting your finger, move your finger on the screen until you
reach the target position. i.e. moving the apps around the
home screen
Swipe or slide
Quickly move the finger across the surface of the screen.
i.e. slide a lock screen to open the lock
Double-tap
Tap quickly twice on a webpage, screen, or App to zoom
Scale
Place two finger on the screen and pinching them together

9
Quick Start Guide
❼ Changing Touch Screen Modes
The M101RK rugged tablet’s touch screen supports hand, stylus, and glove modes. You can change
the touch mode by eGloveSwitch application.
To change touch mode:
1. Open eGloveSwitch application.
2. Select touch mode. Follow the table below.
3. Press OK.
Mode
Mode
Description
Mode 0
Hand/Rain
(Default)
In Hand/Rain mode, the touchscreen rejects false inputs from
liquid drops. When the liquid is removed, the touchscreen
accepts touch inputs from bare fingertips.
Supports input by:
Rubber tip passive stylus
Bare fingertips, even with water drops on the screen
Mode 1
Stylus
In Stylus
mode, the touchscreen supports inputs from the
passive capacitive stylus (shipped with tablet).
Support input by:
Rubber tip passive stylus
Bare fingertips
Mode 2
Glove
In Glove mode, the touchscreen supports inputs while the
user is operating the touchscreen with gloves on.
Supports input by:
Glove
Rubber tip passive stylus
Bare fingertips
❽ Winmate Home Manager
The M101RK series tablet comes with a pre-installed APP named Winmate® Home Manager
(WHM). This application lets the device manager lock the launcher. When the launcher is
locked, the user can only use one application assigned by the device manager.

10
10.1" Rugged Android Tablet M101RK Series
❾ Winmate Data Capture
The M101RK with Barcode Reader comes with pre-installed software made by Winmate® -
Winmate Data Collection (WDC) that allows users to turn on the readers and set up the button to
trigger the scan function.
❿ Basic Troubleshooting
Problem
Solution
The removable battery is not
charging.
• Make sure the AC adapter is connected correctly and
that the removable battery is inserted correctly.
Nothing appears on the screen.
• The tablet computer may be in sleep mode. Press the
power button to wake up the display.
• The brightness level may be too
low. Increase
brightness.
The screen suddenly turns blank
and the power indicator goes off.
• Make sure the AC adapter is connected correctly.
•
If running on battery power, the battery may be
depleted; charge the battery.
• Make sure that the LED indicator shows red.
Wireless LAN signal quality is
poor.
• The tablet computer may be out of range. Move the
tablet computer closer to the access point or another
wireless LAN device associated with it.
• Check if your surroundings have interferences, such as
microwave ovens, cordless phones. Move the tablet
computer away from objects causing interference.

11
Quick Start Guide
Problem
Solution
I cannot connect to another
wireless LAN device.
• Make sure that the wireless LAN feature is powered on.
• Make sure that the SSID setting is the same for every
wireless LAN device in the network.
• Restart the tablet computer.
• Make sure the IP address or subnet mask setting is
correct.
I cannot connect to another device
with Bluetooth.
• Make sure that both devices have Bluetooth powered on
(For the Tablet Computer, check Settings to check if
Bluetooth is powered on).
• Make sure that the distance between the two devices is
within 10 meters, and there are no walls or large
obstructions between the devices.
• Make sure both devices are powered on and configured
to be discoverable.
• Make sure that both devices are compatible.
The GPS application cannot find
my location.
• Make sure that GPS is turned on in Settings.
• Make sure that GPS receiver and the location sensor
are enabled in Control Panel.
• The tablet computer may be out of coverage area. Move
your tablet computer outdoors or closer to a window.
• Check if your surroundings have interferences, such as
microwave ovens, cordless phones. Move the tablet
computer away from objects causing interference.
No sound is produced.
• Adjust the volume of the tablet computer by pressing on
the volume rocker.
• If using an external audio device, make sure that the
cable is properly connected.
I cannot project the tablet
computer display to another
monitor.
• Make sure the VGA driver is installed.
• Make sure the output setting selected is correct.
The Barcode scanner does not
emit a
laser beam and does not
seem to work.
• Make sure the Barcode scanner device is detected;
please open WDC application and check Data Capture
“About”.
• If the device is not detected in WDC application under
Data Capture “About,” please press Reset Setting in
Data Capture.
Barcode Scanner emits a laser
beam but does not read the
barcode presented to it.
• Adjust the distance between the barcode scanner of the
device and the barcode being scanned.
• Make sure the barcode code type is enabled in the
tablet. To enable/disable a specific barcode code type,
go through the “Barcode Scanner Configuration” section.
Battery leaking or swollen
• The lithium battery used in this tablet may swell after
being charged/ discharged many times, but there is no
problem regarding safety.
• Continued use in such a state may result in the battery
getting jammed, so please stop using the battery, and
purchase a new one.

/