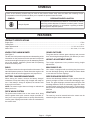
PowerStroke PS21ESLM Le manuel du propriétaire
- Catégorie
- Tondeuses à gazon
- Taper
- Le manuel du propriétaire

OPERATOR’S MANUAL
MANUEL D’UTILISATION / MANUAL DEL OPERADOR
21 in. LAWN MOWER
21 po TONDEUSE / 1 pulg. PODADORA
PS21ESLM
CUSTOMER SERVICE
SERVICE CLIENTELE / SERVICIO AL CLIENTE
1-877-617-3501
www.powerstroketools.com
Monday – Friday 8am-8pm ET / Saturday & Sunday 9am-6pm ET
Translation Available in Over 200 Languages
To register your POWERSTROKE product, please
visit: http://register.powerstroketools.com/
Pour enregistrer votre produit de POWERSTROKE,
s’il vous plaît la visite :
http://register.powerstroketools.com/
Para registrar su producto de POWERSTROKE, por
favor visita: http://register.powerstroketools.com/
GUARDE ESTE MANUAL
PARA FUTURAS CONSULTAS
WARNING: To reduce the
risk of injury, the user must read and
understand the operator’s manual before
using this product.
TABLE OF CONTENTS
Important Safety Instructions ............2-4
Symbols ............................................5-6
Features ...............................................6
Assembly ..........................................7-8
Operation ........................................9-11
Maintenance .................................12-15
Troubleshooting .................................16
Warranty .............................................17
Parts Ordering / Service ....... Back Page
AVERTISSEMENT : Pour
réduire les risques de blessures,
l’utilisateur doit lire et veiller à bien
comprendre le manuel d’utilisation avant
d’employer ce produit.
TABLE DES MATIÈRES
Instructions importantes
concernant la sécurité ......................2-4
Symboles ..........................................5-6
Caractéristiques ................................... 6
Assemblage ......................................7-8
Utilisation ........................................9-11
Entretien ........................................12-15
Dépannage .........................................16
Garantie .............................................17
Commande de pièces /
réparation ............................Páge arrière
ADVERTENCIA: Para reducir
el riesgo de lesiones, el usuario debe leer
y comprender el manual del operador
antes de usar este producto.
ÍNDICE DE CONTENIDO
Instrucciones de seguridad
importantes .......................................2-4
Símbolos ...........................................5-6
Características .....................................6
Armado .............................................7-8
Funcionamiento ..............................9-11
Mantenimiento ..............................12-15
Corrección de problemas ..................16
Garantía .............................................17
Pedidos de piezas/
servicio ............................ Pág. posterior
NOTICE AVIS AVISO
Do not use E15 or E85 fuel in this
product. It is a violation of federal
law and will damage the unit and
void your warranty. Only use unleaded gasoline containing
up to 10% ethanol.
Ne pas utiliser d’essence E15 ou E85 dans ce produit. Une
telle utilisation représente une violation de la loi fédérale
et endommagera l’appareil et annulera la garantie. Utiliser
seulement de l’essence sans plomb ne contenant pas plus
de 10 % d’éthanol.
No utilice combustibles E15 o E85 con este producto. Esto
constituye una violación a la ley federal, dañará la unidad
y anulará la garantía. Use únicamente gasolina sin plomo
con un contenido de hasta 10 % de etanol.
SAVE THIS MANUAL FOR
FUTURE REFERENCE CONSERVER CE MANUEL
POUR FUTURE RÉFÉRENCE

ii
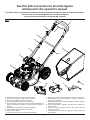
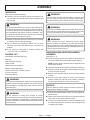
Fig. 1
A - Handle knob (bouton de la poignée, perilla del mango)
B - Grass catcher (collecteur d’herbe, receptor de hierba)
C - Start key (clé de démarrage, llave del arranque)
D - Upper handle (poignée supérieure, mango superior)
E - Start bail/operator presence control (levier de démarrage/détecteur de
présence de l’utilisateur, palanca de arranque/control de presencia de
operador)
F - Drive bail (levier d’entraînement, palanca de impulsión)
G - Lower handle (poignée inférieure, mango inferior)
H - Battery (batterie, batería)
I - Fuel valve (robinet de carburant, válvula de combustible)
See this fold-out section for all of the figures
referenced in the operator’s manual.
Consulter l’encart à volets afin d’examiner toutes les figures mentionnées dans le manuel d’utilisation.
Consulte esta sección desplegable para ver todas las figuras
a las que se hace referencia en el manual del operador.
J - Mulching plug (déflecteur pour déchiquetage, tapón para trituración)
K - Muffler/muffler guard (silencieux/garde de silencieux, silenciador/
protección del silenciador)
L - Battery charger/maintainer (chargeur/mainteneur de batterie, cargador/
mantenedor de la batería)
M
- Side discharge deflector (déflecteur d’éjection latérale, deflector de
descarga lateral)
N - Starter grip and rope (poignée du lanceur avec corde, mango del
arrancador y cuerda)
O - Height adjustment lever (levier de réglage de la hauteur, palanca de
ajuste de altura)
K
A
A
B
D
F
E
G
H
O
C
J
L
M
N
I

iii
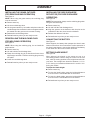
Fig. 2
A - Lower handle (poignée inférieure, mango inferior)
B - Bolt (boulon, perno)
C - Washer (rondelle, arandela)
D - Handle knob (bouton de la poignée, perilla del mango)
E - Mounting bracket (support de fixation, soporte de montaje)
F - Handle angle hole positions (trous de position d’angle de poignée,
posiciones del orificio según el ángulo del mango)
Fig. 5
Fig. 3
A - Rear discharge door (couvercle d’éjection arrière, puerta de descarga
posterior)
B - Rear discharge opening (ouverture d’éjection arrière, abertura de
descarga posterio)
C - Mulching plug (insert broyeur, tapón para trituración)
A - Upper handle (poignée supérieure, mango superior)
B - Handle knob (bouton de la poignée, perilla del mango)
C - Rope guide (guide câble, guía de la cuerda)
D - Starter grip and rope (poignée du lanceur avec corde, mango del
arrancador y cuerda)
Fig. 4
A - Grass catcher handle (collecteur d’herbe, mango
del receptor de hierba)
B - Groove (rainure, ranura)
C - Rear discharge door (couvercle d’éjection
arrière, puerta de descarga posterior)
D - Rear discharge opening (ouverture d’éjection
arrière, abertura de descarga lateral)
E - Hooks (crochets, ganchos)
Fig. 6
A - Side discharge deflector (déflecteur d’éjection latérale, deflector de
descarga lateral)
B - Side discharge door (couvercle d’éjection latérale, puerta de descarga
lateral)
C - Grooves (rainures, ranuras)
D - Pins (goupilles, pasadores)
A
B
C
C
D
A
B
C
A
BD
D
C
C
A
B
C
D
D
A
B
E
3
1
2
E
D
C
F

iv
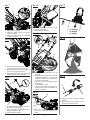
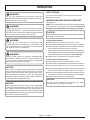
Fig. 14
A - Start key (clé de démarrage, llave del
arranque)
B - Start bail/operator presence control (levier
de démarrage/détecteur de présence de
l’utilisateur, palanca de arranque/control
de presencia de operador)
C - Drive bail (levier d’entraînement, palanca
de impulsión)
D - Handle (poignée, mango)
E - Fuel valve OPEN (robinet de carburant à la
position ouvert, válvula de combustible en
la posición ABIERTO)
Fig. 13
A - Height adjustment lever (levier de réglage de
la hauteur, palanca de ajuste de altura)
B - Lowest blade setting (le plus bas réglage de
la lame, ajuste más bajo de la hoja)
C - Highest blade setting (le plus haut réglage de
la lame, ajustes de cuchilla más alto)
Fig. 8
Fig. 7
A - Battery (batterie, batería)
B - Cable from battery (câble de la batterie,
cable de la batería)
C - Cable from mower (câble de la tondeuse,
cable de la podadora)
A - Fuel cap (bouchon de carburant, tapa del
tanque de combustible)
B - Funnel (entonnoir, embudo)
Fig. 10
Fig. 9
A - Oil cap/dipstick (bouchon/jauge d’huile, tapa
del aceite con varilla de nivel)
B - Oil fill hole (orifice de remplissage d’huile,
agujero de llenado de aceite)
C - Funnel (entonnoir, embudo)
Fig. 11
Fig. 12
A - Starter grip and rope (poignée du lanceur
avec corde, mango del arrancador con
cuerda)
Fig. 15
A - Garden hose (tuyau d’arrosage, manguera
de jardín)
B - Quick connect coupler (coupleur à ressort,
acoplador de conexión rápida)
15° MAXIMUM
15° MAXIMAL
15° MÁXIMA
A
A
B
A
B
A
C
B
A
B
A
B
C
A
C
B
D
E
C

v
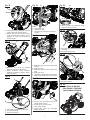
Fig. 19
A - Blade (lame, hoja)
B - Wrench (clé, llave)
C - Block of wood (pièce de bois, bloque de
madera)
Fig. 20
A - Blade posts (tiges pour lame, montantes de
cuchilla)
B - Shaft (arbre, eje)
C - Blade holes (trous pour lame, orificios de la
hoja)
D - Blade (lame, hoja)
E - Flat washer (rondelles plate, arandela plana)
F - Blade bolt (boulon de lame, perno de la hoja)
TO STORE THE MACHINE
POUR REMISER L’ÉQUIPEMENT
PARA GUARDAR LA MÁQUINA
Fig. 16
A - Quick connect fitting (adaptateur à raccord
rapide, accesorio de conexión rápida)
B - Garden hose with quick connect coupler
(tuyau d’arrosage avec coupleur à ressort,
manguera de jardín con acoplador de
conexión rápida)
Fig. 17
A - Maintainer input (entrée du chargeur/
mainteneur, entrada del mantenedor)
B - Battery maintainer charger (chargeur/
mainteneur de batterie, cargador man ten -
edor de la batería)
Fig. 18
A - Fuse holder (porte-fusible, portafusibles)
B - Fuse (fusible, fusible)
C - Screws (vis, tornillos)
Fig. 22
Fig. 23
A - Oil fill hole (orifice de remplissage d’huile,
agujero de llenado de aceite)
A - Spark plug cap (bouchon de la bougie, tapa
de la bujía)
B - Spark plug (bougie, bujía)
Fig. 24
A - Spark arrestor (pare-étincelles, parachispas)
B - Screw (vis, tornillo)
A
A
B
A
B
Fig. 25
Fig. 21
A - Air filter cover (couvercle du filtre à air,
cubierta del filtro de aire)
B - Air filter (filtre à air, filtro de aire)
C - Latch (loquet, pestillo)
D - Locking tabs (ergots de verrouillage,
orejetas de fijación)
BA
B
A
B
A
B
A
C
C
D
EF
A
A
B
C
C
D
A
B
C

Page 2 — English
DANGER:
Risk of fire and serious burns: Never remove fuel cap
when unit is running. Shut off engine and allow the unit
to cool at least five minutes. Remove cap slowly.
WARNING:
READ AND UNDERSTAND ALL INSTRUCTIONS.
Failure to follow all instructions listed below and on the
machine may result in electric shock, fire, and/or serious
personal injury.
READ ALL INSTRUCTIONS
This cutting machine is capable of amputating hands and
feet and throwing objects. Failure to observe all safety
instructions could result in serious injury or death.
Avoid dangerous environment — Do not use the lawn
mower in damp or wet conditions or operate in the rain.
Keep children away — Keep all bystanders, children, and
pets at least 100 ft. away. Stop machine if anyone enters
the area.
Tragic accidents can occur if the operator is not alert to
the presence of children. Children are often attracted to
the machine and the mowing activity. Never assume that
children will remain where you last saw them.
• Keep children out of the mowing area and under the
watchful care of a responsible adult other than the
operator.
• Be alert and turn mower off if a child enters the area.
• Never allow children to operate the machine.
• Use extra care when approaching blind corners, shrubs,
trees, or other objects that may block your view of a
child.
Dress properly — Wear heavy, long pants, long sleeves,
gloves, and protective footwear that will protect your
feet and improve your footing on slippery surfaces. Do
not wear loose fitting clothing, short pants, sandals, or
go barefoot. Do not wear jewelry of any kind. They can
be caught in moving parts.
Heavy protective clothing may increase operator fatigue,
which could lead to heat stroke. During weather that is
hot and humid, heavy work should be scheduled for early
morning or late afternoon hours when temperatures are
cooler.
Don’t overreach — Keep proper footing and balance at
all times. Overreaching can result in loss of balance.
Do not leave the mower unattended while running or with
the start key installed.
Keep hands and feet away from cutting area. Keep clear
of the discharge opening at all times.
Operate the lawn mower only in daylight or good artificial
light.
Always wear eye protection with side shields marked to
comply with ANSI Z87.1, along with hearing protection
when operating this product. Failure to do so could result
in objects being thrown into your eyes, resulting in possible
serious injury.
Use the right appliance — Do not use the lawn mower
for any job except that for which it is intended.
Do not force the lawn mower — It will do the job better
and safer at the rate for which it was designed.
Stay alert — Watch what you are doing and use common
sense when operating the lawn mower. Do not operate
the mower while tired, upset or under the influence of
drugs, alcohol, or medication. A moment of inattention
while operating the lawn mower may result in serious
personal injury.
Maintain lawn mower with care — Keep machine in good
working condition. Keep blades sharp and guards in place
and in working order. Replace damaged or unevenly worn
blades before using mower for best performance.
Do not dispose of the battery in a fire. The cell may
explode. Check with local codes for possible special
disposal instructions.
Check all nuts, bolts, and screws at frequent intervals
for proper tightness to be sure the equipment is in safe
working condition. Mower blades are sharp. Wrap the
blade or wear gloves, and use extra caution when servicing
them.
Do not touch area around the muffler or cylinder of the
unit; these parts get hot from operation. Contact with hot
surfaces could result in possible serious personal injury.
Stop the engine, wait until the blade comes to a complete
stop, remove the start key, and disconnect the spark plug
wire before cleaning the lawn mower, removing the grass
catcher, or removing the mulching plug.
Replace blade if it is bent or cracked. An unbalanced
blade causes vibration that could damage the engine
drive unit or cause personal injury. Sharpen a dull blade
equally at each end to maintain the balance. Clean the
blade thoroughly and check its balance by supporting
it horizontally on a thin nail through its center hole. The
nail should be in a horizontal position. If either end of
the blade rotates downward, remove some metal from
the heavy or lower end until the blade is balanced. It is
balanced when neither end drops.
Always use safety protective devices. Do not operate the
mower without the entire grass catcher, mulching plug
and rear discharge door in place and working properly.
Follow manufacturer’s instructions for proper operation
and installation of accessories. Only use accessories
approved by the manufacturer.
IMPORTANT SAFETY INSTRUCTIONS

Page 3 — English
Exercise care in handling batteries in order not to short the
battery with conducting materials such as rings, bracelets,
and keys. The battery or conductor may overheat and
cause burns.
Clear the work area before each use. Remove all objects
such as rocks, sticks, metal, wire, tree nuts, bones, toys,
or other objects which can be thrown by the blade. Stay
behind the handle when the engine is running.
Avoid holes, ruts, bumps, rocks, property stakes, or other
hidden objects. Uneven terrain could cause a slip and fall
accident.
Do not mow near drop-offs, ditches, or embankments.
Mow across the face of slopes, never up and down.
Exercise extreme caution when changing direction on
slopes.
Plan your mowing pattern to avoid discharge of material
toward roads, sidewalks, bystanders and the like. Also,
avoid discharging material against a wall or obstruction,
which may cause the material to ricochet back toward
the operator.
Do not mow on wet grass or excessively steep slopes.
Poor footing could cause a slip and fall accident. Walk,
never run.
Use extra care when approaching blind corners, shrubs,
trees, or other objects that may block your view.
Do not pull the mower backward unless absolutely
necessary. If you must back the mower away from a
wall or obstruction, first look down and behind to avoid
tripping or pulling the mower over your feet.
Never direct discharged material toward anyone. Avoid
discharging material against a wall or obstruction. Material
may ricochet back toward the operator. Stop the blade
when crossing gravel surfaces.
Objects struck by the lawn mower blade can cause severe
injuries to persons. The lawn should always be carefully
examined and cleared of all objects prior to each mowing.
If the lawn mower strikes a foreign object, follow these
steps:
• Stop the lawn mower by releasing the blade control
lever, wait until the blade comes to a complete stop,
and then remove start key.
• Thoroughly inspect the mower for any damage.
• Replace the blade if it is damaged in any way. Repair
any damage before restarting and continuing to operate
the mower.
Stop the engine, wait until the blade comes to a complete
stop, and remove start key before unclogging the side
or rear discharge areas. The cutting blade continues to
rotate for a few seconds after the engine is shut off. Never
place any part of the body in the blade area until you are
sure the blade has stopped rotating.
If the mower should start to vibrate abnormally, stop the
engine and check immediately for the cause. Replace
the blade if it is unevenly worn or damaged in any way.
Vibration is generally a warning of trouble.
Service on the product must be performed by qualified
repair personnel only. Service or maintenance performed
by unqualified personnel could result in injury to the user
or damage to the product.
The grass catcher assembly is subject to deterioration
and wear and should be checked each time the mower is
used. If replacement is needed, make sure the new grass
catcher meets original manufacturer’s recommendations
and specifications.
Use only recommended or equivalent replacement parts
when servicing the product. Use identical replacement
blades only. Use of any other parts may create a risk of
serious injury to the user, or damage to the product.
Maintain or replace safety instructions labels, as necessary.
Disconnect spark plug wire and remove start key from
the appliance before storing, servicing, or changing
accessories such as blades. Such preventive safety
measures reduce the risk of starting the tool accidentally.
Stop the unit and remove the start key when not in use.
Carry or push the unit with the engine stopped and the
start key removed from the mower.
Store idle lawn mower indoors — When not in use, mower
should be stored indoors in a dry, locked place out of the
reach of children. The start key should also be removed
and stored in a separate location out of the reach of
children.
Follow instructions for lubricating and changing
accessories.
Only allow responsible adults who are familiar with the
instructions to operate this machine.
Do not start or operate the engine in a confined space,
building, near open windows, or in other unventilated
space where dangerous carbon monoxide fumes can
collect. Carbon monoxide, a colorless, odorless, and
extremely dangerous gas, can cause unconsciousness
or death.
Never tamper with safety devices. Check for proper
operation regularly.
IMPORTANT SAFETY INSTRUCTIONS

Page 4 — English
IMPORTANT SAFETY INSTRUCTIONS
It has been reported that vibrations from gasoline pow-
ered tools may contribute to a condition called Raynaud’s
Syndrome in certain individuals. Symptoms may include
tingling, numbness, and blanching of the fingers, usually
apparent upon exposure to cold. Hereditary factors, ex-
posure to cold and dampness, diet, smoking, and work
practices are all thought to contribute to the development
of these symptoms. It is presently unknown what, if any,
vibrations or extent of exposure may contribute to the
condition. There are measures that can be taken by the
operator to possibly reduce the effects of vibration:
a) Keep your body warm in cold weather. When operating
the unit wear gloves to keep hands and wrists warm.
It is reported that cold weather is a major factor con-
tributing to Raynaud’s Syndrome.
b) After each period of operation, exercise to increase
blood circulation.
c) Take frequent work breaks. Limit the amount of
exposure per day.
d) Keep the tool well maintained, fasteners tightened,
and worn parts replaced.
If you experience any of the symptoms of this condition,
immediately discontinue use and see your physician about
these symptoms.
Store fuel in a container approved for gasoline.
Wipe up any fuel spillage. Move 30 ft. away from refueling
site before starting engine. Slowly remove the fuel cap
after stopping engine. Do not smoke when refueling.
Stop the engine and allow to cool before refueling or
storing the unit.
Never fill containers inside a vehicle or on a truck or trailer
bed with a plastic liner. Always place containers on the
ground away from your vehicle before filling.
Remove gas powered equipment from the truck or trailer
and refuel it on the ground. If this is not possible, then
refuel such equipment with a portable container, rather
than from a gasoline dispenser nozzle.
When fueling, keep the nozzle in contact with the rim of
the fuel tank or container opening at all times until fueling
is complete. Do not use a nozzle lock open device.
If fuel is spilled on clothing, change clothing immediately.
Never overfill fuel tank. After fueling, replace gas cap and
tighten securely.
Do not change engine governor setting or over speed the
engine.
Save these instructions. Refer to them frequently and
use them to instruct others who may use this product. If
you loan someone this tool, loan them these instructions
also.

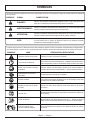
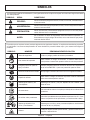
Page 5 — English
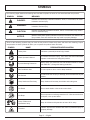
Some of the following symbols may be used on this product. Please study them and learn their meaning. Proper
interpretation of these symbols will allow you to operate the product better and safer.
SYMBOL NAME DESIGNATION/EXPLANATION
Safety Alert Indicates a potential personal injury hazard.
Read Operator’s Manual To reduce the risk of injury, user must read and understand
operator’s manual before using this product.
Eye and Hearing Protection Always wear eye protection with side shields marked to comply
with ANSI Z87.1, along with hearing protection.
Wet Conditions Alert Do not expose to rain or use in damp locations.
Hot Surface To reduce the risk of injury or damage, avoid contact with any hot
surface.
Keep Hands and Feet Away Keep hands and feet away from blade and cutting area.
No Reach Do not reach hands or feet under mower deck.
No Slope Do not operate on inclines greater than 15º. Mow across the face
of slopes, never up and down.
Keep Children and
Bystanders Away Keep all children and bystanders at least 100 ft. away.
Ricochet Thrown objects can ricochet and result in personal injury or
property damage.
The following signal words and meanings are intended to explain the levels of risk associated with this product.
SYMBOL SIGNAL MEANING
DANGER: Indicates an imminently hazardous situation, which, if not avoided, will result
in death or serious injury.
WARNING: Indicates a potentially hazardous situation, which, if not avoided, could result
in death or serious injury.
CAUTION: Indicates a potentially hazardous situation, which, if not avoided, may result in
minor or moderate injury.
NOTICE: (Without Safety Alert Symbol) Indicates important information not related to an
injury hazard, such as a situation that may result in property damage.
SYMBOLS

Page 6 — English
Some of the following symbols may be used on this product. Please study them and learn their meaning. Proper
interpretation of these symbols will allow you to operate the product better and safer.
SYMBOL NAME DESIGNATION/EXPLANATION
Recycle Symbol
This product uses lead acid (Pb) batteries. Local, state or federal
laws may prohibit disposal of batteries in ordinary trash. Consult
your local waste authority for information regarding available
recycling and/or disposal options.
SYMBOLS
PRODUCT SPECIFICATIONS
Engine Size .................................................................................................................................................................... 175cc
Cutting Path ................................................................................................................................................................... 21 in.
Height Adjustments ................................................................................................................................. 1-1/4 in. to 3-1/2 in.
Wheel Size................................................................................................................................ ...............8 in. front, 11 in. rear
KNOW YOUR LAWN MOWER
See Figure 1.
The safe use of this product requires an understanding of the
information on the product and in this operator’s manual as
well as a knowledge of the project you are attempting. Before
use of this product, familiarize yourself with all operating
features and safety rules.
BAILS
The bails are located on the upper handle of the mower. The
start bail/operator presence control allows the engine to be
started, and the drive bail engages the self-propel drive.
BATTERY CHARGER/MAINTAINER
When storing the mower, connect the battery charger/
maintainer to keep the battery fully charged and ready for
use. If the battery’s charge is depleted, the electric start
feature will not function.
NOTE: The mower engine does not charge or maintain the
battery as it runs.
DECK WASH SYSTEM
The quick connect water inlet on the mower deck, along
with the garden hose quick connect coupler provided, al-
lows you to use your garden hose to quickly and efficiently
remove grass clippings and debris from the underside of
the mower deck.
GRASS CATCHER
The grass catcher collects grass clippings and prevents
them from being discharged across your lawn as you mow.
HEIGHT ADJUSTMENT LEVER
The height adjustment lever provides cutting height
adjustments.
MULCHING PLUG
Your mower is equipped with a mulching plug that covers
the rear discharge opening, which allows the mower blade
to cut and recut for finer clippings.
SIDE DISCHARGE DEFLECTOR
Use the side discharge deflector on your mower when the
grass is too high to mulch or when side discharging is pre-
ferred. The grass clippings produced when using the side
discharge deflector alone are noticeably larger than those
produced when using the mulching plug. For best results,
always use the mulching plug when using the side discharge
deflector.
START KEY
The start key must be inserted before the mower can be
started using the electric start feature.
FEATURES

Page 7 — English
UNPACKING
This product requires assembly.
Carefully remove the product and any accessories from
the box. Make sure that all items listed in the packing list
are included.
WARNING:
Do not use this product if any parts on the Packing List
are already assembled to your product when you unpack
it. Parts on this list are not assembled to the product by
the manufacturer and require customer installation. Use
of a product that may have been improperly assembled
could result in serious personal injury.
Inspect the product carefully to make sure no breakage
or damage occurred during shipping.
Do not discard the packing material until you have
carefully inspected and satisfactorily operated the
product.
If any parts are damaged or missing, please call
1-877-617-3501 for assistance.
PACKING LIST
Lawn Mower with Mulching Plug
Start Key
Side Discharge Deflector
Grass Catcher
Handle Mounting Hardware
Battery Charger/Maintainer
Garden Hose Quick Connect Coupler
4-Cycle Lubricant
Operator’s Manual
WARNING:
If any parts are damaged or missing, do not operate this
product until the parts are replaced. Use of this product
with damaged or missing parts could result in serious
personal injury.
WARNING:
Do not attempt to modify this product or create
accessories not recommended for use with this product.
Any such alteration or modification is misuse and could
result in a hazardous condition leading to possible serious
personal injury.
WARNING:
Do not insert start key until assembly is complete and
you are ready to mow. Failure to comply could result in
accidental starting and possible serious personal injury.
WARNING:
To prevent accidental starting that could cause serious
personal injury, always disconnect the engine spark plug
wire from the spark plug when assembling parts.
WARNING:
Never operate the mower without the proper safety
devices, guards, and deflectors in place and working.
Never operate the mower with damaged safety devices.
Operating the mower with missing or damaged parts can
result in serious personal injury.
UNFOLDING AND ADJUSTING HANDLE
ASSEMBLY
See Figure 2 - 3.
Pull up and back on the lower handle until the holes on
the lower handle and mounting bracket are aligned.
NOTE: Choose the hole position that corresponds to the
handle angle desired.
Insert bolt through holes with the threaded end facing in.
Install the washer and handle knob and tighten securely
to secure the bolt in place.
Repeat on the opposite side to secure the lower handle
in place.
Pull up on the upper handle to raise it into operating
position. Make sure that the lower handle is seated in
the grooves at the bottom of the upper handle.
NOTICE:
Do not allow the starter cable to become pinched or
trapped when raising the handle.
To secure the upper handle in place, securely tighten the
handle knobs.
Route the the starter grip and rope up to and through the
rope guide on the upper handle as shown.
To lower the handle assembly, loosen the handle knobs
and fold the handle to the front of the unit. Avoid pinching
or trapping any cables.
ASSEMBLY

Page 8 — English
INSTALLING THE GRASS CATCHER
(FOR REAR BAGGING OPERATION)
See Figure 4.
NOTE: When using the grass catcher, the mulching plug
must be removed.
Remove start key.
Lift the rear discharge door.
Lift the grass catcher by its handle and place under the
rear discharge door so that the hooks on the grass catcher
are seated onto the groove on the mower housing.
Release the rear discharge door.
Reinstall start key when you are ready to mow.
REINSTALLING THE MULCHING PLUG
(FOR MULCHING OPERATION)
See Figure 5.
NOTE: When using the mulching plug, do not install the
grass catcher.
Remove start key.
Lift and hold the rear discharge door.
Grasp the mulching plug by its handle and insert it at a
slight angle, as shown. Push the mulching plug securely
into place.
Lower the rear discharge door.
Reinstall start key when you are ready to mow.
INSTALLING THE SIDE DISCHARGE
DEFLECTOR (FOR SIDE DISCHARGE
OPERATION)
See Figure 6.
NOTE: For best results, always use the mulching plug when
using the side discharge.
Remove start key.
Lift and hold the side discharge door.
Align the grooves on the deflector with the pins on the
underside of the door, then lower the deflector.
Release the deflector and door.
Reinstall start key when you are ready to mow.
CONNECTING THE BATTERY
See Figure 7.
When shipped, the battery that operates the electric start
feature of the mower is not connected. To allow operation of
the electric start feature, connect the cable from the battery
to the cable from the mower’s starter as shown.
SETTING BLADE HEIGHT
See Figure 8.
When shipped, the wheels on the mower are set to a
low- cutting position. Before using the mower for the first
time, raise the cutting position to the height best suited for
your lawn. The average lawn should be between 1-1/2 in.
to 2 in. during cool months and between 2 in. and 3-1/4 in.
during hot months.
To adjust the blade height:
Remove start key.
To raise the blade height, grasp the height adjustment
lever and move it toward the back of the mower.
To lower the blade height, grasp the height adjustment
lever and move it toward the front of the mower.
Reinstall start key when you are ready to mow.
ASSEMBLY

Page 9 — English
WARNING:
Do not allow familiarity with products to make you
careless. Remember that a careless fraction of a second is
sufficient to inflict serious injury.
WARNING:
Always wear eye protection with side shields marked to
comply with ANSI Z87.1, along with hearing protection.
Failure to do so could result in objects being thrown into
your eyes and other possible serious injuries.
WARNING:
Do not use any attachments or accessories not
recommended by the manufacturer of this product. The
use of attachments or accessories not recommended
can result in serious personal injury.
WARNING:
Always inspect mower for missing or damaged parts
and blade for damage, uneven, or excessive wear prior
to use. Use of the mower with damaged or missing parts
can result in serious personal injury.
NOTICE:
This product is equipped with a spark arrestor that has
been evaluated by the USDA Forest Service; however,
product users must comply with Federal, State, and lo-
cal fire prevention regulations. Check with appropriate
authorities. Refer to accompanying engine manual for
maintenance and replacement parts.
NOTICE:
Before each use, inspect the entire product for damaged,
missing, or loose parts such as screws, nuts, bolts, caps,
etc. Tighten securely all fasteners and caps and do not
operate this product until all missing or damaged parts
are replaced. Please contact customer service or a quali-
fied service center for assistance.
APPLICATIONS
You may use this product for the purpose listed below:
Mowing your lawn
ADDING/CHECKING ENGINE LUBRICANT
See Figure 9.
NOTE: This machine has been shipped with approximately
2 oz. of lubricant in the engine from testing. You must add
lubricant to the engine before starting it the first time.
NOTICE:
Any attempt to start the engine without adding lubricant
will result in engine failure.
To add engine lubricant:
Place mower on a flat, level surface. Do not tilt.
Unscrew the oil cap/dipstick by turning counter-clockwise.
Before first use, squeeze the entire contents of the lubri-
cant container provided into the oil reservoir.
After initial use, add 4-stroke engine lubricant (SAE 30 or
SAE 10W30) until the fluid level rises to the upper portion
of the hatched area on the dipstick. Do not overfill.
Replace the oil cap/dipstick and securely tighten.
To check engine lubricant level:
Place mower on a flat, level surface. Do not tilt.
Unscrew the oil cap/dipstick by turning counter-clockwise.
Wipe dipstick clean and re-seat in hole; do not rethread.
Remove dipstick again and check lubricant level. Lubricant
level should fall within the hatched area on the dipstick.
If level is low, add engine lubricant until the fluid level rises
to the upper portion of the hatched area on the dipstick.
Replace and secure the oil cap/dipstick.
NOTICE:
Do not overfill. Overfilling the crankcase may cause
excessive smoke and engine damage.
OPERATION

Page 10 — English
ETHANOL-BLENDED FUELS
NOTICE:
Do not use E15 or E85 fuel in this product. It is a viola-
tion of federal law and will damage the unit and void
your warranty. Only use unleaded gasoline containing
up to 10% ethanol.
FUELING AND REFUELING THE MOWER
See Figure 10.
DANGER:
Risk of fire and serious burns: Never remove fuel cap
when unit is running. Shut off engine and allow the unit
to cool at least five minutes. Remove cap slowly.
WARNING:
Gasoline and its vapors are highly flammable and ex-
plosive. To prevent serious personal injury and property
damage, handle it with care. Keep away from ignition
sources and open flames, handle outdoors only, do not
smoke and wipe up spills immediately.
WARNING:
Always shut off engine before fueling. Never remove
fuel cap or add fuel to a machine with a running or hot
engine. Make sure the unit is sitting on a flat, level sur-
face and only add fuel outdoors. If the engine is hot, let
the unit cool for at least five minutes before adding fuel.
After fueling, immediately replace fuel cap and tighten
securely. Move at least 30 ft. from refueling site before
starting engine. Do not smoke and stay away from open
flames and sparks! Failure to follow these instructions
could result in a fire and cause serious personal injury.
WARNING:
Check for fuel leaks. A leaking fuel cap, tank, or line is a
fire hazard and must be replaced immediately. If you find
any leaks, correct the problem before using the product.
Failure to do so could result in a fire that could cause
serious personal injury.
NOTE: This is a 4-cycle engine. DO NOT mix fuel and
lubricant together.
Clean surface around fuel cap to prevent contamination.
Loosen fuel cap slowly by turning counterclockwise. Rest
the cap on a clean surface.
Carefully pour fuel into the tank. Avoid spillage.
Prior to replacing the fuel cap, clean and inspect the
gasket.
Immediately replace fuel cap and hand tighten by turning
it clockwise. Wipe up any fuel spillage.
NOTE: It is normal for smoke to be emitted from a new
engine after first use.
OPERATING THE MOWER
See Figures 11 - 12.
Insert the start key.
Turn the fuel valve to the OPEN position.
Pull the start bail/operator presence control toward the
handle and hold.
Start the mower.
•Turn the start key to start using the electric start feature.
NOTE: The battery may need to be charged with the
battery maintainer/charger before the electric start
feature can be used. See instructions for charging in
the Maintenance section of this manual.
•To start manually, pull the starter grip and rope until
the engine begins to run.
To use the self-propel drive, continue to hold the start
bail/operator presence control, pull the drive bail toward
the handle to engage the drive transmission.
NOTE: Slight turns can be made with the drive transmis-
sion engaged, but release the self-propel drive bail when
making turns or pulling the mower backward.
To turn the mower off, release both bails.
WARNING:
While operating and storing, keep at least 3 feet of
clearance on all sides of this product, including overhead.
Allow a minimum of 30 minutes of “cool down” time before
storage. Keep all body parts, clothing, and combustible
materials away from the muffler. Heat created by muffler
and exhaust gases could be hot enough to cause serious
burns and/or ignite combustible objects.
MOWING TIPS
Make sure the lawn is clear of stones, sticks, wires, and
other objects that could damage the lawn mower blades
or engine. Do not mow over property stakes or other
metal posts. Such objects could damage the blade or be
accidentally thrown by the mower in any direction and
cause serious personal injury to the operator and others.
For a healthy lawn, always cut off one-third or less of the
total length of the grass.
OPERATION

Page 11 — English
OPERATION
When cutting heavy grass, reduce walking speed to allow
for more effective cutting and a proper discharge of the
clippings.
Do not cut wet grass. It will stick to the underside of the
deck and prevent proper bagging or mulching of grass
clippings.
New or thick grass may require a narrower cut or a higher
cutting height.
Clean the underside of the mower deck after each use
to remove grass clippings, leaves, dirt, and any other
accumulated debris.
NOTE: To clean, follow instructions in Washing the Un-
derside of the Mower Deck later in this manual.
SLOPE OPERATION
See Figure 13.
WARNING:
Slopes are a major factor related to slip and fall accidents
that can result in severe injury. Operation on slopes
requires extra caution. If you feel uneasy on a slope, do
not mow it. For your safety, do not attempt to mow slopes
greater than 15 degrees.
Mow across the face of slopes, not up and down. Exercise
extreme caution when changing direction on slopes.
Watch for holes, ruts, rocks, hidden objects, or bumps
which can cause you to slip or trip. Tall grass can hide
obstacles. Remove all objects such as rocks, tree limbs,
etc., which could be tripped over or thrown by the blade.
Always be sure of your footing. A slip and fall can cause
serious personal injury. If you feel you are losing your bal-
ance, release the upper blade control lever immediately.
Do not mow near drop-offs, ditches, or embankments;
you could lose your footing or balance.
EMPTYING THE GRASS CATCHER
See Figure 14.
Stop the mower and allow blades to completely stop.
Remove start key.
Lift the rear discharge door.
Lift the grass catcher by its handle to remove from mower.
Empty grass clippings.
Lift the rear discharge door and reinstall the grass catcher
as described earlier in this manual.
Reinstall start key when you are ready to mow.
WASHING THE UNDERSIDE OF THE MOWER
DECK
See Figures 15 - 16.
Position the mower on a level, clear spot on your lawn
within reach of your garden hose.
Stop the mower and allow blades to completely stop.
Raise the mower deck to the highest setting.
With the faucet turned completely off, install the garden
hose quick connect coupler on your garden hose. Tighten
securely.
To connect garden hose to mower deck, pull back on the
sleeve of the garden hose coupler, then slide the coupler
over the fitting on the mower. Be sure to push the coupler
fully onto the fitting until the sleeve springs forward and
locks in place.
Turn the water faucet fully on.
Start the mower as described previously and allow the
mower to run for approximately two minutes to allow the
underside of the cutting deck to rinse thoroughly. Do not
engage the drive bail during this time.
Stop the engine and allow the blade to come to a complete
stop.
Turn off the faucet, pull back on the release sleeve on the
coupler, then slide the garden hose off the fitting on the
mower deck.
Restart the mower and allow to run for an additional
2 minutes to allow the underside of the cutting deck to
dry thoroughly.

Page 12 — English
Normal maintenance, replacement or repair of emission con-
trol devices and systems may be performed by any qualified
repair establishment or individual with original or equivalent
parts. Warranty and recall repairs must be performed by an
authorized service center; please contact customer service
for assistance.
WARNING:
Before performing any maintenance, make sure the
mower battery and start key are removed to avoid ac-
cidental starting and possible serious personal injury.
WARNING:
Always wear eye protection with side shields marked to
comply with ANSI Z87.1, along with hearing protection.
Failure to do so could result in objects being thrown into
your eyes and other possible serious injuries.
WARNING:
When servicing, use only qualified replacement parts.
Use of any other parts can create a hazard or cause
product damage.
NOTICE:
Periodically inspect the entire product for damaged,
missing, or loose parts such as screws, nuts, bolts, caps,
etc. Tighten securely all fasteners and caps and do not
operate this product until all missing or damaged parts
are replaced. Please contact customer service or a quali-
fied service center for assistance.
GENERAL MAINTENANCE
Avoid using solvents when cleaning plastic parts. Most
plastics are susceptible to damage from various types of
commercial solvents and may be damaged by their use. Use
clean cloths to remove dirt, dust, oil, grease, etc.
WARNING:
Do not at any time let brake fluids, gasoline, petroleum-
based products, penetrating oils, etc., come in contact
with plastic parts. Chemicals can damage, weaken, or
destroy plastic which can result in serious personal injury.
Remove any build-up of grass and leaves on or around
the engine cover. Wipe the mower clean with a dry cloth
occasionally. Do not use water.
LUBRICATION
All of the bearings in this product are lubricated with a
sufficient amount of high grade lubricant for the life of the
unit under normal operating conditions. Therefore, no further
bearing lubrication is required.
USING THE BATTERY MAINTAINER
CHARGER
See Figure 17.
When storing the mower, connect the battery maintainer
charger to keep the battery fully charged and ready for use.
NOTE: The battery maintainer charger provided should only
be used with the 12V 4.5Ah/20HR sealed lead acid battery
model RT1245B supplied with this mower.
Plug the battery maintainer charger into a standard
household 120V receptacle. Make sure the household
power supply is 120V, 60 Hz, AC only.
Remove the input cover and connect the battery maintainer
charger to the mower’s maintainer input. The light on the
battery maintainer charger will illuminate red while the
battery is charging.
The battery will become slightly warm to the touch while
charging. This is normal and does not indicate a problem.
When battery is fully charged, the red light will turn green.
NOTE: If the light does not illuminate, the battery maintainer
fuse may need to be replaced. Check the fuse and replace
if needed.
Disconnect the battery maintainer charger before operating
the mower. Place the cover over the the mower’s maintainer
input when not in use.
CHANGING BATTERY MAINTAINER
CHARGER FUSE
See Figure 18.
NOTICE:
Do not use a higher rated fuse other than the specified
amperage. This could cause damage to the product.
Open the fuse holder and remove the old fuse.
Insert new 7.5 amp fuse and close the fuse holder.
REPLACING THE CUTTING BLADE
See Figures 19 - 20.
NOTE: Only use manufacturer’s recommended or equivalent
replacement blades.
WARNING:
Always protect hands by wearing heavy gloves and/or
wrapping the cutting edges of the blade with rags and
other material when performing blade maintenance.
Contact with the blade could result in serious personal
injury.
MAINTENANCE

Page 13 — English
Stop the engine and remove the start key. Allow blade to
come to a complete stop.
Disconnect the spark plug wire.
Turn the mower on its side.
Wedge a block of wood between the blade and mower
deck to prevent the blade from turning.
Loosen the blade bolt by turning it counterclockwise (as
viewed from bottom of mower) using a 9/16 in. wrench
or socket (not provided).
Remove the blade bolt, flat washer, and blade.
Place the new blade on the shaft. Ensure blade is properly
seated with shaft going through center blade hole and
the two blade posts inserted into their respective holes
on the blade. Make sure the blade is installed with the
curved ends pointing up toward the mower deck and not
down toward the ground.
Replace the flat washer and blade bolt. Finger tighten the
bolt.
NOTE: Make certain all parts are replaced in the exact
order in which they were removed.
Torque the blade bolt down clockwise using a torque
wrench (not provided) to ensure the bolt is properly
tightened. The recommended torque for the blade bolt
is 35-40 ft. lbs.
WARNING:
Ensure blade is properly seated and the blade bolt is
tightened to the torque specifications above. Failure to
properly attach the blade could cause it to come loose
and result in possible serious personal injury.
CLEANING AIR FILTER
See Figure 21.
Clean the air filter as indicated by the maintenance schedule.
To clean the air filter:
Depress the latch located below the air filter cover. Then,
lift the cover away from the locking tabs and remove it
from the unit.
Remove the air filter.
Rinse filter with clean water.
Gently squeeze filter until excess water is removed.
Apply a light coat of engine lubricant to the filter, then
squeeze it out.
Reinstall the air filter.
NOTE: Make sure the filter is seated properly inside the
cover. Installing the filter incorrectly will allow dirt to enter
the engine, causing rapid engine wear.
Reinstall the air filter cover making sure that the locking
tabs on the unit and the holes in the air filter cover are
aligned.
MAINTENANCE
To secure, press against the air filter cover until the latch
below the cover snaps in place.
NOTE: For best performance, the air filter should be replaced
once each year.
FUEL CAP, TANK, AND LINES
WARNING:
Check for fuel leaks. A leaking fuel cap, tank, or line is a
fire hazard and must be replaced immediately. If you find
any leaks, correct the problem before using the product.
Failure to do so could result in a fire that could cause
serious personal injury.
The fuel cap contains a non-serviceable filter and a check
valve. A clogged fuel filter will cause poor engine perfor-
mance. If performance improves when the fuel cap is loos-
ened, check valve may be faulty or filter clogged. Replace
fuel cap if required.
CHANGING ENGINE LUBRICANT
See Figure 22.
For best performance, engine lubricant should be changed
after every 25 hours of operation.
Stop the engine and disconnect the spark plug wire. Allow
the engine to cool completely before proceeding.
Remove the oil fill cap/dipstick.
Tip the unit on its side and allow lubricant to drain from
the oil fill hole into an approved container.
NOTE: Drain the lubricant while the engine is still warm
but not hot. Warm lubricant will drain quickly and more
completely.
WARNING:
Do not change engine lubricant while it is hot. Accidental
contact with hot engine lubricant could result in serious
burns.
Return the unit to an upright position and refill with lubri-
cant following the instructions in the Adding/Checking
Engine Lubricant section previously in this manual.
NOTE: Used lubricant should be disposed of at an approved
disposal site. See your local retailer for more information.
SPARK PLUG MAINTENANCE
See Figure 23.
The spark plug must be properly gapped and free of deposits
in order to ensure proper engine operation. To check:
Remove the spark plug cap.
Clean any dirt from around base of spark plug.
Remove spark plug using wrench (not included).

Page 14 — English
Inspect spark plug for damage, and clean with a wire
brush before reinstalling. If insulator is cracked or chipped,
spark plug should be replaced. For replacement spark
plug, see Product Specifications earlier in this manual
or the accompanying engine manual, if applicable.
Measure plug gap. The correct gap is 0.028−0.031 in.
(0.7-0.8 mm). To widen gap, if necessary, carefully bend
the ground (top) electrode. To lessen gap, gently tap
ground electrode on a hard surface.
Seat spark plug in position; thread in by hand to prevent
cross-threading.
Tighten with wrench to compress washer. If spark plug
is new, use 1/2 turn to compress washer appropriate
amount. If reusing old spark plug, use 1/8 to 1/4 turn for
proper washer compression.
NOTE: An improperly tightened spark plug will become
very hot and could damage the engine.
CLEANING THE EXHAUST PORT AND
MUFFLER
Depending on the type of fuel used, the type and amount of
lubricant used, and/or your operating conditions, the exhaust
port and muffler may become blocked with carbon deposits.
If you notice a power loss with your gas-powered products,
you may need to remove these deposits to restore perfor-
mance. We highly recommend that only qualified service
technicians perform this service.
SPARK ARRESTOR
See Figure 24.
NOTICE:
This product is equipped with a spark arrestor that has
been evaluated by the USDA Forest Service; however,
product users must comply with Federal, State, and
local fire prevention regulations. Check with appropriate
authorities. Refer to accompanying engine manual for
maintenance and replacement parts.
Inspect the spark arrestor for breaks or holes. Replace if
necessary.
Remove the screw securing the spark arrestor in place.
Then, remove the spark arrestor.
Use a brush (not provided) to remove carbon deposits
from the spark arrestor as needed.
Replace the spark arrestor and reinstall the screw. Tighten
to secure.
MAINTENANCE
STORING THE MOWER
See Figure 25.
WARNING:
While storing, keep at least 3 feet of clearance on all sides
of this product, including overhead. Allow a minimum
of 30 minutes of “cool down” time before storage. Heat
created by muffler and exhaust gases could be hot
enough to ignite combustible objects.
Clean any grass clippings that have accumulated on the
underside of the mower deck.
NOTE: To clean, follow instructions in Washing the Un-
derside of the Mower Deck earlier in this manual.
Drain the fuel tank completely by running the mower until
the gas runs out. Stored gas can go stale in 30 days.
Drain the lubricant and replace with fresh, clean lubricant
as described in Adding/Checking Engine Lubricant in
the Operation section of this manual.
Make sure the fuel valve is in the CLOSED position.
Disconnect spark plug wire and remove the spark plug.
Pour about a teaspoon of clean, air-cooled, four-cycle
lubricant through the spark plug hole into the combustion
chamber.
Leaving the spark plug out, pull the starter grip and rope
two or three times to coat the inside of the cylinder wall.
Inspect the spark plug and clean or replace, as necessary.
Reinstall the spark plug, but leave the spark plug wire
disconnected.
Clean the air filter.
Extend the starter grip and rope rope to check its condition.
If the rope is frayed, have it replaced immediately by a
qualified service center.
Remove the start key and store in a secure location out
of the reach of children.
Wipe the mower clean with a dry cloth.
Check all nuts, bolts, knobs, screws, fasteners, etc., for
tightness.
Inspect moving parts for damage, breakage, and wear.
Have repairs made on any damaged or missing parts.
Check blade for damage, uneven, or excessive wear and
replace blade if these conditions exist.
For short-term storage, connect the charging cable
and allow the battery to charge. For long-term storage,
disconnect the cable and coil it neatly.
Lower the handle assembly as described earlier in this
manual. Avoid pinching or trapping any cables.
Store mower indoors in a clean, dry place out of the reach
of children.

Page 15 — English
MAINTENANCE
MAINTENANCE SCHEDULE
Inspect For Clean Replace Replace
Maintenance Damage Before Every Every 25 Hours Every
Part Each Use 5 Hours or Yearly 50 Hours
* AIR FILTER ASSY
includes:
Filter .................................................................................... X
* CARBURETOR ASSY
* FUEL TANK ASSY
includes:
Fuel Lines ..................................... X
Fuel Cap .......................................X
Fuel Filter................................................................................................................... X
* IGNITION ASSY
includes:
Spark Plug ................................................................................................................. X
Spark Arrestor ..................................................................................................................................................X
* NOTICE: THE USAE OF EMISSION CONTROL COMPONENTS OTHER THAN THOSE DESIGNED FOR THIS UNIT
IS A VIOLATION OF FEDERAL LAW.
Do not store near corrosive materials such as fertilizer or
rock salt.
Never store the machine or fuel container where there is
an open flame, spark, or pilot light such as on a water
heater or on other appliances.
BATTERY REMOVAL AND PREPARATION
FOR RECYCLING
WARNING:
To reduce the risk of electric shock or explosion, do
not short circuit the battery terminals. Keep sparks and
flame away. Do not use metal tools for connections and
keep metal objects away from the battery terminals.
Metal objects can make a connection from one terminal
to another. Shorting the battery terminals together can
cause sparks, burns, or a fire.
To preserve natural resources, please recycle
or dispose of batteries properly.
This product uses lead acid batteries. Local,
state or federal laws may prohibit disposal of
batteries in ordinary trash.
Consult your local waste authority for information regarding
available recycling and/or disposal options.
WARNING:
Upon removal, cover the battery’s terminals with
heavy-duty adhesive tape. Do not attempt to destroy or
disassemble battery or remove any of its components.
Lead acid batteries must be recycled or disposed of
properly. Also, never touch both terminals with metal
objects and/or body parts as short circuit may result.
Keep away from children. Failure to comply with these
warnings could result in fire and/or serious injury.

Page 16 — English
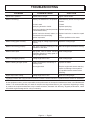
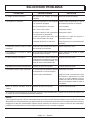
PROBLEM POSSIBLE CAUSE SOLUTION
Handle not in position. Handle knobs not tight. Tighten handle knobs.
Mower not starting. Start key not installed or in off position.
No fuel in tank.
Spark plug shorted or fouled.
Spark plug is broken (cracked porcelain
or electrodes broken).
Ignition lead wire shorted, broken, or
disconnected from spark plug.
Ignition inoperative.
Install start key and/or turn key to start
position.
Fill tank.
Replace spark plug.
Replace spark plug.
Replace lead wire or attach to spark
plug.
Contact qualified service center.
Mower cutting grass unevenly. Lawn is rough or cutting height not set
properly.
Adjust the cutting height.
Mower not mulching properly. Wet grass clippings sticking to the
underside of the deck.
Wait until the grass dries before mowing.
Mower hard to push. High grass, rear of mower housing
and blade dragging in heavy grass, or
cutting height too low.
Raise cutting height.
Mower not bagging properly. Cutting height set too low. Raise cutting height.
Mower vibrating at higher speed. Blade is unbalanced, excessively or
unevenly worn.
Bent engine shaft.
Replace the blade.
Stop the engine and remove start key.
Inspect for damage. Have repaired
by a qualified service center before
restarting.
Engine stops while cutting. Cutting height set too low. Raise the cutting height.
If problem persists after trying the above solutions, contact customer service or a qualified service center for assistance.
NOTICE:
As the equipment owner, you are responsible for the performance of the required maintenance listed in the Maintenance
section. It is recommended that you retain all receipts covering maintenance on your equipment. Neglecting or failing
to perform the required maintenance may increase emissions, decrease fuel efficiency, degrade performance, cause
irreversible engine damage and/or void your warranty.
TROUBLESHOOTING
La page est en cours de chargement...
La page est en cours de chargement...
La page est en cours de chargement...
La page est en cours de chargement...
La page est en cours de chargement...
La page est en cours de chargement...
La page est en cours de chargement...
La page est en cours de chargement...
La page est en cours de chargement...
La page est en cours de chargement...
La page est en cours de chargement...
La page est en cours de chargement...
La page est en cours de chargement...
La page est en cours de chargement...
La page est en cours de chargement...
La page est en cours de chargement...
La page est en cours de chargement...
La page est en cours de chargement...
La page est en cours de chargement...
La page est en cours de chargement...
La page est en cours de chargement...
La page est en cours de chargement...
La page est en cours de chargement...
La page est en cours de chargement...
La page est en cours de chargement...
La page est en cours de chargement...
La page est en cours de chargement...
La page est en cours de chargement...
La page est en cours de chargement...
La page est en cours de chargement...
La page est en cours de chargement...
La page est en cours de chargement...
La page est en cours de chargement...
La page est en cours de chargement...
La page est en cours de chargement...
La page est en cours de chargement...
-
 1
1
-
 2
2
-
 3
3
-
 4
4
-
 5
5
-
 6
6
-
 7
7
-
 8
8
-
 9
9
-
 10
10
-
 11
11
-
 12
12
-
 13
13
-
 14
14
-
 15
15
-
 16
16
-
 17
17
-
 18
18
-
 19
19
-
 20
20
-
 21
21
-
 22
22
-
 23
23
-
 24
24
-
 25
25
-
 26
26
-
 27
27
-
 28
28
-
 29
29
-
 30
30
-
 31
31
-
 32
32
-
 33
33
-
 34
34
-
 35
35
-
 36
36
-
 37
37
-
 38
38
-
 39
39
-
 40
40
-
 41
41
-
 42
42
-
 43
43
-
 44
44
-
 45
45
-
 46
46
-
 47
47
-
 48
48
-
 49
49
-
 50
50
-
 51
51
-
 52
52
-
 53
53
-
 54
54
-
 55
55
-
 56
56


PowerStroke PS21ESLM Le manuel du propriétaire
- Catégorie
- Tondeuses à gazon
- Taper
- Le manuel du propriétaire
dans d''autres langues
Documents connexes
Autres documents
-
Snapper 1688022 Mode d'emploi
-
 EarthWise 65821 Le manuel du propriétaire
-
-
Ryobi RY14110 Manuel utilisateur
-
-
Scotts 60040S Manuel utilisateur
-
-
-
