Fadini Astro 43 MQB Le manuel du propriétaire
- Taper
- Le manuel du propriétaire
La page est en cours de chargement...

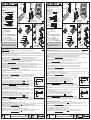
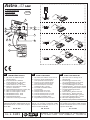
Aerial
Birio A8 with
RG58 cable
Dip -Switches only for encoding,
no function can be made able
by them
Dip -Switches only for
encoding, no function can
be made able by them
1st Channel and power supply
(to be plugged into the control box)
2
nd
Channel
Control panel
ELPRO range
Functions Dip -Switches
aerial
RG 58
1
NO
2
3
4
5
NC
C
12345
R1R2
IMPORTANT: to have an output available
with the radio receiver terminals, all the
Dip-Switches in it must be set on to OFF
!
Button 1
Button 2
Button 1
Button 2
Button 3
Button 4
Pic. 2
12V
Astro 43 Small
Button 1
Button 2
DIP-SWITCHES ONLY IN THE RADIO RECEIVER ASTRO 43 PLUG-IN
Dip 1=ON Operates Relay 1 (Channel 1)
Dip 2=ON Operates Relay 2 (Channel 2)
Dip 3=Blank
Dip 4=Blank
Dip 5=
ON enables memorization of the radio channels
Dip 6=ON enables delete one transmitter only
Dip 7=ON enables the function Bistable
Dip 8=ON enables the function Timer T1 (1sec ÷ 15min)
Dip 9=ON enables the function Timer T2 (1sec ÷ 15min)
Dip10=ON enables the function delete all memory
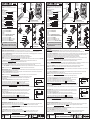
RADIO RECEIVER 433.92MHz:
self-learning, plug-in radio card
to operate with a 433.92MHz radio signal
Please note: do not e
xpose the receiver to electro-magnetic or
heat sources
Technical specifications:
Working frequency 433.92MHz ±75KHz
Intermediate frequency value 500 KHz
Stray emission max.power 2 nW
Aerial impedance value 50 Ohm
Sensitivity 1.5 μV
Power supply 24V ac
Absorption 20 mA ac
Working temperature -20°C +55°C
Safety delay time 150msec
Relay contact rating 0.5A - 125V ac
IP standards IP53
Distance range 120 metres
Plug-in radio channels 2
Number of transmitters in the memory 800
Pic. 1
Pic. 3
Red Led
ASTRO
43 Q.
FUNCTIONS OF THE RADIO RECEIVER ASTRO 43 PLUG-IN: the Dip-Switches in the transmitters are only to encode the user's code, no function can be made able by them
Memorizing one radio channel: Dip-Switch 5= ON (procedure to memorize the single transmitter buttons in the receiver):
- Transmitter: open the casing and set the user's code by means of the internal Dip-Switches (Pic.3), record it down to prevent forgetting it, and re-assemble the unit.
- Set to ON one of the Dip-Switches 1 and 2 in the receiver corresponding to the channel to memorize: the channel 1 is activated by plugging the receiver in the connector, the
channel 2 is by connecting the terminals (Pic.1)
- Press and hold a transmitter button (Pic.2), the receiver learns the signal and the red led flashes to confirm memorizing:
each pulse with the transmitter emits a signal that closes the output relay contact of the channel memorized in the radio receiver.
- Important: once this operation is finished set all the Dip-switches on to OFF. The receiver led flashes 5 times to confirm.
N.W. In order to match all the radio channels with the respective transmitter buttons by a single operation (button 1 with channel 1 and button 2 with channel 2) set the Dip-Switches
1, 2, 3, 4 and 5 = ON, carry on the memorizing operation as before, by pressing and holding any one button of the transmitter until the led flashes 1 time.
Once the operation is finished
set all the Dip-switches on to OFF. The receiver led flashes 5 times to confirm.
Deleting one transmitter: Dip-Switch 6= ON (the memory does not receive any signal from that transmitter any longer, but the transmitter code remains in the memory)
- Press any one button of the transmitter to be deleted (previously memorized) (Pic.2): the led flashes 1 time to confirm that the signal is received
- Set on to OFF the Dip-Switch 6: only at this stage, the radio receiver deletes the transmitter from the memory, and the led flashes 6 times to confirm the operation as accomplished
- Important: once the operation is finished,
set all the Dip-Switches on to OFF. in order to delete more transmitters, repeat the entire operation
Bistable Output: Dip-Switch 7= ON, (first, it is necessary to memorize at least one transmitter button): the first pulse from the transmitter enables the relay, whereas the second
pulse from the same transmitter button disables it (step-by-step function).
- Set to ON one of the Dip-Switches 1 and 2 corresponding to the radio channel required to be used as bistable mode and to the transmitter button as previously memorized
- Press the transmitter button required to operate on bistable mode (Pic.2)
- Important: once the operation is finished
set all the Dip-Switches to OFF, the led in the receiver flashes 7 times to confirm the accomplished operation
Timer 1: Dip-Switch 8= ON, (first, it is necessary to memorize the transmitter button by means of which the function is carried out):
on pulsing the transmitter button, the output of the selected channel is activated for a time as pre-set, on expiry of which, it is
automatically deactivated
- Set to ON one of the Dip-Switches 1 and 2 corresponding to the radio channel required to be used as mode timer 1
- Press the button 1 of the transmitter (Pic.2) as many times as the minutes required to be memorized (max 15 minutes)
- Press the button 2 of the transmitter (Pic.2) as many times as the seconds required to be memorized
NW:
After each pressing of the buttons, wait for the led to go off as a confirmation that the time has been memorized.
- Once the operation is finished,
set all the Dip-Switches to OFF, the led in the receiver flashes as many times as follows:
long flashes as the minutes, short flashes as the seconds. After a short pause, the receiver led flashes 8 times to confirm.
On operating phase, a pulse to the receiver from the transmitter button on mode Timer 1 (superior to 3 seconds) disables the output and stops the operation.
Timer 2: Dip-Switch 9= ON, (first, select and memorize the transmitter button by means of which this function is carried out):
a pulse from the transmitter activates the selected channel output for 200ms, after the time as pre-set, a second pulse
is released for another 200ms
- Set to ON one of the Dip-Switches 1, 2, 3 or 4 corresponding to the radio channel to be used as mode timer 2
- Press the button 1 of the transmitter (Pic.2) as many times as the
minutes required to be memorized (max 15 minutes)
- Press the button 2 of the transmitter (Pic.2) as many times as the
seconds required to be memorized
NW:
After each pressing of the buttons, wait for the led to go off as a confirmation that the time has been memorized
- Once the operation is finished,
set all the Dip-Switches to OFF, the led in the receiver flashes as many times as follows:
long flashes as the minutes, short flashes as the seconds. After a short pause, the receiver led flashes 9 times to confirm.
On operating phase, a pulse to the receiver from the transmitter button on mode Timer 2 (superior to 3 seconds) gives out the 2nd pulse and stops the operation.
Deleting the total memory: Dip-Switch 10= ON, the memory of the receiver is deleted in total
- Press any one button of the transmitter, provided it is already in the memory (Pic.2), for at least 5 seconds. The red led of the receiver stays on until the operation is finished.
- Important: Once the operation is finished, set all the Dip-Switches to OFF, the led in the receiver flashes 10 times to confirm the operation is accomplished
Set the outputs back to Standard mode: Dip-Switch 7= ON - Dip-Switch 8= ON - Dip-Switch 9= ON, the single channels are kept in the memory (but all previous settings such
as Bistable, Timer T1 and Timer T2 modes are cancelled)
- Set to ON the Dip-Switch corresponding to the channel to be set back to Standard Mode.
- Press any one button of the transmitter, provided it is already in the memory (Pic.2), for at least
5 seconds. The red led in the receiver flashes once to confirm.
- Important:Once the operation is finished, set all the Dip-Switches to OFF, the led in the receiver flashes 3 times to confirm the operation is accomplished.
code 4329
- PLUG-IN
PLUG-IN
Self-learning
ON
OFF
OFF
Timer 1
Signal output
Pulse from the
transmitter
ON
OFFOFF
Timer 2
200ms output
Pulse from the
transmitter
Drwg.
5485
Directive
2003/108/EC
Disposal of electric and
electronic material
DO NOT DISPOSE OF AS NORMAL WASTE.
HARMFUL FOR THE ENVIRONMENT
GB
12V
+
-
+
-
INSTRUCTIONS OF THE RADIO RECEIVER
ASTRO 43
PLUG-IN
SELF-LEARNING - MULTIFUNCTIONS
Antenne
Birio A8 avec
câble RG58
Dips-Switch pour le codage,
ne sont pas habilités pour
les fonctions
Dips-Switch pour le codage,
ne sont pas habilités
pour les fonctions
1° Canal et Alimentation
(enfichable dans le programmateur)
2° Canal
Programmateur
série ELPRO
Dips-Switch des fonctions
antenne
RG 58
1
NO
2
3
4
5
NF
C
12345
R1R2
IMPORTANT: afin qu'il y ait une sortie aux bornes
de la radio, il faut que tous ses Dips-switch
soient en position OFF
!
1° bouton
2° bouton
1° bouton
2° bouton
3° bouton
4° bouton
Fig. 2
12V
Astro 43 Petit
1° bouton
2° bouton
DIPS-SWITCH SEULEMENT DU RECEPTEUR RADIO ASTRO 43 ENFICHABLE
Dip 1 = ON Active le Relais 1 (1° Canal)
Dip 2 = ON Active le Relais 2 (2° Canal)
Dip 3 = libre
Dip 4 = libre
Dip 5 = ON habilite la mémorisation des canaux radio
Dip 6 = ON habilite l'effacement d'une télécommande seulement
Dip 7 = ON habilite la fonction Bistable
Dip 8 = ON habilite la fonction Timer T1 (1sec ÷ 15min)
Dip 9 = ON habilite la fonction Timer T2 (1sec ÷ 15min)
Dip10=ON habilite la fonction qui efface toute la mémoire
RECEPTEUR RADIO 433.92MHz:
carte radio enfichable pour la
réception d'un signal radio à 433.92MHz à autoapprentissage.
Avertissements: pas exposer le récepteur radio à sources
électromagnétiques ou de chaleur.
Données techniques:
Fréquence de fonctionnement 433,92MHz ±75KHz
Valeur fréquence intermédiaire 500 KHz
Puissance max. émissions parasites 2 nW
Valeur impédence antenne 50 Ohm
Sensibilité 1,5 μV
Alimentation 24V ca
Consommation 20 mA ca
Température de fonctionnement -20°C +55°C
Durée retard de sécurité 150m sec
Contact relais 0,5A - 125V ca
Degrée de protection IP53
Portée réception 120 mètres
Canaux radio Enfichable 2
Numéro télécommandes en mémoire 800
Fig. 1
Fig. 3
Led rouge
ASTRO
43 Q.
FONCTIONS DU RECEPTEUR RADIO ASTRO 43 ENFICHABLE: Les Dips-switch des télécommandes sont utiles seulement pour la codification du code personnel, ils ne sont pas
habilités aux fonctions.
Mémorisation d'un canal radio: Dip-Switch 5= ON (procédure pour la mémorisation des boutons individuels de la télécommande sur la radio):
- Sur la télécommande: l'ouvrir complètement et composer le code personnel avec le Dip-Switch interne (Fig.3). Il faut se rappeler ce code. Ensuite, fermer le tout.
- Positionner sur ON un des Dips-switch 1 et 2 de la radio relative au canal à mémoriser: le 1° canal est activé introduisant la carte, le 2° avec les branchements à la bornier (Fig.1).
- Tenir appuyé un bouton de la télécommande qu'on veut mémoriser (Fig.2), le récepteur radio apprend le signal et un clignotement du led rouge confirme la mémorisation: à
chaque impulsion de la télécommande est émis un signal qui ferme le contact du relais à la sortie du canal mémorisé sur le récepteur radio.
- Important: terminée l'opération, positionner sur OFF tous les Dips-switch, le led du récepteur radio emettra n°5 clignotements de confirmation.
N.B. Pour mémoriser tous les canaux radio sur les réspectifs boutons de la télécommande avec une seule opération (1° bouton avec le 1° canal et 2° bouton avec le 2° canal),
positionner les Dips-switch 1, 2, 3, 4 et 5 = ON, ensuite compléter l'opération appuyant n'importe quel bouton jusqu'à visualiser n°1 clignotement du led.
Terminée l'opération,
positionner sur OFF tous les Dips-switch. Le led du récepteur radio emettra n°5 clignotements de confirmation.
Effacement d'une télécommande: Dip-Switch 6= ON (la mémoire ne reçoit plus le signal de la télécommande, de toute façon le code de la télécommande reste dans la mémoire)
- Appuyer n'importe quel bouton de la télécommande à effacer (déjà mémorisée) (Fig.2): un clignotement du led me confirme la transmission reçue.
- Positionner sur OFF le Dip-Switch 6: maintenant, le récepteur radio efface la télécommande de la mémoire. L'opération est confirmée avec n°6 clignotements.
- Important: terminée l'opération,
positionner sur OFF tous les Dips-switch. Pour effacer plusieurs télécommandes, il faut répéter toute l'opération.
Sortie Bistable: Dip-Switch 7= ON, (avant tout, il faut mémoriser au moins un bouton de la télécommande) à la première impulsion de la télécommande, s'active le relais, qui se
désactive avec la deuxième impulsion de la même touche (fonction pas-pas).
- Positionner sur ON un des Dips-switch 1 et 2 rélatif au canal radio qu'il faut utiliser en modalité bistable et sur lequel on a déjà mémorisé un bouton de la télécommande
- Appuyer le bouton de la télécommande qu'on veut en modalité bistable (Fig.2)
- Important: terminée l'opération,
positionner sur OFF tous les Dips-switch, le led du récepteur radio emettra n°7 clignotements pour confirmer l'opération.
Timer 1: Dip-Switch 8= ON, (avant tout, il faut mémoriser le bouton de la télécommande sur lequel on veut appliquer la fonction):
avec une impulsion de la télécommande s'active la sortie du canal seléctionné pour le temps établi, expiré ce temps elle se désactive.
- Positionner sur ON un des Dips-switch 1 et 2 rélatif au canal radio qu'on veut utiliser en modalité timer 1.
- Appuyer le 1° bouton de la télécommande (Fig.2) pour aussi bien fois que les
minutes qu'on doit mémoriser (max 15 minutes)
- Appuyer le 2° bouton de la télécommande (Fig.2) pour aussi bien fois que les
secondes qu'on doit mémoriser
NB:
A chaque pression des boutons, attendre l'extinction du led comme épreuve que la mémorisation du temps a été faite.
- Terminée l'opération, positionner sur OFF tous les Dips-switch. Le led du récepteur radio émettra les clignotements pour le temps établi:
clignotements longs pour les minutes, clignotements courts pour les secondes. Après une petite pause, le récepteur radio émet n°8
clignotements de confirmation.
Si durant l'activation du timer, la radio réçoit une impulsion du bouton habilité avec le Timer 1 (ce dérnier supérieure à 3 sec.), la sortie se désactive.
Timer 2: Dip-Switch 9= ON, (avant tout, il faut mémoriser le bouton de la télécommande sur lequel on veut appliquer la fonction):
avec une impulsion de la télécommande s'active la sortie du canal sélectionné pour une durée de 200ms, après ce temps établi, se
réactive une deuxième impulsion pour 200ms encore.
- Positionner sur ON un des Dips-switch 1, 2, 3 ou 4 rélatif au canal radio qu'on veut utiliser en modalité timer 2
- Appuyer le 1° bouton de la télécommande (Fig.2) pour aussi bien fois que les
minutes qu'on veut mémoriser (max 15 minutes)
- Appuyer le 2° bouton de la télécommande (Fig.2) pour aussi bien fois que les
secondes qu'on veut mémoriser.
NB:
A chaque pression des boutons, il faut attendre l'éxtinction du led pour confirmer la mémorisation du temps.
- Terminée l'opération, positionner sur OFF tous les Dips-switch. Le led du récepteur radio émettra des clignotements pour le temps établi:
clignotements longs pour les minutes, clignotements courts pour les secondes. Après une petite pause le récepteur radio émet n°9 clignotements de confirmation.
Si durant l'activation du timer, la radio réçoit une impulsion du bouton habilité avec le Timer 2 (ce dérnier supérieure à 3 secondes), émet la 2° impulsion et termine la fonction.
Effacement totale de la mémoire: Dip-Switch 10= ON, on efface totalement la mémoire du récepteur radio.
- Appuyer n'importe quel bouton d'une télécommande déjà mémorisée (Fig.2) pour 5 secondes au moins. Le led rouge de la radio s'allume jusqu'à la conclusion de l'opération.
- Important: terminée l'opération,
positionner sur OFF tous les Dip-switch, le led du récepteur radio émettra n. 10 clignotements pour confirmer l'opération.
Rétablir les sorties en modalité Normale: Dip-Switch 7= ON - Dip-Switch 8= ON - Dip-Switch 9= ON, sont rétablis les canaux individuels en modalité de simple mémorisation
sans leur effacement en mémoire (modalité Bistable, Timer T1 et Timer T2 sont annullés)
- Positionner sur ON le Dip-Switch rélatif au canal qu'on veut rétablir en modalité normale.
- Appuyer n'importe quel bouton d'une télécommande déjà mémorisée (Fig.2) pour au moins 5 secondes. Le led rouge de la radio clignote une fois pour confirmer.
- Important: terminée l'operation,
positionner sur OFF tous les Dips-switch, le led du récepteur radio émettra n°3 clignotements pour confirmer l'opération.
art. 4329
-ENFICHABLE
ENFICHABLE
Autoapprentissage
ON
OFF
OFF
Timer 1
Signal de sortie
Impulsion de la
télécommande
ON
OFF
OFF
Timer 2
sortie de 200ms
Impulsion de la
télécommande
Des. 5485
Diréctive 2003/108/CE
Elimination des matériaux
électriques et électroniques
INTERDIT JETER DANS LES DECHETS
MATERIAUX NUISIBLES POUR
L'ENVIRONNEMENT
F
12V
+
-
+
-
INSTRUCTIONS DU RECEPTEUR RADIO
ASTRO 43
ENFICHABLE
A
AUTOAPPRENTISSAGE -
MULTIFONCTION
La page est en cours de chargement...

FUNCTIONS OF THE RADIO RECEIVER ASTRO 43 EXTERNAL: the Dip-Switches in the transmitters are only to encode the user's code, no function can be made able by them
Memorizing one radio channel: Dip-Switch 5= ON (procedure to memorize the single transmitter buttons in the receiver):
- Transmitter: open the casing and set the user's code by means of the internal Dip-Switches (Pic.3), record it down to prevent forgetting it, and re-assemble the unit.
- Set to ON one of the Dip-Switches 1, 2, 3 or 4 in the receiver corresponding to the channel to memorize: the channel is activated by fitting the relay module, either NO or NC in
the receiver connector (Pic.1)
- Press and hold a transmitter button (Pic.2), the receiver learns the signal and the red led flashes to confirm memorizing:
each pulse with the transmitter emits a signal that closes the relay NO contact (or opens it, if the relay is NC) in the receiver output, corresponding to the memorized channel.
- Important: once this operation is finished
set all the Dip-switches on to OFF. The receiver led flashes 5 times to confirm.
N.W. In order to match all the radio channels with the respective transmitter buttons by a single operation (button 1 with channel 1, button 2 with channel 2, and so on.) set the
Dip-Switches 1, 2, 3, 4 and 5 = ON, carry on the memorizing operation as before, by pressing and holding any one button of the transmitter until the led flashes 1 time.
Once the operation is finished
set all the Dip-switches on to OFF. The receiver led flashes 5 times to confirm.
Deleting one transmitter: Dip-Switch 6= ON (the memory does not receive any signal from that transmitter any longer, but the transmitter code remains in the memory)
- Press any one button of the transmitter to be deleted (previously memorized) (Pic.2): the led flashes 1 time to confirm that the signal is received
- Set on to OFF the Dip-Switch 6: only at this stage, the radio receiver deletes the transmitter from the memory, and the led flashes 6 times to confirm the operation as accomplished
- Important: once the operation is finished,
set all the Dip-Switches on to OFF. in order to delete more transmitters, repeat the entire operation
Bistable Output: Dip-Switch 7= ON, (first, it is necessary to memorize at least one transmitter button): the first pulse from the transmitter enables the relay, whereas the second
pulse from the same transmitter button disables it (step-by-step function).
- Set to ON one of the Dip-Switches 1, 2, 3 or 4 corresponding to the radio channel required to be used as bistable mode and to the transmitter button as previously memorized
- Press the transmitter button required to operate on bistable mode (Pic.2)
- Important: once the operation is finished
set all the Dip-Switches to OFF, the led in the receiver flashes 7 times to confirm the accomplished operation
Timer 1: Dip-Switch 8= ON, (first, it is necessary to memorize the transmitter button by means of which the function is carried out):
on pulsing the transmitter button, the output of the selected channel is activated for a time as pre-set, on expiring of which, it is
automatically deactivated
- Set to ON one of the Dip-Switches 1, 2, 3 or 4 corresponding to the radio channel required to be used as mode timer 1
- Press the button 1 of the transmitter (Pic.2) as many times as the
minutes required to be memorized (max 15 minutes)
- Press the button 2 of the transmitter (Pic.2) as many times as the
seconds required to be memorized
NW:
After each pressing of the buttons, wait for the led to go off as a confirmation that the time has been memorized.
- Once the operation is finished,
set all the Dip-Switches to OFF, the led in the receiver flashes as many times as follows:
long flashes as the minutes, short flashes as the seconds. After a short pause, the receiver led flashes 8 times to confirm.
On operating phase, a pulse to the receiver from the transmitter button on mode Timer 1 (superior to 3 seconds) disables the output and stops the operation.
Timer 2: Dip-Switch 9= ON, (first, select and memorize the transmitter button by means of which this function is carried out):
a pulse from the transmitter activates the selected channel output for 200ms, after the time as pre-set, a second pulse
is released for another 200ms
- Set to ON one of the Dip-Switches 1, 2, 3 or 4 corresponding to the radio channel to be used as mode timer 2
- Press the button 1 of the transmitter (Pic.2) as many times as the
minutes required to be memorized (max 15 minutes)
- Press the button 2 of the transmitter (Pic.2) as many times as the
seconds required to be memorized
NW:
After each pressing of the buttons, wait for the led to go off as a confirmation that the time has been memorized
- Once the operation is finished,
set all the Dip-Switches to OFF, the led in the receiver flashes as many times as follows:
long flashes as the minutes, short flashes as the seconds. After a short pause, the receiver led flashes 9 times to confirm.
On operating phase, a pulse to the receiver from the transmitter button on mode Timer 2 (superior to 3 seconds) gives out the 2nd pulse and stops the operation.
Deleting the total memory: Dip-Switch 10= ON, the memory of the receiver is deleted in total
- Press any one button of the transmitter, provided it is already in the memory (Pic.2), for at least
5 seconds. The red led of the receiver stays on until the operation is finished.
- Important: Once the operation is finished,
set all the Dip-Switches to OFF, the led in the receiver flashes 10 times to confirm the operation is accomplished
Set the outputs back to Standard mode: Dip-Switch 7= ON - Dip-Switch 8= ON - Dip-Switch 9= ON, the single channels are kept in the memory (but all previous settings such
as Bistable, Timer T1 and Timer T2 modes are cancelled)
- Set to ON the Dip-Switch corresponding to the channel to be set back to Standard Mode.
- Press any one button of the transmitter, provided it is already in the memory (Pic.2), for at least
5 seconds. The red led in the receiver flashes once to confirm.
- Important:Once the operation is finished,
set all the Dip-Switches to OFF, the led in the receiver flashes 3 times to confirm the operation is accomplished
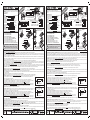
DIP-SWITCHES ONLY IN THE RADIO RECEIVER ASTRO 43 EXTERNAL
Dip 1= ON Operates Relay 1 (Channel 1)
Dip 2= ON Operates Relay 2 (Channel 2)
Dip 3= ON Operates Relay 3 (Channel 3)
Dip 4= ON Operates Relay 4 (Channel 4)
Dip 5= ON enables memorization of the radio channels
Dip 6= ON enables delete one transmitter only
Dip 7= ON enables the function Bistable
Dip 8= ON enables the function Timer T1 (1sec ÷ 15min)
Dip 9= ON enables the function Timer T2 (1sec ÷ 15min)
Dip10= ON enables the function delete all memory
RADIO RECEIVER 433.92MHz: self-learning, for external application
to operate with a 433.92MHz radio signal
Please note: do not expose the receiver to electro-magnetic or heat
sources
Technical specifications:
Working frequency 433.92MHz ± 75KHz
Intermediate frequency value 500 KHz
Stray emission max.power 2 nW
Aerial impedance value 50 Ohm
Sensitivity 1.5 μV
DC and AC power supply 12÷24V dc and ac
Absorption 20 mA ac
Working temperature -20°C +55°C
Safety delay time 150msec
Relay contact rating 0.5A - 125V ac
IP standards IP53
Distance range 120 metres
External radio channels 4
Number of transmitters in the memory 800
IMPORTANT: to have an output available with
the radio receiver terminals, all the Dip-Switches
in it must be set on to OFF
!
Astro 43 Small
Button 1
Button 2
Button 1
Button 2
Button 1
Button 2
Button 3
Button 4
Dip -Switches only for
encoding, no function can be
made able by them
12V
+
-
+
-
Dip -Switches only for
encoding, no function can
be made able by them
Pic. 3
Pic. 2
12V
Astro 43
91
73
27
Drwg. 5486
GB
EXTERNAL
Self-learning
code 4327
- EXTERNAL
Directive 2003/108/EC
Disposal of electric and
electronic material
DO NOT DISPOSE OF AS NORMAL
WASTE.
HARMFUL FOR THE ENVIRONMENT
GB
ON
OFF
OFF
Timer 1
Signal output
Pulse from the
transmitter
ON
OFFOFF
Timer 2
200ms output
Pulse from the
transmitter
Relay 1(standard)= enables Channel 1
Relay 2= enables Channel 2
Relay 3= enables Channel 3
Relay 4= enables Channel 4
1°
2°
3°
4°
Power supply 12V or 24V dc/ac
from control panel Elpro range
Modules (
non standard) NO or NC
to enable the radio channels:
Dip -Switches to select functions
Aerial
Birio A8 with
cable RG58
NO modules
aerial RG 58
1234567891011 12
1°
24V
2° 3° 4°
Strip to select power
supply either 12V or 24V dc/ac
24V dc/ac
12V dc/ac
Pic. 1
Astro
Removable
memory
Red led
FONCTIONS DU RECEPTEUR RADIO ASTRO 43 MODULAIRE: Les Dips-switch des télécommandes sont utiles seulement pour la codification du code personnel, ils ne sont
pas habilités aux fonctions.
Mémorisation d'un canal radio: Dip-Switch 5= ON (procédure pour la mémorisation des boutons individuels de la télécommande sur la radio):
- Sur la télécommande: l'ouvrir complètement et composer le code personnel avec le Dip-Switch interne (Fig.3). Il faut se rappeler ce code. Ensuite, fermer le tout.
- Positionner sur ON un des Dips-switch 1, 2, 3 ou 4 de la radio relative au canal à mémoriser: le canal est activé introduisant le module relais NO ou NF sur la radio (Fig.1)
- Tenir appuyé un bouton de la télécommande qu'on veut mémoriser (Fig.2), le récepteur radio apprend le signal et un clignotement du led rouge confirme la mémorisation: à chaque
impulsion de la télécommande est émis un signal qui ferme (ou ouvre si relais NF) le contact du relais NO à la sortie du canal mémorisé sur le récepteur radio.
- Important: terminée l'opération,
positionner sur OFF tous les Dips-switch, le led du récepteur radio emettra n°5 clignotements de confirmation.
N.B. Pour mémoriser tous les canaux radio sur les réspectifs boutons de la télécommande avec une seule opération (1° bouton avec le 1° canal, 2° bouton avec le 2° canal ecc.),
positionner les Dips-switch 1, 2, 3, 4 et 5 = ON, ensuite compléter l'opération appuyant n'importe quel bouton jusqu'à visualiser n°1 clignotement du led.
Terminée l'opération,
positionner sur OFF tous les Dips-switch. Le led du récepteur radio emettra n°5 clignotements de confirmation.
Effacement d'une télécommande: Dip-Switch 6= ON (la mémoire ne reçoit plus le signal de la télécommande, de toute façon le code de la télécommande reste dans la mémoire)
- Appuyer n'importe quel bouton de la télécommande à effacer (déjà mémorisée) (Fig.2): un clignotement du led me confirme la transmission reçue.
- Positionner sur OFF le Dip-Switch 6: maintenant, le récepteur radio efface la télécommande de la mémoire. L'opération est confirmée avec n°6 clignotements.
- Important: terminée l'opération,
positionner sur OFF tous les Dips-switch. Pour effacer plusieurs télécommandes, il faut répéter toute l'opération.
Sortie Bistable: Dip-Switch 7= ON, (avant tout, il faut mémoriser au moins un bouton de la télécommande) à la première impulsion de la télécommande, s'active le relais, qui se
désactive avec la deuxième impulsion de la même touche (fonction pas-pas).
- Positionner sur ON un des Dips-switch 1, 2, 3 ou 4 rélatif au canal radio qu'il faut utiliser en modalité bistable et sur lequel on a déjà mémorisé un bouton de la télécommande
- Appuyer le bouton de la télécommande qu'on veut en modalité bistable (Fig.2)
- Important: terminée l'opération,
positionner sur OFF tous les Dips-switch, le led du récepteur radio emettra n°7 clignotements pour confirmer l'opération.
Timer 1: Dip-Switch 8= ON, (avant tout, il faut mémoriser le bouton de la télécommande sur lequel on veut appliquer la fonction):
avec une impulsion de la télécommande s'active la sortie du canal seléctionné pour le temps établi, expiré ce temps elle se désactive.
- Positionner sur ON un des Dips-switch 1, 2, 3 ou 4 rélatif au canal radio qu'on veut utiliser en modalité timer 1
- Appuyer le 1° bouton de la télécommande (Fig.2) pour aussi bien fois que les
minutes qu'on doit mémoriser (max 15 minutes)
- Appuyer le 2° bouton de la télécommande (Fig.2) pour aussi bien fois que les
secondes qu'on doit mémoriser
NB:
A chaque pression des boutons, attendre l'extinction du led comme épreuve que la mémorisation du temps a été faite.
- Terminée l'opération,
positionner sur OFF tous les Dips-switch. Le led du récepteur radio émettra les clignotements pour le temps établi:
clignotements longs pour les minutes, clignotements courts pour les secondes. Après une petite pause, le récepteur radio émet n°8 clignotements de confirmation.
Si durant l'activation du timer, la radio réçoit une impulsion du bouton habilité avec le Timer 1 (ce dérnier supérieure à 3 sec.), la sortie se désactive.
Timer 2: Dip-Switch 9= ON, (avant tout, il faut mémoriser le bouton de la télécommande sur lequel on veut appliquer la fonction):
avec une impulsion de la télécommande s'active la sortie du canal sélectionné pour une durée de 200ms, après ce temps établi, se
réactive une deuxième impulsion pour 200ms encore.
- Positionner sur ON un des Dips-switch 1, 2, 3 ou 4 rélatif au canal radio qu'on veut utiliser en modalité timer 2
- Appuyer le 1° bouton de la télécommande (Fig.2) pour aussi bien fois que les
minutes qu'on veut mémoriser (max 15 minutes)
- Appuyer le 2° bouton de la télécommande (Fig.2) pour aussi bien fois que les
secondes qu'on veut mémoriser.
NB:
A chaque pression des boutons, il faut attendre l'éxtinction du led pour confirmer la mémorisation du temps.
- Terminée l'opération,
positionner sur OFF tous les Dips-switch. Le led du récepteur radio émettra des clignotements pour le temps établi:
clignotements longs pour les minutes, clignotements courts pour les secondes. Après une petite pause le récepteur radio émet n°9 clignotements de confirmation
Si durant l'activation du timer, la radio réçoit une impulsion du bouton habilité avec le Timer 2 (ce dérnier supérieure à 3 secondes), émet la 2° impulsion et termine la fonction.
Effacement totale de la mémoire: Dip-Switch 10= ON, on efface totalement la mémoire du récepteur radio.
- Appuyer n'importe quel bouton d'une télécommande déjà mémorisée (Fig.2) pour
5 secondes au moins. Le led rouge de la radio s'allume jusqu'à la conclusion de l'opération.
- Important: terminée l'opération,
positionner sur OFF tous les Dips-switch, le led du récepteur radio émettra n. 10 clignotements pour confirmer l'opération.
Rétablir les sorties en modalité Normale: Dip-Switch 7= ON - Dip-Switch 8= ON - Dip-Switch 9= ON, sont rétablis les canaux individuels en modalité de simple mémorisation
sans leur effacement en mémoire (modalité Bistable, Timer T1 et Timer T2 sont annullés)
- Positionner sur ON le Dip-Switch rélatif au canal qu'on veut rétablir en modalité normale.
- Appuyer n'importe quel bouton d'une télécommande déjà mémorisée (Fig.2) pour au moins
5 secondes. Le led rouge de la radio clignote une fois pour confirmer.
- Important: terminée l'operation,
positionner sur OFF tous les Dips-switch, le led du récepteur radio émettra n°3 clignotements pour confirmer l'opération.
DIP-SWITCH SEULEMENT DU RECEPTEUR RADIO ASTRO 43 MODULAIRE
Dip 1=ON Active le Relais 1 (1° Canal)
Dip 2=ON Active le Relais 2 (2° Canal)
Dip 3=ON Active le Relais 3 (3° Canal)
Dip 4=ON Active le Relais 4 (4° Canal)
Dip 5=ON habilite la mémorisation des canaux radio
Dip 6= ON habilite l'effacement d'une télécommande seulement
Dip 7=ON habilite la fonction Bistable
Dip 8=ON habilite la fonction Timer T1 (1sec ÷ 15min)
Dip 9=ON habilite la fonction Timer T2 (1sec ÷ 15min)
Dip10=ON habilite la fonction qui efface toute la mémoire
Des. 5486
F
RECEPTEUR RADIO 433.92MHz: carte radio modulaire pour la réception
d'un signal radio à 433.92MHz à autoapprentissage.
Avertissements: pas exposer le récepteur radio à sources
électromagnétiques ou de chaleur.
Données techniques:
Fréquence de fonctionnement 433,92MHz ± 75KHz
Valeur fréquence intermédiaire 500 KHz
Puissance max. émissions parasites 2 nW
Valeur impédence antenne 50 Ohm
Sensibilité 1,5 μV
Alimentation en CC et CA 12÷24V cc et ca
Consommation 20 mA ca
Température de fonctionnement -20°C +55°C
Durée retard de sécurité 150m sec
Contact relais 0,5A - 125V ca
Degrée de protection IP53
Portée réception 120 mètres
Canaux radio Extérieurs 4
Numéro télécommandes en mémoire 800
1° Relais (de série)= met en service
1° Canal
2° Relais=habilite 2° Canal
3° Relais=habilite 3° Canal
4° Relais=habilite 4° Canal
1°
2°
3°
4°
Alimentation 12V ou 24V cc/ca
du programmateur série Elpro
Modules (
non de série) NO ou NF
pour l'activation des canaux radio:
Dips -Switch des fonctions
IMPORTANT: afin que il y ait une sortie aux
bornes de la radio, il faut que tous ses
Dip-switch soient en position OFF
!
Antenne
Birio A8 avec
câble RG58
Modules NO
antenne RG 58
1234567891011 12
1°
24V
2° 3° 4°
Dips -Switch pour le codage,
ne sont pas habilités pour
les fonctions
12V
+
-
+
-
Dips -Switch pour le codage,
ne sont pas habilités pour
les fonctions
Diréctive 2003/108/CE
Elimination des matériaux
électriques et électroniques
INTERDIT JETER DANS LES DECHETS
MATERIAUX NUISIBLES POUR
L'ENVIRONNEMENT
F
Strip pour sélectionner
l'alimentation 12V ou 24V cc/ca
24V cc/ca
12V cc/ca
ON
OFF
OFF
Timer 1
Signal de sortie
Impulsion de la
télécommande
ON
OFF
OFF
Timer 2
sortie de 200ms
Impulsion de la
télécommande
Fig. 3
Fig. 1
12V
Astro
Mémoire
extractible
Led rouge
pour EXTERIEUR
Autoapprentissage
art. 4327
- EXTERIEUR
Astro 43 Petit
1° bouton
2° bouton
1° bouton
2° bouton
1° bouton
2° bouton
3° bouton
4° bouton
Fig. 2
Astro 43
91
73
27

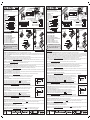
NOUVELLE RECEPTEUR RADIO
ENFICHABLE ASTRO 43
1 - Dip-switch pour codifier
2 - Ponts 2
ème
canal: pour choisir le
poussoir émetteur de 1 à 4 max.
3 - Ponts 1
ère
canal: pour choisir le
poussoir émetteur de 1 à 4 max.
4 - Borne de raccordement 2
ème
canal
(R 2) contact N.F. et N.O. et antenne
5 - Connecteur enfichable femelle
1
ère
canal (R 1)
6 - Relais pour actionner le 2
ème
canal
7 - Relais pour actionner le 1
ère
canal
8 - Cavalier de contact ponts 1
ère
canal
9 - Cavalier de contact ponts 2
ème
canal
10 - Connecteur enfichable mâle
11 - Programmateur électronique série Elpro
Carte enfichable pour récepteur radio “Astro 43/2 R”
avec oscillateur (SAW) complet de deux modules
relais pour le 1
ère
et 2
ème
canal fréquence
433,92 MHz
Code Art. 4312
NEW PLUG-IN RADIO RECEIVER
CARD ASTRO 43
1 - Dip-switches for secret encoding
2 - Pins for channel 2: any one
transmitter button 1 to 4 can be selected
3 - Pins for channel 1: any one
transmitter button 1 to 4 can be selected
4 - Terminal to connect N.O. - N.C.
channel No.2 (R 2) and aerial
5 - Female plug-on connector channel 1 (R 1)
6 - Relay to activate channel No. 2
7 - Relay to activate channel No. 1
8 - Contact insert pins channel 1
9 - Contact insert pins channel 2
10 - Male plug-on connector
11 - Electronic programmer Elpro series
Plug-in radio receiver card type “Astro 43/2 R”
fitted with (SAW) stabilized oscillator, complete
with two relay modules for channels 1 and 2,
433,92 MHz
Item Code No. 4312
NUOVA SCHEDA RICEVENTE
ASTRO 43 AD INNESTO
1 - Dip-switch per la codifica del codice segreto
2 - Ponticelli 2° canale: scelta da 1 a 4
pulsanti del trasmettitore
3 - Ponticelli 1° canale: scelta da 1 a 4
pulsanti del trasmettitore
4 - Morsetto di collegamento 2° canale
(R 2) contatto N.C.-N.A. e antenna
5 - Connettore ad innesto femmina 1° canale (R 1)
6 - Relé per attivare il 2° canale
7 - Relé per attivare il 1° canale
8 - Inserto di contatto ponticelli 1° canale
9 - Inserto di contatto ponticelli 2° canale
10 - Connettore ad innesto maschio
11 - Programmatore elettronico serie Elpro
Scheda ad innesto radio ricevente “Astro 43/2 R”
con oscillatore stabilizzato (SAW) completa di
due moduli relé per il 1° e 2° canale, frequenza
433,92 MHz
Cod. Art. 4312
Dis. N.
4045
®
I
- ad innesto
- plug-in
- enfichable
43
Astro
SAW
GB F
1
2
3
4
5
6
7
89
10
11
0678
1
2
2
N.C.
C.
N.A.
GND
ANT.
Via Mantova, 177/A - 37053 Cerea (Verona) Italy - Tel. +39 0442 330422 r.a.
Fax +39 0442 331054 - e-mail: [email protected] - www.fadini.net
1
1
1
1
2
2
2
2
3
3
3
3
4
4
4
4
1
1
2
3
4
R1
R2
1
2
3
4
5
6
7
8
9
1
0
N.C.
C
N.A.
GND
ANT.
I.T.F
.
ASTRO 43
INNESTO
R2
R1
R2
R1
La page est en cours de chargement...
-
 1
1
-
 2
2
-
 3
3
-
 4
4
-
 5
5
-
 6
6


Fadini Astro 43 MQB Le manuel du propriétaire
- Taper
- Le manuel du propriétaire
dans d''autres langues
- italiano: Fadini Astro 43 MQB Manuale del proprietario
- English: Fadini Astro 43 MQB Owner's manual
- Deutsch: Fadini Astro 43 MQB Bedienungsanleitung
Documents connexes
Autres documents
-
Erone SEL2641R433-P4 Use And Installation Manual
-
Telcoma Zen Le manuel du propriétaire
-
Meccanica Fadini Elpro 12 EVO Instructions Manual
-
Chamberlain TPD500 Le manuel du propriétaire
-
 Speck pumpen JET wireless control Mode d'emploi
-
CAME TWIN Maintenance Instructions Manual
-
Chamberlain LiftMaster CB202EV Le manuel du propriétaire
-
-
-
 Beninca TO.GO WP Mode d'emploi

