
DEALER: KEEP THIS MANUAL. THE PROCEDURES IN
THIS MANUAL MUST BE PERFORMED BY A INVACARE
DEALER ONLY.
FOURNISSEUR: CONSERVEZ CE MANUEL. LES
PROCÉDURES CONTENUES DANS CE MANUEL
DOIVENT ÊTRE EXÉCUTÉES PAR UN FOURNISSEUR
INVACARE SEULEMENT.
Service Manual - English
PATRIOT
And PATRIOT
SL
Manuel D'entretien - French Canadian
PATRIOT
Et PATRIOT
SL

2
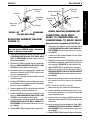
WARNING
W
A
R
N
I
N
G
SAVE THESE INSTRUCTIONS.
SPECIAL NOTES
WARNING/CAUTION notices as used in this manual apply to hazards or unsafe
practices which could result in personal injury or property damage.
NOTICE
THE INFORMATION CONTAINED IN THIS DOCUMENT IS SUBJECT TO CHANGE WITHOUT NOTICE.
WHEELCHAIR USER
As a manufacturer of wheelchairs, Invacare endeavors to supply a wide variety
of wheelchairs to meet many needs of the end user. However, final selection of
the type of wheelchair to be used by an individual rests solely with the user and
his/her healthcare professional capable of making such a selection.
WHEELCHAIR TIE-DOWN RESTRAINTS AND SEAT POSITIONING STRAPS
Invacare recommends that wheelchair users NOT be transported in vehicles of any
kind while in wheelchairs. As of this date, the Department of Transportation has not
approved any tie-down systems for transportation of a user while in a wheelchair, in a
moving vehicle of any type.
It is Invacare’s position that users of wheelchairs should be transferred into appropri-
ate seating in vehicles for transportation and use be made of the restraints made
available by the auto industry. Invacare cannot and does not recommend any wheel-
chair transportation systems.
AS REGARDS RESTRAINTS - SEAT POSITIONING STRAPS - IT IS THE OBLIGATION OF THE DME
DEALER, THERAPISTS AND OTHER HEALTHCARE PROFESSIONALS TO DETERMINE IF A SEATING
POSITIONING STRAP IS REQUIRED TO ENSURE THE SAFE OPERATION OF THIS EQUIPMENT BY
THE USER. SERIOUS INJURY CAN OCCUR IN THE EVENT OF A FALL FROM A WHEELCHAIR.
WARNING
DO NOT OPERATE THIS EQUIPMENT WITHOUT FIRST
READING AND UNDERSTANDING THIS MANUAL. IF YOU ARE
UNABLE TO UNDERSTAND THE WARNINGS, CAUTIONS, AND
INSTRUCTIONS, CONTACT A HEALTHCARE PROFESSIONAL,
DEALER OR TECHNICAL PERSONNEL IF APPLICABLE BEFORE
ATTEMPTING TO USE THIS EQUIPMENT - OTHERWISE INJURY
OR DAMAGE MAY RESULT.
THE INITIAL SET UP OF THIS WHEELCHAIR MUST BE
PERFORMED BY AN AUTHORIZED INVACARE DEALER OR
QUALIFIED TECHNICIAN.

3
TABLE OF CONTENTS
T
A
B
L
E
O
F
C
O
N
T
E
N
T
S
TABLE OF CONTENTS
SPECIAL NOTES................................................................................................................................... 2
SPECIFICATIONS .................................................................................................................................. 4
PROCEDURE 1 - GENERAL GUIDELINES .......................................................................................... 5
OPERATING INFORMATION ................................................................................................................. 5
PROCEDURE 2 - ASSEMBLY ............................................................................................................... 7
ASSEMBLING THE WHEELCHAIR ....................................................................................................... 7
PROCEDURE 3 - ARMS ........................................................................................................................ 8
REMOVING/INSTALLING FRONT ARM SOCKET/SEAT GUIDE ............................................................ 8
PROCEDURE 4 - SEAT/BACK .............................................................................................................. 9
REPLACING REAR SEAT GUIDES ....................................................................................................... 9
ADJUSTING/REPLACING THE BACK CANES ...................................................................................... 9
REPLACING THE SECTOR BLOCK .................................................................................................. 10
ADJUSTING THE SEAT WIDTH .......................................................................................................... 11
PROCEDURE 5 - WHEELS ................................................................................................................. 13
REMOVING/INSTALLING THE REAR WHEELS .................................................................................. 13
REPLACING SIX OR EIGHT-INCH CASTER/FORK ASSEMBLY ......................................................... 13
FRONT CASTER MOUNTING ADJUSTMENTS .................................................................................. 13
CONVERTING FROM TRAILING TO LEADING OR LEADING TO TRAILING CASTERS ..................... 14
REPOSITIONING/REPLACING CAM ................................................................................................... 14
REPLACING THE WHEEL LOCKS ..................................................................................................... 15
REPLACING THE HIGH MOUNT WHEEL LOCKS ............................................................................ 15
PROCEDURE 6 - PATRIOT ................................................................................................................. 16
REMOVING/INSTALLING REAR ARM SOCKET .................................................................................. 16
REPLACING ARMREST BRACKET .................................................................................................... 17
CONVERTING FROM SPACE SAVER TO CONVENTIONAL OR
CONVENTIONAL TO SPACE SAVER ............................................................................................. 17
REMOVING/INSTALLING AXLE BRACKET .......................................................................................... 18
CONVERTING FROM STANDARD AXLE TO AMPUTEE .................................................................... 19
CHANGING SEAT-TO-FLOOR HEIGHT/SEAT-TO-FLOOR ANGLE .................................................... 19
PROCEDURE 7 - PATRIOT SL............................................................................................................ 31
REPLACING ARMREST ..................................................................................................................... 31
CONVERTING FROM STANDARD AXLE TO AMPUTEE .................................................................... 31
CHANGING SEAT-TO-FLOOR HEIGHT .............................................................................................. 32
LIMITED WARRANTY ........................................................................................................................... 36

4
SPECIFICATIONS
S
P
E
C
I
F
C
A
T
I
O
N
S
* 16x16-inch Seat Frame with packaging.
SPECIFICATIONS
NOTE: All specifications are approximate.
PATRIOT/PATRIOT SL
Overall Width: 21-1/2 , 23-1/2 - 25-1/2, 27-1/2-inches
Overall Depth (w/ riggings): 43 or 45-inches
Seat Width: 14, 16, 17, 18, or 20-inches
Seat Depth: 16 or 18-inches
Seat-to-Floor (ADULT/HEMI): 15-1/2 to 19-1/2-inches - in 1-inch increments
Back Style: Adjustable - in 1-inch increments
Back Height: 15-19-inches (Standard on both) and 20-inch (Optional Back
Cane - Patriot Only)
Arm Styles: Swing Back, Space Saver, Desk/Full Length and
Fixed/Adjustable Height (Desk Length, Swing Back,
Fixed Height Arms - Standard)
Front Riggings: Swingaway Footrests and Elevating Legrests
Rear Axle: Permanent (Standard) and Quick-Release
Rear Wheels: 20, 22 and 24-inch Composite; Urethane,
Pneumatic or Pneumatic-Flat Free Insert -
(Standard - 24-inch Composite Urethane)
Handrims: Composite and Aluminum; Non-Projection and Projection
Standard - Composite Non-Projection
Wheel Locks: Toggle Lock - Push or Pull
Caster Size: 6 x 1-inch Urethane, 8 x 1-inch Urethane (Standard),
8 x 1-1/4-inch Pneumatic or Pneumatic-Flat Free Insert
Upholstery: U240 Black Nylon
Weight: Patriot - 29 lbs.
Patriot SL - 32.5 lbs.
Shipping Weight (Approx.): Patriot - 39.5 lbs.
*
Patriot SL - 43 lbs.
*
NOTE: The seat-to-floor heights are based on urethane tires. If wheelchair is equipped with pneumatic tires or pneu-
matic tires with flat free inserts., add 1/4-inch to the measurements listed above. All heights are approximate to +1/4-
inch due to tire wear and air pressure.

5
G
E
N
E
R
A
L
G
U
I
D
E
L
I
N
E
S
GENERAL GUIDELINES PROCEDURE 1
This Procedure Includes the Following:
Operating Information
OPERATING INFORMATION
GENERAL WARNINGS
Unless otherwise noted, all service and adjustments should be performed while the
wheelchair is unoccupied.
DO NOT use the wheelchair unless it has the proper tire pressure (P.S.I.). The recom-
mended tire pressure is listed on the side wall of the tire. DO NOT overinflate the tires.
Failure to follow these suggestions may cause the tire to explode and cause bodily harm.
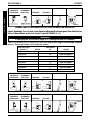
SPECIFIC WARNINGS - STABILITY
The back height, front caster position, seat-to-floor angle, position of the rear wheels,
correct anti-tippers as well as the end user's disability or end user's physical condition
and capabilities directly relate to the stability of the wheelchair. Any change to one (1)
or any combination of the eight (8) may cause the wheelchair to decrease in stability.
These adjustments MUST be performed by an authorized Invacare dealer or qualified
technician.
Seat-to-floor heights have specific positions depending on rear wheel size, rear wheel
position, front caster position and seat-to-floor angle. These adjustments MUST be per-
formed by an authorized Invacare dealer or qualified technician.
ANTI-TIPPERS
Anti-tippers are specific to the different seat-to-floor angles and/or seat-to-floor heights.
Refer to the chart in INSTALLING/ADJUSTING THE ANTI-TIPPERS in PROCEDURE 7 of this
manual for correct usage and adjustment. If these requirements CANNOT be achieved,
DO NOT use the wheelchair. Contact Invacare Technical Support at 1-800-832-4707.
Any changes to the seat-to-floor angle or seat-to-floor height may require different
anti-tippers.
CHANGES: 4 5 6 *7 *7 N/A
Back Height N/A N/A
✓ ✓
✓ ✓
✓
✓ ✓
✓ ✓
✓
✓ ✓
✓ ✓
✓
Front Caster
✓✓
✓✓
✓
✓✓
✓✓
✓
✓✓
✓✓
✓
✓✓
✓✓
✓
✓✓
✓✓
✓
Seat-to-Floor Angle
✓✓
✓✓
✓
✓ ✓
✓ ✓
✓
✓✓
✓✓
✓
✓✓
✓✓
✓
✓ ✓
✓ ✓
✓
Rear Wheels
✓✓
✓✓
✓
✓ ✓
✓ ✓
✓
✓✓
✓✓
✓
✓ ✓
✓ ✓
✓
✓✓
✓✓
✓
Anti-Tippers
✓✓
✓✓
✓
✓✓
✓✓
✓
✓ ✓
✓ ✓
✓
✓✓
✓✓
✓
✓✓
✓✓
✓
User Condition
✓✓
✓✓
✓
✓✓
✓✓
✓
✓✓
✓✓
✓
✓ ✓
✓ ✓
✓
✓ ✓
✓ ✓
✓
Back Height
Front Caster
Seat-to-Floor
Angle
Rear Wheels
Anti-Tippers
User Condition
PROCEDURE
* NOTE: Refer to the Owner's Manual Part No. 1088909 for
these procedures.
NOTE: When changes to the left hand column occur, follow
across the chart and refer to the
✓ ✓
✓ ✓
✓
procedure to maintain the
proper stability, safety and handling of the wheelchair.

6
SPECIFIC WARNINGS - STABILITY (CONTINUED)
Seat-to-floor angle of 0
0
or 3
0
: If so equipped, anti-tippers MUST be attached at all times.
Inasmuch as the anti-tippers are an option for 0
0
or 3
0
on this wheelchair (You may order
with or without the anti-tippers), Invacare strongly recommends using the anti-tippers
as a safeguard for the wheelchair user.
Seat-to-floor angle of 6
0
: If changing the seat-to-floor angle to 6
0
, anti-tippers MUST be
installed.
Seat-to-floor height (which includes seat-to-floor angle): If changing the seat-to-floor
height with or without a change to seat-to-floor angle, the correct anti-tippers MUST
be installed to maintain a 1-1/2 to 2-inch ground clearance.
G
E
N
E
R
A
L
G
U
I
D
E
L
I
N
E
S
GENERAL GUIDELINESPROCEDURE 1

7
This Procedure Includes the Following:
Assembling the Wheelchair
A
S
S
E
M
B
L
Y
PROCEDURE 2ASSEMBLY
ASSEMBLING THE WHEELCHAIR
(FIGURE 1)
1. Unfold the wheelchair. Refer to FOLDING AND UN-
FOLDING THE WHEELCHAIR in PROCEDURE
1 of the Owner's Manual, part number 1088909.
2. If necessary, adjust the back height. Refer to ADJUST-
ING/REPLACING THE BACK CANES in PROCE-
DURE 4 of this manual.
3. If necessary, install the adjustable tension upholstery.
Refer to INSTALLING/REMOVING ADJUSTABLE
TENSION UPHOLSTERY - PATRIOT ONLY in
PROCEDURE 5 of the Owner's Manual, part num-
ber 1088909.
4. If necessary, install the seat and/or chest positioning
straps. Refer to INSTALLING/REMOVING SEAT
POSITIONING STRAP or INSTALLING/REMOV-
ING CHEST POSITIONING STRAP in PROCE-
DURE 5 of the Owner's Manual, part number 1088909.
5. If necessary, convert standard axle to amputee. Re-
fer to CONVERTING FROM STANDARD AXLE TO
AMPUTEE for Patriot in PROCEDURE 6 OR CON-
VERTING FROM STANDARD AXLE TO AMPU-
TEE for Patriot SL in PROCEDURE 7 of this manual.
6. If necessary, adjust the seat-to-floor height and seat-
to-floor angle. Refer to CHANGING SEAT-TO-
FLOOR HEIGHT/SEAT-TO-FLOOR ANGLE in
PROCEDURE 6 for Patriot OR CHANGING SEAT-
TO-FLOOR HEIGHT in PROCEDURE 7 for Pa-
triot SL of this manual and THEN REPOSITIONING
CAM in PROCEDURE 5 of this manual.
7. If necessary, adjust the front caster height. Refer to
REPLACING SIX OR EIGHT-INCH CASTER/
FORK ASSEMBLY in PROCEDURE 5 of this
manual.
8. If necessary, install the anti-tippers. Refer to INSTALL-
ING/ADJUSTING THE ANTI-TIPPERS in PROCE-
DURE 7 of the Owner's Manual, part number 1088909.
9. Install the front riggings. Refer to INSTALLING/RE-
MOVING SWINGAWAY FOOTREST or INSTALL-
ING/REMOVING ELEVATING LEGREST in PRO-
CEDURE 3 of the Owner's Manual, part number
1088909.
FIGURE 1 - ASSEMBLING THE WHEELCHAIR
Step 1, Procedure 1
Step 2, Procedure 4
Step 3, Procedure 5
Step 5, Procedure 6 or 7
Step 8, Procedure 7
Step 7, Procedure 5
Step 6, Procedure 6 or 7 and 5
Step 6, Procedure 6 or 7
Step 9, Procedure 3

8
PROCEDURE 3 ARMS
This Procedure Includes the Following:
Removing/Installing Front Arm Socket/Seat Guide
WARNING
After ANY adjustments, repair or service
and BEFORE use, make sure all attaching
hardware is tightened securely - other-
wise injury or damage may occur.
REMOVING/INSTALLING FRONT
ARM SOCKET/SEAT GUIDE
(FIGURE 1)
Removing
1. Remove the front armrest from the front arm socket/
seat guide. Refer to ADJUSTING/USING ARM-
REST in PROCEDURE 4 of the Owner's Manual,
part number 1088909.
2. Lift up on the crossbraces to remove the crossbraces
from the seat guides.
3. Remove the mounting screw and locknut that secure
the EXISTING front arm socket/seat guide to the
wheelchair frame.
4. Remove the EXISTING front arm socket/seat guide
from the wheelchair.
5. Repeat STEPS 1-4 for opposite side, if necessary.
6. Install the NEW front arm socket/seat guide onto the
wheelchair. Refer to INSTALLING FRONT ARM
SOCKET/SEAT GUIDE in this procedure of the
manual.
A
R
M
S
FIGURE 1 - REMOVING/INSTALLING
FRONT ARM SOCKET/SEAT GUIDE
Installing
1. Install the NEW front arm socket/seat guide as shown
in FIGURE 1.
2. Install the EXISTING mounting screw through the front
arm socket/seat guide.
3. Install the locknut onto the mounting screw. Securely
tighten.
4. Repeat STEPS 1-3 for opposite side, if necessary.
5. Push down on the crossbraces to install the crossbraces
into the seat guides.
6. Reinstall the front armrest into the front arm socket/
seat guide. Refer to ADJUSTING/USING ARM-
REST in PROCEDURE 4 of the Owner's Manual,
part number 1088909.
NOTE: Crossbraces NOT shown for clarity.
Mounting Screw
Locknut
Front Arm Socket/
Seat Guide
Outside of
Wheelchair
Frame

9
PROCEDURE 4SEAT/BACK
S
E
A
T
/
B
A
C
K
This Procedure Includes the Following:
Replacing Rear Seat Guides
Adjusting/Replacing the Back Canes
Replacing the Sector Block
Adjusting the Seat Width
WARNING
After ANY adjustments, repair or service and
BEFORE use, make sure all attaching hard-
ware is tightened securely - otherwise injury
or damage may occur.
REPLACING REAR SEAT GUIDES
(FIGURE 1)
1. Lift up on the crossbraces to remove crossbraces
from the seat guides.
2. Remove the mounting screw and locknut that secure
EXISTING rear seat guide to wheelchair frame.
3. Remove EXISTING rear seat guide from wheelchair.
4. Install the NEW rear seat guide onto the wheelchair
frame as shown in FIGURE 1.
5. Install the mounting screw through the NEW rear seat
guide and wheelchair frame.
6. Securely tighten the NEW rear seat guide to the wheel-
chair frame with the locknut.
7. Repeat STEPS 2-6 for opposite side, if necessary.
8. Push down on the crossbraces to install the crossbraces
into the seat guides. Wiggle the crossbraces to en-
sure they are secured in the seat guides.
FIGURE 1 - REPLACING REAR SEAT
GUIDES
Mounting
Screw
Rear Seat Guide
Locknut
Outside of
Wheelchair
Frame
NOTE: Crossbraces NOT shown for clarity.
Height
Adjustment
Positions
ADJUSTING/REPLACING THE
BACK CANES
WARNING
BEFORE performing this procedure, refer to
SPECIFIC WARNINGS - STABILITY in PROCEDURE
1 of this manual for additional requirements.
NOTE: Both back canes MUST be positioned at the same
height.
Adjusting
PATRIOT SL (FIGURE 2).
1. Remove the two (2) mounting screws and locknuts that
secure the back cane to the wheelchair frame.
2. Reposition the back cane to one (1) of five (5) height
adjustment positions:
Back Height (in inches)
KHOLE # 1 & 2 2 & 3 3 & 4 4 & 5 5 & 6
HEIGHT 15 16 17 18 19
K Holes numbered from bottom to top for refer-
ence only. (There are no numbers on back canes.)
3. Reinstall the two (2) mounting screws and locknuts
that secure the back cane to the wheelchair frame
and securely tighten.
4. Repeat STEPS 1-3 for the opposite back cane.
5. Secure the back upholstery to the wheelchair frame
with the tie wraps.
Back
Cane
Locknuts
Mounting
Screws
Wheelchair
Frame
FIGURE 2 - ADJUSTING THE BACK
CANES- PATRIOT SL
HOLE
6
5
4
3
2
1
Wheelchair
Frame

10
SEAT/BACKPROCEDURE 4
S
E
A
T
/
B
A
C
K
PATRIOT (FIGURE 3).
1. Remove the one (1) mounting screw and locknut that
secure the back cane to the wheelchair.
2. Do one (1) of the following:
A. 20-inch Back Cane - Position the back cane in
the second hole from the bottom on the wheel-
chair frame as shown in FIGURE 3.
B. Adjustable Back Cane - Reposition the back
cane to one (1) of the five (5) adjustment posi-
tions:
Back Height (in inches)
KHOLE # 12345
HEIGHT 15 16 17 18 19
K Holes numbered from bottom to top for refer-
ence only. (There are no numbers on the back
canes.)
3. Reinstall the one (1) mounting screw and locknut that
secure the back cane to the wheelchair frame. and
securely tighten.
4. Repeat STEPS 1-3 for the opposite back cane.
Back
Cane
Locknut
Wheelchair Frame
Height
Adjustment
Positions
Wheelchair
Frame
HOLE
5
4
3
2
1
FIGURE 3- ADJUSTING THE BACK CANES
- PATRIOT
REPLACING THE SECTOR BLOCK
(FIGURE 4)
1. Remove the front rigging from the wheelchair. Refer to
INSTALLING/REMOVING SWINGAWAY FOOT-
REST or INSTALLING/REMOVING ELEVATING
LEGREST/CALFPAD ASSEMBLY in PROCE-
DURE 3 of the Owner's Manual, part number 1088909.
2. Remove the hex screw and washer that secure the
EXISTING sector block to the wheelchair frame.
3. Remove EXISTING sector block from wheelchair.
4. Position the NEW sector block on the wheelchair frame
with the locking pin facing UP as shown in FIGURE 4.
5. Apply Loctite 242
®
to threads of EXISTING hex screw.
6. Securely tighten the NEW sector block to the wheel-
chair frame with the EXISTING hex screw and washer.
7. Repeat STEPS 1-6 for opposite side, if necessary.
8. Install the front rigging onto the wheelchair. Refer to
INSTALLING/REMOVING SWINGAWAY FOOT-
REST or INSTALLING/REMOVING ELEVATING
LEGREST/CALFPAD ASSEMBLY in PROCE-
DURE 3 of the Owner's Manual, part number 1088909.
Replacing (FIGURES 2 AND 3)
1. Cut the tie wraps that secure the EXISTING back up-
holstery to the wheelchair frame.
2. Remove the EXISTING back upholstery from the
wheelchair. Refer to REMOVING/INSTALLING THE
BACK UPHOLSTERY in PROCEDURE 5 of the
Owner's Manual, part number 1088909.
3. Do one (1) of the following:
A. Patriot SL - Remove the two (2) mounting
screws and locknuts that secure the back cane
to the wheelchair frame.
B. Patriot - Remove the one (1) mounting screw
and locknut that secures the back cane to the
wheelchair frame.
4. Repeat STEP 3 for the opposite side, if necessary.
5. Install the NEW/EXISTING back upholstery onto the
NEW back cane(s). Refer to REMOVING/INSTALL-
ING THE BACK UPHOLSTERY in PROCEDURE
5 of the Owner's Manual, part number 1088909.
6. Secure the NEW back cane(s) to the wheelchair
frame with the EXISTING hardware.
7. Secure the NEW/EXISTING back upholstery to the
wheelchair frame with the NEW tie wraps.
20-inch Back Cane
Wheelchair Frame
Back
Cane
Locknut
Mounting
Screw
Mounting
Screw
Adjustable Back Cane
Loctite
®
- Registered Trademark of Loctite Corporation.

11
PROCEDURE 4SEAT/BACK
S
E
A
T
/
B
A
C
K
ADJUSTING THE SEAT WIDTH
(FIGURE 5)
NOTE: When adjusting the seat width of the wheelchair,
the back and seat upholstery must be changed.
1. Remove the rear wheels. Refer to REMOVING/IN-
STALLING REAR WHEELS in PROCEDURE 6 of
the Owner's Manual, part number 1088909.
2. Remove the EXISTING back and seat upholstery from
the wheelchair. Refer to REMOVING/INSTALLING
THE BACK UPHOLSTERY and REMOVING/IN-
STALLING THE SEAT UPHOLSTERY in PROCE-
DURE 5 of the Owner's Manual, part number 1088909.
3. Remove the four (4) mounting screws and locknuts
that secure the two (2) pivot links to the wheelchair
frame and crossbraces.
4. Remove the two (2) mounting screws, locknuts and
crossbrace saddle that secure the bottom of the
crossbrace to the wheelchair frame.
5. Repeat STEP 4 for opposite crossbrace.
SEAT WIDTH PIVOT LINK
16 to18-inch
14-inch
14-Inch
16-Inch
18-Inch
NOTE: Note the orientation of the coved washers, wash-
ers and locknut for assembling the NEW crossbraces.
See DETAIL "A".
6. Remove the mounting screw, coved washers, wash-
ers and locknut that secure the two (2) crossbraces
together.
7. Assemble the two (2) NEW crossbraces together with
the EXISTING mounting screw, coved washers, wash-
ers and locknut. Securely tighten. Refer to DETAIL
"A" for proper hardware orientation.
8. Determine the correct pivot link and mounting hole to
use with the desired seat width. See chart below.
9. Secure the pivot link to the crossbraces and wheel-
chair frame with the four (4) mounting screws and
locknuts. Securely tighten.
NOTE: Position crossbrace saddle on wheelchair frame
using the washer on the underside of the wheelchair frame
as a reference. See DETAIL "B" for proper positioning of
the crossbrace saddle.
10. Reinstall the two (2) mounting screws, locknuts and
crossbrace saddle that secure the bottom of the NEW
crossbrace to the wheelchair frame. Refer to DE-
TAIL "B" for hardware orientation.
11. Repeat STEP 10 for opposite crossbrace. Securely
tighten.
12. Install the NEW back and seat upholstery onto the
wheelchair. Refer to REMOVING/INSTALLING THE
BACK UPHOLSTERY and REMOVING/INSTALL-
ING THE SEAT UPHOLSTERY in PROCEDURE
5 of the Owner's Manual, part number 1088909.
13. Install the rear wheels. Refer to REMOVING/IN-
STALLING REAR WHEELS in PROCEDURE 6 of
the Owner's Manual, part number 1088909.
DO NOT USE
17
17-Inch
20-inch
20-Inch
DO NOT USE
FIGURE 4 - REPLACING THE SECTOR
BLOCK
Sector Block
Hex Screw
Washer
Wheelchair
Frame
Locking Pin

12
FIGURE 5 - ADJUSTING THE SEAT WIDTH
Crossbrace
Saddle
Washer
Wheelchair
Frame
Crossbrace
Saddle
(STEPS 4,10)
Mounting
Screw
(STEPS 4,10)
Crossbrace
Saddle
(STEPS 4,10)
Locknut
(STEPS
4,10)
Pivot Link
(STEPS 3,8,9)
Locknut
(STEPS 3,9)
Locknut
(STEPS 3,9)
Mounting Screw
(STEPS 3,9)
Wheelchair
Frame
Locknut
(STEPS 3,9)
Mounting Screw
(STEPS 3,9)
Mounting
Screw
Washer
Coved
Washer
Locknut
Washer
Coved
Washer
Washer
Coved
Washer
DETAIL "A"
(STEPS 6,7)
DETAIL "B"
Crossbraces
Mounting
Screw
(STEPS 3,9)
Crossbrace
(STEPS 3,5,6,7,9,10)
Mounting
Screw
(STEPS 4,10)
PROCEDURE 4 SEAT/BACK
S
E
A
T
/
B
A
C
K

13
PROCEDURE 5
W
H
E
E
L
S
WHEELS
This Procedure Includes the Following:
Removing/Installing the Rear Wheels
Replacing Six or Eight-Inch Caster/Fork Assembly
Converting From Trailing to Leading OR Leading
to Trailing Casters
Repositioning/Replacing Cam
Replacing the Wheel Locks
Replacing The High Mount Wheel Locks
WARNING
BEFORE performing ANY of these procedures,
refer to SPECIFIC WARNINGS - STABILITY in
PROCEDURE 1 of this manual for additional
requirements.
After ANY adjustments, repair or service
and BEFORE use, make sure all attaching
hardware is tightened securely - otherwise
injury or damage may occur.
REMOVING/INSTALLING THE
REAR WHEELS
NOTE: To remove/install the rear wheels,refer to RE-
MOVING/INSTALLING REAR WHEELS in PROCE-
DURE 6 of the Owner's Manual, part number 1088909.
REPLACING SIX OR EIGHT-INCH
CASTER/FORK ASSEMBLY
(FIGURE 1)
1. Remove the dust cover.
2. Remove the locknut that secures the caster/fork as-
sembly to the caster headtube.
3. Drop the caster/fork assembly out of the caster
headtube.
FIGURE 1 - REPLACING SIX OR EIGHT-INCH
CASTER/FORK ASSEMBLY
Locknut
Dust Cover
Caster/Fork
Assembly
Caster
Headtube
FIGURE 2 - FRONT CASTER MOUNTING
ADJUSTMENTS
Washer
(if applicable)
Locknut
Front Caster
Fork
Mounting
Screw
FRONT CASTER MOUNTING
ADJUSTMENTS (FIGURE 2)
1. Remove the mounting screw, washers (if applicable)
and locknut that secure the front caster to the fork.
2. Reposition front caster on the fork to the determined
mounting hole by performing one (1) of the following:
A. PATRIOT - Refer to CHANGING SEAT-TO-
FLOOR HEIGHT/SEAT-TO-FLOOR ANGLE
in PROCEDURE 6 of this manual.
B. PATRIOT SL - Refer to CHANGING SEAT-TO-
FLOOR HEIGHT in PROCEDURE 7 of this
manual.
3. Secure front caster to fork with EXISTING mounting
screw, washers (if applicable), and locknut. Securely
tighten.
WARNING
Make sure both front casters are posi-
tioned in the same mounting hole BEFORE
using the wheelchair; otherwise injury
may result.
4. Repeat STEPS 1-3 for the opposite front caster.
5. Adjust the anti-tippers. Refer to INSTALLING/AD-
JUSTING THE ANTI-TIPPERS in PROCEDURE
7 of the Owner's Manual, part number 1088909.
4. Slide the NEW six or eight-inch caster/fork assembly
into the caster headtube.
5. Secure the NEW six or eight-inch caster/fork assem-
bly with the EXISTING locknut.
6. Adjust the caster/fork assembly. Refer to ADJUST-
ING FORKS in PROCEDURE 6 of the Owner's
Manual, part number 1088909.
7. Adjust the anti-tippers. Refer to INSTALLING/AD-
JUSTING THE ANTI-TIPPERS in PROCEDURE
7 of the Owner's Manual, part number 1088909.

14
WHEELS
W
H
E
E
L
S
PROCEDURE 5
Locknut
Washer
Cam
Caster Headtube
Coved
Spacers
Mounting Screw
Wheelchair
Frame
Locknut
Washer
Cam
Caster Headtube
Coved Spacers
Mounting Screw
Leading to Trailing (FIGURE 4)
1. Remove the two (2) mounting screws, four (4) coved
spacers, washer, cam and two (2) locknuts that se-
cure the caster headtube to the wheelchair frame.
2. Repeat STEP 1 for opposite side.
3. Position EXISTING RIGHT caster headtube onto LEFT
side of wheelchair frame as shown in FIGURE 4.
4. Secure the bottom of the EXISTING caster headtube
to the wheelchair frame using EXISTING hardware.
Refer to FIGURE 4 for proper hardware orientation.
5. The seat-to-floor angle must be adjusted by perform-
ing one (1) of the following:
A. PATRIOT - Refer to CHANGING SEAT-TO-
FLOOR HEIGHT/SEAT-TO-FLOOR ANGLE
in PROCEDURE 6 of this manual.
B. PATRIOT SL - Refer to CHANGING SEAT-TO-
FLOOR HEIGHT in PROCEDURE 7 of this
manual.
6. Secure the cam to the top of the caster headtube with
the EXISTING hardware. Refer to FIGURE 4 for cor-
rect hardware orientation.
7. Adjust the anti-tippers. Refer to INSTALLING/AD-
JUSTING THE ANTI-TIPPERS in PROCEDURE
7 of the Owner's Manual, part number 1088909.
FIGURE 3 - TRAILING TO LEADING
FIGURE 4 - LEADING TO TRAILING
Wheelchair
Frame
CONVERTING FROM TRAILING TO
LEADING OR LEADING TO
TRAILING CASTERS
Trailing to Leading (FIGURE 3)
1. Remove the two (2) mounting screws, four (4) coved
spacers, washer, cam and two (2) locknuts that se-
cure the caster headtube to the wheelchair frame.
2. Repeat STEP 1 for opposite side.
3. Position EXISTING RIGHT caster headtube onto LEFT
side of wheelchair frame as shown in FIGURE 3.
4. Loosely tighten the bottom of the EXISTING caster
headtube to the wheelchair frame using EXISTING
hardware. Refer to FIGURE 3 for proper hardware
orientation.
5. The seat-to-floor angle must be adjusted by perform-
ing one (1) of the following:
A. PATRIOT - Refer to CHANGING SEAT-TO-
FLOOR HEIGHT/SEAT-TO-FLOOR ANGLE
in PROCEDURE 6 of this manual.
B. PATRIOT SL - Refer to CHANGING SEAT-TO-
FLOOR HEIGHT in PROCEDURE 7 of this
manual.
6. Secure the cam to the top of the caster headtube with
the EXISTING hardware. Refer to FIGURE 3 for cor-
rect hardware orientation.
7. Securely tighten the caster headtube to the wheel-
chair frame.
8. Adjust the anti-tippers. Refer to INSTALLING/AD-
JUSTING THE ANTI-TIPPERS in PROCEDURE
7 of the Owner's Manual, part number 1088909.
REPOSITIONING/REPLACING CAM
(FIGURES 3 AND 4)
1. Do one (1) of the following:
A. TO REPOSITION - Refer to CHANGING SEAT-
TO-FLOOR HEIGHT/SEAT-TO-FLOOR ANGLE
in PROCEDURE 6 for the PATRIOT OR CHANG-
ING SEAT-TO-FLOOR HEIGHT in PROCE-
DURE 7 for the PATRIOT SL in this manual.
B. TO REPLACE - BEFORE removing the cam,
note position of the cam in the caster headtube
for proper reinstallation.

15
REPLACING THE WHEEL LOCKS
(FIGURE 5)
NOTE: BEFORE removing the wheel lock(s), note posi-
tion of wheel lock(s) on the wheelchair frame for proper
reinstallation.
1. Remove the mounting screw and washer that se-
cure the EXISTING wheel lock to the wheelchair frame.
2. Remove the EXISTING wheel lock from the wheelchair.
3. Install the NEW wheel lock to the wheelchair frame.
4. Secure the NEW wheel lock to the wheelchair frame
with the mounting screw and washer.
5. Repeat STEPS 1-4 for opposite side, if necessary.
6. Adjust the wheel locks. Refer to USING/ADJUST-
ING THE PATIENT OPERATED WHEEL LOCKS
in PROCEDURE 7 of the Owner's Manual, part num-
ber 1088909.
FIGURE 5 - REPLACING THE WHEEL LOCKS
W
H
E
E
L
S
WHEELS PROCEDURE 5
2. Remove the mounting screw, coved spacers, cam
and locknut that secure the EXISTING cam to the
caster headtube.
3. Loosen the bottom mounting screw, coved spacers
and locknuts that secure the caster headtube to the
wheelchair frame.
NOTE: Loosening the bottom mounting screw allows
the cam to be positioned easily in the caster headtube.
4. Remove the cam from the wheelchair.
5. Install the NEW/EXISTING cam at the position noted
in STEP 1. Refer to FIGURES 3 OR 4 for correct
hardware orientation.
6. Securely tighten the bottom mounting screw, coved
spacers and locknuts that secure the caster headtube
to the wheelchair frame.
Mounting
Screw
Washer
Wheelchair Frame
Wheel Lock
REPLACING THE HIGH MOUNT
WHEEL LOCKS (FIGURE 6)
NOTE: When using the 24-inch rear wheels the high mount
wheel lock will rest directly under the front arm socket.
NOTE: Note the position and orentation of the high mount
wheel locks and mounting hardware before removing.
1. Remove the two EXISTING (2) socket screws
the secure the EXISTING clamps and wheel lock
assembly to the wheel chair frame and discard.
2. Position the NEW clamps around the wheelchair
frame as shown in FIGURE 6.
3. Loosely tighten the two (2) NEW socket screws
that secure the NEW clamps to the wheelchair
frame.
4. Slide the NEW wheel lock assembly into the
clamps as shown in FIGURE 6.
5. Adjust the wheel locks. Refer to WHEEL LOCK AD-
JUSTMENT in PROCEDURE 7 of the Owner's
Manual, part number 1088233.
FIGURE 6 - REPLACING THE HIGH MOUNT
WHEEL LOCKS
Socket Screws
Wheel
Lock
Wheelchair
Frame
Clamps

16
2. Secure the NEW rear arm socket to the wheelchair
frame with the locknut.
3. Install the armrest onto the wheelchair. Refer to RE-
MOVING/INSTALLING FLIP BACK ARMREST in
PROCEDURE 4 of the Owner's Manual, part num-
ber 1088909.
Space Saver (FIGURE 2)
REMOVING.
1. Remove the armrest from the the wheelchair. Refer
to REMOVING/INSTALLING FLIP BACK ARM-
REST in PROCEDURE 4 of the Owner's Manual,
part number 1088909.
2. Remove the mounting screw, washer and locknut
that secure the EXISTING rear arm socket to the arm-
rest bracket.
3. Remove the EXISTING rear arm socket from the
wheelchair.
4. Do one (1) of the following:
A. Install the NEW rear arm socket to the wheel-
chair. Refer to INSTALLING REAR ARM
SOCKET in this procedure of the manual.
B. Convert the rear arm socket from space saver to
conventional. Refer to INSTALLING REAR ARM
SOCKET - CONVENTIONAL in this procedure
of the manual.
INSTALLING.
1. Install the mounting screw and washer through the
axle brackets and NEW rear arm socket as shown in
FIGURE 2.
2. Secure the NEW rear arm socket to the wheelchair
frame with the locknut.
3. Install the armrest onto the wheelchair. Refer to RE-
MOVING/INSTALLING FLIP BACK ARMREST in
PROCEDURE 4 of the Owner's Manual, part num-
ber 1088909.
Locknut
Spacer
Rear Arm Socket
Mounting
Screw
Wheelchair
Frame
FIGURE 1 - REMOVING/INSTALLING REAR ARM
SOCKET - CONVENTIONAL
PROCEDURE 6 PATRIOT
P
A
T
R
I
O
T
This Procedure Includes the Following:
Removing/Installing Rear Arm Socket
Replacing Armrest Bracket
Converting from Space Saver to Conventional OR
Conventional to Space Saver
Removing/Installing Axle Bracket
Converting from Standard Axle to Amputee
Changing Seat-to-Floor Height/
Seat-to-Floor Angle
WARNING
After ANY adjustments, repair or service
and BEFORE use, make sure all attaching
hardware is tightened securely - otherwise
injury or damage may occur.
REMOVING/INSTALLING REAR
ARM SOCKET
WARNING
The armrest bracket MUST be attached
to the wheelchair BEFORE using - other-
wise, injury or damage may result.
Conventional (FIGURE 1)
REMOVING.
1. Remove the armrest from the the wheelchair. Refer
to REMOVING/INSTALLING FLIP BACK ARM-
REST in PROCEDURE 4 of the Owner's Manual,
part number 1088909.
2. Remove the mounting screw, spacer and locknut that
secure the EXISTING rear arm socket to the armrest
bracket.
3. Remove the EXISTING rear arm socket from the
wheelchair.
4. Do one (1) of the following:
A. Install the NEW rear arm socket to the wheelchair.
Refer to INSTALLING REAR ARM SOCKET in
this procedure of the manual.
B. Convert the rear arm socket from conventional to
space saver. Refer to INSTALLING REAR ARM
SOCKET - SPACE SAVER in this procedure of
the manual.
INSTALLING.
1. Install the mounting screw through the NEW rear arm
socket, spacer, axle brackets and wheelchair frame
as shown in FIGURE 1.

17
FIGURE 2 - REMOVING/INSTALLING REAR ARM
SOCKET - SPACE SAVER
PROCEDURE 6PATRIOT
P
A
T
R
I
O
REPLACING ARMREST BRACKET
(FIGURE 3)
WARNING
The armrest bracket MUST be attached to
the wheelchair BEFORE using -otherwise,
injury or damage may result.
1. Remove the armrest from the the wheelchair. Refer
to REMOVING/INSTALLING FLIP BACK ARM-
REST in PROCEDURE 4 of the Owner's Manual,
part number 1088909.
2. Remove the REAR arm socket from the wheelchair.
Refer to REMOVING/INSTALLING REAR ARM
SOCKET in this procedure of the manual.
3. Remove the three (3) mounting screws, washers and
locknuts that secures the EXISTING armrest brack-
ets to the wheelchair frame.
4. Remove the EXISTING armrest brackets from the
wheelchair frame.
5. Install the EXISTING three (3) mounting screws, wash-
ers and NEW armrest brackets onto the wheelchair
frame as shown in FIGURE 3.
6. Securely tighten the NEW armrest brackets with the
three (3) locknuts. Torque to 50-60 in./lbs.
7. Install the REAR arm socket to the wheelchair frame.
Refer to REMOVING/INSTALLING REAR ARM
SOCKET in this procedure of the manual.
8. Install the armrest onto the wheelchair. Refer to RE-
MOVING/INSTALLING FLIP BACK ARMREST in
PROCEDURE 4 of the Owner's Manual, part num-
ber 1088909.
9. Repeat STEPS 1-8 for opposite side, if necessary.
CONVERTING FROM SPACE
SAVER TO CONVENTIONAL OR
CONVENTIONAL TO SPACE SAVER
Space Saver to Conventional (FIGURE 4)
1. Remove the rear wheels from the wheelchair. Refer
to REMOVING/INSTALLING REAR WHEELS in
PROCEDURE 6 of the Owner's Manual, part num-
ber 1088909.
2. Position the NEW spacer between the rear wheel
and the wheelchair frame.
3. Secure the rear wheel to the wheelchair frame using
the NEW permanent axle, spacer and EXISTING lock-
nut as shown in FIGURE 4. Torque to 20-40 ft./lbs.
4. Repeat STEPS 2-3 for opposite side of wheelchair.
5. Remove the armrest from the wheelchair. Refer to
REMOVING/INSTALLING FLIP BACK ARMREST
in PROCEDURE 4 of the Owner's Manual, part num-
ber 1088909.
6. Remove the mounting screw, washer and locknut
that secure the rear arm socket to the wheelchair
frame.
NOTE: The washer will NOT be reused.
7. Remove the rear arm socket from the wheelchair.
8. Position the NEW spacer between the two (2) arm-
rest brackets and the rear arm socket on the outside
of the wheelchair frame.
9. Secure the rear arm socket and NEW spacer to the
wheelchair frame with the EXISTING mounting screw
and locknut.
10. Install the armrest onto the wheelchair. Refer to RE-
MOVING/INSTALLING FLIP BACK ARMREST in
PROCEDURE 4 of the Owner's Manual, part num-
ber 1088909.
11. Repeat STEPS 5-10 for opposite side of wheelchair.
Mounting
Screw
Rear Arm
Socket
FIGURE 3 - REPLACING ARMREST BRACKET
Mounting
Screw
Armrest Brackets
Wheelchair
Frame
Locknut
Wheelchair
Frame
Locknut
Washer
Washer

18
9. Install the armrest onto the wheelchair. Refer to RE-
MOVING/INSTALLING FLIP BACK ARMREST in
PROCEDURE 4 of the Owner's Manual, part num-
ber 1088909.
10. Repeat STEPS 4-9 for opposite side.
FIGURE 5 - CONVERTING FROM
CONVENTIONAL TO SPACE SAVER
Conventional to Space Saver (FIGURE 5)
1. Remove the rear wheels from the wheelchair. Refer
to REMOVING/INSTALLING REAR WHEELS in
PROCEDURE 7 of the Owner's Manual, part num-
ber 1088909.
2. Remove the two (2) spacers between the rear wheels
and the wheelchair frame.
NOTE: The two (2) spacers will NOT be reused.
3. Secure the rear wheels to the wheelchair frame us-
ing the NEW permanent axle. Torque to 20-40 ft./lbs.
4. Remove the armrest from the wheelchair. Refer to
REMOVING/INSTALLING FLIP BACK ARMREST
in PROCEDURE 4 of the Owner's Manual, part num-
ber 1088909.
5. Remove the mounting screw, spacer and locknut that
secure the rear arm socket to the wheelchair frame.
6. Remove the rear arm socket and spacer from the
wheelchair.
NOTE: The spacer will NOT be reused.
7. Position the rear arm socket between the armrest
brackets as shown in FIGURE 5.
8. Secure the rear arm socket to the wheelchair using
the EXISTING mounting screw, NEW washer and
locknut.
Locknut
NEW
Spacer
Rear Arm
Socket
Mounting
Screw
Outside of
Wheelchair
Frame
FIGURE 4 - CONVERTING FROM SPACE SAVER TO
CONVENTIONAL
PROCEDURE 6 PATRIOT
Wheelchair Frame
Spacer
Rear Wheel
Washer
Dust
Cap
Permanent
Axle
P
A
T
R
I
O
T
Wheelchair Frame
Spacer
Rear Wheel
Washer
Dust
Cap
Permanent
Axle
STEPS 2-4
STEPS 7-10
STEPS 2-3
REMOVING/INSTALLING AXLE
BRACKET (FIGURE 6)
WARNING
BEFORE performing this procedure, refer to
SPECIFIC WARNINGS - STABILITY in PROCEDURE
1 of this manual for additional requirements.
Removing
1. Remove the rear wheel from the wheelchair. Refer to
REMOVING/INSTALLING REAR WHEELS in
PROCEDURE 6 of the Owner's Manual, part num-
ber 1088909.
2. Remove the two (2) mounting screws and locknuts
that secure the EXISTING axle bracket to the wheel-
chair frame.
3. Repeat STEPS 1-2 for opposite side, if necessary.
4. Install the NEW/EXISTING axle bracket to the wheel-
chair frame. Refer to INSTALLING in this procedure
of the manual.
Mounting
Screw
Rear Arm
Socket
Wheelchair
Frame
Locknut
Washer
STEPS 6-9

19
CHANGING SEAT-TO-FLOOR
HEIGHT/SEAT-TO-FLOOR ANGLE
WARNING
DO NOT deviate from the charts on the
following pages. There are restrictions for
seat-to-floor heights and seat-to-floor
angles that will cause the wheelchair to
be in an unsafe position. BEFORE chang-
ing, refer to the following for the allow-
able positions.
The different Seat-to-Floor Heights and angles are pos-
sible by using different combinations of REAR WHEELS,
REAR WHEEL POSITION, FRONT CASTER POSI-
TION, CASTER SIZE AND CAM POSITION.
NOTE: Refer to the charts on the following pages for the
correct settings for the desired Seat-to-Floor Height and
Seat-to-Floor angle.
After determining rear wheel size and rear wheel posi-
tion, refer to REMOVING/INSTALLING REAR
WHEELS in PROCEDURE 6 of the Owner's Manual,
part number 1088909.
After determining caster size and caster position needed,
refer to REPLACING SIX OR EIGHT-INCH CASTER/
FORK ASSEMBLY in PROCEDURE 5 of this manual.
After determiming seat-to-floor angle, refer to REPOSI-
TIONING/REPLACING CAM in PROCEDURE 5 of this
manual.
Adjust the wheel locks. Refer to USING/ADJUSTING
THE PATIENT OPERATED WHEEL LOCKS in PRO-
CEDURE 7 of the Owner's Manual, part number 1088909.
WARNING
After changing Seat-to-Floor Height and/
or Seat-to-Floor Angle, the anti-tippers MUST
be replaced or adjusted BEFORE using the
wheelchair. Refer to INSTALLING/ADJUST-
ING THE ANTI-TIPPERS in PROCEDURE 7 of
the Owner's Manual, part number 1088909.
Seat
-to-
Floor
Seat
Angle
Installing
1. Position the NEW/EXISTING axle bracket onto the
wheelchair frame.
2. Secure the NEW/EXISTING axle bracket to the
wheelchair frame with the EXISTING mounting
screws and locknuts as shown in FIGURE 6.
Torque to 50-60 in./lbs.
3. Repeat STEPS1-2 for opposite side, if necessary.
4. Install the rear wheel from the wheelchair. Refer to
REMOVING/INSTALLING REAR WHEELS in
PROCEDURE 6 of the Owner's Manual, part num-
ber 1088909.
CONVERTING FROM STANDARD
AXLE TO AMPUTEE
WARNING
BEFORE performing this procedure, refer to
SPECIFIC WARNINGS - STABILITY in PROCEDURE
1 of this manual for additional requirements.
1. Remove the axle bracket from the wheelchair. Refer
to REMOVING/INSTALLING AXLE BRACKET in
this procedure of the manual.
2. Determine the desired seat-to-floor height. Refer to
the charts in CHANGING SEAT-TO-FLOOR
HEIGHT in this procedure for corresponding axle
bracket positioning for desired seat-to-floor height.
3. Install the axle bracket Refer to REMOVING/IN-
STALLING AXLE BRACKET in this procedure of
the manual.
4. Adjust the wheel locks. Refer to USING/ADJUST-
ING THE PATIENT OPERATED WHEEL LOCKS
in PROCEDURE 7 of the Owner's Manual, part num-
ber 1088909.
5. Adjust the anti-tippers. Refer to INSTALLING/AD-
JUSTING THE ANTI-TIPPERS in PROCEDURE
7 of the Owner's Manual, part number 1088909.
PROCEDURE 6PATRIOT
FIGURE 6 - REMOVING/INSTALLING AXLE
BRACKET
P
A
T
R
I
O
T
Mounting Screw
Locknut
Axle Bracket
Wheelchair
Frame

20
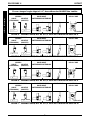
Caster Headtube, Front Caster, Axle Mounting Bracket Positioning and Cam Position for
24-inch Rear Wheels and 8-inch Front Casters (FIGURES 1 - 7)
*WARNING
If changing the seat-to-floor angle to 6
o
,
anti-tippers MUST be installed.
Refer to the following chart to determine the obtainable seat-to-floor height and seat angle combina-
tions for 24-inch rear wheels and 8-inch front casters:
SEAT-TO-FLOOR SEAT ANGLE
HEIGHT OF WITH A OF FIGURE
19-1/2-inches 3
o
Refer to FIGURE 1
19-1/2-inches *6
o
Refer to FIGURE 2
18-1/2-inches 0
o
Refer to FIGURE 3
18-1/2-inches 3
o
Refer to FIGURE 4
18-1/2-inches *6
o
Refer to FIGURE 5
17-1/2-inches 0
o
Refer to FIGURE 6
17-1/2-inches 3
o
Refer to FIGURE 7
AXLE MOUNTING BRACKET CASTER HEADTUBE FRONT CASTER CAM POSITION
FORWARD REARWARD
(STANDARD) (AMPUTEE) LEADING TRAILING
Notch
FIGURE 1 - SEAT-TO-FLOOR HEIGHT OF 19-1/2-INCHES AND A SEAT ANGLE OF 3
0
FIGURE 2 - SEAT-TO-FLOOR HEIGHT OF 19-1/2-INCHES AND A SEAT ANGLE OF 6
0
Notch
FIGURE 3 - SEAT-TO-FLOOR HEIGHT OF 18-1/2-INCHES AND A SEAT ANGLE OF 0
0
PROCEDURE 6 PATRIOT
P
A
T
R
I
O
T
AXLE MOUNTING BRACKET CASTER HEADTUBE FRONT CASTER CAM POSITION
FORWARD REARWARD
(STANDARD) (AMPUTEE) LEADING TRAILING
AXLE MOUNTING BRACKET CASTER HEADTUBE FRONT CASTER CAM POSITION
FORWARD REARWARD
(STANDARD) (AMPUTEE) LEADING TRAILING
Notch
La page est en cours de chargement...
La page est en cours de chargement...
La page est en cours de chargement...
La page est en cours de chargement...
La page est en cours de chargement...
La page est en cours de chargement...
La page est en cours de chargement...
La page est en cours de chargement...
La page est en cours de chargement...
La page est en cours de chargement...
La page est en cours de chargement...
La page est en cours de chargement...
La page est en cours de chargement...
La page est en cours de chargement...
La page est en cours de chargement...
La page est en cours de chargement...
La page est en cours de chargement...
La page est en cours de chargement...
La page est en cours de chargement...
La page est en cours de chargement...
La page est en cours de chargement...
La page est en cours de chargement...
La page est en cours de chargement...
La page est en cours de chargement...
La page est en cours de chargement...
La page est en cours de chargement...
La page est en cours de chargement...
La page est en cours de chargement...
La page est en cours de chargement...
La page est en cours de chargement...
La page est en cours de chargement...
La page est en cours de chargement...
La page est en cours de chargement...
La page est en cours de chargement...
La page est en cours de chargement...
La page est en cours de chargement...
La page est en cours de chargement...
La page est en cours de chargement...
La page est en cours de chargement...
La page est en cours de chargement...
La page est en cours de chargement...
La page est en cours de chargement...
La page est en cours de chargement...
La page est en cours de chargement...
La page est en cours de chargement...
La page est en cours de chargement...
La page est en cours de chargement...
La page est en cours de chargement...
La page est en cours de chargement...
La page est en cours de chargement...
La page est en cours de chargement...
La page est en cours de chargement...
-
 1
1
-
 2
2
-
 3
3
-
 4
4
-
 5
5
-
 6
6
-
 7
7
-
 8
8
-
 9
9
-
 10
10
-
 11
11
-
 12
12
-
 13
13
-
 14
14
-
 15
15
-
 16
16
-
 17
17
-
 18
18
-
 19
19
-
 20
20
-
 21
21
-
 22
22
-
 23
23
-
 24
24
-
 25
25
-
 26
26
-
 27
27
-
 28
28
-
 29
29
-
 30
30
-
 31
31
-
 32
32
-
 33
33
-
 34
34
-
 35
35
-
 36
36
-
 37
37
-
 38
38
-
 39
39
-
 40
40
-
 41
41
-
 42
42
-
 43
43
-
 44
44
-
 45
45
-
 46
46
-
 47
47
-
 48
48
-
 49
49
-
 50
50
-
 51
51
-
 52
52
-
 53
53
-
 54
54
-
 55
55
-
 56
56
-
 57
57
-
 58
58
-
 59
59
-
 60
60
-
 61
61
-
 62
62
-
 63
63
-
 64
64
-
 65
65
-
 66
66
-
 67
67
-
 68
68
-
 69
69
-
 70
70
-
 71
71
-
 72
72


Invacare Patriot SL Manuel utilisateur
- Taper
- Manuel utilisateur
- Ce manuel convient également à
dans d''autres langues
- English: Invacare Patriot SL User manual
Documents connexes
-
Invacare Patriot Owner's Operator And Maintenance Manual
-
-
-
-
-
-
-
-