La page est en cours de chargement...

Légende des icônes.......................4
Avertissements et Notifi cations......5
Assemblage du poteau...................6
Assemblage du poteau à la base...11
Assemblage du tableau à
l’anneau...................................15
Identifi cateur de pièces...............i-iv
Assemblage fi nal.........................19
Entretien..............................24
Autocollant d’avertissement.........25
Enregistrement.....................28
Garantie...............................30
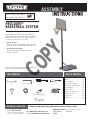
INSTRUCTIONS
D’ASSEMBLAGE
SYSTÈME DE BASKET-BALL
PROCOURT
®
For English, see page 1.
Para el español, ver la página 3.
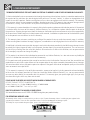
Les systèmes de basket-ball Lifetime
®
sont conçus
pour être solides et durables. Nous nous efforçons
de rendre l’assemblage aussi facile que possible
sans compromettre la qualité. Si vous êtes coincé,
nous avons les outils nécessaires pour vous aider :
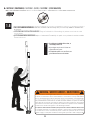
• Préparez le coin
Avant de commencer, déterminez comment vous
souhaitez remplir la base (nous recommendons
le sable, voyez la page 21).
• Rassemblez vos amis et votre famille
L’assemblage devrait prendre 2 adultes à peut
près 2 – 3 heures pour achever.
Guarde estas instrucciones en el caso que tenga que
contactar el fabricante para piezas de reemplazo.
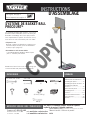
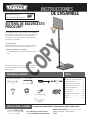
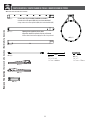
OUTILS REQUIS
SOMMAIRE
Nos experts d’assemblage Lifetime
®
offrent des réponses
rapides et de service à la clientèle supérieure.
NÉCESSITEZ-VOUS DE L’AIDE ? PARLEZ-NOUS !
Composez le 1-800-225-3865
Du lundi au vendredi 7 h – 17 h (HNR)
et samedi 9 h – 13 h (HNR)
web: www.lifetime.com/instructions
tchat: www.lifetime.com/instructions
MODÉLE ET RÉFÉRENCE DU PRODUIT (vous aurez besoin des deux lorsque vous nous contactez)
Número de modèle : Référence du produit :
90690
(2)
(1)
(1)
(1) (1)
(2, inclus)
(319 lb)/(145 kg)
1/2” (13 mm), 7/16” (11 mm) 3/16” (5 mm)
3/8” (1)
(1)
COPY
La page est en cours de chargement...

4
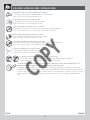
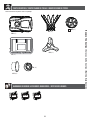
• Indicates the parts to be used for a section.
• Ceci indique les pièces requises pour une section.
• Indica las piezas requeridas para una sección.
• Indicates special heed should be taken when reading.
• Ceci indique que vous devez faire attention à ce que vous lisez.
• Indica que uno debe prestar atención al leer.
• Indicates the hardware to be used for a section.
• Ceci indique la quincaillerie requise pour une section.
• Indica el herraje requerido para una sección.
• Indicates the tools to be used for a section.
• Ceci indique les outils requis pour une section.
• Indica el instrumental requerido para una sección.
• Indicates no hardware required for a specifi c page.
• Ceci indique qu’il n’y a pas de quincaillerie requise pour une page particulière.
• Indica que ningún herraje es requerido para una página específi ca.
• Indicates no parts required for a specifi c section.
• Ceci indique qu’il n’y a pas de pièces requises pour une section particulière.
• Indica que ninguna pieza es requerida para una sección específi ca.
• Indicates to use/not to use an electric drill for a specifi c step.
• Ceci indique utiliser/n’utiliser pas de perceuse électrique pour une étape particulière.
• Indica usar/no usar un taladro eléctrico para un paso específi co.
ICON LEGEND / LÉGENDE DES ICÔNES / LEYENDA DE ÍCONOS
• Indicates the use of a centerlock nut. A nut with this marking will require some effort to tighten. This
hardware was designed with this feature in order to prevent loosening later.
• Cet image indique l’usage d’un écrou de blocage central. Un écrou avec ce marquage requerra plus
d’effort pour le serrer. Cet écrou a été conçu avec cette fonction afi n d’empêcher son desserrage plus tard.
• Indica el uso de una tuerca de bloque central. Una tuerca con esta marca requerirá un poco de esfuerzo
para apretarlo. Esta tuerca fue diseñado con esta característica con el fi n de evitar su afl ojamiento más
tarde.
1170970
01/04/2016
COPY

55
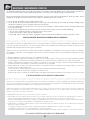
WARNINGS & NOTICES / ADVERTENCIAS Y AVISOS / AVERTISSEMENTS ET AVIS
English:
• Failure to follow these warnings may result in serious injury or property damage and will void warranty.
• To ensure safety, do not attempt to assemble this product without following the instructions carefully.
• Be aware that parts can be damaged by overtightening the screws.
• Three capable adults are required for assembly.
• All who participate in the assembly process should wear safety glasses throughout the assembly.
• If using a ladder during assembly, use extreme caution.
• Proper and complete assembly are essential to reduce the risk of accident or injury.
• Most injuries are caused by misuse and/or not following instructions. Use caution when using this product.
Le français :
• Le non-respect de ces avertissements peut entraîner en conséquence des blessures sérieuses ou dommages à la propriété et annulera la
garantie.
• Pour assurer votre sécurité, ne tentez pas d’assembler ce produit sans suivre attentivement les instructions.
• Il est possible d’endommager les pièces en serrant les vis excessivement.
• Trois adultes capables sont requis pour assembler ce produit.
• Toutes les personnes qui participent à l’assemblage doivent porter des lunettes de sécurité tout le long de l’assemblage.
• Si vous utilisez une échelle pendant l’assemblage, utilisez-la avec prudence.
• L’assemblage correct et complet est essentiel pour réduire le risque des dangers ou des blessures.
• La plupart des blessures sont causées par l’abus et/ou par le non-respect des instructions. Faites attention lorsque vous utilisez ce
produit.
El español:
• El incumplimiento de seguir estas advertencias puede resultar en lesiones graves o daño a la propiedad y anulará la garantía.
• Para asegurar la seguridad, no intente armar este producto sin seguir detenidamente las instrucciones.
• Es posible endañar las piezas por apretar demasiado los tornillos.
• Tres adultos competentes son requeridos para ensamblar el sistema.
• Todas las personas que participan en el ensamble deben llevar gafas de segurdad a lo largo del ensamble.
• Si utiliza una escalera durante el ensamble, tenga cuidado extremo.
• El ensamble propio y completo son esenciales para reducir el riesgo de accidentes y lesiones.
• La mayoría de las lesiones son causadas por el uso erróneo y/o el incumplimiento de seguir las instrucciones. Tenga cuidado al usar este
producto.
5

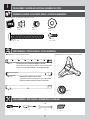
6
POLE ASSEMBLY / ASSEMBLAGE DU POTEAU / ENSAMBLE DEL POSTE
1
BCO
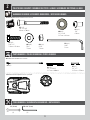
Metal Parts / Pièces en métal / Piezas de metal
Hardware Bag / Sac des accessoires / Bolsa de accesorios
TOOLS REQUIRED / OUTILS REQUIS / HERRAMIENTAS REQUERIDAS
PARTS REQUIRED / PIÈCES REQUISES / PIEZAS REQUERIDAS
HARDWARE REQUIRED / ACCESSOIRES REQUIS / ACCESORIOS REQUERIDOS
(1)
1/2”
(1)
(1)
ALH (x1)
ALF (x1)
ALE (x1)
• Warning Sticker applied to side not shown
• L’Autocollant d’avertissement apliqué au côté n’est pas illustré
• Etiqueta de advertencia aplicada al lado no está ilustrado
ADS (x1)
1/4” x 3/4”
AAN (x1)
5/16”
AYT (x1)
5/16”
AOL (x2)
5/16” x 3 1/4”
ABD (x1)
5/16”
AYU (x1)
• Do not remove Top Section (ALH) from Middle Section (ALF)
• Ne pas enlever la Section supérieure (ALH) de la Section du milieu (ALF)
• No retire la Sección superior (ALH) de la Sección intermedio (ALF)
CIH (x1)
Plastic Parts / Pièces en plastique / Piezas de plástico
(1)

7
TOOLS AND HARDWARE REQUIRED / OUTILS ET ACCESSOIRES REQUIS / HERRAMIENTAS Y ACCESORIOS REQUERIDOS
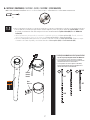
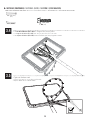
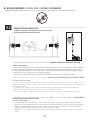
X SECTION 1 (CONTINUED) / SECTION 1 (SUITE) / SECCIÓN 1 (CONTINUACIÓN)
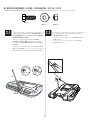
1.1
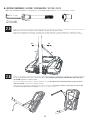
• Use a fl athead screwdriver to pop out the mandrel from the plastic rivet at the top of the Top Pole (ALH). Remove
the plastic rivet from the Pole Assembly and discard. Do not remove the Top Pole Section (ALH) from the Middle Pole
Section (ALF).
• Utilisez un tournevis plat pour retirer le mandrin de l’extrémité supérieure du Poteau supérieur (ALH). Ensuite, enlevez le
rivet du Poteau supérieur et jetez-le. Ne retirez pas le Poteau supérieur (ALH) du Poteau du melieu (ALF).
• Use un destornillador plano para sacar el mandril al extremo superior del Poste superior (ALH). Entonces, saque
el remache del Poste superior y deséchelo. No retire el Poste superior (ALH) del Poste intermedio (ALF).
ALF
ALH
ALF
ALH
ALF
1 2 3
FAUTE DE NE PAS SUIVRE CES AVERTISSEMENTS, VOUS
RISQUEZ DE CAUSER DES BLESSURES GRAVES ET/OU
DES DOMMAGES À L’ÉQUIPEMENT.
SI NO SE OBEDECEN ESTAS ADVERTENCIAS PUEDEN
PRODUCIRSE GRAVES LESIONES Y/O DAÑOS A LA
PROPIEDAD.
Le propriétaire doit s’assurer que tous les joueurs connaissent
HWDSSOLTXHQWOHVUqJOHVVXLYDQWHVD¿QG¶XWLOLVHUO¶pTXLSHPHQWHQ
toute sécurité.
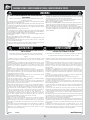
WARNING
(OSURSLHWDULRGHOVLVWHPDGHEHDVHJXUDUVHGHTXHWRGRV
los jugadores conozcan y respeten estas reglas para que el
VLVWHPDVHXVHHQIRUPDVHJXUD
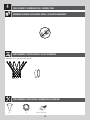
FAILURE TO FOLLOW THESE WARNINGS MAY RESULT IN
SERIOUS INJURY AND/OR PROPERTY DAMAGE.
2ZQHUVPXVWHQVXUHWKDWDOOSOD\HUVNQRZDQGIROORZWKHVH
UXOHVIRUVDIHRSHUDWLRQRIWKHV\VWHP
y2QO\KDQJIURPWKHULPEULHÀ\WRUHJDLQEDODQFH RUDYRLGLQMXULQJ
RWKHUV5HOHDVHWKHULPDVVRRQDVVDIHO\SRVVLEOH
y'XULQJSOD\HVSHFLDOO\ZKHQSHUIRUPLQJGXQNW\SHDFWLYLWLHVNHHS
SOD\HU¶VIDFHDZD\IURPWKHEDFNERDUGULPDQGQHW6HULRXVLQMXU\
FRXOGRFFXULIWHHWKIDFHFRPHLQFRQWDFWZLWKWKHEDFNERDUGULP
RUQHW3OD\HUVKRXOGZHDUDPRXWKJXDUGGXULQJSOD\
y'RQRWVOLGHFOLPERUSOD\RQEDVHRUSROH
y&RPSOHWHO\¿OOEDVH DFFRUGLQJWRPDQXIDFWXUHU¶VLQVWUXFWLRQV
1HYHUOHDYHWKHXQLWVWDQGLQJ LQDQXSULJKWSRVLWLRQZLWKRXW¿UVW
¿OOLQJWKHEDVHZLWKZHLJKWRU WKHV\VWHPZLOOWLSTXLFNO\FDXVLQJ
serious personal injury.
y:KHQDGMXVWLQJKHLJKWRUPRYLQJV\VWHPNHHSKDQGVDQG¿QJHUV
DZD\IURPPRYLQJSDUWV
y'RQRWDOORZFKLOGUHQWRPRYHRUDGMXVWV\VWHP
y'RQRWZHDUMHZHOU\ULQJVZDWFKHVQHFNODFHVHWFGXULQJSOD\
2EMHFWVPD\HQWDQJOHLQQHW
y.HHSRUJDQLFPDWHULDODZD\IURPSROHEDVH*UDVVOLWWHUHWFFRXOG
FDXVHFRUURVLRQDQGRUGHWHULRUDWLRQ
• &XpOJXHVHGHODURVyORHQIRUPDEUHYHSDUDUHFXSHUDUHO
HTXLOLEULRRHYLWDUOHVLRQDUDRWURVMXJDGRUHV6XpOWHVHGHODUROR
PiVSURQWRTXHSXHGDKDFHUORFRQVHJXULGDG
• 'XUDQWH HOMXHJRHVSHFLDOPHQWH DOHPERFDUYLROHQWDPHQWH
GHDOWRODFDUDGHORVMXJDGRUHVGHEHPDQWHQHUVHDOHMDGDGHO
WDEOHURHODUR\ODUHG3XHGHQSURGXFLUVHOHVLRQHVJUDYHVVLORV
GLHQWHVRODF DUDHQWUDQHQFRQW DFWRFRQHOWDEO HURHODURRODUHG
/RVMXJDGRUHVGHEHQXVDUXQSURWHFWRUEXFDOGXUDQWHHOMXHJR
•
1RVHGHVOLFHQRWUHSHQLMXHJXHVREUHODEDVHRHOSRVWH
• /OHQHOD EDVHFRPSOHWDPHQWHVLJXLHQGR ODVLQVWUXFFLRQHVGHO
IDEULFDQWH1XQFDGH MHODXQLGDGHQS RVLFLyQGHXVRVLQ KDEHU
OOHQDGRSUHYLDPHQWHODEDVHFRQPDWHULDOGHFRQWUDSHVRSXHVHO
VLVWHPDSRGUtDWXPEDUVHUiSLGDPHQWH\FDXVDUJUDYHVOHVLRQHV
personales.
• 0DQWHQJDODVPDQRV\ORVGHGRVDOHMDGRVGHODVSLH]DVPRYLEOHV
FXDQGRUHJXOHODDOWXUDRGHVSODFHHOVLVWHPD
• 1RGHMHTXHORVQLxRVUHJXOHQQLGHVSODFHQHOVLVWHPD
• 1RXVHMR\DVDQLOORVUHORMHVFROODUHVRJDUJDQWLOODVHWF
GXUDQWHHOMXHJR(VWRVREMHWRVSXHGHQHQJDQFKDUVHHQODUHG
• /DVXSHU¿FLHGRQGHVHFRORTXHODEDVHGHEHHVWDUOLVD\
GHVSURYLVWDGHSLHGUDVJUDYDXRWURVREMHWRV/DVSHUIRUDFLRQHV
SXHGHQRULJLQDUSpUGLGDV\pVWDVSXHGHQKDF HUTXHHOVLVWHPD
VHWXPEH
• 1RSHUPLWDTXHODEDVHGHOSRVWHHQWUHHQFRQWDFWRFRQ
PDWHULDOHVRUJi QLFRV(O SDVWRORV GHVHFKRVDQLPDOHV HWF
SXHGHQFDXVDUFRUURVLyQ\RGHWHULRURV
• &RQWUROHHOSRVWH\ WRGDVODVSLH]DVPHWiOLFDVXQDYH] DOPHV
HQEXVFDGHVLJQRVYLVLEOHVGHFRUURVLyQR[LGDFLyQSLFDGXUDV
HVFDPDGR(OLPLQHWRGRUDVWURGHy[LGR\YXHOYDDSLQWDUFRQ
HVPDOWHSDUDH[WHULRUHV6LHOy[LGRKDSHQHWUDGRFXDOTXLHUSLH]D
GHDFHURUHHPSODFHHVDSLH]DGHLQPHGLDWR
• ,QVSHFFLRQHHOVLVWHPDDQWHVGHFDGDXVRSDUDYHUL¿FDUTXH
HVWpD GHFXDGD PHQWHFR QWUDSHV DGRTXH ORVHOHP HQWRVG H¿MDFLy Q
QRHVWpQÀRMRVTXHQRKD\DGHVJDVWHH[FHVLYRLQHVWDELOLGDG
QLVLJQRVGHFRUURVLyQ6LHQFXHQWUDLUUHJXODULGDGHVUHSiUHODV
DQWHVGHXVDUHOVLVWHPD
Nunca juegue con un equipo dañado.
• 1RXVHHOVL VWHPDHQSUH VHQFLDGHYL HQWRVIXHU WHVRFRQGLF LRQHV
FOLPiWLFDVDGYHUVDV\DTXHSXHGHWXPEDUVH&RORTXHODXQLGDG
HQVXSRVLFLyQGHDOPDFHQDPLHQWR\RHQXQD]RQDDUHVJXDUGR
del viento, lejos de propiedades personales que puedan dañarse
VLHOVLVWHPDVHFDH\GHOtQHDVGHVXPLQLVWURGHHQHUJtD
• 1RXVHHOVLVWHPDSDUDOHYDQWDUQLQJ~QREMHWR(OPHFDQLVPR
HVWiGLVHxDGRSDUDHOHYDU VRODPHQWHHOSHVRGHOWDEOH URFRQHO
DUR1RFXHOJXHQDGDGHODDJDUUDGHUDHODURHOWDEOHURQLOR
V
EUD]RVGHHO HYDFLyQ\DTXHH VWRSXHGHGDxDU HOVLVWHPD\DQX ODU
ODJDUDQWtD
• Ne vous suspendez pas à l’anneau plus que nécessaire pour
UHWURXYHUYRWUHpTXLOLEUHRX pYLWHUGHEOHVVHUOHV DXWUHVMRXHXUV
5HOkFKH]O¶DQQHDXDXVVLW{WTXHSRVVLEOH
/RUVG¶XQ PDWFKSDUWLFXOLqUHPHQWGDQVOH FDVGHVVPDVKVOH
YLVDJHGXMRXHXUQH GRLWSDVIDLUHIDFHDX SDQQHDXjO¶DQQHDX
QLDX¿OHW/H MRXHXUULVTXHGHJUDYHVEOHVVXUHVVL VHVGHQWVRX
son visage entrent en contact avec le panneau, l’anneau, ou le
¿OHW/HVMRXHXUVGRLYHQWWRXMRXUVSRUWHUXQSURWqJHGHQWVORUVTX¶LOV
jouent.
1HJOLVVH]SDVQHJULPSH]SDVHW QHMRXH]SDVVXUODEDVHRX
le poteau.
5HPSOLVVH] FRPSOqWHPHQWODEDVH VHORQOHV LQVWUXFWLRQVGX
IDEULFDQW1HODLVVH]MDPDLVO¶XQLWpGHERXWGHSOHLQSLHGVDQVDYRLU
G¶DERUGUHPSOLOD EDVHDYHFXQSRLGV RXO¶pTXLSHPHQWSRXUUDLW
EDVFXOHUUDSLGHPHQWHWFDXVHUGHJUDYHVEOHVVXUHV
/RUVTXH YRXVDMXVWH]OD KDXWHXURX ORUVTXHYRXV GpSODFH]
O¶pTXLSHPHQWJDUGH]YRVPDLQVHWGRLJWVORLQGHVSLqFHVPRELOHV
1HSHUPHWWH] SDVDX[ HQIDQWVGH GpSODFHURX G¶DMXVWHU
O¶pTXLSHPHQW
1HSRUWH]SDVGHELMRX[EDJXHVPRQWUHVFROOLHUVHWFORUVTXH
YRXVMRXH]&HVREMHWVSRXUUDLHQWV¶DFFURFKHUDX¿OHW
/DVXUIDFHVXUODTXHOOHHVWSRVpHOD EDVHGRLWrWUHOLVVHHWVDQV
JUDYLHURXWRXWDXWUH REMHWTXLSRXUUDLWWURXHU ODEDVHHQWUDvQDQW
DLQVLXQHIXLWHFHTXLSRXUUDLWIDLUHEDVFXOHUO¶pTXLSHPHQW
/DEDVH QHGRLWSDV QRQSOXVrWUH SRVpHVXUDXFXQ W\SHGH
PDWLqUHRUJDQLTXH/¶KHUEHOHVGpFKHWVHWFSHXYHQWHQWUDvQHUOD
FRUURVLRQHWODGpWpULRUDWLRQGHO¶pTXLSHPHQW
8QHIRLV SDUPRLVYpUL¿H]TXH OH3RWHDXHWWRXWHV OHVSLqFHV
HQPpWDOQHPRQWUHQWSDVGHVLJQHVGHFRUURVLRQURXLOOHSLTUHV
pFDLOODJH(QOHYH] WRXWHOD URXLOOHHW UHSHLJQH]FRPSOqWHPHQW
DYHFXQHSHLQWXUHSRXUH[WpULHXU 6LODURXLOOHDSpQpWUpXQH GHV
SLqFHVHQDFLHUYRXV GHYUH]UHPSODFHULPPpGLDWHPHQWODSLqFH
en question.
$FKDTXHIRLVTXHYRXVDOOH]XWLOLVHUO¶pTXLSHPHQWYpUL¿H]G¶DERUG
O¶pTXLOLEUHODSRVVLELOLWpGHSLqFHVGHVVHUUpHVRXXVpHVODVWDELOLWp
GHO¶pTXLSHPHQWHWWRXWVLJQHGHFRUURVLRQRXUpSDUDWLRQQpFHVVDLUH
avant utilisation.
1HMRXH]MDPDLVDYHFXQpTXLSHPHQWHQGRPPDJp
1¶XWLOLVH] SDVO¶pTXLSHPHQWORUV GHIRUWHVUDIDOHVGH YHQWRX
GH PDXYDLV WHPSV /¶pTXLSHPHQWSRXUUDLW EDVFXOHU3ODFH]
O¶pTXLSHPHQWGDQVXQHQGURLWDEULWpGXYHQWRXORLQGHVVWUXFWXUHV
TX¶LOSRXUUDLWHQGRPPDJHUV¶LOEDVFXODLWHWORLQGHV¿OVpOHFWULTXHV
1¶XWLOLVH]SDV O¶pTXLSHPHQWSRXUOHYHURX VRXOHYHUTXRLTXHFH
VRLW6RQPpFDQLVPH DpWpFRQoX XQLTXHPHQWSRXUVRXWHQLU OH
SRLGVGXSDQQHDXHW GHO¶DQQHDX1¶DFFURFKH]ULHQDX PDQFKH
jO¶DQQHDXDXSDQQHDXQLDX[OHYLHUVVRXV SHLQHG¶HQGRPPDJHU
O¶pTXLSHPHQWHWG¶DQQXOHUODJDUDQWLH
ADVERTENCIA
AVERTISSEMENT
Portable Base - 6.5” x 10”
#FS16400
10/12/2004
www.lifetime.com
y6XUIDFHEHQHDWKWKHEDVHPXVWEHVPRRWKDQGIUHHRI JUDYHORU
RWKHUREMHFWV3XQFWXUHVFDXVHOHDNDJHDQGFRXOGFDXVHV\VWHP
to tip over.
y2QFHDPRQWKFKHFNSROHDQGDOOPHWDOSDUWVIRUVLJQVRIFRUURVLRQ
UXVWSLWWLQJFKLSSLQJ&RPSOHWHO\UHPRYHUXVWDQGUHSDLQWZLWK
H[WHULRUHQDPHO,IUXVWKDVSHQHWUDWHGDQ\VWHHOSDUWUHSODFHWKDW
SDUWLPPHGLDWHO\
y&KHFNV\VWHPEHIRUHHDFKXVHIRUSURSHUEDOODVWORRVHKDUGZDUH
H[FHVVLYHZHDULQVWDELOLW\DQG VLJQVRIFRUURVLRQDQGUHSDLU
EHIRUHXVH
y1HYHUSOD\RQGDPDJHGHTXLSPHQW
y'RQRWXVHV\VWHPGXULQJZLQG\RUVHYHUHZHDWKHU6\VWHPPD\
WLSRYHU3ODFHV\VWHPLQDQDUHDSURWHFWHGIURPWKHZLQGRULQDQ
DUHDDZD\IURPSURSHUW\WKDWPD\EHGDPDJHGLIWKHV\VWHPIDOOV
DQGIURPRYHUKHDGSRZHUOLQHV
y'RQRWXVHWKHV\VWHPWROLIWRUKRLVWDQ\WKLQJ7KHPHFKDQLVPLV
GHVLJQHGWROLIWRQO\WKHZHLJKWRIWKHEDFNERDUGDQGULP'RQRW
KDQJDQ\WKLQJIURPWKHKDQGOHULPEDFNERDUGRU OLIWHUDUPVDV
WKLVZLOOGDPDJHWKHV\VWHPDQGYRLGWKHZDUUDQW\
ALH
• If the Top Pole and Middle Pole become separated, insert the
top of the Top Pole up through the bottom of the Middle Pole.
• Si se séparent les Sections supérieure et du milieu,
insérez l’extrémité supérieure de la Section supérieure dans
l’extrémité inférieure de la Section du milieu.
• Si se separan las Secciones superior e intermedio,
inserte el extremo superior de la Sección superior en el
extremo inferior de la Sección intermedia.
!
(1)
Mandrel
Mandrin
Mandril
Rivet
Remache
ALF

8
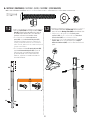
TOOLS AND HARDWARE REQUIRED / OUTILS ET ACCESSOIRES REQUIS / HERRAMIENTAS Y ACCESORIOS REQUERIDOS
X SECTION 1 (CONTINUED) / SECTION 1 (SUITE) / SECCIÓN 1 (CONTINUACIÓN)
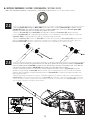
1.2
1/2”
AAN (x1)
AOL (x2)
ABD (x1)
ALH
ALF
AOL
ABD
AAN
• Slide the Top Pole (ALH) far enough out of the Middle
Pole (ALF) so that it does not obstruct the holes at
the bottom of the Middle Pole. Then attach the
hardware indicated in the location shown.
• Tirez l’extrémité de la Section supérieure du
poteau (ALH) de la Section du milieu du poteau (ALF)
suffi samment éloignée pour que n’obstrue pas
de trous à l’extrémité inférieure de la Section du
milieu. Ensuite, attachez les accessoires indiqués à
l’emplacement illustré.
• Tire el extremo de la Sección superior del poste (ALH)
por la Sección intermedia del poste (ALF) apenas lo
sufi ciente para que no obstruya los agujeros
al extremo inferior de la Sección intermedia.
Entonces, sujete los accesorios indicados a la
ubicación illustrada.
1.3
AYT (x1)
ALH
ALF
AYU
AYU
AYT
AOL
• The crimped side of the Top Pole (ALH) must be on the
same side as the Warning Sticker (AMT) on the Middle Pole.
• Vérifi er que le côté gaufré de la Section de poteau
supérieure (ALH) est sur le même côté que l’Autocollant
d’avertissement (AMT) sur la Section du milieu.
• Asegúrese de que el extremo aplanado de la Sección
superior (ALH) quede del mismo lado que la Etiqueta
adhesiva de advertencia (AMT) en la Sección intermedia del
poste.

9
TOOLS AND HARDWARE REQUIRED / OUTILS ET ACCESSOIRES REQUIS / HERRAMIENTAS Y ACCESORIOS REQUERIDOS
X SECTION 1 (CONTINUED) / SECTION 1 (SUITE) / SECCIÓN 1 (CONTINUACIÓN)
1.4
ADS (x1)
CIH
(1)
!
• The Screw should be fl ush with the Pole, and
will spin freely once installed.
• La Vis doit être au ras du Poteau, mais elle
tournera librement une fois installée.
• El Tornillo debe quedar a ras con el Poste,
mas girará libremente una vez esté instalado.
• STOP! Make sure all parts on the Pole assembly are
oriented as shown before continuing to the next
step.
• ARRÊT ! Orientez tous les pièces du Poteau comme
illustré avant de continuer à l’étape suivante.
• ¡PARE! Oriente todas las partes del Poste como se
muestra antes de continuar al próximo paso.
1.5
• Align the hole in the Middle Pole (ALF) with the
slot in the Bottom Pole (ALE). and install the Domed
Countersunk Washer (CIH) with the hardware shown.
• Alignez le trou de la Section de poteau du milieu (ALF)
sur la fente de la Section inférieure (ALE) et glissez
la Section du milieu par-dessus de la Section
inférieure, et installez la Rondelle fraisée (CIH) à l’aide
des accessoires indiqués.
• Alinee el agujero de la Sección intermedia (ALF)
con la ranura de la Sección inferior del poste (ALE) y
deslice la Sección intermedia sobre la Sección
inferior, e instale la Rondana frasada (CIH) usando los
accesorios indicados.
ALE
ADS
ALF
CIH
Warning Sticker
Autocollant d’avertissement
Etiqueta de advertencia
Adjustment Knob
Poignée de réglage
Pomo de ajusto
Cap Nut and Washer
Écrou à chape et rondelle
Tuerca ciega y rondana
Crimped Side of Pole
Côté serti du poteau
Lado crimpado del poste
CIH (x1)

10
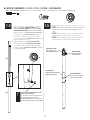
TOOLS AND HARDWARE REQUIRED / OUTILS ET ACCESSOIRES REQUIS / HERRAMIENTAS Y ACCESORIOS REQUERIDOS
X SECTION 1 (CONTINUED) / SECTION 1 (SUITE) / SECCIÓN 1 (CONTINUACIÓN)
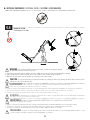
!
• Do not hit your feet with the Pole sections, as
serious injury could occur.
• Ne pas frapper vos pies avec le Poteau sous
risque de blessures graves.
• El Tornillo debe quedar a ras con el Poste, mas
girará libremente una vez esté instalado.
(1)
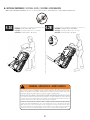
6x
• THIS STEP CANNOT BE REVERSED! Strike the end of the Pole Assembly on a piece of scrap wood or cardboard fi ve
to six times.
• CETTE ÉTAPE NE PEUT PAS ÊTRE INVERSÉE ! Frappez l’extrémité de l’Assemblage de poteau sur un bois de rebut
cinq à six fois.
• ¡ESTE PASO NO PUEDE REVERTIRSE! Golpee el extremo del Ensamblaje de poste en un pedazo de madera o cartón
cinco a seis veces.
1.6
WARNING / AVERTISSEMENT / ADVERTENCIA
The Poles must be seated together! Even if the Poles cover the slots before seating, they must
be struck on a hard surface five to six times! Failure to seat the Poles correctly could allow the
Poles to separate during use, which could lead to serious personal injuries or property damage.
¡Es imperativo asentar las secciones del poste! ¡Aún si las secciones cubren las ranuras antes
de asentarlas, golpéelas en un pedazo de madera o cartón 5 a 6 veces! El incumplimiento
de asentar las secciones correctamente puede ocasionar la separación de las secciones
durante el juego, la cual puede resultar en lesiones graves personales o daño a la propiedad.
Les poteaux doivent s’enclencher les uns dans les autres ! Même si le poteau recouvre la
fente avant de s’enclencher, vous devez les frapper sur un morceau de bois cinq à six fois!
Un mauvais enclenchement des poteaux peut entraîner leur séparation lors de l’utilisation,
pouvant causer des blessures graves et des dommages matériel.
!
!

11
POLE TO BASE ASSEMBLY / ENSAMBLE DEL POSTE A LA BASE / ASSEMBLAGE DU POTEAU A LA BASE
2
BCQ
Metal Part / Pieza de metal / Pièce en métal
Hardware Bag / Bolsa de accesorios / Sac d’accessoires
TOOLS REQUIRED / HERRAMIENTAS REQUERIDAS / OUTILS REQUIS
PARTS REQUIRED / PIEZAS REQUERIDAS / PIÈCES REQUISES
HARDWARE REQUIRED / ACCESORIOS REQUERIDOS / ACCESSOIRES REQUIS
AAE (x2)
5/16” x 1”
7.9mm x 25.4mm
ABN (x2)
1/2” x 1/8”
12.7mm x 3.2mm
DXZ (x1)
1/4” x 2 3/4”
6.4mm x 70mm
BTS (x1)
1/4”
6.4mm
ABD (x4)
5/16”
7.9mm
AAO (x2)
5/16”
7.9mm
EEO (x2)
3/16”
5 mm
ALI
(x2)
AJC (x1)
1/2” x 15 3/4”
12.7mm x 400mm
AJE (x1)
1/2” x 7”
12.7mm x 178mm
AMU (x2)
AJM (x1)
Plastic Parts / Piezas de plástico / Pièces en plastique
(2)
1/2” (13 mm)
15 ”
3/4
7”
EEO-3/16” (5 mm)
(2)

12
TOOLS AND HARDWARE REQUIRED / HERRAMIENTAS Y ACCESORIOS REQUERIDOS / OUTILS ET ACCESSOIRES REQUIS
X SECTION 2 (CONTINUED) / SECCIÓN 2 (CONTINUACIÓN) / SECTION 2 (SUITE)
ALI
AAE
ABD
AJM
ABD
AAO
2.1 2.2
AAE (x2)
ABD (x4)
AAO (x2)
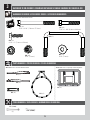
• Attach the fl attened end of a Pole Brace (ALI) to
the Base (AJM) with the hardware shown. Only fi nger
tighten the hardware for now.
• Sujete el extremo aplanado del Tirante del
poste (ALI) a la Base (AJM) usando los accesorios
ilustrados. Sólo apriete a mano los accesorios en este
momento.
• Attachez l’extrémité aplatie d’un Tirant du poteau
(ALI) à la Base (AJM) à l’aide des accessoires illustrés.
Ne serrez les accessoires qu’à la main en ce moment.
• Repeat the last step to attach the remaining
Pole Brace (ALI) as shown.
• Repita este paso para sujetar el Tirante del poste
(ALI) restante.
• Répétez cette étape pour attacher le Tirant du
poteau (ALI) restant.

13
TOOLS AND HARDWARE REQUIRED / HERRAMIENTAS Y ACCESORIOS REQUERIDOS / OUTILS ET ACCESSOIRES REQUIS
X SECTION 2 (CONTINUED) / SECCIÓN 2 (CONTINUACIÓN) / SECTION 2 (SUITE)
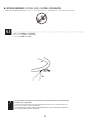
• Slide the Large Axle (AJC) through the Wheels (AMU) and the holes at the end of the Bottom Pole (ALE) as shown. Slide the
Small Axle (AJE) through the second set of holes near the end of the Bottom Pole. Then, slide a 1/2” x 1/8” Spacers (ABN)
onto each end of the Large Axle, and position them against the Wheels.
• Deslice el Eje grande (AJC) por las Ruedas (AMU) y los agujeros al extremo del Poste inferior (ALE) como se muestra.
Deslice el Eje pequeño (AJE) por el segundo juego de agujeros cerca el extremo del Poste inferior. Entonces, deslice los
Espaciadores (ABN) en cada extremo del Eje grande, y ubíquelos contra las Ruedas.
• Glissez le Grand Essieu (AJC) à travers les Roues (AMU) et les trous dans l’extrémité du Poteau inférieur (ALE) comme illustré.
Glissez le Petit Essieu (AJC) à travers le deuxième jeu de trous près l’extrémité du Poteau inférieur. Ensuite, glissez les
Pièces d’écartement (ABN) sur chaque extrémité de le Grand essieu, et positionnez-les contre les Roues.
2.3
AMU
ALE
ALE
AMU
AJE
ABN
ABN
AJC
AJC
ABN (x2)
AJC
AJM
AJE
• Place the Pole assembly on the ground with the Hex Knob on the Middle Pole facing upward. Position the Large Axle (AJC)
under the bottom slots of the Base (AJM) as shown, and step onto the Base so the Axle snaps into the slots. Then, rotate the
Pole assembly upward so that the Small Axle (AJE) snaps into the upper slots of the Base as shown.
• Coloque el Conjunto del poste en el suelo con el Pomo hexagonal hacia arriba. Ubique el Eje grande (AJC) debajo las
ranuras en la parte inferior de la Base (AJM) como se muestra, y pise en la Base para que el Eje se sienta en las ranuras.
Entonces, rote el Ensamblaje del poste para arriba para que el Eje pequeño (AJE) se sienta en las ranuras superiores de la
Base como se muestra.
• Mettez l’Assemblage du poteau sur le sol avec le Bouton hexagonal sur le Poteau du milieu vers le haut. Positionnez le
Grand Essieu (AJC) en dessous les fentes inférieures de la Base (AJM) comme illustré, et marchez sur la Base pour que l’Essieu
s’enclenche dans les fentes. Ensuite, tournez l’Assemblage du poteau vers le haut pour que le Petit Essieu (AJE) s’enclenche
dans les fentes supérieures de la Base comme illustré.
2.4

14
TOOLS AND HARDWARE REQUIRED / HERRAMIENTAS Y ACCESORIOS REQUERIDOS / OUTILS ET ACCESSOIRES REQUIS
X SECTION 2 (CONTINUED) / SECCIÓN 2 (CONTINUACIÓN) / SECTION 2 (SUITE)
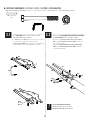
• Tip the system forward and rest the Pole on the ground. Do not stand the system up until it is fi lled with either sand or water later in
the assembly. Tighten the hardware shown.
• Incline el sistema hacia delante y coloque el Poste en el suelo. No ponga vertical el sistema hasta llenarlo con agua o arena más
tarde en el ensamble. Apriete los accesorios indicados.
• Faites basculer le système en avant et posez le Poteau sur la terre. Ne remettez pas debout le système jusqu’à ce qu’il soit rempli
de l’eau ou de sable plus tard dans l’assemblage. Serrez les accessoires indiqués.
2.6
2.5
• Attach the end of the Pole Braces to the Bottom Pole with the hardware shown.
• Sujete los extremos de los Tirantes del poste a la Sección inferior del poste usando los accesorios indicados.
• Attachez les extrémités des Tirants du poteau à la Section inférieur du poteau à l’aide des accessoires indiqués.
BTS DXZ
ALE
ALI
ALI
DXZ (x1)
BTS (x1)
1/2” (13 mm) (x2)
EEO-3/16” (5 mm)

15
BACKBOARD TO RIM ASSEMBLY / ASSEMBLAGE DU TABLEAU À L’ANNEAU / ENSAMBLE DEL TABLERO AL ARO
3
BCR
Metal Parts / Pièces en métal / Piezas de metal
Hardware Bag / Sac d’accessoires / Bolsa de accesorios
TOOLS REQUIRED / OUTILS REQUIS / HERRAMIENTAS REQUERIDAS
PARTS REQUIRED / PIÈCES REQUISES / PIEZAS REQUERIDAS
HARDWARE REQUIRED / ACCESSOIRES REQUIS / ACCESORIOS REQUERIDOS
AJJ (x1)
AJK (x1)
AJI (x1)
AOX (x1)
(2)
1/2” (13 mm)
APG (x2)
5/16” x 3 1/4” (7.9mm x 57.2mm)
AAC (x2)
5/16” x 1 3/4” (6.4mm x 69.9mm)
ABK (x4)
5/16” (7.9mm)
ADQ (x2)
5/16” x 1” (7.9mm x 25.4mm)
ABD (x4)
5/16” (7.9mm)
Plastic Parts / Pièces en plastique / Piezas de plástico
APK (x1)
APN (x2)
ALX (x1)
3/8” (10 mm)

16
X SECTION 3 (CONTINUED) / SECTION 3 (SUITE) / SECCIÓN 3 (CONTINUACIÓN)
TOOLS AND HARDWARE REQUIRED / OUTILS ET ACCESSOIRES REQUIS / HERRAMIENTAS Y ACCESORIOS REQUERIDOS
3.1 3.2
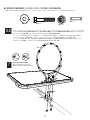
• Secure the Left and Right Backboard Brackets (AJJ & AJK) to
the Top Pole (ALH) with the hardware shown.
• Attachez les Supports du tableau droit et gauche (AJJ et
AJK) à la Section supérieure du poteau (ALH) à l’aide des
accessoires indiqués.
• Sujete los Soportes del tablero derecho e izquierdo (AJJ
y AJK) a la Sección superior del poste (ALH) usando los
accesorios indicados.
1/2” (13 mm)
(x2)
APK
AJJ
AJK
Notch
Encoche
Muesca
APK (x1)
APG (x2)
• The U-Bolt (APK) must rest in the notches of the
Backboard Brackets as shown.
• Le Boulon en « U » (APK) doit rester dans les encoches
des Supports du Tableau comme illustré.
• El Perno en «U» (APK) debe quedarse en las muescas
de los Soportes del Tablero como se muestra.
APN (x2)
APG
APG
APN
APN
AJJ
AJK
ALH
!
• Do not overtighten the hardware.
• Ne pas trop serrer les accessoires.
• No apriete demasiado los accesorios.

i
This page intentionally left blank
Esta página ha sido dejada en blanco intencionalmente
Cette page est intentionnellement laissée en blanc
Remove This Section / Enlevez Cette Section / Reitire Esta Sección
PARTS IDENTIFIER / IDENTIFICADOR DE PIEZAS / IDENTIFICATEUR DE PIÈCES

ii
PARTS IDENTIFIER / IDENTIFICADOR DE PIEZAS / IDENTIFICATEUR DE PIÈCES
Metal Part / Pieza de metal / Pièce en métal
Remove This Section / Enlevez Cette Section / Reitire Esta Sección
ALH (x1)
ALF (x1)
ALE (x1)
ALI (x2)
AJC (x1)
1/2” x 15 3/4”
12.7mm x 400mm
AJE (x1)
1/2” x 7”
12.7mm x 178mm
15 ”
3/4
7”
AJJ (x1)
AJK (x1)
AOX (x1)
ALX (x1)
• Warning Sticker applied to side not shown
• Etiqueta de advertencia aplicada al lado no está ilustrado
• L’Autocollant d’avertissement apliqué au côté n’est pas illustré
• Do not remove Top Section (ALH) from Middle Section (ALF)
• No retire la Sección superior (ALH) de la Sección intermedio (ALF)
• Ne pas enlever la Section supérieure (ALH) de la Section du milieu (ALF)

iii
PARTS IDENTIFIER / IDENTIFICADOR DE PIEZAS / IDENTIFICATEUR DE PIÈCES
HARDWARE REQUIRED / ACCESORIOS REQUERIDOS / ACCESSOIRES REQUIS
Plastic Parts/ Piezas de plástico / Pièces en plastique
Remove This Section / Enlevez Cette Section / Reitire Esta Sección
AJI (x1)
AKZ (x1)
AJM (x1)
AMU (x2)
AEF (x2)
BCO BCQ BCR
AYU (x1)
CIH (x1)

iv
This page intentionally left blank
Esta página ha sido dejada en blanco intencionalmente
Cette page est intentionnellement laissée en blanc
Remove This Section / Enlevez Cette Section / Reitire Esta Sección
PARTS IDENTIFIER / IDENTIFICADOR DE PIEZAS / IDENTIFICATEUR DE PIÈCES

17
TOOLS AND HARDWARE REQUIRED / OUTILS ET ACCESSOIRES REQUIS / HERRAMIENTAS Y ACCESORIOS REQUERIDOS
X SECTION 3 (CONTINUED) / SECTION 3 (SUITE) / SECCIÓN 3 (CONTINUACIÓN)
ABK (x4)
AAC (x2)
ABD (x4)
3.3
• Insert two 5/16” x 2 1/4” Tap Bolts (ABI) with the 5/16” Washers (ABD) and the 7/16” Rubber Washers (ABF) through the bottom holes
in the back of the Rim (ALX), and secure the hardware with two 5/16” Hex T-Nuts (AAJ).
• Inséréz deux Boulons de 5/16” x 2 1/4” (ABI) avec des Rondelles de 5/16” (ABD) et des Rondelles en caoutchouc de 7/16” (ABF) à
travers les trous dans l’Anneau (ALX), et attachez-les bien à l’aide de deux Écrous hexagonaux en « T » de 5/16” (AAJ).
• Inserte dos Pernos de 5/16” x 2 1/4” (ABI) con Rondanas de 5/16” (ABD) y las Rondanas de goma de 7/16” (ABF) por los agujeros
inferiores en el Aro (ALX), y sujételos con dos Tuercas hexagonales en «T» de 5/16” (AAJ).
AOX (x1)
AAC
AAC
ABK
ABK
ABD
ABK
ABK
APK
AJI
ALX
ABD
AOX
• Finger-tighten this hardware.
• Serrez à la main ces accessoires.
• Apriete sólo a mano estos accesorios.
!

18
X SECTION 3 (CONTINUED) / SECTION 3 (SUITE) / SECCIÓN 3 (CONTINUACIÓN)
TOOLS AND HARDWARE REQUIRED / OUTILS ET ACCESSOIRES REQUIS / HERRAMIENTAS Y ACCESORIOS REQUERIDOS
• Tighten all hardware now.
• Serrez bien tous les accessoires maintenant.
• Apriete todos los accesorios ahora.
3.4
• The Backboard Brackets (AJJ & AJK) are designed to be bent by hand.
• Les Supports du tableau (AJJ & AJK) sont conçus pour être pliés à la main.
• Los Soportes del tablero (AJJ & AJK) fueron diseñados por estar plegados a mano.
3.5
ADQ (x2)
1/2” (13 mm)
(x2)
ADQ
ADQ
3/8” (10 mm)
La page est en cours de chargement...
La page est en cours de chargement...
La page est en cours de chargement...
La page est en cours de chargement...
La page est en cours de chargement...
La page est en cours de chargement...
La page est en cours de chargement...
La page est en cours de chargement...
La page est en cours de chargement...
La page est en cours de chargement...
La page est en cours de chargement...
La page est en cours de chargement...
La page est en cours de chargement...
La page est en cours de chargement...
-
 1
1
-
 2
2
-
 3
3
-
 4
4
-
 5
5
-
 6
6
-
 7
7
-
 8
8
-
 9
9
-
 10
10
-
 11
11
-
 12
12
-
 13
13
-
 14
14
-
 15
15
-
 16
16
-
 17
17
-
 18
18
-
 19
19
-
 20
20
-
 21
21
-
 22
22
-
 23
23
-
 24
24
-
 25
25
-
 26
26
-
 27
27
-
 28
28
-
 29
29
-
 30
30
-
 31
31
-
 32
32
-
 33
33
-
 34
34
-
 35
35
-
 36
36


dans d''autres langues
Documents connexes
-
Lifetime 90114 Le manuel du propriétaire
-
-
-
-
-
-
-
Lifetime 90824 Le manuel du propriétaire
-
-