SNOWBEAR 324-223 Manuel utilisateur
- Catégorie
- Épandeur
- Taper
- Manuel utilisateur

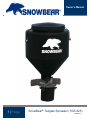
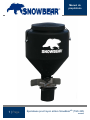
Owner’s Manual
1 | Page
SnowBear
®
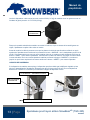
Tailgate Spreader (TGS-325)
Revision 2

Owner’s Manual
2 | Page
SnowBear
®
Tailgate Spreader (TGS-325)
Revision 2
Table of Contents
General Safety Precautions ................................................................................................................... 3
Personal Safety ...................................................................................................................................... 4
Fire and Explosion ................................................................................................................................. 4
Ventilation .............................................................................................................................................. 4
Cell Phones ............................................................................................................................................ 4
Spreader Parts List ................................................................................................................................ 5
Assembly tool list ................................................................................................................................... 6
SnowBear
®
Wireless Remote System .................................................................................................... 7
Spreader Installation .............................................................................................................................. 8
OVERVIEW: ................................................................................................................................. 8
INSTALLATION: ........................................................................................................................... 8
General Maintenance ........................................................................................................................... 13
Tailgate Spreader Troubleshooting ...................................................................................................... 14
SnowBear
®
Warranty Information ....................................................................................................... 15

Owner’s Manual
3 | Page
SnowBear
®
Tailgate Spreader (TGS-325)
Revision 2
General Safety Precautions
READ THE OWNER’S MANUAL CAREFULLY. Know your tailgate spreader. Learn its
applications and limitations. Improper installation and operation could cause personal injury
and/or equipment and property damage.
KEEP AWAY FROM CHILDREN AND PETS. Be sure bystanders, especially children and
pets are kept a safe distance from the tailgate spreader operating area.
DO NOT ABUSE THE SPREADER. Follow the guidelines set forth in this manual. Do not
force the tailgate spreader to do a job it was not designed for.
MAINTAIN THE SPREADER. Keep the spreader clean when the unit is not in use to avoid
corrosion and/or seizing of parts. Before servicing/working on the spreader, disconnect
power cord, secure all loose-fitting clothing, unrestrained long hair and wait for auger and
spinner to stop. Do not operate a spreader in need of maintenance.
INSPECT THE SPREADER BEFORE EACH USE. Check the alignment of all moving
parts, and check for any loose bolts that may affect the operation of the spreader system.
Before operating spreader, reassemble any parts or hardware removed for cleaning or
adjusting.
NEVER SIT IN, CLIMB OR RIDE ON THE SPREADER. Serious injury could occur.
ONLY USE SNOWBEAR
®
CERTIFIED PARTS AND ACCESSORIES. Consult the owner’s
manual for the recommended accessories and/or replacement parts. The use of improper
accessories and/or replacement parts may cause hazards and void applicable warranties.
ALWAYS VERIFY THAT THE HITCH PIN IS PROPERLY INSTALLED BEFORE MOVING.
If the spreader is incorrectly attached to the vehicle's receiver, the spreader could fall off
from the vehicle potentially harming bystanders and damaging your SnowBear
®
product, or
vehicle.
NEVER OVERLOAD YOUR VEHICLE OR SPREADER. Overloading could result in an
accident or damage. Do not exceed GVWR or GAWR ratings as found on the driver-side
door side or corner post of the vehicle. See Loading Section to determine maximum
volumes of spreading material.
DO NOT LEAVE UNUSED MATERIAL IN SPREADER HOPPER. Material can freeze
and/or solidify, causing unit to not work properly. Empty and clean after each use whenever
possible.

Owner’s Manual
4 | Page
SnowBear
®
Tailgate Spreader (TGS-325)
Revision 2
Personal Safety
Remove ignition key and put the vehicle in park or in gear to prevent others from starting
the vehicle during installation or service.
Wear only snug-fitting clothing while working on your vehicle or spreader. Do not wear
dangling jewelry or neckties and secure long hair.
Wear safety glasses to protect your eyes from dust, dirt & debris from the spreader,
especially when in operation and close to spreader. Material is spread at significant velocity.
Fire and Explosion
GASOLINE IS HIGHLY FLAMMABLE, VAPOURS ARE EXPLOSIVE. Never smoke while
working on vehicle. Keep all open flames and sources of ignition away from gasoline tank,
lines and containers. Wipe up any spilled gasoline immediately. Do not use gasoline to
clean parts. Store gasoline only in approved containers away from sources of heat or flame.
Ventilation
VEHICLE EXHAUST CONTAINS LETHAL FUMES. Breathing these fumes, even in low
concentrations, can cause illness or death. Never operate a vehicle or leave engine running
while performing spreader maintenance in an enclosed area without venting the exhaust to
the outside.
Cell Phones
A driver's first responsibility is the safe operation of the vehicle. The most important thing
you can do to prevent a crash is to avoid distractions and pay attention to the road. Wait
until it is safe to operate Mobile Communication Devices such as cell phones, text
messaging devices, pagers or two-way radios (ie. when vehicle is parked).

Owner’s Manual
5 | Page
SnowBear
®
Tailgate Spreader (TGS-325)
Revision 2
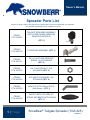
Spreader Parts List
Before you begin, please verify that all of the parts below have been included with your spreader.
Your spreader is packaged nearly complete in one box.
ITEM #1
PT # 324-223
TAILGATE SPREADER ASSEMBLY
(WITH 2 PRE-PAIRED WIRELESS
REMOTE CONTROLS)
(QTY 1)
ITEM #2
PT # 298-178
2" RECEIVER ASSEMBLY (QTY 1)
ITEM #3
PT # 250-761
5/8-11 X 3.50” HEX HEAD CAP
SCREW, 18-8 STAINLESS
(QTY 2)
ITEM #4
PT # 253-255
5/8-11 NYLOCK NUT, 18-8
STAINLESS (QTY 2)
ITEM #5
PT # 254-018
5/8” SAE FLAT WASHER, 18-8
STAINLESS (QTY 4)
ITEM #6
PT # 263-320
Ø5/8"x4.0" HITCH PIN w/ R-CLIP
(Not Shown) (QTY 1)
ITEM #7
PT # 324-239
RIGID PLASTIC LID ASSY KIT
(STRAP AND BRKTS NOT SHOWN)
(QTY 1)

Owner’s Manual
6 | Page
SnowBear
®
Tailgate Spreader (TGS-325)
Revision 2
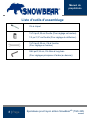
Assembly tool list
Ratcheting Wrench
15/16" Socket (For Height Adjustment),
1/2" Socket (For Deflector Adjustment)
15/16"Open Ended Wrench (For Height Adjustment)
9/64" Long Shank Allen Key wrench
(For Main Shaft Adjustment (if required))

7
7
| Pa
g
Sn
o
The Snow
B
follow this i
n
When the
v
'ON' button
must be pr
e
pressed.
The spread
spreader u
n
perform an
y
specific re
m
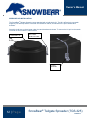
Spreade
r
Indic
a
Key Fob
g
e
o
wB
e
B
ear
®
Tailgat
e
n
struction co
u
v
ehicle has b
e
on the sup
p
e
ssed to turn
er has been
s
n
it. Both sup
p
y
pairing with
m
otes togeth
e
r
'ON' toggle
a
tor Light
Ring Hasp
Sn
o
e
ar
®
W
e
Spreader
s
u
ld result in t
h
e
en turned o
p
lied key fob
m
the spreade
s
upplied with
p
lied key fob
s
the system.
C
e
r with the pr
o
o
wBea
r
W
irele
s
hould only
b
h
e premature
n, the engin
e
m
ust be pre
s
r off. The In
d
two remote
k
s
are already
C
are has be
e
o
perly paired
r
®
Tail
g
ss R
e
b
e operated
w
failure of yo
u
e
is running,
a
s
sed to turn
s
d
icator Light
w
k
ey fobs, and
paired speci
f
e
n taken whe
n
receiver.
g
ate S
p
e
mot
e
w
hen the ve
h
u
r vehicles b
a
a
nd the hea
d
s
preader unit
w
ill flash eac
h
one remote
r
f
ically to the r
n
packaging
t
O
p
reade
r
e
Sys
h
icle is runni
n
a
ttery.
d
lights turned
on. The Re
h
time one o
f
r
eceiver, fact
o
eceiver, so t
h
t
he spreader
S
O
wner’s
r
(TGS
R
e
tem
n
g. Failure
t
on, the Gre
e
d 'OFF' butt
o
f
the buttons
o
ry installed i
h
ere is no ne
e
unit to keep t
S
preader 'O
F
Manual
-325)
e
vision 2
t
o
e
n
o
n
is
n the
e
d to
he
F
F' toggle

Owner’s Manual
8 | Page
SnowBear
®
Tailgate Spreader (TGS-325)
Revision 2
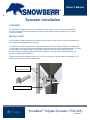
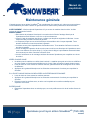
Spreader Installation
OVERVIEW:
The SnowBear
®
Tailgate Spreader uses a standard 2" trailer receiver on your vehicle, and standard 4-
pin trailer connector for the electrical harness. Each of these must be already installed on your vehicle
to use the spreader.
INSTALLATION:
The SnowBear
®
Tailgate Spreader comes factory pre-assembled, except for the 2" Receiver Assembly and
associated mounting hardware (all included).
To install the 2" Receiver Assembly to the Spreader Assembly, select the optimal height for your application.
The Spreader has several vertical mounting height positions that will move the Spreader assembly up or down
2.5" per position. This optimal height will vary with the height of the vehicle's hitch, and the desired
maximum/minimum material spread desired for the application. The higher the Spreader assembly, the
greater the material spread diameter.
Testing was performed at approximately 1 1/2' (18") from the ground to spinner plate of the Spreader. This
yielded an approximate 25-30' spread diameter.
VERTICAL HEIGHT
POSITIONS (2
5"/EA)
2” RECEIVER ASSEMBLY

9
9
| Pa
g
INSTALL
5
AND WAS
H
ASSEMBL
Y
NUT ON V
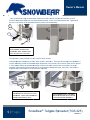
Once you
r
Receiver A
s
there is no
The spread
Hold the s
p
receiver as
s
2” from an
o
assembly’s
supplied r-
c
INST
A
REC
E
REC
E
DEP
T
HITCH P
I
4
5
2
g
e
5
/8-11x3.50” H
E
H
ER ON REC
E
Y
SIDE. WAS
H
ERTICAL PO
S
r
desired hei
g
s
sembly bra
c
movement o
f
er is ready t
o
p
reader asse
m
s
embly to all
o
o
ther. When t
h
holes aligns
c
lip in the hit
c
A
LL SPREAD
E
E
IVER INTO V
E
E
IVER. ALIGN
T
H ADJUSTM
E
R-CLIP
I
N
6
Sn
o
E
X BOLT
E
IVER
H
ER AND
S
T SIDE.
g
ht is determi
n
c
ket side, and
f
the spreade
r
o
install into y
o
m
bly up to th
e
o
w for horizo
n
h
e spreader
a
with the hitc
h
c
h pin hole to
E
R ASSEMBL
Y
E
HICLE'S 2” H
ONE HORIZ
O
E
NT HOLE.
3
o
wBea
r
n
ed, install t
h
install wash
e
r
assembly o
n
o
ur vehicle's
e
2” hitch rec
e
n
tal depth adj
a
ssembly is s
h
receiver, an
secure the a
s
Y
2”
ITCH
O
NTAL
r
®
Tail
g
h
e two 5/8-11
x
e
r and 5/8-11
n
the receive
r
hitch receive
r
e
iver, and sli
d
ustment in th
lid into the hi
t
d install the
s
s
sembly.
g
ate S
p
x
3.50” hex b
o
lock nut on
v
r
assembly.
r
.
d
e in. There a
e vehicle’s hi
t
ch receiver,
l
s
upplied hitch
ONCE DE
S
INSTALL
S
R-CLIP T
O
O
p
reade
r
o
lts and wash
v
ertical post
s
re three hole
s
tch receiver.
l
ook to see
w
pin. Insert fu
S
IRED HOLE
I
S
UPPLIED HI
T
O
SECURE AS
O
wner’s
r
(TGS
R
e
ers on the 2”
s
ide. Tighten
u
s
in the spre
a
Each hole is
w
hen one of t
h
lly, and insta
l
I
S ALIGNED,
T
CH PIN AND
SEMBLY.
Manual
-325)
e
vision 2
u
ntil
a
der’s 2”
spaced
h
e
l
l the

Owner’s Manual
10 | Page
SnowBear
®
Tailgate Spreader (TGS-325)
Revision 2
The 4-pin connector can now be plugged into the vehicle's 4-pin socket (if vehicle has a 7 or 9-pin connector,
then a suitable adaptor needs to be purchased). Spreader is now ready to operate.
The SnowBear
®
Tailgate Spreader is now ready to fill with material and be put to use.
4-PIN CONNECTOR
AND HARNESS

Owner’s Manual
11 | Page
SnowBear
®
Tailgate Spreader (TGS-325)
Revision 2
The spreader hopper is designed to hold approximately 250lbs [115kg] of bagged rock salt or ice melt material
(~4 to 5 - 55lb [25kg] bags)
Once desired amount of material is poured in, and the spinner speed is set, the spreader is ready to run.
Before driving the vehicle, make sure vehicle lights are turned on, and make sure the spreader system is
working by pushing the 'ON' button on the remote key fob. If spinning is going, and material is flowing, system
is ready to spread. Push the 'OFF' button to stop the spreader. Begin driving the vehicle, and when you're in
the desired area to spread the material, push the 'ON' button and continue until the required area is covered,
then push 'OFF' to stop spreading.
SPREAD WIDTH
If the material spread is too wide, the dispersion can be narrowed by the adjustable deflector on the spreader
assembly. Loosen the 2 x 5/16" nuts and move the deflector in or out to achieve desired dispersion width.
SPREADER HOPPER
SPREADER
DEFLECTOR
IN - NARROW SPREAD
OUT - WIDE SPREAD

Owner’s Manual
12 | Page
SnowBear
®
Tailgate Spreader (TGS-325)
Revision 2
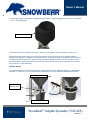
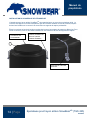
SPREADER LID INSTALLATION
The SnowBear
®
Tailgate Spreader comes standard with a rigid plastic lid. The lid is affixed to the spreader
hopper by two ball-loop stretch cords that are installed on the lid, and latched to the pre-installed catch
brackets.
Stretch the ball-loop cord and snap under the catch bracket and release. To remove the lid, pull on the stretch
cord and out from under the catch bracket.
SPREADER LID
CATCH
BRACKET
BALL-LOOP
STRETCH CORD
7

Owner’s Manual
13 | Page
SnowBear
®
Tailgate Spreader (TGS-325)
Revision 2
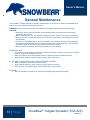
General Maintenance
The SnowBear
®
Tailgate Spreader is generally maintenance free, but there are a few recommendations to
help ensure many seasons of trouble-free operation.
WARNING: Never remove the spreader with material in the hopper. Always empty before removing.
CAUTION:
Disconnect electric power at spreader electrical harness plug connection before servicing or
performing maintenance.
When replacing parts, use only original manufacturer's parts. Failure to do so will void warranty.
Remote receiver is a solid-state electronic unit and is not serviceable. Any attempt to service will
void warranty.
There are no serviceable parts in the motor assembly. Any attempt to service will void warranty.
If pressure washing spreader motor/electrical enclosure area, stay at least 48" [1.2m] away and
avoid direct spray on the openings to avoid excessive water intrusion.
During removal or mounting, securely grip spreader to avoid dropping.
AFTER EACH USE
Do not leave unused material in the hopper. Material can freeze or solidify, causing unit to not work
properly. Empty and clean after each use.
Wash out hopper & rinse off all external surfaces, especially spinner and deflector areas.
Apply dielectric grease on 4-pin connector plugs to prevent corrosion.
AT THE END OF EACH SEASON OR AFTER EXTENDED STORAGE
Wash out hopper & rinse off all external surfaces.
Apply dielectric grease on 4-pin connector plugs to prevent corrosion.
Paint any bare, non-stainless steel, metal surfaces to prevent corrosion.
STORAGE
Store the spreader in a clean, dry location and preferably away from direct sunlight.

Owner’s Manual
14 | Page
SnowBear
®
Tailgate Spreader (TGS-325)
Revision 2
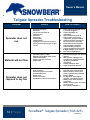
Tailgate Spreader Troubleshooting
PROBLEM CAUSES HOW TO CORRECT
Spreader does not
run
1. Electrical connection
2. Bad motor
3. Loose wire connection to
switch/receiver
4. Corrosion
5. Fuse blown
6. Check battery
7. Jammed auger
8. Headlights on vehicle not turned on
(wiring harness typically part of light
circuit)
1. Check 4-pin plug and make sure it
is securely plugged in
2. Contact distributor for
replacement
3. Open electrical enclosure &
inspect switch and receiver
connections, fix where needed
4. Check all electrical connections
for corrosion, fix if necessary
5. Locate blown fuse and replace
6. Load test battery. Recharge
vehicle's battery if required
7. Unplug spreader and remove jam.
If auger damaged, fix or replace
8. Turn vehicle headlights on
Material will not flow
1. Spreader hopper is empty
2. Material has solidified, stuck to wall,
material obstruction
3. Auger is spinning in reverse
4. Auger broke
1. Refill spreader hopper with desired
material
2. With spreader unplugged, use
screwdriver or rigid rod to break-
up material until proper
consistency
3. Change polarity of motor
4. Auger needs to be replaced
Spreader does not
respond to key fob
1. Plug not secure
2. No vehicle power to connector
3. Key fob battery low
4. Range issue
5. Control connection
6. Headlights on vehicle not turned on
1. Fully seat 4-pin connector plug
2. Ensure vehicle is running and
power is going to plug connector
3. Replace battery
4. Try key fob at close range to
spreader, if unit works, replace
battery. If not, check electrical
connections
5. Remove electrical cover and check
all connections
6. Turn vehicle headlights on

Owner’s Manual
15 | Page
SnowBear
®
Tailgate Spreader (TGS-325)
Revision 2
SnowBear
®
Warranty Information
Please see the latest version of The SnowBear
®
Tailgate Spreader warranty can be found online at:
http://www.snowbear.com/UserContent/documents/
warranty.pdf
Alternatively, please call our customer service hotline
at (800) 337-2327.

Manuel du
propriétaire
1 | Page
Épandeuse pour hayon arrière SnowBear
MD
(TGS-325)
Revision 2

Manuel du
propriétaire
2 | Page
Épandeuse pour hayon arrière SnowBear
MD
(TGS-325)
Revision 2
Table des matières
Mesures générales de sécurité .............................................................................................................. 3
Sécurité personnelle .............................................................................................................................. 5
Feu et explosion ..................................................................................................................................... 5
Ventilation .............................................................................................................................................. 5
Téléphones cellulaires ........................................................................................................................... 6
Liste des pièces de l’épandeuse ............................................................................................................ 7
Liste d'outils d'assemblage .................................................................................................................... 8
Système de télécommande sans fil SnowBear
MD
.................................................................................. 9
L’installation de l’épandeuse ................................................................................................................ 10
VUE D'ENSEMBLE : .................................................................................................................. 10
INSTALLATION : ........................................................................................................................ 10
Maintenance générale ......................................................................................................................... 15
Dépannage de l’épandeuse pour hayon arrière ................................................................................... 16
Renseignements de la garantie SnowBear
MD
...................................................................................... 18

Manuel du
propriétaire
3 | Page
Épandeuse pour hayon arrière SnowBear
MD
(TGS-325)
Revision 2
Mesures générales de sécurité
VEUILLEZ LIRE LE MANUEL DU PROPRIÉTAIRE ATTENTIVEMENT. Apprenez à
connaître votre épandeuse pour hayon arrière. Apprenez ses applications et ses limites.
Une installation impropre ou une mauvaise opération peuvent causer des blessures
personnelles et/ou des dommages à l’équipement et à de la propriété.
GARDEZ HORS DE LA PORTÉE DES ENFANTS ET DES ANIMAUX DE COMPAGNIE.
Veillez à ce que les spectateurs et particulièrement les enfants et les animaux de
compagnie maintiennent une distance sécuritaire de la zone d'opération de l’épandeuse
pour hayon arrière.
N'ABUSEZ PAS L’ÉPANDEUSE. Suivez les lignes directrices établies dans ce manuel.
Ne forcez pas l’épandeuse pour hayon arrière à exécuter un travail pour lequel elle n'a pas
été conçue.
POUR MAINTENIR L’ÉPANDEUSE. Gardez l’épandeuse propre lorsque l’appareil est hors
usage pour empêcher la corrosion et/ou le saisissement de pièces. Avant de faire effectuer
du service ou du travail sur l’épandeuse, débranchez le cordon d’alimentation; sécurisez
tout vêtement à coupe ample; nouez de longs cheveux et attendez que la vis sans fin
d'alimentation et la centrifugeuse s’arrêtent. Ne faites pas fonctionner une épandeuse
qui a besoin de maintenance.
VÉRIFIEZ L’ÉPANDEUSE AVANT CHAQUE UTILISATION. Vérifiez l'alignement de toutes
les pièces mobiles et vérifiez pour tout boulon desserré qui pourrait avoir un effet sur
l'opération du système du dispositif diffuseur. Avant de faire fonctionner l’épandeuse,
veuillez assembler de nouveau toute pièce ou toute quincaillerie qui a été retirée pour le
nettoyage ou pour un ajustement.
NE JAMAIS VOUS ASSEOIR NI FAIRE DE TOURS SUR L’ÉPANDEUSE. Ceci peut
occasionner des blessures graves.
N'UTILISEZ QUE DES PIÈCES ET DES ACCESSOIRES CERTIFIÉS SNOWBEAR
MD
.
Veuillez consulter le manuel du propriétaire pour les accessoires recommandés et/ou pour
des pièces de remplacement. L’usage d’accessoires impropres et/ou de pièces de
remplacement peut causer des dangers et annuler des garanties applicables.
VÉRIFIEZ TOUJOURS QUE LA GOUPILLE D’ATTELAGE EST INSTALLÉE
CORRECTEMENT AVANT DE VOUS DÉPLACER. Si l’épandeuse n’est pas attachée
correctement au récepteur d’attelage du véhicule, l’épandeuse pourrait tomber du véhicule
et probablement blesser des observateurs et endommager votre produit SnowBear
MD
ou
votre véhicule.

Manuel du
propriétaire
4 | Page
Épandeuse pour hayon arrière SnowBear
MD
(TGS-325)
Revision 2
NE JAMAIS SURCHARGER VOTRE VÉHICULE NI L’ÉPANDEUSE. Une surcharge
pourrait occasionner un accident ou des dommages. Veuillez ne pas dépasser les cotes
PNBV ou PTMSE qui se trouvent sur l’intérieur de la porte-côté chauffeur ou bien sur la
colonne de coin du véhicule. Voir la Section de chargement afin de déterminer les volumes
maximums de matériau d’épandage.
NE PAS LAISSER DE MATÉRIAU NON UTILISÉ DANS LA TRÉMIE D’ÉPANDEUR. Le
matériau peut geler et/ou bien se solidifier et ceci peut causer un fonctionnement
défectueux de l’unité. Videz et nettoyez-la après chaque usage autant que possible.

Manuel du
propriétaire
5 | Page
Épandeuse pour hayon arrière SnowBear
MD
(TGS-325)
Revision 2
Sécurité personnelle
Retirez la clé de contact et placez le véhicule dans la position de stationnement ou en prise
pour empêcher d’autres personnes de faire démarrer le véhicule lors de l’installation ou
pendant un service.
Veuillez ne porter que des vêtements à ajustement serré pendant que vous travaillez sur
votre véhicule ou sur votre épandeuse. Ne portez pas de bijoux qui pendent ni de cravate et
nouez les cheveux longs.
Portez des lunettes de sécurité pour protéger vos yeux de la poussière, des saletés et des
débris provenant de l’épandeuse, particulièrement lorsqu’elle est en marche et que vous
vous tenez près de l’épandeuse. Le matériau se fait répandre à grande vitesse.
Feu et explosion
L’ESSENCE EST HAUTEMENT INFLAMMABLE, LES VAPEURS SONT EXPLOSIVES.
Ne fumez jamais pendant que vous travaillez sur un véhicule. Gardez toutes flammes nues
et sources d’inflammation au loin de votre réservoir d’essence, des lignes et des
contenants. Essuyez toute essence renversée immédiatement. N’utilisez pas de l’essence
pour nettoyer des pièces. Entreposez l’essence seulement dans des contenants approuvés
au loin des sources de chaleur et de flammes.
Ventilation
LE SYSTÈME D’ÉCHAPPEMENT DES VÉHICULES CONTIENT DES VAPEURS
NOCIVES MORTELLES. Respirer ces vapeurs, même en de faibles concentrations, peut
vous rendre malade ou même causer la mort. Ne faites jamais fonctionner un véhicule et ne
laissez jamais un moteur en marche pendant que vous exécutez de la maintenance sur
l’épandeuse dans un endroit clos sans vous assurer d’évacuer à l’air libre les gaz
d’échappement.
La page est en cours de chargement...
La page est en cours de chargement...
La page est en cours de chargement...
La page est en cours de chargement...
La page est en cours de chargement...
La page est en cours de chargement...
La page est en cours de chargement...
La page est en cours de chargement...
La page est en cours de chargement...
La page est en cours de chargement...
La page est en cours de chargement...
La page est en cours de chargement...
La page est en cours de chargement...
-
 1
1
-
 2
2
-
 3
3
-
 4
4
-
 5
5
-
 6
6
-
 7
7
-
 8
8
-
 9
9
-
 10
10
-
 11
11
-
 12
12
-
 13
13
-
 14
14
-
 15
15
-
 16
16
-
 17
17
-
 18
18
-
 19
19
-
 20
20
-
 21
21
-
 22
22
-
 23
23
-
 24
24
-
 25
25
-
 26
26
-
 27
27
-
 28
28
-
 29
29
-
 30
30
-
 31
31
-
 32
32
-
 33
33


SNOWBEAR 324-223 Manuel utilisateur
- Catégorie
- Épandeur
- Taper
- Manuel utilisateur
dans d''autres langues
- English: SNOWBEAR 324-223 User manual
Documents connexes


Autres documents
-
 SPYKER S80-12010 Le manuel du propriétaire
-
Power Fist 8265134 Le manuel du propriétaire
-
Chapin 8201A Manuel utilisateur
-
JANOME 1110DX Le manuel du propriétaire
-
Agri-Fab 45-0543 Manuel utilisateur
-
-
-
-
Chapin 81008A Manuel utilisateur
-
