Style Selections 0781458 Manuel utilisateur
- Catégorie
- Chauffe-eau
- Taper
- Manuel utilisateur

1
Lowes.com
ITEM #0781458
Questions, problems, missing parts? Before returning to your retailer, call our customer
service department at 1-877-888-8225, 8 a.m. - 8 p.m., EST, Monday - Friday.
MODEL#16IN-42-109B
Français p. 17
Español p. 33
ATTACH YOUR RECEIPT HERE
Serial Number Purchase Date
Style Selections® is a registered trademark
of LF, LLC. All Rights Reserved.
WALL-MOUNT ELECTRIC
FIREPLACE WITH
BLUETOOTH SPEAKER
EB1656

2
Lowes.com
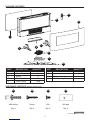
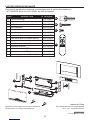
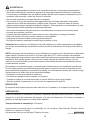
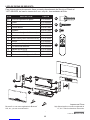
PACKAGE CONTENTS
A
B
C
D
E
F
G
H
I
1
1
2
1
1 bag
1 bag
1
1
1
Electric Firebox
Glass Panel
Stand
Wind Shield
Faux Crystal
Rock
Log
Remote Control
Wall-Mounting Template
PART PARTQUANTITY QUANTITYDESCRIPTION DESCRIPTION
F
D
B
C
C
E
A
H
I
G
HARDWARE CONTENTS (shown actual size)
AA BB CC DD
Wall Anchor
Qty. 4
Screw
Qty. 4
Bolt
Qty. 9
Soft pad
Qty. 4

3
Lowes.com
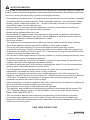
SAFETY INFORMATION
Please read and understand this entire manual before attempting to assemble, operate or install the
product. When using electrical appliance, basic precautions should always be followed to reduce the
risk of re, electric shock and injury to persons including the following:
• This appliance is hot when in use. To avoid burns, do not let bare skin touch hot surface. If provided,
use handles when moving this appliance. Keep combustible materials -- such as furniture, pillows,
bedding, papers, clothes and curtains, etc. -- at least 3 feet away from the front of the appliance.
Keep all items away from the sides and rear.
• Extreme caution is necessary when the appliance is used by or near children or invalids and
whenever the appliance is left operating and unattended.
• Always unplug appliance when not in use.
• Do not operate any appliance with a damaged cord or plug or after the appliance malfunctions,
has been dropped or damaged in any manner. Return appliance to authorized service facility for
examination, electrical or mechanical adjustment or repair.
• Do not use outdoors.
• This appliance is not intended for use in bathrooms, laundry areas and similar indoor locations.
Never locate appliance where it may fall into a bathtub or other water container.
• Do not run cord under carpeting. Do not cover the power cord with throw rugs, runners
or similar oor coverings. Arrange cord away from trafc area and where it will not be tripped over.
• To disconnect the appliance, turn all controls “OFF”, then remove the plug from the electrical outlet.
• Connect to properly grounded outlets only.
• Do not insert or allow foreign objects to enter any ventilation or exhaust openings as this may cause
an electric shock or re, or damage the appliance.
• To prevent a possible re, do not block air intakes or exhausts in any manner. Do not use on soft
surfaces, like a bed, where openings may become blocked.
• All electrical appliances have hot and arching or sparking parts inside. Do not use in areas where
gasoline, paint or ammable liquids are used or stored.
• Use this appliance only as described in this manual. Any other use not recommended by the
manufacturer may cause re, electric shock or injury to persons.
• Avoid the use of an extension cord as it may overheat and cause a risk of re. However, if an
extension cord MUST be used, the cord must be No. 14AWG minimum size and rated not less than
1,875 watts. The extension cord must be a 3-prong cord with grounding type plug and cord
connection and should not exceed 20 feet in length.
• When transporting or storing the appliance, take care to keep both the unit and power cord/plug dry,
free from excessive vibration and away from heat sources.
• Do not attempt to burn wood or other materials in this appliance.
• This appliance, when installed must be electrically grounded in accordance with the current CSA
C22.1 Canadian Electrical codes or for USA installations, follow local codes and the National
Electric Code, ANSI/NFPA NO.70.
• This unit should be operate under supervision and should not be left on without supervision.
• It is strongly recommended that to use the entire 15 amp outlet for the electric replace only.
• Sharing the outlet with another electronic item could create overload and damage the outlet and
electric items in the long term.
SAVE THESE INSTRUCTIONS

4
Lowes.com
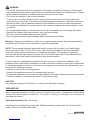
CAUTION
Two people are required to lift this item. It is heavy and will break if dropped.
WARNING
• Do not fully tighten the bolts on the assembly until mantel is completed. Positioning of the mantel
pieces during assembly will be easier if there is some exibility between the different pieces. Tighten
all bolts after the assembly is complete and before the insert is set inside.
• Do not use this replace in wet or moist locations.
• To reduce the risk of re, electric shock or injury to persons, disconnect and unplug the power
cord and let cool for at least 10 minutes before attempting any maintenance, cleaning or service for
the electric insert. Only a qualied professional should attempt to service or repair the appliance.
• Do not dispose of batteries of remote control in re. Improper disposal may cause batteries to leak
or explode.
• The preassembled battery in the remote control is not rechargeable; do not recharge the battery.
• Remove the batteries from remote control once they have expired.
• Be sure to insert the battery with the correct polarity.
• Do not ingest the battery; keep the battery away from babies and children.
PREPARATION
Before beginning assembly of product, make sure all parts are present. Compare parts with package
contents list and hardware contents list. If any part is missing or damaged, do not attempt to
assemble the product.
Estimated Assembly Time: 30 minutes
Tools Required for Assembly (not included): Phillips screwdriver, electric drill and 1/4-inch drill bit.
Helpful Tools (not included): Stud nder
Warning: Changes or modications to this unit not expressly approved by the party responsible for
compliance could void the user’s authority to operate the equipment.
NOTE: This equipment has been tested and found to comply with the limits for a Class B digital
device, pursuant to Part 15 of the FCC Rules. These limits are designed to provide reasonable
protection against harmful interference in a residential installation. This equipment generates,
uses and can radiate radio frequency energy and, if not installed and used in accordance with the
instructions, may cause harmful interference to radio communications.
However, there is no guarantee that interference will not occur in a particular installation. If this
equipment does cause harmful interference to radio or television reception, which can be determined
by turning the equipment off and on, the user is encouraged to try to correct the interference by one
or more of the following measures:
• Reorient or relocate the receiving antenna.
• Increase the separation between the equipment and receiver.
• Connect the equipment into an outlet on a circuit different from that to which the receiver is connected.
• Consult the dealer or an experienced radio/TV technician for help.

5
Lowes.com
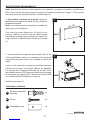
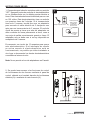
ASSEMBLY INSTRUCTIONS
1
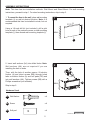
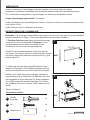
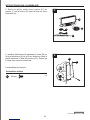
1. To mount the item to the wall, place wall-mounting
template (I) on wall at desired location. Note: It is
recommended this item be installed to studs, but not
required.
Using a 1/4-inch drill bit (not included), drill a pilot
hole at each of the marked corners on wall-mounting
template (I), then discard wall-mounting template (I).
2. Insert wall anchors (AA) into drilled holes. Note:
Wall anchors (AA) are not required if you are
installing the item to studs.
Then, with the help of another person, lift electric
firebox (A) and insert screws (BB) through holed
tabs on electric firebox (A) and soft pads (DD) and
into wall anchors (AA). Tighten screws (BB) with a
Phillips screwdriver (not included).
Hardware Used
AA Wall Anchor
Screw
Soft pad
x 4
x 4
x 4
2
BB
DD
Note: This item has two installation methods: Wall Mount and Stand Mount. For wall mounting
instructions, proceed to step 1. For stand mounting instructions, skip to step 3.
AA BB
A
DD
Skip to step 5.
I
WALL
WALL
12.00 IN
31.33 IN

6
Lowes.com
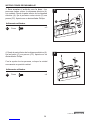
CC
CC
Bolt
Bolt
x 3
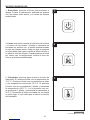
ASSEMBLY INSTRUCTIONS
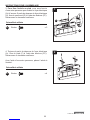
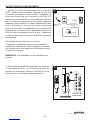
3
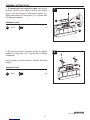
3. To mount the item using the stand, two people
need to carefully turn electric firebox (A) upside
down. From the bottom of the electric firebox (A),
attach wind shield (D) using bolts (CC). Tighten with
a Phillips screwdriver.
Hardware Used
4
4. Still from the bottom of electric rebox (A), attach
stands (C) using bolts (CC). Tighten with a Phillips
screwdriver.
x 4
Hardware Used
With the help of another person, turn the unit back
upright.
A
D
CC

7
Lowes.com
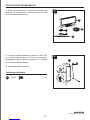
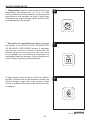
ASSEMBLY INSTRUCTIONS
5
6
5. Depending on your preference, place faux crystals
(E) or rocks (F) or log (G) into the base of electric
rebox (A).
6. Carefully hang glass panel (B) onto electric rebox
(A) as shown, securing on the bottom with bolts (CC).
Tighten with Phillips screwdriver.
Assembly is now complete.
CC Bolt x 2
Hardware Used
E
F
E
G
A
A
B
CC

8
Lowes.com
Grounding Pin
Grounding
Means
Adapter
Matel Screw
Cover of Grounding
Outlet Box
1
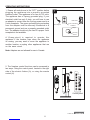
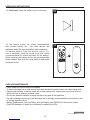
1. Ensure all controls are in the “OFF” position before
plugging the appliance into a properly grounded
electrical outlet. This appliance is for use on 120 volts.
The appliance has a 3-prong grounded plug. If your
electrical outlet has only 2 slots, you will have to use
an adapter to convert from the 3-prong power cord to a
2-slot receptacle. The green grounding plug extending
from the adapter must be securely connected to a
permanent ground such as a properly grounded outlet
box. The adapter should only be used if a proper 3-slot
receptacle is not available.
A 15-amp circuit is required to operate this
appliance. If the breaker trips when the appliance
is running, you may need to move the appliance to
another location or unplug other appliances that are
on the same circuit.
Note: Adapters are not allowed for use in Canada.
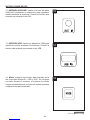
2. The fireplace control functions can be accessed in
two ways: Using the control panel, located in the right
side of the electric firebox (A), or using the remote
control (H).
OPERATING INSTRUCTIONS
2
A
Control panel
MODE
H

9
Lowes.com
3
4
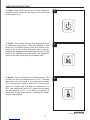
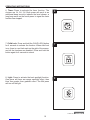
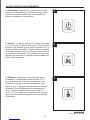
3. Power: Push button to turn on or turn off. When the
fireplace is first turned on, the ember is blue and the
sound system is on.
4. Flame: This button controls the brightness/color
of flame and ember effect. When the fireplace is first
turned on, the default state is with blue ember only.
Each push of the button afterward (up to seven)
changes the brightness effect and alters the color of the
ame. At the eighth press of the button, the setting will
return to the start of the cycle at the default state.
5
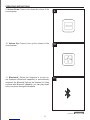
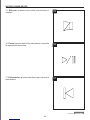
5. Heater: Press to activate the heater function. The
system will start the temperature at 65ºF. Pressing
the button once will result in one beep and a steady
65ºF temperature. Another press of the button will
result in 2 beeps and increase the temperature to
80ºF, and another will result in 3 beeps and increase
the temperature to 90º. If the button is pressed a
fourth time, a long beep will emit, indicating the heater
function has stopped.
OPERATING INSTRUCTIONS

10
Lowes.com
6
7
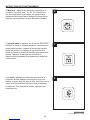
6. Timer: Press to activate the timer function. The
choices are 1H, 2H, 3H. Each press will result in an
additional beep sound to indicate the level chosen; a
long beep emits on the fourth press to signal the timer
function has stopped.
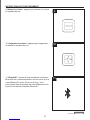
7. Child Lock: Press and hold the CHILD LOCK button
for 4 seconds to activate the function. When child lock
is on, there is a red lock mark on the right of the screen,
and all the functions are disabled. Press and hold the
button again for 4 seconds to unlock.
8
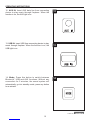
8. Light: Press to activate the back spotlight function.
One press will have an orange spotlight effect, then
blue, then purple, then gradient colors. The fth press
will turn off the light.
OPERATING INSTRUCTIONS

11
Lowes.com
9
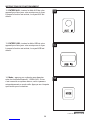
9. Volume Down: Press to turn down the volume of the
sound system.
10
10. Volume Up: Press to turn up the volume of the
sound system.
OPERATING INSTRUCTIONS
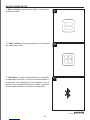
11
11. Bluetooth®: When the fireplace is turned on,
the fireplace's Bluetooth® capability is automatically
activated, the Bluetooth® light on the replace lit. Using
a phone with Bluetooth® capability, you can play music
from your phone through the replace.

12
Lowes.com
12
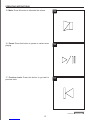
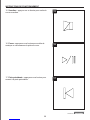
12. AUX IN: Insert AUX data line from connecting
device to play music through fireplace. When the
function is on, the AUX light is on.
13
13. USB IN: Insert USB from connecting device to play
music through fireplace. When the function is on, the
USB light is on.
OPERATING INSTRUCTIONS
14
14. Mode: Press this button to switch between
Bluetooth®, USB and AUX functions. Without any
connection for 5 minutes, the sound system will
automatically go into standby mode; press any button
to re-activate.


14
Lowes.com
18
19
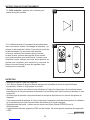
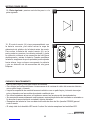
18. Next track: Press this button to go to next track.
19. The remote control (H) comes preassembled
with a correct battery, but you must remove the
insulation plastic lm from the battery before operation.
To remove battery from the remote control (H),
turn to backside, push the round cover and rotate
counterclockwise to unlock and take out the battery.
When replacing the battery, ensure the positive-polarity
faces outward, then push the cover back on and rotate
clockwise to lock.
OPERATING INSTRUCTIONS
MODE
CARE AND MAINTENANCE
• Use a clean dry cloth to clean the replace.
• To remove ngerprints or other marks from glass window of electric insert, use clean damp cloth.
• Clean metal surfaces of electric insert with a clean damp cloth, making sure not to push dust or
debris into any air intake or exhaust vents.
• Do not use abrasive cleaners or spray liquids on any part of the appliance.
• Periodic cleaning/vacuuming of the fan/heater unit is strongly recommended to ensure that no dirt
or foreign objects build up.
• Battery Replacement: Use one lithium coin cell battery (size CR2025) for the remote control.
• Total LED wattage is 6 watts; do not attempt to replace the LEDs.
H
Back

15
Lowes.com
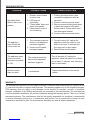
TROUBLESHOOTING
CORRECTIVE ACTION
PROBLEM POSSIBLE CAUSE
1. Pushing the ame button, then
increase the brightness with the
up button.
2. Contact customer service center.
3. Remove screws holding back panel
in place and remove back panel.
Secure end of “Flame wand” back
into the support bracket.
4. Contact customer service center.
1. Turn all controls off, unplug the
appliance, allow the insert to cool
down for at least 10 minutes and
then plug back in and restart.
2. Reset house circuit breaker.
Turn all controls off, unplug the
appliance, allow the insert to cool down
for at least 10 minutes and then plug
back in and restart.
Replace all batteries in the remote
control.
Low batteries.
The overheat protection
device in the appliance
has been triggered.
1. The overheat protection
device in the appliance
has been triggered.
2. House circuit breaker
has been tripped.
1. Dimmer control button
is set too low.
2. LED strip not
functioning.
3. “Flame wand” has come
loose from bracket.
4. “Flame wand” motor is
not functioning.
Simulated ame
effect is dim or not
present.
The appliance
turns off and will
not turn back on.
The appliance does
not turn on when
the button is pushed
to “ON”.
Remote control
does not work.
WARRANTY
The manufacturer warrants this item against defects in materials and workmanship for a period of one
(1) year from the date of original retail purchase. This warranty applies only to the original purchaser.
This warranty does not apply to any damage on the product by accident, misuse, or modified,
improper installation or by afxing accessories not produced by the manufacturer. The manufacturer
is not accountable whatsoever for product installation during the warranty period. There is no further
expressed warranty. The manufacturer shall not be legally responsible for incidental, consequential
or special damages arising at or in connection with product use or performance except as may
otherwise be accorded by law. The manufacturer disclaims any and all implied warranties.

16
Lowes.com
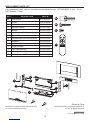
REPLACEMENT PARTS LIST
For replacement parts, call our customer service department at 1-877-888-8225, 8 a.m. - 8 p.m.,
EST, Monday - Friday.
AA
BB
CC
H
Printed in China
Style Selections® is a registered trademark of
LF, LLC. All Rights Reserved.
AA
BB
CC
H
1
2
3
4
5
6
7
8
9
10
Wall Anchor
Screw
Bolt
Remote Control
Blower
Motherboard (for replace)
Control Panel
Motherboard (for sound system)
Speaker
Left Spotlight
Right Spotlight
LED Light Board A
LED Light Board B
Flame Generator Drive Motor
2016-424001
2016-406008
2016-402006
2016-411003
2016-417003
2016-416003
2016-412003
2016-416004
2016-425001
2016-426001
2016-426002
2016-415005
2016-415006
2016-419003
PART PART #
DESCRIPTION
MODE
7
1
10
2
5
4
6
8
9
3
Bluetooth® is a registered mark of Bluetooth® SIG,
Inc. and is used with permission.

17
Lowes.com
ARTICLE #0781458
Des questions, des problèmes, des pièces manquantes? Avant de retourner l’article au
détaillant, communiquez avec notre service à la clientèle au 1 877 888-8225, entre 8 h et
20 h (HNE), du lundi au vendredi.
MODÈLE #16IN-42-109B
JOIGNEZ VOTRE REÇU ICI
Numéro de série Date d’achat
Style Selections® est une marque déposée
de LF, LLC. Tous droits réservés.
FOYER ÉLECTRIQUE À
MONTAGE MURAL AVEC
BLUETOOTH INTÉGRÉ

18
Lowes.com
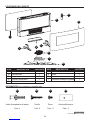
CONTENU DE L’EMBALLAGE
A
B
C
D
E
F
G
H
I
1
1
2
1
1 sac
1 sac
1
1
1
Foyer électrique
Panneau de verre
Pied
Pare-vent
Faux cristal
Pierre
Bûche
Télécommande
Gabarit de montage mural
PIÈCE PIÈCEQUANTITÉ QUANTITÉDESCRIPTION DESCRIPTION
F
D
B
C
C
E
A
H
I
G
QUINCAILLERIE INCLUSE (grandeur réelle)
AA BB CC DD
Cheville d’ancrage
Qté : 4
Vis
Qté : 4
Boulon
Qté : 9
Tampon doux
Qté : 4

19
Lowes.com
CONSIGNES DE SÉCURITÉ
Assurez-vous de lire et de comprendre l’intégralité du présent manuel avant de tenter d’assembler,
d’utiliser ou d’installer l’article. Lorsque vous utilisez un appareil électrique, respectez les mesures
de sécurité élémentaires suivantes an de réduire les risques d’incendie, de choc électrique et de
blessure :
• Cet appareil est chaud lorsqu’il est en fonction. An de prévenir les brûlures, ne laissez pas la peau
nue entrer en contact avec la surface chaude. Si l’appareil est muni de poignées, utilisez-les pour
le déplacer. Assurez-vous que les matières combustibles, comme les meubles, les oreillers, la
literie, le papier, les vêtements et les rideaux, se trouvent à au moins 0,91 m de l’avant de l’appareil.
Gardez tous les articles loin des côtés et de l’arrière de l’appareil.
• Faites preuve d’une extrême prudence lorsque l’appareil est utilisé à proximité d’enfants ou de
personnes handicapées, de même que lorsque vous laissez l’appareil en marche sans surveillance.
• Débranchez toujours le cordon d’alimentation de l’appareil lorsqu’il n’est pas utilisé.
• N’utilisez aucun appareil dont la che ou le cordon est endommagé, qui a subi une défaillance, qui
est tombé ou qui a été endommagé de quelque façon que ce soit. Rapportez l’appareil à un centre
de service agréé an qu’il fasse l’objet d’une inspection, d’un réglage électrique ou mécanique ou
d’une réparation.
• N’utilisez pas cet appareil à l’extérieur.
• Cet appareil n’est pas conçu pour être utilisé dans une salle de bains, une salle de lavage ou tout
autre endroit humide semblable. Ne placez jamais cet appareil dans un endroit où il risquerait de
tomber dans une baignoire ou dans un autre contenant rempli d’eau.
• Ne placez pas le cordon sous un tapis. Ne couvrez pas le cordon d’alimentation d’une moquette, d’un
tapis de couloir ou de tout autre revêtement de sol similaire. Placez le cordon dans un endroit peu
passant où il ne risque pas d’être accroché.
• Pour débrancher l’appareil, réglez d’abord toutes les commandes à la position « OFF » (arrêt), puis
retirez la che de la prise.
• Branchez le cordon uniquement sur une prise correctement mise à la terre.
• N’insérez jamais un objet, quel qu’il soit, dans les ouvertures de ventilation ou de sortie d’air de
l’appareil an de prévenir les dommages ainsi que les risques de choc électrique et d’incendie.
• An de prévenir les risques d’incendie, ne bloquez jamais les ouvertures d’aération ou de sortie d’air
de quelque façon que ce soit. Ne placez pas l’appareil sur une surface molle, comme un lit, car cela
pourrait bloquer ses ouvertures.
• Tous les appareils électriques renferment des pièces chaudes qui produisent des arcs électriques
ou des étincelles. N’utilisez pas l’appareil là où de l’essence, de la peinture ou des liquides
inammables sont utilisés ou entreposés.
• N’utilisez cet appareil que pour l’usage prévu dans ce manuel. Toute utilisation qui n’est pas
recommandée par le fabricant peut provoquer un incendie, un choc électrique ou des blessures.
• Évitez d’utiliser une rallonge, car elle pourrait surchauffer et entraîner des risques d’incendie.
Toutefois, si vous DEVEZ utiliser une rallonge, optez pour une rallonge d’un calibre minimal de
14 AWG et d’une puissance minimale de 1875 watts. La rallonge doit être munie d’une che à trois
broches avec mise à la terre et prise correspondante, et sa longueur ne doit pas excéder 6,09 m.
• Prenez soin de garder le foyer et le cordon d’alimentation au sec, protégez-les contre les vibrations
excessives et tenez-les loin des sources de chaleur lors du transport ou de l’entreposage.
• N’essayez pas de faire brûler du bois ou d’autres matériaux dans cet appareil.
• Lors de l’installation, veillez à ce que le foyer soit mis à la terre conformément à la plus récente
version du Code canadien de l’électricité, CSA C22.1 ou, dans le cas des installations aux É.-U.,
aux codes locaux et au code national de l’électricité, ANSI/NFPA nº 70.

20
Lowes.com
ATTENTION
Vous aurez besoin de l’aide d’une seconde personne pour lever cet article. Il est lourd et peut se
briser en cas d’impact.
AVERTISSEMENT
• Ne serrez pas complètement les boulons avant d’avoir terminé l’assemblage du manteau de
cheminée. L’assemblage des pièces du manteau de cheminée sera plus facile s’il y a une certaine
exibilité entre les différentes pièces. Serrez tous les boulons une fois l’assemblage complété et
avant d’installer le foyer.
• N’utilisez pas ce foyer dans des endroits mouillés ou humides.
• An de réduire les risques d’incendie, de choc électrique ou de blessure, débranchez le cordon
d’alimentation et laissez l’appareil refroidir pendant au moins 10 minutes avant de tenter de le
réparer, de le nettoyer ou de l’entretenir. Seul un professionnel qualié doit entretenir ou réparer cet
appareil.
• Ne jetez pas les piles de la télécommande au feu. Une mise au rebut inadéquate pourrait causer
une fuite ou faire exploser les piles.
• La pile préinstallée dans la télécommande n’est pas rechargeable; ne la rechargez pas.
• Retirez les piles de la télécommande lorsqu’elles sont à plat.
• Assurez-vous d’insérer la pile de façon à respecter la polarité.
• Évitez d’ingérer la pile. Gardez-la hors de la portée des bébés et des enfants.
Avertissement : Les modications non autorisées expressément par la partie responsable de la
conformité peuvent annuler le droit de l’utilisateur de se servir de cet appareil.
REMARQUE : Cet appareil a été testé et déclaré conforme aux limites imposées aux appareils
numériques de classe B, conformément à l’alinéa 15 du règlement de la FCC. Ces limites
sont destinées à assurer une protection raisonnable contre les interférences nuisibles dans un
environnement résidentiel. Cet appareil génère, utilise et peut émettre de l’énergie radiofréquence et,
s’il n’est pas installé et utilisé conformément aux instructions, risque de provoquer des interférences
nuisibles aux communications radio.
Cependant, tout risque d’interférence ne peut être totalement exclu. S’il constate des interférences
nuisibles lors de la réception d’émissions de radio ou de télévision (pour le vérier, il suft d’allumer
et d’éteindre successivement l’appareil), l’utilisateur devra prendre les mesures nécessaires pour les
éliminer. À cette n, il devra :
• réorienter ou déplacer l’antenne réceptrice;
• accroître la distance entre l’appareil et le récepteur;
• brancher l’article sur une prise de courant appartenant à un autre circuit que celui du récepteur;
• obtenir de l’aide auprès du détaillant ou d’un technicien en radio ou en télévision expérimenté.
CONSERVEZ CES INSTRUCTIONS
• Cet appareil doit être utilisé sous surveillance et ne doit pas être laissé sans surveillance.
• Il est fortement recommandé de réserver l’utilisation de la prise de 15 ampères complète à la
cheminée électrique.
• Le partage de la prise avec un autre appareil électronique pourrait provoquer une surcharge et
endommager la prise ainsi que les éléments électriques à long terme.
La page est en cours de chargement...
La page est en cours de chargement...
La page est en cours de chargement...
La page est en cours de chargement...
La page est en cours de chargement...
La page est en cours de chargement...
La page est en cours de chargement...
La page est en cours de chargement...
La page est en cours de chargement...
La page est en cours de chargement...
La page est en cours de chargement...
La page est en cours de chargement...
La page est en cours de chargement...
La page est en cours de chargement...
La page est en cours de chargement...
La page est en cours de chargement...
La page est en cours de chargement...
La page est en cours de chargement...
La page est en cours de chargement...
La page est en cours de chargement...
La page est en cours de chargement...
La page est en cours de chargement...
La page est en cours de chargement...
La page est en cours de chargement...
La page est en cours de chargement...
La page est en cours de chargement...
La page est en cours de chargement...
La page est en cours de chargement...
-
 1
1
-
 2
2
-
 3
3
-
 4
4
-
 5
5
-
 6
6
-
 7
7
-
 8
8
-
 9
9
-
 10
10
-
 11
11
-
 12
12
-
 13
13
-
 14
14
-
 15
15
-
 16
16
-
 17
17
-
 18
18
-
 19
19
-
 20
20
-
 21
21
-
 22
22
-
 23
23
-
 24
24
-
 25
25
-
 26
26
-
 27
27
-
 28
28
-
 29
29
-
 30
30
-
 31
31
-
 32
32
-
 33
33
-
 34
34
-
 35
35
-
 36
36
-
 37
37
-
 38
38
-
 39
39
-
 40
40
-
 41
41
-
 42
42
-
 43
43
-
 44
44
-
 45
45
-
 46
46
-
 47
47
-
 48
48


Style Selections 0781458 Manuel utilisateur
- Catégorie
- Chauffe-eau
- Taper
- Manuel utilisateur
dans d''autres langues
Autres documents
-
Classic Flame 80649 Manuel utilisateur
-
YOTRIO 5 Piece Motion Fire Chat Set Fire Pit Assembly Instructions
-
Master Forge 0516431 Le manuel du propriétaire
-
-
-
-
Masterbuilt 20070513 Le manuel du propriétaire
-
Danby 416709 Le manuel du propriétaire
-
-
 Idylis #0530393 Portable Air Conditioner Manuel utilisateur
