Quick Start Guide
AXION KEY
Thermal
Imaging Scope

For detailed information about the device, please download the
complete user manual:
http://www.pulsar-nv.com/products/thermal-imaging-scopes/
Pour des informations détaillées sur la lunette, prière de
télécharger le manuel complet d'utilisation:
http://www.pulsar-nv.com/products/thermal-imaging-scopes/
Für detaillierte Informationen über das Gerät, bitte das
vollständige Handbuch herunterladen:
http://www.pulsar-nv.com/de/products/thermal-imaging-scopes/
Para obtener información detallada acerca del dispositivo,
descargue el manual de usuario al completo:
http://www.pulsar-nv.com/es/products/thermal-imaging-scopes/
Per informazioni dettagliate sul dispositivo, scaricare il manuale
d'uso completo:
http://www.pulsar-nv.com/products/thermal-imaging-scopes/
Для получения подробной информации о приборе скачайте
полное руководство по эксплуатации:
http://www.pulsar-nv.com/ru/products/thermal-imaging-scopes/
EN
FR
DE
ES
IT
RU
v.0119
1-4
5-8
9-12
13-16
17-20
21-24
Thermal Imaging Scope AXION
Lunette d'imagerie thermique AXION
Wärmebildgerät AXION
Monocular térmico AXION
Termovisore AXION
Тепловизор AXION
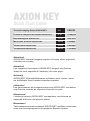
Attention!
Axion thermal imaging monoculars require a license if exported
outside your country.
Attention!
Les monoculaires d'imagerie thermique Axion nécessitent une
licence s'ils sont exportés hors de votre pays.
Achtung!
Wärmebildgeräte Axion benötigen eine Lizenz, wenn sie außerhalb
Ihres Landes exportiert werden.
¡Atención!
Los monoculares de visión térmica Axion requieren una licencia si
se exportan fuera de su país.
Attenzione!
I monocoli termici Axion necessitano una licenza se esportati al di
fuori del proprio paese.
Внимание!
Тепловизионные монокуляры Axion требуют лицензии, если они
экспортируются за пределы Вашей страны.
ENGLISH
FRANÇAIS
DEUTSCH
ESPAÑOL
ITALIANO
РУССКИЙ
For detailed information about the device, please download the
complete user manual:
http://www.pulsar-nv.com/products/thermal-imaging-scopes/
Pour des informations détaillées sur la lunette, prière de
télécharger le manuel complet d'utilisation:
http://www.pulsar-nv.com/products/thermal-imaging-scopes/
Für detaillierte Informationen über das Gerät, bitte das
vollständige Handbuch herunterladen:
http://www.pulsar-nv.com/de/products/thermal-imaging-scopes/
Para obtener información detallada acerca del dispositivo,
descargue el manual de usuario al completo:
http://www.pulsar-nv.com/es/products/thermal-imaging-scopes/
Per informazioni dettagliate sul dispositivo, scaricare il manuale
d'uso completo:
http://www.pulsar-nv.com/products/thermal-imaging-scopes/
Для получения подробной информации о приборе скачайте
полное руководство по эксплуатации:
http://www.pulsar-nv.com/ru/products/thermal-imaging-scopes/
EN
FR
DE
ES
IT
RU
v.0119
1-4
5-8
9-12
13-16
17-20
21-24
Thermal Imaging Scope AXION
Lunette d'imagerie thermique AXION
Wärmebildgerät AXION
Monocular térmico AXION
Termovisore AXION
Тепловизор AXION
Attention!
Axion thermal imaging monoculars require a license if exported
outside your country.
Attention!
Les monoculaires d'imagerie thermique Axion nécessitent une
licence s'ils sont exportés hors de votre pays.
Achtung!
Wärmebildgeräte Axion benötigen eine Lizenz, wenn sie außerhalb
Ihres Landes exportiert werden.
¡Atención!
Los monoculares de visión térmica Axion requieren una licencia si
se exportan fuera de su país.
Attenzione!
I monocoli termici Axion necessitano una licenza se esportati al di
fuori del proprio paese.
Внимание!
Тепловизионные монокуляры Axion требуют лицензии, если они
экспортируются за пределы Вашей страны.
ENGLISH
FRANÇAIS
DEUTSCH
ESPAÑOL
ITALIANO
РУССКИЙ
Thermal Imaging Scope AXION KEY
Lunette d’imagerie thermique AXION KEY
Wärmebildgerät AXION KEY
Monocular térmico AXION KEY
Termovisore AXION KEY
Тепловизор AXION KEY
1-5
6-10
11-15
16-20
21-25
26-30
ENGLISH
FRANÇAIS
DEUTSCH
ESPAÑOL
ITALIANO
РУССКИЙ
Attention!
AXION KEY thermal imagers require a licence when exported
outside your country.
Attention!
Les imageurs thermiques AXION KEY exigent une licence
lorsqu’ils sont exportés à l’extérieur de votre pays.
Achtung!
AXION KEY Wärmebildkameras erfordern eine Lizenz, wenn
sie außerhalb Ihres Landes exportiert werden.
¡Atención!
Los generadores de imágenes térmicos AXION KEY necesitan
una licencia cuando se exportan fuera de su país
Attenzione!
I monocoli termici AXION KEY necessitano una licenza se
esportati al di fuori del proprio paese.
Внимание!
Тепловизионные монокуляры AXION KEY требуют лицензии,
если они экспортируются за пределы Вашей страны.
Quick Start Guide
AXION KEY

1
123456
7 9 8
ENGLISH
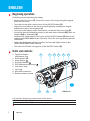
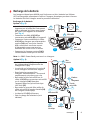
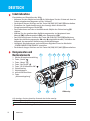
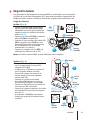
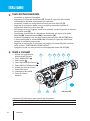
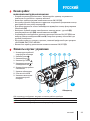
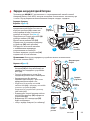
Beginning operation
Switching on and adjusting the image.
• Remove the lens cover (7). Secure the cover to the strap using the magnet
built into the cover.
• Turn the unit on with a short press of the ON/OFF button (5).
• Adjust the resolution of the icons on the display by rotating the dioptre
adjustment ring on the eyepiece (1).
• To focus on the object under observation, rotate the lens focus ring (6).
• Select the desired calibration mode in the main menu: Manual (M), Semi-au-
tomatic (SA) or Automatic (A).
• Calibrate the image with a short press of the ON/OFF button (5) (where cali-
bration mode SA or M has been selected). Close the lens cap during manual
calibration.
• Adjust the brightness, display contrast and smooth digital zoom in the
‘QUICK MENU FUNCTIONS’ section.
• Turn the unit off with a long press of the ON/OFF button (5).
Units and controls
1. Eyepiece dioptre
adjustment ring
2. Down button
3. Menu button
4. Up/Zoom button
5. On/Calibration ON button
6. Lens focus ring
7. Lens cap
8. MicroUSB connector
9. Battery release button
LED indicator
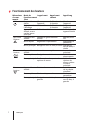
LED indicator displaying current status of the device:
LED Indicator Operating Mode
Device is powered on
device on / battery charge <10%
Fig.
1
ENGLISH

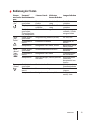
2
123456
7 9 8
Operation of buttons
Control
mechanism
Condition /
Operating Mode
1 short press Next short
press
Long press
ON button
Device is
powered off
Power on the
device
Device
calibration
Power on the
device
Display off Turn on display Device
calibration
Power off the
device
Device turned
on, quick menu,
main menu
Device calibration Display off /
device powered
off
Up/Zoom
button
Device is
powered on
Change magnication (Zoom) PiP on/off
Quick menu Increase parameter Increase
parameter
Main menu Navigation up, right Navigation up,
right
Menu
button
Device is
powered on
Open quick menu Open main
menu
Quick menu Navigation up Exit quick menu
Main menu Conrm value, enter menu
options
Exit menu
options, exit
main menu
Down
button
Device is
powered on
Switching palettes Enabling the
standard palette
Quick menu Reduce parameter Reduce
parameter
Main menu Navigation down, left Navigation
down, left
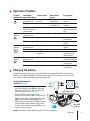
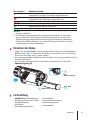
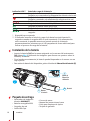
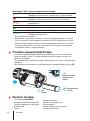
Charging the battery
AXION thermal imagers are supplied with a rechargeable APS3 Lithium-ion
Battery Pack which enables the thermal imager to be used for up to 4 hours.
The battery should be charged before rst use.
17
15
16
8
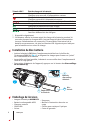
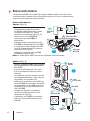
Charging the battery
Option 1 (Fig. 2):
• Install the battery (10) into its slot on
the instrument case (14) by aligning
the icons to form a ‘dot’ on the unit
and the battery (see Fig. 4).
• Attach a USB cable (15) to the
microUSB connector (8) on the device.
• Connect the other end of the USB cable
(15) to the mains charger (16) or to a
USB socket connected to another power
sources with rated output of 5V or less.
• Connect the mains charger (16) to the
mains power supply.
MicroUSB
connector
USB cable
Charger Power
outlet
Note: The PB8I* Power Bank may be used as a charger.
Fig.
2
ENGLISH

3
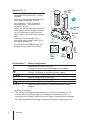
Option 2 (Fig. 3):
• Insert the battery (10) fully along
the guide rail into the APS* charger
slot (11).
• Point A on the battery and Point B on
the charger should be aligned.
• Two batteries can be charged at
the same time – a second slot is
provided for this.
• Attach the microUSB plug on the USB
cable (15) to the microUSB connector
on the mains device (16). Plug the
device into a 100–240V power outlet
(17).
• Attach the second plug of the
microUSB cable to the socket (12) of
the mains charger (11).
• The LED indicator (13) will light up.
• Battery charge status (see table).
15
12
13
А
B
B
А
10
17 16
11
Battery
Pack
Charging
base
MicroUSB
port
USB
cable
Power
outlet
LED Indicator
Charger
LED Indicator ** Battery charge status
Battery charge from 0% to 10%;
Charger not connected to the mains power supply.
Battery charge from 0% to 10%;
Charger connected to the mains power supply.
Battery defective. Battery should not be used.
Battery charge from 10% to 20%;
Battery charge from 20% to 60%
Battery charge from 60% to 95%
Battery completely charged. Can be disconnected from the
charger.
* Available separately
** The indicator displays the current level of charge of the battery for 30
seconds when the APS charger is not plugged in. When the power is
connected, the display shows the current status of the battery constantly,
the LEDs additionally ickering to indicate the battery charging process.
Fig.
3
ENGLISH

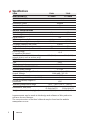
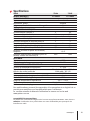
4
9
10
14
Battery
release
button
Fig.
4
Installing the battery
• Insert the battery (10) into the assigned slot on the instrument’s casing (14)
(see Fig. 4), aligning the images to form a ‘dot’ on the instrument and the
battery.
• When properly installed, the battery is locked into the slot with a special clip.
• To remove the battery from the device, press the Battery Release button (9).
Battery
Pack
Battery Slot
Delivery package
• AXION KEY Thermal Imager
• APS3 rechargeable battery
• Mains charger
• USB cable
• Case
• Hand strap
• Quick start guide
• Lens cloth
• Warranty card
Electromagnetic compatibility
This product complies with the requirements of European standard EN 55032: 2015, Class A.
Caution: Operating this product in a residential area may cause radio interference.
ENGLISH

5
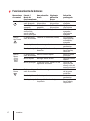
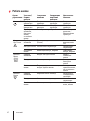
Specications
SKU# 77424 77425
Model AXION KEY KEY XМ22 KEY XМ30
MICROBOLOMETER
Type uncooled
Resolution, pixels 320x240
Frame refresh rate, Hz 50
Pixel size, microns 12
OPTICAL SPECIFICATIONS
Optical magnication, x 2 2.5
Smooth digital zoom, x 2-8 2.5-10
Digital zoom, x 2/4
Relative aperture, D/f 1.2 1.2
Minimum focusing distance, m (y) 3 (3.28) 3 (3.28)
Exit pupil diameter, mm (inch) 3 (0.12)
Angle of eld of view, degrees 10 7,3
Angle of eld of view, metres at 100m 17.5 12.8
Focusing range
Of eyepiece (dioptres)
-4/+5
Maximum observation distance for
animal object, such as a deer, m (y)
950 (1040) 1300 (1420)
DISPLAY
Type LCOS
Resolution, pixels 960х720
OPERATIONAL SPECIFICATIONS
External power voltage 3 – 4.3V
Battery type / Capacity / Rated
Output Voltage
Li-Ion Battery Pack АPS3 /
3200 mAh / DC 3.7V
External power supply 5V (USB)
Battery charge life in hours (at 22°C) 4
IP code (IEC60529) degree of
protection
IPХ7
Operating temperature range -10°С – +40°С (+14°F – +104°F)
Dimensions, mm (inch)
143x41x69
(5.63x1.61x2.71)
143x41x69
(5.63x1.61x2.71)
Weight without batteries, kg (oz) 0.25 (8.82) 0.25 (8.82)
Improvements may be made to the design and software of this product to
enhance its user features.
The current version of the User’s Manual may be found on the website
www.pulsar-nv.com
ENGLISH

6
123456
7 9 8
FRANÇAIS
Mise en route
Allumage de l’appareil et réglage de l’image
• Retirez le couvercle de la lentille (7). Fixez le couvercle sur la sangle à l’aide
de l’aimant intégré dans le couvercle.
• Allumez la lunette en appuyant rapidement sur le bouton ON/OFF (5).
• Réglez la résolution des icônes sur l’écran en faisant tourner la bague de
réglage dioptrique sur l’oculaire (1).
• Pour mettre au point sur l’objet observé, faites tourner la bague de mise au
point (6).
• Sélectionnez le mode de calibration voulu dans le menu principal : manuel
(M), semi-automatique (SA) ou automatique (A).
• Calibrez l’image en appuyant rapidement sur le bouton ON/OFF (5) (lorsque
le mode de calibration SA ou M a été sélectionné). Fermez le couvercle de
lentille pendant la calibration manuelle.
• Réglez la luminosité, le contraste de l’écran et le zoom numérique continu
dans la section “FONCTIONS DU MENU RAPIDE”.
• Éteignez la lunette en appuyant longuement sur le bouton ON/OFF (5).
Unités et commandes
1. Bague de réglage de dioptre
d’oculaire
2. Bouton èche vers le bas
3. Bouton Menu
4. Bouton èche vers le
haut/zoom
5. Bouton
allumage/étalonnage
6. Bague de mise au
point de l’objectif
7. Couvercle de lentille
8. Connecteur
MicroUSB
9. Bouton de
déverrouillage
de batterie
Témoin LED
Témoin LED afchant l’état actuel de l’appareil :
Témoin LED Mode opératoire
L'appareil est allumé.
appareil allumé/charge batterie <10%
Fig.
1
FRANÇAIS

7
Fonctionnement des boutons
Mécanisme
de com-
mande
Mode de
fonctionnement
/état
1 appui court Appui court
suivant
Appui long
ON bouton
L'appareil est
éteint.
Allumez
l'appareil
Calibration de
la lunette
Marche
l'appareil
Extinction de
l'afchage
Allumez l'écran Calibration de
la lunette
Eteignez
l'appareil
Appareil
allumé, menu
rapide, menu
principal
Calibration de la lunette Ecran éteint/
appareil éteint
Up/Zoom
bouton
L'appareil est
allumé.
Changez le grossissement
(zoom)
Marche/arrêt
PiP
Menu rapide Augmenter le paramètre Augmenter le
paramètre
Menu principal Navigation vers le haut, à droite Navigation
vers le haut, à
droite
Menu
bouton
L'appareil est
allumé.
Lancez le menu rapide Lancez le menu
principal
Menu rapide Navigation vers le haut Quittez le
menu rapide.
Menu principal Conrmez la valeur, entrez les
options de menu
Quittez les
options de
menu, quittez
le menu
principal
Down
bouton
L'appareil est
allumé.
Palettes de commutation Activation
de la palette
standard
Menu rapide Diminuer le paramètre Diminuer le
paramètre
Menu principal Navigation vers le bas, à
gauche
Navigation
vers le bas, à
gauche
FRANÇAIS

8
15
12
13
А
B
B
А
10
17 16
11
Вloc-
batterie
L’embase
de
chargement
Port du
micro USB
Câble
USB
Prise
électrique
Indicateur LED
Chargeur
Fig.
3
17
15
16
8
Port
micro-USB
Câble USB
Chargeur Prise
électrique
Fig.
2
Note: Le PB8I* Power Bank peut servir ce chargeur.
Recharge de la batterie
Les imageurs thermiques AXION sont livrés avec un bloc batterie ion-lithium
APS3 rechargeable permettant d’utiliser l’imageur thermique pendant 4 heures.
La batterie doit être chargée avant la première utilisation
Recharge de la batterie
Option 1 (Fig. 2):
• Installez la batterie (10) dans son
logement sur le boîtier de l’instrument
(14) en alignant les icônes pour former
un “point” sur l’appareil et la batterie.
(voir Fig. 4).
• Connectez un câble USB (15) au
connecteur microUSB (8) sur l’appareil.
• Connectez l’autre extrémité du câble
USB (15) au chargeur par alimentation
secteur (16) ou à une prise femelle
USB connectée à une autre source
d’alimentation avec une tension
nominale de sortie de 5V ou moins.
• Connectez le chargeur secteur (16) à
l’alimentation électrique du secteur.
Option 2 (Fig. 3):
• Insérez la batterie (10) le long du rail
de guidage dans l’emplacement du
chargeur APS* (11).
• Le point A sur la batterie et le point B
sur le chargeur doivent être alignés.
• Deux batteries peuvent être
chargées simultanément – un second
emplacement est prévu pour cela.
• Raccordez la che microUSB sur le
câble USB (15) au connecteur microUSB
sur le chargeur (16). Branchez
l’appareil dans une prise électrique
100–240V (17).
• Raccordez la seconde che mâle du
câble microUSB à la prise femelle (12)
du chargeur secteur (11).
• Le témoin LED (13) s’allumera.
• Etat de charge de la batterie (voir
tableau).
FRANÇAIS

9
9
10
14
Bouton de
déverrouillage
de batterie
Fig.
4
Вloc-
batterie
Emplacement
de la batterie
Témoin LED** État de charge de la batterie
Charge de la batterie de 0 à 10 % ;
Chargeur non raccordé à l’alimentation secteur.
Charge de la batterie de 0 à 10 % ;
Chargeur raccordé à l'alimentation secteur.
Batterie défectueuse. La batterie ne doit pas être utilisée.
Charge de la batterie entre 10% et 20%
Charge de la batterie entre 20% et 60%
Charge de la batterie entre 60% et 95%
Batterie complètement chargée.
Peut être débranchée du chargeur.
* Disponible séparément
** L’indicateur afche le niveau actuel de charge de la batterie pendant 30
secondes lorsque le chargeur APS n’est pas branché dans l’alimentation.
Lorsque l’alimentation est connectée, l’écran afche l’état actuel de la
batterie en permanence, de plus les témoins LED clignotent pour indiquer
que la batterie est en cours de charge.
Installation du bloc-batterie
• Insérez la batterie (10) dans l’emplacement attribué sur le boîtier de
l’instrument (14) (voir Fig. 4), en alignant les images pour former un “point”
sur l’instrument et la batterie.
• Lorsqu’elle est bien installée, la batterie se verrouille dans l’emplacement à
l’aide d’un clip spécial.
• Pour retirer la batterie de l’appareil, appuyez sur le bouton de déverrouillage
de la batterie (9).
Emballage de livraison
• Imageur thermique AXION KEY
• Batterie rechargeable APS3
• Chargeur secteur
• Câble USB
• Caisse
• Dragonne
• Manuel d’instruction de mise en
route
• Chiffon pour nettoyer l’optique
• Carte de garantie
FRANÇAIS

10
Specications
SKU# 77424 77425
Modèle AXION KEY KEY XМ22 KEY XМ30
MICROBOLOMÈTRE
Type Non refroidi
Résolution, pixels 320x240
Fréquence de rafraîchissement d'image, Hz 50
Taille pixels, microns 12
SPÉCIFICATIONS OPTIQUES
Grossissement optique, x 2 2,5
Zoom numérique continu, x 2-8 2,5-10
Zoom numérique, x 2/4
Ouverture relative, D/f 1,2 1,2
Distance minimum de mise au point, m 3 3
Diamètre pupille de sortie, mm 3
Angle du champ de vision, degrés 10 7,3
Angle du champ de vision, mètres à 100 m 17,5 12,8
Distance de mise au point de l'oculaire,
dioptries
-4/+5
Distance d'observation maximale pour un
animal, comme un chevreuil, m
950 1300
AFFICHAGE
Type LCOS
Résolution, pixels 960х720
SPÉCIFICATIONS OPÉRATIONNELLES
Tension d'alimentation extérieure 3 – 4,3V
Type de batterie / capacité /
tension de sortie nominale
Bloc batterie Li-Ion АPS3 /
3200 mAh / DC 3,7V
Alimentation extérieure 5V (USB)
Autonomie batterie chargée en heures (à 22°C) 4
Code IP (IEC60529) degré de protection IPХ7
Plage de températures opératoires -10°С – +40°С
Dimensions, mm 143x41x69 143x41x69
Poids sans batteries, kg 0,25 0,25
Des améliorations peuvent être apportées à la conception et au logiciel de ce
produit pour améliorer ses fonctionnalités pour l’utilisateur.
La version actuelle du Manuel d’utilisation se trouve sur le site web
www.pulsar-nv.com
Compatibilité électromagnétique
Ce produit est conforme aux exigences de la norme européenne EN 55032 : 2015, Classe A.
Attention : L’utilisation de ce produit dans une zone résidentielle peut provoquer des
interférences radio.
FRANÇAIS

11
123456
7 9 8
DEUTSCH
Inbetriebnahme
Einschalten und Einstellen des Bilds
• Nehmen Sie den Objektivschutz (7) ab. Befestigen Sie den Schutz mit dem im
Schutz eingebauten Magneten an der Schlaufe.
• Gerät durch kurzes Drücken auf die Taste ON (EIN)/OFF (AUS) (5) einschalten.
• Einstellen der Symbolauösung in der Anzeige durch Drehen des
Dioptrieneinstellring am Okular (1).
• Zum Fokussieren auf das zu beobachtende Objekt den Fokussierring (6)
drehen.
• Wählen Sie den gewünschten Kalibrierungsmodus im Hauptmenü aus:
Manuell (M), Halbautomatisch (SA) oder Automatisch (A).
• Das Bild durch kurzes Drücken der Taste ON (EIN)/OFF (AUS) (5) kalibrieren
(wobei der Kalibrierungsmodus SA oder M ausgewählt wurde). Schließen Sie
während der manuellen Kalibrierung die Objektivkappe.
• Helligkeit, Displaykontrast und stufenloses digitales Zoom im Abschnitt
„SCHNELLMENÜ-FUNKTIONEN“ einstellen.
• Gerät durch langes Drücken auf die Taste ON (EIN)/OFF (AUS) (5) ausschalten.
Komponenten und
Bedienelemente
1. Okular-Dioptrieneinstellring
2. Taste „Down“
3. Taste „Menu“
4. Taste „Up/Zoom“
5. Taste „On/Calibration ON“
6. Fokussierring
7. Objektivkappe
8. microUSB-Anschluss
9. Taste
„Akkuentriegelung“
LED-Anzeige
LED-Anzeige, die den aktuellen Zustand des Geräts anzeigt:
LED-Anzeige Betriebsmodus
Gerät ist eingeschaltet
Gerät eingeschaltet / Akkustand < 10 %
Abb.
1
DEUTSCH

12
123456
7 9 8
Bedienung der Tasten
Steuer-
mechanis-
mus
Zustand/
Betriebsmodus
1 kurzer Druck Nächstes
kurzes Drücken
Langes Drücken
Taste
„On“
Gerät ist aus-
geschaltet
Einschalten des
Geräts
Gerätekalibrie-
rung
Gerät Ein-
schalten
Display aus Display ein-
schalten
Gerätekalibrie-
rung
Gerät aus-
schalten
Gerät ein-
geschaltet,
Schnellstartme-
nü, Hauptmenü
Gerätekalibrierung Display ausge-
schaltet / Gerät
ausgeschaltet
Taste
„Up/
Zoom“
Gerät ist ein-
geschaltet
Vergrößerung ändern (Zoom) PiP ein/aus
Schnellstart-
menü
Parameter erhöhen Parameter er-
höhen
Hauptmenü Navigation nach oben, rechts Navigation nach
oben, rechts
Taste
„Menu“
Gerät ist ein-
geschaltet
Schnellstartmenü aufrufen Hauptmenü
aufrufen
Schnellstart-
menü
Navigation nach oben Schnellstartme-
nü verlassen
Hauptmenü Wert bestätigen, Menüoptionen
aufrufen
Menüoptionen
verlassen,
Hauptmenü ver-
lassen
Taste
„Down“
Gerät ist ein-
geschaltet
Wechseln der Paletten Aktivieren der
Standardpalette
Schnellstart-
menü
Parameter verringern Parameter ver-
ringern
Hauptmenü Navigation nach unten, links Navigation nach
unten, links
DEUTSCH

13
17
15
16
8
Micro-USB-
Anschluss
Micro-USB-Kabel
Ladegerät Steckdose
Abb.
2
Auaden des Akkus
AXION Wärmebildkameras werden mit einem wiederauadbaren APS3 Lithium-Io-
nen-Akkupack geliefert, mit dem die Wärmebildkamera bis zu 4 Stunden verwen-
det werden kann. Der Akku sollte vor dem ersten Gebrauch aufgeladen werden.
Auaden des Akkus
Option 1 (Abb. 2):
• Setzen Sie den Akku (10) in seinen
Schacht im Gerätegehäuse (14) ein,
indem Sie die Symbole so ausrichten,
dass sie auf dem Gerät und dem Akku
einen „Punkt“ bilden. (siehe Abb. 4).
• Schließen Sie an dem microUSB-
Anschluss (8) des Geräts ein USB-
Kabel (15) an.
• Verbinden Sie das andere Ende
des USB-Kabels (15) mit dem
Netzladeadapter (16) oder mit
einer USB-Buchse, die an eine
andere Stromquelle mit einer
Ausgangsspannung von 5V oder
weniger angeschlossen ist.
• Stecken Sie den Netzladeadapter (16)
in die Netzsteckdose.
Option 2 (Abb. 3):
• Schieben Sie den Akku (10) entlang
der Führungsschiene vollständig in
den APS* Ladeschacht (11).
• Punkt A auf dem Akku und Punkt B auf
dem Ladegerät müssen zueinander
ausgerichtet sein.
• Es können zwei Akkus gleichzeitig
geladen werden – hierzu ist ein
zweiter Schacht vorgesehen.
• Verbinden Sie den microUSB-Stecker
des USB-Kabels (15) mit dem
microUSB-Anschluss des Netzsteckers
(16). Stecken Sie das Gerät in eine
Steckdose mit 100 – 240 V (17).
• Verbinden Sie den zweiten Stecker
des microUSB-Kabels mit der Buchse
(12) des Netzladeadapters (11).
• Die LED-Anzeige (13) leuchtet auf.
• Akkuladezustand (siehe Tabelle).
15
12
13
А
B
B
А
10
17 16
11
Akku
Ladestation
Micro-USB-
Anschluss
Micro-USB-
Kabel
Steckdose
LED-Anzeige
Ladegerät
Abb.
3
Hinweis: Die PB8I Power Bank kann als Ladegerät
verwendet werden.
DEUTSCH

14
17
15
16
8
Steckdose
Micro-USB-
Anschluss
Micro-USB-
Kabel
9
10
14
Taste
„Akkuentriegelung“
Abb.
4
Akku
Akkuschacht
LED-Anzeige** Akkuladezustand
Akkuladung beträgt 0 % bis 10 %.
Ladegerät ist nicht am Stromnetz angeschlossen.
Akkuladung beträgt 0 % bis 10 %.
Ladegerät ist am Stromnetz angeschlossen.
Akku ist defekt. Akku sollte nicht verwendet werden.
Akkuladung beträgt 10% bis 20%.
Akkuladung beträgt 20 % bis 60 %.
Akkuladung beträgt 60% bis 95%.
Akku vollständig geladen. Kann vom Ladegerät getrennt werden.
* Separat erhältlich
** Die Anzeige zeigt den aktuellen Ladezustand des Akkus 30 Sekunden
lang an, wenn das APS-Ladegerät nicht angeschlossen ist. Wenn die
Stromversorgung angeschlossen wird, zeigt das Display den aktuellen
Zustand des Akkus ständig an und die LEDs ackern zusätzlich, um den
Ladevorgang des Akkus anzuzeigen.
Einsetzen des Akkus
• Setzen Sie den Akku (10) in seinen vorgesehenen Schacht im Gerätegehäuse
(14) ein (siehe Abb. 4), indem Sie die Bilder so ausrichten, dass sie auf dem
Gerät und dem Akku einen „Punkt“ bilden.
• Bei ordnungsgemäßer Installation wird der Akku mit einem speziellen Clip im
Akkufach verriegelt.
• Um den Akku aus dem Gerät zu entnehmen, drücken Sie auf die Taste
Akkuentriegelung (9).
Lieferumfang
• AXION KEY Wärmebildkamera
• Wiederauadbarer APS3-Akku
• Netzladeadapter
• USB-Kabel
• Aufbewahrungstasche
• Handschlaufe
• Kurze Betriebsanleitung
• Optikreinigungstuch
• Garantiekarte
DEUTSCH

15
Technische daten
Lagereinheit-Nr. (Stock Keeping Unit; SKU) 77424 77425
Modell AXION KEY KEY XМ22 KEY XМ30
MIKROBOLOMETER
Typ ungekühlt
Auösung, Pixel 320x240
Bildwiederholfrequenz, Hz 50
Pixelgröße, Mikron 12
OPTISCHE DATEN
Optische Vergrößerung, x 2 2,5
Stufenloses digitales Zoom, x 2-8 2,5-10
Digitales Zoom, x 2/4
Relatives Öffnungsverhältnis, D/f 1,2 1,2
Minimaler Fokussierabstand, m 3 3
Durchmesser Austrittspupille, mm 3
Blickwinkel des Sichtfeldes, Grad 10 7,3
Blickwinkel des Sichtfeldes, Meter bei 100 m 17,5 12,8
Fokussierbereich des Okulars, Dioptrien -4/+5
Maximale Beobachtungsentfernung für ein
Tierobjekt, wie z. B. ein Hirsch, m
950 1300
DISPLAY
Typ LCOS
Auösung, Pixel 960х720
BETRIEBSTECHNISCHE DATEN
Externe Versorgungsspannung 3 – 4,3V
Akkutyp / Kapazität /
Nennausgangsspannung
Li-Ion Akkupack АPS3 / 3200 mAh
/ DC 3,7V
Externe Stromversorgung 5V (USB)
Akkulaufzeit in Stunden (bei 22 °C) 4
IP-Code (IEC60529) Schutzart IPХ7
Betriebstemperaturbereich -10°С bis +40°С
Abmessungen, mm 143x41x69 143x41x69
Gewicht ohne Akku, kg 0,25 0,25
Es können Optimierungen am Design und an der Software dieses Produkts
vorgenommen werden, um die Benutzerfunktionen zu verbessern.
Die aktuelle Version des Benutzerhandbuchs nden Sie auf der Website
www.pulsar-nv.com
Elektromagnetische Kompatibilität
Dieses Produkt entspricht den Anforderungen des Europäischen Standards EN 55032: 2015, Klasse A.
Warnung: Der Betrieb dieses Produkts in einem Wohngebiet kann zu Funkstörungen führen.
DEUTSCH

16
123456
7 9 8
Indicador LED
Fig.
1
ESPAÑOL
ESPAÑOL
Puesta en funcionamiento
Encendido y ajuste de la imagen
Retire la tapa de la lente (7). Fije la tapa a la correa con el imán integrado en
la tapa.
Encienda la unidad pulsando brevemente el botón de ON/OFF (ENCENDIDO/
APAGADO) (5).
Ajuste la resolución de los iconos en la pantalla girando el anillo de ajuste de
dioptrías en el visor (1).
Para enfocar el objeto bajo observación, gire el anillo de enfoque de la lente
(6).
Seleccione el modo de calibración deseado en el menú principal: Manual (M),
semiautomático (SA) o automático (A).
Calibre la imagen pulsando brevemente el botón de ON/ OFF (ENCENDIDO/
APAGADO) (5) (si se ha seleccionado el modo de calibración SA o M). Cierre la
tapa de la lente durante la calibración manual.
Ajuste el brillo, el contraste de la pantalla y el zoom digital suave en la sección
«FUNCIONES DEL MENÚ RÁPIDO».
Apague la unidad pulsando prolongadamente el botón de ON/OFF
(ENCENDIDO/APAGADO) (5).
Unidades y controles
1. Anillo de ajuste de
dioptrías de visor
2. Botón ABAJO
3. Botón Menú
4. Botón Up/Zoom
(Arriba/Zoom)
5. Botón de encendido/
Calibración
ENCENDIDA
6. Anillo de enfoque
de la lente
7. Tapa de lente
8. Conector microUSB
9. Botón de liberación
de batería
Indicador LED que muestra el estado actual del dispositivo:
Indicador LED Modo de funcionamiento
El dispositivo está encendido
Dispositivo encendido / carga de batería < 10 %

17
ESPAÑOL
Funcionamiento de botones
Mecanismo
de control
Estado /
Modo de
funcionamiento
Una pulsación
breve
Siguiente
pulsación
breve
Pulsación
prolongada
Botón ON
El dispositivo
está apagado
Encender el
dispositivo
Calibración del
dispositivo
Apagar el
apagada
Pantalla
apagada
Encender la
pantalla
Calibración del
dispositivo
Apagar el
dispositivo
Dispositivo
encendido,
menú rápido,
menú principal
Calibración del dispositivo Pantalla
apagada /
dispositivo
apagado
Botón
Up/Zoom
El dispositivo
está encendido
Cambiar el aumento (zoom) PiP (imagen
superpuesta)
encendida/
apagada
Menú rápido Aumentar parámetro Aumentar
parámetro
Menú principal Navegación hacia arriba,
derecha
Navegación
hacia arriba,
derecha
Botón
Menu
El dispositivo
está encendido
Abrir el menú rápido Abrir el menú
principal
Menú rápido Navegar hacia arriba Salir del menú
rápido
Menú principal Conrmar valor, entrar en las
opciones de menú
Salir de las
opciones de
menú, salir del
menú principal
Botón
Down
El dispositivo
está encendido
Cambio entre gamas Habilitación
de la gama
estándar
Menú rápido Reducir parámetro Reducir
parámetro
Menú principal Navegación hacia abajo,
izquierda
Navegación
hacia abajo,
izquierda
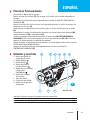
La page est en cours de chargement...
La page est en cours de chargement...
La page est en cours de chargement...
La page est en cours de chargement...
La page est en cours de chargement...
La page est en cours de chargement...
La page est en cours de chargement...
La page est en cours de chargement...
La page est en cours de chargement...
La page est en cours de chargement...
La page est en cours de chargement...
La page est en cours de chargement...
La page est en cours de chargement...
La page est en cours de chargement...
La page est en cours de chargement...
La page est en cours de chargement...
-
 1
1
-
 2
2
-
 3
3
-
 4
4
-
 5
5
-
 6
6
-
 7
7
-
 8
8
-
 9
9
-
 10
10
-
 11
11
-
 12
12
-
 13
13
-
 14
14
-
 15
15
-
 16
16
-
 17
17
-
 18
18
-
 19
19
-
 20
20
-
 21
21
-
 22
22
-
 23
23
-
 24
24
-
 25
25
-
 26
26
-
 27
27
-
 28
28
-
 29
29
-
 30
30
-
 31
31
-
 32
32
-
 33
33
-
 34
34
-
 35
35
-
 36
36


Pulsar AXION KEY X?30 Guide de démarrage rapide
- Taper
- Guide de démarrage rapide
- Ce manuel convient également à
dans d''autres langues
Documents connexes
-
Pulsar Axion Key XM22 / XM30 Le manuel du propriétaire
-
Pulsar Axion Key Operating Instructions Manual
-
-
-
-
-
Pulsar Axion XQ Le manuel du propriétaire
-
Pulsar XQ30 Mode d'emploi
-
-