
• @ @
Whaf The World Comes Home To _'
W_te_Dis?e_
Model#
F@ @
_s_yuc_s J _s_o_ o
ModUle#
_s_yuc_s _ _s_c_ o
Modelo#

ReadcIH of the instructions before using this appJiclnceo
When using this appliance, always exercise basic safety
precautiens, indudin9 the following:
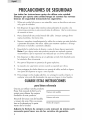
"1. Use this appliance only for its intended purpose as described in this use and
care guide.
2. This water dispenser must be properly installed in accordance with the
installation instructions before it is used. See the grounding instructions in the
installation section.
3.
4_
5.
6.
7_
Never unplugyour water dispenserby pulling on the powercor& Always
grasp theplug firmly and pull straightout fromtheoutlet.
Repair or replace immediately, al! electric service cords that have become
frayed or otherwise damaged. Do not use a cord that shows cracks or abrasion
damage along its length, on the plug or at the connector end_
Unplug your water dispenser before cleaning and making any repairs.
Note: If for any reason this product requires service, we strongly recommend
that a certified technician perform the service.
This water dispenser should not be recessed or built into an enclosed cabinet. It
is designed for freestanding installation only.
Thisapplianceisdesignedfor INDOOR USEONLYand shouldnotbe used
outdoors.
8. Do not operate ),'our water dispenser in the presence of explosive fumes.
9. Close supervision is necessary when any appliance is used by or near children.
10. To protect against electric shock, do not immerse the cord, plug, or any other
part of the water dispenser in water or other liquids.
SAVEI'HESEINSl'RU(I'IONS
ForFutureUse
Thank you for purchasing our Haier
producL This easy-to-use manual will
guide you in getting the best use of
your water dispensen
Remember to record the model and
serial numben They are on a label in
back of the uniL
Model number
Serial number
Date of purchase
Staple your receipt to your manual° You wiJJ need it to obtain
warranty service.

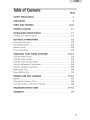
PAGE
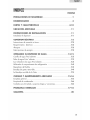
SAFEYYPRECAUTIONS............................................................................ 1
PARTSAND FEATURES...................................................................... 4-10
PROPER LOCATION .............................................................................. 11
ELECTRICAL CONNECYION$ 12
Grounding Instructions 12
Wiring Requirements 12
Extension Cords 12
Power Interruptions .................................................................................... ] 2
OPm:RATING YOUR WA'[_:R DISP_:N$_:R ....................................... 13" 15
Cold/Hot \,,VaterFaucets 13
Cold/Hot Water Switches 13
Cold/Hot Water Indicator Lights.................................................................. 13
Using the Refrigerator Compartment ............................................................ 'J4
Using the Storage Compartment .................................................................. ] 4
Replacing the Fuse...................................................................................... 14
Removable Drip Tra';!.................................................................................. 15
PROPER ¢ARm:AND CLEANING ...................................... 15-16
General ] 5
Cleaning the Condenser Coils ............................................................. 16
For"Long Vacations or Absences / Moving .................................................. 16
]rRouBP.ESHOOTmNG GUID_: .......................................................... 17-18
WARRANTY ............................................................................................ 19

iiiiiiiiiiiiiiiiiiiiiiiiiiiiiiiiiiiiiiiiiiiiiiiiiiiiii @ i i i i i i i i i i i i i i i i i i i i i i i i i i i!
1_RemoveaJJpacking materials. Thisincludesthefoam baseand aJJadhesivetape
homingtheaccessoriesinsideand outside.
2. Inspectand removeany remaining packaging,tapeand printed materiaJsbefore
turningon thewater dispensen
Note: AJJowthewater dispenserto standin an upright positionfor at Jeast
8 hours b÷for÷ turning on tB÷ power.

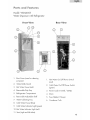
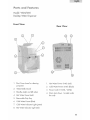
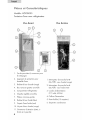
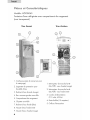
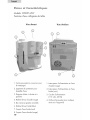
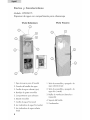
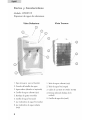
Features
Model: WDQS055
Water Dispenser with Refrigerator
Front View Rear View
© ©
©
1. DustCover(savefor cleaning
purposes)
2. Water BottleGuard
3_ Hot Water Faucet(red)
4. RemovableDrip Tray
5. RefrigeratorCompartment
& RemovableAdjustableShelf
7. \'Vater-CoJJectingTray
8_ ColdWater Faucet(blue)
9. ColdWater hdicator Light(green)
10_HotWater Ndicator Light(red)
11.Vent(right and Jeffsides)
1. Hot Water On/Off Power Switch
(red)
2. Cold Water On/Off Power Switch
(green)
3. Power Cord (115Volt / 60Hz)
4. Drain
5. FuseHolder (15Amp)
6. Condenser Coils

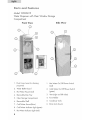
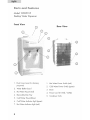
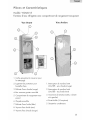
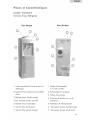
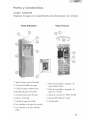
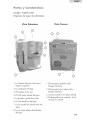
_H_s _d Fe_tuHes
Model: WDQS015
Water Dispenser with Clear Window Storage
Compartment
Front View
$i4e View
\
\
/®
1. Dust Cover (save for cleaning
purposes)
2. Water Bottle Guard
3_ Hot Water Faucet (red)
4. Removable Drip Tray
5. Clear Storage Compartment
6. RemovableShdf
7_ Cold \'VaterFaucet(Mud
8. Cold Water hdicator Light(green}
9_ Hot Water nndicatorLight(red}
5
1. Hot Water On/Off PowerSwitch
(red)
2. Cold \dater On/Off PowerSwitch
(green}
3. Vent(right and Jeffsides}
4. FuseHdder
5. CondenserCoils
6. Drain (notshown}

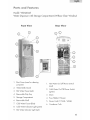
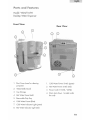
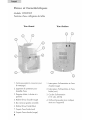
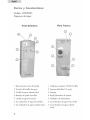
_rts _d Features
Model: WDQS045
Water Dispenser with Storage Compartment (Without dear Window)
Front View Rear View
©
1. DustCover(savefor cleaning
1. Hot Water On/Off PowerSwitch
purposes) (red)
2. Water BottJeGuard
2. CoJdWater On/Off PowerSwitch
3_ Hot Water Faucet(red} (green)
4. RernovabJeDrip Tray 3. Drain
5. StorageCornpartrnent 4. FuseHoJder(15Amp}
6. RernovabJeShdf 5. PowerCord (115Volt/ 60Hz)
7_ CoJdWater Faucet(bJue) 6. CondenserCoiJs
8. CoJdWater hdicator Light(green)
9_ Hot Water hdicator Light(red)

iiiiiiiiiiiiiiiiiiiiiiiiiiiiiiiiiiiiiiiiiiiiiiiiiiiiii @ i i i i i i i i i i i i i i i i i i i i i i i i i i i!
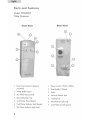
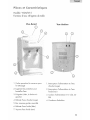
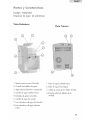
_ts _d Features
Model: WDQSO05
Water Dispenser
Front View
Rear View
©
1_ DustCover(save for cleaning
purposes}
2. WaterBottleGuard
3. HotWater Faucet(red}
4_ RemovableDrip Tray
5. ColdWater Faucet(blue}
& ColdWater IndicatorLight(green}
7. HotWater IndicatorLight(red}
1. Power Cord (115Vdt / 60Hz}
2_ FuseHoMer (15Amp)
3. Drain
4. Pressure ReleaseVent
5. Coding Fan
6. Hot Water Switch (red)
7. Cold Water Switch (green}

P_Hts _d _÷_uHes
ModeJ: WDQTO05
Desktop Water Dispenser
Front Vi÷_
Rear Vie_
1_ Dust Cover (save for cleaning
purposes)
2. Water BottJeGuard
3. Handles (right and Jeffsides}
4_ Hot Water Faucet (red/
5. RemovabJeDrip Tray
& CoJdWater Faucet (bJue)
7. Cold Water _ndicator Light (green/
8. Hot Water hclicator Light (red}
1_ Hot Water Power Switch (red)
2_ CoJd\'Vater Power Switch (black)
3. Pawer Cord (115VoJt / 60Hz/
4. Drain (not shown - Jocated under
the unit)
8

ModeJ: WD©T015
Desktop Water Dispenser
Front View
/
©
©
©
Rear View
........
1_ Dust Cover (save for cleaning
purposes)
2. Water Bottle Guard
3. Hot Water Faucet (red)
4_ RemovabJeDrip Tray
5. CoJdWater Faucet (bJue}
6_ Cold Water Indicator Light (green)
7. Hot Water Hndicator Light (red)
1_ Hot Water Power Switch (red}
2_ CoJd Water Power Switch (green)
3. Drain
4. Power Cord (115VoJt / 60Hz)
5. Condensor CoiJs
9

Mode[: WDQT165W
Desktop Water Dispenser
Front View
©
Eear View
1_ DustCover{savefor cleaning
purposes}
2. Water BaffleGuard
3. Cup Storage
4_ HotWater Faucet(red}
5. RernovabJeDrip Tray
& CoJdWater Faucet(Mud
7. Cold Water hdicator Light(green}
8. HotWater hdicator Light(red}
1_ Cold Vv'ater Power Switch (green}
2_ Hot Water Power Switch (red)
3. Power Cord (115VoJt / 60Hz)
4. Drain (not shown - Jocated under
the unit}
10

r@per L@ tioH
®Toensurethat your water dispenserworks at themaximumefficiencyit was
designedfor. you shouldinstall it in a locationwherethereis proper air
circulationand electricalconnections.
®Thefollowing are therecommendedclearancesaround thewater dispensen
Sides..........3/4" (19ram}
Back..............2" (50ram)
® Do not instaJJyour water dispenser in any location that is not properly insulated
or heated because the unit is not designed to operate in temperature settings
below 55°F/ 13°C_
Note: Thebuilt-in thermostatmaintainsthehotand cold temperatures
automatically.Thehotwater temperaturewiJJbe between
176-203°F/ 80-95°C and thecold water temperaturewiJJbe between
36-50°F / 2-10"C during thisoperation.
®Selecta suitablelocation for theunit on a hard evensurfaceaway from direct
sunlightand heat sources(e.g, radiators, baseboardheaters,cooking
appliances,etc.}.
Note: Hot and coldwater wiJJnot be instantlyavailable as theunitwiJJneed
time to heatup and cooldown thewater.
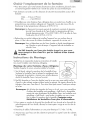
CAUTION: DO NOY plug in the water dispenser until water
flows through both Hot ond Cold woter IFoucets.
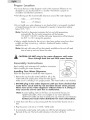
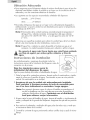
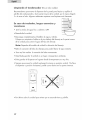
Assembly _HStrUCtieH5
Read carefuJly and understand all installation instructions
before installing thewater dispenser',
Installing Your Water Dispenser
Followthestepsbelowto install thewater dispensen
1. Removethecap from thewater bottlefirst. Liftup the
water bottleand quickly placeit into thewater guard.
Make sureit is standingin an uprightposition.(Thewater bottle isnot included.}
2. DO NOT plug in the woter dispenser untJJyou hove checked thor
woter flaws out of both the red ond blue foucets when pressed.
Never turn on the woter dispenser without woter in it. Doing so
moy ¢ouse the unit to ¢otch fire or too[function°
Note: To avoid spilling water on the floor, we recommend that you use
"Spill-Proof"bottles,which are availableat any water distributor.
"Spill-Proof"bottlesare easyto installsincecap removalis not necessary.
¢ontoct yaur [oco[ woter distributor for more informotian.
3. Checkthatwater flowsout by pressingboththe red and blue faucetsone at a
time.
4_ Plug the power cord into an 115Vdt / 60Hz outlet.
5. Toactivate the water heater and coder, turn ON the red and green switches on
the back of the unit. The hot & cdd indicators in the front wiHBe lit.
11

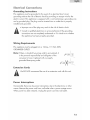
Grounding Instructions
Thisappliancemustbegrounded_Hntheeventofanelectricalshortcircuit,
groundingreducestheriskofelectricshockbyprovidinganescapewireforthe
electriccurrent.Thisapplianceisequippedwithacordcontainingagroundingwire
andagroundedpJug_Theplugmustbeinsertedintoanoutletthatisproperly
installedandgroundd.
®Hmproperuseoftheplugmayresultintheriskofelectricshock_
®Consultaqualifiedelectricianorservicetechnicianifthegrounding
instructionsarenotcompJetdyunderstoodorifindoubtastowhether
theappliancehasbeenproperlygrounded.
Wiring Requirements
Thisappliance mustbe plugged intoa 15Amp, 115 Volt,60Hz
GROUNDEDOUTLET.
Note: Where a standardtwo-prong outletis encountered,it
is thepersonalresponsibilityand obligation of the
consumerto haveit repJacd with a properly
grounded three-prongoutlet.
E×tensien Cords
We DO NOT recommend the use of an extension cord with this unit.
Power Jnterrupti@n5
Occasionally, there may be power interruptions due to thunderstorms or other
causes. Remove the power cord from wall outlet when a power outage occurs.
When power has been restored, re-plug the power cord into waJJoutlet.
12

iiiiiiiiiiiiiiiiiiiiiiiiiiiiiiiiiiiiiiiiiiiiiiiiiiUi_i__i__i__i__i__i__i__i__i__i__i__i__i__i__i__i__i__i__i__i__i__i__i__!__!__i__!_
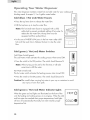
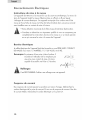
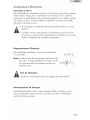
@oereting Your W ter Disoenser
Thiswater dispensermaintainsinstanthotand coldwater for your cookingand
drinking needs.Itaccepts2, 3 or 5-gallonwater bottles.
Cold (blue) / Hot (red) Water Faucets
®Pressthetap leverdown to releasethewater flow.
®PuJJthetap leverup to stopthewater flow.
Note: Thehot(red)water faucetis equippedwith a child
safetylock to preventaccidentalspillingof hotwaten To
releasethehotwater flow,thetap levermustbe
squeezedand thenpusheddown_
Inthecaseof WDQT165W pressin the hotwater safetychild
lockand thenpushdown. Releasetheleverto stopthewater
flow.
S _ _._
1
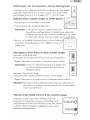
Cold (green) / Hot (red) Water Switches
ColdWater Switch(green}:
Thecoldwater switchactivatesthecooling processwhen turnedON.
®Presstheswitchto theON position.Theswitchshouldbecomelit. HoT
Note: When turning on the unitfor thefirst time,it will take
some time to chill the waten
HotWater Switch(red}:
Thehotwater switchactivatestheheatingprocesswhenturnedON.
Presstheswitchto theQN position.TheswitchshouldbecomeJiL
¢autienJ Becarefulwhencarrying hotwater in ),'ourcupor containerto avoid
any injury or harmfrom spills.
m
COLD
Cold (green) / Hot (red) Water Indkator Lights
When thegreenand red lights are illuminatedon thefront of the
unit, theheatingand coolingprocessisin progress.When thecold
and hotwater hasreachedtheir proper temperatures,both lights
wiJJturn off automatically.Normally, hotwater reachesproper
temperaturefirst.
HOT(
COLD @
13

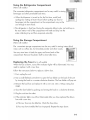
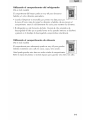
Usingthe Refrigerator Compartment
(Not in all models)
Theconvenientrefrigerator compartmentcan be very usefulin storing
beveragesand otherperishablefood items_
When thedispenseris turnedon for thefirst time,avoid food
spoiJageby waiting at Jeast8 hoursbeforeputtingany food or
beveragesinto thecompartment,asthecompartmentmay notbe
cool enoughto storefoods.
®Therefrigerator is frostfree_During theautomaticdefrostcycle,ice buiJd-upon
therear interiorwall of thecompartmentwiJJmeltand drip into the
water-colJectingtray and thenevaporatenaturaJly.
Using the St@rage ¢@mpart_ent
(Not in all models)
The convenientstoragecompartmentcanbe very usefuJin storing instantdrink
mixessuchascoffee,tea, hot chocoJatepowderand othersnacks.
Youmay storeitemsin both theupper and lower JeveJsof the
compartment.RemovethepJasticsheJfto storetaJJeritems.
RepJadng the Fuse (Not in aJJmodds)
When thefuseisbJown,noneof the indicator JightswiJJbe iJJuminated.Youmay
needto repJaceit with a newfuse.
FoJJowtheinstructionsbeJowto repJacea bJownfuse.
1_First,unpJugtheunit_
2. Usea smallfJatheadscrewdriverto open thefusehomeron the backof the unit
by turningthe knobin a counter-clockwisedirection.Thefuseholder wiJJpop out.
3_Removethebad fuseand replaceit with a newone.Usea 15Amp rating fuse
ONLY.
4. Closethefuseholder by pushingand turning theknob in a clockwisedirection.
5. Hugthe unitinto theouflet_
6. If theindicator lights are stiJJnot iJJuminatedafteryou have replacedtheblown
fusewith a newone,
a) Thenew fusemay be defective.Checkthefuse status.
b) Youmay haveinstdJedthefuseimproperJy_Repeatthe stepsabove_
14

iiiiiiiiiiiiiiiiiiiiiiiiiiiiiiiiiiiiiiiiiiiiiiiiiiUi_i__i__i__i__i__i__i__i__i__i__i__i__i__i__i__i__i__i__i__i__i__i__i__!__!__i__!_
RemovabJe Drip Tray
ThespiJJedwater in thedrip tray mustbe removedregularJyand cleanedproperly
to avoid any bacteriaand residuebuiJd-up_Toremoveit gently_Jiflthetray up.
_roper C_r÷ _d C_÷_iHg
Cautian_ Before using any cleaning product, always read and follow the
manufacturer's instructions and warnings to avoid personal iniury and/or
product damage.
Not÷: It is best to dean the dispenser and its surrounding area in between
repladng the empty bottle with a new one. This way you can move the unit
easily without the weight of the bottle.
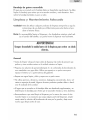
WARNING! 1
AJwaysunpJugthe unit beJeredeaningto avoid dectrk shOCkoFaiJureto
de se may res@ in deat_er i_j_ryo
BeforecJeaning,pJacethedust coveron topof thewater guard to preventdust
and debrisfrom going intothedispenserwhiJecJeaning_
®Preparea cleaningsdution of 3-4 tabJespoonsof baking soda mixedwith warm
waten Usea spongeor a softclothdampenedwith thecJeaningsoJutiontowipe
down theunik
®Wipe with dean warm water and dry with a softcJoth_
®Do notuseharshchemicals,abrasives,ammonia,chJorinebJeach,concentrated
detergents,soJventsor metaJscouringpads. Someof thesechemicalsmay
dissoJve,damageand/or discdor theunit.
®ThespiJJedwater in thedrip tray mustbe removedreguJarJyand cleanedproperJy
toavoid any bacteriaand residuebuiJd-up.
We recommendthatyou cJeanthewater dispenserat Jeasttwicea yeanWhen
cleaning,you do notneed to takeanything apart. SimpJypour thebaking
soda/water soJutionthroughthewater guard_Thenrinsewith pJentyof water and
aJJowthewater to drain.
15

CJeaning [_he Condense_ CoiJs (Not in all modeJs)
® \'Ve recommend that you move the dispenser away from the waJ[ and vacuum or
brush the cdJs on the rear of the unit at least 4 times a yean Some operating
environments may require more frequent cleaning.
TurnOFF the cold and hot water switches.
® UnpJug the unit.
" Drain the unit compJetdy and remove the empty water bottle. --
Put a container or bucket on the floor under the drain on the
back of the unit to catch the water rdeased from the drain tube_
Note: The Jocation of the drain may vary depending on the modeJ type_
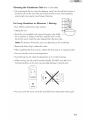
Remove the drain pJug to rdease the water.
® After compJeting the drain process, repJace the drain pJugto its original position.
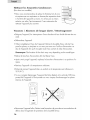
® You must store the unit at room temperature.
Avoid storing the unit where the temperature is at or beJow freezing.
When moving, the unit must be moved verticdJy_ DO NOT move the unit in
horizontal position as this may cause possibJedamage to internaJ parts_
0
'1111111111111111111111111'
You mustcover the unit to avoid dust and debris from entering the water guard.
16

iiiiiiiiiiiiiiiiiiiiiiiiiiiiiiiiiiiiiiiiiiiiiiiiiiUi_i__i__i__i__i__i__i__i__i__i__i__i__i__i__i__i__i__i__i__i__i__i__i__!__!__i__!_
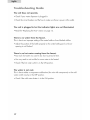
Tr@ub es @@ti g @uid÷
The unit does not operate.
* Checkif your"water dispenser"is pJuggd in.
®Checkthecircuitbreakerand thefuseto makesurethereis powerat theoutlet.
The uriJt is plugged iri But the iridicator Jlghts are riot iJtumiriate4,
®Readthe _RepJacingtheFuse'_sectionon page 14.
There is rio water from the faucet,
Thisis due toan improper settingof thewater bottle or from blockedairflow.
®Adiustthe positionof the bottleproperly on thewater bottle guard sothe air
opening isnot bJockd.
There is rio hot water comirig from the faucet,
®Toomuchhotwater was usedin too shorta period of time.
Youmay needtowait awhilefor morewater to be heated.
Checkif thehotwater switchis in theON position.
The water is riat cool,
Thisis due toeither a compressormalfunction(for unitswith compressor)or thecold
water switchmay be in theOFFposition.
®Checkif the coldwater button is in theON position.
17

¢ompr÷ssor runs too frequentiyo
Thismay be necessaryto maintaina constanttemperatureduring hot and humid
days.
®CJeanthecondensercoiJson theback of theuniL
The water is leaking fro_ the drip tray.
Thisis due toover-spiJJingof thewater in thedrip tray.
Youmustremovethedrip tray fromthedispenserand emptyout thewaten
RepJaceitonceyou haveemptiedthewaten
What happens if the water dispenser is running dry
(without the war÷r)?
® You must never Jet the water dispenser run dry as this may cause damage to the
unitand createa fire_DO NOT Jetthedispenserrunwithout waten
YoumustrepJacetheemptybottleimmediateJy.
What size of water batt_e can J use with this water dispenser?
* Youcan use2, 3 or 5-gaJJonbottJeswithour waterdispensen
18

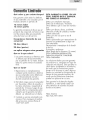
What is covered and for how
long?
Thiswarrant)'-coversaJidefectsin work-
manshipor materialsfor a period of:
12 months Jabot (carry-in only)
12 months ports
Thewarrantycommenceson thedate
theitemwas purchasedand theoriginal
purchasereceiptmustbe presentedto
theauthorized servicecenterbefore
warranty repairsare rendered.
EXCEPTIONS: Commercial or
Rental Use warranty
90 days labor (carry-in only)
90 days ports
No other warranty applies
What is covered.
1.Themechanicaland electricalparts,
which serveasa functionalpurpose
of thisappliance, for a period of 12
months.ThisincludesaJ/parts except
finish, and trim_
Whot wiJJ be done?
1.We wiJJrepair or replace,at our
discretion,any mechanicalor
electricalpart which provesto be
defectivein normalusageduring the
warrant),-period sospecified.
2. TherewiJJbe no chargeto the
purchaserfor parts and labor on any
covereditemsduring theinitial 12
monthperiod. Beyondthis period,
only parts are coveredin tJ_e
remainingwarrant}<Laboris not
providedand mustbe paid by the
customer,
3. Contactyour nearestauthorized
servicecentenForthenameof the
nearestservicecenterpleasevisitour
websiteat wwwHaierAmerica.com or
caJJ1-877-337-3639 for more
information.
]9
THIS WARRANTY COVERS
APPLIANCES WITHIN THE
CONTINENTAL UNITED STATES,
PUERTO RICO AND CANADA.
IT DOES NOT COVER
THE FOLLOWING:
Damages from improper installation.
Damages in shipping.
Defects other than manufacturing.
Damage from misuse, abuse, accident,
alteration, lack of proper care and
maintenance or incorrect current or
voJtage_
Damage from other than household use_
Damage from service by other than an
authorized dealer or service centen
Decorative trims or replaceable light
bulbs_
Transportation and shipping_
Labor (after the initial 12 months)_
THIS LIMITEDWARRANTY ISGIVEN IN
LIEUOF ALL OTHER WARRANTIES,
EXPRESSEDOR, INCLUDING THE
WARRANTIES OF MERCHANTABILITY
AND FITNESSFOR A PARTICULAR
PURPOSE.
The remedy provided in this warranty is
exclusive and is granted in lieu of aJJ
other remedies.
This warrant),- does not cover incidental
or consequential damages, so the above
limitations may not apply to you_ Some
States do not allow limitations on how
long an implied warranty lasts, so the
above limitations may not apply to you.
This warrant),, gives you specific Je_aJ
rights, and you may have other ri@ts,
which vary, from state to state.
Haier America
New York, NY 10018
La page est en cours de chargement...
La page est en cours de chargement...
La page est en cours de chargement...
La page est en cours de chargement...
La page est en cours de chargement...
La page est en cours de chargement...
La page est en cours de chargement...
La page est en cours de chargement...
La page est en cours de chargement...
La page est en cours de chargement...
La page est en cours de chargement...
La page est en cours de chargement...
La page est en cours de chargement...
La page est en cours de chargement...
La page est en cours de chargement...
La page est en cours de chargement...
La page est en cours de chargement...
La page est en cours de chargement...
La page est en cours de chargement...
La page est en cours de chargement...
La page est en cours de chargement...
La page est en cours de chargement...
La page est en cours de chargement...
La page est en cours de chargement...
La page est en cours de chargement...
La page est en cours de chargement...
La page est en cours de chargement...
La page est en cours de chargement...
La page est en cours de chargement...
La page est en cours de chargement...
La page est en cours de chargement...
La page est en cours de chargement...
La page est en cours de chargement...
La page est en cours de chargement...
La page est en cours de chargement...
La page est en cours de chargement...
La page est en cours de chargement...
La page est en cours de chargement...
La page est en cours de chargement...
La page est en cours de chargement...
-
 1
1
-
 2
2
-
 3
3
-
 4
4
-
 5
5
-
 6
6
-
 7
7
-
 8
8
-
 9
9
-
 10
10
-
 11
11
-
 12
12
-
 13
13
-
 14
14
-
 15
15
-
 16
16
-
 17
17
-
 18
18
-
 19
19
-
 20
20
-
 21
21
-
 22
22
-
 23
23
-
 24
24
-
 25
25
-
 26
26
-
 27
27
-
 28
28
-
 29
29
-
 30
30
-
 31
31
-
 32
32
-
 33
33
-
 34
34
-
 35
35
-
 36
36
-
 37
37
-
 38
38
-
 39
39
-
 40
40
-
 41
41
-
 42
42
-
 43
43
-
 44
44
-
 45
45
-
 46
46
-
 47
47
-
 48
48
-
 49
49
-
 50
50
-
 51
51
-
 52
52
-
 53
53
-
 54
54
-
 55
55
-
 56
56
-
 57
57
-
 58
58
-
 59
59
-
 60
60


Haier WDQS055 Installation Instructions Manual
- Taper
- Installation Instructions Manual
dans d''autres langues
- English: Haier WDQS055
- español: Haier WDQS055