V 4.0 8646119
User Manual
2/6/10A Battery Charger
Please read and understand all instructions before use. Retain this manual for
future reference.

8646119 2/6/10A Battery Charger V 4.0
SPECIFICATIONS
Input Voltage
120V AC
Output Voltage
6 or 12V DC
Output Current
2/6/10A
INTRODUCTION
The Powerfist Battery Charger has a 2/10 amp setting for 12V batteries and a
6 amp setting for 6V lead acid batteries. The charger has a Power ON LED. The
ammeter indicates the charging current.
SAFETY
WARNING! Read and understand all instructions before using this tool. The
operator must follow basic precautions to reduce the risk of personal injury
and/or damage to the equipment.
Keep this manual for safety warnings, precautions, operating or inspection and
maintenance instructions.
HAZARD DEFINITIONS
Please familiarize yourself with the hazard notices found in this manual. A notice
is an alert that there is a possibility of property damage, injury or death if certain
instructions are not followed.
DANGER! This notice indicates an immediate and specific hazard that will result in
severe personal injury or death if the proper precautions are not taken.
WARNING! This notice indicates a specific hazard or unsafe practice that could
result in severe personal injury or death if the proper precautions
are not taken.
2/6/10A Battery Charger
2 For technical questions call 1-800-665-8685

V 4.0 2/6/10A Battery Charger 8646119
CAUTION! This notice indicates a potentially hazardous situation that may result
in minor or moderate injury if proper practices are not taken.
NOTICE! This notice indicates that a specific hazard or unsafe practice will
result in equipment or property damage, but not personal injury.
WORK AREA
1. Operate in a safe work environment. Keep your work area clean, well lit and
free of distractions.
2. Keep anyone not wearing the appropriate safety equipment away from the
work area.
3. Store unused tools properly in a safe and dry location to prevent rust or
damage. Lock tools away and keep out of the reach of children.
4. Do not install or use in the presence of flammable gases, dust or liquids.
PERSONAL SAFETY
WARNING! Wear personal protective equipment approved by the Canadian
Standards Association (CSA) or American National Standards Institute (ANSI).
PERSONAL PROTECTIVE EQUIPMENT
1. Always wear impact safety goggles that provide front and side protection
for the eyes. Eye protection equipment should comply with CSA Z94.3-07
or ANSI Z87.1 standards based on the type of work performed.
2. Wear gloves that provide protection based on the work materials or to
reduce the effects of tool vibration.
3. Wear protective clothing designed for the work environment and tool.
PERSONAL PRECAUTIONS
Control the tool, personal movement and the work environment to avoid
personal injury or damage to tool.
1. Do not operate any tool when tired or under the influence of drugs, alcohol
or medications.
SPECIFIC SAFETY PRECAUTIONS
WARNING! DO NOT let comfort or familiarity with product (gained from
repeated use) replace strict adherence to the tool safety rules. If you use
this tool unsafely or incorrectly, you can suffer serious personal injury.
Visit www.princessauto.com for more information 3

8646119 2/6/10A Battery Charger V 4.0
1. Use the correct tool for the job. This tool was designed for a specific function.
Do not modify or alter this tool or use it for an unintended purpose.
2. Use the unit for charging a lead acid battery only. Do not use the unit for
charging dry-cell batteries that are commonly used with home appliances
such as AA and AAA. These batteries may burst and cause an injury to
bystanders or damage property.
ELECTRICAL SAFETY
WARNING! To reduce risk of electric shock, be certain that the plug is
connected to a properly grounded receptacle.
1. Disconnect the tool from the power source before cleaning, servicing,
changing parts/accessories or when not in use.
2. Protect yourself against electric shocks when working on electrical
equipment. Avoid body contact with grounded surfaces. There is an
increased chance of electrical shock if your body is grounded.
3. Remove personal metal items such as rings, bracelets, necklaces and watches
when working with a lead acid battery. Contact with the metal item can create a
short circuit. The current may be high enough to cause a severe burn.
4. Do not expose tool to rain or wet conditions. Water entering a power tool
will increase the risk of electric shock.
5. Do not disconnect the power cord in place of using the ON/OFF switch on
the tool. This will prevent an accidental startup when the power cord is
plugged into the power supply.
a. In the event of a power failure, turn off the machine as soon as the
power is interrupted. The possibility of accidental injury could occur if
the power returns and the unit is not switched off.
6. Do not alter any parts of the tool or accessories. All parts and accessories are
designed with built-in safety features that may be compromised if altered.
7. Make certain the power source conforms to requirements of your
equipment (see Specifications).
8. Grounded tools must be plugged into an outlet that is properly installed and
grounded in accordance with all codes and ordinances. Check with a qualified
electrician if you are in doubt as to whether the outlet is properly grounded. If
the tool should electronically malfunction or break down, grounding provides a
low resistance path to carry electricity away from the user.
4 For technical questions call 1-800-665-8685

V 4.0 2/6/10A Battery Charger 8646119
a. Never remove the grounding prong or modify the plug in any way, as
this will render the tool unsafe.
b. Do not use any adapter plugs.
9. This device is only for use on 120V (single phase) and is equipped with a
3-prong grounded power supply cord and plug.
10. DO NOT use this device with a 2-prong wall receptacle.
a. Choose an available 3-prong power outlet.
b. Replace 2 prong outlet with a grounded 3-prong receptacle, installed
in accordance with the CE Code and local codes and ordinances.
11. Do not operate unit with damaged cord or plug; or if the unit has received a
sharp blow, been dropped, or otherwise damaged in any way. Do not
disassemble the unit; incorrect reassembly may result in a risk of electric
shock or fire.
WARNING! All wiring should be performed by a qualified electrician.
POWER CORD
1. Insert the power cord plug directly to the power supply whenever possible.
Use extension cords or surge protectors only when the tool's power cord
cannot reach a power supply from the work area.
a. When operating a power tool outside, use an outdoor extension cord
marked W-A or W. These cords are rated for outdoor use and reduce
the risk of electric shock.
b. Use in conjunction with a Ground Fault Circuit Interrupter (GFCI). If
operating a power tool in a damp location is unavoidable, the use of a
GFCI reduces the risk of electric shock. It is recommended that the
GFCI should have a rated residual current of 30 mA or less.
2. Do not operate this tool if the power cord is frayed or damaged as an electric
shock or surge may occur, resulting in personal injury or property damage.
a. Inspect the tool's power cord for cracks, fraying or other faults in the
insulation or plug before each use.
b. Discontinue use if a power cord feels more than comfortably warm
while operating the tool.
c. Have the power cord replaced by a qualified service technician.
Visit www.princessauto.com for more information 5

8646119 2/6/10A Battery Charger V 4.0
3. Keep all connections dry and off the ground to reduce the risk of electric
shock. Do not touch plug with wet hands.
4. Prevent damage to the power cord by observing the following:
a. Do not pull on the cord to disconnect the plug from an outlet.
b. Keep cord away from heat, oil, sharp edges or moving parts.
c. Never use the cord to carry the tool.
5. Do not allow people, mobile equipment or vehicles to pass over
unprotected power cords.
a. Position power cords away from traffic areas.
b. Place cords in reinforced conduits.
c. Place planks on either side of the power cord to create a
protective trench.
BATTERY PRECAUTIONS – LEAD ACID
WARNING! Wash skin or clothing that comes in contact with battery acid
immediately with soap and water for at least 10 minutes. Seek medical
attention immediately if there is burn injury.
WARNING! Do not charge a damaged or frozen battery. Contact your local
municipality for proper disposal procedures.
1. Lead acid batteries generate oxygen and hydrogen. These gases can be
explosive. Keep batteries well ventilated. Remove any source of ignition
such as an open flame or a device like a heater from the area. Sparks may
also ignite the gas.
2. Lead batteries contain sulfuric acid, also referred to as electrolyte or battery
acid. The acid is corrosive and can cause a skin burn if leaking or splashed.
The acid may also pose a threat if inhaled or ingested accidentally. The acid
can destroy normal clothing and injure the flesh underneath. Wear splash-
proof goggles and protective clothing when handling a battery.
3. Even a discharged battery may still carry a charge. To prevent a shock, place
battery terminal caps or covers over the terminal to prevent accidental contact.
Hold the battery by the bottom if moving the battery to a different location.
4. Batteries are heavy due to the weight of the lead and liquid contained
inside. A lead acid battery could weigh upwards of 40 lbs. Use safe lifting
methods if moving the battery.
6 For technical questions call 1-800-665-8685

V 4.0 2/6/10A Battery Charger 8646119
UNPACKING
WARNING! Do not operate the tool if any part is missing. Replace the
missing part before operating. Failure to do so could result in a malfunction
and personal injury.
Remove the parts and accessories from the packaging and inspect for damage.
Make sure that all items in the parts list are included.
Contents:
• Battery Charger
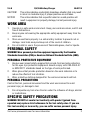
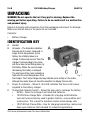
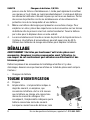
IDENTIFICATION KEY
A. Handle
B. Ammeter – The Ammeter indicates
the amount of current, measured in
amps, that is being drawn by the
battery. As a battery takes on a
charge, it draws less current from the
charger. Correspondingly, the meter
will show less current being drawn by
the battery. When the current stops
decreasing, the battery is charged.
The start area of the meter indicates a
high rate of current being drawn from
the charger. The 2 amp charge rate may indicate some activity on the meter,
although the meter does not have the resolution to display this low rate.
C. Power On Indicator – When lit, this LED indicates that there is AC power
supplied to the battery charger.
D. Charge Rate Selector Switch – Select the amp rate to recharge the battery.
• 6V/6A – Select to recharge 6 volt lead acid batteries.
• 12V/2A Slow Charge Rate – Intended for charging small batteries
such as those commonly used in garden tractors, snow mobiles and
motorcycles. This is also the maintain mode’s trickle charge rate.
• 12V/10A Fast Charge Rate – Use for charging automotive, marine and
deep cycle batteries. Not intended for industrial applications.
Fig. 1
Visit www.princessauto.com for more information 7

8646119 2/6/10A Battery Charger V 4.0
ASSEMBLY & INSTALLATION
Letter references in parenthesis (A) refer to the included Identification Key.
Dashed numbers in parenthesis (Fig. 1-1) refer to specific point of an
illustration or image.
OPERATION
BATTERY TYPES
The unit can recharge two types of batteries: SLI and deep cycle. Each type of
battery has different recharging requirements.
SLI – These initials stand for Starting, Lighting and Ignition, which are the three
basic functions which a battery has to perform on all normal vehicles. This
battery type is used in cars, trucks and motorcycles. These batteries have vent
caps and are often marked ‘Low Maintenance’ or ‘Maintenance-Free’. This type
of battery is designed to deliver quick bursts of energy (such as starting
engines) and have a greater plate count. The plates will also be thinner and have
somewhat different material composition. Most Maintenance Free Batteries are
SLI, otherwise known as Flooded, Regular or Standard Batteries. Regular
batteries should not be used for deep cycle applications.
Deep Cycle – Deep cycle batteries are usually marked as ‘Deep Cycle’ or
‘Marine’. Deep cycle batteries are usually larger than the other types. This type
of battery has less instant energy, but somewhat greater long-term energy
delivery than regular batteries. Deep cycle batteries have thicker plates and can
survive a number of discharge cycles.
CHARGING
1. Ensure that all of the charger components are in place and in good working
condition, including the plastic boots on the battery clips.
2. Make sure the SLI battery’s electrolyte in each cell is at the correct level
before charging (See Battery Maintenance).
3. Connect the unit’s battery clips to the terminals with the correct polarity.
4. Set the appropriate charge rate for your battery as indicated by the
manufacturer.
5. Plug the charger into a grounded AC power outlet.
8 For technical questions call 1-800-665-8685

V 4.0 2/6/10A Battery Charger 8646119
6. Reverse the procedure to disconnect the charger, starting with unplugging
the charger.
7. This unit performs an automatic charge by switching to maintain mode
when the battery is fully charged.
MAINTAIN MODE
When the battery is fully charged, the unit switches to the Maintain Mode of
operation. The charger keeps the battery fully charged by delivering a small
current, when necessary. If the battery voltage drops below a preset level, the
charger will go back into Charge Mode until the battery voltage returns to the
full charge level, at which point the charger will return to Maintain Mode. The
voltage is maintained at a level determined by the battery type selected.
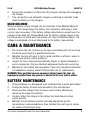
CARE & MAINTENANCE
1. Do not open the unit, as there are no user-serviceable parts. All servicing
should be performed by a qualified technician.
2. Maintain the tool with care. A tool in good condition is efficient, easier to
control and will have fewer problems.
3. Inspect the tool components periodically. Repair or replace damaged or
worn components. Only use identical replacement parts when servicing.
4. Maintain the tool’s labels and name plates. These carry important information.
If unreadable or missing, contact Princess Auto Ltd. for replacements.
WARNING! Only qualified service personnel should repair the tool. An
improperly repaired tool may present a hazard to the user and/or others.
BATTERY MAINTENANCE
1. Charge batteries in a designated, well-ventilated area to avoid gas buildup.
2. Charge the battery at rates recommended by the manufacturer.
3. Disconnect the charger from its power source before attaching or
removing the clamp connections.
4. Carefully attach the clamps to the battery terminals based on their
proper polarity.
5. Maintain the connections and the vent plug adjustment per the
manufacture's recommendations. Also maintain the vent caps to reduce
the chance of electrolyte spray.
Visit www.princessauto.com for more information 9

8646119 2/6/10A Battery Charger V 4.0
6. Clean the terminals and rinse off the battery's outer surface before
recharging. Brush away from yourself when cleaning debris from the
battery and terminals to avoid potential contamination.
7. Fill sulfuric acid (electrolyte) to the prescribed level before charging to
reduce the chances of the electrolyte heating up excessively. If water is
added, use distilled water. Do not use tap water due to impurities that can
impact the battery performance.
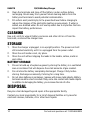
CLEANING
Use a dry cloth to wipe all battery corrosion and other dirt or oil from the
terminals, cords and the charger case.
STORAGE
1. Store the charger unplugged, in an upright position. The power cord will
still conduct electricity until it is unplugged from the power outlet.
2. Store the unit inside a cool, dry place.
3. Store the unit without clipping the leads to the handle, cables, metal or
each other.
BATTERY STORAGE
1. Prevent a build-up of explosive gases by storing the battery in a ventilated
area or container that will disperse the small amounts of gas created.
2. Do not store the battery completely discharged. Charge it fully before
storing. Recharge occasionally if storing for a long time.
3. Do not store batteries in containers / spaces with loose metal objects. Battery
terminals could be short circuited if they come into contact with metal objects.
In addition to damaging the battery, you increase the risk of a fire.
DISPOSAL
Recycle a tool damaged beyond repair at the appropriate facility.
Contact your local municipality for a list of disposal facilities or by-laws for
electronic devices, batteries, oil or other toxic liquids.
10 For technical questions call 1-800-665-8685

V 4.0 2/6/10A Battery Charger 8646119
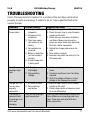
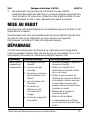
TROUBLESHOOTING
Visit a Princess Auto Ltd. location for a solution if the tool does not function
properly or parts are missing. If unable to do so, have a qualified technician
service the tool.
Problem(s) Possible Cause(s) Suggested Solution(s)
No reading on
the ammeter.
1. Charger is not
plugged in.
2. No power at the
receptacle.
3. Clips have a poor
connection to the
battery.
4. Connections are
reversed.
5. Battery is defective
(will not accept a
charge).
6. 2 amp charge rate
is being used.
1. Plug the charger into an AC outlet.
2. Check for open fuse or circuit breaker
supplying AC outlet.
3. Check for poor connection to battery
and frame. Make sure connection
points are clean. Rock clips back and
forth for a better connection.
4. Unplug the charger and reverse the
clips.
5. Have battery checked.
6. Ammeter may show no activity at the
2A charge rate.
Ammeter
readings stays
high.
1. Battery is severely
discharged.
2. Wrong battery
voltage.
1. Continue charging battery for two more
hours.
2. If problem continues have the battery
checked.
3. Verify the voltage settings or output
ratings on the charger are correct.
Charger will not
turn on when
properly
connected.
1. AC outlet is dead.
2. Poor electrical
connection.
1. Check for open fuse or circuit breaker
supplying AC outlet.
2. Check power cord and extension cord
for loose fitting plug.
The battery is
connected and
the charger is on,
but is not
charging.
Clips are not making a
good connection.
Check for poor connection at battery and
frame. Make sure connecting points are
clean. Rock clips back and forth for a
better connection.
Visit www.princessauto.com for more information 11

8646119 2/6/10A Battery Charger V 4.0
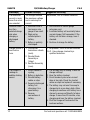
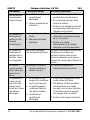
Problem(s)
Possible Cause(s)
Suggested Solution(s)
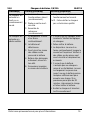
The measured
current is much
lower than what
was selected.
The charger reached
the maximum voltage
and is reducing the
current.
No problem, this is a normal condition.
Ammeter reads
less than
selected charge
rate when
charging a
discharged
battery.
1. Extension cord is
too long or wire
gauge is too small.
2. Weak cell or
sulfated plate in
battery.
3. Battery is partially
discharged.
1. Use a shorter or heavier gauge
extension cord.
2. A sulfated battery will eventually take a
normal charge if left connected. If the
battery will not take a charge, have it
checked.
3. Continue to charge the battery.
Charger makes a
loud buzz or
hum.
1. Transformer
laminations vibrate
(buzz).
2. Shorted Diode
Assembly or
Output.
3. Rectifier Assembly
(hum).
1. No problem, this is a normal condition.
2 & 3. Have charger checked by a
qualified technician.
The charger is
making an
audible clicking
sound.
1. Circuit breaker is
cycling.
2. Battery is defective.
3. Shorted battery
cables or clips.
4. Severely discharged
battery, but
otherwise it is a
good battery.
5. Reverse
connections at
battery.
1. The settings may be wrong. Check the
charger settings.
2. Have the battery checked.
3. Circuit breaker cycles when current
draw is too high. Check for shorted
cables or clips and replace if necessary.
4. The battery may not want to accept a
charge due to a run-down state. Allow
charging to continue until battery has a
chance to recover sufficiently to take a
charge. If more than 20 minutes, stop
charging and have the battery checked.
5. Shut the charger off and correct the
lead connections.
12 For technical questions call 1-800-665-8685

V4,0 8646119
Manuel d'utilisateur
Chargeur de batteries,
2/6/10 A
Vous devez lire et comprendre toutes les instructions avant d'utiliser l'appareil.
Conservez ce manuel afin de pouvoir le consulter plus tard.

8646119 Chargeur de batteries, 2/6/10 A V4,0
SPÉCIFICATIONS
Tension d'entrée 120 V c.a.
Fonctionne avec 6 ou 12 V c.c
Courant de sortie 6 / 2 / 10 A
INTRODUCTION
Le chargeur de batterie Powerfist présente un réglage de 2/10 A pour les
batteries de 12 V et un réglage de 6 A pour les batteries d'accumulateurs du
plomb de 6 V. Le chargeur est muni d'une DÉL d'alimentation. L'ampèremètre
indique le courant de chargement.
SÉCURITÉ
AVERTISSEMENT ! Veuillez lire et comprendre toutes les instructions avant
d'utiliser cet outil. L'utilisateur doit respecter les précautions de base
lorsqu'il utilise cet outil afin de réduire le risque de blessure ou de
dommage à l'équipement.
Conservez ce manuel qui contient les avertissements de sécurité, les
précautions, les instructions de fonctionnement ou d'inspection et d'entretien.
DÉFINITIONS DE DANGER
Veuillez-vous familiariser avec les avis de danger qui sont présentés dans ce
manuel. Un avis est une alerte indiquant qu'il existe un risque de dommage à la
propriété, de blessure ou de décès si on ne respecte pas certaines instructions.
Chargeur de batteries,
2/6/10 A
2 En cas de questions techniques, appelez le 1-800-665-8685

V4,0 Chargeur de batteries, 2/6/10 A 8646119
DANGER ! Cet avis indique un risque immédiat et particulier qui
entraînera des blessures corporelles graves ou même la
mort si on omet de prendre les précautions nécessaires.
AVERTISSEMENT ! Cet avis indique un risque particulier ou une pratique non
sécuritaire qui pourrait entraîner des blessures
corporelles graves ou même la mort si on omet de
prendre les précautions nécessaires.
ATTENTION ! Cet avis indique une situation possiblement dangereuse qui
peut entraîner des blessures mineures ou modérées si on
ne procède pas de la façon recommandée.
AVIS ! Cet avis indique un risque particulier ou une pratique non
sécuritaire qui entraînera des dommages au niveau de
l'équipement ou des biens, mais non des blessures corporelles.
AIRE DE TRAVAIL
1. Travaillez dans un environnement de travail sécuritaire. Gardez votre aire
de travail propre, bien éclairée et exempte de toute distraction.
2. Assurez-vous que les personnes qui ne portent pas l'équipement de
sécurité approprié ne se trouvent pas à proximité de l'aire de travail.
3. Rangez les outils correctement dans un lieu sécurisé et sec. Gardez les
outils hors de la portée des enfants.
4. N'installez pas et n'utilisez pas d'outils électriques en présence de gaz, de
poussière ou de liquides inflammables.
SÉCURITÉ PERSONNELLE
AVERTISSEMENT ! Portez de l'équipement de protection personnelle
homologué par l'Association canadienne de normalisation (CSA) ou
l'American National Standards Institute (ANSI).
ÉQUIPEMENT DE PROTECTION PERSONNELLE
1. Portez toujours des lunettes antiprojections qui offrent une protection
frontale et latérale pour les yeux. L'équipement de protection des yeux
devrait être conforme à la norme CSA Z94.3-07 ou ANSI Z87.1 fonction du
type de travail effectué.
Visitez www.princessauto.com pour plus d'informations 3

8646119 Chargeur de batteries, 2/6/10 A V4,0
2. Portez des gants qui protègent en fonction des matériaux de travail et pour
réduire les effets des vibrations de l'outil.
3. Portez des vêtements de protection conçus pour l'environnement de travail
et pour l'outil.
PRÉCAUTIONS PERSONNELLES
Gardez le contrôle de l'outil, de vos mouvements et de l'environnement de
travail pour éviter les blessures ou le bris de l'outil.
1. N'utilisez pas l'outil si vous êtes fatigué ou sous l'effet de drogues, d'alcool
ou de médicaments.
CONSIGNES DE SÉCURITÉ SPÉCIFIQUES
DANGER ! Ne permettez PAS au confort ou à votre familiarisation avec l'outil
(obtenus après un emploi répété) de se substituer à une adhésion stricte aux
règles de sécurité de l'outil. Si vous utilisez cet outil de façon dangereuse
ou incorrecte, vous pouvez subir des blessures corporelles graves.
1. Utilisez le bon outil pour la tâche à effectuer. Cet outil a été conçu pour une
utilisation spécifique. Évitez de modifier ou d'altérer cet outil ou de l'utiliser à
une fin autre que celle pour laquelle il a été conçu.
2. Utilisez uniquement l'appareil pour charger les batteries d'accumulateurs
au plomb. N'utilisez pas l'appareil pour charger les batteries à anode sèche
qui sont utilisées couramment dans les appareils électro-ménagers, tels
que AA et AAA. Ces batteries peuvent éclater et causer des blessures aux
gens à proximité ou des dommages matériels.
SÉCURITÉ EN ÉLECTRICITÉ
AVERTISSEMENT ! Pour réduire les risques de choc électrique, assurez-vous que
la fiche est branché dans une prise de courant correctement mise à la masse.
1. Déconnectez l'outil de la source d'énergie avant le nettoyage, l'entretien, le
remplacement de pièces ou d'accessoires ou lorsqu'il n'est pas utilisé.
2. Protégez-vous contre les chocs électriques lorsque vous travaillez en
présence d'équipement électrique. Évitez le contact entre votre corps et les
surfaces reliées à la terre. Il y a un risque plus élevé de choc électrique si
votre corps est mis à la terre.
4 En cas de questions techniques, appelez le 1-800-665-8685

V4,0 Chargeur de batteries, 2/6/10 A 8646119
3. Retirez les articles métalliques personnels tels que les bagues, les
bracelets, les colliers et les montres lorsque vous travaillez avec une
batterie d'accumulateurs au plomb. Un contact avec une pièce de métal
peut provoquer un court-circuit. Le courant peut être suffisamment élevé
pour provoquer des brûlures graves.
4. Les outils ne doivent jamais être exposés à la pluie ou à une forte humidité.
Si l'eau pénètre à l'intérieur d'un outil, le risque de choc électrique devient
beaucoup plus grand.
5. Ne débranchez pas le cordon d'alimentation au lieu d'utiliser le
commutateur de MARCHE/ARRÊT sur l'outil. Ceci permet d'éviter une mise
en marche involontaire lorsque vous branchez le cordon d'alimentation
dans la source d'énergie.
a. Advenant une panne de courant, fermez l'appareil dès que le courant
est interrompu. Il pourrait y avoir un risque de blessure accidentelle
advenant le retour du courant alors qu'on n'a pas fermé l'appareil.
6. Ne modifiez aucune partie de l'outil ou des accessoires. Toutes les pièces
et tous les accessoires sont conçus avec des dispositifs de sécurité
intégrés qui seront compromis s'ils sont modifiés.
7. Assurez-vous que la source d'énergie est conforme aux exigences de votre
équipement (consulter les spécifications).
8. Les outils mis à la masse doivent être branchés dans une prise qui est
correctement installée et mise à la masse conformément à tous les codes
et à tous les règlements. Consultez un électricien qualifié si vous doutez de
la mise à la masse appropriée d'une prise. En cas de défaillance
électronique ou de bris de l'outil, la mise à la masse procure un trajet de
faible résistance pour éloigner l'électricité de l'utilisateur.
a. Ne retirez jamais la broche de masse et ne modifiez jamais la fiche
puisque cela fera en sorte que l'outil ne sera plus sécuritaire.
b. N'utilisez aucune fiche d'adaptation.
9. Cet appareil ne doit être utilisé qu'avec un courant monophasé de 120 V et
est muni d'un cordon d'alimentation et d'une fiche à 3 broches.
10. N'utilisez PAS cet appareil avec une prise murale à 2 broches.
a. Choisissez une prise de courant libre à 3 broches.
Visitez www.princessauto.com pour plus d'informations 5

8646119 Chargeur de batteries, 2/6/10 A V4,0
b. Remplacez la prise à 2 broches par une prise à 3 broches mise à la
masse, installée conformément au Code de l'électricité, ainsi qu'aux
ordonnances et aux codes locaux en vigueur.
11. Do not operate unit with damaged cord or plug; or if the unit has received a
sharp blow, been dropped, or otherwise damaged in any way. Do not
disassemble the unit; incorrect reassembly may result in a risk of electric
shock or fire.
AVERTISSEMENT ! Tout le câblage doit être installé par un électricien
qualifié.
CORDON D'ALIMENTATION
1. Autant que possible, insérez la fiche du cordon d'alimentation directement
dans la source d'énergie. N'utilisez des rallonges ou des limiteurs de
surtension que lorsque le cordon d'alimentation de l'outil est trop court
pour atteindre la source d'énergie depuis l'aire de travail.
a. Lorsque vous vous servez d'un outil électrique à l'extérieur, employez
un cordon prolongateur portant la mention W-A ou W. Ces rallonges
peuvent être utilisées à l'extérieur et elles réduisent le risque de choc
électrique.
b. Servez-vous de l'outil avec un interrupteur de circuit en cas de fuite à
la terre (GFCI). S'il est absolument nécessaire d'utiliser un outil
électrique dans un endroit humide, l'emploi d'un tel interrupteur de
circuit diminue le risque de choc électrique.
2. N'utilisez pas cet outil si le cordon d'alimentation est effilé ou endommagé,
car un choc électrique peut se produire, ce qui pourrait causer des
blessures ou des dommages à la propriété.
a. Avant chaque utilisation, inspectez le cordon d'alimentation de l'outil;
vérifiez qu'il n'est ni fissuré, ni effiloché et que l'isolant et la fiche ne
sont pas endommagés.
b. Arrêtez d'utiliser l'outil si le cordon d'alimentation est trop chaud au
toucher.
c. Faites remplacer le cordon d'alimentation par un technicien de service
compétent.
6 En cas de questions techniques, appelez le 1-800-665-8685

V4,0 Chargeur de batteries, 2/6/10 A 8646119
3. Pour réduire le risque de choc électrique, assurez-vous que toutes les
connexions sont sèches et qu'elles ne présentent aucun contact avec le
sol. Ne touchez pas la fiche avec les mains humides.
4. Pour éviter tout dommage au cordon d'alimentation, observez les
précautions suivantes :
a. Ne tirez jamais sur le cordon d'alimentation pour déconnecter la fiche
de la prise.
b. Tenez le cordon à l'écart de la chaleur, de l'huile, des rebords
coupants ou des pièces mobiles.
c. N'utilisez jamais le cordon d'alimentation pour transporter l'outil.
5. Veillez à ce que personne, ni aucun matériel mobile ni des véhicules
n'écrasent les cordons d'alimentation non protégés.
a. Disposez les cordons d'alimentation loin des zones de passage.
b. Placez les cordons d'alimentation à l'intérieur de conduits renforcés.
c. Placez des planches de chaque côté du cordon d'alimentation pour
créer un couloir protecteur.
Précautions la batterie d'accumulateurs –
Accumulateur au plomb
AVERTISSEMENT ! Lavez immédiatement la peau ou les vêtements qui sont
venus en contact avec l'acide sulfurique, et ce, avec de l'eau et du savon
pendant 10 minutes. Appelez immédiatement un médecin en cas de brûlure.
AVERTISSEMENT ! Ne chargez pas une batterie endommagée ou gelée.
Communiquez avec votre municipalité locale afin de connaître le processus
de mise au rebut.
1. Les batteries d'accumulateurs au plomb produisent de l'oxygène et de
l'hydrogène. Ces gaz peuvent exploser. Assurez-vous que les batteries sont
bien aérées. Retirez de la pièce toute source d'allumage, telle qu'une
flamme nue ou un dispositif, comme un appareil de chauffage. Des
étincelles suffisent également à enflammer le gaz.
2. Les batteries d'accumulateurs au plomb contiennent de l'acide sulfurique,
qu'on appelle également électrolyte. L'acide est corrosif et peut brûler la
Visitez www.princessauto.com pour plus d'informations 7

8646119 Chargeur de batteries, 2/6/10 A V4,0
peau en cas de fuite ou d'éclaboussure. L'acide peut également constituer
une menace s'il est inhalé ou ingéré accidentellement. L'acide peut détruire
les vêtements habituels et blesser la peau qui se trouve en dessous. Portez
des verres de protection contre les éclaboussures et des vêtements de
protection lors de la manipulation d'une batterie.
3. Même une batterie déchargée peut présenter une certaine charge. Pour
empêcher un choc, placez des capuchons ou des couvercles sur les bornes
de batterie afin de prévenir ainsi tout contact accidentel. Tenez la batterie
par le bas pour la déplacer dans un autre endroit.
4. Les accumulateurs sont lourds en raison du plomb et du liquide contenu à
l'intérieur. Une batterie d'accumulateurs pourrait peser plus de 40 lb.
Utilisez des méthodes de levage sécuritaires pour déplacer la batterie.
DÉBALLAGE
AVERTISSEMENT ! Ne faites pas fonctionner l'outil si des pièces sont
manquantes. Remplacez les pièces manquantes avant l'utilisation. Le
non-respect de cet avertissement peut entraîner une défectuosité et des
blessures graves.
Retirez les pièces et les accessoires de l'emballage et vérifiez s'il y a des
dommages. Assurez-vous que tous les articles sur la liste de pièces sont compris.
Contenu :
• Chargeur de batterie
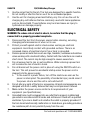
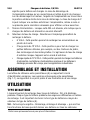
TOUCHE D'IDENTIFICATION
A. Poignée
B. Ampèremètre - L'ampèremètre indique le
degré de courant, en ampères, que
consomme la batterie. Au fur et à mesure
que la batterie se charge, elle consomme
moins de courant du chargeur. Par
conséquent, l'ampèremètre indiquera que la
batterie consomme moins de courant.
Lorsque le courant cesse de diminuer, cela
Fig. 1
8 En cas de questions techniques, appelez le 1-800-665-8685
La page est en cours de chargement...
La page est en cours de chargement...
La page est en cours de chargement...
La page est en cours de chargement...
La page est en cours de chargement...
La page est en cours de chargement...
La page est en cours de chargement...
La page est en cours de chargement...
-
 1
1
-
 2
2
-
 3
3
-
 4
4
-
 5
5
-
 6
6
-
 7
7
-
 8
8
-
 9
9
-
 10
10
-
 11
11
-
 12
12
-
 13
13
-
 14
14
-
 15
15
-
 16
16
-
 17
17
-
 18
18
-
 19
19
-
 20
20
-
 21
21
-
 22
22
-
 23
23
-
 24
24
-
 25
25
-
 26
26
-
 27
27
-
 28
28


dans d''autres langues
- English: Power Fist 8646119 User manual
Documents connexes
-
Power Fist 8656969 Le manuel du propriétaire
-
-
-
-
-
-
-
-
-