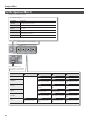
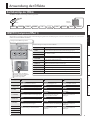
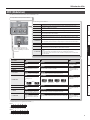
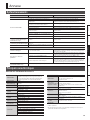
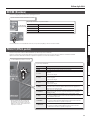
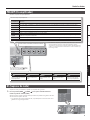
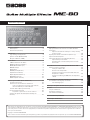
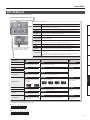
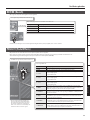
Boss ME-80 Manuel utilisateur
- Catégorie
- Pédale de musique
- Taper
- Manuel utilisateur
Ce manuel convient également à

Deutsch Français Italiano Español Português NederlandsEnglish
Owner’s Manual
Bedienungsanleitung
Mode d’emploi
Manuale dell'utente
Manual del usuario
Manual do proprietário
Gebruikershandleiding


Owner’s Manual
Panel Descriptions . . . . . . . . . . . . . . . . . . . . . . . . . . . . . . . . . . . . . . . . . . . . . . . 2
Top Panel . . . . . . . . . . . . . . . . . . . . . . . . . . . . . . . . . . . . . . . . . . . . . . . . . . . . . . . 2
Rear Panel (Connections) . . . . . . . . . . . . . . . . . . . . . . . . . . . . . . . . . . . . . . . . 3
Outputting Sounds . . . . . . . . . . . . . . . . . . . . . . . . . . . . . . . . . . . . . . . . . . . . . . 4
Switching the Unit On and O . . . . . . . . . . . . . . . . . . . . . . . . . . . . . . . . . . . 4
Adjusting the Volume (OUTPUT LEVEL) . . . . . . . . . . . . . . . . . . . . . . . . . . 4
Tuning the Guitar (TUNER) . . . . . . . . . . . . . . . . . . . . . . . . . . . . . . . . . . . . . .4
Using the Eects . . . . . . . . . . . . . . . . . . . . . . . . . . . . . . . . . . . . . . . . . . . . . . . . . 5
The Connection Order of Eects . . . . . . . . . . . . . . . . . . . . . . . . . . . . . . . . . 5
COMP/FX1 (Compressor/Eect 1) . . . . . . . . . . . . . . . . . . . . . . . . . . . . . . . . 5
OD/DS (Overdrive/Distortion) . . . . . . . . . . . . . . . . . . . . . . . . . . . . . . . . . . . 6
MOD (Modulation) . . . . . . . . . . . . . . . . . . . . . . . . . . . . . . . . . . . . . . . . . . . . . . 7
DELAY (Delay) . . . . . . . . . . . . . . . . . . . . . . . . . . . . . . . . . . . . . . . . . . . . . . . . . . . 8
PREAMP (Preamp) . . . . . . . . . . . . . . . . . . . . . . . . . . . . . . . . . . . . . . . . . . . . . . . 9
NS (Noise Suppressor) . . . . . . . . . . . . . . . . . . . . . . . . . . . . . . . . . . . . . . . . . . . 9
EQ/FX2 (Equalizer/Eect 2) . . . . . . . . . . . . . . . . . . . . . . . . . . . . . . . . . . . . .10
REVERB (Reverb) . . . . . . . . . . . . . . . . . . . . . . . . . . . . . . . . . . . . . . . . . . . . . . .11
PEDAL FX (Pedal Eects) . . . . . . . . . . . . . . . . . . . . . . . . . . . . . . . . . . . . . . .11
Saving/Calling Up Tones (Memory Mode) . . . . . . . . . . . . . . . . . . . . . . . .12
The Structure of Patches . . . . . . . . . . . . . . . . . . . . . . . . . . . . . . . . . . . . . . .12
Changing Between the Manual and Memory Modes . . . . . . . . . . . .12
Making the Operation Settings for Changing from
Memory Mode to Manual Mode . . . . . . . . . . . . . . . . . . . . . . . . . .12
Saving Tones (Patch Write) . . . . . . . . . . . . . . . . . . . . . . . . . . . . . . . . . . . . .12
Calling Up Tones (Patches) . . . . . . . . . . . . . . . . . . . . . . . . . . . . . . . . . . . . .13
Specifying What Happens When You Switch Banks . . . . . . . .13
Changing Tone Settings (Memory Edit Mode) . . . . . . . . . . . . . . . . . . .13
Convenient Functions . . . . . . . . . . . . . . . . . . . . . . . . . . . . . . . . . . . . . . . . . . .14
Applying Eects in Time with the Song Tempo (Tap Tempo) . . . . .14
Setting Modulation Speed and Delay Time Using the
Pedals . . . . . . . . . . . . . . . . . . . . . . . . . . . . . . . . . . . . . . . . . . . . . . . . . . .14
Phrase Loop Play . . . . . . . . . . . . . . . . . . . . . . . . . . . . . . . . . . . . . . . . . . . . . . .15
Adjusting the Expression Pedal . . . . . . . . . . . . . . . . . . . . . . . . . . . . . . . . .15
Adjusting the Settings for the [CTL] (Control) Pedal. . . . . . . . . . . . . .16
Adjusting the Functions of the Pedals . . . . . . . . . . . . . . . . . . . . .16
Specifying How Pedals Behave When Pressed . . . . . . . . . . . . .16
Using the ME-80 Connected to a Computer via USB . . . . . . . . . . . . . . .17
Before Connecting via USB . . . . . . . . . . . . . . . . . . . . . . . . . . . . . . . . . . . . .17
Installing the USB Driver. . . . . . . . . . . . . . . . . . . . . . . . . . . . . . . . . .17
Connecting the Computer. . . . . . . . . . . . . . . . . . . . . . . . . . . . . . . .17
Transmitting/Receiving Audio Signals Between a
Computer and the ME-80 . . . . . . . . . . . . . . . . . . . . . . . . . . . . . . . . .17
Transmitting MIDI Messages Between the Computer
and the ME-80 . . . . . . . . . . . . . . . . . . . . . . . . . . . . . . . . . . . . . . . . . . .17
Making Global Settings (System Settings) . . . . . . . . . . . . . . . . . . . . . . . .18
System Setting Procedure . . . . . . . . . . . . . . . . . . . . . . . . . . . . . . . . . . . . . .18
List of Settings . . . . . . . . . . . . . . . . . . . . . . . . . . . . . . . . . . . . . . . . . . .18
Restoring the Factory Settings (Factory Reset) . . . . . . . . . . . . . . . . . . . .18
Appendix . . . . . . . . . . . . . . . . . . . . . . . . . . . . . . . . . . . . . . . . . . . . . . . . . . . . . .19
Troubleshooting . . . . . . . . . . . . . . . . . . . . . . . . . . . . . . . . . . . . . . . . . . . . . . .19
Main Specications . . . . . . . . . . . . . . . . . . . . . . . . . . . . . . . . . . . . . . . . . . . .19
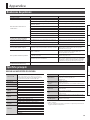
Preset Patch List . . . . . . . . . . . . . . . . . . . . . . . . . . . . . . . . . . . . . . . . . . . . . . .20
USING THE UNIT SAFELY . . . . . . . . . . . . . . . . . . . . . . . . . . . . . . . . . . . . . . . .21
IMPORTANT NOTES . . . . . . . . . . . . . . . . . . . . . . . . . . . . . . . . . . . . . . . . . . . . .21
Index . . . . . . . . . . . . . . . . . . . . . . . . . . . . . . . . . . . . . . . . . . . . . . . . . . . . . . . . . .22
Before using this unit, carefully read the sections entitled “USING THE UNIT SAFELY” and “IMPORTANT NOTES” (separate sheet “Read Me First” and Owner’s
Manual p. 21). These sections provide important information concerning the proper operation of the unit. Additionally, in order to feel assured that you
have gained a good grasp of every feature of your new unit, read the Owner’s Manual in its entirety. This manual should be saved and kept on hand as a
convenient reference.
Copyright © 2013 BOSS CORPORATION
All rights reserved. No part of this publication may be reproduced in any form without the written permission of BOSS CORPORATION.
Deutsch Français Italiano Español Português NederlandsEnglish

2
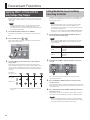
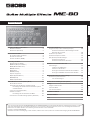
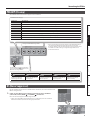
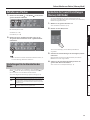
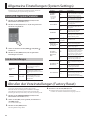
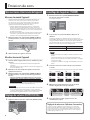
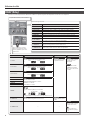
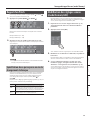
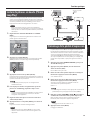
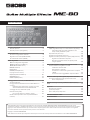
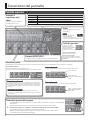
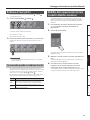
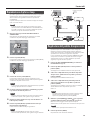
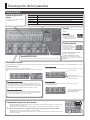
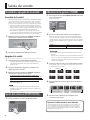
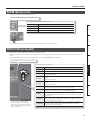
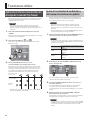
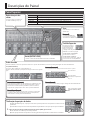
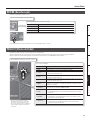
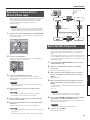
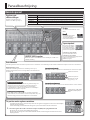
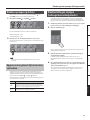
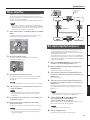
Panel Descriptions
Top Panel
Eect setting knobs
Used to make eect settings for the
ME-80 (p. 5 to p. 11).
Display
Various information about the ME-80 is
shown here.
MEMO
BATTERY LOW indicator on the
display will blink if the batteries
are low. Replace them with new ones.
[OUTPUT LEVEL] knob
Controls the volume of the Gt. AMP OUTPUT jacks and REC OUT/PHONES jack.
Buttons Explanation
[EXIT] button Pressed to go back to previous pages or cancel actions.
[WRITE] button Pressed to save/copy your patch settings (p. 12).
[CTL] button Pressed to set the functions of the [CTL] pedal in Memory Mode (p. 16).
[EDIT] button Pressed to enter Memory Edit Mode (p. 13).
Expression pedal
By strongly pressing the
toe end of the pedal, you
can turn the pedal eect on
and o (PEDAL FX indicator
will light/go out).
Pedal eect is o:
The pedal controls volume.
Pedal eect is on:
The pedal controls the eect (e. g. : wah)
that you select with the [PEDAL FX] knob.
Pedal switches
In Memory Mode, the pedal switches select banks and patches. In Manual mode, the pedal switches turn each eect on/o individually.
[MEMORY/MANUAL] pedal
Switches between Memory Mode and Manual Mode (p. 12).
To turn on the tuner, hold down the pedal for at least two seconds (p. 4).
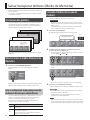
What is Memory Mode?
You can load 72 patches that are the combinations and sound settings of
eects. Out of 72 patches, you can save up to 36 (4 patches x 9 banks) of
them to user bank (9 preset banks, 9 user banks). You can use the pedal to
switch between bank and patch immediately.
What is Manual Mode?
You can turn the eects on and o by using the pedals. You can turn the
eects on and o just like turning eects pedals mounted on an eects
board on and o individually.
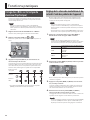
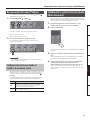
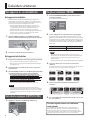
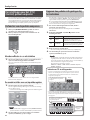
In Memory Mode
Use the pedals shown below to switch between bank and patch.
Switch banks.
Switch patches.
Operate functions that have
been specied on p. 16.
In Manual Mode
Use the pedals shown below to turn an eect on and o individually.
Turn eects (COMP, OD/DS,
MOD, DELAY, AMP, EQ, REV) on
and o.
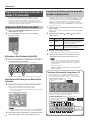
Checking knob positions
In Memory Mode (p. 12), the positions of knobs on the panel may not match the actual values of parameters.
You can get the actual parameter values to appear in the display so you can check them.
1. Turn the knob you want to check while holding down the [EDIT] button.
The value of the knob will be displayed for a limited time.
When the knob position matches its value, the tuning guide on both sides of the display will light.

Panel Descriptions
3
Deutsch Français Italiano Español Português NederlandsEnglish
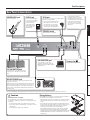
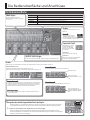
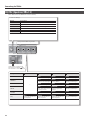
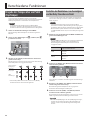
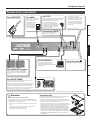
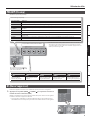
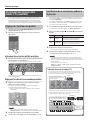
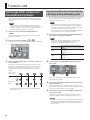
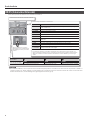
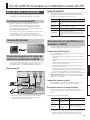
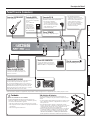
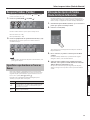
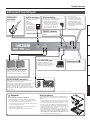
Rear Panel (Connections)
GUITAR INPUT jack
Connect your guitar.
Gt. AMP OUTPUT jacks
Connect these to your guitar amp or mixer.
If using a mono connection, use only the “L”
jack.
AUX IN jack
Use a stereo-mini plug to
connect your audio player.
Use your audio player’s
volume control to
control the volume
of Gt. AMP OUTPUT
jacks and REC OUT/
PHONES jack.
REC OUT/PHONES jack
Use a stereo-mini plug to connect your headphones (sold
separately) or recorder.
When you connect a stereo-mini plug to this jack, the internal
guitar amp simulator will be automatically on so that you can
also enjoy the powerful guitar sound with your headphones.
In this case, the sound from Gt. AMP OUTPUT jacks will have
the same eect.
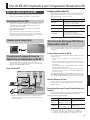
USB COMPUTER port
Use a USB cable to connect to a
computer and exchange audio and
MIDI data between the ME-80 and the
computer (p. 17).
DC IN jack
This jack is for connecting an AC adaptor (BOSS
PSA series; sold separately).
* Use only the specied AC adaptor
(PSA series), and connect it to an
AC outlet of the correct voltage.
Do not use any other AC adaptor,
since this may cause malfunction.
[POWER] switch
Turns the unit on and o (p. 4).
To prevent the inadvertent
disruption of power to your unit
(should the plug be pulled out
accidentally), and to avoid applying
undue stress to the DC IN jack,
anchor the power cord using
the cord hook, as shown in the
illustration.
Security slot ( )
http://www.kensington.com/
Caution
Handle batteries carefully
* If used improperly, you risk the dangers of uid leakage,
overheating, combustion, explosion, etc. Carefully observe the
following:
• Do not heat, disassemble, or toss them into a re or water.
• Do not expose them to sunlight, ame, or any other source of
extreme heat.
• Do not attempt to charge a dry cell battery.
Placing batteries
Place batteries in the battery box on the bottom of the unit. Make
sure that batteries are facing the correct direction.
* When turning the unit over, be careful so as to protect the buttons
and knobs from damage. Also, handle the unit carefully; do not
drop it.
* We recommend that you keep batteries installed in the unit even
though you’ll be powering it with the AC adaptor. That way, you’ll
be able to continue a performance even if the cord of the AC
adaptor gets accidently disconnected from the unit.
* If you handle batteries improperly, you risk explosion and uid
leakage. Make sure that you carefully observe all of the items
related to batteries that are listed in “USING THE UNIT SAFELY” and
“IMPORTANT NOTES” (separate sheet “Read Me First” and Owner’s
manual p. 21).
* To prevent malfunction and equipment failure, always turn down the volume, and turn o all the units before making any connections.

4
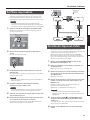
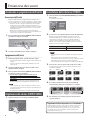
Outputting Sounds
Switching the Unit On and O
Switching the unit on
Once everything is properly connected (p. 3), be sure to follow the
procedure below to turn on their power. If you turn on equipment in
the wrong order, you risk causing malfunction or equipment failure.
* Before turning the unit on/o, always be sure to turn the volume
down. Even with the volume turned down, you might hear some
sound when switching the unit on/o. However, this is normal
and does not indicate a malfunction.
* This unit is equipped with a protection circuit. A brief interval
(afew seconds) after turning the unit on is required before it will
operate normally.
1. Hold down the ME-80’s [POWER] switch for several
seconds to turn on the power.
2. Turn on the power of the connected guitar amp.
Switching the unit o
1. Before turning o the power, conrm the following.
• Have you minimized the volume of the connected equipment?
• Have you saved any patches containing setting that have been
changed? (p. 12)
2. Turn o the power of your guitar amp and any other
connected equipment.
3. Hold down the ME-80’s [POWER] switch for several
seconds to turn o the power.
* The power to this unit will be turned o automatically after
a predetermined amount of time has passed since it was
last used for playing music, or its buttons or controls were
operated (Auto O function).
* If you do not want the power to be turned o automatically,
disengage the Auto O function (p. 18).
NOTE
• Any settings that you are in the process of editing will be lost
when the power is turned o. If you have any settings that you
want to keep, you should save them beforehand.
• To restore power, turn the power on again.
Adjusting the Volume (OUTPUT LEVEL)
1. Adjust volume with the [OUTPUT LEVEL] knob.
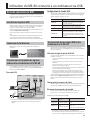
Tuning the Guitar (TUNER)
1. Hold down the [MEMORY/MANUAL] pedal for at least two
seconds.
The tuner is switched on.
2. If necessary, you can change the reference pitch.
The reference pitch is shown when you press the [EDIT] button.
Each press of the button increases the value within the range of 435
Hz to 445 Hz. When the value is over 445 Hz, the value goes back to
435 Hz again. If you don’t press the [EDIT] button for 2 seconds, it
will go back to the normal tuner.
Display Pitch
35 to 45 435 to 445 (Hz)
MEMO
• The reference pitch appears in the display for a brief time.
• The reference pitch setting is saved automatically, so there is no
need to make this setting each time you tune.
• The reference pitch was set to 40 (440 Hz) when the unit was
shipped from the factory.
3. Play a single open note on the string to be tuned.
The name of the note closest to the pitch of the string played
appears in the display.
(C)
(F)
(#symbol)
(G)
(D)
(A)
(E)
(B)
4. Tune so that both tuning guide indicators light up.
Too low Too high
(rapid ashing)
(rapid ashing)
Tuned
5. To turn the tuner o, press any of the pedal switches.
Adjusting outputs when using a tuner
When the tuner is on, you can choose whether the sound is output from the
Gt. AMP OUTPUT and REC OUT/PHONES jacks or not. If you’ve specied that
the sound is output, you can use the expression pedal to adjust the volume.
For details, refer to “Making Global Settings (System Settings)” (p. 18).

5
Deutsch Français Italiano Español Português NederlandsEnglish
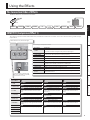
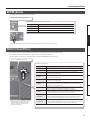
Using the Eects
COMP/FX1 (Compressor/Eect 1)
The compressor produces sustain without distortion, and makes the volume more consistent. You can also select from among a wide variety of
unique eects.
In Manual Mode and Memory Edit
Mode, use the Number [1]/[COMP]
pedal to turn on and o.
Choose the type of compressor or eect.
Type of Eect Explanation
1. COMP
Produces sustain without distortion.
It also works as a limiter to suppress loud peaks in the input signal.
2. T.WAH UP
Produces a wah eect matched to the intensity of picking.
3. T.WAH DOWN
4. OCTAVE Adds sound an octave lower and two octaves lower.
5. SLOW GEAR This removes the attack portion of the signal to create violin-like sounds.
6. DEFRETTER Simulates a fretless guitar.
7. RING MOD
By ring-modulating the guitar sound with the signal from an internal oscillator,
this eect creates a metallic sound that has no denite pitch.
8. AC SIM Changes the sound of electric guitar into the sound of acoustic guitar.
9. Single J Hum
Changes a single-coil sound to a humbucker sound.
10. Hum J Single
Changes a humbucker sound to a single-coil sound.
11. SOLO
By using this setting in conjunction with OD/DS and PREAMP, you can create a
sound suitable for solos.
Type of Eect
1 2 3
1. COMP
SUSTAIN
Sets the sustain for the sound.
ATTACK
Sets the attack (onset) of the sound.
LEVEL
Sets the volume of the eect.
2. T.WAH UP/
3. T.WAH DOWN
SENS
Sets the sensitivity of response to the input sound.
TONE
Sets the tone (brightness) of the wah.
PEAK
Sets the intensity of the wah sound.
4. OCTAVE
-1 OCT
Sets the volume level of the sound one octave
below.
-2 OCT
Sets the volume level of the sound two
octaves below.
DIRECT
Sets the volume level of the direct
sound.
5. SLOW GEAR
SENS
Sets the sensitivity of response to the input sound.
ATTACK
Adjusts the time needed for the volume to
reach its maximum.
LEVEL
Sets the volume level of the eect.
6. DEFRETTER
SENS
Sets the sensitivity of response to the input sound.
TONE
Sets the brightness of the sound.
7. RING MOD
FREQ
Sets the frequency of the signal from the internal
oscillator.
D. LEVEL
Sets the volume level of the direct sound.
E. LEVEL
Sets the volume level of the eect.
8. AC SIM
LOW
Adjusts the tone of the low frequency range.
HIGH
Adjusts the tone of the high frequency
range.
LEVEL
Sets the volume level of the eect.
9. Single J Hum
10. Hum J Single
11. SOLO
When the eect is on, the indicator lights.
1 2 3
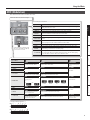
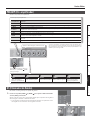
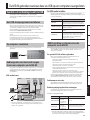
The Connection Order of Eects
The ME-80’s eects are connected as shown below.
PEDAL FX COMP/FX1 OD/DS PREAMP EQ/FX2NS
FOOT
VOLUME
MOD DELAY REVERB
Guitar
Guitar
Amp

Using the Eects
6
OD/DS (Overdrive/Distortion)
These eects add distinctive distortion or sustain.
Type of Eect
1 2 3
All types of OD/DS
DRIVE
Sets the intensity of the distortion.
TONE
Sets the brightness of the sound.
LEVEL
Sets the volume level for OD/DS.
In Manual Mode and Memory Edit
Mode, use the Number [2]/[OD/DS]
pedal to turn on and o.
When the eect is on, the indicator lights.
Choose the type of Overdrive or Distortion.
Type of Eect Explanation
1. BOOST This is a gain booster, but it also works for creating punchy clean tones when used alone.
2. OVERDRIVE This is the sound of the BOSS OD-1. It produces sweet, mild distortion.
3. T-SCREAM This models the sound of Ibanez TS-808.
4. BLUES This is the sound of the BOSS BD-2.
5. TURBO OD This is a powerful overdrive sound. This is the sound of the BOSS OD-2 TURBO=ON.
6. DISTORTION This is the sound of the BOSS DS-1.
7. TURBO DS
This is a unique distortion that emphasizes the midrange. This is the sound of the BOSS
DS-2 TURBO=ON.
8. METAL DS This is the sound of the BOSS METAL ZONE MT-2.
9. CORE This is the sound of the BOSS ML-2 which is ideal for high speed metal ris.
10. FUZZ This models the sound of Electro Harmonics’ Big Mu.
11. OCT FUZZ
This models the sound of the Octavia, a unique fuzz pedal that adds a pitch one octave
above the original sound.
* Company names and product names appearing in this document are the registered trademarks or
trademarks of their respective owners. This document uses these names in order to appropriately
describe the sounds simulated by COSM technology.
1 2 3
MEMO
When using the ME-80, sometimes knob positions on the panel may not match the actual values of parameters due to loading patches and so on.
You can set how the parameters behave when the control knobs are moved in this state. For more information, refer to ”Making Global Settings
(System Settings)” (p. 18).

Using the Eects
7
Deutsch Français Italiano Español Português NederlandsEnglish
MOD (Modulation)
These eects broaden and/or modulate the sound.
Choose the type of modulation.
Type of Eect Explanation
1. PHASER
By adding phase-shifted components to the sound, this eect gives a whooshing,
swirling character to the sound.
2. FLANGER This eect gives an undulating, jet-airplane-like character to the sound.
3. TREMOLO This eect gives a retro feeling by creating a cyclic change in volume.
4. CHORUS
This eect adds subtle wavering to transform the tone into one that is broader, thicker,
and more beautiful. The volume of the direct sound is xed.
5. VIBRATO This produces an intense vibrato eect unobtainable with normal guitar playing.
6. PITCH SHIFT
This eect changes the pitch of the original sound (up or down) within a range of two
octaves.
7. HARMONIST
This creates harmonies reminiscent of twin guitars.
* Play only single notes. The volume of the direct sound is xed.
8. ROTARY This stereo eect produces the sound of rotating speakers.
9. UNI-V This models the Uni-Vibe, an eect that’s essential to the rock sound of the 1960’s.
10. DELAY
This delays the sound to produce an echo-like eect. At delay times of 10 to 600 ms
(milliseconds), you can use it as a secondary delay.
11. OVERTONE
This next-generation eect creates new overtones that add more body to the sound.
You can enjoy the eect not only when playing single notes, but also when playing
chords. This eect is suited to either clean or distorted sound.
Type of Eect
1 2 3
1. PHASER
RATE
Sets the speed of the eect.
DEPTH
Sets the richness of the eect.
RESONANCE
Sets the intensity of the
eect.
2. FLANGER
3. TREMOLO
RATE
Sets the speed of the eect.
DEPTH
Sets the richness of the eect.
E. LEVEL
Sets the volume level of
the eect.
4. CHORUS
5. VIBRATO
6. PITCH SHIFT
PITCH
Sets the amount of pitch-shifting.
D. LEVEL
Sets the volume level of the direct sound.
7. HARMONIST
KEY
Sets the musical key of the song
being played. *1
Ex.
(E) (C#)
HARMONY
Sets the pitch of the harmony.
-1 Octave +1 Octave Detune 3rd
E. LEVEL
Sets the volume level of
the harmonies.
8. ROTARY
RATE
Sets the speed of the eect.
DEPTH
Sets the richness of the eect.
E. LEVEL
Sets the volume level of
the eect.
9. UNI-V
10. DELAY
TIME
Sets the delay time (10 to 600
ms), in steps of 10 ms.
FEEDBACK
Sets the number of repetitions for the delay.
11. OVERTONE
UPPER
Sets the volume level of the
sound an octave above.
LOWER
Sets the volume level of the sound an octave below.
D. LEVEL
Sets the volume level of
the direct sound.
In Manual Mode and Memory Edit
Mode, use the Number [3]/[MOD]
pedal to turn on and o.
When the eect is on, the indicator lights.
1 2 3
*1 Song key and key signature (¾, ²)
Major
Major
Minor
Minor

Using the Eects
8
DELAY (Delay)
This delays the sound to produce an echo-like eect. It lets you add thickness and create complex sounds.
Choose the type of delay.
Type of Eect Explanation
1. 1–99 ms This is a delay of 1 to 99 ms (milliseconds), which is ideal for a doubling eect.
2. 100–600 ms This is a delay of 100 to 600 ms (milliseconds).
3. 500–6000 ms This is a delay of 500 to 6000 ms (milliseconds), which is suited to special eects.
4. ANALOG This produces a mild analog delay sound.
5. TAPE This produces a wavering sound, which is unique to tape echo.
6. MODULATE This is a delay with a pleasant chorus-type eect added to the delay repeats.
7. REVERSE This produces the eect of playback in reverse.
8. CHO + DELAY
This produces stereo chorus and delay eects at the same time.
(The settings for chorus cannot be changed.)
9. TEMPO This determines the delay time (tempo) by using the pedal.
10. TERA ECHO
This is a new space eect which is neither Reverb nor Delay. This gives you
broadening and movements to the sound.
11. PHRASE LOOP
This lets you record a performance and play it back repeatedly.
This is useful for live performances and practice sessions.
Type of Eect
1 2 3
1. 1–99 ms
TIME
Sets the delay time in steps of 1 ms.
Ex.
FEEDBACK
Sets the number of
repetitions for the delay.
E. LEVEL
Sets the volume level of the
delay/eect sound.
MEMO
When the TYPE is set to
REVERSE, this adjusts the
balance of direct and eect
sound.
2. 100–600 ms
TIME
Sets the delay time in steps of 10 ms.
Ex.
3. 500–6000 ms
TIME
Sets the delay time in steps of 100 ms.
Ex.
4. ANALOG
TIME
Sets the delay time.
• ANALOG/TAPE/MODULATE: 30–400ms
• REVERSE: 300–4800ms
• CHO+DELAY: 10–990ms
5. TAPE
6. MODULATE
7. REVERSE
8. CHO + DELAY
9. TEMPO
Sets the beat for the delay sound.
Ex.
cf.
“Applying Eects in Time with the Song Tempo (Tap Tempo)” (p. 14)
10. TERA ECHO
TIME
Sets the length of the delay sound.
FEEDBACK
Sets the decay of the eect.
11. PHRASE LOOP — —
E. LEVEL
Sets the volume level of the
phrase loop.
cf.
“Phrase Loop Play” (p. 15)
2 ms 99 ms
120 ms 590 ms
500 ms 6000 ms
Dotted eighth note Quarter note
When In Manual Mode and
Memory Edit Mode, use the
Number [4]/[DELAY] pedal to
switch on and o.
When the eect is on, the indicator lights.
1 2 3

Using the Eects
9
Deutsch Français Italiano Español Português NederlandsEnglish
PREAMP (Preamp)
This models preamp response.
Choose the type of preamp.
Type of Preamp Explanation
1. AC This amp is suited to an electric acoustic guitar.
2. CLEAN This is a clean, uncolored sound without the idiosyncracies of a typical guitar amp such as trebly character or boomy low end.
3. TWEED This simulates the Fender Bassman’s VINTAGE crunch sound.
4. CRUNCH
ADVANCED crunch sound that allows the nuances of your picking to be expressed even more faithfully than on conventional combo
amps.
5. COMBO This simulates the VOX AC30’s VINTAGE crunch sound.
6. LEAD This simulates the sustaining VINTAGE lead sound of the Boogie Mk series.
7. DRIVE
An ADVANCED straight drive sound that works well in a broad range of situations. A sound like this cannot be obtained from any
existing amps.
8. STACK This models the sound of when input 1 of a Marshall 1959 is used. This is a VINTAGE trebly sound suited to hard rock.
9. METAL This models the heavily distorted sound of a Bogner Uberschall.
1 2 3 4 5
GAIN
Sets the amount of distortion
of the preamp.
BASS
Adjusts the volume of the
bass.
MIDDLE
Adjusts the volume of the
middle.
TREBLE
Adjusts the volume of the
treble.
LEVEL
Sets the overall volume level
of the preamp.
When In Manual Mode and
Memory Edit Mode, use the [BANK
]/[AMP] pedal to turn on and o.
When the eect is on, the indicator lights.
1 2 3 4 5
NS (Noise Suppressor)
This suppresses the noise and hum picked up by the guitar’s pickup.
1. Press the [BANK ] and [BANK ] pedals to adjust the threshold while
holding down the [EDIT] button.
Adjust this according to the level of noise emitted by your guitar’s pickups. A value of 0
switches o the noise suppressor.
* If you set this unnecessarily high, you might not hear any sound when you play soft
notes on your guitar.
* Company names and product names appearing in this document are
the registered trademarks or trademarks of their respective owners. This
document uses these names in order to appropriately describe the sounds
simulated by COSM technology.

Using the Eects
10
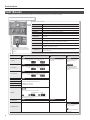
EQ/FX2 (Equalizer/Eect 2)
This eect is inserted after preamp.
When In Manual Mode and
Memory Edit Mode, use the [BANK
]/[EQ] pedal to turn on and o.
Type of Eect
1 2 3 4
1. PHASER
—
RATE
Sets the speed of the eect.
DEPTH
Sets the richness of the eect.
LEVEL
Sets the intensity of the eect.
2. TREMOLO
RATE
Sets the speed of the eect.
DEPTH
Sets the richness of the eect.
LEVEL
Sets the volume level of the
eect.
3. BOOST
DRIVE
Sets the intensity of the
distortion.
TONE
Sets the brightness of the
sound.
LEVEL
Sets the volume level of the
sound.
4. DELAY
TIME
Sets the delay time (10 to 990
ms) in steps of 10 ms.
FEEDBACK
Sets the number of repeti-
tions for the delay.
LEVEL
Sets the volume level of the
delay sound.
5. CHORUS
RATE
Sets the speed of the eect.
DEPTH
Sets the richness of the eect.
LEVEL
Sets the volume level of the
eect.
6. EQ
BASS
Adjusts the volume of the
bass.
MIDDLE
Adjusts the volume of the
middle.
TREBLE
Adjusts the volume of the
treble.
LEVEL
Sets the volume level of the
sound.
Choose the type of eect.
Type of Eect Explanation
1. PHASER
By adding varied-phase portions to the sound, this eect gives a whooshing,
swirling character to the sound.
2. TREMOLO This eect gives a retro feeling by creating a cyclic change in volume.
3. BOOST
This is a gain booster, but it also works for creating punchy clean tones when
used alone.
4. DELAY This delays the sound to produce an echo-like eect.
5. CHORUS
This eect adds subtle wavering to transform the tone into one that is broader,
thicker, and more beautiful.
6. EQ This is a 3-band equalizer.
When the eect is on, the indicator lights.
1 2 3 4

Using the Eects
11
Deutsch Français Italiano Español Português NederlandsEnglish
REVERB (Reverb)
This adds lingering stereo reverberations to the sound.
In Manual Mode and Memory Edit Mode, use the [CTL]/[REV] pedal to turn on and o.
This adjusts the type of reverb and the size of the eect.
Type of Reverb Explanation
ROOM This simulates the reverberations inside a room. (Value: 0–49)
HALL This simulates the reverberations inside a hall. (Value: 0.–49.)
SPRING This models a spring reverb. (Value: .0.–4.9.)
When the reverb is on, the indicator lights.
PEDAL FX (Pedal Eects)
This produces a variety of eects using the unit’s expression pedal.
Firmly pressing the toe of the expression pedal (while putting some weight into it) switches Pedal FX on and o.
When Pedal FX is o, the expression pedal functions as VOLUME (volume pedal).
Choose the type of PEDAL FX.
Type of Eect Explanation
1. WAH This is a wah eect.
2. VOICE This lets you create sounds that simulate a human voice.
3. +1 OCT
This lets you continuously vary the pitch up to one octave higher than the
original sound.
* Play single notes.
4. +2 OCT
This lets you continuously vary the pitch up to two octaves higher than the
original sound.
* Play single notes.
5. -1 OCT
This lets you continuously vary the pitch up to one octave lower than the
original sound.
* Play single notes.
6. FREEZE
Firmly pressing the pedal switches the FREEZE function, which sustains the tone
of the guitar. Freeze is applied at the moment you press the pedal.
7. OSC DELAY
This lets you use the pedal alone to produce an oscillating delay that otherwise
would require you to carefully control both the FEEDBACK and TIME parameters.
8. OD/DS
This lets you control the DRIVE when using OD/DS eect.
* The [DRIVE] knob determines the maximum value of the range controlled with
the expression pedal.
9. MOD RATE
This lets you control the RATE when using the MOD eect.
* The MODULATION eect’s [RATE] knob determines the maximum value of the
range controlled with the expression pedal.
10. DELAY LEV
This lets you control the delay level when using the DELAY eect.
* The DELAY eect’s [E. LEVEL] knob determines the maximum value of the
range controlled with the expression pedal.
When PEDAL FX is on, the indicator will light.
* When you operate the expression pedal,
please be careful not to get your ngers
pinched between the movable part and the
panel. In places where small children are
present, make sure that an adult provides
supervision and guidance.

12
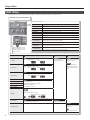
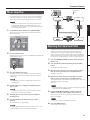
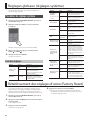
Saving/Calling Up Tones (Memory Mode)
“Memory Mode” allows you to save tone settings and recall them
for later use.
In contrast, “Manual Mode” allows you to turn each eect on and o
by pressing pedals.
The Structure of Patches
In Memory mode, a combination (or set) of eects together with a
group of parameter settings is called a “Patch.”
There are 72 patches stored in the ME-80 and they are organized
into Banks/Number as shown below.
Preset Bank 9
Preset Bank 1
User Bank 9
User Bank 1
You can read from
and write to these
without restriction.
These are read-only.
(Writing to them is
not possible.)
The respective patches in a bank correspond to the number pedals.
Changing Between the Manual and
Memory Modes
1. Press the [MEMORY/MANUAL] pedal.
Each press switches you between the Manual Mode and Memory
Mode.
When in Memory Mode, the red indicator lights up.
When in Manual Mode, the green indicator lights up.
Making the Operation Settings for Changing
from Memory Mode to Manual Mode
When you switch from Memory Mode to Manual Mode, you can
keep the sound from Memory Mode or make the sound change
according to the current positions of the panel’s knobs.
Refer to “Making Global Settings (System Settings)” (p. 18) for how to
set.
Value Explanation
m0
When you switch to Manual Mode, the current knob positions
will aect the sound.
m1
When you switch to Manual Mode, the setting stays as same as
when in Memory Mode.
You can turn individual eects on and o while keeping the
setting in Memory Mode.
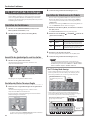
Saving Tones (Patch Write)
This saves the control settings in a patch.
NOTE
• Until you perform a patch-write operation, switching o the
power or changing patches will cause any tones you’ve created
to be lost.
• Carrying out a write operation causes any tone already saved at
the destination patch to be lost.
1. Press the [WRITE] button.
The pedal indicators of the patch numbers blink.
Display
Pedal indicators
2. Choose the user bank and patch number where you’d like
to save the patch.
• Choose the user bank number (U1 – U9) by pressing the [BANK
] and [BANK ] pedals.
• Choose the patch number by pressing a number pedal
(1 through 4).
* To cancel Patch Write, press the [EXIT] button.
3. Press the [WRITE] button again.
All sound settings other than OUTPUT LEVEL are saved.
MEMO
• You can perform patch-write operations either in Manual Mode
or in Memory Mode.
• Performing a patch-write operation switches the unit into
Memory Mode.
TIP
To copy a patch, call up the patch you want to copy (p. 13), then
simply carry out a write operation. You can copy the patch by
choosing a dierent patch number and saving it there.

Saving/Calling Up Tones (Memory Mode)
13
Deutsch Français Italiano Español Português NederlandsEnglish
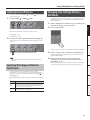
Calling Up Tones (Patches)
To switch patches, use the [BANK ] and [BANK ] pedals and the
number pedals (1-4).
1. Press the [BANK ] or [BANK ] pedal.
Choose the bank number to which you want to switch.
User Bank (U1 – U9)
Preset Bank (
P1 – P9)
2. Press any one of the number pedals from [1] through [4].
The unit switches to the patch within the bank number you chose
in Step 1.
TIP
When you’re selecting a patch within the same bank, you can
skip Step 1.
Specifying What Happens When You
Switch Banks
You can set the unit to change a patch to the next patch
immediately, or to not change to the next one until the number
pedal is pressed when you switch the bank with the [BANK ] and
[BANK ] pedals.
Refer to “Making Global Settings (System Settings)” (p. 18) for how to
set.
Value Explanation
H0
When you press the bank pedal to switch the bank, the patch
doesn’t change although the display changes. The bank and
the patch number are conrmed by pressing the number pedal,
then the patch changes to the next one.
H1
The patch changes to the next one as soon as you press either
the bank pedal or the number pedal.
Changing Tone Settings (Memory
Edit Mode)
In Memory Mode, you cannot turn eects on and o. If you want to
turn eects on and o, or change the tone settings, put the unit in
Memory Edit Mode.
1. Refer to “Calling Up Tones (Patches)” (p. 13) and call up the
patch whose settings you want to change.
2. Press the [EDIT] button.
“Ed” appears in the display. The unit switches to Memory Edit Mode.
3. Use the controls, pedals, and buttons to modify the tone.
In Memory Edit Mode, the pedal switches turn eects on and o
just like in Manual Mode.
4. If you want to save the tone whose settings you’ve
changed, save the patch in the order of “Saving Tones
(Patch Write)” (p. 12).
Until you perform a patch-write operation, switching o the power
or changing patches will cause tones you’ve created to be lost.

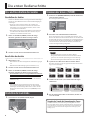
14
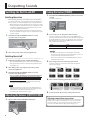
Convenient Functions
Applying Eects in Time with the
Song Tempo (Tap Tempo)
By pressing the pedal in time with the tempo of the song, you can
set delay time of dotted eighth note or quarter note of the tempo
of the song.
MEMO
This section describes how to carry out the operation when
in Manual Mode. When you’re in Memory Mode, you can
accomplish the same operation by using the number pedal for
the currently selected patch.
1. Set the DELAY eect’s TYPE knob to “TEMPO.”
The pedal’s indicator ashes in time with the currently set delay
time.
2. Set the [TIME] knob at or .
Choose the rhythm for the delay sound that’s produced (dotted
eighth note or quarter note).
2
1
3. Press the [DELAY] pedal at least twice in time with the
song’s tempo.
The timing of pressing the pedal determines the timing of the
delay sound. The delay time is set at either a dotted eighth note or
at a quarter note, regarding the interval of pressing the pedal as a
quarter note. The pedal’s indicator ashes in time with the tempo
you input.
The timing of
pressing the pedal
The timing of the
delay sound
TIME settings
* To turn delay o, hold down the [DELAY] pedal for at least two
seconds.
Setting Modulation Speed and Delay
Time Using the Pedals
In addition to adjusting the speed (frequency) of modulation and
the delay time using the knobs, you can also set the timings you
want using the pedals.
MEMO
• This section describes how to carry out the operation when
in Manual Mode. When you’re in Memory Mode, you can
accomplish the same operation by using the number pedal for
the currently selected patch.
• When you’re in Memory Mode and the MOD and DELAY eects
are both on, you can make the setting for only the delay time.
1. Use the TYPE knobs for the MOD and DELAY eects to
choose the desired eects types.
MEMO
When one of the TYPE settings shown below has been chosen
for the MOD or DELAY eect, you cannot make the settings
using the pedals.
Eect TYPE value you cannot set using the pedals
MOD
HARMONIST
PITCH SHIFT
OVERTONE
DELAY
TEMPO
PHRASE LOOP
TERA ECHO
2. Hold down the [MOD] or [DELAY] pedal for at least two
seconds.
or
Two seconds after you begin pressing the pedal, the pedal’s
indicator starts to ash.
3. Press the [MOD] or [DELAY] pedal at least twice at the
speed you want.
The speed of the eect is set by the timing with which you press the
pedal. The pedal’s indicator ashes in time with the modulation rate
or the delay sound.
4. Once again hold down the [MOD] or [DELAY] pedal for at
least two seconds.
The setting for the speed is completed, and the eect is turned on.
The pedal’s indicator stops ashing and stays steadily illuminated.
MEMO
After you’ve nished making the settings, moving the [RATE]
knob or the [TIME] knob deactivates the eect timing set using
the pedal and returns priority to the knob setting.

Convenient Functions
15
Deutsch Français Italiano Español Português NederlandsEnglish
Phrase Loop Play
You can record up to 38 seconds of a performance and play back
the recorded section over and over. You can also layer additional
performances with the recording as it plays back (overdubbing).
This lets you create real-time backing performances on the y.
MEMO
This section describes how to carry out the operation when
in Manual Mode. When you’re in Memory Mode, you can
accomplish the same operation by using the number pedal for
the currently selected patch.
1. Set the DELAY eect’s TYPE knob to “PHRASE LOOP.”
The unit goes into recording standby and the pedal’s indicator
ashes at a xed rate.
2. Press the [DELAY] pedal.
Recording starts as soon as you press the [DELAY] pedal (the pedal’s
indicator ashes rapidly).
3. Press the [DELAY] pedal again.
Recording ends. As soon as recording stops, repeated playback
of what’s been recorded starts, and the pedal’s indicator lights
continuously.
MEMO
An oscillating sound may be audible with extremely short
recording times.
4. To layer additional recordings (overdubbing), repeat
Steps 2 and 3.
MEMO
If you switch the TYPE knob to another position or turn the
power o, the recorded data is deleted.
5. Adjust the phrase loop’s volume as desired with the
[E. LEVEL] knob.
6. Press the [DELAY] pedal twice quickly to stop the
playback.
The unit returns to recording standby.
MEMO
• Press the [DELAY] pedal twice within the span of one second.
• When playback ends, the recorded data is deleted.
STANDBY
OVERDUB
PLAY
REC
... ...
...
2.
3.
4.
1.
Pedal Indicator
Lit
Dark
6.
Press twice
Adjusting the Expression Pedal
The ME-80’s expression pedal has been set for optimal operation
at the factory. However, extended use and certain operating
environments can result in the pedal going out of adjustment.
If you encounter problems such as the expression pedal’s ON/OFF
switch not functioning or the volume pedal not fully cutting o the
sound, you can use the following procedure to readjust the pedal.
1. Press the [MEMORY/MANUAL] pedal to switch to Manual
Mode (p. 12).
2. Press the [DELAY] pedal while holding down the [EDIT]
button.
The display shows “Pd” then “Up”.
3. Move the heel of the expression pedal all the way down,
then release the pedal and press the [WRITE] button.
The display shows “dn”.
4. Move the toe of the expression pedal all the way down,
then release the pedal and press the [WRITE] button.
A value indicating the current stiness (sensitivity) of the expression
pedal switch appears in the display.
Value: 1–9
MEMO
If the display ashes in Steps 3 and 4, press the expression pedal
again, then press the [WRITE] button.
5. Use the [BANK ] and [BANK ] pedals to adjust the
stiness (sensitivity) of the expression pedal switch.
The lower the value, the more easily the switch will respond, even
when pressed lightly.
MEMO
This is set to “5” when shipped from the factory.
6. Press the [WRITE] button.
The setting is saved in memory.

Convenient Functions
16
Adjusting the Settings for the [CTL]
(Control) Pedal
In Memory Mode of the ME-80, using the [CTL] pedal lets you
turn multiple eects on and o simultaneously, or switch the
setting value of a specied eect setting knob to a particular value
immediately (one knob at a time). You can save the setting of the
[CTL] pedal to each patch.
Adjusting the Functions of the Pedals
1. Press the [MEMORY/MANUAL] pedal to switch to Memory
Mode (p. 12).
2. Press the [CTL] button to switch to CTL Setting Mode.
Turning multiple eects on and o
3. Select the eects you want to turn on and o by pressing
the corresponding pedals.
To cancel a selection, press that pedal once again.
The pedal indicators of the eects that want to turn and o blinks.
Setting the value for a particular knob
3. Adjust the knob to the desired value.
To discard the knob settings, make an eect on/o setting.
* You can’t specify the setting of each eect’s TYPE knob.
MEMO
You can check the eect specied with the [MEMORY/MANUAL]
pedal before carrying out patch-write procedure.
4. Save the setting by following “Saving Tones (Patch Write)”
(p. 12) procedure.
Specifying How Pedals Behave When
Pressed
The eect specied with Step 3 can either be switched with each
press of the pedal (TOGGLE), or only be turned on while the pedal is
pressed (MOMENTARY).
The original factory settings are TOGGLE when the eect’s on/o is
assigned and MOMENTARY when the value of the knob is assigned.
1. When in Memory Mode, press the [CTL] button twice.
The unit switches to the setting mode for TOGGLE/MOMENTARY.
2. Use the [BANK ] and [BANK ] pedals to choose the
setting.
Display Settings Explanation
to
TOGGLE
The eect switches with each press of the
pedal (factory setting when the eect’s on/
o is assigned).
mo
MOMENTARY
The eect turns on only while the pedal is
pressed (factory setting when the value of
the knob is assigned).
3. Press the [CTL] button again.
* To cancel the setting, press the [EXIT] button.
4. Save the settings as described in “Saving Tones (Patch
Write)” (p. 12).
MEMO
The lit or unlit state of the [CTL] pedal indicator is linked to the
state of the indicator of the highest-priority eect of those you
turn on/o, according to the internal priority order.
The priority order is as follows.
COMP/FX1 > OD/DS > MOD > DELAY > PREAMP > EQ/FX2 >
REVERB > PEDAL FX
CTL Setting Mode indication
• If the eect’s on/o is assigned and you are in CTL Setting Mode, “Ct” will
be shown on the display and the pedal indicator of the eect that on/o is
assigned to will blink.
The eect pedal that on/o is
assigned to blinks.
Display
• If the value of the specic knob is assigned, the indicator of the
corresponding eect will blink. Then “
Ct” and the number of the knob that
the value is assigned to will be shown on the display.
The indicator of the eect that the
value of the knob is assigned to
blinks.
1- 1- 1- 1-
1-
1-
2-
2-
2- 2-
2-
2-
3- 3- 3- 3-
3-
3-
4-
4-
5-
Display (changes alternately)
Knob number

17
Deutsch Français Italiano Español Português NederlandsEnglish
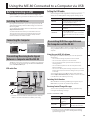
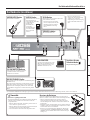
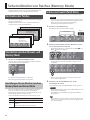
Using the ME-80 Connected to a Computer via USB
Before Connecting via USB
With the ME-80, you can use USB to transmit both digital audio
signals and MIDI messages between the ME-80 and your computer.
Installing the USB Driver
By using the dedicated driver, you can record, play back, and edit
audio with high-quality sound and stable timing, and control the
ME-80 using MIDI.
You can download the ME-80 driver from the Roland local website
(http://www.roland.com/).
You must install the driver before you make USB connections.
The program and procedures for installing the driver may vary
according to your operating environment; carefully read the
Readme included in the downloaded le.
Connecting the Computer
Make connections as shown in the illustration below.
Transmitting/Receiving Audio Signals
Between a Computer and the ME-80
The ME-80’s sound can be recorded on a computer, and sound from
the computer can be played through the ME-80’s Gt. AMP OUTPUT
jacks or REC OUT/PHONES jack.
USB audio ow
USB
LEVEL
USB
LOOPBACK
USB DIRECT
MONITOR
USB
DRY REC
ME-80
USB IN
USB OUT
INPUT
Gt. AMP
OUTPUT
REC OUT
PHONES
ME-80 Eects
ON OFF
* For details on how to switch the audio input on the computer
software, refer to the manual for the software you’re using.
Setting the USB audio
You can change the audio signal ow to suit your purpose. For
details, refer to “Making Global Settings (System Settings)” (p. 18).
List of Settings Explanation
USB LEVEL
Adjusts the level of the audio input from the
computer that will be mixed with the sound
processed by the ME-80’s eects.
USB DIRECT MONITOR
Switches the output of the ME-80 sound to the Gt.
AMP OUTPUT and REC OUT/PHONES jacks.
USB LOOPBACK
Switches the audio input from the computer to
the USB OUT.
USB DRY REC
Switches the guitar sound from USB OUT to go
through the ME-80’s eects.
The audio input from the computer is mixed with
the ME-80’s Gt. AMP OUTPUT (the eect sound of
guitar).
Transmitting MIDI Messages Between
the Computer and the ME-80
You can control the ME-80, edit tones, and manage patches by
using your DAW software and the special ME-80 software in your
computer.
Using the special ME-80 software
By using the special ME-80 software, you can do the operations
shown below.
• You can edit the settings of patches in the user banks.
• You can set names for patches in the user banks.
• You can change the order of patches in the user banks or
exchange patches.
• You can download patches to the unit easily via the Patch
Download website.
• You can save a backup of the settings of the patches in the user
banks and the unit, and restore the settings to those you saved
as a backup.
You can download the special ME-80 software from the Roland
website (http://www.roland.com/). For details on how to use, refer
to the Readme for the software you’re using.
Switching Patch Numbers
When the ME-80 receives Program Change messages from your
DAW software, its patches are simultaneously switched.
Receiving Control Change Messages
You can control specied parameters during a performance by
receiving Control Change messages.
Information transmittable via MIDI
Pedal Control Change Value
Expression Pedal
CC16
(general purpose
controller 1)
0 to 127
[CTL] pedal
CC80
(general purpose
controller 5)
When the pedal is pressed: 127
When the pedal is released: 0
* For details on how to set the MIDI channel for transmitting/
receiving Control Changes, refer to “Making Global Settings
(System Settings)” (p. 18).

18
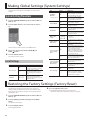
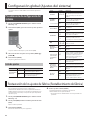
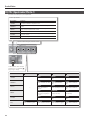
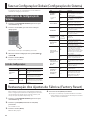
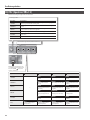
Making Global Settings (System Settings)
Restoring the Factory Settings (Factory Reset)
Settings that are shared by the entire ME-80 are called “system
settings.”
System Setting Procedure
1. Press the [MEMORY/MANUAL] pedal to switch to Manual
Mode (p. 12).
2. Press the [EDIT] button to choose the item you want to
set.
The item switches with each press of the [EDIT] button.
3. Choose the setting value with the [BANK ] and
[BANK ] pedals.
4. Press the [WRITE] button.
The setting is saved in memory.
List of Settings
Item Display Explanation
Knob operation
n0
The value changes immediately as
the knob is turned (factory setting).
n1
The value changes once the
knob is turned past the position
corresponding to the currently set
value.
USB LEVEL
LO to L9
Adjusts the level of the audio input
from the computer that will be
mixed with the sound processed by
the ME-80’s eects.
Item Display Explanation
USB DIRECT
MONITOR
*
d1 at power on
D0
The sound of the ME-80 will not be
output to the REC OUT/PHONES
jack and Gt. AMP OUTPUT jacks.
D1
The sound of the ME-80 will be
output to the REC OUT/PHONES
jack and Gt. AMP OUTPUT jacks.
USB LOOPBACK
B0
The input from the computer will
not be output to USB OUT.
B1
The input from the computer will
be output to USB OUT.
USB DRY REC
R0
The sound of guitar being output
from USB OUT will be processed by
the ME-80’s eects.
R1
The sound of guitar being output
from USB OUT will not be processed
by the ME-80’s eects.
MIDI channel
settings
c1 to c9,
c.0 to c.6
ch. 1 to ch. 9,
ch. 10 to ch. 16
Output settings
while tuning
T0
The sound will not be output while
tuning.
T1
The direct sound will be output
while tuning.
Control operations
when switching
banks
H0
When you press the bank pedal to
switch the bank, the patch doesn’t
change although the display
changes. The bank and the patch
number are conrmed by pressing
the number pedal, then the patch
changes to the next one.
H1
The patch changes to the next one
as soon as you press either the bank
pedal or the number pedal.
Control operations
when switching to
Manual Mode
m0
When you switch to Manual Mode,
the current knob positions will
aect the sound.
m1
When you switch to Manual Mode,
the setting stays the same as when
in Memory Mode.
Auto O settings
o0
The power will not turn o
automatically.
o1
The power will automatically turn
o when 10 hours have passed
since you last played or operated
the ME-80 (Factory Setting).
The following procedure restores the factory-set state for all
settings stored in the ME-80 (user patches, tuner reference pitch,
knob response type), with the exception of the expression pedal
adjustment (p. 15).
1. Press the [MEMORY/MANUAL] pedal to switch to Manual
Mode (p. 12).
2. Press the [MOD] pedal while holding down the [EDIT]
button.
“FA” appears in the display.
3. Press the [WRITE] button.
The Tuning Guide ashes.
4. Press the [WRITE] button again.
The display ashes and the factory reset is executed.
* Never turn o the power while Factory Reset is in progress.
La page est en cours de chargement...
La page est en cours de chargement...
La page est en cours de chargement...
La page est en cours de chargement...
La page est en cours de chargement...
La page est en cours de chargement...
La page est en cours de chargement...
La page est en cours de chargement...
La page est en cours de chargement...
La page est en cours de chargement...
La page est en cours de chargement...
La page est en cours de chargement...
La page est en cours de chargement...
La page est en cours de chargement...
La page est en cours de chargement...
La page est en cours de chargement...
La page est en cours de chargement...
La page est en cours de chargement...
La page est en cours de chargement...
La page est en cours de chargement...
La page est en cours de chargement...
La page est en cours de chargement...
La page est en cours de chargement...
La page est en cours de chargement...
La page est en cours de chargement...
La page est en cours de chargement...
La page est en cours de chargement...
La page est en cours de chargement...
La page est en cours de chargement...
La page est en cours de chargement...
La page est en cours de chargement...
La page est en cours de chargement...
La page est en cours de chargement...
La page est en cours de chargement...
La page est en cours de chargement...
La page est en cours de chargement...
La page est en cours de chargement...
La page est en cours de chargement...
La page est en cours de chargement...
La page est en cours de chargement...
La page est en cours de chargement...
La page est en cours de chargement...
La page est en cours de chargement...
La page est en cours de chargement...
La page est en cours de chargement...
La page est en cours de chargement...
La page est en cours de chargement...
La page est en cours de chargement...
La page est en cours de chargement...
La page est en cours de chargement...
La page est en cours de chargement...
La page est en cours de chargement...
La page est en cours de chargement...
La page est en cours de chargement...
La page est en cours de chargement...
La page est en cours de chargement...
La page est en cours de chargement...
La page est en cours de chargement...
La page est en cours de chargement...
La page est en cours de chargement...
La page est en cours de chargement...
La page est en cours de chargement...
La page est en cours de chargement...
La page est en cours de chargement...
La page est en cours de chargement...
La page est en cours de chargement...
La page est en cours de chargement...
La page est en cours de chargement...
La page est en cours de chargement...
La page est en cours de chargement...
La page est en cours de chargement...
La page est en cours de chargement...
La page est en cours de chargement...
La page est en cours de chargement...
La page est en cours de chargement...
La page est en cours de chargement...
La page est en cours de chargement...
La page est en cours de chargement...
La page est en cours de chargement...
La page est en cours de chargement...
La page est en cours de chargement...
La page est en cours de chargement...
La page est en cours de chargement...
La page est en cours de chargement...
La page est en cours de chargement...
La page est en cours de chargement...
La page est en cours de chargement...
La page est en cours de chargement...
La page est en cours de chargement...
La page est en cours de chargement...
La page est en cours de chargement...
La page est en cours de chargement...
La page est en cours de chargement...
La page est en cours de chargement...
La page est en cours de chargement...
La page est en cours de chargement...
La page est en cours de chargement...
La page est en cours de chargement...
La page est en cours de chargement...
La page est en cours de chargement...
La page est en cours de chargement...
La page est en cours de chargement...
La page est en cours de chargement...
La page est en cours de chargement...
La page est en cours de chargement...
La page est en cours de chargement...
La page est en cours de chargement...
La page est en cours de chargement...
La page est en cours de chargement...
La page est en cours de chargement...
La page est en cours de chargement...
La page est en cours de chargement...
La page est en cours de chargement...
La page est en cours de chargement...
La page est en cours de chargement...
La page est en cours de chargement...
La page est en cours de chargement...
La page est en cours de chargement...
La page est en cours de chargement...
La page est en cours de chargement...
La page est en cours de chargement...
La page est en cours de chargement...
La page est en cours de chargement...
La page est en cours de chargement...
La page est en cours de chargement...
La page est en cours de chargement...
La page est en cours de chargement...
La page est en cours de chargement...
La page est en cours de chargement...
La page est en cours de chargement...
La page est en cours de chargement...
La page est en cours de chargement...
La page est en cours de chargement...
La page est en cours de chargement...
La page est en cours de chargement...
La page est en cours de chargement...
La page est en cours de chargement...
La page est en cours de chargement...
La page est en cours de chargement...
La page est en cours de chargement...
-
 1
1
-
 2
2
-
 3
3
-
 4
4
-
 5
5
-
 6
6
-
 7
7
-
 8
8
-
 9
9
-
 10
10
-
 11
11
-
 12
12
-
 13
13
-
 14
14
-
 15
15
-
 16
16
-
 17
17
-
 18
18
-
 19
19
-
 20
20
-
 21
21
-
 22
22
-
 23
23
-
 24
24
-
 25
25
-
 26
26
-
 27
27
-
 28
28
-
 29
29
-
 30
30
-
 31
31
-
 32
32
-
 33
33
-
 34
34
-
 35
35
-
 36
36
-
 37
37
-
 38
38
-
 39
39
-
 40
40
-
 41
41
-
 42
42
-
 43
43
-
 44
44
-
 45
45
-
 46
46
-
 47
47
-
 48
48
-
 49
49
-
 50
50
-
 51
51
-
 52
52
-
 53
53
-
 54
54
-
 55
55
-
 56
56
-
 57
57
-
 58
58
-
 59
59
-
 60
60
-
 61
61
-
 62
62
-
 63
63
-
 64
64
-
 65
65
-
 66
66
-
 67
67
-
 68
68
-
 69
69
-
 70
70
-
 71
71
-
 72
72
-
 73
73
-
 74
74
-
 75
75
-
 76
76
-
 77
77
-
 78
78
-
 79
79
-
 80
80
-
 81
81
-
 82
82
-
 83
83
-
 84
84
-
 85
85
-
 86
86
-
 87
87
-
 88
88
-
 89
89
-
 90
90
-
 91
91
-
 92
92
-
 93
93
-
 94
94
-
 95
95
-
 96
96
-
 97
97
-
 98
98
-
 99
99
-
 100
100
-
 101
101
-
 102
102
-
 103
103
-
 104
104
-
 105
105
-
 106
106
-
 107
107
-
 108
108
-
 109
109
-
 110
110
-
 111
111
-
 112
112
-
 113
113
-
 114
114
-
 115
115
-
 116
116
-
 117
117
-
 118
118
-
 119
119
-
 120
120
-
 121
121
-
 122
122
-
 123
123
-
 124
124
-
 125
125
-
 126
126
-
 127
127
-
 128
128
-
 129
129
-
 130
130
-
 131
131
-
 132
132
-
 133
133
-
 134
134
-
 135
135
-
 136
136
-
 137
137
-
 138
138
-
 139
139
-
 140
140
-
 141
141
-
 142
142
-
 143
143
-
 144
144
-
 145
145
-
 146
146
-
 147
147
-
 148
148
-
 149
149
-
 150
150
-
 151
151
-
 152
152
-
 153
153
-
 154
154
-
 155
155
-
 156
156
-
 157
157
-
 158
158
-
 159
159
-
 160
160


Boss ME-80 Manuel utilisateur
- Catégorie
- Pédale de musique
- Taper
- Manuel utilisateur
- Ce manuel convient également à
dans d''autres langues
- italiano: Boss ME-80 Manuale utente
- español: Boss ME-80 Manual de usuario
- Deutsch: Boss ME-80 Benutzerhandbuch
- Nederlands: Boss ME-80 Handleiding
- português: Boss ME-80 Manual do usuário
Documents connexes
-
Boss ME-70 Le manuel du propriétaire
-
Boss ME-90 Le manuel du propriétaire
-
Boss ME-25 Le manuel du propriétaire
-
-
-
-
Boss CE-2W Le manuel du propriétaire
-
-
-
Boss eBand JS-10 Le manuel du propriétaire
Autres documents
-
Zoom G71UT Le manuel du propriétaire
-
Roland GT-8 Le manuel du propriétaire
-
-
Yamaha DG60FX Manuel utilisateur
-
Sony GP5 Manuel utilisateur
-
Vox DelayLab Le manuel du propriétaire
-
-
-
Alesis X Le manuel du propriétaire
-
Fender Cyber-Twin SE Le manuel du propriétaire