Nikon P-TACTICAL SPUR Manuel utilisateur
- Taper
- Manuel utilisateur

En
Fr
En
Fr
De
Se
Ru
Fi
Cz
Instruction manual/Mode d'emploi
Reex sight/Viseur reex

En
Fr
En
Fr
De
Se
Ru
Fi
Cz
2
Introduction
Read this first
Thank you for purchasing the Nikon P-TACTICAL SPUR reflex sight.
Before using the product, read this manual thoroughly to ensure proper use.
After reading this manual, keep it in a readily accessible place for future reference.
z About the manual
• No part of the manual may be reproduced, transmitted, transcribed, stored in a retrieval system, or translated into any language in any form, by any
means, without Nikon’s prior written permission.
• Illustrations shown in this manual may differ from the actual product.
• Nikon will not be held liable for any errors this manual may contain.
• The appearance, specifications, and capabilities of this product are subject to change without notice.
z WARNING
IMPROPER MOUNTING OF YOUR NIKON SIGHT CAN CAUSE SERIOUS INJURY.
THUS IT IS IMPORTANT THAT YOUR NIKON SIGHT IS MOUNTED PROPERLY BEFORE USING. TO ENSURE PROPER MOUNTING OF YOUR NIKON SIGHT, PLEASE HAVE IT
MOUNTED AND/OR CHECKED BY AN EXPERIENCED GUNSMITH BEFORE USING.
THE USER ASSUMES ALL RESPONSIBILITY AND LIABILITY FOR HAVING THE SIGHT PROPERLY MOUNTED TO A FIREARM AND FOR USING THE SIGHT PROPERLY.
ALWAYS CHECK THE CONDITION OF YOUR SIGHT AND YOUR MOUNTING SYSTEM BEFORE USING YOUR FIREARM.
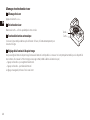
Package contents
Body
Mount base (already attached to the body)
Battery (3V CR1632 lithium battery)
Body cover
Dual use wrench
*
Hex key
Cloth
*
With a flat driver for adjustment screws on one side and a battery-chamber cover opener on the other side

En
Fr
En
Fr
De
Se
Ru
Fi
Cz
3
For your safety
Caution
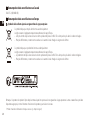
(1) Do NOT look at the sun through the sight. It will permanently damage your eye.
(2) The sight is effectively sealed against moisture and dust. You may use your sight safely either in the rain or in dusty climates. To preserve the appearance of the
sight, we recommend that it be dried and cleaned prior to storage.
(3) Never leave the sight in the sun for extended periods without the body cover attached. The lens can function as a burning glass and damage the sight.
(4) When not in use for an extended period, please remove the battery from the body.
(5) If the battery-chamber cover is damaged, or if it emits a strange sound due to dropping or some other cause, remove the battery immediately and discontinue
use.
Caution (Lithium battery)
If handled incorrectly, the battery may rupture and leak, corroding equipment and staining clothing. Be sure to observe the following:
• Install the battery with the + and - poles positioned correctly.
• The battery should be removed when exhausted or during extended periods of non-use.
• Do not short the end terminal of the battery chamber.
• Do not carry together with keys or coins in a pocket or bag because it may short and cause overheating.
• Do not expose the battery to water or flames. Never disassemble the battery.
• Do not charge the lithium battery.
• If liquid from a damaged battery comes into contact with clothing or skin, rinse immediately with plenty of water. If liquid from a damaged battery enters the
eyes, rinse immediately with clean water, then consult a doctor.
• When disposing of the battery, follow your local area regulations.

En
Fr
En
Fr
De
Se
Ru
Fi
Cz
4
Notices
Notice for customers in the U.S.A.
This device complies with Part 15 of the FCC Rules. Operation is subject to the following two conditions:
(1) This device may not cause harmful interference, and
(2) This device must accept any interference received, including interference that may cause undesired operation.
This equipment has been tested and found to comply with the limits for a Class B digital device, pursuant to Part 15 of the FCC Rules and to EU EMC directive.
These limits are designed to provide reasonable protection against harmful interference in a residential installation. This equipment generates, uses and can radiate
radio frequency energy and, if not installed and used in accordance with the instructions, may cause harmful interference to radio communications. However, there
is no guarantee that interference will not occur in a particular installation. If this equipment does cause harmful interference to radio or television reception, which
can be determined by turning the equipment off and on, the user is encouraged to try to correct the interference by one or more of the following measures:
• Reorient or relocate the receiving antenna.
• Increase the separation between the equipment and receiver.
• Consult the dealer or an experienced radio/TV technician for help.
Notice for customers in the State of California
WARNING: This product contains chemicals including Lead which is known to the State of California to cause cancer and birth defects or other
reproductive harm. For more information go to www.P65Warnings.ca.gov.

En
Fr
En
Fr
De
Se
Ru
Fi
Cz
5
Notice for customers in Canada
CAN ICES-3(B)/NMB-3(B)
Notice for customers in Europe
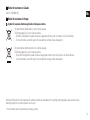
z Symbol for separate collection applicable in European countries
This symbol indicates that this battery is to be collected separately.
The following apply only to users in European countries.
• This battery is designated for separate collection at an appropriate collection point. Do not dispose of as household waste.
• For more information, contact the retailer or the local authorities in charge of waste management.
This symbol indicates that this product is to be collected separately.
The following apply only to users in European countries.
• This product is designated for separate collection at an appropriate collection point. Do not dispose of as household waste.
• For more information, contact the retailer or the local authorities in charge of waste management.
N.B. Export of the products
*
in this manual may be controlled under the laws and relatives of the exporting country. Appropriate export procedure, such as
obtaining of export license, shall be required in case of export.
*
Products: Hardware and its technical information (including software)

En
Fr
En
Fr
De
Se
Ru
Fi
Cz
6
Getting to know your reflex sight
Key features
• Lens coating: Fully multi-coated optics with “TRUCOLOR” coating minimizes bluish tint for clear, natural view and increased dot brightness.
• Waterproof performance: IPX7 waterproof rating allows dependable use in the worst weather conditions.
• Shockproof: Rugged construction withstands recoil and impacts.
• Brightness settings: Choose between 10 levels of brightness. Levels 1 and 2 are night vision compatible
*
, 3 to 10 are for normal use.
• Low battery indicator: Visually alerts the user in the display when it’s time for replacement.
• Body structure: Lightweight, durable aluminum alloy housing.
• Battery life: Extended battery life that provides 15,000 hours of continuous usage.
• Lightweight, compact: Compact and lightweight, so it won’t affect firearm balance or handling.
• Wide field-of-view: Allows the user to see more of the environment in the sight image.
• Mounting system: Visit the Nikon Inc. official web site for more information. www.NikonSportOptics.com
• Picatinny rail mount: Includes Picatinny rail mount.
• Magnification: 1× magnification allows shooting with both eyes open, for enhanced awareness and faster target acquisition.
• Parallax-free: For operation with both eyes open.
*
When you adjust illumination, levels 1-2 are primarily for use with night vision devices, although the view may be visible in certain light conditions. Levels 3 to 10 are
visible to the naked eye during daylight.

En
Fr
En
Fr
De
Se
Ru
Fi
Cz
7
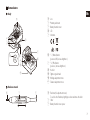
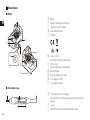
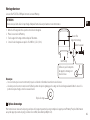
Nomenclature
z Body
4
3
7
6
5
2
a
1
8
0
9
1 Lens
2 Picatinny rail mount
3 Battery-chamber cover
4 LED
5 Indication
6 “−” (Minus) button
(power on/off, decrease brightness)
7 “+” (Plus) button
(power on, increase brightness)
8 Hex bolt
9 Tightness guide mark
0 Windage adjustment screw
a Elevation adjustment screw
z Dual use wrench
21 3
1 Flat driver (for adjustment screws)
To use/close the flat driver, slightly press down and move the slider.
2 Slider
3 Battery-chamber cover opener

En
Fr
En
Fr
De
Se
Ru
Fi
Cz
8
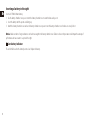
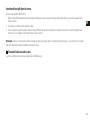
Inserting a battery in the sight
Insert a 3V CR1632 lithium battery.
1. Use the battery-chamber cover opener to turn the battery-chamber cover counterclockwise and open it.
2. Insert the battery with the positive side facing up.
3. Attach the battery-chamber cover and use the battery-chamber cover opener to turn the battery-chamber cover clockwise to securely lock it.
Notice: Make sure that no foreign substances such as lint are caught in the battery-chamber cover. Failure to observe this precaution could impair the waterproof
performance and cause water to seep inside the sight.
Low battery indicator
The red dot flashes when the battery becomes low. Replace the battery.

En
Fr
En
Fr
De
Se
Ru
Fi
Cz
9
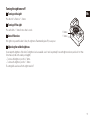
Turning the sight on or off
Turning on the sight
Press either the “+” button or “−” button.
Turning off the sight
Press and hold the “−” button for more than 3 seconds.
Auto off function
If the sight is not operated for about 12 hours, the sight turns off automatically (auto off) to save power.
Adjusting the red dot brightness
You can adjust the brightness of the red dot. Ten brightness levels are available. Levels 1 and 2 are primarily for use with night vision devices, and levels 3 to 10 are
for normal use (visible to the naked eye in daylight).
• To increase the brightness: press the “+” button.
• To decrease the brightness: press the “−” button.
The setting will be saved even after the sight is turned off.
“+” button
“−” button

En
Fr
En
Fr
De
Se
Ru
Fi
Cz
11
Adjusting the sight
CAUTION
The following should be done at an approved range or other safe area. Ear and eye protection is recommended.
1. Place the firearm on a solid support.
2. Press either the “+” button or “−” button to turn on the sight.
3. Look through your sight and rotate the windage and elevation adjustment screws using the included flat driver to align the red dot with the target.
4. Fire several shots and make windage and elevation adjustments until the shot pattern is on the center of the target.
• Each click of the adjustment screws moves the point of impact by 1 MOA (approx. 1 in. at 100 yd., 1/2 in. at 50 yd.).

En
Fr
En
Fr
De
Se
Ru
Fi
Cz
12
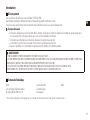
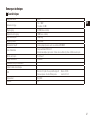
Technical notes
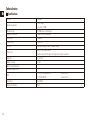
Specifications
Eye relief Unlimited
Adjustment graduation
1 click: 1 MOA
*1
1 revolution: 30 MOA
Adjustment range 120 MOA (elevation and windage)
Adjustment screw print 1 MOA (elevation and windage)
Dot size/color 3 MOA/red
Parallax setting Parallax free
Lens coat Fully multi-coated optics with “TRUCOLOR” coating
Power source
One 3V CR1632 lithium battery
Automatic power off (after approx. 12 h unoperated), battery low indicator
Battery life 15,000 hours
*2
Brightness settings 10 steps
Motion activated illumination –
Automatic brightness sensor –
EMC
US: FCC Part15 subpartB Class B
EU: CE EMC DIRECTIVE
Oceania: AS/NZS
Canada: ICES-003
Environment RoHS WEEE
Waterproof performance IPX7
*3

En
Fr
En
Fr
De
Se
Ru
Fi
Cz
13
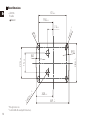
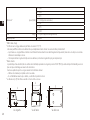
Dimensions
*4
(in.)/(mm)
a: 1.0/25
b: 1.8/46
c: 0.4/10
d: 1.1/28 (excluding projections)
e: 1.1/27
f: 0.6/16
g: 1.8/45
Weight (oz)/(g) 1.1/30 (excluding battery and mount)
Origin of product Phillipines
*1
MOA = Minute of Angle
*2
Tested at lowest light settings and at approx. 25°C (77°F).
This figure may differ according to conditions such as temperature and other factors. Use only as a guide.
• The battery supplied with this Nikon product is for operation checking. Due to natural electrical discharge, the life of this battery will likely be shorter than that noted above.
• If water enters the battery chamber due to submersion, dry the battery chamber well, then replace the battery.
*3
Waterproof models
This product has waterproof capabilities (under Nikon’s testing conditions) equivalent to JIS/IEC protection class 7 (IPX7) and can be used in conditions of high humidity, dust and rain
without risk of damage to internal functions.
However, observe the following when using the sight:
• Do not operate or hold the product in running water.
• If any moisture is found on movable parts of this product, stop using the product and wipe it off.
*4
Dimensions (a) to (f) refer to letters a to f in the diagram below.
a
b
d
c
f
e
d
g
Left view Back view Bottom view

En
Fr
En
Fr
De
Se
Ru
Fi
Cz
14
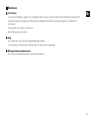
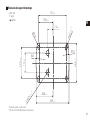
Mount dimensions
• Unit: mm
R: radius
: diameter
7.4±0.05
4-3
*1
+0.06
+0.02
28.4
0
−0.1
37.5
±0.05
19.35±0.05
4-R2.5
R60
44.9
0
−0.05
23.05+0.05
14±0.05
22.4
±0.05
R79.2
2-
3.75
±0.025
*2
*1
Pin height: 2 mm or less
*2
Use No.6-48UNC-2B screws (depth: 6 mm or more).

En
Fr
En
Fr
De
Se
Ru
Fi
Cz
15
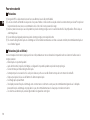
Maintenance
z Lens cleaning
To remove dirt or fingerprints, soak gauze or lens cleaning paper (silicone-free paper sold at camera retailers) with a small quantity of absolute alcohol
(available from drugstores) and lightly wipe off the affected areas. Wiping with a handkerchief or leather may damage the lens surface and is not
recommended.
Dust may scratch the lens surface or corrode the lens.
Brush off dust using a soft oil-free brush.
z Body
Use a soft dry cloth to wipe off any dirt or fingerprints that might accumulate.
It is not necessary to oil the sight’s surface. Attach the body cover when you are not using the sight.
z Windage/elevation adjustment screws
These screws are permanently lubricated. Do not attempt to lubricate them.

En
Fr
En
Fr
De
Se
Ru
Fi
Cz
16
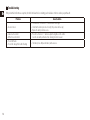
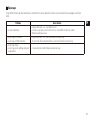
Troubleshooting
If this product fails to function as expected, check the list below before consulting your local dealer or the store where you purchased it.
Problem Cause/Solution
• Does not turn on
• Press either the “+” button or “−” button to turn on the sight.
• Check that the battery is inserted correctly (the positive side faces up).
• Replace the battery with a new one.
• Cannot see the red dot
• Difficult to see the red dot
• Press the “+” button or “−” button to adjust the brightness of the red dot.
Cover the lens with your hand so that checking the red dot is easier.
• The red dot flashes
• The red dot changed from solid to flashing
• The battery is low. Replace the battery with a new one.

En
Fr
En
Fr
De
Se
Ru
Fi
Cz
17
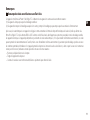
Introduction
À lire en premier
Nous vous félicitons d’avoir choisi un viseur reflex Nikon P-TACTICAL SPUR.
Avant d’utiliser le produit, lisez attentivement le présent manuel afin de garantir une utilisation correcte.
Conservez ensuite le présent manuel dans un lieu facilement accessible afin de pouvoir vous y reporter ultérieurement.
z À propos du manuel
• Aucune partie du manuel ne peut être reproduite, diffusée, transcrite, stockée dans un système de récupération ou traduite dans quelque langue que ce
soit, sous quelque forme et de quelque manière que ce soit, sans l’accord préalable écrit de Nikon.
• Il est possible que les illustrations présentées dans ce manuel ne correspondent pas au produit.
• La société Nikon ne peut être tenue responsable des erreurs que le présent manuel peut contenir.
• L’aspect, les spécifications et les fonctionnalités du produit peuvent être modifiés sans notification préalable.
z AVERTISSEMENT
LE MONTAGE INCORRECT DE VOTRE VISEUR NIKON PEUT ENTRAÎNER DES BLESSURES GRAVES.
IL EST DONC IMPORTANT QUE VOTRE VISEUR NIKON SOIT MONTÉ DE MANIÈRE CORRECTE AVANT UTILISATION. POUR GARANTIR LE MONTAGE CORRECT DE VOTRE VISEUR
NIKON, CONFIEZ LE MONTAGE ET/OU LA VÉRIFICATION À UN ARMURIER EXPÉRIMENTÉ AVANT UTILISATION.
L’UTILISATEUR ACCEPTE L’ENTIÈRE RESPONSABILITÉ CONCERNANT LE MONTAGE DU VISEUR SUR UNE ARME À FEU ET L’UTILISATION DU VISEUR.
VÉRIFIEZ TOUJOURS L’ÉTAT DE VOTRE VISEUR ET DE VOTRE SYSTÈME DE MONTAGE AVANT D’UTILISER VOTRE ARME À FEU.
Contenu de l’emballage
Boîtier
Socle de montage (déjà fixé au boîtier)
Pile (pile au lithium CR1632 de 3V)
Couvercle du boîtier
Clé à double usage
*
Clé hexagonale
Chiffon
*
Avec un tournevis plat pour les vis de réglage d’un côté et un dispositif d'ouverture du couvercle du logement de la pile de l’autre

En
Fr
En
Fr
De
Se
Ru
Fi
Cz
18
Pour votre sécurité
Précautions
(1) Ne regardez PAS le soleil au travers du viseur. Vous vous abîmeriez la vue de façon irrémédiable.
(2) Le viseur est étanche à l’humidité et à la poussière. Vous pouvez l’utiliser en toute sécurité sous la pluie et dans les environnements poussiéreux. Pour préserver
l’aspect extérieur du viseur, nous vous recommandons de le sécher et de le nettoyer avant de le ranger.
(3) Ne laissez jamais le viseur exposé au soleil pendant des périodes de temps prolongées sans le couvercle du boîtier fixé. L’objectif peut faire office de loupe et
endommager la vue.
(4) Si vous n’utilisez pas l’appareil pendant une période de temps prolongée, retirez la pile du boîtier.
(5) Si le couvercle du logement de la pile est endommagé ou s’il émet un bruit anormal suite à une chute ou à un autre incident, retirez immédiatement la pile et
cessez d’utiliser l’appareil.
Précautions (pile au lithium)
Si elle est manipulée incorrectement, la pile peut se briser et fuir, entraînant une corrosion du matériel et risquant de tacher vos vêtements. Veuillez suivre les
consignes suivantes :
• Installez la pile en respectant la polarité.
• La pile doit être retirée lorsqu’elle est déchargée ou si l’appareil n’est pas utilisé pendant une période de temps prolongée.
• Ne court-circuitez pas l’embout du logement de la pile.
• Ne transportez pas le viseur avec des clés ou des pièces dans une poche ou un sac afin d’éviter tout risque de court-circuit et de surchauffe.
• N’exposez pas la pile à de l’eau ou à des flammes. Ne démontez jamais la pile.
• Ne rechargez pas la pile au lithium.
• Si du liquide provenant d’une pile endommagée entre en contact avec vos vêtements ou votre peau, rincez immédiatement à grande eau. Si du liquide
provenant d’une pile endommagée est projeté dans les yeux, rincez immédiatement avec de l'eau propre et consultez un médecin.
• Lors de la mise au rebut de la pile, suivez la réglementation en vigueur dans votre région.

En
Fr
En
Fr
De
Se
Ru
Fi
Cz
19
Remarques
Remarque destinée aux utilisateurs aux États-Unis
Cet appareil est conforme à la Partie 15 des Règles FCC. L'utilisation de cet appareil est soumise aux deux conditions suivantes :
(1) Cet appareil ne doit pas provoquer des brouillages nuisibles et
(2) Cet appareil doit accepter les brouillages auxquels il est soumis, y compris les brouillages qui peuvent provoquer des anomalies de fonctionnement.
Après essais, les caractéristiques de cet appareil ont été jugées comme entrant dans les limites des dispositifs numériques de la classe B, telles que décrites à la
Partie 15 des Règles FCC et de la directive EMC de l'UE. Ces limites ont été fixées dans le but d’apporter une protection raisonnable contre les brouillages nuisibles
des appareils domestiques. Cet appareil produit, utilise et peut émettre des ondes radioélectriques ; s'il n'est pas installé conformément aux instructions, ces ondes
peuvent perturber les radiocommunications. Toutefois, même en cas d'installation conforme aux instructions, il peut arriver qu'un brouillage se produise en raison
des conditions particulières d'installation. Si cet appareil perturbe la réception des émissions de radio ou de télévision, ce dont on peut s'assurer en le mettant sous
tension puis hors tension, l'utilisateur est invité à prendre les mesures correctives suivantes :
• Réorientez ou déplacez l’antenne de réception.
• Éloignez l’équipement du récepteur.
• Contactez le revendeur ou un technicien radio/télévision expérimenté pour obtenir de l’aide.

En
Fr
En
Fr
De
Se
Ru
Fi
Cz
20
Remarque destinée aux utilisateurs au Canada
CAN ICES-3(B)/NMB-3(B)
Remarque destinée aux utilisateurs en Europe
z Symbole de la collecte séparée en vigueur dans les pays européens
Ce symbole indique que cette pile doit être mise au rebut séparément.
Les règles suivantes s'appliquent uniquement aux utilisateurs des pays d'Europe.
• Cette pile doit être déposée dans un lieu de collecte spécialement prévu à cet effet. Elle ne doit pas être jetée dans les ordures ménagères.
• Pour plus d’informations, contactez votre revendeur ou les autorités locales chargées de la gestion des déchets.
Ce symbole indique que ce produit doit être mis au rebut séparément.
Les règles suivantes s'appliquent uniquement aux utilisateurs des pays d'Europe.
• Ce produit doit être déposé dans un lieu de collecte spécialement prévu à cet effet. Elle ne doit pas être jetée dans les ordures ménagères.
• Pour plus d’informations, contactez votre revendeur ou les autorités locales chargées de la gestion des déchets.
Remarque : l’exportation des produits
*
objets du présent manuel peut être sujette aux lois en vigueur dans le pays exportateur. La mise en œuvre d’une procédure
d’exportation appropriée, comme l'obtention d'une licence d'exportation, peut s'avérer nécessaire.
*
Produits: matériel et informations techniques connexes (y compris le logiciel)

En
Fr
En
Fr
De
Se
Ru
Fi
Cz
21
Familiarisation avec le viseur reflex
Principales caractéristiques
• Revêtement de l’objectif: le système optique à plusieurs couches avec revêtement TRUCOLOR réduit les nuances bleuâtres pour une vue claire et naturelle
et une luminosité accrue du point.
• Étanchéité: l’étanchéité de catégorie IPX7 permet une utilisation fiable dans les pires conditions climatiques.
• Résistance aux chocs: la structure solide résiste au recul et aux impacts.
• Réglages de luminosité: dix niveaux de luminosité sont disponibles. Les niveaux1 et 2 sont compatibles avec la vision nocturne
*
, les niveaux de3 à 10
sont destinés à l’utilisation normale.
• Témoin de faible niveau de la pile: informe visuellement l’utilisateur au niveau de l’écran lorsqu’il est temps de remplacer la pile.
• Structure du boîtier: logement en alliage d’aluminium durable et léger.
• Durée de vie de la pile: durée de vie prolongée de la pile (15000heures d’utilisation en continu).
• Léger et compact: léger et compact, le viseur n’affecte pas l’équilibre ou le maniement de l’arme à feu.
• Large champ de vision: permet à l’utilisateur de voir davantage de l’environnement qui l’entoure dans l’image du viseur.
• Système de montage: consultez le site Web officiel de Nikon Inc. pour plus d’informations (www.NikonSportOptics.com).
• Support de montage pour rail Picatinny: support de montage pour rail Picatinny inclus.
• Agrandissement: l’agrandissement 1× permet de tirer avec les deux yeux ouverts pour une perception optimisée et une acquisition plus rapide de la cible.
• Sans parallaxe: pour l’utilisation avec les deux yeux ouverts.
*
Lors du réglage de l’illumination, les niveaux1 et 2 sont essentiellement utilisés avec les appareils de vision nocturne, la vue peut cependant être visible dans certaines
conditions lumineuses. Les niveaux de3 à 10 sont visibles à l’œil nu à la lumière du jour.
La page est en cours de chargement...
La page est en cours de chargement...
La page est en cours de chargement...
La page est en cours de chargement...
La page est en cours de chargement...
La page est en cours de chargement...
La page est en cours de chargement...
La page est en cours de chargement...
La page est en cours de chargement...
La page est en cours de chargement...
La page est en cours de chargement...
-
 1
1
-
 2
2
-
 3
3
-
 4
4
-
 5
5
-
 6
6
-
 7
7
-
 8
8
-
 9
9
-
 10
10
-
 11
11
-
 12
12
-
 13
13
-
 14
14
-
 15
15
-
 16
16
-
 17
17
-
 18
18
-
 19
19
-
 20
20
-
 21
21
-
 22
22
-
 23
23
-
 24
24
-
 25
25
-
 26
26
-
 27
27
-
 28
28
-
 29
29
-
 30
30
-
 31
31


Nikon P-TACTICAL SPUR Manuel utilisateur
- Taper
- Manuel utilisateur
dans d''autres langues
- English: Nikon P-TACTICAL SPUR User manual