
– 1 –
ENGLISH
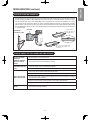
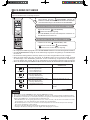
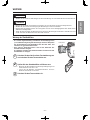
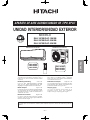
SPLIT TYPE AIR CONDITIONER
INDOOR UNIT/OUTDOOR UNIT
MODEL
RAK-18PSB/RAC-18WSB
RAK-25PSB/RAC-25WSB
RAK-35PSB/RAC-35WSB
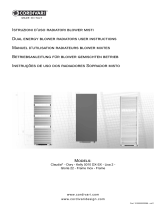
INDOOR UNIT OUTDOOR UNIT
RAK-18PSB
RAK-25PSB
RAK-35PSB
RAC-18WSB
RAC-25WSB
RAC-35WSB
This room air conditioner is only for consumer usage.
Do not use for preservation of foods, animals, plants, precision machines, art, medicine or such.
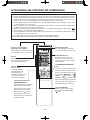
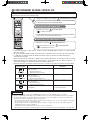
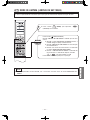
Instruction manual Page 1~20
To obtain the best performance and ensure years of
trouble free use, please read this instruction manual
completely.
Bedienungsanleitung Seite 21~40
Lesen Sie diese Bedienungsanleitung vollständig
durch, um eine optimale Geräteleistung und einen
langjährigen störungsfreien Betrieb sicherzustellen.
Mode d'emploi Pages 41~60
Pour obtenir une efficacité optimale et garantir la fiabilité
de fonctionnement de votre télécommande pendant
de nombreuses années, veuillez lire attentivement et
entièrement cette notice.
Manuale di istruzioni Pagina 61~80
Per ottenere il massimo delle prestazioni e garantire
un utilizzo sicuro per anni, leggere questo manuale di
istruzioni nella sua integrità.
Manual de instrucciones Página 81~100
Para obtener un rendimiento óptimo y asegurarse
muchos años de uso sin problemas, lea detenidamente
este manual de instrucciones.
Manual de instruções Página 101~120
Leia este manual de instruções na íntegra para obter
um desempenho ideal e garantir o funcionamento sem
problemas da unidade ao longo dos anos.
Οδηγίες χρήσης Σελίδα 121~140
Για να έχετε την καλύτερη δυνατή απόδοση και να
διασφαλίσετε πολυετή χρήση χωρίς προβλήματα,
διαβάστε ολόκληρο το παρόν εγχειρίδιο οδηγιών.

– 2 –
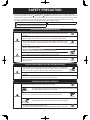
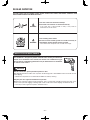
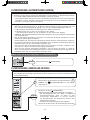
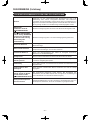
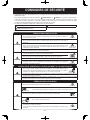
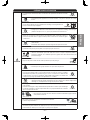
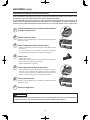
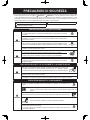
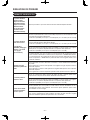
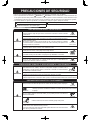
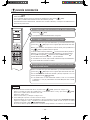
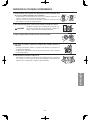
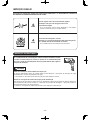
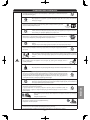
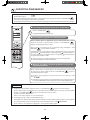
SAFETY PRECAUTION
• Please read the “Safety Precaution” carefully before operating the unit to ensure correct usage of the unit.
• Pay special attention to signs of “ Warning” and “ Caution”. The “Warning” section contains matters which, if
not observed strictly, may cause death or serious injury. The “Caution” section contains matters which may result
in serious consequences if not observed properly. Please observe all instructions strictly to ensure safety.
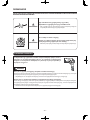
• The signs indicate the following meanings. (The following are examples of signs.)
Make sure to connect earth line. This sign in the figure indicates prohibition.
Indicates the instructions that must be followed.
• Please keep this manual after reading.
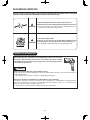
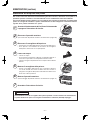
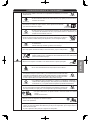
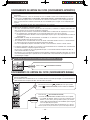
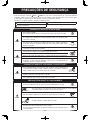
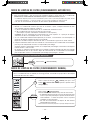
PRECAUTIONS DURING INSTALLATION
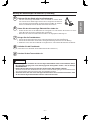
WARNING
• Do not reconstruct the unit.
Water leakage, fault, short circuit or fire may occur if you reconstruct the unit by
yourself.
PROHIBITION
• Please ask your sales agent or qualified technician for the installation of your unit.
Water leakage, short circuit or fire may occur if you install the unit by yourself.
• Please use earth line.
Do not place the earth line near water or gas pipes, lightning-conductor, or the
earth line of telephone. Improper installation of earth line may cause electric
shock or fire.
CONNECT EARTH LINE
• Be sure to use the specified piping set for R410A. Otherwise, this may result in
broken copper pipes or faults.
CAUTION
• A circuit breaker should be installed depending on the mounting site of the unit.
Without a circuit breaker, the danger of electric shock exists.
PROHIBITION
• Do not install the unit near a location where there is flammable gas.
The outdoor unit may catch fire if flammable gas leaks around it.
• Please ensure smooth flow of water when installing the drain hose.
• Make sure that a single phase 220V-230V power source is used.
The use of other power sources may cause electrical components to overheat
and lead to fire.
PROHIBITION
PRECAUTIONS DURING SHIFTING OR MAINTENANCE
WARNING
• Should abnormal situation arise (like burning smell), please stop operating the
unit and turn off the circuit breaker. Contact your agent. Fault, short circuit or fire
may occur if you continue to operate the unit under abnormal situation.
• Please contact your agent for maintenance. Improper self maintenance may cause electric shock
and fire.
• Please contact your agent if you need to remove and reinstall the unit. Electric shock or fire may
occur if you remove and reinstall the unit yourself improperly.
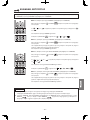
PRECAUTIONS DURING OPERATION
WARNING
• Avoid an extended period of direct airflow for your health.
PROHIBITION
• Do not put objects like thin rods into the panel of blower and suction side because
the high-speed fan inside may cause danger.
• Do not use any conductor as fuse wire, this could cause fatal accident.
PROHIBITION
• During thunder storm, disconnect and turn off the circuit breaker.
• Spray cans and other combustibles should not be located within a meter of the
air outlets of both indoor and outdoor units.
As a spray can’s internal pressure can be increased by hot air, a rupture may result.
PROHIBITION
“OFF”
“OFF”
PROHIBITION

– 3 –
ENGLISH
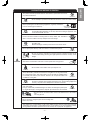
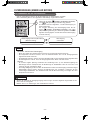
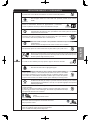
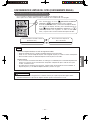
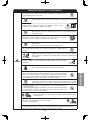
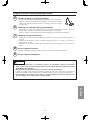
PRECAUTIONS DURING OPERATION
CAUTION
• The product shall be operated under the manufacturer specification and not for
any other intended use.
PROHIBITION
DON'T WET
• Do not attempt to operate the unit with wet hands, this could cause fatal accident.
• When operating the unit with burning equipments, regularly ventilate the
room to avoid oxygen insufficiency.
PROHIBITION
• Do not direct the cool air coming out from the air-conditioner panel to face
household heating apparatus as this may affect the working of apparatus such
as the electric kettle, oven etc.
• Please ensure that outdoor mounting frame is always stable, firm and without
defect. If not, the outdoor unit may collapse and cause danger.
PROHIBITION
PROHIBITION
• Do not wash the unit with water or place a water container such as a vase on
the indoor unit.
Electrical leakage could be present and cause electric shock.
• Do not place plants directly under the airflow as it is bad for the plants.
PROHIBITION
• Be sure to stop the operation by using the remote controller and turn off the
circuit breaker during cleaning, the high-speed fan inside the unit may cause
danger.
• Turn off the circuit breaker if the unit is not be operated for a long period.
PROHIBITION
• Do not climb on the outdoor unit or put objects on it.
• When operating the unit with the door and windows opened, (the room humidity is
always above 80%) and with the air deflector facing down or moving automatically
for a long period of time, water will condense on the air deflector and drips down
occasionally. This will wet your furniture. Therefore, do not operate under such
condition for a long time.
PROHIBITION
PROHIBITION
• If the amount of heat in the room is above the cooling or heating capability of
the unit (for example: more people entering the room, using heating equipments
and etc.), the preset room temperature cannot be achieved.
• Indoor unit cleaning must be performed by authorized personnel only. Consult
your sales agent.
Using a commercially available detergent or similar can damage the plastic parts
or clog the drain pipe, causing water to drip with potential electric shock hazard.
PROHIBITION
DON'T TOUCH
• Do not touch the air outlet, bottom surface and aluminium fin of the outdoor
unit.
You may get hurt.
• Do not touch the refrigerant pipe and connecting valve.
Burns may result.
DON'T TOUCH
• This appliance is not intended for use by young children or infirm persons unless they have been
adequately supervised by a responsible person to ensure that they can use this appliance safely.
Young children should be supervised to ensure that they do not play with the appliance.
“OFF”
“OFF”
STRICTLY OBSERVE
PRECAUTIONS

– 4 –
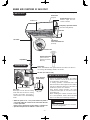
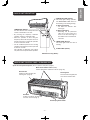
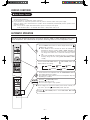
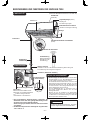
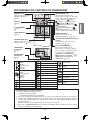
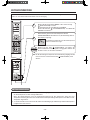
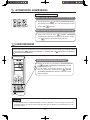
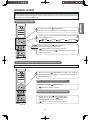
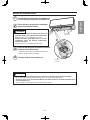
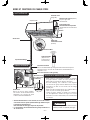
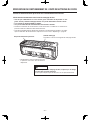
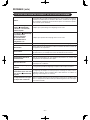
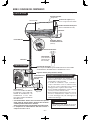
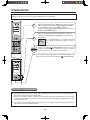
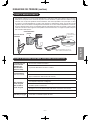
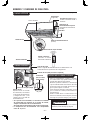
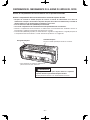
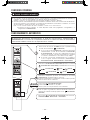
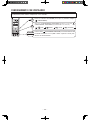
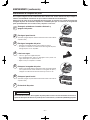
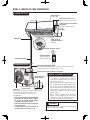
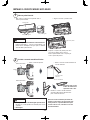
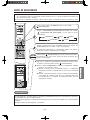
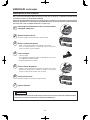
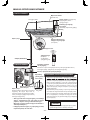
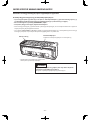
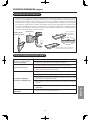
NAMES AND FUNCTIONS OF EACH PART
(Understanding The Operating Mechanism, page 14)
Air Outlet
ECO Sensor
Front Panel
(Page 6)
Signal Receiver (internal)
Receive signal from the
remote controller.
Temporary Operation Switch
(Forced Cooling Switch)
Indicator
Horizontal/
Vertical Air Deflector
(internal)
Ion Mist Unit
Remote Controller
(Please refer to
Remote Controller
Manual)
Pipe/Wiring
Drain Hose
Drains dehumidified water generated from the indoor unit when in
the cooling, dehumidifying and dry cool modes.
Air Inlet (rear and left side)
Earth Terminal
(side bottom)
Drain Port (bottom)
Air Outlet
Discharges cool air when in heating
mode and warm air when in cooling
and dry cool modes, and warm or
cold air when in the dehumidifying
mode.
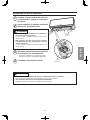
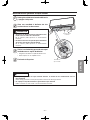
• While the power is on, a very small amount of power is
consumed within the control circuit even when the unit
is not in operation.
Power can be saved if the circuit breaker is switched off.
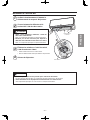
• Operation temperature of outdoor is -20°C to 43°C.
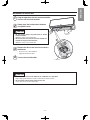
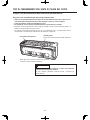
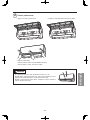
ABOUT OUTDOOR UNIT
• Even if the operation is stopped, the outdoor
unit fan continues to rotate for 10~60 seconds
to cool down the electrical parts.
• In heating operation, condensed water and
defrosted water is discharged from the outdoor
unit. Do not block the drain port as the water in
the drain may freeze in a cold area.
• Even during cooling operation, the water
condensed in the pipe, etc. may flow out from
the outdoor unit.
• When installing the outdoor unit under eaves,
etc. of the apartment, install a bush and drain
pipe on the drain port for drainage treatment.
CAUTION
Turn off the circuit breaker if the unit is not
in use for a long period.
INDOOR UNIT
OUTDOOR UNIT

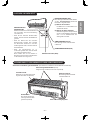
– 5 –
ENGLISH
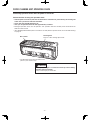
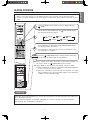
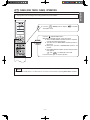
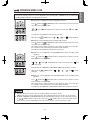
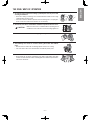
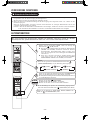
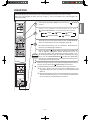
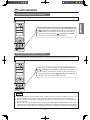
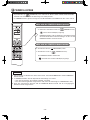
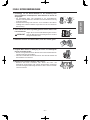
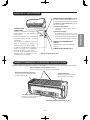
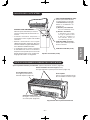
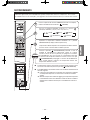
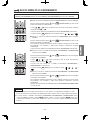
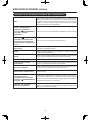
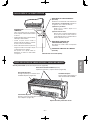
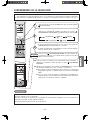
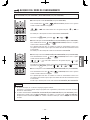
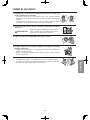
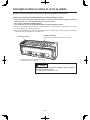
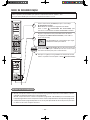
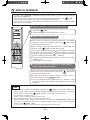
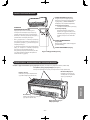
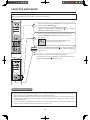
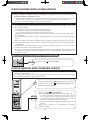
TEMPORARY SWITCH
Use this switch to start and stop when the
remote controller does not work.
• By pressing the temporary switch,the
operation is done in automatic mode.
• When the operation is done using the
temporary switch after the power source is
turned off and turn on again,the operation
is done in automatic mode.
• The air conditioner performs force-cooling
operation if the temporary switch is pressed
for about 5 seconds.
This operation is allowed to sales agents
only. Users must not perform this operation.
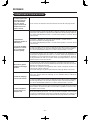
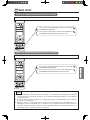
OPERATION LAMP (Yellow)
This lamp lights during operation.
The OPERATION LAMP flashes in
the following cases during heating.
(1) During preheating
For about 2-3 minutes after
starting up.
(2) During defrosting
Defrosting will be performed
about once an hour when frost
forms on the heat exchanger of
the outdoor unit, for 5-10 minutes
each time.
TIMER LAMP (Orange)
This lamp lights when the timer is
working.
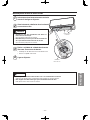
CLEAN LAMP (Yellow)
ECO Sensor Lamp (Green)
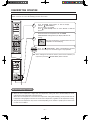
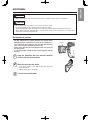
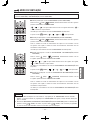
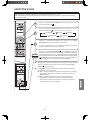
Open the front panel to operate. (How to open the front panel, page 6)
Dust Catcher
Collects the dust swept by the
cleaning unit. (Page 12)
Micro mesh Stainless Filter (inside)
Collects particulates and dusts in the air. (Page 10)
Cleaning Unit
Cleans the dust caught by the
micro mesh stainless filter.
Dust Box
Collects and keeps the dust that
has been cleaned. (Page 9)
Air Purifying Filter Holder
INDOOR UNIT INDICATIONS
INDOOR UNIT CONTROL PANEL / CLEANING UNIT

– 6 –
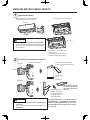
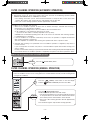
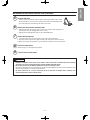
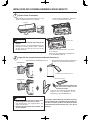
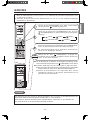
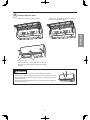
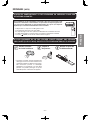
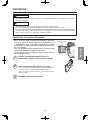
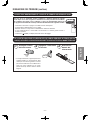
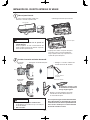
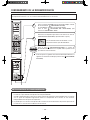
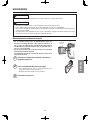
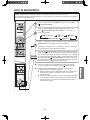
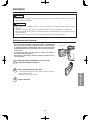
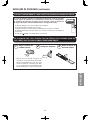
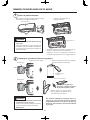
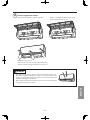
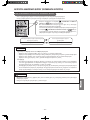
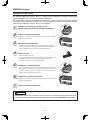
INSTALLING ANTI-MOLD WASABI CASSETTE
1
Open the front panel.
2
Install the anti-mold wasabi cassette.
• Do not hold the movable panel when
opening and closing the front panel.
Front panel
Gripping part
Gripping part
• Hold and lift up the front panel.
• Push up the panel support until it
clicks to lock it.
Lower the front panel and fix in
position with the panel support.
Panel support
CAUTION
• Do not open the front panel during operation.
It may interrupt the movable panel to work properly.
Be sure to stop the operation first before opening
the front panel.
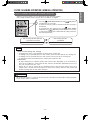
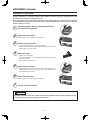
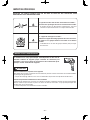
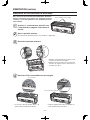
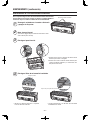
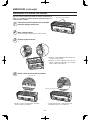
• Remove the dust box • Take out the anti-mold wasabi
cassette from the aluminium bag.
• Slide the anti-mold
wasabi cassette that
has been taken out of
the wrapper directly
into the Dust Box.
Do not remove or tear
the aluminium sheet on
the surface nor make a
hole on it.
Dust Box
Handle
Dust Box
Anti-mold wasabi
cassette
Aluminium bag
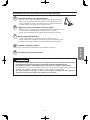
CAUTION
• Do not put your face close to the package when
you open it.
Your eyes or nose may be irritated by wasabi aroma.
• Do NOT eat.
No daily maintenance is required. However,
the effectiveness of anti-mold wasabi cassette
will be lost after approximately 10 years have
elapsed. Replace the anti-mold wasabi cassette
in such event.

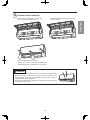
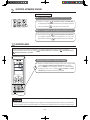
– 7 –
ENGLISH
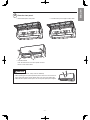
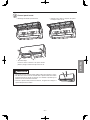
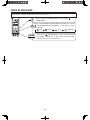
3
Close the front panel.
• Hold and lift up the front panel. • Push down the panel support until it clicks.
• Pull it downward.
Push the both ends of the front panel first and
then its center until it clicks.
CAUTION
• If the front panel is loose, it may come off and drop.
• When opening the front panel upwards, please do not use excessive force.
If the front panel comes off the device, this may cause it to malfunction.
• When the front panel remains open, be sure to push up the panel support.

– 8 –
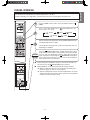
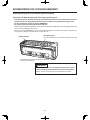
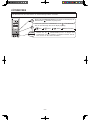
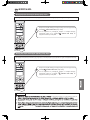
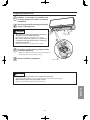
FILTER CLEANING UNIT OPERATION CHECK
Performing operation check after the power is turned on.
Perform the filter cleaning unit operation check
• After the power is turned on (after the circuit breaker is switched on or power failure), the cleaning unit
makes one cycle of back and forth movement.
• At this time, the (CLEAN) indicator is lit.
• One cycle of operation check will take approximately 5 minutes.
• During the operation check, the unit performs “Fan” operation while the movable panel and horizontal air
deflector remain closed.
• If the (CLEAN) indicator blinks (lit for 4 seconds/off 1 second) after the operation check, refer to “Troubleshooting”
on page 16.
Dust catcher
Cleaning Unit
There is a filter cleaning wiper inside.
• The illustration shows the unit without front
panel for your reference only.
CAUTION
Do not put your fingers or a stick etc into the top surface during
the filter cleaning operation
It may result in injury or malfunction.

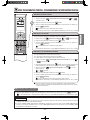
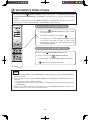
– 2 –
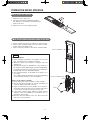
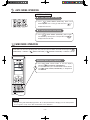
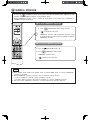
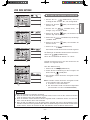
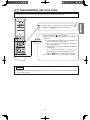
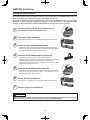
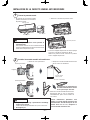
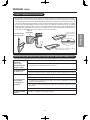
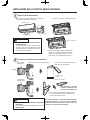
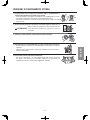
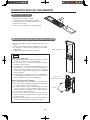
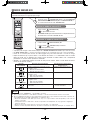
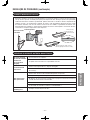
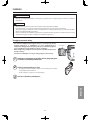
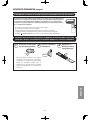
PREPARATION BEFORE OPERATION
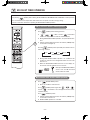
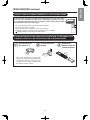
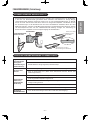
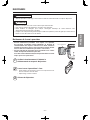
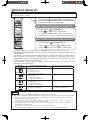
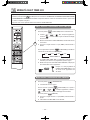
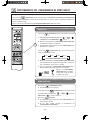
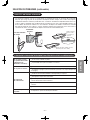
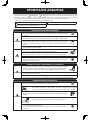
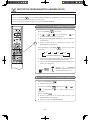
■ To install the batteries
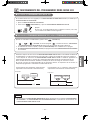
■ To fi x the remote controller holder to the wall
1. Slide the cover to take it off.
2. Install two dry batteries AAA.LR03 (alkaline).
The direction of the batteries should match the
marks in the case.
3. Replace the cover at its original position.
1. Choose a place from where the signals can reach the unit.
2. Fix the remote controller holder to a wall, a pillar or similar
location with the provided screws.
3. Place the remote controller in the remote controller holder.
NOTE
Notes on batteries
● When replacing the batteries, use batteries of the same
type, and replace both old batteries together.
● When the system is not used for a long time, take the
batteries out.
● The batteries will last for approximately 1 year. However, if
the remote controller display begins to fade and degradation
of reception performance occurs within a year, replace both
batteries with new size AAA.LR03 (alkaline).
● The attached batteries are provided for the initial use of
the system.
The usable period of the batteries may be short depending
on the manufactured date of the air conditioner.
Notes on the remote controller
● Never expose the remote controller to direct sunlight.
● Dust on the signal transmitter or receiver will reduce the
sensitivity. Wipe off dust with soft cloth.
● Signal communication may be disabled if an electronic-
starter-type fluorescent lamp (such as inverter-type lamps)
is in the room. Consult the shop if that is the case.
● If the remote controller signals happen to operate another
appliance, move that appliance to somewhere else, or
consult the service shop.
● When the remote controller is not in use, please close the
slide cover to prevent failure.
Remote controller
Screws
Remote
controller holder

– 3 –
ENGLISH
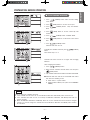
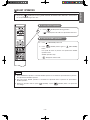
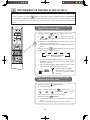
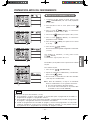
PREPARATION BEFORE OPERATION
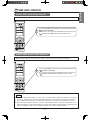
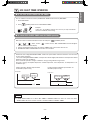
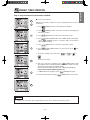
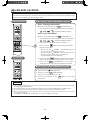
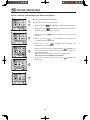
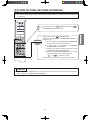
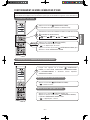
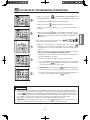
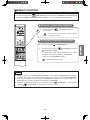
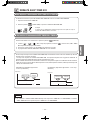
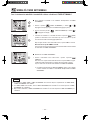
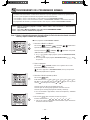
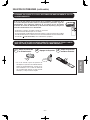
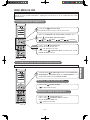
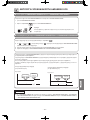
■ To set calendar and clock
1. Press (RESET) button when first time setting.
"Year" blinks.
2. Press (TIME) button to set the current year.
3. Press (CLOCK) button. "Day" and "Month"
blink.
4. Press (TIME) button to set the current day and
month.
5. Press (CLOCK) button. "CLOCK" blinks.
6. Press (TIME) button to set the clock to the current
time.
7. Press
(CLOCK) button.
Calendar and clock are set.
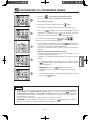
To modify the calendar and clock, press
(CLOCK)
button.
Then follow steps 1 to 7.
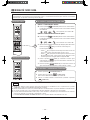
Calendar and clock need to be set again after changing
batteries.
After changing the batteries,
1. Press (RESET) button.
2. Direct remote controller towards indoor unit and press
(INFO) button.
3. The calendar and clock from indoor unit will be transmitted.
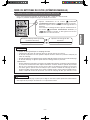
■ Calendar and clock will not be transmitted from indoor
unit when the following occurs:
● When there is a power failure.
● When breaker is OFF by user (unit is not in STANDBY
MODE).
NOTE
Note on setting the calendar and clock.
● If the calendar and clock are not set, the ON-timer, OFF-timer and Weekly Timer cannot be set.
● If the calendar and clock are not set correctly, the ON-timer, OFF-timer and Weekly Timer will not
operate correctly.
● When the ON-timer, OFF-timer and Weekly Timer are set, the calendar and clock cannot be changed.
If there is a need to change the calendar and clock, ON-timer, OFF-timer and Weekly Timer need to
be cancelled.

– 4 –
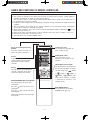
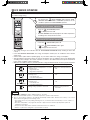
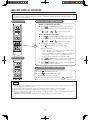
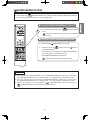
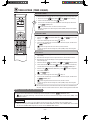
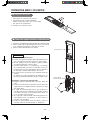
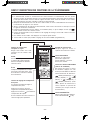
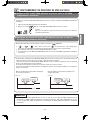
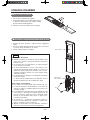
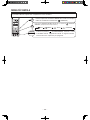
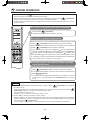
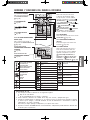
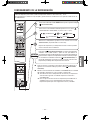
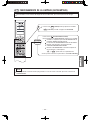
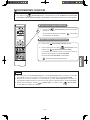
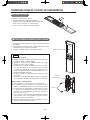
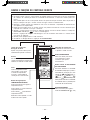
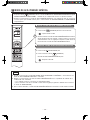
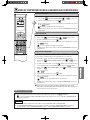
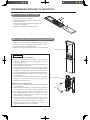
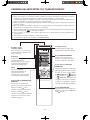
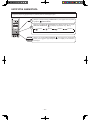
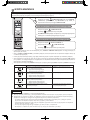
NAMES AND FUNCTIONS OF REMOTE CONTROLLER
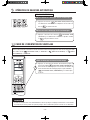
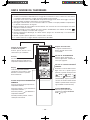
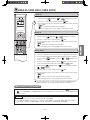
REMOTE CONTROLLER
● This controls the operation of the indoor unit. The range of control is about 7 meters. If indoor lighting is
controlled electronically, the range of control may be shorter.
This unit can be fixed on a wall using the fixture provided. Before fixing it, make sure the indoor unit can
be controlled from the remote controller.
● Handle the remote controller with care. Dropping it or getting it wet may compromise its signal transmission
capability.
● After new batteries are inserted into the remote controller, the unit will initially require approximately
10 seconds to respond to commands and operate.
● When remote controller is not in use for about 3 minutes during OFF condition, indicated by on the
display, the LCD will turn off.
● During clock setting, the LCD will turn off about 10 minutes later if the remote controller is not in use.
● When pressing any button, the LCD will turn on.
● The LCD will not turn off during TIMER setting.
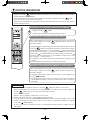
Signal Transmitting/Receiving
Window
Point this window towards the
indoor unit when controlling it.
Sensor
A temperature sensor inside the
remote controller senses ambient
temperature around the remote-
controller.
Display
This indicates the room temperature
selected, current time, timer status,
function and airflow rate selected.
ROOM TEMPERATURE setting Buttons
Press these buttons to set the room
temperature.
Press the [ ] button to raise the room
temperature.
Press the [ ] button to lower the room
temperature.
Keep pressing and the value will change
more quickly.
ECO SENSOR Button
Use this button to set the ECO
SENSOR mode. ( p. 16)
START/STOP button
Press this button to start
operation. Press it again to stop
operation.
FAN SPEED selector Button
This determines the fan speed. Every
time you press this button, the airflow
rate will change from
(AUTO)
➞
(HIGH) ➞ (MED) ➞
(LOW) ➞ (SILENT) (This
button allows selection of optimal
or preferred fan speed for each
operation mode).
Transmission sign
The transmission sign lights up
when a signal is sent.

– 5 –
ENGLISH
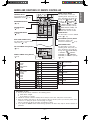
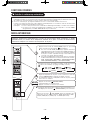
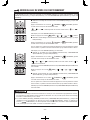
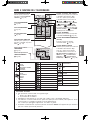
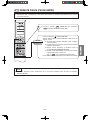
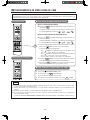
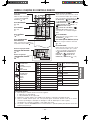
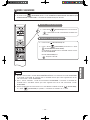
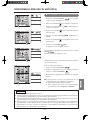
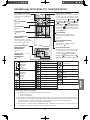
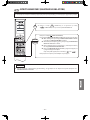
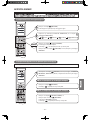
MODE SELECTOR
AUTO
HEAT
DEHUMIDIFY
COOL
FAN
FAN SPEED
AUTO
SILENT
LOW
MED
HIGH
START / STOP
ECO SENSOR
FAN
POWERFUL
Precautions for Use
●
Do not put the remote controller in the following places.
●
Under direct sunlight.
●
In the vicinity of a heater.
●
Handle the remote controller carefully. Do not drop it on the floor, and protect it from water.
●
Once the outdoor unit stops, it will not restart for about 3 minutes (unless you turn the power switch
off and on or unplug the power cord and plug it in again).
This is to protect the device and does not indicate a failure.
●
If you press the MODE selector button during operation, the device may stop for about 3 minutes for
protection.
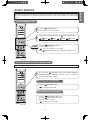
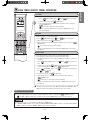
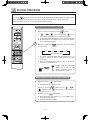
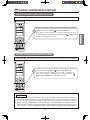
POWERFUL Button
Use this button to set the
POWERFUL mode. (
p. 18)
INFORMATION Button
(
p. 30)
ION MIST Button
(
p. 17)
ON / OFF TIMER setting Buttons
( p. 21)
WEEKLY TIMER setting Buttons
( p. 24)
MODE selector Button
Use this button to select the
operating mode. Every time you
press this button, the mode will
change from (AUTO) ➞
(HEAT) ➞ (DEHUMIDIFY) ➞
(COOL) ➞ (FAN) ➞
(ONE TOUCH CLEAN) and ➞
(FILTER CLEAN) cyclically.
(ONE TOUCH CLEAN) and
(FILTER CLEAN) can be
selected when the unit is OFF.
SILENT Button
Use this button to set the SILENT
mode. ( p. 19)
AUTO SWING (Vertical) Button
Controls the angle of the
horizontal air deflector. (
p. 14)
WIND MODE Button
Use this button to select the
operating mode. Every time you
press the button, the mode will
change from (AUTO SWING)
➞ CANCEL ➞
(DIRECT
AIRFLOW) ➞ (INDIRECT
AIRFLOW) ➞ CANCEL cyclically.
( p. 14)
LEAVE HOME Button
( p. 20)
NAMES AND FUNCTIONS OF REMOTE CONTROLLER
ECO SLEEP TIMER Button
Use this button to set the ECO
sleep timer. ( p. 22)
SILENT
INFO
SLEEP TIMER
AUTO SWING (VERTICAL)
AUTO SWING (HORIZONTAL)
LEAVE HOME
CLEAN
FILTER CLEAN
ION MIST
DIRECT AIRFLOW
INDIRECT AIRFLOW
DAY
PROGRAM NO.
ON / OFF TIMER
TIME
OK
DELETE
COPY / PASTE
CANCEL
SEND
CLOCK

– 6 –
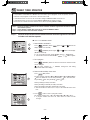
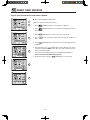
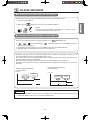
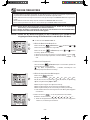
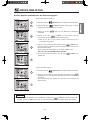
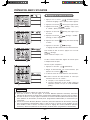
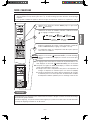
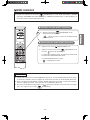
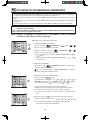
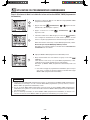
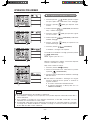
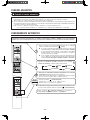
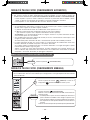
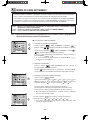
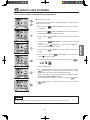
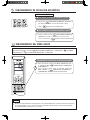
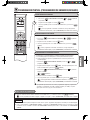
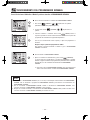
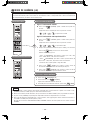
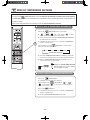
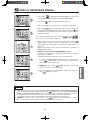
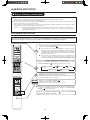
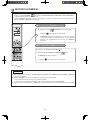
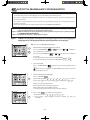
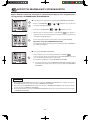
AUTOMATIC OPERATION
The device will automatically determine the mode of operation, HEAT or COOL depending on the current
room temperature. The selected mode of operation will change when the room temperature varies.
VARIOUS FUNCTIONS
■ Auto Restart Control
● If there is a power failure, operation will be automatically restarted when the power is resumed with previous operation
mode and airflow direction.
(As the operation is not stopped by remote controller.)
● If you intend not to continue the operation when the power is resumed, switch off the power supply.
When you switch on the circuit breaker, the operation will be automatically restarted with previous operation mode
and airflow direction.
Note: 1. If you do not require Auto Restart Control, please consult your sales agent.
2. Auto Restart Control is not available when Timer or Sleep Timer mode is set.
■ As the settings are stored in the memory of the remote controller, you
only have to press the
(START/STOP) button next time.
Press the MODE selector button so that the display indicates the
(AUTO) mode of operation.
● When AUTO has been selected, the device will automatically
determine the mode of operation, HEAT or COOL depending on
the current room temperature. However the mode of operation will
not change when indoor unit is connected to multi type outdoor
unit.
● If the mode automatically selected by the unit is not satisfactory,
manually change the mode setting (HEAT, DEHUMIDIFY, COOL
or FAN).
Press the (FAN SPEED) button to select AUTO, HIGH, MED, LOW
or SILENT.
Press the (START/STOP) button.
Operation starts with a beep.
Press the button again to stop operation.
Set the desired room temperature with the TEMPERATURE buttons
(the display indicates the setting).
The temperature setting and the actual room temperature may vary
depending on conditions.
START
STOP
1
2
3
Set the desired FAN SPEED with the (FAN SPEED) button (the
display indicates the setting).
(AUTO) (HIGH) (MED)
(SILENT) (LOW)

– 7 –
ENGLISH
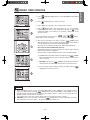
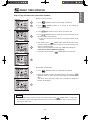
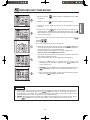
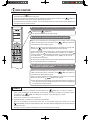
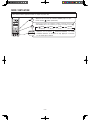
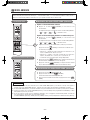
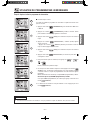
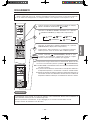
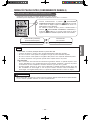
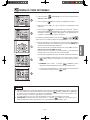
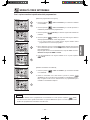
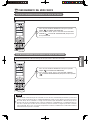
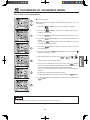
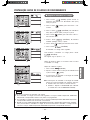
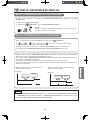
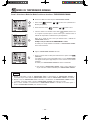
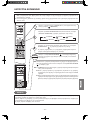
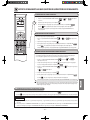
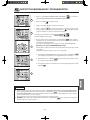
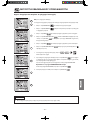
HEATING OPERATION
● Use the device for heating when the outdoor temperature is under 21°C.
When it is too warm (over 21°C), the heating function may not work in order to protect the device.
● In order to maintain reliability of the device, please use this device when outdoor temperature is above
–20°C.
Press the MODE selector button so that the display indicates
(HEAT).
Set the desired FAN SPEED with the (FAN SPEED) button
(the display indicates the setting).
(AUTO) (HIGH) (MED)
(SILENT) (LOW)
Set the desired room temperature with the TEMPERATURE buttons
(the display indicates the setting).
The temperature setting and the actual room temperature may
vary depending on conditions.
Press the (START/STOP) button. Heating operation starts with
a beep. Press the button again to stop operation.
■ As the settings are stored in the memory of the remote controller, you
only have to press the (START/STOP) button next time.
■ During AUTO fan, the fan speed automatically changes as below:
● When the difference between room temperature and setting temperature
is large, fan starts to run at HI speed.
● After room temperature reaches the preset temperature, fan speed
will be changed to lower speed to obtain optimum room temperature
condition for natural healthy heating.
START
STOP
Defrosting will be performed about once an hour when frost forms on the heat exchange of the outdoor unit,
for 5~10 minutes each time.
During defrosting operation, the operation lamp blinks in a cycle of 3 seconds on and 0.5 second off.
The maximum time for defrosting is 20 minutes.
1
2
3
Defrosting

– 8 –
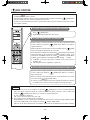
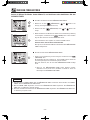
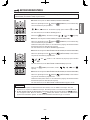
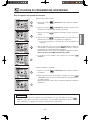
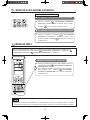
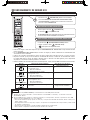
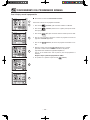
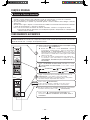
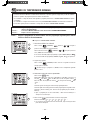
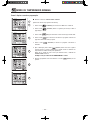
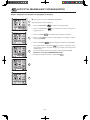
DEHUMIDIFYING OPERATION
■ Dehumidifying Function
● When the room temperature is higher than the temperature setting: The device will dehumidify the room,
reducing the room temperature to the preset level.
When the room temperature is lower than the temperature setting: Dehumidifying will be performed at the
temperature setting slightly lower than the current room temperature, regardless of the temperature setting.
● The preset room temperature may not be reached depending on the number of people present in the room
or other room conditions.
Set the desired room temperature with the ROOM
TEMPERATURE setting buttons (the display indicates the
setting).
The range of 20-26˚C is recommended as the room
temperature for dehumidifying.
Press the (START/STOP) button. Dehumidifying operation
starts with a beep. Press the button again to stop operation.
■ As the settings are stored in the memory of the remote controller, you
only have to press the (START/STOP) button next time.
START
STOP
Press the MODE selector button so that the display
indicates (DEHUMIDIFY).
The fan speed is set at LOW.
Press (FAN SPEED) button to select SILENT or LOW fan
speed.
Use the device for dehumidifying when the room temperature is over 16°C.
When it is under 15°C, the dehumidifying function will not work.
1
2

– 9 –
ENGLISH
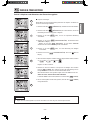
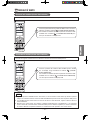
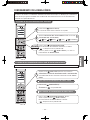
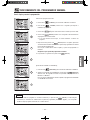
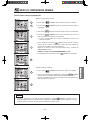
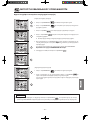
COOLING OPERATION
Use the device for cooling when the outdoor temperature is -10~ 43°C.
If indoors humidity is very high (80%), some dew may form on the air outlet grille of the indoor unit.
Press the MODE selector button so that the display indicates
(COOL).
■ As the settings are stored in the memory of the remote controller, you
only have to press the (START/STOP) button next time.
■ During AUTO fan, the fan speed automatically changes as below:
● When the difference between room temperature and setting tem-
perature is large, fan starts to run at HI speed.
● After room temperature reaches the preset temperature, fan speed
will be changed to lower speed to obtain optimum room temperature
condition for natural healthy cooling.
START
STOP
1
2
3
Set the desired FAN SPEED with the (FAN SPEED) button (the
display indicates the setting).
(AUTO) (HIGH) (MED)
(SILENT) (LOW)
Set the desired room temperature with the TEMPERATURE buttons
(the display indicates the setting).
The temperature setting and the actual room temperature may vary
depending on conditions.
Press the (START/STOP) button. Cooling operation starts with a
beep. Press the button again to stop operation. The cooling function
does not start if the temperature setting is higher than the current
room temperature (even though the (OPERATION) lamp lights).
The cooling function will start as soon as user set the temperature
below the current room temperature.

– 10 –
FAN OPERATION
User can use the device simply as an air circulator.
START
STOP
1
2
Press the MODE selector so that the display indicates
(FAN).
Set the desired FAN SPEED with the (FAN SPEED) button (the
display indicates the setting).
(HIGH) (MED) (LOW) (SILENT)
Press the (START/STOP) button. Fan operation starts with
a beep. Press the button again to stop operation.

– 11 –
ENGLISH
CLEAN (ONE TOUCH CLEAN) OPERATION
● Drying indoor heat exchanger after cooling operation to prevent mildew.
● Press the (MODE) button to display “ ” (CLEAN)
during OFF mode.
Press the (START/STOP) button.
ONE TOUCH CLEAN operation starts with a beep.
● When the ONE TOUCH CLEAN operation completes,
unit will switch OFF automatically.
● Total time taken for ONE TOUCH CLEAN operation is
60 minutes.
● During this operation, HEATING/FAN operation will
operate.
● During ONE TOUCH CLEAN, operation lamp and clean
lamp light up.
“ ” and “ ” are displayed on the LCD.
Press the button again to stop the operation.
Ion Mist
Wind Mode
NOTE
● Once if the weekly timer is set then there is no need to cancel it before operating ONE TOUCH CLEAN.
START
STOP
1

– 12 –
FILTER CLEANING OPERATION (AUTOMATIC OPERATION)
■ To stop AUTOMATIC FILTER CLEANING operation
● Automatic filter cleaning mode is set at the time of purchase.
● Automatically cleans the micro mesh stainless filter when the basic air-conditioning operation (AUTO,
HEATING, DEHUMIDIFYING or COOLING) has ended.
• The cleaning unit makes cycle to back and forth movement to sweep the dust on the micro mesh
stainless filter and the dust catcher puts the collected dust into the dust box.
• One cycle of filter cleaning operation will take approximately 5 minutes.
Conditions of the automatic filter cleaning.
• When the air conditioner operates for more than 15 minutes and stops, automatic filter cleaning is
performed in one of the following conditions.
(1) Accumulated operating hours of the air conditioner have exceeded 8 hours.
(2) Air conditioner is not operated for more than one week.
(To clean the dust which is naturally deposited on the top filter.)
CAUTION: The accumulated operating hours will not be reset if the automatic filter cleaning operation
is stopped before its completion.
• If the air conditioner is in operation continuously for 24 hours, the operation is stopped and automatic
filter cleaning operation is performed.
After the completion of automatic filter cleaning, the operation will return to previous mode.
● Automatic filter cleaning is not performed if the air conditioner operation is stopped by sleep timer or
off timer function.
If you use sleep timer or off timer every time, it is recommended to operate manual filter cleaning once
every 2~3 days.
However, if manual filter cleaning is not performed, automatic filter cleaning will be performed approximately
once a week after the air conditioner operation is stopped by sleep timer or off timer to protect the device.
Press the (START/STOP) button.
STOP
● Use the remote controller to run filter cleaning operation when the air conditioner operation is stopped.
● If the air conditioner is not in use for a long period, it is recommended to manually run filter cleaning before
using the air conditioner.
Press the (MODE) select button so that the display
indicates (FILTER CLEANING) when the unit is OFF.
Press the (START/STOP) button.
FILTER CLEANING operation starts with a beep.
• The cleaning unit makes one cycle of back and forth movement
to sweep the dust on the micro mesh stainless filter and the
dust catcher puts the collected dust in to the dust box.
• One cycle of filter cleaning operation will take approximately
5 minutes.
Press the button again to stop the filter cleaning operation.
FILTER CLEANING OPERATION (MANUAL OPERATION)
Ion Mist
Wind Mode
1
START
STOP

– 13 –
ENGLISH
HOW TO PROHIBIT THE FILTER CLEANING OPERATION
• With the remote controller, you can deactivate the filter cleaning operation.
• This setting should be made only when the air conditioner is stopped.
Press the (AUTO SWING VERTICAL) and (OK) buttons
simultaneously for 5 seconds.
A double short beep sounds is emitted and the filter cleaning is
deactivated.
To reactivate the filter cleaning, press the (AUTO SWING
VERTICAL) and (OK) buttons simultaneously for 5 seconds,
a single short beep sound is emitted and the setting returns the
filter cleaning operation.
Ion Mist
Wind Mode
Filter cleaning operation (Default)
(at the time of purchase)
“Beep” sound
Filter cleaning operation
is prohibited
“Beep Beep” sound
1
FILTER CLEANING OPERATION (MANUAL OPERATION)
NOTE
About the noise during filter cleaning
• A whirring motor noise is generated due to driving of the cleaning unit.
• A clapping noise is generated when the dust catcher collects the dust swept by the cleaning unit.
• A clapping noise is generated when the dust catcher is turned over by the cleaning unit.
• A sweeping sound is generated when the cleaning unit sweeps the dust.
Maintenance
• No daily maintenance is required. However, dust amount varies depending on the environment in
which the air conditioner is used. Check the dust amount in the Dust Box approximately once every
two years and throw the dust, if any.
• Greasy dirt can also be cleaned by the combined function of filter cleaning and the micro mesh
stainless filter. If the dirt looks heavy,remove the micro mesh stainless filter, the dust catcher and
the filter cleaning wiper to wash them with water.
CAUTION
Do not put your fingers or a stick etc into the top part of the indoor unit during filter cleaning operation.
It may result in injury or malfunction.
La page est en cours de chargement...
La page est en cours de chargement...
La page est en cours de chargement...
La page est en cours de chargement...
La page est en cours de chargement...
La page est en cours de chargement...
La page est en cours de chargement...
La page est en cours de chargement...
La page est en cours de chargement...
La page est en cours de chargement...
La page est en cours de chargement...
La page est en cours de chargement...
La page est en cours de chargement...
La page est en cours de chargement...
La page est en cours de chargement...
La page est en cours de chargement...
La page est en cours de chargement...
La page est en cours de chargement...
La page est en cours de chargement...
La page est en cours de chargement...
La page est en cours de chargement...
La page est en cours de chargement...
La page est en cours de chargement...
La page est en cours de chargement...
La page est en cours de chargement...
La page est en cours de chargement...
La page est en cours de chargement...
La page est en cours de chargement...
La page est en cours de chargement...
La page est en cours de chargement...
La page est en cours de chargement...
La page est en cours de chargement...
La page est en cours de chargement...
La page est en cours de chargement...
La page est en cours de chargement...
La page est en cours de chargement...
La page est en cours de chargement...
La page est en cours de chargement...
La page est en cours de chargement...
La page est en cours de chargement...
La page est en cours de chargement...
La page est en cours de chargement...
La page est en cours de chargement...
La page est en cours de chargement...
La page est en cours de chargement...
La page est en cours de chargement...
La page est en cours de chargement...
La page est en cours de chargement...
La page est en cours de chargement...
La page est en cours de chargement...
La page est en cours de chargement...
La page est en cours de chargement...
La page est en cours de chargement...
La page est en cours de chargement...
La page est en cours de chargement...
La page est en cours de chargement...
La page est en cours de chargement...
La page est en cours de chargement...
La page est en cours de chargement...
La page est en cours de chargement...
La page est en cours de chargement...
La page est en cours de chargement...
La page est en cours de chargement...
La page est en cours de chargement...
La page est en cours de chargement...
La page est en cours de chargement...
La page est en cours de chargement...
La page est en cours de chargement...
La page est en cours de chargement...
La page est en cours de chargement...
La page est en cours de chargement...
La page est en cours de chargement...
La page est en cours de chargement...
La page est en cours de chargement...
La page est en cours de chargement...
La page est en cours de chargement...
La page est en cours de chargement...
La page est en cours de chargement...
La page est en cours de chargement...
La page est en cours de chargement...
La page est en cours de chargement...
La page est en cours de chargement...
La page est en cours de chargement...
La page est en cours de chargement...
La page est en cours de chargement...
La page est en cours de chargement...
La page est en cours de chargement...
La page est en cours de chargement...
La page est en cours de chargement...
La page est en cours de chargement...
La page est en cours de chargement...
La page est en cours de chargement...
La page est en cours de chargement...
La page est en cours de chargement...
La page est en cours de chargement...
La page est en cours de chargement...
La page est en cours de chargement...
La page est en cours de chargement...
La page est en cours de chargement...
La page est en cours de chargement...
La page est en cours de chargement...
La page est en cours de chargement...
La page est en cours de chargement...
La page est en cours de chargement...
La page est en cours de chargement...
La page est en cours de chargement...
La page est en cours de chargement...
La page est en cours de chargement...
La page est en cours de chargement...
La page est en cours de chargement...
La page est en cours de chargement...
La page est en cours de chargement...
La page est en cours de chargement...
La page est en cours de chargement...
La page est en cours de chargement...
La page est en cours de chargement...
La page est en cours de chargement...
La page est en cours de chargement...
La page est en cours de chargement...
La page est en cours de chargement...
La page est en cours de chargement...
La page est en cours de chargement...
La page est en cours de chargement...
La page est en cours de chargement...
La page est en cours de chargement...
La page est en cours de chargement...
La page est en cours de chargement...
La page est en cours de chargement...
La page est en cours de chargement...
La page est en cours de chargement...
La page est en cours de chargement...
La page est en cours de chargement...
La page est en cours de chargement...
La page est en cours de chargement...
La page est en cours de chargement...
La page est en cours de chargement...
La page est en cours de chargement...
La page est en cours de chargement...
La page est en cours de chargement...
La page est en cours de chargement...
La page est en cours de chargement...
La page est en cours de chargement...
La page est en cours de chargement...
La page est en cours de chargement...
La page est en cours de chargement...
La page est en cours de chargement...
La page est en cours de chargement...
La page est en cours de chargement...
La page est en cours de chargement...
La page est en cours de chargement...
La page est en cours de chargement...
La page est en cours de chargement...
La page est en cours de chargement...
La page est en cours de chargement...
La page est en cours de chargement...
La page est en cours de chargement...
La page est en cours de chargement...
La page est en cours de chargement...
La page est en cours de chargement...
La page est en cours de chargement...
La page est en cours de chargement...
La page est en cours de chargement...
La page est en cours de chargement...
La page est en cours de chargement...
La page est en cours de chargement...
La page est en cours de chargement...
La page est en cours de chargement...
La page est en cours de chargement...
La page est en cours de chargement...
La page est en cours de chargement...
La page est en cours de chargement...
La page est en cours de chargement...
La page est en cours de chargement...
La page est en cours de chargement...
La page est en cours de chargement...
La page est en cours de chargement...
La page est en cours de chargement...
La page est en cours de chargement...
La page est en cours de chargement...
La page est en cours de chargement...
La page est en cours de chargement...
La page est en cours de chargement...
La page est en cours de chargement...
La page est en cours de chargement...
La page est en cours de chargement...
La page est en cours de chargement...
La page est en cours de chargement...
La page est en cours de chargement...
La page est en cours de chargement...
La page est en cours de chargement...
La page est en cours de chargement...
La page est en cours de chargement...
La page est en cours de chargement...
La page est en cours de chargement...
La page est en cours de chargement...
La page est en cours de chargement...
La page est en cours de chargement...
La page est en cours de chargement...
La page est en cours de chargement...
La page est en cours de chargement...
La page est en cours de chargement...
La page est en cours de chargement...
La page est en cours de chargement...
La page est en cours de chargement...
La page est en cours de chargement...
La page est en cours de chargement...
La page est en cours de chargement...
La page est en cours de chargement...
La page est en cours de chargement...
La page est en cours de chargement...
La page est en cours de chargement...
La page est en cours de chargement...
La page est en cours de chargement...
La page est en cours de chargement...
La page est en cours de chargement...
La page est en cours de chargement...
La page est en cours de chargement...
La page est en cours de chargement...
La page est en cours de chargement...
La page est en cours de chargement...
La page est en cours de chargement...
La page est en cours de chargement...
La page est en cours de chargement...
La page est en cours de chargement...
La page est en cours de chargement...
La page est en cours de chargement...
La page est en cours de chargement...
La page est en cours de chargement...
La page est en cours de chargement...
La page est en cours de chargement...
La page est en cours de chargement...
La page est en cours de chargement...
La page est en cours de chargement...
La page est en cours de chargement...
La page est en cours de chargement...
La page est en cours de chargement...
La page est en cours de chargement...
La page est en cours de chargement...
La page est en cours de chargement...
La page est en cours de chargement...
La page est en cours de chargement...
La page est en cours de chargement...
La page est en cours de chargement...
La page est en cours de chargement...
La page est en cours de chargement...
La page est en cours de chargement...
La page est en cours de chargement...
La page est en cours de chargement...
La page est en cours de chargement...
La page est en cours de chargement...
La page est en cours de chargement...
La page est en cours de chargement...
La page est en cours de chargement...
La page est en cours de chargement...
La page est en cours de chargement...
La page est en cours de chargement...
La page est en cours de chargement...
La page est en cours de chargement...
La page est en cours de chargement...
La page est en cours de chargement...
La page est en cours de chargement...
La page est en cours de chargement...
La page est en cours de chargement...
La page est en cours de chargement...
La page est en cours de chargement...
La page est en cours de chargement...
La page est en cours de chargement...
La page est en cours de chargement...
La page est en cours de chargement...
La page est en cours de chargement...
La page est en cours de chargement...
La page est en cours de chargement...
La page est en cours de chargement...
La page est en cours de chargement...
La page est en cours de chargement...
La page est en cours de chargement...
La page est en cours de chargement...
La page est en cours de chargement...
La page est en cours de chargement...
La page est en cours de chargement...
La page est en cours de chargement...
La page est en cours de chargement...
La page est en cours de chargement...
La page est en cours de chargement...
La page est en cours de chargement...
La page est en cours de chargement...
La page est en cours de chargement...
La page est en cours de chargement...
La page est en cours de chargement...
La page est en cours de chargement...
La page est en cours de chargement...
La page est en cours de chargement...
La page est en cours de chargement...
La page est en cours de chargement...
La page est en cours de chargement...
La page est en cours de chargement...
La page est en cours de chargement...
La page est en cours de chargement...
La page est en cours de chargement...
La page est en cours de chargement...
La page est en cours de chargement...
La page est en cours de chargement...
La page est en cours de chargement...
La page est en cours de chargement...
La page est en cours de chargement...
La page est en cours de chargement...
La page est en cours de chargement...
La page est en cours de chargement...
La page est en cours de chargement...
La page est en cours de chargement...
La page est en cours de chargement...
La page est en cours de chargement...
La page est en cours de chargement...
La page est en cours de chargement...
La page est en cours de chargement...
La page est en cours de chargement...
La page est en cours de chargement...
La page est en cours de chargement...
La page est en cours de chargement...
La page est en cours de chargement...
La page est en cours de chargement...
La page est en cours de chargement...
La page est en cours de chargement...
La page est en cours de chargement...
La page est en cours de chargement...
La page est en cours de chargement...
La page est en cours de chargement...
La page est en cours de chargement...
La page est en cours de chargement...
La page est en cours de chargement...
-
 1
1
-
 2
2
-
 3
3
-
 4
4
-
 5
5
-
 6
6
-
 7
7
-
 8
8
-
 9
9
-
 10
10
-
 11
11
-
 12
12
-
 13
13
-
 14
14
-
 15
15
-
 16
16
-
 17
17
-
 18
18
-
 19
19
-
 20
20
-
 21
21
-
 22
22
-
 23
23
-
 24
24
-
 25
25
-
 26
26
-
 27
27
-
 28
28
-
 29
29
-
 30
30
-
 31
31
-
 32
32
-
 33
33
-
 34
34
-
 35
35
-
 36
36
-
 37
37
-
 38
38
-
 39
39
-
 40
40
-
 41
41
-
 42
42
-
 43
43
-
 44
44
-
 45
45
-
 46
46
-
 47
47
-
 48
48
-
 49
49
-
 50
50
-
 51
51
-
 52
52
-
 53
53
-
 54
54
-
 55
55
-
 56
56
-
 57
57
-
 58
58
-
 59
59
-
 60
60
-
 61
61
-
 62
62
-
 63
63
-
 64
64
-
 65
65
-
 66
66
-
 67
67
-
 68
68
-
 69
69
-
 70
70
-
 71
71
-
 72
72
-
 73
73
-
 74
74
-
 75
75
-
 76
76
-
 77
77
-
 78
78
-
 79
79
-
 80
80
-
 81
81
-
 82
82
-
 83
83
-
 84
84
-
 85
85
-
 86
86
-
 87
87
-
 88
88
-
 89
89
-
 90
90
-
 91
91
-
 92
92
-
 93
93
-
 94
94
-
 95
95
-
 96
96
-
 97
97
-
 98
98
-
 99
99
-
 100
100
-
 101
101
-
 102
102
-
 103
103
-
 104
104
-
 105
105
-
 106
106
-
 107
107
-
 108
108
-
 109
109
-
 110
110
-
 111
111
-
 112
112
-
 113
113
-
 114
114
-
 115
115
-
 116
116
-
 117
117
-
 118
118
-
 119
119
-
 120
120
-
 121
121
-
 122
122
-
 123
123
-
 124
124
-
 125
125
-
 126
126
-
 127
127
-
 128
128
-
 129
129
-
 130
130
-
 131
131
-
 132
132
-
 133
133
-
 134
134
-
 135
135
-
 136
136
-
 137
137
-
 138
138
-
 139
139
-
 140
140
-
 141
141
-
 142
142
-
 143
143
-
 144
144
-
 145
145
-
 146
146
-
 147
147
-
 148
148
-
 149
149
-
 150
150
-
 151
151
-
 152
152
-
 153
153
-
 154
154
-
 155
155
-
 156
156
-
 157
157
-
 158
158
-
 159
159
-
 160
160
-
 161
161
-
 162
162
-
 163
163
-
 164
164
-
 165
165
-
 166
166
-
 167
167
-
 168
168
-
 169
169
-
 170
170
-
 171
171
-
 172
172
-
 173
173
-
 174
174
-
 175
175
-
 176
176
-
 177
177
-
 178
178
-
 179
179
-
 180
180
-
 181
181
-
 182
182
-
 183
183
-
 184
184
-
 185
185
-
 186
186
-
 187
187
-
 188
188
-
 189
189
-
 190
190
-
 191
191
-
 192
192
-
 193
193
-
 194
194
-
 195
195
-
 196
196
-
 197
197
-
 198
198
-
 199
199
-
 200
200
-
 201
201
-
 202
202
-
 203
203
-
 204
204
-
 205
205
-
 206
206
-
 207
207
-
 208
208
-
 209
209
-
 210
210
-
 211
211
-
 212
212
-
 213
213
-
 214
214
-
 215
215
-
 216
216
-
 217
217
-
 218
218
-
 219
219
-
 220
220
-
 221
221
-
 222
222
-
 223
223
-
 224
224
-
 225
225
-
 226
226
-
 227
227
-
 228
228
-
 229
229
-
 230
230
-
 231
231
-
 232
232
-
 233
233
-
 234
234
-
 235
235
-
 236
236
-
 237
237
-
 238
238
-
 239
239
-
 240
240
-
 241
241
-
 242
242
-
 243
243
-
 244
244
-
 245
245
-
 246
246
-
 247
247
-
 248
248
-
 249
249
-
 250
250
-
 251
251
-
 252
252
-
 253
253
-
 254
254
-
 255
255
-
 256
256
-
 257
257
-
 258
258
-
 259
259
-
 260
260
-
 261
261
-
 262
262
-
 263
263
-
 264
264
-
 265
265
-
 266
266
-
 267
267
-
 268
268
-
 269
269
-
 270
270
-
 271
271
-
 272
272
-
 273
273
-
 274
274
-
 275
275
-
 276
276
-
 277
277
-
 278
278
-
 279
279
-
 280
280
-
 281
281
-
 282
282
-
 283
283
-
 284
284
-
 285
285
-
 286
286
-
 287
287
-
 288
288
-
 289
289
-
 290
290
-
 291
291
-
 292
292
-
 293
293
-
 294
294
-
 295
295
-
 296
296
-
 297
297
-
 298
298
-
 299
299
-
 300
300
-
 301
301
-
 302
302
-
 303
303
-
 304
304
-
 305
305
-
 306
306
-
 307
307
-
 308
308
-
 309
309
-
 310
310
-
 311
311
-
 312
312
-
 313
313
-
 314
314
-
 315
315
-
 316
316
-
 317
317
-
 318
318
-
 319
319
-
 320
320
-
 321
321
-
 322
322
-
 323
323
-
 324
324
-
 325
325
-
 326
326
-
 327
327
-
 328
328
-
 329
329
-
 330
330
-
 331
331
-
 332
332
-
 333
333
-
 334
334
-
 335
335
-
 336
336
-
 337
337
-
 338
338
-
 339
339
-
 340
340
-
 341
341
-
 342
342
-
 343
343
-
 344
344
-
 345
345
-
 346
346
-
 347
347
-
 348
348
-
 349
349
-
 350
350


Hitachi RAC-18WSB Manuel utilisateur
- Catégorie
- Climatiseurs split-system
- Taper
- Manuel utilisateur
dans d''autres langues
- italiano: Hitachi RAC-18WSB Manuale utente
- English: Hitachi RAC-18WSB User manual
- español: Hitachi RAC-18WSB Manual de usuario
- Deutsch: Hitachi RAC-18WSB Benutzerhandbuch
- português: Hitachi RAC-18WSB Manual do usuário
Documents connexes
-
Hitachi RAC-35WSA Manuel utilisateur
-
-
-
-
-
-
-
-
-
Autres documents
-
LG CB12L Le manuel du propriétaire
-
Equation WAP-41EWH Le manuel du propriétaire
-
Johnson Controls YORK EOKC-12 FS Operating Instructions Manual
-
-
LG PREMTB10U Mode d'emploi
-
 Cordivari RF Digital Remote Control Manuel utilisateur
-
Klarstein Silent Storm Manuel utilisateur
-
Sanyo ABC-VW24A - Air Washer Plus™ Manuel utilisateur
-
 Cordivari Dual energy blower radiators Manuel utilisateur
-
Fagor CA-70 CI Le manuel du propriétaire

