
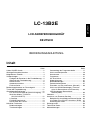
LCD COLOUR TELEVISION
LCD-FARBFERNSEHGERÄT
TÉLÉVISION COULEUR À ÉCRAN
À CRISTAUX LIQUIDES (LCD)
TELEVISORE A COLORI LCD
TELEVISIÓN EN COLOR LCD
LCD-FÄRG-TV
LCD-KLEURENTELEVISIE
LC-13B2E
OPERATION MANUAL
BEDIENUNGSANLEITUNG
MODE D’EMPLOI
MANUALE DI ISTRUZIONI
MANUAL DE MANEJO
BRUKSANVISNING
GEBRUIKSAANWIJZING
ENGLISH
DEUTSCH
FRANÇAIS
ITALIANO
ESPAÑOL
SVENSKA
NEDERLANDS
MEN
U

This equipment complies with the requirements of Directive 89/336/EEC and 73/23/EEC as amended
by 93/68/EEC.
Dieses Gerät entspricht den Anforderungen der EG-Richtlinien 89/336/EWG und 73/23/EWG mit
Änderung 93/68/EWG.
Ce matériel répond aux exigences contenues dans les directives 89/336/CEE et 73/23/CEE modifiées
par la directive 93/68/CEE.
Dit apparaat voldoet aan de eisen van de richtlijnen 89/336/EEG en 73/23/EEG, gewijzigd door 93/68/
EEG.
Dette udstyr overholder kravene i direktiv nr. 89/336/EEC og 73/23/EEC med tillæg nr. 93/68/EEC.
Quest’apparecchio è conforme ai requisiti delle direttive 89/336/EEC e 73/23/EEC come emendata
dalla direttiva 93/68/EEC.
Η εγκατάσταση αυτή ανταπκρίνεται στις απαιτήσεις των δηγιών της Ευρωπαϊκής Ενωσης
89/336/ΕΚ και 73/23/ΕΚ, #πως ι καννισµί αυτί συµπληρώθηκαν απ# την δηγία 93/68/
ΕΚ.
Este equipamento obedece às exigências das directivas 89/336/CEE e 73/23/CEE, na sua versão
corrigida pela directiva 93/68/CEE.
Este aparato satisface las exigencias de las Directivas 89/336/CEE y 73/23/CEE, modificadas por
medio de la 93/68/CEE.
Denna utrustning uppfyller kraven enligt riktlinjerna 89/336/EEC och 73/23/EEC så som kompletteras
av 93/68/EEC.
Dette produktet oppfyller betingelsene i direktivene 89/336/EEC og 73/23/EEC i endringen 93/68/
EEC.
Tämä laite täyttää direktiivien 89/336/EEC ja 73/23/EEC vaatimukset, joita on muutettu direktiivillä 93/
68/EEC.
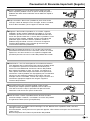
SPECIAL NOTE FOR USERS IN THE U.K.
The mains lead of this product is fitted with a non-rewireable (moulded) plug incorporating a 3A fuse.
Should the fuse need to be replaced, a BSI or ASTA approved BS 1362 fuse marked
or
ASA
and of
the same rating as above, which is also indicated on the pin face of the plug, must be used.
Always refit the fuse cover after replacing the fuse. Never use the plug without the fuse cover fitted.
In the unlikely event of the socket outlet in your home not being compatible with the plug supplied, cut
off the mains plug and fit an appropriate type.
DANGER: The fuse from the cut-off plug should be removed and the cut-off plug destroyed immedi-
ately and disposed of in a safe manner.
Under no circumstances should the cut-off plug be inserted elsewhere into a 13A socket
outlet, as a serious electric shock may occur.
To fit an appropriate plug to the mains lead, follow the instructions below:
IMPORTANT: The wires in the mains lead are coloured in accordance with the following code:
Blue : Neutral Brown : Live
As the colours of the wires in the mains lead of this product may not correspond with the coloured
markings identifying the terminals in your plug, proceed as follows;
• The wire which is coloured blue must be connected to the plug terminal which is marked N
or coloured black.
• The wire which is coloured brown must be connected to the plug terminal which is marked
L or coloured red.
Ensure that neither the brown nor the blue wire is connected to the earth terminal in your three-pin plug.
Before replacing the plug cover make sure that:
• If the new fitted plug contains a fuse, its value is the same as that removed from the cut-off
plug.
• The cord grip is clamped over the sheath of the mains lead, and not simply over the lead
wires.
IF YOU HAVE ANY DOUBT, CONSULT A QUALIFIED ELECTRICIAN.

LCD COLOUR TELEVISION
OPERATION MANUAL
ENGLISH
ENGLISH
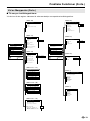
Contents
Page Page
Dear SHARP Customer.......................................... 2
Important Safety Precautions ................................. 2
Supplied Accessories ............................................. 4
Preparation ............................................................. 5
Installing Batteries in the Remote Control ...... 5
Using Remote Control ..................................... 5
Power Connection ........................................... 6
Antenna Connection ........................................ 6
First Installation................................................ 7
Part Names of Main Unit ........................................ 9
Part Names of Remote Control ............................ 11
Basic Operation .................................................... 12
Turning On and Off the Main Power ............. 12
Switching the TV/VIDEO (AV1/AV2/AVS/TV)
Mode ........................................................... 12
Sound Volume ............................................... 13
ON/OFF Standby ........................................... 13
Changing Channels ....................................... 14
Useful Features .................................................... 15
Adjusting Picture Settings ............................. 15
Adjusting Sound Settings .............................. 16
Using Programme Table................................ 17
Selecting Menu Items .................................... 18
Standard Settings .......................................... 20
Programmes .................................................. 21
AV Connections ............................................. 28
Child Lock ...................................................... 31
On-screen Display ......................................... 36
Timer Functions ............................................. 37
Setting Time and Date (Manual) ................... 38
NICAM Broadcast Selection .......................... 39
IGR (German stereo system) Broadcasts..... 40
Teletext ................................................................. 41
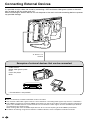
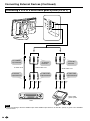
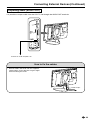
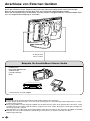
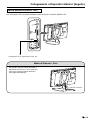
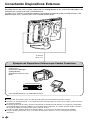
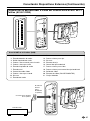
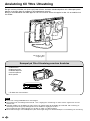
Connecting External Devices ............................... 46
Examples of external devices that can be
connected ................................................... 46
21-pin Euro-SCART (RGB) ........................... 47
How to fix the cables ..................................... 49
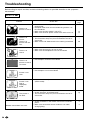
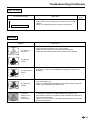
Troubleshooting .................................................... 50
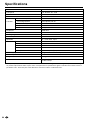
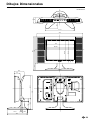
Specifications........................................................ 52
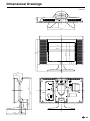
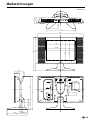
Dimensional Drawings.......................................... 53
LC-13B2E

2
Dear SHARP Customer
Thank you for your purchase of the SHARP LCD Colour TV product. To ensure safety and many
years of trouble-free operation of your product, please read the Important Safety Precautions
carefully before using this product.
Important Safety Precautions
Electricity is used to perform many useful functions, but it can also cause personal injuries and property
damage if improperly handled. This product has been engineered and manufactured with the highest priority
on safety. However, improper use can result in electric shock and/or fire. In order to prevent potential danger,
please observe the following instructions when installing, operating and cleaning the product. To ensure your
safety and prolong the service life of your LCD colour TV product, please read the following precautions
carefully before using the product.
■ Read instructions—All operating instructions must be read and understood before the product is operated.
■ Keep this manual in a safe place—These safety and operating instructions must be kept in a safe place for
future reference.
■ Observe warnings—All warnings on the product and in the instructions must be observed closely.
■ Follow instructions—All operating instructions must be followed.
■ Attachments—Do not use attachments not recommended by the manufacturer. Use of inadequate attach-
ments can result in accidents.
■ Power source—This product must operate on a power source specified on the specification label. If you
are not sure of the type of power supply used in your home, consult your dealer or local power company.
For units designed to operate on batteries or another power source, refer to the operating instructions.
■ Power cord protection—The power cords must be routed properly to prevent people from stepping on them
or objects from resting on them. Check the cords at the plugs and product.
■ If you plan to use a DC power supply unit other than the AC adapter supplied with the product, make sure
the power supply unit provides stable voltage with minimum fluctuations. Unstable power supply can cause
problems in the product.
■ Overloading—Do not overload AC outlets or extension cords. Overloading can cause fire or electric shock.
■ Entering of objects and liquids—Never insert an object into the product through vents or openings. High
voltage flows in the product, and inserting an object can cause electric shock and/or short internal parts.
For the same reason, do not spill water or liquid on the product.
■ Servicing—Do not attempt to service the product yourself. Removing covers can expose you to high
voltage and other dangerous conditions. Request a qualified service person to perform servicing.
■ Repair—If any of the following conditions occurs, unplug the power cord from the AC outlet, and request a
qualified service person to perform repairs:
a. When the power cord or plug is damaged.
b. When a liquid was spilled on the product or when objects have fallen into the product.
c. When the product has been exposed to rain or water.
d. When the product does not operate properly as described in the operating instructions.
Do not touch the controls other than those described in the operating instructions. Improper adjustment
of controls not described in the instructions can cause damage, which often requires extensive adjust-
ment work by a qualified technician.
e. When the product has been dropped or damaged.
f. When the product displays an abnormal condition. Any noticeable abnormality in the product indicates
that the product needs servicing.
■ Replacement parts—In case the product needs replacement parts, make sure that the service person uses
replacement parts specified by the manufacturer, or those with the same characteristics and performance
as the original parts. Use of unauthorized parts can result in fire, electric shock and/or other danger.
■ Safety checks—Upon completion of service or repair work, request the service technician to perform safety
checks to ensure that the product is in proper operating condition.
■ Wall or ceiling mounting—When mounting the product on a wall or ceiling, be sure to install the product
according to the method recommended by the manufacturer.

3
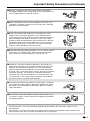
Important Safety Precautions (Continued)
■ Cleaning—Unplug the power cord from the AC outlet before
cleaning the product. Use a damp cloth to clean the product. Do
not use liquid cleaners or aerosol cleaners.
■ Water and moisture—Do not use the product near water, such
as bathtub, washbasin, kitchen sink and laundry tub, swimming
pool and in a wet basement.
■ Stand—Do not place the product on an unstable cart, stand,
tripod or table. Placing the product on an unstable base can
cause the product to fall, resulting in serious personal injuries as
well as damage to the product. Use only a cart, stand, tripod,
bracket or table recommended by the manufacturer or sold with
the product. When mounting the product on a wall, be sure to
follow the manufacturer’s instructions. Use only the mounting
hardware recommended by the manufacturer.
■ When relocating the product placed on a cart, it must be moved
with utmost care. Sudden stops, excessive force and uneven
floor surface can cause the product to fall from the cart.
■ Ventilation—The vents and other openings in the cabinet are
designed for ventilation. Do not cover or block these vents and
openings since insufficient ventilation can cause overheating
and/or shorten the life of the product. Do not place the product
on a bed, sofa, rug or other similar surface, since they can block
ventilation openings. This product is not designed for built-in
installation; do not place the product in an enclosed place such
as a bookcase or rack, unless proper ventilation is provided or
the manufacturer’s instructions are followed.
■ The LCD panel used in this product is made of glass. Therefore,
it can break when the product is dropped or applied with impact.
Be careful not to be injured by broken glass pieces in case the
LCD panel breaks.
■ Heat sources—Keep the product away from heat sources such
as radiators, heaters, stoves and other heat-generating products
(including amplifiers).
The LCD panel is a very high technology product with 921,600 thin film transistors, giving you fine
picture details.
Occasionally, a few non-active pixels may appear on the screen as a fixed point of blue, green or red.
Please note that this does not affect the performance of your product.

4
LCD COLOUR TELEVISION
LCD-FARBFERNSEHGERÄT
TÉLÉVISION COULEUR À ÉCRAN
À CRISTAUX LIQUIDES (LCD)
TELEVISORE A COLORI LCD
TELEVISIÓN EN COLOR LCD
LCD-FÄRG-TV
LCD-KLEURENTELEVISIE
LC-13B2E
OPERATION MANUAL
BEDIENUNGSANLEITUNG
MODE D’EMPLOI
MANUALE DI ISTRUZIONI
MANUAL DE MANEJO
BRUKSANVISNING
GEBRUIKSAANWIJZING
ENGLISHDEUTSCHFRANÇAISITALIANOESPAÑOLSVENSKA
NEDERLANDS
M
E
N
U
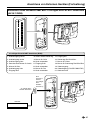
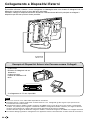
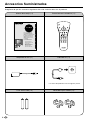
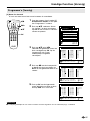
Make sure the following accessories are provided with the product.
Supplied Accessories
Operation manual (×1) Wireless remote control (×1)
AC cord (×1)
R-03 dry battery (×2)
AC adapter (×1)
Cable clamp (×2)
* Product shape varies in some countries.

5
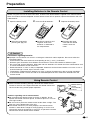
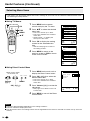
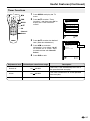
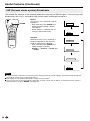
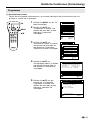
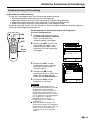
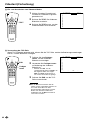
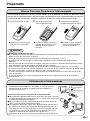
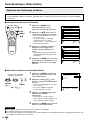
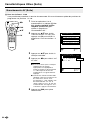
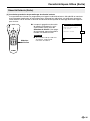
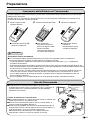
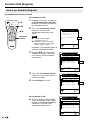
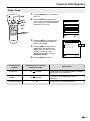
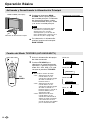
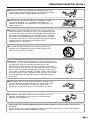
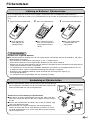
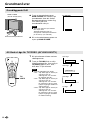
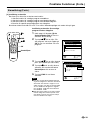
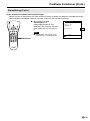
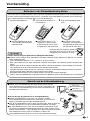
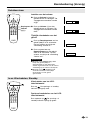
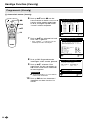
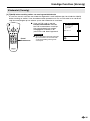
Installing Batteries in the Remote Control
Before using the LCD TV set for the first time, install the two R-03 batteries supplied in the remote control.
When the batteries become depleted and the remote control fails to operate, replace the batteries with new
R-03 batteries.
1 Open the battery cover. 2 Insert two R-03 batteries. 3 Replace the battery cover.
■ Position the positive and
negative ends of the
batteries as indicated in
the compartment.
Caution!
Precautions regarding batteries
■ Improper use of batteries can result in a leakage of chemicals and/or explosion. Be sure to follow the
instructions below.
• Place batteries with their terminals corresponding to the (+) and (–) indications.
• Different types of batteries have different characteristics. Do not mix batteries of different types.
• Do not mix old and new batteries. Mixing old and new batteries can shorten the life of new batteries and/
or cause old batteries to leak chemicals.
• Remove batteries as soon as they are depleted. Chemicals that leak from batteries can cause a rash. If
chemical leakage is found, wipe it off with a cloth.
• The batteries supplied with the product may have a shorter life expectancy due to storage conditions.
• If the remote control is not to be used for an extended period of time, remove the batteries from the
remote control.
Preparation
■ Engaging the lower
claw with the remote
control, close the
cover.
Using Remote Control
■ Use the remote control by pointing it towards the remote sensor
window of the main unit. Objects between the remote control and
sensor window may prevent proper operation.
Cautions regarding use of remote control
■ Do not expose the remote control to shock. In addition, do not
expose the remote control to liquids, and do not place it in an area
with high humidity.
■ Do not install or place the remote control under direct sunlight. The
heat may cause deformation of the unit.
■ The remote control may not work properly if the remote sensor
window is under direct sunlight or strong lighting. In such a case,
change the angle of the lighting or main unit, or operate the remote
control closer to the remote sensor window.
■ Raise the cover while
pressing the ([) part.
Remote sensor
window
Power/Standby
indicator

6
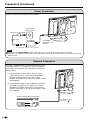
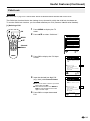
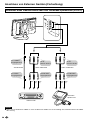
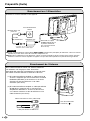
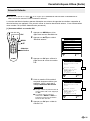
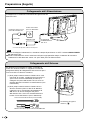
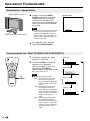
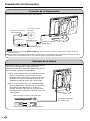
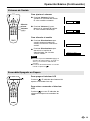
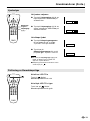
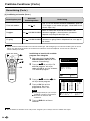
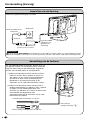
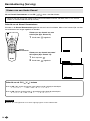
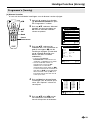
Power Connection
Notes:
■ Always turn the MAIN POWER switch of the LCD TV set to OFF when connecting the AC adapter.
■ Unplug the AC adapter from the LCD TV set and power outlet when the LCD TV set is not to be used for a long
period of time.
Preparation (Continued)
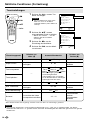
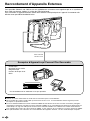
Antenna Connection
Connect to the DC input terminal of the product.
To POWER
INPUT DC 12 V
terminal
Plug into an AC outlet.
Household
power outlet
AC cord*
AC adapter
* Product shape varies in some countries.
To enjoy a clearer picture, we recommend that you use
an outdoor antenna. The following is a brief explanation
of the types of connection that are used for coaxial and
feeder cables:
(1)If your outdoor antenna uses a 75-ohm coaxial
cable, change this for a new standard DIN45325
(IEC169-2) plug and plug it into the antenna
terminal at the back of TV set via the antenna cable
(not supplied).
(2)If your outdoor antenna uses a 300-ohm twin-lead
flat feeder, change this for a 300-ohm to 75-ohm
impedance converter and plug it into the antenna
terminal at the back of TV set via the antenna cable
(not supplied).
To antenna input
terminal ( )
75-ohm coaxial cable (round cable)
300-ohm twin-lead flat feeder

7
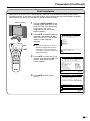
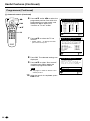
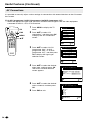
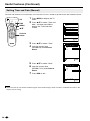
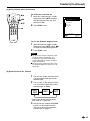
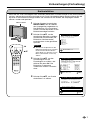
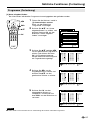
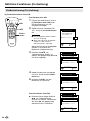
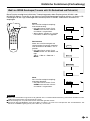
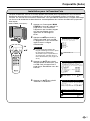
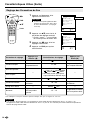
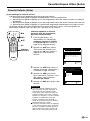
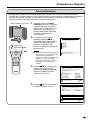
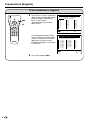
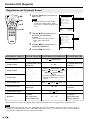
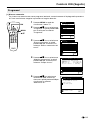
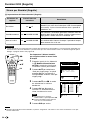
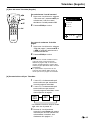
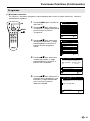
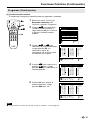
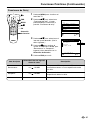
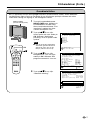
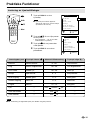
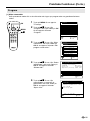
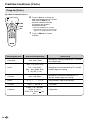
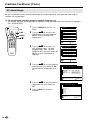
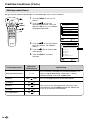
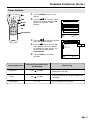
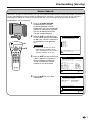
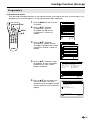
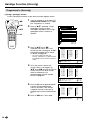
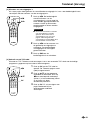
First Installation
When you turn on the LCD TV set for the first time, the First Installation routine, which makes
installation easier, is activated. Using this routine, you can select the on-screen display language,
and automatically search for and store all the receivable channels.
1 Press the MAIN POWER switch
located on the upper part of the
main unit. The “First installation”
screen with a list of the
languages for the on-screen
display appears.
2 Press ]/[ to select the desired
language, and then press OK.
The “Location of TV set” screen
appears in the language
selected.
Note:
■ You can change the on-screen
display language after the First
Installation routine by selecting
“Language” on the TV menu (see
pages 18 and 19).
3 Press ]/[ to select the TV set
location, and then press OK. The
“Autom. programme search”
screen appears.
4 Press ]/[ to select “Start
search.”
]/[
OK
iE
CH
TV/VIDEO
SOUND
END
T
M
MENUTEXT
(
RED
)(
GREEN
)(
YELLOW
)(
CYAN
)
INFO
OK
Please enter t he TV set locat ion
fo r the cor rect TV st andard and
the appropr iate programme
c l assi f icat ion for the count ry:
Locat ion of TV set
Other . . .
GB
I
NL
PL
HU
SL
Other countries
Great Br i t ai n
Italy
Netherlands
Pol and
Hungar y
Slovenia
(
PAL- I
)
(
PAL- BG
)
(
PAL-BG
)
(
PAL-DK
)
(SECAM-DK)
(
PAL-DK
)
(Auto, -BG)
Se l ec t and
proceed with OK
Back
End
MAIN POWER
Whi ch l ang ua ge do you wan t
First installat ion
to use for operation?
Deut sch
Français
Italiano
Español
Svenska
Select and
proceed
wi t h OK
Engl i sh
Nede r lands
Preparation (Continued)
Your TV set searches wi th the
fol lowing set t ings:
Extent of search Al l progr .
Store progr . from Pr ogramme 001
Locat i on of TV set Other count r i
Aut om. programme sear ch
Back
End
Change se t t i ngs
St ar t search

8
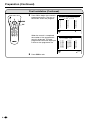
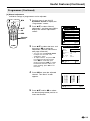
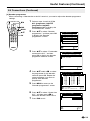
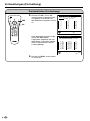
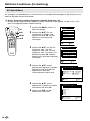
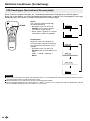
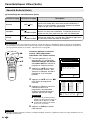
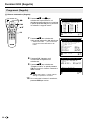
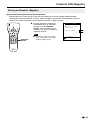
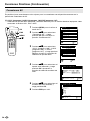
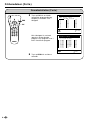
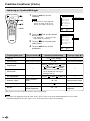
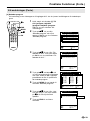
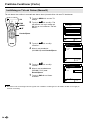
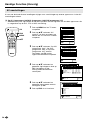
First Installation (Continued)
Preparation (Continued)
Star t search
Search is complet ed.
19 Programmes found.
0
1
2
3
4
5
6
7
8
9
10
14
15
16
17
18
19
11
12
13
28
29
20
21
22
23
24
25
26
27
End
S01
S08
S10
S10
S11
E03
E05
E06
E09
E10
E11
E36
E37
E38
E50
E53
E54
E56
E57
5 Press OK to begin the automatic
programme search. The bar on
the screen shows the progress.
When the search is completed,
the number of the programmes
found is displayed. The new
programmes found are displayed
in blue on the programme list.
6 Press END to exit.
iE
CH
TV/VIDEO
SOUND
END
T
M
MENUTEXT
(
RED
)(
GREEN
)(
YELLOW
)(
CYAN
)
INFO
OK
END
Star t search
Cancel
Search is ac t i ve. Pl ease wai t !
001 MHz Auto-BG
0
1
2
3
4
5
6
7
8
9
10
14
15
16
17
18
19
11
12
13
28
29
20
21
22
23
24
25
26
27
OK

9
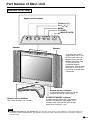
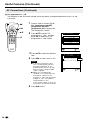
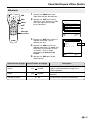
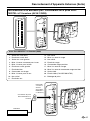
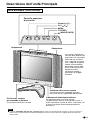
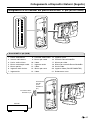
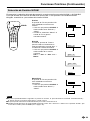
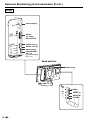
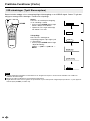
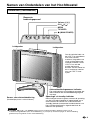
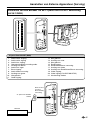
Part Names of Main Unit
Main unit (front view)
Note:
■ TV/VIDEO, CH( )/( ), and Volume (+)/(–) on the main unit have the same functions as the same buttons on
the remote control. Fundamentally, this operation manual provides a description based on operation using the
remote control.
To change the vertical
angle of the LCD TV set,
tilt the screen up to 10
degrees forward or 20
degrees backward. The
TV set can also be
rotated 90 degrees
horizontally. Please adjust
the angle so that the TV
set can be watched most
comfortably.
Upper control panel
Volume (+)/(–)
CH ( )/( )
MENU
TV/VIDEO
(MAIN POWER)
Speaker
Speaker
Remote sensor window
(The actual location is not visible.)
POWER/STANDBY indicator
A green indicator lights when the power is
on and a red indicator lights when in the
standby mode (the indicator will not light
when the main power is off).
Remote sensor indicator
A red indicator blinks when the TV set
receives the remote control signal.

10
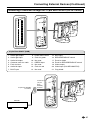
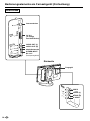
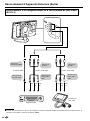
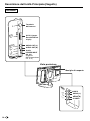
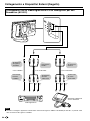
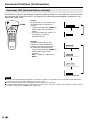
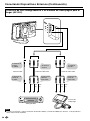
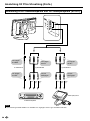
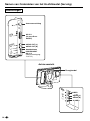
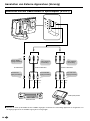
Terminals
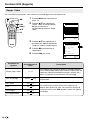
Part Names of Main Unit (Continued)
Rear view
RGB
POWER
INPUT
DC12V
L
R
AV-IN 1
AUDIO OUT
VIDEO
S-VIDEO
AUDIO
L
R
AV-IN 2
POWER INPUT
DC 12 V
Antenna
AUDIO OUT (L)
AV-IN 1
(21-pin Euro-
SCART)
AUDIO OUT (R)
HEADPHONES
VIDEO
AUDIO (L)
AUDIO (R)
S-VIDEO
Carrying handle

11
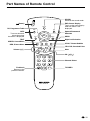
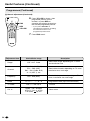
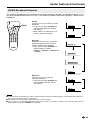
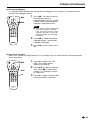
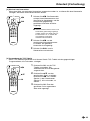
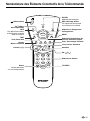
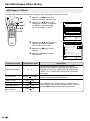
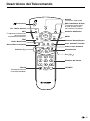
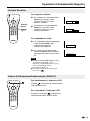
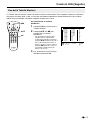
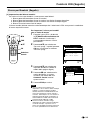
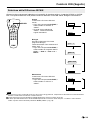
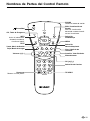
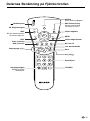
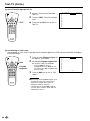
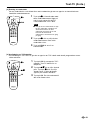
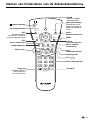
Part Names of Remote Control
iE
CH
TV/VIDEO
SOUND
END
T
M
MENUTEXT
(
RED
)(
GREEN
)(
YELLOW
)(
CYAN
)
INFO
OK
(Power)
OK, Programme Table
INFO
Turns on the menu
information when
the menu is displayed.
Mute
TEXT
YELLOW, Standard Value
GREEN, Sound Menu
CYAN, Teletext Subtitle
TV/VIDEO
Channel Select
MENU
Volume (+)/(–)
Flashback
Returns to the
previous channel.
RED, Picture Menu
Upward / Downward
Selection
END, Status Display
Turns on the status display
when the menu is not
displayed.
SOUND
Switches the sound mode.
Right / Left Selection
CH ( )/( )

12
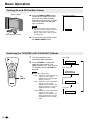
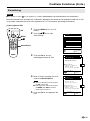
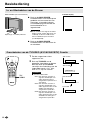
Basic Operation
|
Press the MAIN POWER switch
located on the upper part of the
main unit. The Power/Standby
indicator instantaneously changes
from red to green and the main
unit is turned on.
Note:
■ The display time of the on-screen
indicators can be selected with “On-
screen time” for the “On-screen
display” menu item in the TV menu
(see page 36).
|
To turn off the main power, press
the MAIN POWER switch.
Turning On and Off the Main Power
Switching the TV/VIDEO (AV1/AV2/AVS/TV) Mode
1 Turn on the power of the
connected video equipment.
2 Press TV/VIDEO to select the
applicable input source. The
screen displays AV1, AV2, AVS or
TV mode each time TV/VIDEO is
pressed.
Note:
■ About the video modes
• AV1: Select this when viewing the
signals from the video
equipment connected to the
AV-IN 1 terminal.
• AV2: Select this when viewing the
signals from the video
equipment connected to the
AV-IN 2 terminals using the
VIDEO terminal for video
input.
• AVS: Select this when viewing the
signals from the video
equipment connected to the
AV-IN 2 terminals using the
S-VIDEO terminal for video
input.
Power/Standby indicator
MAIN POWER
198 AV2
197 AVS
1 S08
199 AV1
1 S08
On-screen display
AV1 mode
AV2 mode
AVS mode
TV mode
iE
CH
TV/VIDEO
SOUND
END
T
M
MENUTEXT
(
RED
)(
GREEN
)(
YELLOW
)(
CYAN
)
INFO
OK
TV/
VIDEO

13
Sound Volume
ON/OFF Standby
Basic Operation (Continued)
To adjust the volume
|
Press Volume (+) to increase the
sound volume. The numerical
value increases.
|
Press Volume (–) to decrease the
sound volume. The numerical
value decreases.
To mute the sound
|
Press Mute to temporarily turn off
the sound. “Sound off” is
displayed.
|
Press Mute to turn off the Mute
function. “Sound on” is displayed.
Notes:
■ When Volume (+)/(–) is pressed in the
Mute mode, the sound turns on and the
volume indicator is displayed.
■ The Mute function is cancelled when
is pressed.
To turn off the LCD TV
Press . The Power/Standby indicator
will turn red.
To turn the LCD TV back on
Press again. The Power/Standby
indicator will turn green.
iE
CH
TV/VIDEO
SOUND
END
T
M
MENUTEXT
(
RED
)(
GREEN
)(
YELLOW
)(
CYAN
)
INFO
OK
Volume
(+)/(–)
Mute
iE
CH
TV/VIDEO
SOUND
END
T
M
MENUTEXT
(
RED
)(
GREEN
)(
YELLOW
)(
CYAN
)
INFO
OK
Volume
50
Volume
10
Sound off
Sound on

14
Basic Operation (Continued)
Changing Channels
You can select channels using Channel Select or CH ( )/( ).
To select a one-digit channel
(e.g. Channel 5):
1 Hold down the button.
To select a two/three-digit channel
(e.g. Channel 15):
1 Press the button.
2 Hold down the button.
• To handle the increasing number of channels available, this LCD TV set allows you to select up to
200 channels (0 to 199).
Using Channel Select
When selecting the channel using Channel Select, finish inputting the channel number by holding down
the button for the last digit for a moment.
Using CH ( )/( )
Press CH ( ) and the channels change in the order shown below:
1 → 2 → 3 → . . . → 198 → 199 → 0 → 1 → 2 → 3 → . . .
Press CH (
) and the channels change in the order shown below:
3 → 2 → 1 → 0 → 199 → 198 → . . . → 3 → 2 → 1 → . . .
15
1
Channel
Select
iE
CH
TV/VIDEO
SOUND
END
T
M
MENUTEXT
(
RED
)(
GREEN
)(
YELLOW
)(
CYAN
)
INFO
OK
5
Note:
■ Channel “0” is prepared for RF output of VCR.

15
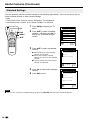
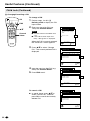
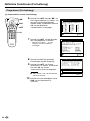
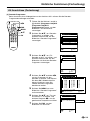
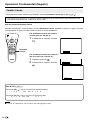
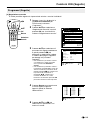
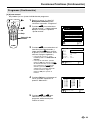
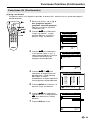
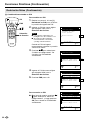
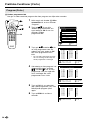
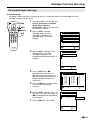
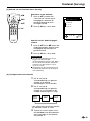
1 Press RED to display the Picture
menu.
Note:
■ The Picture menu can also be
displayed by selecting “Picture” in
the TV menu (see pages 18 and
19).
2 Press ]/[ to select the desired
adjustment item.
• Select “Other...” to display the
other part of the Picture menu.
3 Press </> to make the
adjustment.
4 Press END to exit.
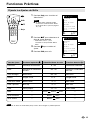
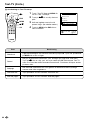
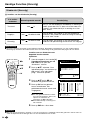
Adjusting Picture Settings
iE
CH
TV/VIDEO
SOUND
END
T
M
MENUTEXT
(
RED
)(
GREEN
)(
YELLOW
)(
CYAN
)
INFO
OK
</>
]/[
RED
END
Contrast
Pi c ture menu
Co l our
Black level
Sharpness
Green colour ing
Red - b l ue c o l ou r i ng
Other .. .
40
Back
End
Contrast
Picture menu
Co l our
Black level
Shar pness
Green colour ing
Red - b l ue c o l ou r i ng
Other .. .
0
Back
End
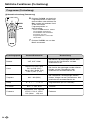
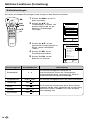
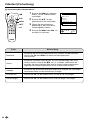
Useful Features
Press Left (<)
Decrease contrast
Lower colour intensity
Less bright
Soft picture
Less green
More red
Toward purple
–
–
–
Adjustment item
Contrast
Colour
Black level
Sharpness
Green colouring
Red-blue colouring
Tint
Brightness
Rotate horizontally
Rotate vertically
Choice/Value range
0 – 60
-30 – 30
-30 – 30
0 – 5
-5 – 5
-5 – 5
-15 – 15
dark medium bright
off on
off on
Press Right (>)
Increase contrast
Higher colour intensity
More bright
Sharp picture
More green
More blue
Toward green
–
–
–
Note:
■ When you use RGB mode (AV1), the image colour is not adjustable.

16
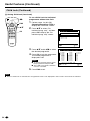
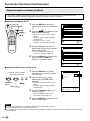
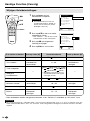
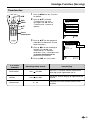
Useful Features (Continued)
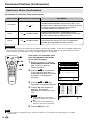
Adjusting Sound Settings
1 Press GREEN to display the
Sound menu.
Note:
■ The Sound menu can also be
displayed by selecting “Sound” in
the TV menu (see pages 18 and
19).
2 Press ]/[ to select the desired
adjustment item.
• Select “Other...” to display the
other part of the Sound menu.
3 Press </> to make the
adjustment.
4 Press END to exit.
Note:
■ In the “AV audio sig.” item, mono-video recorders should select “Sound1” or “Sound2”. Stereo-video recorders should
select “Sound1+2” so that the desired sound can be selected when playing back the video.
</>
]/[
END
GREEN
iE
CH
TV/VIDEO
SOUND
END
T
M
MENUTEXT
(
RED
)(
GREEN
)(
YELLOW
)(
CYAN
)
INFO
OK
So und v i a
Sound menu
Headph. vol.
Loudsp. sound
Headph. sound
AV au d i o s i g .
Other .. .
TV Hi - f i
Back
End
So und v i a
Sound menu
Headph. vol.
Loudsp. sound
Headph. sound
AV audio sig.
Other .. .
Back
End
20
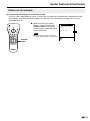
* These items are not displayed when the “Sound via” item is set to “Hi-fi”.
Press Left (<)
–
Decrease head-
phones volume
–
–
Decrease maximum
volume
–
Increase the volume
of the left speaker
Choice/Value range
TV Hi-fi
0 – 60
Mono Mono!/Sound1
Sound2 Sound1+2 Mono!/
Stereo Mono!/Nicam Mono!
(* The choices differ depending on
whether or not a NICAM or IGR
signal is received.)
Sound1 Sound2 Sound1+2
10 – 60
off on
-15 – 15
Press Right (>)
–
Increase head-
phones volume
–
–
Increase maximum
volume
–
Increase the volume
of the right speaker
Adjustment item
Sound via
Headph. vol.*
Loudsp. sound
Headph. sound*
AV audio sig.
Maximum volume*
Sound wide*
Balance*

17
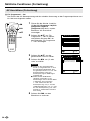
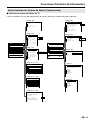
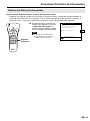
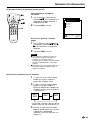
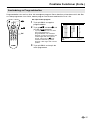
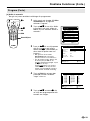
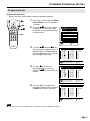
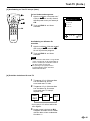
Using Programme Table
The Programme table shows a list of all receivable programmes. They are located in channels 0 to 199.
The currently selected programme is displayed in blue, and the child-locked programmes are displayed in
red.
To select the desired programme
1 Press OK to display the
Programme table.
2 Press ]/[ and/or < /> to select
the desired programme.
• To display the next or previous list
of the Programme table, press
]/[ when the cursor is at a
programme in the lower-right or
upper-left position, or press </>
when the cursor is at a pro-
gramme in the right or left column.
3 Press OK to display the selected
programme.
Programme table
197
198
199
0
1
2
3
4
5
6
7
8
9
10
AV2
AVS
AV1
S01
S08
S10
S10
S11
E03
E05
E06
E09
E10
E11
14
15
16
17
18
19
20
21
22
23
24
E36
E37
E38
E50
E53
E54
E56
E57
11
12
13
28
29
30
31
32
33
34
35
36
37
38
25
26
27
Se l ec t and
proceed wi t h OK
Back
End
Useful Features (Continued)
</>
]/[
OK
iE
CH
TV/VIDEO
SOUND
END
T
M
MENUTEXT
(
RED
)(
GREEN
)(
YELLOW
)(
CYAN
)
INFO
OK

18
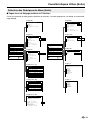
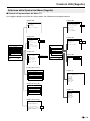
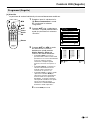
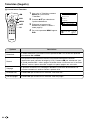
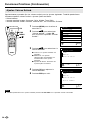
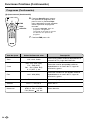
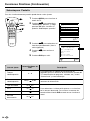
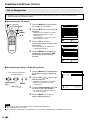
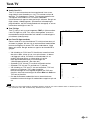
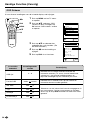
Useful Features (Continued)
• The menus can be used to adjust the various settings of your LCD TV set. Select the desired menu item
by following the steps below.
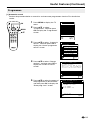
1 Press MENU on the remote
control to display the TV menu.
2 Press ]/[ to select the desired
menu item.
• The cursor moves up or down.
• The cursor indicates the selected
menu item.
• Select “Other...” to display the
other part of the menu.
3 Press OK to display the setting
screen for the selected menu
item.
• See the next page for a table of
the setting screens.
4 Press MENU to return to the
previous screen or END to return
to the normal screen.
Selecting Menu Items
Notes:
■ The items displayed differ depending on the setting conditions.
■ The item selected is displayed in blue.
■ The adjustment values and settings which were changed before the screen is restored are saved as they are in the
memory.
Upper Control panel
of the main unit
Standard settings
TV menu
Picture
Sound
Programmes
AV connec t i ons
Ch i l d l oc k
Back
End
Other .. .
TV menu
On-screen display
Timer functions
Time and date
First instal lat ion
Other .. .
Back
End
Language
Black level
Direct control at TV
Cont r as t
Col our
E
:
End
: Selec t
M
:
Back
: Change
0
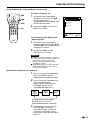
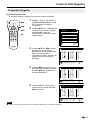
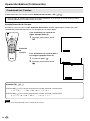
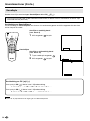
■ Using TV Menus
■ Using Direct Control Menu
1 Press MENU on the main unit to
display the Direct Control menu.
2 Press CH ( )/( ) to select the
desired menu item.
• The cursor moves up or down.
• The cursor indicates the selected
menu item.
3 Press Volume (+)/(–) to make the
adjustment.
• See page 15 for details on the use
of each item.
4 Press MENU to turn off the Direct
Control menu.
CH (
)/( )
Volume
(+)/(–)
MENU
iE
CH
TV/VIDEO
SOUND
END
T
M
MENUTEXT
(
RED
)(
GREEN
)(
YELLOW
)(
CYAN
)
INFO
OK
OK
]/[
MENU
END
CH MENU TV/VIDEO
La page est en cours de chargement...
La page est en cours de chargement...
La page est en cours de chargement...
La page est en cours de chargement...
La page est en cours de chargement...
La page est en cours de chargement...
La page est en cours de chargement...
La page est en cours de chargement...
La page est en cours de chargement...
La page est en cours de chargement...
La page est en cours de chargement...
La page est en cours de chargement...
La page est en cours de chargement...
La page est en cours de chargement...
La page est en cours de chargement...
La page est en cours de chargement...
La page est en cours de chargement...
La page est en cours de chargement...
La page est en cours de chargement...
La page est en cours de chargement...
La page est en cours de chargement...
La page est en cours de chargement...
La page est en cours de chargement...
La page est en cours de chargement...
La page est en cours de chargement...
La page est en cours de chargement...
La page est en cours de chargement...
La page est en cours de chargement...
La page est en cours de chargement...
La page est en cours de chargement...
La page est en cours de chargement...
La page est en cours de chargement...
La page est en cours de chargement...
La page est en cours de chargement...
La page est en cours de chargement...
La page est en cours de chargement...
La page est en cours de chargement...
La page est en cours de chargement...
La page est en cours de chargement...
La page est en cours de chargement...
La page est en cours de chargement...
La page est en cours de chargement...
La page est en cours de chargement...
La page est en cours de chargement...
La page est en cours de chargement...
La page est en cours de chargement...
La page est en cours de chargement...
La page est en cours de chargement...
La page est en cours de chargement...
La page est en cours de chargement...
La page est en cours de chargement...
La page est en cours de chargement...
La page est en cours de chargement...
La page est en cours de chargement...
La page est en cours de chargement...
La page est en cours de chargement...
La page est en cours de chargement...
La page est en cours de chargement...
La page est en cours de chargement...
La page est en cours de chargement...
La page est en cours de chargement...
La page est en cours de chargement...
La page est en cours de chargement...
La page est en cours de chargement...
La page est en cours de chargement...
La page est en cours de chargement...
La page est en cours de chargement...
La page est en cours de chargement...
La page est en cours de chargement...
La page est en cours de chargement...
La page est en cours de chargement...
La page est en cours de chargement...
La page est en cours de chargement...
La page est en cours de chargement...
La page est en cours de chargement...
La page est en cours de chargement...
La page est en cours de chargement...
La page est en cours de chargement...
La page est en cours de chargement...
La page est en cours de chargement...
La page est en cours de chargement...
La page est en cours de chargement...
La page est en cours de chargement...
La page est en cours de chargement...
La page est en cours de chargement...
La page est en cours de chargement...
La page est en cours de chargement...
La page est en cours de chargement...
La page est en cours de chargement...
La page est en cours de chargement...
La page est en cours de chargement...
La page est en cours de chargement...
La page est en cours de chargement...
La page est en cours de chargement...
La page est en cours de chargement...
La page est en cours de chargement...
La page est en cours de chargement...
La page est en cours de chargement...
La page est en cours de chargement...
La page est en cours de chargement...
La page est en cours de chargement...
La page est en cours de chargement...
La page est en cours de chargement...
La page est en cours de chargement...
La page est en cours de chargement...
La page est en cours de chargement...
La page est en cours de chargement...
La page est en cours de chargement...
La page est en cours de chargement...
La page est en cours de chargement...
La page est en cours de chargement...
La page est en cours de chargement...
La page est en cours de chargement...
La page est en cours de chargement...
La page est en cours de chargement...
La page est en cours de chargement...
La page est en cours de chargement...
La page est en cours de chargement...
La page est en cours de chargement...
La page est en cours de chargement...
La page est en cours de chargement...
La page est en cours de chargement...
La page est en cours de chargement...
La page est en cours de chargement...
La page est en cours de chargement...
La page est en cours de chargement...
La page est en cours de chargement...
La page est en cours de chargement...
La page est en cours de chargement...
La page est en cours de chargement...
La page est en cours de chargement...
La page est en cours de chargement...
La page est en cours de chargement...
La page est en cours de chargement...
La page est en cours de chargement...
La page est en cours de chargement...
La page est en cours de chargement...
La page est en cours de chargement...
La page est en cours de chargement...
La page est en cours de chargement...
La page est en cours de chargement...
La page est en cours de chargement...
La page est en cours de chargement...
La page est en cours de chargement...
La page est en cours de chargement...
La page est en cours de chargement...
La page est en cours de chargement...
La page est en cours de chargement...
La page est en cours de chargement...
La page est en cours de chargement...
La page est en cours de chargement...
La page est en cours de chargement...
La page est en cours de chargement...
La page est en cours de chargement...
La page est en cours de chargement...
La page est en cours de chargement...
La page est en cours de chargement...
La page est en cours de chargement...
La page est en cours de chargement...
La page est en cours de chargement...
La page est en cours de chargement...
La page est en cours de chargement...
La page est en cours de chargement...
La page est en cours de chargement...
La page est en cours de chargement...
La page est en cours de chargement...
La page est en cours de chargement...
La page est en cours de chargement...
La page est en cours de chargement...
La page est en cours de chargement...
La page est en cours de chargement...
La page est en cours de chargement...
La page est en cours de chargement...
La page est en cours de chargement...
La page est en cours de chargement...
La page est en cours de chargement...
La page est en cours de chargement...
La page est en cours de chargement...
La page est en cours de chargement...
La page est en cours de chargement...
La page est en cours de chargement...
La page est en cours de chargement...
La page est en cours de chargement...
La page est en cours de chargement...
La page est en cours de chargement...
La page est en cours de chargement...
La page est en cours de chargement...
La page est en cours de chargement...
La page est en cours de chargement...
La page est en cours de chargement...
La page est en cours de chargement...
La page est en cours de chargement...
La page est en cours de chargement...
La page est en cours de chargement...
La page est en cours de chargement...
La page est en cours de chargement...
La page est en cours de chargement...
La page est en cours de chargement...
La page est en cours de chargement...
La page est en cours de chargement...
La page est en cours de chargement...
La page est en cours de chargement...
La page est en cours de chargement...
La page est en cours de chargement...
La page est en cours de chargement...
La page est en cours de chargement...
La page est en cours de chargement...
La page est en cours de chargement...
La page est en cours de chargement...
La page est en cours de chargement...
La page est en cours de chargement...
La page est en cours de chargement...
La page est en cours de chargement...
La page est en cours de chargement...
La page est en cours de chargement...
La page est en cours de chargement...
La page est en cours de chargement...
La page est en cours de chargement...
La page est en cours de chargement...
La page est en cours de chargement...
La page est en cours de chargement...
La page est en cours de chargement...
La page est en cours de chargement...
La page est en cours de chargement...
La page est en cours de chargement...
La page est en cours de chargement...
La page est en cours de chargement...
La page est en cours de chargement...
La page est en cours de chargement...
La page est en cours de chargement...
La page est en cours de chargement...
La page est en cours de chargement...
La page est en cours de chargement...
La page est en cours de chargement...
La page est en cours de chargement...
La page est en cours de chargement...
La page est en cours de chargement...
La page est en cours de chargement...
La page est en cours de chargement...
La page est en cours de chargement...
La page est en cours de chargement...
La page est en cours de chargement...
La page est en cours de chargement...
La page est en cours de chargement...
La page est en cours de chargement...
La page est en cours de chargement...
La page est en cours de chargement...
La page est en cours de chargement...
La page est en cours de chargement...
La page est en cours de chargement...
La page est en cours de chargement...
La page est en cours de chargement...
La page est en cours de chargement...
La page est en cours de chargement...
La page est en cours de chargement...
La page est en cours de chargement...
La page est en cours de chargement...
La page est en cours de chargement...
La page est en cours de chargement...
La page est en cours de chargement...
La page est en cours de chargement...
La page est en cours de chargement...
La page est en cours de chargement...
La page est en cours de chargement...
La page est en cours de chargement...
La page est en cours de chargement...
La page est en cours de chargement...
La page est en cours de chargement...
La page est en cours de chargement...
La page est en cours de chargement...
La page est en cours de chargement...
La page est en cours de chargement...
La page est en cours de chargement...
La page est en cours de chargement...
La page est en cours de chargement...
La page est en cours de chargement...
La page est en cours de chargement...
La page est en cours de chargement...
La page est en cours de chargement...
La page est en cours de chargement...
La page est en cours de chargement...
La page est en cours de chargement...
La page est en cours de chargement...
La page est en cours de chargement...
La page est en cours de chargement...
La page est en cours de chargement...
La page est en cours de chargement...
La page est en cours de chargement...
La page est en cours de chargement...
La page est en cours de chargement...
La page est en cours de chargement...
La page est en cours de chargement...
La page est en cours de chargement...
La page est en cours de chargement...
La page est en cours de chargement...
La page est en cours de chargement...
La page est en cours de chargement...
La page est en cours de chargement...
La page est en cours de chargement...
La page est en cours de chargement...
La page est en cours de chargement...
La page est en cours de chargement...
La page est en cours de chargement...
La page est en cours de chargement...
La page est en cours de chargement...
La page est en cours de chargement...
La page est en cours de chargement...
La page est en cours de chargement...
La page est en cours de chargement...
La page est en cours de chargement...
La page est en cours de chargement...
La page est en cours de chargement...
La page est en cours de chargement...
La page est en cours de chargement...
La page est en cours de chargement...
La page est en cours de chargement...
La page est en cours de chargement...
La page est en cours de chargement...
La page est en cours de chargement...
La page est en cours de chargement...
La page est en cours de chargement...
La page est en cours de chargement...
La page est en cours de chargement...
La page est en cours de chargement...
La page est en cours de chargement...
La page est en cours de chargement...
La page est en cours de chargement...
La page est en cours de chargement...
La page est en cours de chargement...
La page est en cours de chargement...
La page est en cours de chargement...
La page est en cours de chargement...
La page est en cours de chargement...
La page est en cours de chargement...
La page est en cours de chargement...
La page est en cours de chargement...
La page est en cours de chargement...
La page est en cours de chargement...
La page est en cours de chargement...
La page est en cours de chargement...
La page est en cours de chargement...
La page est en cours de chargement...
La page est en cours de chargement...
La page est en cours de chargement...
La page est en cours de chargement...
La page est en cours de chargement...
La page est en cours de chargement...
La page est en cours de chargement...
La page est en cours de chargement...
La page est en cours de chargement...
La page est en cours de chargement...
La page est en cours de chargement...
La page est en cours de chargement...
La page est en cours de chargement...
La page est en cours de chargement...
La page est en cours de chargement...
La page est en cours de chargement...
La page est en cours de chargement...
La page est en cours de chargement...
La page est en cours de chargement...
La page est en cours de chargement...
-
 1
1
-
 2
2
-
 3
3
-
 4
4
-
 5
5
-
 6
6
-
 7
7
-
 8
8
-
 9
9
-
 10
10
-
 11
11
-
 12
12
-
 13
13
-
 14
14
-
 15
15
-
 16
16
-
 17
17
-
 18
18
-
 19
19
-
 20
20
-
 21
21
-
 22
22
-
 23
23
-
 24
24
-
 25
25
-
 26
26
-
 27
27
-
 28
28
-
 29
29
-
 30
30
-
 31
31
-
 32
32
-
 33
33
-
 34
34
-
 35
35
-
 36
36
-
 37
37
-
 38
38
-
 39
39
-
 40
40
-
 41
41
-
 42
42
-
 43
43
-
 44
44
-
 45
45
-
 46
46
-
 47
47
-
 48
48
-
 49
49
-
 50
50
-
 51
51
-
 52
52
-
 53
53
-
 54
54
-
 55
55
-
 56
56
-
 57
57
-
 58
58
-
 59
59
-
 60
60
-
 61
61
-
 62
62
-
 63
63
-
 64
64
-
 65
65
-
 66
66
-
 67
67
-
 68
68
-
 69
69
-
 70
70
-
 71
71
-
 72
72
-
 73
73
-
 74
74
-
 75
75
-
 76
76
-
 77
77
-
 78
78
-
 79
79
-
 80
80
-
 81
81
-
 82
82
-
 83
83
-
 84
84
-
 85
85
-
 86
86
-
 87
87
-
 88
88
-
 89
89
-
 90
90
-
 91
91
-
 92
92
-
 93
93
-
 94
94
-
 95
95
-
 96
96
-
 97
97
-
 98
98
-
 99
99
-
 100
100
-
 101
101
-
 102
102
-
 103
103
-
 104
104
-
 105
105
-
 106
106
-
 107
107
-
 108
108
-
 109
109
-
 110
110
-
 111
111
-
 112
112
-
 113
113
-
 114
114
-
 115
115
-
 116
116
-
 117
117
-
 118
118
-
 119
119
-
 120
120
-
 121
121
-
 122
122
-
 123
123
-
 124
124
-
 125
125
-
 126
126
-
 127
127
-
 128
128
-
 129
129
-
 130
130
-
 131
131
-
 132
132
-
 133
133
-
 134
134
-
 135
135
-
 136
136
-
 137
137
-
 138
138
-
 139
139
-
 140
140
-
 141
141
-
 142
142
-
 143
143
-
 144
144
-
 145
145
-
 146
146
-
 147
147
-
 148
148
-
 149
149
-
 150
150
-
 151
151
-
 152
152
-
 153
153
-
 154
154
-
 155
155
-
 156
156
-
 157
157
-
 158
158
-
 159
159
-
 160
160
-
 161
161
-
 162
162
-
 163
163
-
 164
164
-
 165
165
-
 166
166
-
 167
167
-
 168
168
-
 169
169
-
 170
170
-
 171
171
-
 172
172
-
 173
173
-
 174
174
-
 175
175
-
 176
176
-
 177
177
-
 178
178
-
 179
179
-
 180
180
-
 181
181
-
 182
182
-
 183
183
-
 184
184
-
 185
185
-
 186
186
-
 187
187
-
 188
188
-
 189
189
-
 190
190
-
 191
191
-
 192
192
-
 193
193
-
 194
194
-
 195
195
-
 196
196
-
 197
197
-
 198
198
-
 199
199
-
 200
200
-
 201
201
-
 202
202
-
 203
203
-
 204
204
-
 205
205
-
 206
206
-
 207
207
-
 208
208
-
 209
209
-
 210
210
-
 211
211
-
 212
212
-
 213
213
-
 214
214
-
 215
215
-
 216
216
-
 217
217
-
 218
218
-
 219
219
-
 220
220
-
 221
221
-
 222
222
-
 223
223
-
 224
224
-
 225
225
-
 226
226
-
 227
227
-
 228
228
-
 229
229
-
 230
230
-
 231
231
-
 232
232
-
 233
233
-
 234
234
-
 235
235
-
 236
236
-
 237
237
-
 238
238
-
 239
239
-
 240
240
-
 241
241
-
 242
242
-
 243
243
-
 244
244
-
 245
245
-
 246
246
-
 247
247
-
 248
248
-
 249
249
-
 250
250
-
 251
251
-
 252
252
-
 253
253
-
 254
254
-
 255
255
-
 256
256
-
 257
257
-
 258
258
-
 259
259
-
 260
260
-
 261
261
-
 262
262
-
 263
263
-
 264
264
-
 265
265
-
 266
266
-
 267
267
-
 268
268
-
 269
269
-
 270
270
-
 271
271
-
 272
272
-
 273
273
-
 274
274
-
 275
275
-
 276
276
-
 277
277
-
 278
278
-
 279
279
-
 280
280
-
 281
281
-
 282
282
-
 283
283
-
 284
284
-
 285
285
-
 286
286
-
 287
287
-
 288
288
-
 289
289
-
 290
290
-
 291
291
-
 292
292
-
 293
293
-
 294
294
-
 295
295
-
 296
296
-
 297
297
-
 298
298
-
 299
299
-
 300
300
-
 301
301
-
 302
302
-
 303
303
-
 304
304
-
 305
305
-
 306
306
-
 307
307
-
 308
308
-
 309
309
-
 310
310
-
 311
311
-
 312
312
-
 313
313
-
 314
314
-
 315
315
-
 316
316
-
 317
317
-
 318
318
-
 319
319
-
 320
320
-
 321
321
-
 322
322
-
 323
323
-
 324
324
-
 325
325
-
 326
326
-
 327
327
-
 328
328
-
 329
329
-
 330
330
-
 331
331
-
 332
332
-
 333
333
-
 334
334
-
 335
335
-
 336
336
-
 337
337
-
 338
338
-
 339
339
-
 340
340
-
 341
341
-
 342
342
-
 343
343
-
 344
344
-
 345
345
-
 346
346
-
 347
347
-
 348
348
-
 349
349
-
 350
350
-
 351
351
-
 352
352
-
 353
353
-
 354
354
-
 355
355
-
 356
356
-
 357
357
-
 358
358
-
 359
359
-
 360
360
-
 361
361
-
 362
362
-
 363
363
-
 364
364
-
 365
365
-
 366
366
-
 367
367
-
 368
368
-
 369
369
-
 370
370
-
 371
371
-
 372
372
-
 373
373
-
 374
374
-
 375
375
-
 376
376
-
 377
377
-
 378
378
-
 379
379
-
 380
380
-
 381
381


Sharp LC13-B2E Le manuel du propriétaire
- Taper
- Le manuel du propriétaire
- Ce manuel convient également à
dans d''autres langues
- italiano: Sharp LC13-B2E Manuale del proprietario
- English: Sharp LC13-B2E Owner's manual
- español: Sharp LC13-B2E El manual del propietario
- Deutsch: Sharp LC13-B2E Bedienungsanleitung
- Nederlands: Sharp LC13-B2E de handleiding
- svenska: Sharp LC13-B2E Bruksanvisning
Documents connexes
Autres documents
-
Hanns.G HANNSAPPLE.GREEN Fiche technique
-
Samsung LA40A680M1R Manuel utilisateur
-
Samsung PS50A650T1R Manuel utilisateur
-
NEC E461 Manuel utilisateur
-
Samsung LA32A550P1M Manuel utilisateur
-
-
Sony KLV-L23M1 Manuel utilisateur
-
Sony KLV-17HR2 Le manuel du propriétaire
-
Panasonic DVDRA61 Le manuel du propriétaire
-
Grundig GV 9400 EURO Servise Manual