HAEGER DE-016.011A Manuel utilisateur
- Catégorie
- Déshumidificateurs
- Taper
- Manuel utilisateur

Dehumidifier / Desumidificador
Deshumidificador / Déshumidificateur
User instructions
Instruções de uso
Instrucciones de uso
Mode d’emploi
Humidifree 16 * DE-016.011A
RoHS


GB
Instructions for use 1
Dear customer
Thank you for having chosen a HÆGER product.
The HÆGER products have been produced to think about the welfare of the
consumer privileging the most raised standards of quality, functionality and
assign. We are sure you will be happy with this appliance.
Before using the appliance for the first time please read carefully and
thoroughly through these operating instructions and the safety advice,
completely familiarising yourself with the appliance. Keep these instructions for
future reference and pass them on to whoever might acquire the appliance at
a future date.
Intended use
The appliance is designed and produced for domestic use only. Use this
appliance only as described in this instruction manual. As with all electrical
equipment, whilst the instructions aim to cover as many eventualities as possible.
Caution and common sense should be applied when operating and installing
this appliance.
For safety reasons, alterations or modifications of the device are prohibited.
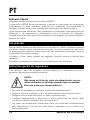
General Safety Instructions
To reduce the risk of fire, electrical shock, or injury when using your appliance,
follows these basic precautions:
WARNING:
Do not touch the plug at the mains cable with wet
or moist hands when connecting or disconnecting.
Risk of death by electric shock!
• In case of emergency, unplug the device immediately.
• Hold the plug when disconnecting the mains cable; do not pull the cable.
• Disconnect the plug before cleaning or servicing.
• Regularly check the device and cable for signs of damage. Do not continue
to operate the device in case of damage.
• A damaged mains cable must be replaced by the manufacturer or a
technician and without any delay. Do not use the device with a damaged
cable or plug.

English
2 Instructions for use
• Do not repair the device by yourself. Please contact authorized personnel. In
order to avoid hazards a damaged mains cable must be replaced with an
equivalent cable by the manufacturer or qualified specialist.
• Except for cleaning and maintenance work described in this manual, no
other alterations of this device must be executed.
• Do not operate the device with an external timer or separate remote-
control system.
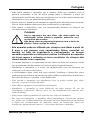
CUATION!
In order to ensure your children’s safety, please keep all
packaging (plastic bags, boxes, polystyrene etc.) out of
their reach.
Do not allow small children to play with the foil as there is
a danger of suffocation!
• This appliance can be used by children aged from 8 years and
above and persons with reduced physical, sensory or mental
capabilities or lack of experience and knowledge if they have been
given supervision or instruction concerning use of the appliance in a
safe way and understand the hazards involved.
• Cleaning and user maintenance shall not be made by children unless they
are older 8 years and supervised.
• Keep the appliance and its cord out of reach of children less than 8 years.
• The packaging must be undamaged. Check the device for any possible
transport damage. Do not install a damaged device. In case of damage,
please contact your distributor.
• Do not install the appliance in rooms containing gas, oil or sulphur. Do not
install near sources of heat.
• Do not use the appliance on sloping surfaces.
• Keep the appliance at least 50 cm away from flammable substances
(alcohol etc) or pressurised containers (e.g. aerosol cans).
• Do not rest heavy or hot objects on top of the appliance.
• Always transport the appliance upright or resting on one side. Remember to
drain the condensate tank before moving the appliance. Wait at least 1
hour after transporting the appliance before starting it.
• R290 is a refrigerant gas that complies with the European
directives on the environment. Do not puncture any part of the
refrigerant circuit. At the end of its working life, consign the
appliance to a specialist collection centre.

English
Instructions for use 3
• DANGER: Propane gas (R290) is flammable,
odourless gas. While working on a machine, no
smoking and no open flames should be permitted.
• If the appliance is installed, operated or stored in a
nonventilated area, the room must be designed to prevent to
the accumulation of refrigerant leaks resulting in a risk of fire or
explosion due to ignition of the refrigerant caused by electric
heaters, stoves, or other sources of ignition.
• The appliance must be stored in such a way as to prevent
mechanical failure.
• Individuals who operate or work on the refrigerant circuit must
have the appropriate certification issued by an accredited
organization that ensures competence in handling refrigerants
according to a specific evaluation recognized by associations
in the industry.
• Repairs must be performed based on the recommendation
from the manufacturing company. Maintenance and repairs
that require the assistance of other qualified personnel must
be performed under the supervision of an individual specified
in the use of flammable refrigerants.
• The materials used for packaging can be recycled. You are
therefore recommended to dispose of them in special
differentiated waste collection containers.
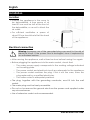
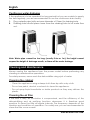
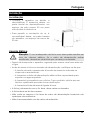
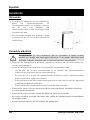
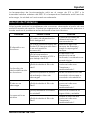
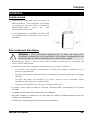
Product description
1. Control panel
2. Handle
3. Wind defector
4. Caster
5. Filter box
6. Water tank
7. Supply cord

English
4 Instructions for use
Installation
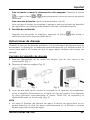
Location
• Position the appliance in the room to
be dehumidified. A free space of at
least 50 cm must be left at the front of
the dehumidifier, so as not to block the
air outlet.
• For efficient ventilation a space of
about 20 cm should be left at the back
of the appliance.
Electrical connection
Warning: Improper use of the grounded plug can result in the risk of
electrical shock. If the power cord is damaged, have it replaced by
an authorized service.
• After moving the appliance, wait at least an hour before turning it on again.
• Before plugging the appliance into the mains socket, check that:
– The mains power supply corresponds to the working voltage indicated
on the rating plate.
– The power socket and electrical circuit are adequate for the appliance.
– The power socket matches the plug. If this is not the case, have the
plug replaced by a qualified electrician.
– The mains socket is adequately earthed.
• The plug, together with the grounding conductor, must fit into the wall
socket.
• The mains plug must be freely accessible.
• Do not cut or remove the ground wire from the power cord supplied under
any circumstances.
• Use of extension cords is not recommended.

English
Instructions for use 5
Operating Instructions
IMPORTANT: Before connecting the appliance to the power source, let
it stand upright for approximately 1 hour. This will reduce the possibility
of a malfunction in the cooling system from handling during
transportation.
IMPORTANT: In case you disconnect the device or in case of power
failure, wait for 3 minutes before restarting the device.
Before switching on your appliance, make sure that:
- the appliance is positioned in accordance with these instructions,
- the air inlet and outlet grills are completely unobstructed,
- the appliance is placed on a flat and stable surface,
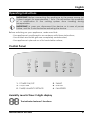
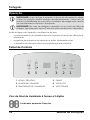
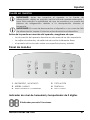
Control Panel
1. POWER ON/OFF
2. SWING
3. UP/DOWN
4. DISPLAY
5. TIMER/ HUMIDITY SETTINGS
6. FAN SPEED
Humidity Level & Timer 2 digits display
The indicator features 3 functions:
1
2
3
4
5
6

English
6 Instructions for use
1. When the unit is plugged in, it will indicate the room humidity level.
2. when you set the humidity, it will indicate the humidity that you have
selected.
3. when you program the time for the unit to turn on and off, it will show the
hours.
4. When the environment humidity is lower than 35%, it will show “35”
5. When the environment humidity is higher than 95%, it will show “95”
Notes:
- Water tank must be correctly installed for the dehumidifier to operate.
- Do not remove the tank while unit is in operation.
- If you want to use drain hose to drain water away, please install the hose
according to section “continuous external draining”.
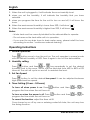
Operating instructions
1. Normal operation
Press button once to turn the unit on. The unit operates in normal mode
with the default humidity of 55%. Press it again to turn off the dehumidifier.
2. Humidity setting
Press button and then or key repeatedly to set the desired
humidity level in the room, which can be selected from 40% to 80% at 5%
intervals. The unit will cycle on and off to maintain the level.
3. Set Fan Speed
Press button to set the desired fan speed. It can be adjusted between
high speed and low speed.
4. Timer Setting (0 hour – 24 hours)
To turns off when power is on: Press button and then or to
program the time when the unit turns off.
To turns on when the power is off: Press button and then or to
program the time when the unit turns on.
To cancel the function: adjust the timer at 00.
Once turned on or off by user or entering water-full state, the unit may lose
the timing function.

English
Instructions for use 7
5. Swing function
After the machine is started, press to start or stop the air-outlet leaf
swing.
Draining the collected water
When the drainage tank is full, the tank full indicator light will turn on, the
operation will stop automatically, and the buzzer will beep 15 times to alert the
user, that the water needs to be emptied from the drainage tank.
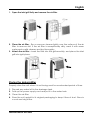
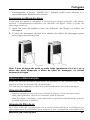
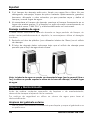
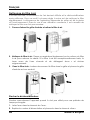
Emptying the drainage tank
1. Lightly press on the sides of the tank with both hands and pull out gently.
(see Fig. 1)
2. Discard the collected water. (Fig. 2)
3. Once it is empty, replace the tank in the appliance. When replacing the
drainage tank, press the tank firmly into place with both hands. If the tank is
not positioned properly, the Water-full sensor will be activated, and the
dehumidifier will not operate. (Fig. 3)
NOTE
1. If the drainage tank is dirty, wash it with cold or lukewarm water. Do not use
detergent, scouring pads, chemically treated dust cloths, gasoline, benzene,
thinner, or other solvents, as these can scratch and damage the tank and
cause water leakage
2. When replacing the drainage tank, press the tank firmly into place with both
hands. If the tank is not positioned properly, the “TANK FULL” sensor will be
activated, and the dehumidifier will not operate.
Fig. 1
Fig. 2
Fig. 3

English
8 Instructions for use
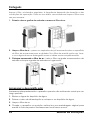
Continuous water drainage
If the appliance is to be operated for long periods but you are unable to empty
the tank regularly, you are recommended to use the continuous drain facility.
1. Plug a plastic pipe (with an inner diameter of 10mm) to draining hole.
2. Draining tube should place lower than the draining hole to let water flow
out.
Note: Water pipe cannot be too long (usually 0.6m or 1m), the height cannot
surpass the height of drainage mouth, or there will be water leakage.
Cleaning and Maintenance
Always unplug the appliance from the power socket before performing any
cleaning or maintenance operations.
For safety reasons, never wash the dehumidifier using a jet of water.
Cleaning the cabinet
- Clean the appliance using a damp cloth then dry with a dry cloth.
- Do not use petrol, alcohol or solvents to clean the appliance.
- Do not spray liquid insecticide or similar products as they may deform the
plastic.
Cleaning the air filter
If the filter is dirty, air circulation is compromised, and the efficiency of the
dehumidifying and air purifying functions decreases. It is therefore good
practice to clean the filter at regular intervals. The frequency depends on the
duration and conditions of operation. For a daily use, you are recommended to
clean the filter once a week.

English
Instructions for use 9
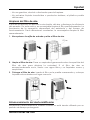
1. Open the inlet grill firstly and remove the air filter.
2. Clean the air filter - Run a vacuum cleaner lightly over the surface of the air
filter to remove dirt. If the air filter is exceptionally dirty, wash it with warm
water and a mild cleaner and dry thoroughly.
3. Attach the air filter - Insert the filter into the grill smoothly, and place the inlet
grill into right place.
Storing the dehumidifier
Properly store the unit when it is not being used for an extended period of time
1. Discard any water left in the drainage tank.
2. Fold up the power supply cord and put it in the water tank.
3. Clean the air filter
4. Store the unit upright in its original packaging to keep it free of dust. Store in
a cool and dry place.

English
10 Instructions for use
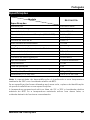
Specifications
Model
Specification
DE-016.011A
Power Supply
220-240V~50Hz
Power consumption
260W
Fuse type and current value
T/ 2A 250VAC
Dehumidify capacity (30℃ RH80%)
16 Litres/24h
Noise level
≤ 46dB (A)
Air flow Volume
250m3/h
Recommended room area
16-20m2
Refrigerant/Charge
R290/75g
GWP - Global Warming Potential
3
Water Tank Capacity
3.8~4.0L
Working temperature
5 ℃~35 ℃
Defrost control
Automatic
Control type
Electronic control
Timer
0~24h
Degree of protection
IPX0
Suction / Discharge Operating Pressure
0.6MPa / 1.8MPa
Net Weight / Gross Weight
13Kg / 16Kg
Body size (W x D x H) mm
342 x 251 x 561 mm
Note: The dehumidification capacity is rated at a room temperature of 30℃
with a relative humidity of 80%.
If specifications are improved after this pointing, the product nameplate will
reflect the new specifications.
The operational temperature is in the range of 5℃ to 35℃ and max relative
humidity of 80%. If the room temperature is outside of this range, the unit will not
operate normally.

English
Instructions for use 11
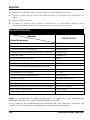
Troubleshooting
You can solve many common problems easily, saving you the cost of a possible
service call. Try the suggestion below to see if you can solve the problem before
calling service centre.
Problem
Possible Cause
Solution
The unit doesn't
operate
Has the power cord been
disconnected?
Plug the power cord into
the outlet.
Is the tank full indicator
light? (The tank is
full or in a wrong position.)
Discard the water in the
drainage tank and then
reposition the tank.
Is the temperature of the
room above 35℃ or below
5℃?
The protection device is
activated and the unit
cannot be started.
The
dehumidifying
function
doesn't work
Is the air filter clogged?
Clean the air filter as
instructed under
"Cleaning and
Maintenance".
Is the intake duct or
discharge duct obstructed?
Remove the obstruction
from the discharge duct
or intake duct.
No air is
discharged
Is the air filter clogged?
Clean the air filter as
instructed under
"Cleaning and
Maintenance".
Operation is
noisy
Is the unit tilted or
unsteady?
Move the unit to a stable,
sturdy location.
Is the air filter clogged?
Clean the air filter as
instructed under
"Cleaning and
Maintenance".

English
12 Instructions for use
Conformity
This product has been designed, manufactured and marked in compliance
with:
- the safety of Low Voltage Directive 2014/35/EU,
- the protection requirements of EMC Directive 2014/30/EU,
- RoHS directive 2011/65/EU and its amendment directive
(EU)2015/863.
- Regulation (EU) no.517/2014
The electrical safety of the appliance is guaranteed only if it is connected to an
efficient and approved earthing system.
Disposal – Environment policy
Disposal
The appliance is manufactured using recyclable material.
This appliance is marked according to the European directive 2012/19/EU on
Waste Electrical and Electronic Equipment (WEEE).
By ensuring this product is disposed of correctly, you will help prevent potential
negative consequences for the environment and human health, which could
otherwise be caused by inappropriate waste handling of this product.
This symbol on the product, or on the documents accompanying the
product, indicates that this appliance may not be treated as
household waste. Instead it shall be handed over to the applicable
collection point for the recycling of electrical and electronic
equipment.
Before disposal, make the appliance unusable by cutting off the power cable.
Disposal must be carried out in accordance with local environmental
regulations for waste disposal. Deliver the appliance immediately to an
authorized dump; do not leave it unattended even for a few days, since it is
potentially dangerous for children.
For more detailed information about treatment, recovery and recycling of this
product, please contact your local city office, your household waste disposal
service or the shop where you purchased the product.
Packing
The packaging material is entirely recyclable and marked with the
recycling symbol. Follow local regulations for scrapping. Keep the
packaging materials (plastic bags, polystyrene parts, etc.) out of
reach of children, as they are potentially dangerous.

English
Instructions for use 13
Guarantee
This unit is covered by a 24 months (*) warranty, from the purchase date, and
covers the repair free of charges of the damaged due to the manufacturer
fault or defected components. The distributor reserves the right to change the
unit for an equivalent model.
The warranty does not cover any damaged caused by incorrect use, lightning,
incorrect installation, external factors or any intentional damaged. The warranty
does not cover damage thus attributable to falls, blows, spill, exposure to
extreme environmental conditions or deterioration caused by normal use of
plastic parts or keyboards, as well as using batteries other than those specified in
this manual.
For the repairing, during the warranty period, the unit shall be sent to the
distributor or reseller, or to the address indicated by them, and must be jointed
the warranty certificated and the respective original invoice or selling ticket,
where the buying date is expressed indicated.
The consumer is protected by the guarantee provided by Directive 1999/44/CE
of European Parliament and Council of 25 May.
(*) Only for European Union countries

PT
14 Manual de Instruções
Estimado Cliente
Obrigado por ter escolhido um produto HÆGER.
Os produtos HÆGER foram concebidos a pensar no bem-estar do consumidor,
privilegiando os mais elevados padrões de qualidade, funcionalidade e
designe. Estamos certos da sua satisfação pela aquisição deste produto.
Antes da primeira utilização, leia cuidadosa e totalmente estas instruções de
utilização e de segurança e familiarize-se com as funções do aparelho.
Guarde estas instruções para futura referência e entregue-as a quem adquirir o
produto no futuro.
Uso previsto
Este aparelho destina-se apenas para uso doméstico. Utilize o aparelho apenas
conforme descrito neste manual de instruções. Tal como acontece com todos
os equipamentos elétricos, estas instruções não pretendem abranger todas as
condições e situações possíveis.
Cuidados e bom senso devem ser seguidos quando operar e instalar este
aparelho.
Por razões de segurança, alterações e modificações são proibidas.
Instruções gerais de segurança
Para reduzir o risco de incêndio, choque elétrico ou ferimentos ao usar o
aparelho, siga estas precauções básicas:
AVISO:
Não toque na ficha do cabo de alimentação com as
mãos molhadas ou húmidas quando ligar ou desligar.
Risco de morte por choque elétrico!
• Em caso de emergência, desligue o aparelho imediatamente.
• Segure a ficha ao desligar o cabo de alimentação; não puxe pelo cabo.
• Desligue a ficha antes de limpar ou fazer a manutenção.
• Verifique regularmente o dispositivo e cabo para sinais de danos. Não
continue a utilizar o aparelho em caso de danos.
• Um cabo de alimentação danificado deve ser substituído imediatamente
pelo fabricante ou um técnico. Não utilize o dispositivo com o cabo ou a
ficha danificada.

Português
Manual de Instruções 15
• Não tente reparar o aparelho por si mesmo. Entre em contacto com o
pessoal autorizado. A fim de evitar perigo para o utilizador o cabo de
alimentação danificado deve ser substituído por um cabo equivalente pelo
fabricante ou por um especialista qualificado.
• Exceto para os trabalhos de limpeza e manutenção descritos neste manual,
não se deve realizar nenhuma outra modificação no aparelho.
• Não opere o dispositivo com um temporizador externo ou sistema de
controlo remoto separado.
Cuidado!
Para a segurança dos seus filhos, não deixe partes da
embalagem (sacos plásticos, papelão, esferovite, etc.)
ao alcance dos mesmos.
Não deixe crianças pequenas brincarem com a bolsa de
plástico. Existe o perigo de asfixia!
• Este aparelho pode ser utilizado por crianças com idade a partir de
8 anos e por pessoas com capacidades físicas, sensoriais ou
mentais ou falta de experiência e conhecimento, se tiverem
recebido supervisão ou instruções relativas à utilização do aparelho
de forma segura e entender os riscos envolvidos. As crianças não
devem brincar com o aparelho.
• Qualquer limpeza e ou manutenção não deve ser feito por crianças a não
ser que tenham idade superior a 8 anos e sejam supervisionados.
• Mantenha o aparelho e o cabo de alimentação fora do alcance de
crianças com menos de 8 anos.
• A embalagem deve estar em bom estado. Verifique o dispositivo para
qualquer possível dano de transporte. Não instale um dispositivo danificado.
Em caso de danos, contacte o seu distribuidor.
• Não instale o aparelho em ambientes cujo ar possa conter gás, óleo,
enxofre, ou junto a fontes de calor.
• Não utilize o aparelho em superfícies inclinadas.
• Mantenha o aparelho a uma distância de pelo menos 50 cm de
substâncias inflamáveis, (álcool, etc.) ou de recipientes sob pressão (ex.:
latas de spray).
• Não pouse objetos pesados ou quentes por cima do aparelho.
• Em caso de transporte, o aparelho deve permanecer na posição vertical
ou, então, ser cuidadosamente colocado de lado. Relembre-se de eliminar
a água de condensação do depósito antes do transporte. Após um
transporte, aguarde pelo menos, 1 hora antes de ligar o aparelho.

Português
16 Manual de Instruções
• R290 é um gás refrigerante que respeita as diretivas europeias sobre
o ambiente. Não perfure nenhuma parte do circuito refrigerante. No
final da sua vida útil, consignar o aparelho a um centro de coleta
especializado.
• PERIGO: O gás propano (R290) é um gás inflamável e
inodoro. Enquanto estiver a trabalhar no aparelho, não
se deve fumar nem aproximar qualquer chama.
• Se o aparelho for instalado, operado ou armazenado
em uma área não ventilada, a sala deve ser projetada para evitar o
acúmulo de vazamentos de refrigerante, resultando em risco de
incêndio ou explosão devido à ignição do refrigerante causada por
aquecedores elétricos, fogões ou outras fontes de ignição.
• O aparelho deve ser armazenado de forma a evitar falhas
mecânicas.
• Indivíduos que operam ou trabalham no circuito de refrigerante
devem ter a certificação apropriada emitida por uma organização
acreditada que garanta competência no manuseio de refrigerantes
de acordo com uma avaliação específica reconhecida pelas
associações do setor.
• As reparações devem ser realizadas com base na recomendação
da empresa fabricante. Manutenção e reparos que requerem a
assistência de outro pessoal qualificado, devem ser executados sob
a supervisão de um indivíduo especificado no uso de refrigerantes
inflamáveis.
• Os materiais utilizados na embalagem são recicláveis.
Recomendamos, por isso, que sejam depositados nos respetivos
contentores de recolha seletiva.
Descrição do Produto
1. Painel superior
2. Cabo de alimentação
3. Caixa de filtro
4. Depósito de água
5. Rodízios (opcional)
6. Base Cobertura traseira
7. Cobertura traseira
8. Cobertura frontal

Português
Manual de Instruções 17
Instalação
Localização
• Coloque o aparelho na divisão a
desumidificar. É essencial deixar, na
parte frontal do desumidificador, um
espaço de pelo menos 50 cm para
não obstruir a saída do ar.
• Para permitir a circulação do ar, é
aconselhável deixar, na parte traseira
do aparelho, um espaço de cerca de
20 cm.
Ligação Elétrica
Atenção: O uso inadequado da ficha com terra pode resultar em
risco de choque elétrico. Se o cabo de alimentação estiver
danificado, deverá ser substituído por um serviço autorizado.
• Depois de transportar o aparelho, aguarde pelo menos uma hora antes de
o ligar.
• Antes de inserir a ficha na tomada de alimentação, certifique-se de que:
– A tensão da rede corresponde à tensão de exercício indicada na
chapa de características.
– A tomada e a linha de alimentação elétrica têm capacidade para
suportar a carga requerida.
– A tomada é compatível com a ficha. Caso contrário, solicite que um
técnico qualificado proceda à sua substituição.
– A tomada está devidamente ligada à terra.
• A ficha, juntamente com o fio terra, deve caber na tomada.
• A ficha deve ser de livre acesso.
• Não corte ou remova o fio terra do cabo de alimentação fornecido sob
quaisquer circunstâncias.
• Não é recomendado uso de cabos de extensão.

Português
18 Manual de Instruções
Operação
IMPORTANTE: Antes de ligar o aparelho à fonte de alimentação, deixe-
o ficar em posição vertical durante aproximadamente 1 horas. Isso irá
reduzir a possibilidade de uma falha no sistema de refrigeração devido
ao manuseamento durante o transporte.
IMPORTANTE: No caso de desligar o aparelho ou em caso de falha de
energia, aguarde pelo menos 5 minutos antes de reiniciar o dispositivo.
Antes de ligar o seu aparelho, certifique-se de que:
– o posicionamento do aparelho descrito no presente modo de utilização é
respeitado,
– as grelhas de entrada e de saída do ar estão totalmente soltas,
– o aparelho está situado sobre uma superfície plana e estável,
Painel de Controlo
1. LIGAR / DESLIGAR
2. SWING
3. AUMENTAR / DIMINUIR
4. VISOR LCD
5. TEMPORIZADOR / HUMIDADE
6. VELOCIDADE
Visor de Nível de Humidade & Tempo a 2 dígitos
O indicador apresenta 3 funções:
1
2
3
4
5
6
La page charge ...
La page charge ...
La page charge ...
La page charge ...
La page charge ...
La page charge ...
La page charge ...
La page charge ...
La page charge ...
La page charge ...
La page charge ...
La page charge ...
La page charge ...
La page charge ...
La page charge ...
La page charge ...
La page charge ...
La page charge ...
La page charge ...
La page charge ...
La page charge ...
La page charge ...
La page charge ...
La page charge ...
La page charge ...
La page charge ...
La page charge ...
La page charge ...
La page charge ...
La page charge ...
La page charge ...
La page charge ...
La page charge ...
La page charge ...
La page charge ...
La page charge ...
-
 1
1
-
 2
2
-
 3
3
-
 4
4
-
 5
5
-
 6
6
-
 7
7
-
 8
8
-
 9
9
-
 10
10
-
 11
11
-
 12
12
-
 13
13
-
 14
14
-
 15
15
-
 16
16
-
 17
17
-
 18
18
-
 19
19
-
 20
20
-
 21
21
-
 22
22
-
 23
23
-
 24
24
-
 25
25
-
 26
26
-
 27
27
-
 28
28
-
 29
29
-
 30
30
-
 31
31
-
 32
32
-
 33
33
-
 34
34
-
 35
35
-
 36
36
-
 37
37
-
 38
38
-
 39
39
-
 40
40
-
 41
41
-
 42
42
-
 43
43
-
 44
44
-
 45
45
-
 46
46
-
 47
47
-
 48
48
-
 49
49
-
 50
50
-
 51
51
-
 52
52
-
 53
53
-
 54
54
-
 55
55
-
 56
56


HAEGER DE-016.011A Manuel utilisateur
- Catégorie
- Déshumidificateurs
- Taper
- Manuel utilisateur
dans d''autres langues
- English: HAEGER DE-016.011A User manual
- español: HAEGER DE-016.011A Manual de usuario
Documents connexes
Autres documents
-
Homa HDH-20T33 Manuel utilisateur
-
UFESA DH5010 Le manuel du propriétaire
-
mundoclima Series MH-V9 Le manuel du propriétaire
-
-
-
Create Industrial Fan Manuel utilisateur
-
Whirlpool DE 20 LWS0 Mode d'emploi
-
Daitsu ADDH-12 Manuel utilisateur
-
Flama 1319FL Manuel utilisateur
-
Fagor DH-10D Le manuel du propriétaire