
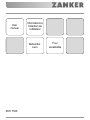
ZKH 7528
User
manual
Built-under
oven
Informations à
l’intention de
l’utilisateur
Four
encastrable

2 electrolux
2
Warnings and Important Safety Information .................................................................................... 3
Description of the appliance ........................................................................................................... 5
Controls ....................................................................................................................................... 6
Before using the oven for the first time ........................................................................................... 8
Using the Oven ............................................................................................................................ 9
Baking and Roasting Tables ....................................................................................................... 13
Cleaning and Maintenance ......................................................................................................... 15
If something is wrong .................................................................................................................. 20
Technical Data ............................................................................................................................ 21
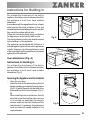
Instructions for the Installer .......................................................................................................... 22
Instructions fo Building In ............................................................................................................. 23
Service and spare parts ............................................................................................................. 24
Safety instructions
Step by step instructions
Hints and Tips
Guide to using the user instructions
)
Contents
This appliance conforms with the following ECC Directives:
- 2006/95 (Low Voltage Directive);
- 2004/108 (EMC Directive);
and subsequent modifications.

electrolux 3
3
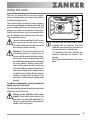
Warnings and Important Safety Information
Always keep these user instructions with the appliance. Should the appliance be passed on
to third persons or sold, or if you leave this appliance behind when you move house, it is
very important that the new user has access to these user instructions and the accompanying
information.
These warnings are provided for the safety of the users and those living with them. So read
them carefully before connecting and/or using the appliance.
Installation
• The installation must be performed by a
qualified person in accordance with the rules
and regulations in force. The individual op-
erations for installing the appliance are de-
scribed under the instructions for the installer.
• Have the appliance installed and connected
by a qualified person with specialist knowl-
edge, who will carry it out in accordance
with the directives.
• If any modifications to the power supply are
required because of the installation, these
should also be carried out by a qualified
electrician.
Operation
• This oven is designed for cooking foodstuffs;
never use it for other purposes.
• When opening the oven door during or at
the end of cooking be careful of the stream
of hot air, which comes out of the oven.
• Be very careful when using the cooker. The
extreme heat of the heating elements makes
the shelves and other parts very hot.
• If you should for whatever reason use alu-
minium foil to cook food in the oven, never
allow it to come into direct contact with the
floor of the oven.
• When cleaning the oven, proceed with care:
never spray anything onto the grease filter
(if fitted), the heating elements and the ther-
mostat sensor.
• If is dangerous to make modifications of any
kind to this appliance or to its specifications.
• During the baking, roasting and grilling pro-
cess, the oven window and the other parts
of the appliance get hot, so children should
be kept away from the appliance. Take care,
if connecting electrical appliances to sock-
ets near the oven, that cables do not come
into contact with hot rings or get caught in
the oven door.
• Always use oven gloves to take hot oven-
proof dishes or pots out of the oven.
• Regular cleaning prevents the surface ma-
terial from deteriorating.
• Before cleaning the oven, either turn the
power off or pull the mains plug out.
• Make sure that the oven is in the “OFF”
position, when the oven is no longer being
used.
• This oven was made as a single appliance
or as a combination appliance with electri-
cal hotplate, depending on the model, for
single-phase connection to 230 V.
• The appliance must not be cleaned with a
superheated steam cleaner or a steam jet
cleaner.
• Do not use abrasive cleaners or sharp metal
scrapers. These can scratch the glass in the
oven door, which may result in the shattering
of the glass.
English

4 electrolux
4
Child Safety
• This appliance is intended for use by adults. It
is dangerous to allow children to use it or play
with it.
• Children should be kept away while the oven
is working. Also, after you have switched the
oven off, it remains hot for a long time.
• This appliance is not intended for use by chil-
dren or other persons whose physical, sen-
sory or mental capabilities or lack of experi-
ence and knowledge prevents them from us-
ing the appliance safely without supervision or
instruction by a responsible person to ensure
that they can use the appliance safely.
Customer Service
• Have checks and/or repairs carried out by the
manufacturer’s service department or by a
service department authorised by the manu-
facturer and use only original spare parts.
• Do not attempt to repair the appliance yourself
in the event of malfunctions or damage. Re-
pairs carried out by untrained persons may
cause damage or injury.
The symbol on the product or its packaging
indicates that this product is not to be treated as
normal household waste. Instead it must be handed
over to a collection point for the recycling of electrical
and electronic equipment. The correct disposal of
this product will help to protect the environment and
human health. Environment and health are
endangered by incorrect disposal. For more detailed
information about recycling of this product, please
contact your local town hall, your household waste
disposal service or the shop where you purchased
the product.

electrolux 5
5
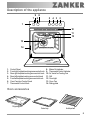
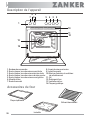
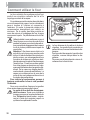
Description of the appliance
Oven accessories
Anti-tip shelfCake tray
Dripping pan
1. Control Panel
2. Front right hotplate/cooking zone control knob
3. Rear right hotplate/cooking zone control knob
4. Rear left hotplate/cooking zone control knob
5. Front left hotplate/cooking zone control knob
6. Oven Function Control Knob
7. Thermostat Control Knob
8. Mains On Indicator
9. Thermostat Control Indicator
10. Air Vents for Cooling Fan
11. Grill
12. Oven light
13. Oven Fan
14. Rating plate
1
12
11
14
10
13
23457
89
6

6 electrolux
6
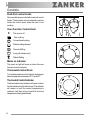
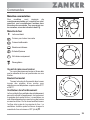
Controls
Push-Pull control knobs
Some models are provided with push-pull control
knobs. These knobs can be completely sunken
inside the control panel when the oven is not
working.
Oven Function Control Knob
0 The oven is off
Fan cooking
Conventional cooking
Bottom heating element
Thermal Grilling
Inner grill element only
Defrost Setting
Mains on Indicator
The mains on light will come on when the oven
function control knob is set.
Thermostat Control Knob
Turn the thermostat control knob anti-clockwise to
select temperatures between 50°C and 250°.
Thermostat Control Indicator
The thermostat control indicator will come on when
the thermostat control knob is turned. The indicator
will remain on until the correct temperature is
reached. It will then cycle on and off to show the
temperature is being maintained.

electrolux 7
7
Safety Thermostat
To prevent dangerous overheating (through
incorrect use of the appliance or defective
components), the oven is fitted with a safety
thermostat, which interrupts the power supply. The
oven switches back on again automatically, when
the temperature drops.
Should the safety thermostat trigger due to incorrect
use of the appliance, it is enough to remedy the error
after the oven has cooled down; if on the other hand,
the thermostat triggers because of a defective
component, please contact Customer Service.
The cooling fan
The oven is provided with a cooling fan, meant to
keep the front panel, the knobs and the oven door
handle cool.The fan switches on automatically
when the oven is activated. Warm air is blown out
through the aperture near the oven door handle.
The fan switches off when, after cooking, the oven
function control knob is set to OFF position 0.
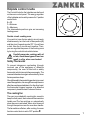
Hotplate control knobs
The Control Knobs for the hotplates can be found
on the oven control panel. The energy regulator
of the hotplates can be set by means of a 7-position
control knob:
0 = Off
1 = Minimum
3 = Maximum
The intermediate positions give an increasing
heating power.
Double circuit cooking zone
If you wish to have the two electric circuits work
simultaneously, turn the knob to Max position (3)
and then turn it towards symbol “0”. You will hear
a click. Now the 2 circuits work together. Then,
you can regulate the power of the cooking zone
by turning the control knob anticlockwise.
Carefully supervise cookings with oil
or fats, since these types of food can
result in a fire, when over-heated.

8 electrolux
8
Before using the oven for the first time
To open the oven door, always hold the
handle in the centre.
Remove all packaging, both inside and
outside the oven, before using the oven.
Before using for the first time, the oven should be
heated up without food.
During this time, an unpleasant odour may be
emitted. This is absolutely normal. It is caused by
manufacturing residues.
Ensure the room is well ventilated.
1. Switch the oven function control knob
to Fan cooking
2. Set the thermostat control knob to
250°C.
3. Open a window for ventilation.
4. Allow the oven to run empty for ap-
proximately 45 minutes.
This procedure should be repeated with the Con-
ventional cooking and the grill functions
for approximately 5-10 minutes.
Then let the oven cool down. Then
dampen a soft cloth with warm water and
a little mild washing-up liquid and use this
to clean the oven cavity.
Before using for the first time, carefully
wash the oven accessories as well.
)

electrolux 9
9
Using the oven
The oven is supplied with an exclusive system
which produces a natural circulation of air and the
constant recycling of steam.
This system makes it possible to cook in a steamy
environment and keep the dishes soft inside and
crusty outside. Moreover, the cooking time and
energy consumption are reduced to a minimum.
During cooking steam may be produced which
can be released when opening the oven door.
This is absolutely normal.
However, always stand back from the oven
when opening the oven door during
cooking or at the end of it to allow any build
up of steam or heat to release.
Attention! - Do not place objects on the
oven base and do not cover any part of
the oven with aluminium foil while cooking,
as this could cause a heat build-up which
would affect the baking results and damage
the oven enamel. Always place pans,
heat-resisting pans and aluminium trays
on the shelf which has been inserted in the
shelf runners.When food is heated, steam
is created, like in a kettle. When the steam
comes into contact with the glass in the
oven door, it condenses and creates water
droplets.
To reduce condensation, always preheat the
empty oven for 10 minutes.
We recommend you wipe the water droplets away
after every cooking process.
Always cook with the oven door
closed. Stand clear when opening the
drop down oven door. Do not allow it to
fall open - support the door using the door
handle, until it is fully open.
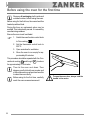
4
3
2
1
The oven has four shelf levels, and is
supplied with two shelves. The shelf
positions are counted from the bottom of
the oven as shown in the diagram.
It is important that these shelves are
correctly positioned as shown in the
diagram.
Do not place cookware directly on the oven
base.

10 electrolux
10
Conventional Cooking
- The middle shelf position allows for the best
heat distribution. To increase base browning
simply lower the shelf position. To increase
top browning, raise the shelf position.
- The material and finish of the baking trays
and dishes used will affect base browning.
Enamelware, dark, heavy or non-stick utensils
increase base browning, while oven
glassware, shiny aluminium or polished steel
trays reflect the heat away and give less base
browning.
- Always place dishes centrally on the shelf to
ensure even browning.
- Stand dishes on suitably sized baking trays to
prevent spillage onto the base of the oven
and make cleaning easier.
- Do not place dishes, tins or baking trays
directly on the oven base as it becomes very
hot and damage will occur.When using this
setting, heat comes from both the top and bottom
elements. This allows you to cook on a single
level and is particularly suitable for dishes
which require extra base browning such as
quiches and flans.
Gratins, lasagnes and hotpots which require extra
top browning also cook well in the conventional
oven.
How to use the conventional oven
1. Turn the oven function control knob to the
required cooking function .
2. Turn the thermostat control knob to the required
temperature.
Bottom oven element only
This function is particularly useful when blind-
baking pastry. It may also be used to finish off
quiches or flans to ensure the base pastry is cooked
through.
The thermostat control light will remain on
until the correct temperature is reached. It
will then cycle on and off to show the
temperature is being maintained.
Grilling
- Most foods should be placed on the grid in the
grill pan to allow maximum circulation of air
and to lift the food out of the fats and juices.
Food such as fish, liver and kidneys may be
placed directly on the grill pan, if preferred.
- Food should be thoroughly dried before grilling
to minimise splashing. Brush lean meats and
fish lightly with a little oil or melted butter to
keep them moist during cooking.
- Accompaniments such as tomatoes and
mushrooms may be placed underneath the
grid when grilling meats
- When toasting bread, we suggest that the top
runner position is used.
- The food should be turned over during
cooking, as required.
How to use the Inner Grill Element
The inner grill provides quick direct heat to the
central area of the grill pan. By using the inner grill
element for cooking small quantities, it can help to
save energy.
1. Turn the oven control function knob on .
2. Turn the thermostat control knob on the required
temperature.
3. Adjust the grid and grill pan runner position to
allow for different thicknesses of food and follow
the instructions for grilling.
The grill element is controlled by the thermostat.
During cooking, the grill cycles on and off to prevent
overheating.

electrolux 11
11
Defrosting
The oven fan operates without heat and circulates the
air, at room temperature, inside the oven.
Ensure the thermostat control knob is in the
OFF position.
Hints and Tips
On baking:
Cakes and pastries usually require a medium
temperature (150°C-200°C) and therefore it is
necessary to preheat the oven for about 10
minutes.
Do not open the oven door before 3/4 of the baking
time has elapsed.
Shortcrust pastry is baked in a springform tin or
on a tray for up to 2/3 of the baking time and then
garnished before being fully baked. This further
baking time depends on the type and amount of
topping or filling. Sponge mixtures must separate
with difficulty from the spoon. The baking time would
be unnecessarily extended by too much liquid.
If two baking trays with pastries or biscuits are
inserted into the oven at the same time, a shelf
level must be left free between the trays.
If two baking trays with pastries or biscuits are
inserted into the oven at the same time, the trays
must be swapped and turned around after about
2/3 of the baking time.
On Roasting:
Do not roast joints smaller than 1 kg. Smaller pieces
could dry out when roasting. Dark meat, which is
to be well done on the outside but remain medium
or rare inside, must be roasted at a higher tem-
perature (200°C-250°C).
White meat, poultry and fish, on the other hand,
require a lower temperature (150°C-175°C). The
ingredients for a sauce or gravy should only be
added to the roasting pan right at the beginning if
Thermal grilling
Turn the oven function control knob to position
and regulate the thermostat to the temperature
required.
This function offers an alternative method of
cooking food items, normally associated with
conventional grilling. The grill element and the
oven fan operate alternately, circulating hot air
around the food.
When using this function, select a maximum
temperature of 200°C.
Fan cooking
- The food is cooked by means of preheated air
force blown evenly round the inside of the
oven by a fan set on the rear wall of the oven
itself.
- Heat thus reaches all parts of the oven evenly
and fast and this means that you can simulta-
neously cook different types of foods positioned
on the various oven shelves . Fan cooking
ensures rapid elimination of moisture and the
dryer oven environment stops the different
aromas and flavours from being transmitted
from one food to another.
- The possibility of cooking on several shelf
heights means that you can cook several differ-
ent dishes at the same time and up to three tins
of biscuits and mini pizzas to be eaten
immediately or subsequently deep frozen.
- Naturally the oven can also be used for
cooking on just one shelf. In this case you
should use the lowest set of runners so that
you can keep an eye on progress more easily.
- In addition, the oven is particularly
recommended for sterilizing preserves,
cooking home-made fruit in syrup, and for
drying mushrooms or fruit.

12 electrolux
12
the cooking time is short. Otherwise add them in
the last half hour.
You can use a spoon to test whether the meat is
cooked: if it cannot be depressed, it is cooked
through. Roast beef and fillet, which is to remain
pink inside, must be roasted at a higher tempera-
ture in a shorter time.
If cooking meat directly on the oven shelf, insert
the roasting pan in the shelf level below to catch
the juices.
Leave the joint to stand for at least 15 minutes, so
that the meat juices do not run out.
To reduce the build up of smoke in the oven, it is
recommended to pour a little water in the roasting
pan. To prevent condensation forming, add water
several times. The plates can be kept warm in the
oven at minimum temperature until serving.
Caution!
Do not line the oven with aluminium
foil and do not place a roasting pan
or baking tray on the floor, as other-
wise the oven enamel will be dam-
aged by the heat build-up.
Cooking times
Cooking times can vary according to the different
composition, ingredients and amounts of liquid in
the individual dishes.
Note the settings of your first cooking or roasting
experiments to gain experience for later prepara-
tion of the same dishes.
Based upon your own experiences you will be
able to alter the values given in the tables.

electrolux 13
13
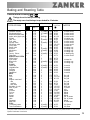
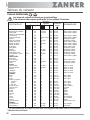
Baking and Roasting Table
Conventional Cooking -
Timings do not include pre-heating.
The empty oven should always be pre-heated for 10 minutes.
CAKES
Whisked recipies 2 170 2 (1and3)* 160 45-60 In cake mould
Shortbread dough 2 170 2 (1and3)* 160 20-30 In cake mould
Butter-milk cheese cake 1 175 2 165 60-80 In cake mould
Apple cake (Apple pie) 1 170 2lef+righ. 160 90-120 In cake mould
Strudel 2 180 2 160 60-80 In baking tray
Jam- tart 2 190 2(1and3)* 180 40-45 In cake mould
Fruit cake 2 170 2 150 60-70 In cake mould
Sponge cake 1 170 2(1and3)* 165 30-40 In cake mould
Christmas cake 1 150 2 150 120-150 In cake mould
Plum cake 1 175 2 160 50-60 In bread tin
Small cake 3 170 2 160 20-35 In baking tray
Biscuits 2 160 2(1and3)* 150 20-30 In baking tray
Meringues 2 135 2(1and3)* 150 60-90 In baking tray
Buns 2 200 2 190 12~20 In baking tray
Pastry: Choux 2or 3 210 2(1and3)* 170 25-35 In braking tray
Plate tarts 2 180 2 170 45-70 In cake mould
BREAD AND PIZZA
White bread 1 195 2 185 60-70
Rye bread 1 190 1 180 30-45 In bread tin
Bread rolls 2 200 2(1and3)* 175 25-40 In baking tray
Pizza 2 200 2 200 20-30 In baking tray
FLANS
Pasta flan 2 200 2(1and3)* 175 40-50 In mould
Vegetable flan 2 200 2(1and3)* 175 45-60 In mould
Quiches 1 210 1 190 30-40 In mould
Lasagne 2 200 2 200 25-35 In mould
Cannelloni 2 200 2 200 25-35 In mould
MEAT
Beef 2 190 2 175 50-70 On grid
Pork 2 180 2 175 100-130 On grid
Veal 2 190 2 175 90-120 On grid
English roast beef
rare 2 210 2 200 50-60 On grid
medium 2 210 2 200 60-70 On grid
well done 2 210 2 200 70-80 On grid
Shoulder of pork 2 180 2 170 120-150 With rind
Shin of pork 2 180 2 160 100-120 2 pieces
Lamb 2 190 2 175 110-130 Leg
Chicken 2 190 2 200 70-85 Whole
Turkey 2 180 2 160 210-240 Whole
Duck 2 175 2 220 120-150 Whole
Goose 2 175 1 160 150-200 Whole
Rabbit 2 190 2 175 60-80 Cut in pieces
Hare 2 190 2 175 150-200 Cut in pieces
Pheasant 2 190 2 175 90-120 Whole
Meat loaf 2 180 2 170 tot.150 in bread pan
FISH
Trout/Sea bream 2 190 2(1and3)* 175 40-55 3-4 fishes
Tuna fish/Salmon 2 190 2(1and3)* 175 35-60 4-6 fillets
TYPE OF DISH
Conventional Cooking Fan Cooking
temp °C
temp
°C
4
3
2
1
4
3
2
1
Cooking times
in minutes
NOTES
(*)
If you cook more than one dish at the same time, we recommend you place them on the levels
quoted between brackets.

14 electrolux
14
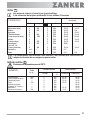
Grilling
Timings do not include pre-heating.
The empty oven should always be pre-heated for 10 minutes.
The temperatures quoted are guidelines. The temperatures may have to be adapted to personal
requirements.
1st side
temp.°CPieces g.
Quantity
Cooking time in
minutes
2nd side
Grilling
4
3
2
1
TYPE OF DISH
Fillet steaks 4 800 3 250 12~15 12~14
Beef-steaks 4 600 3 250 10~12 6~8
Sausages 8 / 3 250 12~15 10~12
Pork chops 4 600 3 250 12~16 12~14
Chicken (cut in two) 2 1000 3 250 30~35 25~30
Kebabs 4 / 3 250 10~15 10~12
Chicken (breast) 4 400 3 250 12~15 12~14
Hamburger* 6 600 2 250 20-30
*
Preheat 5’00'’
Fish (fillets) 4 400 3 250 12~14 10~12
Sandwiches 4~6 / 3 250 5~7 /
Toast 4~6 / 3 250 2~4 2~3
The oven temperatures are intended as a guide only. It may be necessary to increase or decrease the
temperatures to suit individual preferences and requirements.
Thermal grilling
TYPE OF DISH Quantity Shelf Temp. Cooking time (minutes)
(gr.) level lower upper
side side
Rolled joints
(turkey) 1000 3 200 30 ~ 40 20 ~ 30
Chicken (cut in two) 1000 3 200 25 ~ 30 20 ~ 30
Chicken legs — 3 200 15 ~ 20 15 ~ 18
Quail
500 3 200 25 ~ 30 20 ~ 25
Vegetable gratin — 3 200 20 ~ 25 —
St. Jacques shells — 3 200 15 ~ 20 —
Mackerel — 3 200 15 ~ 20 10 ~ 15
Fish slices 800 3 200 12 ~ 15 8 ~ 10
With thermal grilling select a maximum temperature of 200°C.
°C

electrolux 15
15
Before cleaning switch the oven off
and let it cool down.
The appliance must not be cleaned
with a superheated steam cleaner or
a steam jet cleaner.
Important: Before carrying out any cleaning
operation, the appliance must be disconnected from
the power supply.
To ensure a long life for your appliance, it is
necessary to perform the following cleaning
operations regularly:
- Only perform when the oven has cooled down.
- Clean the enamelled parts with soapy water.
- Do not use abrasive cleaners.
- Dry the stainless steel parts and glass with a
soft cloth.
- If there are stubborn stains, use commercially
available for stainless steel or warm vinegar.
The oven’s enamel is extremely durable and highly
impermeable. The action of hot fruit acids (from
lemons, plums or similar) can however leave
permanent, dull, rough marks on the surface of the
enamel. However such marks in the brightly
polished surface of the enamel does not affect the
operation of the oven. Clean the oven thoroughly
after every use. This is the easiest way to clean
dirt off. It prevents dirt being burnt on.
Cleaning materials
Before using any cleaning materials on your oven,
check that they are suitable and that their use is
recommended by the manufacturer.
Cleaners that contain bleach should NOT be used
as they may dull the surface finishes. Harsh
abrasives should also be avoided.
Cleaning and Maintenance
External cleaning
Regularly wipe over the control panel, oven door
and door seal using a soft cloth well wrung out in
warm water to which a little liquid detergent has
been added.
To prevent damaging or weakening the door glass
panels avoid the use of the following:
• Household detergent and bleaches
• Impregnated pads unsuitable for non-stick
saucepans
• Brillo/Ajax pads or steel wool pads
• Chemical oven pads or aerosols
• Rust removers
• Bath/Sink stain removers
Clean the outer and inner door glass using warm
soapy water. Should the inner door glass become
heavily soiled it is recommended that a cleaning
product such as Hob Brite is used. Do not use
paint scrapers to remove soilage.
DO NOT clean the oven door while
the glass panels are warm. If this
precaution is not observed the glass
panel may shatter.
If the door glass panel becomes chipped
or has deep scratches, the glass will be
weakened and must be replaced to
prevent the possibility of the panel
shattering. Contact your local Service
Force Centre who will be pleased to
advise further.
Oven Cavity
The enamelled base of the oven cavity is best
cleaned whilst the oven is still warm.
Wipe the oven over with a soft cloth soaked in
warm soapy water after each use. From time to
time it will be necessary to do a more thorough
cleaning, using a proprietary oven cleaner.

16 electrolux
16
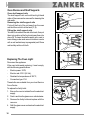
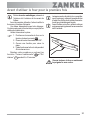
Oven Shelves and Shelf Supports
Oven shelf support rails
The shelf support rails on the left and right hand
sides of the oven can be removed for cleaning the
side walls.
Removing the shelf support rails
First pull the front of the rail away from the oven
wall and then unhitch at the back (1, 2).
Fitting the shelf support rails
To install, first reattach the rails at the back, then put
them into position at the front and press them into
place (3).To clean the shelf support rails, soak in
warm soapy water and remove stubborn marks
with a well wetted soap impregnated pad. Rinse
well and dry with a soft cloth.
Replacing The Oven Light
Disconnect the appliance
If the oven bulb needs replacing, it must comply
with the following specifications:
- Electric power: 25 W,
- Electric rate: 230 V (50 Hz),
- Resistant to temperatures of 300°C,
- Connection type: E14.
These bulbs are available from your local Service
Force Centre.
To replace the faulty bulb:
1. Ensure the oven is isolated from the electrical
supply.
2. Push in and turn the glass cover anticlockwise.
3. Remove the faulty bulb and replace with the
new one.
4. Refit the glass cover and restore the electrical
supply.
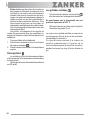
1
2
3

electrolux 17
17
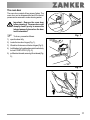
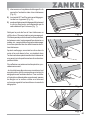
The oven door
The oven door consists of two panes of glass. The
oven door can be disassembled and the internal
panes can be removed to make cleaning easier.
Important - Remove the oven door
before cleaning it. The oven door could
abruptly close if you try to remove the
internal panes of glass when the door
is still assembled.
To do so, proceed as follows.
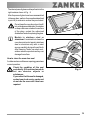
1) open the door fully;
2) locate the two door hinges (Fig. 1);
3) lift and turn the levers on the two hinges (Fig. 2);
4) hold the door by the side edges and close it slowly
but not COMPLETELY (Fig. 3);
5 ) pull the door forward, removing it from its seat (Fig.
3);
Fig. 1
Fig. 2
Fig. 3
)

18 electrolux
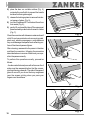
18
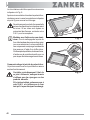
6) place the door on a stable surface (Fig. 4)
protected by a soft cloth to prevent the handle
surface from being damaged;
7) release the locking system to remove the inter-
nal panes of glass (Fig. 5);
8) turn the 2 fasteners 90° and extract them from
their seats (Fig. 6);
9) gently lift and carefully take off the uppermost
pane marked by a decorative frame on 4 sides
(Fig. 7).
Clean the oven door with lukewarm water and a soft
cloth. Do not use products such as scouring pads,
steel wool, abrasive sponges or acids because
they could damage the special heat-reflecting sur-
face of the internal panes of glass.
After cleaning, reassemble the panes in the door
and then the oven door, following the procedure
described above in reverse. Make sure you repo-
sition the panes correctly.
To perform this operation correctly, proceed as
follows:
- the decorated internal pane with a frame on the 4
sides must be reassembled so that the screen-
printing is facing outwards. The side of the pane of
glass is correct if you do not feel any roughness
near the screen printing when you pass your
fingers over the surface.
Fig. 5
Fig. 6
Fig. 4
90°

electrolux 19
19
How to clean the oven door seal
A rubber seal around the oven opening guarantees
correct operation.
Check the condition of this seal
periodically. If it has to be cleaned, do
not use abrasive objects or
substances.
If you notice that the seal is damaged,
contact your local service centre and
do not use the oven until it has been
repaired.
The internal pane of glass must be put back into the
right seats as shown in Fig. 8
After the panes of glass have been reassembled
in the oven door, perform the procedure described
in point 8) in reverse to ensure they are locked.
Do not clean the oven door when it is still
hot, as the glass could shatter. If scratches
or deep cracks are noted on the surface
of the glass, contact the authorised
Assistance Centre for replacing the glass.
Models in stainless steel or
aluminium: It is advisable to clean the
oven door and control panel in stainless
steel or aluminium only with a moist
sponge, carefully drying with a soft cloth
after cleaning. Never use steel wool,
acids or abrasive products as they can
damage the surface.
1
2
Fig. 7
Fig. 8

20 electrolux
20
If the appliance is not working correctly, please check the following before contacting the Electrolux
Service Centre:
If something is wrong
SOLUTION
Check that both a cookingfunction and temperature
have been selected
or
Check whether the appliance is correctly connected
and the socket switch or the mains supply to the oven
is ON.
Select a temperature with the thermostat control knob
or
Select a function with the oven function control knob.
Select a temperature with the thermostat control knob
or
Check the light bulb, and replace it if necessary (see
"Cleaning the Oven")
The temperature may need adjusting
or
Following the advice contained in these instructions,
especially the section “Practical Tips“.
When the cooking process is completed, do not
leave the dishes standing in the oven for longer than
15-20 minutes.
Check that shelves and bakeware are not vibrating
in contact with the oven back panel.
PROBLEM
The oven is not switching on.
The oven temperature light does not
come on.
The oven light does not come on.
It takes too long to cook the dishes or
they cook too quickly.
Steam and condensation settle on the
food and in the oven cavity.
The oven fan is noisy.
La page est en cours de chargement...
La page est en cours de chargement...
La page est en cours de chargement...
La page est en cours de chargement...
La page est en cours de chargement...
La page est en cours de chargement...
La page est en cours de chargement...
La page est en cours de chargement...
La page est en cours de chargement...
La page est en cours de chargement...
La page est en cours de chargement...
La page est en cours de chargement...
La page est en cours de chargement...
La page est en cours de chargement...
La page est en cours de chargement...
La page est en cours de chargement...
La page est en cours de chargement...
La page est en cours de chargement...
La page est en cours de chargement...
La page est en cours de chargement...
La page est en cours de chargement...
La page est en cours de chargement...
La page est en cours de chargement...
La page est en cours de chargement...
La page est en cours de chargement...
La page est en cours de chargement...
La page est en cours de chargement...
La page est en cours de chargement...
-
 1
1
-
 2
2
-
 3
3
-
 4
4
-
 5
5
-
 6
6
-
 7
7
-
 8
8
-
 9
9
-
 10
10
-
 11
11
-
 12
12
-
 13
13
-
 14
14
-
 15
15
-
 16
16
-
 17
17
-
 18
18
-
 19
19
-
 20
20
-
 21
21
-
 22
22
-
 23
23
-
 24
24
-
 25
25
-
 26
26
-
 27
27
-
 28
28
-
 29
29
-
 30
30
-
 31
31
-
 32
32
-
 33
33
-
 34
34
-
 35
35
-
 36
36
-
 37
37
-
 38
38
-
 39
39
-
 40
40
-
 41
41
-
 42
42
-
 43
43
-
 44
44
-
 45
45
-
 46
46
-
 47
47
-
 48
48


ZANKER ZKH7528B Manuel utilisateur
- Catégorie
- Fours
- Taper
- Manuel utilisateur
dans d''autres langues
- English: ZANKER ZKH7528B User manual
Documents connexes
Autres documents
-
Zanussi ZOB161X Manuel utilisateur
-
Electrolux FHH6885GK Manuel utilisateur
-
-
Novamatic FH66-412K Manuel utilisateur
-
-
-
-
Valberg VC 60 4MFC S 373P2 Manuel utilisateur
-
Unox 596060 Manuel utilisateur