Delta Children Madisson Side Table Assembly Instructions
- Taper
- Assembly Instructions

Note: The style of your item may vary from what is pictured in the instruction sheet.
Remarque : Le modèle de votre article peut être différent de celui qui est illustré dans le feuillet d’instructions.
Note: El estilo de su artículo puede variar de la ilustración en la hoja de instrucciones.
©2013 Simmons Juvenile Furniture, A Division of Children's Products, LLC
Simmons Juvenile Furniture
A Division Of Children's Products, LLC
114 West 26th Street
New York, NY 10001
1-800-218-2741
Lea todas las instrucciones antes de
ensamblar y usar. MANTENGA LAS
INSTRUCCIONES PARA SU USO FUTURO.
Read all instructions before assembly
and use. KEEP INSTRUCTIONS
FOR FUTURE USE.
Instrucciones de Ensamble
de su Mesa lateral
Directives de Montage pour votre
Table d'appui
Assembly Instructions for your
Side Table
ADULT ASSEMBLY
REQUIRED
Due to the presence of small parts during assembly,
keep out of reach of children until assembly is complete.
DEBE SER ENSAMBLADO
POR UN ADULTO
Debido a la presencia de piezas pequeñas durante el ensamblaje,
mantenga fuera del alcance de los niños hasta que complete el
ensamblaje.
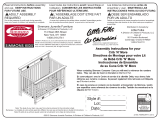
Style #:
Lot:
Date:
___________
___________
___________
Children's Products LLC is an authorized licensee of Dreamwell, Ltd. a
wholly-owned subsidiary of Simmons Bedding Company. SIMMONS
KIDS® and the SIMMONS S&GLOBE are registered trademarks of
Dreamwell, Ltd. ©2011 Dreamwell, Ltd. All rights reserved.
Trademark is a registered trademark of
Delta Enterprise Corp., New York, NY.
Distributed in Canada by
Little Folks
A Division of Children’s Products, LLC
Care of:
501 Franklin Boulevard
Cambridge, Ontario N1R8G9
1-800-218-2741
Lisez toutes les instructions avant l’assemblage et
l’utilisation. CONSERVEZ LES INSTRUCTIONS
POUR RÉFÉRENCE ULTÉRIEURE.
L’ASSEMBLAGE DOIT ETRE FAIT
PAR UN ADULTE
A cause de la présence de petites piéces, pendant l’assemblage gardez
hors de portée des enfants jusqu'à ce que celui-ci soit terminé.
When contacting Simmons Consumer Care please reference the below information. Before contacting
Simmons Consumer Care please ensure that the information below matches the information found on the
label on the Bottom, please reference the information found on the product when contacting Simmons
Consumer Care.
Lorsque vous contactez le Service client de Simmons, veuillez faire référence aux informations ci-dessous.
Avant de contacter le Service client de Simmons, veuillez vous assurer que les informations ci-dessous
correspondent aux informations indiquées sur l’étiquette qui se trouve sur Partie inférieure; veuillez faire
référence aux informations indiquées sur le produit lorsque vous contactez le Service client de Simmons.
Al contactar al servicio al cliente de Simmons, entregue la información abajo. Antes de contactar al servicio
de atención al cliente de Simmons, asegúrese de que la información abajo calza con la que aparece en la
etiqueta en Fondo; al contactar al centro de atención al cliente de Simmons, mencione la información que
aparece en el producto.
23941 - MAY 7, 2013

THIS PAGE LISTS THE PARTS THAT ARE REQUIRED TO ASSEMBLE YOUR PRODUCT. PLEASE CONTACT CUSTOMER SERVICE AT 1-800-218-2741
BEFORE STARTING ASSEMBLY IF ANY PARTS ARE MISSING OR DAMAGED.
CETTE PAGE ÉNUMÈRE LES PIÈCES QUI SONT EXIGÉES POUR ASSEMBLER VOTRE HUCHE. SERVICE À LA CLIENTÈLE DE CONTACT À
1-800-218-2741 AVANT LA MISE EN MARCHE DE L'ASSEMBLÉE SI DES PIÈCES SONT ABSENTES OU ENDOMMAGÉES
ESTA PÁGINA ENUMERA LAS PIEZAS QUE SE REQUIEREN PARA MONTAR SU PESEBRE. POR FAVOR CONTACTO EL SERVICIO DE
ATENCIÓN AL CLIENTE EN 1-800-218-2741 ANTES DE ENCENDER A LA ASAMBLEA SI ALGUNAS PIEZAS SON QUE FALTA O DAÑADAS.
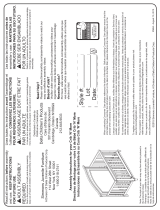
GLIDER
PIÈCES DU FAUTEUIL SUR BILLES
PIEZAS DE LA MECEDORA
PARTS
#2 - (1) Support Arm
(1) Bras de support
(1) Reposabrazos
23936
23935
#3 - (1) Bottom
(1) Partie inférieure
(1) Fondo
23937
#4 - (1) Post
(1) Colonne
(1) Poste
23939
Glider Hardware
Quincaillerie du fauteuil sur billes
Herramientas de la Mecedora
Note: Fasteners are shown full size
Remarque: Les dispositifs de fixation sont
Montrés en taille réelle
Nota: Los pernos se muestran en tamaño real
#5 - (3) 1/4” x 65mm Bolt
(3) Boulons 1/4” x 65mm
(3) Pernos 1/4” x 65mm
5665
#9 - (1) Φ10 x 30mm Wood Dowel
M4 Allen Wrench (Provided)
Clé hexagonale M4 (Fournie)
Llave Allen M4 (se Incluye)
1177
#6 - (2) 1/4” x 55mm Bolt
(2) Boulons 1/4” x 55mm
(2) Pernos 1/4” x 55mm
5688
(1) goujon en bois de diamètre 10 x 30mm
(1) arandelas de madera de Φ10 x 30 mm
5329
#10 - (2) Φ6 x 25mm Wood Dowel
(2) goujon en bois de diamètre 6 x 25mm
(2) arandelas de madera de Φ6 x 25 mm
5065
#7 - (1) 1/4” x 35mm Bolt
(1) Boulons 1/4” x 35mm
(1) Pernos 1/4” x 35mm
5526
#8 - (3) Plastic Clamp
(3) pince en plastique
(3) pinza plástica
5202
#1 - (1) Top
(1) Partie supérieure
(1) Parte superior
Hardware kit is Part#23940-988 for color 907.
L'ensemble de quincaillerie correspond à la
pièce n°23940-988 pour la couleur 907.
El kit de herramientas es la Pieza #23940-988
para el color 907

The following tools and parts are required:
Outils et pièces nécessaires:
Se necesitan las siguientes herramientas
y piezas:
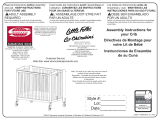
STEP
#1
ÉTAPE N°1
PASO #1
Note: Fasteners are shown full size
Remarque: Les dispositifs de fixation sont
Montrés en taille réelle
Nota: Los pernos se muestran en tamaño real
STEP #1
ÉTAPE No1 PASO #1
Part #5
Pièce No5
Pieza #5
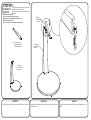
Attach the Post (Part #4) to the Bottom (Part #3) using (1) Φ10 x
30mm Wood Dowel (Part #9), (1) Plastic Clamp (Part #8), (1) 1/4”
x 65mm Bolt (Part #5) and (2) 1/4” x 55mm Bolts (Part #6).
Tighten with the M4 Allen Wrench.
M4 Allen Wrench (Provided)
Clé hexagonale M4 (Fournie)
Llave Allen M4 (se Incluye)
#5 - (1) 1/4” x 65mm Bolt
(1) Boulons 1/4” x 65mm
(1) Pernos 1/4” x 65mm
#6 - (2) 1/4” x 55mm Bolt
(2) Boulons 1/4” x 55mm
(2) Pernos 1/4” x 55mm
Part #8
Pièce No8
Pieza #8
Part #6
Pièce No6
Pieza #6
Part #3
Pièce No3
Pieza #3
Part #4
Pièce No4
Pieza #4
Part #9
Pièce No9
Pieza #9
#3 - (1) Bottom
(1) Partie inférieure
(1) Fondo
#4 - (1) Post
(1) Colonne
(1) Poste
#8 - (1) Plastic Clamp
(1) pince en plastique
(1) pinza plástica
#9 - (1) Φ10 x 30mm Wood Dowel
(1) goujon en bois de diamètre 10 x 30mm
(1) arandelas de madera de Φ10 x 30 mm
Attacher la colonne (pièce No4) à la partie inférieure (pièce No3)
avec (1) 1 goujon en bois de diamètre 10 x 30mm (pièce No9), (1)
pince en plastique (pièce No8), (1) boulon 1/4” x 65mm (pièce No5)
et (2) boulons 1/4” x 55mm (pièce No6). Serrer à l’aide de la clé
hexagonale M4.
Fije el poste (Pieza #4) al fondo (Pieza #3) utilizando (1) arandelas
de madera de Φ10 x 30 mm (Pieza #9), (1) pinza plástica (Pieza
#8), (1) perno 1/4” x 65 mm (Pieza #5) y (2) pernos 1/4” x 55 mm
(Pieza #6). Apriete todos los pernos utilizando la Llave Allen M4.

From Step 1
Après l’Etape 1
Del Paso 1
Part #2
Pièce No2
Pieza #2
Part #4
Pièce No4
Pieza #4
The following tools and parts are required:
Outils et pièces nécessaires:
Se necesitan las siguientes herramientas
y piezas:
STEP
#2
ÉTAPE N°2
PASO #2
Note: Fasteners are shown full size
Remarque: Les dispositifs de fixation sont
Montrés en taille réelle
Nota: Los pernos se muestran en tamaño real
STEP #2
ÉTAPE No2 PASO #2
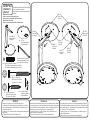
Insert the Support Arm (Part #2) into the Post (Part #4) as shown.
#2 - (1) Support Arm
(1) Bras de support
(1) Reposabrazos
Insérer le bras de support (pièce No2) dans la colonne (pièce No4)
comme indiqué.
Inserte el reposabrazos (Pieza #2) en el poste (Pieza #4) como se
indica.

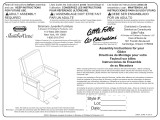
The following tools and parts are required:
Outils et pièces nécessaires:
Se necesitan las siguientes herramientas
y piezas:
STEP
#3
ÉTAPE N°3
PASO #3
Note: Fasteners are shown full size
Remarque: Les dispositifs de fixation sont
Montrés en taille réelle
Nota: Los pernos se muestran en tamaño real
STEP #3
ÉTAPE No3 PASO #3
M4 Allen Wrench (Provided)
Clé hexagonale M4 (Fournie)
Llave Allen M4 (se Incluye)
#5 - (2) 1/4” x 65mm Bolt
(2) Boulons 1/4” x 65mm
(2) Pernos 1/4” x 65mm
Part #10
Pièce No10
Pieza #10
Part #10
Pièce No10
Pieza #10
Part #5
Pièce No5
Pieza #5
Part #8
Pièce No8
Pieza #8
Part #8
Pièce No8
Pieza #8
Part #7
Pièce No7
Pieza #7
#7 - (1) 1/4” x 35mm Bolt
(1) Boulons 1/4” x 35mm
(1) Pernos 1/4” x 35mm
From Step 2
Après l’Etape 2
Del Paso 2
Part #1
Pièce No1
Pieza #1
Attach the Top (Part #1) to the assembly from step 2
1) Insert (2) Φ6 x 25mm Wood Dowels (Part #10) into the Post
and Top. Attach using (2) Plastic Clamps (Part #8) and (2) 1/4” x
65mm Bolts (Part #5).
2) Insert (1) 1/4” x 35mm Bolt (Part #7) through the Support Arm
into the Top.
3) Tighten all bolts with the M4 Allen Wrench.
#1 - (1) Top
(1) Partie supérieure
(1) Parte superior
#8 - (2) Plastic Clamp
(2) pince en plastique
(2) pinza plástica
#10 - (2) Φ6 x 25mm Wood Dowel
(2) goujon en bois de diamètre 6 x 25mm
(2) arandelas de madera de Φ6 x 25 mm
Attacher la partie supérieure (pièce No1) à l'ensemble monté à l'étape 2
1) Insérer (2) goujons en bois de diamètre 6 x 25mm (pièce No10) dans
la colonne et dans la partie supérieure. Serrer à l'aide de (2) pinces en
plastique (pièce 8) et de (2) boulons 1/4” x 65mm (pièce 5).
2) Insérer (1) boulon 1/4” x 35mm (pièce No7) à travers le bras de
support dans la partie supérieure.
3) Serrer tous les boulons à l’aide de la clé hexagonale M4.
Fije la parte superior (Pieza #1) a la pieza ensamblada en el paso 2.
1) Inserte (2) arandelas de madera de Φ6 x 25 mm (Pieza #10) en el
poste y parte superior. Fije utilizando (2) pinzas plásticas (Pieza #8)
y (2) pernos 1/4” x 65 mm (Pieza #5).
2) Inserte (1) perno 1/4” x 35 mm (Pieza #7) en la parte superior, a
través del reposabrazos.
3) Apriete todos los pernos utilizando la Llave Allen M4.
-
 1
1
-
 2
2
-
 3
3
-
 4
4
-
 5
5


Delta Children Madisson Side Table Assembly Instructions
- Taper
- Assembly Instructions
dans d''autres langues
- English: Delta Children Madisson Side Table
Documents connexes
-
 Delta Children Madisson Changing Table Assembly Instructions
-
 Delta Children Rowen Upholstered Glider Assembly Instructions
-
 Delta Children Grow Assembly Instructions
-
 Delta Children Elite Changing Table Assembly Instructions
-
 Delta Children SIMMONS KIDS Slumber Time Crib ‘N’ More Assembly Instructions
-
 Delta Children Impressions Crib 'N' More Assembly Instructions
-
 Delta Children Elite Glider & Ottoman Assembly Instructions
-
 Delta Children Belmont 4-in-1 Crib Assembly Instructions
-
 Delta Children Foldaway Crib Assembly Instructions
-
 Delta Children Madisson Upholstered Glider & Ottoman Assembly Instructions


