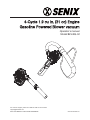
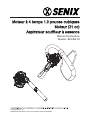
Senix BLV4QL-M Le manuel du propriétaire
- Catégorie
- Souffleurs / sécheurs d'air
- Taper
- Le manuel du propriétaire

8458-A074003001-001
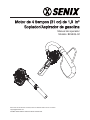
Operator’s manual
Model:BLV4QL-M
For customer support, please call 1-800-261-3981 or send email to:
SAVE THIS MANUAL FOR FUTURE REFERENCE.

2 WWW.SENIXTOOLS.COM
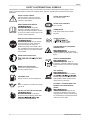
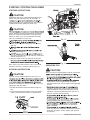
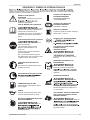
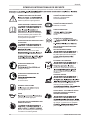
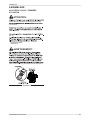
SAFETY & INTERNATIONAL SYMBOLS
This operator’s manual describes safety and international symbols and pictographs that may appear on this
product. Read the operator’s manual for complete safety, assembly, operating and maintenance and repair
information.
SAFETY ALERT SYMBOL
Indicates danger, warning or caution.
May be used in conjunction with other
symbols or pictographs.
ON/OFF STOP CONTROL
ON / START / RUN
ON/OFF STOP CONTROL
OFF or STOP
PRIMER BULB
Push primer bulb, fully and slowly,
10 times.
CHOKE CONTROL
THROWN OBJECTS CAN CAUSE
SEVERE INJURY
WARNING: Small objects
can be propelled at high speed, causing
injury.
KEEP BYSTANDERS AWAY
WARNING: Keep all
bystanders, especially children and pets,
at least 50 feet (15 m) from the operating
area.
HOT SURFACE
WARNING:Do not touch
burned. These parts get extremely hot
from operation. When turned off, they
remain hot for a short time.
BLOWERS - ROTATING IMPELLER
BLADES CAN CAUSE SEVERE
INJURY
WARNING:Stop the unit
and allow the impeller to stop before
changing tubes, cleaning or performing
any maintenance. Keep hands and feet
away from moving parts.
READ OPERATOR’S MANUAL
WARNING: Read the
operator’s manual(s) and follow all
warnings and safety instructions. Failure
to do so can result in serious injury to the
operator and/or bystanders.
WEAR EYE AND HEARING PROTECTION
WARNING:Thrown objects
and loud noise can cause severe eye
injury and hearing loss. Wear eye
protection meeting current ANSI / ISEA
Z87.1 standards and ear protection when
operating this unit. Use a full face shield
when needed.
WEAR HAND PROTECTION
hands.
WEAR FOOT PROTECTION
Wear boots with slip-resistant and
puncture-resistant soles.
UNLEADED FUEL
Always use clean, fresh unleaded fuel.
OIL
Refer to operator’s manual for the proper
type of oil.
DO NOT USE E85 FUEL IN THIS UNIT
WARNING: It has been
proven that fuel containing greater than
engine and void the warranty.
SAFETY

3WWW.SENIXTOOLS.COM
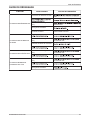
TABLE OF CONTENTS
COMPONENT LOCATION.............................................6
TECHNICAL DATA..........................................................6
OPERATION..................................................................10
MAINTENANCE.............................................................12
TROUBLESHOOTING..................................................13
PARTS...........................................................................14
TABLE OF CONTENTS

4 WWW.SENIXTOOLS.COM
SAFETY
Safety is a combination of common sense, staying
fueling.
2. Always add fuel in a clean, well-ventilated outdoor area
3. Never operate the unit without the fuel cap securely in
place.
4. Avoid creating a source of ignition for spilled fuel. Wipe
up any spilled fuel from the unit immediately, before
starting the unit. Move the unit at least 30 ft. (9.1 m)
from the fueling source and site before starting the
5. Never start or run the unit inside a closed room or
unit only in a well ventilated outdoor area.
to reduce the chance of serious personal injury.
2. Store fuel in a cool, well-ventilated area, safely away
purpose.
5. Add fuel before starting the engine. Never remove
running or when the engine is hot.
fuel from escaping around the cap.
8. Tighten the fuel cap securely after refueling.
9. Wipe spilled fuel from the unit. Move 30 feet away from
refueling site before starting engine.
10.Never attempt to burn off spilled fuel under any
circumstances.
12. If fuel is spilled, do not attempt to start the engine but
move the machine away from the area of spillage and
avoid creating any source of ignition until fuel vapors
have dissipated.
and restrain the unit from moving before transporting in
a vehicle.
storage container in a well-ventilated area.
16.Select bare ground, stop engine, and allow to cool
before refueling.
and use them to instruct others who may use this
tool. If you loan someone this tool, loan them these
instructions also.
Wear safety glasses or goggles that meet current ANSI /
hearing protection when operating this unit. Wear a face
shirt. Do not wear loose clothing, jewelry, short pants,
SAFETY
SAFETY WARNING FOR GAS UNIT
FUELING
WHILE OPERATING
approved for the storage of such materials.
When using the unit, all safety instructions must be
followed. Please read these instructions before operating
the unit in order to ensure the safety of the operator and
use.
WARNING:
WARNING:
WARNING:
1. Read the instructions carefully. Be familiar with the
controls and proper use of the unit.
2. Do not operate this unit when tired, ill or under the
3. Never allow children to operate the unit. Teens must
be trained, accompanied and supervised by an adult.
Never allow adults to operate the unit without proper
instruction.
4. All guards and safety attachments must be installed
properly before operating the unit.
5. Inspect the unit before use. Replace damaged parts.
chipped, or damaged in any way. Do not operate the
unit with loose or damaged parts.
7. Carefully inspect the area before starting the unit.
and other objects that may be thrown or become
entangled with the unit.
them outside a 50-foot (15 m) radius, at a minimum.
Encourage bystanders to wear eye protection. If you
are approached, stop the unit immediately.
or repairs before using the unit.
10. Do not change the engine governor settings or over
speed the engine.
11. This unit is intended for occasional, household use
only.

5WWW.SENIXTOOLS.COM
SAFETY
sandals or go barefoot. Secure hair above shoulder
level.
whenever pulling the starter rope. The operator and
unit must be in a stable position while starting. Refer to
Starting and Stopping.
purpose.
steep slopes or inclines. To avoid serious injury, do not
operate the unit while on a ladder or a roof.
Do not touch or try to stop moving parts.
extremely hot from operation, even after the unit is
turned off.
do the job. Do not run the unit at high speed when not
in use.
used at the intended rate.
engine is off and all moving parts have stopped.
not operate the unit before repairing damage. Do not
operate the unit with loose or damaged parts.
maintenance or repair.
replacement parts and accessories for this unit. Use
of any other parts or accessories could lead to serious
injury to the user, or damage to the unit, and void the
warranty.
leaves, excessive grease or carbon build up.
immediately. Inspect the unit for the cause of the
vibration. Vibration is generally an indicator of trouble.
FOLLOW THESE RULES WHILE OPERATING THE
BLOWER
SPECIFIC RULES FOR THE BLOWER
WARNING:
free from dust, lint, hair and anything else that may
attached.
any other substance that may contain toxic materials.
thrown out the discharge opening, resulting in damage
to the unit or property or causing serious injury to
bystanders or the operator.
people, animals, windows or automobiles. Always direct
blowing debris away from people, animals, windows or
automobiles.
objects, such as trees, walls, fences, etc. When
possible, blow away from such objects, not toward
them.
of the blown air could damage tender plants.
while the unit is running.
moving parts and openings.
SAVE THESE INSTRUCTIONS

6 WWW.SENIXTOOLS.COM
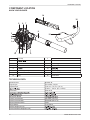
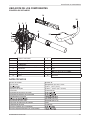
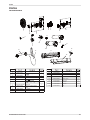
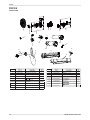
COMPONENT LOCATION
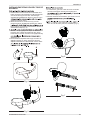
KNOW YOUR BLOWER
COMPONENT LOCATION
1 fuel cap 2 primer bulb
3 4 air cleaner
5 handle 6 throttle trigger
7 ON/OFF switch 8 air tube
9 10
11 lubricating oil cap 12 starter rope grip
13 lower handle 14 vacuum tube
15 bag 16 curved tube
65
8
3
7
4
2
16
14
12 10 1113 9
15
1
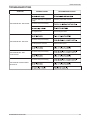
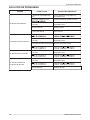
TECHNICAL DATA
Model Number BLV4QL-M
Engine Type Air-Cooled, 4-Cycle
Displacement 1.62 cu in. 1.9 cu in. (31 cc)
0.025 in. - 0.30 in. (0.6 - 0.8mm)
Lubrication SAE 30 Oil
Blowing Air Speed
Volume of Air Moved 425 CFM (720 m
3
/h)
Vacuum Air Flow Max 550 CFM (930 m
3
/h)
Mulch Reduction Ratio 10:01
Bag Capacity 1.37 bushel
Blower Weight(no fuel)
Vacuum/Mulcher Weight(no fuel)

7WWW.SENIXTOOLS.COM
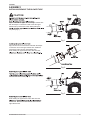
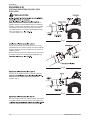
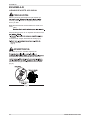
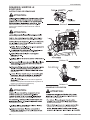
Fig. 1
Fig. 2
Fig. 3
ASSEMBLY
INSTALLING/REMOVE THE BLOWER TUBE
ASSEMBLY
Align the slots on the upper end of the upper blower tube
with the bumps on the blower outlet .Insert the upper
blower tube into the blower outlet. While holding the
into place (Fig. 1).
Align the slots on the lower blower tube with the bumps
on the lower end of the upper blower tube. Install the
lower blower tube onto the upper blower tube .
While holding the upper blower tube, twist the lower
tube from the blower outlet (Fig. 3).
While holding the upper blower tube, twist the lower
blower tube. Remove the lower blower tube from the
upper blower tube.
CAUTION:

8 WWW.SENIXTOOLS.COM
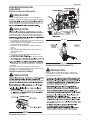
Fig. 4
Fig. 5
Fig. 7
Fig. 6
ASSEMBLY
INSTALLING/REMOVE THE VACUUM TUBE
of bag. See complete assembly picture in FIG. 4 for
Velcro strap.
2. Align the slots in the curved tube (C) with the with the
bumps on the blower outlet (D) Slide the tube on and
assembled the tube will curve downward (Fig.5).
wrench ( provided ) vertically into the slot of the air
4. Assemble the lower vacuum tube (E) onto the upper
vacuum tube (F), ,then insert the assembled vacuum
of the machine and turn the E and F parts of the whole
vacuum tube away. (Fig.7)
2. While holding the machine, twist the the curved tube
( Fig.5)
(Fig.4)
A
B
DC
F E

9WWW.SENIXTOOLS.COM
ADDING OIL: INITIAL USE
oil. Failure to use clean oil of the correct type can cause
premature engine wear and failure.
has a four-cycle engine. DO NOT mix oil with gasoline.
oil.
(Fig. 8)
Oil must be added before starting the unit.
Fig. 8
CAUTION:
WARNING:
ASSEMBLY
ASSEMBLY

10 WWW.SENIXTOOLS.COM
OPERATION
STARTING INSTRUCTIONS
STOPPING INSTRUCTIONS
Operate this unit only in a well-ventilated outdoor area.
Carbon monoxide exhaust fumes can be lethal in a
avoid serious injury, the operator and the unit must be in
a stable position when pulling the starter rope.
Clear the area of children bystanders, and pets. At a
should be encouraged to wear eye protection. If you are
approached, stop the engine.
While vacuuming or blowing debris, hold the unit with the
people, animals, windows, automobiles or loose debris.
Be sure to read the fuel information in the safety rules
before you begin. If you do not understand the safety
rules, do not attempt to fuel your unit.
3. Slowly press and release the primer bulb 10 times
(Fig. 10).
(Fig. 10 ).
starting position (Fig. 11).
rope with a controlled and steady motion 3 to 5 times to
start the engine (Fig. 11).
7. Allow the engine to warm up less than 10 seconds,
Note: There is no need to turn the unit on. The On/Off
switch is in the ON ( I ) position at all times (Fig. 9).
1. Release the throttle control and allow the engine to
idle.
2. Press and hold the On/Off switch in the OFF (STOP)
position until the engine comes to a complete stop.
rotating parts, stop the engine before installing or
removing attachments. Do not operate without guard(s)
in place.
not early in the morning or late at night when people
might be disturbed. Comply with times listed in local
ordinances. Usual recommendations are 9:00 a.m. to
5:00 p.m., Monday through Saturday.
lowest possible throttle speed to do the job.
water is available.
hoses for many lawn and garden applications, including
areas such as gutters, screens, patios, grills, porches,
and gardens.
Fig. 9
Fig. 10
Fig. 11
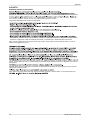
OPERATING TIPS
STARTING / STOPPING THE BLOWER
CAUTION:
CAUTION:
CAUTION:
CAUTION:

11WWW.SENIXTOOLS.COM
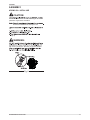
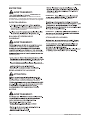
Fig. 12
washed cars. Blow debris away safely.
Dispose of debris in trash receptacles.
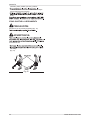
OPERATION
Stand in the operating position (Fig. 12). Stand up
straight. Do not bend over.
To prevent serious personal injury or damage to the unit,
DO NOT hold the unit at your side (Fig. 12) The engine
(Fig. 12)
HOLDING THE UNIT
CAUTION:
WARNING:

12 WWW.SENIXTOOLS.COM
MAINTENANCE
MAINTENANCE
GENERAL MAINTENANCE
FUEL CAP AND TANK AND LINES
SPARK PLUG REPLACEMENT
CHANGING ENGINE LUBRICANT
NOTE: Drain the lubricant while the engine is still warm
more completely.
NOTE: Used lubricant should be disposed of at an
approved disposal site. See your local retailer for
more information.
Engine Lubricant section previously in this manual.
Reinstall the engine cover. Replace the screws and
tighten securely.
1. Avoid using solvents when cleaning plastic parts. Most
plastics are susceptible to damage from various types
of commercial solvents and may be damaged by their
use.
2. Use clean cloths to remove dirt, dust, lubricant, grease,
etc.
Read the ENTIRE IMPORTANT SAFETY INFORMATION
section at the beginning of this manual including all
text under subheading therein before maintenance this
product.
serious personal injury.
threading will seriously damage the product.
plug with .025 in. electrode gap. Use a recommended or
Do not change engine lubricant while it is hot. Accidental
contact with hot engine lubricant could result in serious
burns.
performance. If performance improves when the fuel
clogged.
To change the engine lubricant:
before proceeding.
cover and set aside.
WARNING:
WARNING:
CAUTION:
WARNING:
Clean all foreign material from the product. Store idle unit
indoors in a dry, well-ventilated area that is inaccessible
to children. Keep away from corrosive agents such as
garden chemicals and deicing salts.
Abide by all ISO and local regulations for the safe storage
and handling of gasoline.
STORING THE PRODUCT

13WWW.SENIXTOOLS.COM
TROUBLESHOOTING
TROUBLESHOOTING
SYMPTOM POSSIBLE CAUSE RECOMMENDED ACTIONS
THE ENGINE WILL NOT START
The primer bulb was not pressed
enough Press the primer bulb 10 times
The fuel is old (over 30 days)
The engine is hot Cool the engine down
THE ENGINE WILL NOT IDLE
The fuel is old (over 30 days)
The idle speed is incorrect Adjust the idle speed
THE ENGINE WILL NOT
ACCELERATE
The fuel is old (over 30 days)
THE ENGINE LACKS POWER
OR STALLS
The fuel is old (over 30 days)

14 WWW.SENIXTOOLS.COM
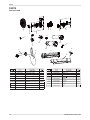
PARTS
PARTS
EXPLODED VIEW
1
8
9
10
11
12
19
18
17
13
15
16
14
23
54
76
11 207180200023 1
12 202094000239 Lance 2 1
13 202094000224 Bend Tube 1
14 199999001291 1
15 299010000024 Dust Bag 1
16 202154000006 Bend Tube 1
17 202155000025 Blowpipe 1
18 202155000024 Blowpipe 1
19 201045000180 blade 1
1 207109900127 Blades 1
2 199999001301 Starter Bowl Assembly 1
3 199096000077 Starter 1
4 202083001017 Cover 1
5 8326-950201-0000010 Air Filter Net 1
6 199999001395 1
7 8613-982001-0000001 Carburetor 1
8 199999001396 Oil Ruler Component
9 199037000036 Ignitor
10 202037000005 Cage

15WWW.SENIXTOOLS.COM
WARRANTY
WARRANTY
LIMITED THREE-YEAR WARRANTY
This warranty does not cover normal wear of parts and components such as cutting chain, line or blades nor does this
warranty cover product transportation cost for warranty or service.
are limited to three years from the date of purchase on power tools and chargers and seven years on batteries. The
not allow limitations on how long an implied warranty lasts and/or do not allow the exclusion or limitation of incidental
and you may also have other rights which vary from state to state or province to province.
ines any responsibility in regard to civil liability arising from abusive use or not in conformity with
proper use and maintenance of the machine as described in the operator’s manual.
After the purchase, the manufacturer recommends proper maintenance of the machine and to read the operator’s
manual before using the machine.
For customer service contact us toll free at 1-800-261-3981 or Senixtools.com.
, AZ 85260
Warranty is subject to the following conditions:
of proper installation and improper maintenance or storage.
To locate your nearest Senix service provider call toll free at 800-261-3981 or email us at service@senixtools.com.

Manual del operador
Modelo: BLV4QL-M
Para el servicio de atención al cliente, llame al 1-800-261-3981 o envíe un email a:
GUARDE ESTE MANUAL PARA FUTURAS CONSULTAS.

17WWW.SENIXTOOLS.COM
SEGURIDAD Y SÍMBOLOS INTERNACIONALES
aparecer en este producto. Lea el manual del operador para obtener información completa sobre seguridad,
montaje, operación y mantenimiento y reparación.
SÍMBOLO DE ALERTA DE
SEGURIDAD
Indica peligro, advertencia o precaución.
símbolos o pictogramas.
CONTROL DE PARADA DE
ENCENDIDO/APAGADO
ENCENDIDO/ARRANQUE/
FUNCIONAMIENTO
CONTROL DE PARADA DE
ENCENDIDO/APAGADO
APAGADO o PARADA
PERILLA DE CEBADO
Presione la perilla de cebado, despacio y
hasta el tope, 10 veces.
CONTROL DEL ESTRANGULADOR
FUNCIONAMIENTO
LOS OBJETOS PROYECTADOS
PUEDEN CAUSAR
LESIONES GRAVES
ADVERTENCIA:
proyectados a alta velocidad y causar
lesiones.
MANTENER ALEJADOS A LOS
TRANSEÚNTES
ADVERTENCIA:
Mantenga a todos los transeúntes,
al menos a 50 pies (15 m) del área de
operación.
SUPERFICIE CALIENTE
ADVERTENCIA:No
funcionamiento. Después de apagar la
herramienta permanecen calientes por
un cierto tiempo.
SOPLADORES - IMPULSOR GIRATORIO
LAS CUCHILLAS PUEDEN CAUSAR
LESIONES GRAVES
ADVERTENCIA:Detenga
antes de cambiar los tubos, limpiarla o
Mantenga las manos y los pies alejados de
las partes móviles.
LEER EL MANUAL DEL OPERADOR
ADVERTENCIA:Lea el
manuales del operador y siga todas las
advertencias e instrucciones de
seguridad. Si no lo hace, el operador y/o
los transeúntes pueden sufrir lesiones
graves.
USAR PROTECCIÓN OCULAR Y AUDITIVA
ADVERTENCIA:Los
objetos proyectados
y el ruido fuerte pueden causar
lesiones y pérdida auditiva. Use
protección
ocular conforme con los estándares
actuales ANSI/ISEA
Z87.1 y protección auditiva al operar
esta herramienta. Use un protector facial
completo cuando sea necesario.
USAR PROTECCIÓN PARA LAS
MANOS
Use guantes de trabajo robustos para
proteger las manos.
USAR PROTECCIÓN PARA LOS PIES
y resistentes a perforaciones.
COMBUSTIBLE SIN PLOMO
Utilice siempre combustible sin plomo,
nuevo y limpio.
ACEITE
Consulte el manual del operador para
conocer el tipo adecuado de aceite.
NO UTILICE COMBUSTIBLE E85 CON
ESTA HERRAMIENTA
ADVERTENCIA: Se
anulará la garantía.
SEGURIDAD

18 WWW.SENIXTOOLS.COM
ÍNDICE
SEGURIDAD........................................................................... 19
UBICACION DE LOS COMPONENTES..................................21
DATOS TECNICOS................................................................ 21
ENSAMBLAJE........................................................................ 22
OPERACIÓN.... ..................................................................... 25
MANTENIMIENTO. ............................................................... 27
SOLUCIÓN DE PROBLEMAS................................................ 28
PIEZAS.................................................................................... 29
GARANTÍA.............................................................................. 30
ÍNDICE

19WWW.SENIXTOOLS.COM
SEGURIDAD
La seguridad es una combinación de sentido
común, mantenerse alerta y saber cómo funciona su
herramienta. CONSERVE ESTAS INSTRUCCIONES DE
SEGURIDAD.
antes de llenar el depósito de combustible. Nunca
siempre el tapón del depósito de combustible
antes de llenarlo.
2. Agregue siempre combustible en un área limpia y bien
ventilada al aire libre donde no haya chispas ni llamas.
NO fume.
3. Nunca utilice la herramienta sin el tapón del depósito
del combustible bien cerrado.
4. Evite crear una fuente de ignición al derramar
combustible. Limpie el combustible derramado de la
herramienta inmediatamente, antes de arrancarla.
Lleve la herramienta al menos 30 pies (9,1 m) de la
fuente de combustible y del lugar del derrame antes de
arrancar el motor. NO fume.
los gases de escape puede matar. Utilice esta
herramienta solo en un área exterior bien ventilada.
precauciones al usarlo para disminuir la posibilidad de
sufrir lesiones personales graves.
2. Almacene el combustible en un área fresca y bien
llamas.
4. Reposte solo al aire libre y no fume mientras lo hace.
5. Eche combustible antes de arrancar el motor. Nunca
retire el tapón del depósito de combustible ni eche
combustible mientras el motor está en marcha o
cuando el motor esté caliente.
6. No fume mientras manipula el combustible.
escape alrededor de la tapa.
8. Cierre bien el tapón del depósito del combustible
después de repostar.
9. Limpie el combustible derramado de la herramienta.
Aléjese 30 pies (9,1 m) del sitio de reabastecimiento
antes de arrancar el motor.
ninguna circunstancia.
11. Para reducir el riesgo de lesiones por incendio y
12. Si se derrama combustible, no intente arrancar el
motor, aleje la herramienta del área de derrame y
vapores del combustible se hayan disipado.
13. Vuelva a cerrar bien los tapones del depósito del
combustible y de su recipiente.
14. Vacíe el depósito de combustible en un recipiente
homologado para gasolina y asegure la herramienta
un vehículo.
15. Para vaciar el depósito de combustible, utilice
un recipiente de almacenamiento de combustible
homologado y hágalo en un área bien ventilada.
16. Seleccione un suelo desnudo, detenga el motor y
17. Conserve estas instrucciones. Consúltelas con
puedan usar esta herramienta. Si le presta a alguien
esta herramienta, préstele también estas instrucciones.
estándares ANSI/ISEA Z87.1 actuales y estén marcados
como tales. Use protección de oreja/oído cuando utilice
esta herramienta. Use una protección facial o una
mascarilla de polvo si la operación es polvorienta.
camisa de manga larga. No use ropa suelta, joyas,
SEGURIDAD
ADVERTENCIA DE SEGURIDAD PARA LA
HERRAMIENTA DE GASOLINA
REPOSTADO DE COMBUSTIBLE
DURANTE EL USO
Almacene el combustible únicamente en recipientes
almacenamiento de dichos materiales.
instrucciones de seguridad. Lea estas instrucciones antes
del operador y de los transeúntes. Conserve estas
instrucciones para su uso posterior.
ADVERTENCIA:
ADVERTENCIA:
ADVERTENCIA:
1. Lea atentamente las instrucciones. Familiarícese con
los controles y el uso adecuado de la herramienta.
2. No utilice esta herramienta cuando esté cansado,
los medicamentos.
Los adolescentes deben ser entrenados,
instrucción adecuada.
4. Todos los protectores y accesorios de seguridad
herramienta.
5. Inspeccione la herramienta antes de usarla. Sustituya
6. Tenga en cuenta el riesgo de sufrir lesiones en la
7. Inspeccione cuidadosamente el área antes de
arrancar la herramienta. Retire piedras, vidrios rotos,
salir proyectados o enredarse con la herramienta.
manténgalos fuera de un radio de 50 pies (15 m),
como mínimo. Incluso entonces, todavía están en
salir proyectados. Anime a los transeúntes a usar
protección para los ojos. Si se le acerca alguien,
detenga inmediatamente la herramienta.
vuelve automáticamente a la posición de ralentí.
Realice todos los ajustes o reparaciones antes de
haga funcionar el motor a una velocidad excesiva.
ocasional.

20 WWW.SENIXTOOLS.COM
SEGURIDAD
el cabello si lo tiene a la altura de los hombros.
operador y la herramienta deben estar en una posición
especial cuidado al trabajar en escaleras, pendientes
pronunciadas o inclinaciones. Para evitar lesiones
graves, no opere la herramienta mientras esté en una
escalera o en un tejado.
las partes móviles.
calientan mucho de la operación, incluso después de
apagar la herramienta.
herramienta a alta velocidad cuando no esté en uso.
seguro cuando se utilice a la velocidad prevista.
herramienta inmediatamente y compruebe si presenta
operaciones de mantenimiento o reparaciones.
herramienta y anular la garantía.
partes móviles.
Mantenga el motor y el silenciador libres de hierba,
hojas, grasa excesiva o acumulación de carbono.
deténgala de inmediato. Inspeccione la herramienta
en busca de la causa de la vibración. La vibración es
generalmente un indicador de problemas.
SIGUE ESTAS REGLAS MIENTRAS OPERA EL
SOPLADOR
REGLAS ESPECIFICAS PARA EL SOPLADOR
ADVERTENCIA:
Mantenga las aberturas de aire libres de polvo, pelusas,
de aire.
mientras esté en funcionamiento. Los escombros
pueden ser recogidos por la toma de aire y arrojados
a la herramienta o a la propiedad, o lesiones graves a
los transeúntes o al operador.
en la dirección de personas, animales, ventanas o
automóviles. Nunca dirija el soplado de residuos
hacia las personas, los animales, las ventanas o los
automóviles.
de objetos sólidos, como árboles, paredes, cercas,
dichos objetos.
plantas tiernas.
obstruida mientras la herramienta está funcionando.
partes del cuerpo lejos de las partes móviles y de las
aberturas.
CONSERVE ESTAS
INSTRUCCIONES
La page est en cours de chargement...
La page est en cours de chargement...
La page est en cours de chargement...
La page est en cours de chargement...
La page est en cours de chargement...
La page est en cours de chargement...
La page est en cours de chargement...
La page est en cours de chargement...
La page est en cours de chargement...
La page est en cours de chargement...
La page est en cours de chargement...
La page est en cours de chargement...
La page est en cours de chargement...
La page est en cours de chargement...
La page est en cours de chargement...
La page est en cours de chargement...
La page est en cours de chargement...
La page est en cours de chargement...
La page est en cours de chargement...
La page est en cours de chargement...
La page est en cours de chargement...
La page est en cours de chargement...
La page est en cours de chargement...
La page est en cours de chargement...
La page est en cours de chargement...
La page est en cours de chargement...
La page est en cours de chargement...
La page est en cours de chargement...
-
 1
1
-
 2
2
-
 3
3
-
 4
4
-
 5
5
-
 6
6
-
 7
7
-
 8
8
-
 9
9
-
 10
10
-
 11
11
-
 12
12
-
 13
13
-
 14
14
-
 15
15
-
 16
16
-
 17
17
-
 18
18
-
 19
19
-
 20
20
-
 21
21
-
 22
22
-
 23
23
-
 24
24
-
 25
25
-
 26
26
-
 27
27
-
 28
28
-
 29
29
-
 30
30
-
 31
31
-
 32
32
-
 33
33
-
 34
34
-
 35
35
-
 36
36
-
 37
37
-
 38
38
-
 39
39
-
 40
40
-
 41
41
-
 42
42
-
 43
43
-
 44
44
-
 45
45
-
 46
46
-
 47
47
-
 48
48


Senix BLV4QL-M Le manuel du propriétaire
- Catégorie
- Souffleurs / sécheurs d'air
- Taper
- Le manuel du propriétaire
dans d''autres langues
- English: Senix BLV4QL-M Owner's manual
- español: Senix BLV4QL-M El manual del propietario


