Braun BUA 7200 Le manuel du propriétaire
- Catégorie
- Unités de pression artérielle
- Taper
- Le manuel du propriétaire


H
B
A
D
C
I
E
J
G
F
1
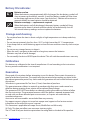
www.hot-europe.com
This product is manufactured under a licence to the
‘Braun’ trademark. ‘Braun’ is a registered trademark
of Braun GmbH, Kronberg , Germany.
The Bluetooth® word mark and logos are registered
trademarks owned by Bluetooth SIG, Inc., and any
use of such marks is under licence.
App Store is a service mark of Apple Inc., registered
in the U.S. and other countries.
Google Play and the Google Play logo are
trademarks of Google Inc.
Kaz Europe Sàrl
Place Chauderon 18
CH-1003 Lausanne
Switzerland
Printed in China
© 2017, All rights reserved
BUA7200WE P/N A000496R0 12SEP17
Braun ActivScan
™
9
BUA7200
Upper arm blood pressure monitor
Product description
English ...........................2
Deutsch ......................14
Español .......................26
Français ......................38
Italiano .......................50
Nederlands ...............62
Português ..................74
GB
DE
ES
FR
IT
NL
PT
Downloaded from www.Manualslib.com manuals search engine

2
Intended use of the Braun ActivScan
™
9
ActivScan
™
9 is a blood pressure monitor that has been developed for accurate, comfortable
and intuitive blood pressure measurements from the upper arm.
What you should know about blood pressure
Blood pressure constantly changes throughout the day. It rises sharply in the early morning and
declines during the late morning. Blood pressure rises again in the afternoon and finally drops
to a low level at night. It may also vary over a short period of time. Therefore readings from
successive measurements may fluctuate.
This device will display your blood pressure reading referring to two values: systolic and diastolic.
The systolic blood pressure (the upper number) indicates how much pressure your blood is
exerting against your artery walls when the heart beats. The diastolic blood pressure (the lower
number) indicates how much pressure your blood is exerting against your artery walls while the
heart is resting between beats. The pulse value is also displayed after each measurement.
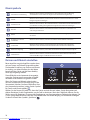
The ESH (European Society of Hypertension) and WHO (World Health Organisation) have set up
the following standard blood pressure values when measured with a resting pulse at home:
Blood pressure
(mmHg)
Too
low
Normal
values
Grade 1
mild
hypertension
Grade 2
moderate
hypertension
Grade 3
severe
hypertension
SYS = systole
(upper value)
below 100 up to 134 135-159 160-179 ≥180
DIA = diastole
(lower value)
below 60 up to 84 85-99 100-109 ≥110
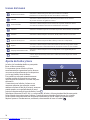
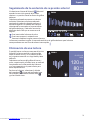
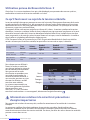
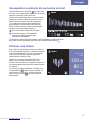
For every measurement displayed
on the screen, the associated colour
(from green to red) will indicate the
corresponding blood pressure level.
You can use this classification daily
to help you understand your blood
pressure. If you are really concerned
by the classification, you should
consult your doctor.
The guidance levels set by the
World Health Organisation are also
available directly on the ActivScan™ 9
blood pressure monitor. If you wish
to consult the colour-coded chart on
your device, select the Information tab
.
Safety information and important precautions
To ensure accurate measuring results, read the complete instructions for use carefully.
People suffering from cardiac arrhythmia, vascular constriction, arteriosclerosis in the extremities,
diabetes or users of cardiac pacemakers should consult their doctor before measuring their blood
pressure themselves. Deviations in blood pressure values may occur in such cases.
180+ 110+
160-179 100-109
135-159
85-99
< 85
< 135
and
or
or
or
SYS
(mmHg)
DIA
(mmHg)
Green >
Yellow >
Orange >
Red >
Downloaded from www.Manualslib.com manuals search engine

3
English
If you are under medical treatment or taking any medication, please consult your doctor first.
The use of this blood pressure monitor is not intended as a substitute for a consultation with
your doctor.
Key rules for accurate blood pressure measurement
Always take readings at the same time of day, under the same conditions.
Do not take a measurement within 30 minutes of smoking, drinking coffee or tea or any form
of exertion. These factors will influence the measurement.
Always measure on the same arm. The left arm is recommended.
Place the cuff in direct contact with the skin. Do not wrap the cuff over a jacket, sweater or shirt.
If you want to take multiple measurements, wait approximately 3 minutes before repeating
a measurement.
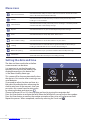
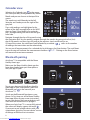
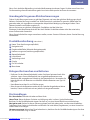
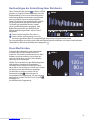
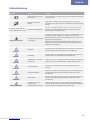
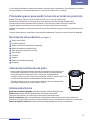
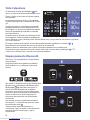
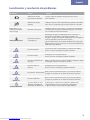
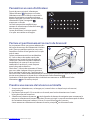
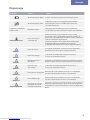
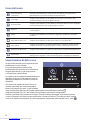
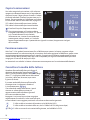
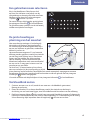
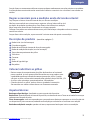
Product description (see Page 1)
A
Home button (touch-sensitive)
B
Navigation dial
C
Enter button (centre of navigation dial)
D
Heart measurement button (touch-sensitive)
E
Battery compartment cover
F
Air hose
G
Connector
H
Display
I
On/Off button
J
Cuff
Inserting/replacing batteries
• Remove the battery compartment cover by sliding it horizontally to the
left. Insert the four batteries supplied with this product, with polarity
as indicated in the battery compartment. When replacing batteries,
use alkaline batteries exclusively, type AA/LR6, 1.5V.
• New batteries will provide approximately 350 measurements.
• When replacing batteries, all readings saved in memory are preserved
but date and time must be set again.
The basics
On/Off button: located at the top of the device.
Home button: When home is available this icon will be lit. Simply touch or tap this button takes you back
to the home screen menu.
Navigation dial: turn this control to the left or right to go through the different functions of your device
and press in the centre (Enter button) to select or confirm a choice.
Heart measurement button: When lit, touch or tap this button will start a measurement.
Downloaded from www.Manualslib.com manuals search engine

4
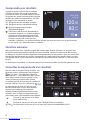
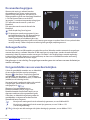
Menu icons
Take a measurement
Select this function and press enter to take a measurement. This function is the
same as the Heart measurement button (D)
History
Select this function to view the history and the trend of your blood pressure
readings in a coloured chart
Calendar View
Select this function to view your blood pressure readings in a month by month
calendar view with coloured daily averages
Reports Select this function to see your 7/14/30 day blood pressure averages
Users Select this function to select, add, edit or delete a user
Date and time setting Select this function to set the date and time on your device
Settings
Select this function to enable/disable the guided animations when taking a
reading or enable/disable the user selection when turning on
Bluetooth® pairing Select this function to pair your device with the Braun Healthy Heart app
Information
Select this function to obtain more information about the blood pressure colour
chart and how to take a blood pressure reading correctly
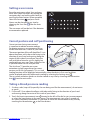
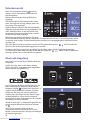
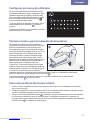
Setting the date and time
The date and time need to be set before
a measurement can be taken.
It is important to set the date and time
correctly to ensure that the readings are
displayed correctly on this device and
in the Braun Healthy Heart app.
This screen will be shown automatically when
the device is first used or after inserting a new
set of batteries.
If you need to adjust the date and time at a
later date (for example when advancing the
clock by one hour in the summer), then you
can access this screen from the main menu
by selecting the date and time icon
.
Choose the format (EU or US), then the date and time by turning the navigation dial.
Press the Enter button to activate the field. When the field flashes you can adjust the numbers.
Press the Enter button to confirm the number entered and the cursor will jump to next field.
Repeat the process. When completed, confirm by selecting the 'Save' icon
.
Downloaded from www.Manualslib.com manuals search engine

5
Setting a user name
From the main menu select User and press
Enter. Now select the letters by turning the
navigation dial, and confirm each letter by
pressing the Enter button. When complete,
select the Save icon and press Enter.
Names can be changed at any time by
choosing the User icon
from the main
menu.
The user name will not be lost if the batteries
are removed or replaced.
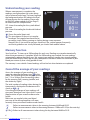
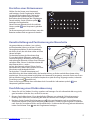
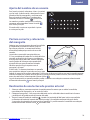
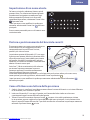
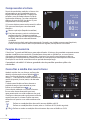
Correct posture and cuff positioning
Correct posture during measurement
is important to obtain accurate readings.
For greater accuracy, we recommend using
the left arm because it's closer to your heart.
The correct position of the cuff should be 2-3 cm
above the elbow, with tube outlet facing in the
direction of your hand and running along the
centre of the inside of your elbow, close the
cuff with Velcro fasterner so it fits tightly but
comfortable on your arm. There should not be
a space between the cuff and your arm.
The ActivScan™ 9 provides on-screen
animations to help you achieve the correct
posture and fit the cuff properly. This assisted
reading function will be displayed automatically when the device is first used and then
can be displayed optionally before each reading by selecting the Settings icon
.
The on-screen animation guide can also be viewed at any time by choosing the Information
icon
from the main menu.
Taking a blood pressure reading
1. Sit down, relax, keep still (especially the arm being used for the measurement), do not move
or speak.
2. Fit the cuff 2-3 cm above the elbow, with tube outlet facing in the direction of your hand
and running along the centre of the inside of your elbow.
3. Touch the heart measurement icon
located to the left of the dial to start a measurement
or select the heart button in the main menu. The measurement starts after 3 seconds of
on-screen countdown animation. It is possible to cancel the measurement at any time by
touching the Home button or the Enter button.
3
English
Downloaded from www.Manualslib.com manuals search engine

6
Understanding your reading
When a measurement is complete, the
readings are displayed on the screen along
with a coloured heart logo. The heart logo and
the background colour will indicate the level
of hypertension for the reading. Please refer
to the WHO colour-coded chart (on Page 2)
to understand this interpretation.
SYS: shows the reading for the systolic blood
pressure
DIA: shows the reading for the diastolic blood
pressure
Shows the pulse (heart rate)
This icon appears if there is an irregular
heartbeat. An irregular heartbeat can be
caused by simply talking, moving or shaking during a measurement.
Normally this is not cause for concern. However if the symbol appears frequently,
and these guidelines are strictly followed, you should seek medical advice.
Memory function
Your ActivScan
™
9 stores up to 200 readings for each user. Readings are stored automatically
when the measurement is complete. When the 200 readings are reached, the new readings
automatically replace the oldest ones. We suggest you regularly transfer your stored readings
onto the Braun Healthy Heart app on your Smartphone in order to follow the evolution of your
blood pressure easily over a long period of time.
The memory is non-volatile. Stored readings will not be lost when batteries are replaced.
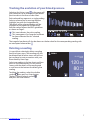
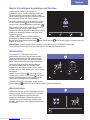
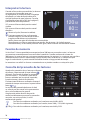
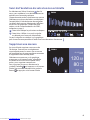
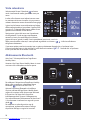
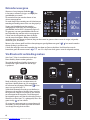
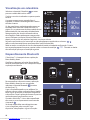
Consult the average of your readings
Access the averages of your readings as a
report by selecting the Report icon in the
menu. This function gives the averages for the
last 7, 14 or 30 days from the readings taken
for the morning (left), evening (middle) and
the whole day (right).
The total number of readings taken during the
time period is displayed at the bottom and is
shown as
.
Consulting the average of your readings will
give you a blood pressure value which is more
representative of your overall cardiovascular
health.
Make sure you regularly take your blood
pressure so the average numbers will more
accuratly show your overall cardiovascular health.
Refers to measurements taken in the morning, between 04:00 and 09:59
Refers to measurements taken in the evening between 19:00 and 01:59 (on the next day)
24h
Refers to all measurements taken during the day, between 00:00 to 23:59
EMMA
mmHg
70
80
mmHg
120
SYS
DIA
4:56 PM
03-25-2016
18-12-2016 — 25-12-2016
75
140
90
SYS
DIA
7 14 30
14
mmHg
mmHg
mmHg
80
160
100
SYS
DIA
mmHg
mmHg
mmHg
70
120
80
SYS
DIA
mmHg
mmHg
mmHg
24h
Downloaded from www.Manualslib.com manuals search engine

7
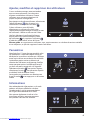
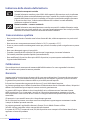
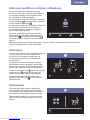
Tracking the evolution of your blood pressure
Selecting the History icon in the menu will
give you access to an overview of your blood
pressure data in the form of a bar chart.
Each coloured bar represents a single reading.
Select a coloured bar by moving the blue
highlight box with the navigation dial.
The details of the selected reading will be
displayed at the bottom of the bar chart.
Each bar colour follows the WHO guidelines
as shown on Page 2.
This icon indicates the pulse reading.
This icon appears if an irregular heartbeat
has been detected for this selected
reading.
The irregular heartbeat will also be shown on the bar chart for the corresponding reading with
an interrupted coloured bar
.
Deleting a reading
It is possible to selectively delete a reading
from the history view. That reading will also
be deleted from all other views and will not
be transfered at next connection with your
Braun Healthy Heart App.
Select one reading in the bar chart, and then
press on the Enter button: this will show a
screen with the details of the reading and
a small icon at the bottom for deleting that
reading.
To delete the reading, select the dustbin
symbol
then press on Enter button.
To abort, select the back symbol
and press on Enter button.
EMMA
EMMA
mmHg
70
80
mmHg
120
SYS
DIA
16:56
03-25-2016
English
Downloaded from www.Manualslib.com manuals search engine

8
Calendar view
Selecting the Calendar icon in the menu
will show your daily average month by month.
Month and year are shown at the top of the
screen.
The week starts with Monday to the left;
Saturday and Sunday are to the right of the
grey line.
Days with readings are highlighted in the
colour of the daily average (refer to the WHO
chart on Page 2) and details of a particular
day's average reading are shown on the right
hand side.
Navigate through the days of the month using
the navigation dial. You can quickly navigate through the months by going to the first (last)
day of the month, and then you will jump to the previous (next) month and so on.
On top of the screen, the small heart icon followed by a number
refers to the number
of readings that were taken on the selected day.
You can see all measurements for a selected day by clicking on the Enter button. The small heart
icon at the top will indicate the measurement numbers
1/2
. Clicking on the Enter button
will move to the next measurement.
Bluetooth pairing
ActivScan™ 9 is comptabile with the Braun
Healthy Heart app.
Make sure the Braun Healthy Heart app has
been downloaded onto your Smartphone
and your app is open.
To pair your device with the Braun Healthy
Heart app on your Smartphone, select the
Bluetooth icon
in the menu of your
ActivScan™ 9.
Switch on the Bluetooth function on your
phone. At first time use of the Braun Healthy
Heart app, follow the on-screen instructions
to pair your device. Both app and device will
show that the connection is in progress.
When your ActivScan™ 9 is successfully paired,
the screen will display a green tick mark
.
If you want to pair another device with your
smartphone, go to the ‘Connect device’ section
of the app and follow the instructions.
03-13-16
EMMA
mmHg
75
90
DIA
mmHg
140
SYS
16:56
2
EMMA
EMMA
Downloaded from www.Manualslib.com manuals search engine

9
Adding, editing and deleting users
Adding a second user is necessary if you want
to share this blood pressure monitor with
another person. Each user will have his/her
own saved memories and averages.
To add a second user, select the Users icon
in the menu and then select the Add User
icon .
If two users are already created, select a user
by choosing the corresponding orange or
blue icon; the user's name is displayed below
the icon.
Once selected, confirm the user with check
mark. You can edit the user's name
or
delete that user , using the small icons at
the bottom the screen.
Warning: deleting a user deletes all blood pressure readings and averages for that user as well
as deleting the user name.
Settings
Your ActiveScan™ 9 can be customized to
your preferences. The first option enables
or disables the animated instructions which
are shown before taking a blood pressure
measurement.
The second option enables or disables the
user selection at power-on. Note that this
option has only an effect when two users are
active on the device.
Select the check mark
to enable the option;
select the cross to disable the option and
validate option with Enter button.
Save you settings by selecting the big
checkmark sign
and press Enter button.
Information
Get information about the color coding
used for displaying measurement results.
This color coding follows the World Health
Organisation guidelines.
You can also see here the animated
instructions on how to take accurate blood
pressure measurement.
EMMA
English
Downloaded from www.Manualslib.com manuals search engine

10
Battery life indicator
Batteries are low
When the batteries are approximately 80% discharged, the low battery symbol will
show at power-up for about 6 seconds. A small low battery symbol will then show
on the upper right corner of the screen. Your ActivScan® 9 device will continue to
measure reliably, but new batteries should be obtained.
Batteries are empty — replacements required
When the batteries are fully discharged, the empty battery symbol will show
at power-up for about 6 seconds and then device will automatically shut off.
You cannot take any readings and must replace the batteries.
Storage and cleaning
• Do not place/leave the item in direct sunlight, at high temperatures or in damp and dusty
places.
• Do not store at extremely low (less than -20 °C) or high (more than 55 °C) temperatures.
• Use a damp cloth or a mild cleansing agent to clean the case and then use a dry cloth to wipe
it dry.
• Do not use any strong cleansers to clean it.
• When the unit is not going to be used for a long time, remove the batteries.
(Batteries may leak or cause damage).
• Do not modify the device. NEVER open the device! This will void the manufacturers warranty.
Calibration
This device was calibrated at the time of manufacture. If used according to the instructions
for use, periodic recalibration is not required.
Guarantee
Please read all instructions before attempting to use this device. Please retain the receipt as
proof of and date of purchase. The receipt must be presented when making any claim within
the relevant guarantee period. Any claim under the guarantee will not be valid without a proof
of purchase.
Your device is guaranteed for Two Years (2 Years) from date of purchase.
This guarantee covers defects in materials or workmanship that occur under normal use;
defective devices meeting these criteria will be replaced free of charge.
The guarantee DOES NOT cover defects or damage resulting from abuse or failure to follow
the user instructions. The guarantee becomes void if the device is opened, tampered with,
or used with non-Braun branded parts or accessories, or if repairs are undertaken by
unauthorised persons.
Accessories and consumables are excluded from any warranty.
For support requests, please visit www.hot-europe.com/support or find service contact
information at the end of this owner's manual.
This Guarantee is applicable to Europe, Russia, Middle East and Africa only.
UK Only: This does not affect your consumer statutory rights.
The LOT and SN of your device are printed on the rating label on the back of the product.
Downloaded from www.Manualslib.com manuals search engine

11
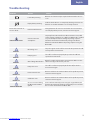
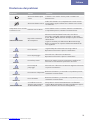
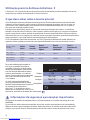
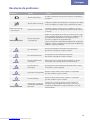
Troubleshooting
Problem Reason Solution
ERROR 0
ERROR 1
ERROR 2
ERROR 3
ERROR 255
ERROR 254
ERROR FIRMWARE
ERROR BLUETOOTH
Low battery warning
Batteries are low. Be ready to replace batteries with new ones
soon.
ERROR 0
ERROR 1
ERROR 2
ERROR 3
ERROR 255
ERROR 254
ERROR FIRMWARE
ERROR BLUETOOTH
Empty battery warning
Indicates that batteries are completely discharged. Insert new
batteries or check that batteries are correctly inserted.
Device does not turn on,
screen is black
Problem with batteries
Change batteries for new ones and make sure to insert them
correctly. If problem persists, contact consumer support.
ERROR 0
ERROR 1
ERROR 2
ERROR 3
ERROR 255
ERROR 254
ERROR FIRMWARE
ERROR BLUETOOTH
Cannot connect to
Smartphone
Stay away from radio interference like microwave ovens, WiFi
routers, laptop computers, etc... Make sure Bluetooth is enabled
on your Smartphone before starting the pairing sequence.
Follow the instructions for Bluetooth pairing in the Braun
APP and re-initiate the Bluetooth pairing sequence using the
Braun APP.
ERROR 0
ERROR 1
ERROR 2
ERROR 3
ERROR 255
ERROR 254
ERROR FIRMWARE
ERROR BLUETOOTH
Measuring error
The pulse signals on the cuff are too weak. Re-position the cuff
and repeat the measurement.
ERROR 0
ERROR 1
ERROR 2
ERROR 3
ERROR 255
ERROR 254
ERROR FIRMWARE
ERROR BLUETOOTH
Pumping error
The cuff is not fastened properly. Re-position the cuff and
repeat the measurement.
ERROR 0
ERROR 1
ERROR 2
ERROR 3
ERROR 255
ERROR 254
ERROR FIRMWARE
ERROR BLUETOOTH
Out of Range Results Error
Relax for a while and repeat the measurement. Make sure the
cuff is correctly positioned on your arm.
ERROR 0
ERROR 1
ERROR 2
ERROR 3
ERROR 255
ERROR 254
ERROR FIRMWARE
ERROR BLUETOOTH
Pump time error
The cuff is not fastened properly. Re-fit the cuff, and take a
measurement again.
ERROR 0
ERROR 1
ERROR 2
ERROR 3
ERROR 255
ERROR 254
ERROR FIRMWARE
ERROR BLUETOOTH
Device internal error
Remove and then reinsert the batteries. If the problem persists,
contact customer support.
ERROR 0
ERROR 1
ERROR 2
ERROR 3
ERROR 255
ERROR 254
ERROR FIRMWARE
ERROR BLUETOOTH
Calibration error
Remove and then reinsert the batteries. If the problem persists,
contact customer support.
ERROR 0
ERROR 1
ERROR 2
ERROR 3
ERROR 255
ERROR 254
ERROR FIRMWARE
ERROR BLUETOOTH
An error occurred during
the Bluetooth Firmware
update
Device will automatically restart using the original Bluetooth
firmware. Re-initiate the firmware download process or follow
the on-screen instruction from Braun APP.
English
Downloaded from www.Manualslib.com manuals search engine

12
Specifications
Model number BUA7200
Method of measurement Oscillometric
Blood pressure measurement range 40 ~ 255 mmHg
Pulse measurement range 40 ~ 199 beats/minute
Calibration accuracy Blood pressure: +/- 3 mmHg
Pulse rate: 4% of reading
Inflation/Deflation Automatic
Display Color TFT dot matrix display
Sets of memory Up to 200 readings per user
Cuff size Universal cuff: 22-42 cm (9-17 inch) min/max arm
circumference
Operating temperature +10 °C ~ + 40 °C, less than 85 % R.H. non-condensing
Storage temperature -20 °C ~ +55 °C, less than 85 % R.H. non-condensing
Unit weight 610g (excluding batteries)
Power source Alkaline battery: 4 x AA (LR6) 1.5V
Auto power off Approx. 60 seconds
Service life 5 years
Wireless communication Bluetooth® Smart
Frequency Range: 2.4GHz ISM Band (2400 - 2483.5 MHz)
Modulation: GFSK
Effective radiated power: <20dBm
Important
Read the operating instructions.
If the device is not used within the specified temperature, humidity and atmospheric
pressure ranges, the technical accuracy of the measurement cannot be guaranteed.
Classification:
Internally powered equipment
Type BF applied parts
Protected against solid foreign objects of 12.5 mm diameter and larger.
Protected against water drops falling vertically when the device is tilted up to 15°.
Not suitable for use in the presence of flammable anaesthetic mixtures with air, oxygen or nitrous
oxide.
Continuous operation with short-time loading.
10 °C
40 °C
Operating temperature Storage temperature
Storage humidity
Subject to change without notice.
Downloaded from www.Manualslib.com manuals search engine

13
This device conforms to the following standards:
EN 60601-1:2006/A1:2013: - General requirements for basic safety and essential performance.
EN 60601-1-2:2015 - Medical Electrical Equipment - Electromagnetic compatibility - Requirements
and tests.
EN 60601-1-11:2010 - Medical Electrical Equipment - Requirements for medical electrical
equipment and medical electrical systems used in the home healthcare environment.
EN 1060-3:1997 + A2:2009 - Non-invasive sphygmomanometers - Supplementary requirements
for electromechanical blood pressure measuring systems.
EN 1060-4:2004 - Non-invasive sphygmomanometers - Test procedures to determine the overall
system accuracy of automated non-invasive sphygmomanometers.
This product conforms to the provisions of the EC Directive 93/42/EEC
(Medical Device Directive).
This product carries the CE mark and is manufactured in conformity with the RoHS
Directive 2011/65/EU.
MEDICAL ELECTRICAL EQUIPMENT needs special precautions regarding EMC.
For a detailed description of EMC requirements please contact an authorised local Service Centre
(see guarantee) or visit www.hot-europe.com/support..
Portable and mobile RF communications equipment can affect medical electrical equipment.
This product contains batteries and recyclable electronic waste. To protect the
environment, do not dispose of it in household waste, but take it to appropriate local
collection centre.
English
Downloaded from www.Manualslib.com manuals search engine

14
Vorgesehene Verwendung des Braun ActivScan
™
9
ActivScan™ 9 ist ein Blutdruckmessgerät, das für genaue, bequeme und intuitive Blutdruckmessungen
am Oberarm entwickelt wurde.
Wichtige Informationen zum Blutdruck
Der Blutdruck ändert sich im Laufe des Tages ständig. Er steigt am frühen Morgen scharf an und nimmt
am späten Morgen ab. Der Blutdruck steigt wieder am Nachmittag und fällt dann über Nacht auf
einen niedrigen Wert ab. Er kann auch über einen kurzen Zeitraum schwanken. Aufeinanderfolgende
Messungen können daher voneinander abweichen.
Dieses Gerät zeigt Ihren Blutdruckwert mit Bezug auf zwei Werte an: den systolischen und den
diastolischen Blutdruck. Der systolische Blutdruck (die obere Zahl) zeigt an, wie viel Druck Ihr Blut
gegenüber Ihren Arterienwänden ausübt, wenn das Herz schlägt. Der diastolische Blutdruck (die untere
Zahl) zeigt an, wie viel Druck Ihr Blut gegenüber Ihren Arterienwänden ausübt, wenn das Herz zwischen
zwei Schlägen ruht. Auch der Pulswert wird nach jeder Messung angezeigt.
Die Europäische Hochdruckgesellschaft (ESH) und die Weltgesundheitsorganisation
Weltgesundheitsorganisation (WHO) haben die folgenden Standard-Blutdruckwerte definiert (bei
Ruhepuls):
Blutdruck
(mmHg)
Zu niedrig Normalwerte
Grad 1
Leicht erhöhter
Blutdruck
Grad 2
Erhöhter Blutdruck
Grad 3
Stark erhöhter
Blutdruck
SYS = Systole
(oberer Wert)
unter 100 bis 134 135-159 160-179 ≥180
DIA = Diastole
(unterer Wert)
unter 60 bis 84 85-99 100-109 ≥110
Bei jeder auf dem Bildschirm
angezeigten Messung zeigt die
dazugehörige Farbe (von Grün bis Rot)
das entsprechende Blutdruckniveau an.
Diese Klassifizierung hilft Ihnen dabei,
Ihren Blutdruck zu verstehen. Wenn Sie
sich über diese Klassifizierung wirklich
Sorgen machen, sollten Sie sich an
Ihren Arzt wenden.
Die Richtlinien der Weltgesundheits-
organisation sind auch direkt auf
Ihrem ActivScan™ 9 Blutdruckmonitor
zu finden. Wenn Sie die farbkodierte
Tabelle auf Ihrem Gerät einsehen
möchten, wählen Sie die
Informationsschaltfläche
.
Sicherheitshinweise und wichtige Vorsichtsmaßnahmen
Bitte lesen Sie die komplette Gebrauchsanweisung sorgfältig durch, um genaue Messergebnisse
gewährleisten zu können.
Personen, die unter Herzrhythmusstörungen, Gefäßverengungen, Arteriosklerose in den Extremitäten
oder Diabetes leiden oder einen Herzschrittmacher haben, sollten ihren Arzt konsultieren, bevor sie
beginnen, ihren Blutdruck selbst zu messen. In diesen Fällen können Blutdruckabweichungen auftreten.
180+ 110+
160-179 100-109
135-159
85-99
< 85
< 135
und
oder
oder
oder
SYS
(mmHg)
DIA
(mmHg)
Grün >
Gelb >
Orange >
Rot >
Downloaded from www.Manualslib.com manuals search engine

15
Deutsch
Wenn Sie in ärztlicher Behandlung sind oder Medikamente einnehmen, fragen Sie bitte zuerst Ihren Arzt.
Die Verwendung dieses Blutdruckmessgeräts kann keine Rücksprache mit Ihrem Arzt ersetzen.
Grundregeln für genaue Blutdruckmessungen
Führen Sie die Messungen immer zur gleichen Tageszeit und unter den gleichen Bedingungen durch.
Nehmen Sie keine Messung innerhalb von 30 Minuten durch, nachdem Sie geraucht, Kaffee oder Tee
getrunken oder sich irgendeiner anstrengenden körperlichen Betätigung unterzogen haben. Diese
Faktoren beeinflussen die Messergebnisse.
Messen Sie immer am gleichen Handgelenk. Empfohlen wird der linke Arm.
Platzieren Sie die Manschette direkt auf der Haut. Wickeln Sie die Manschette nicht über eine Jacke,
einem Pullover oder Sweatshirt.
Wenn Sie mehrfache Messungen vornehmen wollen, warten Sie etwa 3 Minuten, bevor Sie eine Messung
wiederholen.
Produktbeschreibung (siehe Seite 1)
A
Home-Taste (berührungsempfindlich)
B
Navigationsrad
C
Eingabeschaltfläche (Mitte des Navigationsrads)
D
Herzmessungstaste (berührungsempfindlich)
E
Batteriefachdeckel
F
Luftschlauch
G
Verbindungsstück
H
Display
I
Ein-/Ausschalter
J
Manschette
Einlegen/Austauschen von Batterien
• Entfernen Sie den Batteriefachdeckel, indem Sie diesen horizontal nach links
schieben. Legen Sie anschließend die vier mitgelieferten Batterien unter
Beachtung der vorgegebenen Polarität in das Batteriefach ein. Verwenden Sie
beim Austausch von Batterien ausschließlich Alkaline-Batterien vom Typ AA/
LR6, 1,5V.
• Neue Batterien reichen für ca. 350 Messungen.
• Beim Austausch der Batterien werden alle im Speicher festgehaltenen Werte
bewahrt, Datum und Uhrzeit müssen jedoch neu eingestellt werden.
Die Grundlagen
Ein-/Ausschalter: befindet sich oben auf dem Gerät.
Home-Taste: Wenn die Home-Funktion zur Verfügung steht, ist dieses Symbol beleuchtet.
Berühren Sie die Schaltfläche oder tippen Sie diese an, um zum Home-Bildschirm zurückzukehren.
Navigationsrad: Drehen Sie diesen Steuerungsknopf nach links oder rechts, um die unterschiedlichen
Funktionen Ihres Geräts zu durchlaufen und drücken Sie in der Mitte (Eingabetaste), um eine Auswahl zu
wählen oder zu bestätigen.
Herzmessungstaste: Wenn diese Taste beleuchtet ist, berühren Sie die Schaltfläche oder tippen Sie diese
an, um eine neue Messung zu starten.
Downloaded from www.Manualslib.com manuals search engine

16
Menüsymbole
Durchführen einer Messung
Wählen Sie diese Funktion und betätigen Sie die Eingabetaste, um eine Messung
durchzuführen. Diese Funktion ist die gleiche wie die Herzmessungstaste (D)
Verlauf
Wählen Sie diese Funktion, um den Verlauf und den Trend Ihrer Blutdruckwerte in einem
farbigen Diagramm anzuzeigen
Kalenderansicht
Wählen Sie diese Funktion, um Ihre Blutdruckwerte in einem Monat über die Kalenderansicht
nach Monaten mit farbig hervorgehobenen Tagesdurchschnittswerten anzuzeigen.
Berichte
Wählen Sie diese Funktion, um Ihre Blutdruck-Durchschnittswerte in Abständen von
7/14/30 Tagen anzusehen
Nutzer
Wählen Sie diese Funktion, um einen Nutzer zu wählen, hinzuzufügen, zu bearbeiten oder
zu löschen
Einstellung von Datum
und Uhrzeit
Wählen Sie diese Funktion, um Datum und Uhrzeit auf Ihrem Gerät einzustellen
Schaltstufen
Wählen Sie diese Funktion, um die Anweisungen der Animationen zu aktivieren/
deaktivieren oder die Nutzerauswahl beim Einschalten zu aktivieren/deaktivieren
Bluetooth®-Kopplung Wählen Sie diese Funktion, um Ihr Gerät mit der Braun Healthy Heart App zu koppeln
Informationen
Wählen Sie diese Funktion, um weitere Informationen über die Blutdruck-Farbtabelle
und korrekte Messungen von Blutdruckwerten zu erhalten
Datum und Uhrzeit einstellen
Bevor eine Messung durchgeführt werden kann,
müssen Datum und Uhrzeit eingestellt werden.
Die korrekte Einstellung von Datum und Uhrzeit
ist wichtig, um sicherzustellen, dass die Werte
korrekt auf dem Gerät und der Braun Healthy
Heart App angezeigt werden.
Dieser Bildschirm wird automatisch angezeigt,
wenn das Gerät erstmals verwendet wird oder
nachdem neue Batterien eingesetzt wurden.
Wenn Sie Datum und Uhrzeit später ändern
müssen (zum Beispiel für die Anpassung an die
Sommerzeit), können Sie diesen Bildschirm über
das Hauptmenü erreichen, indem Sie das Symbol
für Datum und Uhrzeit wählen
.
Wählen Sie das Format (EU oder US), dann das Datum und die Uhrzeit, indem Sie das Navigationsrad
drehen. Betätigen Sie die Eingabetaste, um das Feld zu aktivieren. Wenn das Feld blinkt, können Sie die
Zahlen anpassen. Betätigen Sie erneut die Eingabetaste, um die eingegebenen Zahlen zu bestätigen. Der
Cursor springt daraufhin zum nächsten Feld. Wiederholen Sie diesen Vorgang. Anschließend bestätigen
Sie durch Auswahl des Symbols „Speichern“
.
Downloaded from www.Manualslib.com manuals search engine

17
Einstellen eines Nutzernamens
Wählen Sie den Nutzer vom Hauptmenü
und betätigen Sie die Eingabetaste. Wählen
Sie jetzt die Buchstaben durch Drehen des
Navigationsrads und bestätigen Sie jeden
Buchstaben durch Betätigen der Eingabetaste.
Danach wählen Sie das Speichersymbol
betätigen die Eingabetaste.
Namen können jederzeit durch Auswahl des
Nutzersymbols
vom Hauptmenü geändert
werden.
Der Nutzernamen geht nicht verloren, wenn die
Batterien entfernt oder ausgetauscht werden.
Korrekte Haltung und Positionierung der Manschette
Um genaue Werte zu erhalten, ist es wichtig
auf eine korrekte Haltung zu achten. Für mehr
Genauigkeit empfehlen wir die Verwendung
des linken Armes, da sich dieser näher an Ihrem
Herzen befindet.
Die korrekte Position der Manschette liegt
2-3 cm oberhalb des Ellbogens, wobei der
Schlauchausgang in Richtung Ihrer Hand weist
und entlang der Mitte des Inneren Ihres Ellbogens
verlaufen sollte. Sichern Sie die Manschette mit
dem Klettverschluss, so dass
sie fest, aber bequem anliegt. Ziehen Sie die
Manschette fest, sodass kein Freiraum zwischen
Manschette und Handgelenk bleibt.
Der ActivScan™ 9 bietet Animationen auf
dem Bildschirm, die Ihnen dabei helfen, die korrekte Haltung zu finden und die Manschette richtig
anzubringen. Diese unterstützte Lesefunktion wird automatisch angezeigt, wenn das Gerät zum ersten
Mal verwendet wird und kann anschließend optional vor jeder Nutzung angezeigt werden, indem das
Einstellungssymbol
gewählt wird.
Diese Anweisungsanimation kann außerdem durch Auswahl des Informationssymbols
vom
Hauptmenü geändert werden.
Durchführung einer Blutdruckmessung
1. Setzen Sie sich hin, bleiben Sie ruhig, sprechen und bewegen Sie sich während der Messung nicht,
ganz besonders nicht den Arm, an dem Sie messen.
2. Bringen Sie die Manschette 2-3 cm oberhalb des Ellbogens an, wobei der Schlauchausgang in
Richtung Ihrer Hand weist und entlang der Mitte des Inneren Ihres Ellbogens verlaufen sollte.
3. Berühren Sie das Symbol für die Herzmessung
links vom Navigationsrad, um eine Messung zu
starten oder wählen Sie die Herzschaltfläche im Hauptmenü. Die Messungen beginnen 3 Sekunden
nach Start des Countdown-Zählers auf dem Bildschirm. Sie können die Messung jederzeit abbrechen,
indem Sie die Home-Taste oder die Eingabetaste betätigen.
3
Deutsch
Downloaded from www.Manualslib.com manuals search engine

18
Ihre Werte verstehen
Wenn eine Messung abgeschlossen ist, werden
die Werte auf dem Bildschirm zusammen mit
einem farbigen Herzlogo angezeigt. Das Herzlogo
und die Hintergrundfarbe zeigen das Niveau an
Bluthochdruck für diesen Wert an. Bitte sehen
Sie in der farbkodierten WHO-Tabelle (auf Seite
2) nach, um diese Interpretation verstehen zu
können.
SYS: zeigt den Wert für den systolischen Blutdruck an
DIA: zeigt den Wert für den diastolischen
Blutdruck an
Zeigt den Puls an (Herzfrequenz)
Dieses Symbol wird angezeigt, wenn
der Herzschlag unregelmäßig ist. Ein
unregelmäßiger Herzschlag kann schlicht durch Sprechen, Bewegungen oder Erschütterungen
während einer Messung verursacht werden. Wenn das Symbol jedoch öfter erscheint, obwohl Sie
sich strikt an die Anweisungen gehalten haben, sollten Sie mit Ihrem Arzt sprechen.
Speicherfunktion:
Ihr ActivScan™ 9 speichert bis zu 200 Werten für jeden Nutzer. Die Werte werden automatisch
gespeichert, sobald die Messung abgeschlossen ist. Wenn 200 Werte erreicht sind, ersetzen die neuesten
Werte automatisch die ältesten. Wir empfehlen Ihnen, Ihre gespeicherten Wert regelmäßig auf die
Braun Healthy Heart App auf Ihrem Smartphone zu übertragen, um die Entwicklung Ihres Blutdrucks
problemlos auch über einen längeren Zeitraum verfolgen zu können.
Der Speicher ist nicht-flüchtig. Gespeicherte Werte gehen bei einem Austausch der Batterien nicht
verloren.
Rufen Sie den Durchschnitt Ihrer Werte auf
Sie können die Durchschnitte Ihrer Werte als
Bericht aufrufen, indem Sie das Berichtssymbol
im Menü wählen. Diese Funktion liefert Ihnen
die Durchschnittswerte der letzten 7, 14 oder 30
Tage der Werte für den Morgen (links), den Abend
(Mitte) oder den ganzen Tag (rechts).
Die gesamte Anzahl der in der entsprechenden
Periode gemessenen Werte wird unten und als
angezeigt.
Der Aufruf der Durchschnitte Ihrer Werte liefert
Ihnen eine Blutdruckwert, der repräsentativer für
Ihre gesamte Herzgesundheit ist.
Achten Sie darauf, regelmäßig Ihren Blutdruck zu
messen, sodass die durchschnittlichen Angaben
ein genaueres Bild Ihrer Herzgesundheit anzeigen.
Bezieht sich auf die am Morgen zwischen 04:00 und 09:59 Uhr durchgeführten Messungen
Bezieht sich auf die am Abend zwischen 19:00 und 01:59 Uhr durchgeführten Messungen
24h
Bezieht sich auf die den ganzen Tag über, also zwischen 00:00 und 23:59 Uhr, durchgeführten
Messungen
EMMA
mmHg
70
80
mmHg
120
SYS
DIA
4:56 PM
03-25-2016
18-12-2016 — 25-12-2016
75
140
90
SYS
DIA
7 14 30
14
mmHg
mmHg
mmHg
80
160
100
SYS
DIA
mmHg
mmHg
mmHg
70
120
80
SYS
DIA
mmHg
mmHg
mmHg
24h
Downloaded from www.Manualslib.com manuals search engine
La page est en cours de chargement...
La page est en cours de chargement...
La page est en cours de chargement...
La page est en cours de chargement...
La page est en cours de chargement...
La page est en cours de chargement...
La page est en cours de chargement...
La page est en cours de chargement...
La page est en cours de chargement...
La page est en cours de chargement...
La page est en cours de chargement...
La page est en cours de chargement...
La page est en cours de chargement...
La page est en cours de chargement...
La page est en cours de chargement...
La page est en cours de chargement...
La page est en cours de chargement...
La page est en cours de chargement...
La page est en cours de chargement...
La page est en cours de chargement...
La page est en cours de chargement...
La page est en cours de chargement...
La page est en cours de chargement...
La page est en cours de chargement...
La page est en cours de chargement...
La page est en cours de chargement...
La page est en cours de chargement...
La page est en cours de chargement...
La page est en cours de chargement...
La page est en cours de chargement...
La page est en cours de chargement...
La page est en cours de chargement...
La page est en cours de chargement...
La page est en cours de chargement...
La page est en cours de chargement...
La page est en cours de chargement...
La page est en cours de chargement...
La page est en cours de chargement...
La page est en cours de chargement...
La page est en cours de chargement...
La page est en cours de chargement...
La page est en cours de chargement...
La page est en cours de chargement...
La page est en cours de chargement...
La page est en cours de chargement...
La page est en cours de chargement...
La page est en cours de chargement...
La page est en cours de chargement...
La page est en cours de chargement...
La page est en cours de chargement...
La page est en cours de chargement...
La page est en cours de chargement...
La page est en cours de chargement...
La page est en cours de chargement...
La page est en cours de chargement...
La page est en cours de chargement...
La page est en cours de chargement...
La page est en cours de chargement...
La page est en cours de chargement...
La page est en cours de chargement...
La page est en cours de chargement...
La page est en cours de chargement...
La page est en cours de chargement...
La page est en cours de chargement...
La page est en cours de chargement...
La page est en cours de chargement...
La page est en cours de chargement...
La page est en cours de chargement...
La page est en cours de chargement...
La page est en cours de chargement...
-
 1
1
-
 2
2
-
 3
3
-
 4
4
-
 5
5
-
 6
6
-
 7
7
-
 8
8
-
 9
9
-
 10
10
-
 11
11
-
 12
12
-
 13
13
-
 14
14
-
 15
15
-
 16
16
-
 17
17
-
 18
18
-
 19
19
-
 20
20
-
 21
21
-
 22
22
-
 23
23
-
 24
24
-
 25
25
-
 26
26
-
 27
27
-
 28
28
-
 29
29
-
 30
30
-
 31
31
-
 32
32
-
 33
33
-
 34
34
-
 35
35
-
 36
36
-
 37
37
-
 38
38
-
 39
39
-
 40
40
-
 41
41
-
 42
42
-
 43
43
-
 44
44
-
 45
45
-
 46
46
-
 47
47
-
 48
48
-
 49
49
-
 50
50
-
 51
51
-
 52
52
-
 53
53
-
 54
54
-
 55
55
-
 56
56
-
 57
57
-
 58
58
-
 59
59
-
 60
60
-
 61
61
-
 62
62
-
 63
63
-
 64
64
-
 65
65
-
 66
66
-
 67
67
-
 68
68
-
 69
69
-
 70
70
-
 71
71
-
 72
72
-
 73
73
-
 74
74
-
 75
75
-
 76
76
-
 77
77
-
 78
78
-
 79
79
-
 80
80
-
 81
81
-
 82
82
-
 83
83
-
 84
84
-
 85
85
-
 86
86
-
 87
87
-
 88
88
-
 89
89
-
 90
90


Braun BUA 7200 Le manuel du propriétaire
- Catégorie
- Unités de pression artérielle
- Taper
- Le manuel du propriétaire
dans d''autres langues
- italiano: Braun BUA 7200 Manuale del proprietario
- español: Braun BUA 7200 El manual del propietario
- Deutsch: Braun BUA 7200 Bedienungsanleitung
- Nederlands: Braun BUA 7200 de handleiding
- português: Braun BUA 7200 Manual do proprietário
Documents connexes
-
Braun BUA 5000 Manuel utilisateur
-
Braun BPW4500 ICHECK 7 Le manuel du propriétaire
-
-
-
-
-
-
