
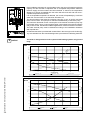
- Donotstoreorusegasolineorotherammablevaporsand
liquidsinthevicinityofthisoranyotherappliance.
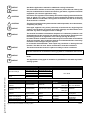
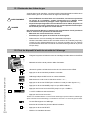
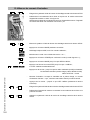
- WHAT TO DO IF YOU SMELL GAS
- DoNOTtrytolightanyappliance.
- DoNOTtouchanyelectricalswitch.
- DoNOTuseanyphoneinyourbuilding.
- Immediatelycallyourgassupplierfromaneighbor’sphone.
Followthegassupplier’sinstructions.
- Ifyoucannotreachyourgassupplier,calltheredepartment.
8W.51.54.03 / 01.17 Changes reserved.
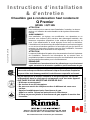
Installation & Servicing
Instructions
Theseinstructionstoberetainedbyuser.
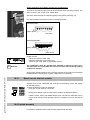
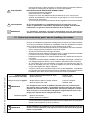
CAUTION!
Read this manual thoroughly before installing, servicing, putting
into operation or using this boiler and vent system.
WARNING!
Improper installation, adjustment, alteration, service or
maintenance can cause property damage, personal injury
(exposure of hazardous materials)* or loss of life. Refer to the
user's information manual provided with this boiler. Installation
and service must be performed by a licensed professional, service
agency or the gas supplier (who must read and follow the supplied
instructions before installing, servicing, or removing this boiler).
CAUTION!
The user manual is part of the documentation that is delivered
to the installation's operator. Go through the information in this
manual with the owner/operator and make sure that they are
familair with all necessary operating instructions.
NOTICE!
Installation and service must be performed by a licensed
professional,servicetechnicianorthegassupplier.
WARNING!
Ifyoudonotfollowtheseinstructionsexactly,areorexplosion
mayresultcausingpropertydamage,personalinjuryorlossoflife.
Address:103InternationalDrive,PeachtreeCity,GA,30269
Toll-free:1-800-621-9419 • Fax:678-829-1666 • www.rinnai.us
Français:voirpage99
Higheciencycondensinggasboiler
QPremier
QP85N/QP130N
Pictured: QP85N, QP130N

Installation & Servicing Instructions Rinnai Q Premier
2
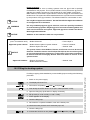
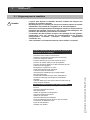
Contentsofinstructions
These installation instructions contain important information for the safe installation, start-up and maintenance of
boilers with capacities 85,000 through 130,000 BTU/hr.
These installation instructions are intended for licensed professionals, who have the necessary knowledge and
are approved for working on heating and gas systems.
Subjecttotechnicalchanges
Changes may be made without notice to the illustrations, process steps and technical data as a result of our policy
of continuous improvement.
Updatingofdocumentation
Please contact us if you have any suggestions for improvements or corrections.
Find our contact details on the back of this manual.
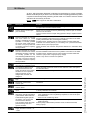
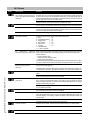
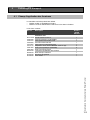
1 Safety and general instructions ........................................................4
1.1 Designated use ...................................................................4
1.2 Hazarddenitions ................................................................4
1.3 Symboldenitions ...............................................................4
1.4 The following instructions must be followed ........................5
1.5 Follow these instructions for the space heating water .........6
1.6 Tools, materials and additional equipment ..........................6
1.7 Relevant Installation, Service and User manuals ................7
1.8 Disposal ...........................................................................7
2 Regulations and guidelines ..............................................................7
3 Description of the boiler ...................................................................8
4 Packaging and transportation ..........................................................9
4.1 Scope of delivery .................................................................9
4.2 Transportation ...................................................................10
5 Installation .........................................................................11
5.1 Requirements for the installation room ............................. 11
5.2 Fitting the boiler .................................................................12
5.3 Dimensions ........................................................................13
5.3.1 Clearences from the boiler ................................................16
5.4 Technicalspecications .....................................................17
6 Connecting the boiler .....................................................................18
6.1 Central heating system ......................................................19
6.1.2 Safety Valve and Temperature and Pressure Gauge ........25
6.1.3 Lowwatercuto ...............................................................25
6.2 Boiler expansion tank ........................................................26
6.3 Underoorheatingsystem(plasticpipes) ...........................26
6.4 Gas connection .................................................................27
6.4.1. Gas connection with natural gas .......................................27
6.4.2 Gas connection with propane gas .....................................28
6.5 Hot water supply ................................................................29
6.5.1 Domestic Water quality ......................................................29
6.5.2 Domestic water treatment Accessory ...............................29
6.5.3 DHW Expansion Tank ........................................................30
6.5.4 Installing a Thermostatic Mixing Valve ..............................30
6.5.5 Installing a valve kit ...........................................................30
6.5.6 Pressure relief valve for Combi boilers ..............................31
6.6 Condensate drain pipe ......................................................31
6.7 Vent system and air supply system ...................................32
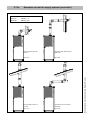
6.7.1 Intake / Exhaust Guidelines ...............................................32
6.7.2a Examples vent and air supply systems (concentric) .........33
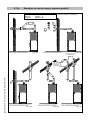
6.7.2b Examples vent and air supply systems (parallel) ..............34
6.7.3 Installation of the vent system ...........................................35
6.7.3.1 Boiler conversion from concentric to parallel ....................36
6.7.3.2 Placingairlter .................................................................36
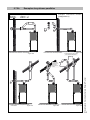
6.7.4 Recommended vent/air intake terminal position ...............37
6.7.5 Direct vent closet and alcove installation ........................39
6.7.6 Dimensioning of the exhaust and air intake duct .............40
6.7.7 Combustion air and vent piping lengths. ...........................41

Installation & Servicing Instructions Rinnai Q Premier
3
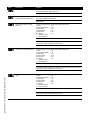
Content
1 Safety and general instructions ........................................................4
1.1 Designated use ...................................................................4
1.2 Hazarddenitions ................................................................4
1.3 Symboldenitions ...............................................................4
1.4 The following instructions must be followed ........................5
1.5 Follow these instructions for the space heating water .........6
1.6 Tools, materials and additional equipment ..........................6
1.7 Relevant Installation, Service and User manuals ................7
1.8 Disposal ...........................................................................7
2 Regulations and guidelines ..............................................................7
3 Description of the boiler ...................................................................8
4 Packaging and transportation ..........................................................9
4.1 Scope of delivery .................................................................9
4.2 Transportation ...................................................................10
5 Installation .........................................................................11
5.1 Requirements for the installation room ............................. 11
5.2 Fitting the boiler .................................................................12
5.3 Dimensions ........................................................................13
5.3.1 Clearences from the boiler ................................................16
5.4 Technicalspecications .....................................................17
6 Connecting the boiler .....................................................................18
6.1 Central heating system ......................................................19
6.1.2 Safety Valve and Temperature and Pressure Gauge ........25
6.1.3 Lowwatercuto ...............................................................25
6.2 Boiler expansion tank ........................................................26
6.3 Underoorheatingsystem(plasticpipes) ...........................26
6.4 Gas connection .................................................................27
6.4.1. Gas connection with natural gas .......................................27
6.4.2 Gas connection with propane gas .....................................28
6.5 Hot water supply ................................................................29
6.5.1 Domestic Water quality ......................................................29
6.5.2 Domestic water treatment Accessory ...............................29
6.5.3 DHW Expansion Tank ........................................................30
6.5.4 Installing a Thermostatic Mixing Valve ..............................30
6.5.5 Installing a valve kit ...........................................................30
6.5.6 Pressure relief valve for Combi boilers ..............................31
6.6 Condensate drain pipe ......................................................31
6.7 Vent system and air supply system ...................................32
6.7.1 Intake / Exhaust Guidelines ...............................................32
6.7.2a Examples vent and air supply systems (concentric) .........33
6.7.2b Examples vent and air supply systems (parallel) ..............34
6.7.3 Installation of the vent system ...........................................35
6.7.3.1 Boiler conversion from concentric to parallel ....................36
6.7.3.2 Placingairlter .................................................................36
6.7.4 Recommended vent/air intake terminal position ...............37
6.7.5 Direct vent closet and alcove installation ........................39
6.7.6 Dimensioning of the exhaust and air intake duct .............40
6.7.7 Combustion air and vent piping lengths. ...........................41
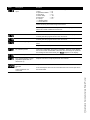
6.7.8 Calculation of compensation factor ......................................42
6.7.9 Room Air System (indoor combustion air) ...........................43
7 Electrical connections ....................................................................46
8 Controls .........................................................................47
9 Boiler controls .........................................................................50
9.1 Explanation of the function buttons ...................................51
10 Starting up: Filling and de-aerating the boiler and installation .......52
10.1 Requirements of the water system ....................................52
10.2 Filling the heating system ..................................................53
10.3 Hot water supply ................................................................54
11 Adjustments .........................................................................56
11.1 Altering adjustments ..........................................................56
11.2 Activating factory settings (green button function) ...........59
12 Isolating the boiler .........................................................................59
13 Commissioning .........................................................................59
13.1 Testing for gas leaks ..........................................................61
13.2 TestingtheIgnitionSafetyshutodevice .........................61
13.3 Checking the O
2
at full load (Step 1/3) ...............................62
13.3.1 Checking the O
2
at low load (Step 2/3) ..............................63
13.3.2 Settings on the gas valve (Step 3/3) .................................64
13.4 Measuring the ionization current .......................................65
13.5 Installing the casing ...........................................................66
14 Maintenance .........................................................................66
14.1 Periodic examination of venting systems and boiler .........66
14.2 Inspection .........................................................................66
14.2.1 Visual inspection for general signs of corrosion ................67
14.2.2 Measuring the ionization current .......................................67
14.2.3 Measuring the inlet gas pressure ......................................67
14.2.4 Testing for gas leaks ..........................................................67
14.2.5 Carrying out a pressure test of the heating system ...........67
14.2.6 Checking venting systems .................................................67
14.3 Maintenance activities .......................................................68
14.3.1 Reset service interval counter ...........................................70
14.4 Limited warranty ................................................................70
15 Parts of the boiler .........................................................................71
16 Blocks and Errors .........................................................................72
16.1 Error indication (short reference) .......................................72
16.2 Blocks .........................................................................73
16.3 Errors .........................................................................74
16.4 Other Errors .......................................................................78
17 Spare parts / Pièces de rechange ..................................................80
18 Parts list vent system .....................................................................96
20 Common venting guidelines ...........................................................98
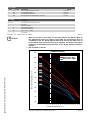
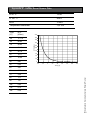
Appendix A - Outoor Reset Sensor Data .............................................99
Appendix B - Resistance table NTC sensors ....................................100

Installation & Servicing Instructions Rinnai Q Premier
4
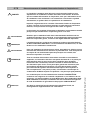
1 Safetyandgeneralinstructions
Please observe these instructions in the interest of your own safety.
1.1 Designateduse
The boiler is designed for heating water for a central heating system and, if applicable,
generating domestic hot water. The boiler is delivered with a burner controller
(MCBA)pre-installed.Theboilercanbettedwithamodulatingoutdoorresetsensor
ARV12(includedwiththeboiler)oranOn/Othermostatorrelaypanelendswitch
(accessories).
1.2 Hazarddenitions
Thefollowingdenedtermsareusedthroughoutthedocumentationtobringattention
to the presence of hazards of various risk levels. Notices give important information
concerning the operation of the product.
DANGER:
Indicates the presence of hazards that will cause severe personal injury, death or
substantial property damage.
WARNING:
Indicates the presence of hazards that can cause severe personal injury, death or
substantial property damage.
CAUTION:
Indicates presence of hazards that will or can cause minor personal injury or property
damage.
CAUTION:
Risk of electric shock. Indicates presence of hazards due to electric shock.
NOTICE:
Indicates special instructions on installation, operation or maintenance that are
important but not related to personal injury or property damage.
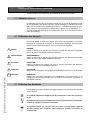
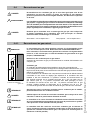
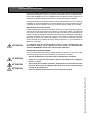
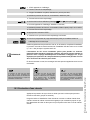
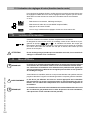
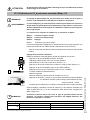
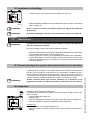
1.3 Symboldenitions
The following (safety) symbols may be encountered in these installation instructions
and on the unit:
Thissymbolindicatesthattheunitmustbestoredawayfromfreezingconditions.
Thissymbolindicatesthatthepackagingand/orcontentscanbedamagedas
aresultofinsucientcaretakenduringtransport.
Thissymbolindicatesthat,whilestillinitspackaging,theunitmustbeprotected
fromweatherconditionsduringtransportandstorage.
!
CAUTION
CAUTION
!
WARNING
NOTICE
i
!
DANGER

Installation & Servicing Instructions Rinnai Q Premier
5
1.4 Thefollowinginstructionsmustbefollowed
- The boiler must only be used for its designated purpose, as described in the
Installation Instructions.
- Eachunitisttedwithadataplate.Consultthedetailsonthisplatetoverifywhether
the boiler is compliant with its intended location, e.g.: gas type, power source and
ventingclassication.
-
Only use the boiler with the accessories and spare parts listed.
- Other combinations, accessories and consumables may only be used if they are
specicallydesignedfortheintendedapplicationanddonotaectthesystem
performance and the safety requirements.
- Maintenance and repairs must be performed by a licensed professional.
- Installation of a condensing gas boiler must be reported to the relevant gas utility
company and have it approved.
- You are only allowed to operate the condensing gas boiler with the vent system
thathasbeenspecicallydesignedandapprovedforthistypeofboiler.
- Please note that local permission for the vent system and the condensate water
connection to the public sewer system may be required.
You must also respect:
- The local building codes stipulating the installation rules.
- The local building codes concerning the air intake and outlet systems and the
chimney connection.
- The regulations for the power supply connection.
- The technical rules established by the gas utility company concerning the
connection of the gas connection to the local gas mains.
- The instructions and standards concerning the safety equipment for the water/
space heating system.
- The Installation Instructions for building heating systems.
- The boiler must be located in an area where leakage of the boiler or connections
willnotresultindamagetotheareaadjacenttotheboilerortoloweroorsof
the structure. When such locations cannot be avoided, it is recommended that a
suitable drain pan be installed under the boiler.
- The boiler must be installed in such way that the all components are protected
from water (dripping, spraying, rain etc.) during boiler operation and service.
- The boiler must not be installed on or against carpeting.
- Do not restrict or seal any air intake or outlet openings.
- Ifyoundanydefects,youmustinformtheownerofthesystemofthedefectand
the associated hazard in writing.
Infailuretoproperlycommissiontheboilerasdescribedinsection13mayresult
unreliableburneroperation,reducedcomponentlife,andunsafeboileroperation.
DANGER.Gasisammableandmaycauseanexplosion.
Bewareifyousmellgas:theremaybeanexplosionhazard!
Iftheinformationintheseinstructionsisnotfollowedexactly,areorexplosionmay
result causing property damage, personal injury or death.
- Donotstoreorusegasolineorotherammablevaporsandliquidsinthevicinity
of this or any other appliance.
!
DANGER
!
WARNING

Installation & Servicing Instructions Rinnai Q Premier
6
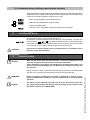
WHAT TO DO IF YOU SMELL GAS
- Do NOT try to light any appliance.
- Do NOT touch any electrical switch.
- Do NOT use any phone in your building.
- Immediately call your gas supplier from a neighbor’s phone. Follow the gas
supplier’s instructions.
- Ifyoucannotreachyourgassupllier,calltheredepartment.
Shouldoverheatingoccurorthegassupplyfailtoshuto,donotturnoor
disconnecttheelectricalsupplytothepump.Instead,shutothegassupply
atalocationexternaltotheboiler.
Chemicalsthatarecorrosiveinnatureshouldnotbestoredorusednearthe
boilerorventtermination.
1.5 Followtheseinstructionsforthespaceheatingwater
Unsuitable heating system water can cause the formation of scale or sludge, which
aects system eciency. It canalso cause corrosionand reduce lifeof the heat
exchanger.
– You must follow Rinnai guidelines for boiler water quality.
– Thoroughlyushthesystempriortolling.
– Follow the Rinnai cleaning instructions.
– Never use water that has been treated by a reverse osmosis, D.I., or distilled water
tosoftenthewatertolltheheatingsystem.
– Do not use inhibitors or other additives unless approved by Rinnai for that purpose.
– When freeze protection of the heating system is desired, only use Rinnai-approved
antifreezes. The allowed maximum concentration is 50%.
– Whenusingoxygen-permeablepipes,e.g.forunderoorheatingsystems,you
must separate the system from the boiler using plate heat exchangers.
– Valveoboilerwhileushingsystem,donotintroduceanysystemcleanerinto
theboilerloop.Flushsystemthoroughlytoremoveallsystemcleanerbeforelling
boiler.
Approvedantifreeze: • Rhomar RhoGard Mutli-Metal (AL safe) • Sentinel X500
(max. concentration 50%) • Noble Noburst AL • Fernox Alphi 11
Approvedsystemcleaner: • Noble Noburst Hydronic System Cleaner • Fernox F3 Cleaner
• Rhomar Hydro-Solv 9100 • Sentinel X400
ThesystemcleanersfromNoBurst,Rhomar,andFernoxarenottobeusedin
theboiler.Theboilermustbeclosedo(valvedo)fromtherestofthesystem
ornotconnectedwhilethecleanersareinthesystem.Thesystemshouldthen
be drained and then thoroughly ushed with clean water to remove all the
systemcleaner.
Approvedinhibitors: • Rhomar Pro-tek 922 • Sentinel X100
• Noble Noburst AL inhibitor
See the Rinnai Boiler Applications Manual or Chapter 6 and 10 of this manual for
additional information.
Ifproblemsoccurwhenusingsanitarywaterwithachlorinecontent
higher than 150mg/l, no recoursecan bemade to theterms ofthelimited
warranty.
NOTICE
i
NOTICE
i
!
WARNING
!
WARNING
NOTICE
i

Installation & Servicing Instructions Rinnai Q Premier
7
1.6 Tools,materialsandadditionalequipment
For the installation and maintenance of the boiler you will need:
– Standardtoolsforspaceheating,gasandwatertting
– Digital manometer that is capable of reading both positive and negative pressures
– Combustion analyzer (intended for use with condensing boilers)
– Digital multimeter
– pH digital meter
– Metric Allen wrenches
– Metric socket wrenches
In addition, a handtruck with a fastening belt is useful.
For maintenance of the boiler you will need, apart from standard tools for space
heating,gasandwaterttingsthefollowingitems:
- Rinnai toolkit Q and E-Series
1.7 RelevantInstallation,ServiceandUsermanuals
– Approved vent system
– Rinnai Boiler Applications Manual
– User manual
1.8 Disposal
– Dispose of the boiler packaging in an environmentally sound manner.
– Dispose of components of the heating system (e.g. boiler or control device), that
must be replaced in an environmentally responsible manner.
2 Regulationsandguidelines
The installation must comply to the requirements of the authority having jurisdiction
or, in the absence of such requirements, to the latest edition of the National Fuel Gas
Code, ANSI Z223.1/NFPA 54. In Canada, installation must be in accordance with
the requirements of CAN/CSA B149.1, Natural Gas and Propane Installation Code.
Where required by the authority having jurisdiction, the installation must comply to
the Standard for Controls and Safety Devices for Automatically Fired Boilers, ANSI/
ASME CSD-1.
Install CO detectors per local regulations. Boiler requires an inspection every 2 years or
4000 hours and maintenance every 4 years or 8000 hours. See maintenance section
chapter 14.
Operating Limits of the boiler:
Max. boiler temperature: 176 °F (80 °C)
Max. operating pressure: 45 psi (3 bar)
Max. Allowable Working Temperature ASME: 200 °F (93 °C)
Max. Allowable Working Pressure ASME: 45 psi (3 bar)
The hot water distribution system must comply with all applicable codes and
regulations. When replacing an existing boiler, it is important to check the condition
of the entire hot water distribution system to ensure safe operation.

Installation & Servicing Instructions Rinnai Q Premier
8
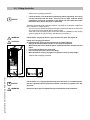
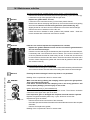
3 Descriptionoftheboiler
The Rinnai Q-CC boiler is a room sealed, condensing and modulating central heating
boiler, with an integrated DHW cylinder.
The boiler is provided with a compact stainless steel heat exchanger with smooth
tubes. This design is a well engineered principle using durable materials.
The boiler burns gas for supplying heat. The heat is transferred in the heat exchanger
to the water in the central heating system. By cooling down the exhaust gases con-
densateisformed.Thisresultsinhigheciency.Thecondensate,whichhasnoeect
on the heat exchanger and the function of the boiler, is drained through a condensate
collector trap.
The boiler is provided with an intelligent control system (CMS Control Management
System). The boiler anticipates the heat demand of the central heating system or the
domestic hot water facility system.
When an outdoor sensor is connected to the boiler it will operate weather depen-
dantly using outdoor reset. This means that the boiler control measures the outside
temperature and supply temperature. With this data the boiler calculates the optimal
supply temperature for the installation.
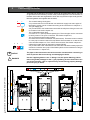
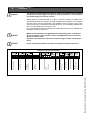
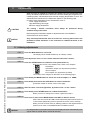
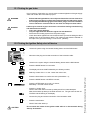
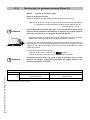
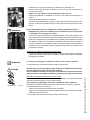
Explanation of the type indication: Rinnai QP130N
QP = Type
130 = Nominal load in (x1,000) BTU
N = Natural Gas
Roomsealedboiler
The boiler retreives its
combustion air from outside
then discharges the ue
gasses to the outside.
Condensing
Retrieves heat as much as
possiblefromtheuegasses.
Water condensates on the
heat exchanger.
Modulating
Stepless higher or lower
burning according to the heat
demand.

Installation & Servicing Instructions Rinnai Q Premier
9
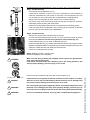
4 Packagingandtransportation
4.1 Scopeofdelivery
The boiler is supplied ready for use.
• Please check if the packaging is intact.
• Check if all the items listed are included in the delivery.
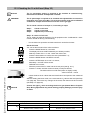
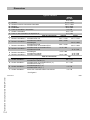
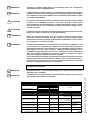
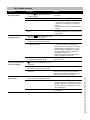
The supply kit contents:
PartNo. Description
A
moun
t
QP85N
QP130N
Boilerwith:
ARV1215U Outdoor reset sensor ARV12 1
44323420 Cover air supply Ø120/Ø80 1
44323510 Gasket vent system ø80 1
44440520 Flue pipe Ø 80 PP 1
44472600 Lip-ring flue pipe ø80 1
44770110 Flue adapter Ø80/Ø3" pps UL appr. 2
44021000 Gasket set hydraulics (5x EPDM) 5
44637900 Gasket set gas (6x Fiber) 1
8U51540x Installation & Service Instructions 1
8U52540x User information manual 1
8U304000 Warranty document 1
8U300600 ICSL book 1

Installation & Servicing Instructions Rinnai Q Premier
10
!
CAUTION
4.2 Transportation
Theboilermaybedamagedwhennotsecuredproperly.
- Only transport the boiler using appropriate transportation equipment, such as a
handtruck with a fastening belt or special equipment for maneuvering steps.
- When shipping the boiler must be secured on the transportation equipment to
preventitfromfallingo.
- Protect all parts against impacts if they are to be transported.
- Follow the transportation markings on the packaging.
• Packaged boilers must always be lifted and carried by two people, or you must
use a handtruck or special equipment for transport.
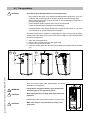
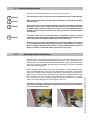
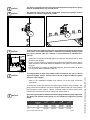
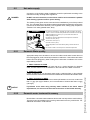
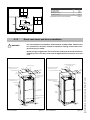
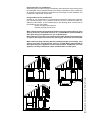
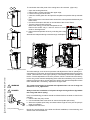
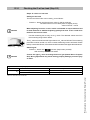
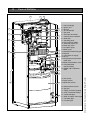
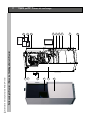
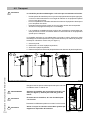
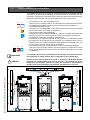
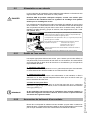
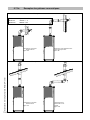
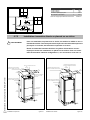
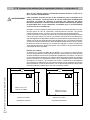
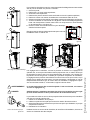
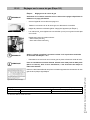
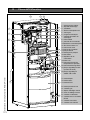
The boiler is delivered on a pallet in a card board box. After removing the packaging
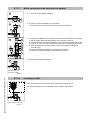
certain parts of the casing can be removed to reduce weight for indoor transportation
asfollows(seegure1):
1. Open the smoke glass door;
2. Remove the 2 screws just below the upper edge;
3. Lift the front top part at the front;
4. Close the smoke glass door and pull the complete front panel at the top towards
you;
Store all removed parts after transportation and during
installation in a safe place.
Lifttheboileronlybytheboiler'sgripsandtherear
wall.Seegure2.Useprotectivegloves.
Whentiltingtheboiler,testingwatermaydrainfrom
theboiler.
Reassembly of the components is done in reverse order.
Makesurethepinsarepositionedcorrectlyinthe
snaplocks.
grips gure2
1 3 4
removingboilercasing gure1
2
!
CAUTION
!
WARNING
!
CAUTION

Installation & Servicing Instructions Rinnai Q Premier
11
5 Installation
5.1 Requirementsfortheinstallationroom
- Theroomwheretheboilerwillbeplacedmustalwaysbefreefromfreezing
conditions.
- Donotstoreorusegasolineorotherammablevaporsandliquidsinthe
vicinityofthisoranyotherappliance.
- Neveruseorstoreanychlorinateddetergentsorhalogenatedhydrocarbons
(e.g.inspraycans,solventsanddetergents,paints,adhesives)inproximity
oftheboiler.
- Theboilermustbeinstalledinsuchawaythatitisprotectedfromwater
(dripping, spraying, rain, etc.) during operation and service (circulator
replacement,condensatetrap,controlreplacement,etc.)
- Thisboilerisforintendedforindoorinstallationsonly.
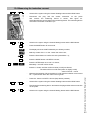
Productstoavoidpresentinboilerroom
and/oraroundcombustionairintake
Spray cans containing chloro-/fluorcarbons
Ammonium and/or ammonium solutions
Permanent wave solutions (hair product)
Chlorinated waxes and/or cleaners
Swimming pool chemicals based on chlorine
Calcium chloride used for thawing
Sodium chloride used for water softening
Refrigerant leaks
Paint or varnish removers
Hydrochloric acid/muriatic acid
Cements and glues
Antistatic fabric softeners used in clothes dryers
Chlorine-type bleaches, detergents, and cleaning solvents
found in household laundry rooms
Adhesives used to fasten building products and
other similar products
Areaslikel
y
tohavecontaminants
Dry cleaning/laundry areas and establishments
Swimming pools
Metal fabrication plants
Beauty shops
Refrigeration repair shops
Photo processing plants
Auto body shops
Plastic manufacturing plants
Furniture refinishing areas and establishments
New building construction
Remodeling areas
Garages with workshops
!
DANGER

Installation & Servicing Instructions Rinnai Q Premier
12
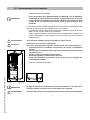
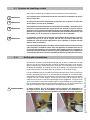
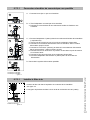
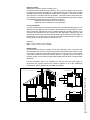
5.2 Fittingtheboiler
- Remove the packaging materials.
- Leavetheboileronitspalletduringunpacking.Whenunpacking,thecasing
can be removed from the boiler. This part can be kept seperate during
installation.Itmustbereinstalledontheboilerandxedwiththescrews
behindthedoorbeforetheboilerisstartedup.
Theboilercanbeplacedonmostoorsurfaces.Theboilerisnotallowedorapproved
tobeinstalledoncarpetooring.
- Theoormustbeatandofsucientstrengthinordertobeabletosecurelyhold
and support the boiler weight with its water content.
- Take note of the necessary space around the boiler for installation of the venting
system, pipework and for servicing. See drawing in section 5.3.
Lifttheboileronlybytheboiler'sgripsandtherearwall.Seegure3a.
Liftingandcarryingprecautions.
Toavoidpersonalinjurypleasefollowtheserecommendations:
- Alwayslifttheboilerwith2peopleorusespecialequipment.
- Whenliftingtheboiler,bendtheknees,andkeepthebackstraightandfeet
apart.
- Donotliftandtwistatthesametime.
- Liftandcarrytheboilerclosetothebody.
- Wearprotectiveclothingandglovestoprotectfromanysharpedges.
- Dispose the packaging materials.
Lifttheboilerinit'suprightpositionandplacetheboilerinit'sdenedplace.
Usetheadjustmentfeettopositiontheboilerverticalusingaplumbrule.See
gure3b.
Protectallpartsagainstimpactsduringtransportationandinstallation.
!
CAUTION
NOTICE
i
NOTICE
i
!
WARNING
position boiler grips
QPremier gure3a
!
WARNING
adjustmentfeetQPremier
gure3b

Installation & Servicing Instructions Rinnai Q Premier
13
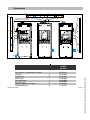
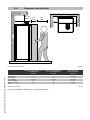
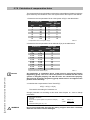
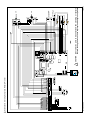
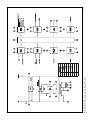
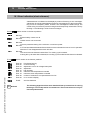
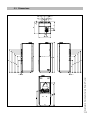
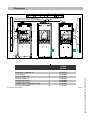
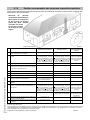
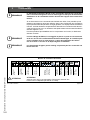
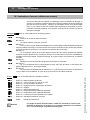
5.3 Dimensions
dimensions Q Premier gure4
B
H
J
K
G
D
C
E
F
A
O
N
L
H
J
K
L
M M
N
O
P P
Q Q
R R
S
SS

Installation & Servicing Instructions Rinnai Q Premier
14
Dimensions
dimensions table 1
Boilertype
A
B
C
D
E
F
G
Connectionside: left right
H Bottom side boiler /
supply pipe 48.4" / 1230 48.4" / 1230
J Bottom side boiler /
return pipe 45.7" / 1160 45.7" / 1160
hot water pipe 42.9" / 1090
gas pipe 42.9" / 1090
cold water pipe 40.2" / 1020
DHW circulation return pipe 40.2" / 1020
DHW circulation return pipe 37.4" / 950
cold water pipe 37.4" / 950
gas pipe 34.6" / 880
hot water pipe 34.6" / 880
O Bottom side boiler / condensate pipe 26.0" / 662 26.0" / 662
Connectionside:
gas pipe ( g* )
hot water pipe ( h* )
DHW circulation return pipe ( x* )
cold water pipe ( c* )
supply pipe ( s* )
return pipe ( r* )
S Back boiler / center of all
p
i
p
e connections
61.8" / 1570
64.5" / 1640
23.6" / 600
25.2" / 640
3,7" / 95
4.7" / 122
inch / mm
QP85N
QP130N
6.9" / 175
top
18.5" / 470
4.1" / 105
1.4" / 35
1.2" / 30
Center to center / vent and air supply
Height
Height including vent connection
Width
Depth
Center boiler / vent
Back / vent
K Bottom side boiler /
L Bottom side boiler /
Q Center boiler /
M Bottom side boiler /
N Bottom side boiler /
P Center boiler /
R Center boiler /
S
Back boiler /
center of all pipe connections
* See figure 5
1.2 / 30
Dimensions

Installation & Servicing Instructions Rinnai Q Premier
15
Dimensions
8U442600
2
connection diameters table 2
boilerconnections gure5
Connectionforcombustion
airsupplyandventsystem
Boilertype
QP85N
QP130N
Vent system / Combustion air supply
80/125mm
Gas pipe
g 3/4"M-NPT
Supply pipe s
3/4"M-NPT
Return pipe r
3/4"M-NPT
Cold water pipe c
3/4"M-NPT
Hot water pipe h
3/4"M-NPT
DHW circulation return pipe x
3/4"M-NPT
Condensate pipe d
1" / 25mm
h c r s x g
s
r
h
c
x
g
s
r
g
x
c
h
d
d
d

Installation & Servicing Instructions Rinnai Q Premier
16
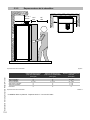
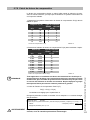
5.3.1 Clearencesfromtheboiler
Minimumrequiredclearances
tocombustibles
Minimumrequiredclearances
tonon-combustibles
Recommended
serviceclearances
Alltypes
A
lltypes
A
lltypes
inch / mm inch / mm inch / mm
Top of boiler 0" 0" 10" / 250
Back of boiler 0" 0" 0
Front of boiler * 6" / 150 6" / 150 24" / 600
Left side of boiler 0" 0" 2" / 50
Right side of boiler 0" 0" 2" / 50
Vent 0" 0" 0"
clearances to the boiler table 3
wall
2"
50
ceiling
Min. 10" /
250mm
15.7"
400
24"
600
serviceclearancestotheboiler gure6
* For closet installation: clearance is 1” / 25mm from the front.
2"
50

Installation & Servicing Instructions Rinnai Q Premier
17
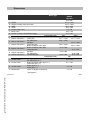
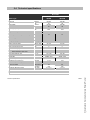
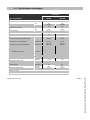
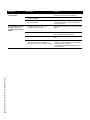
5.4 Technicalspecications
Technicalspecications table4
Boiler type QP85N QP130N
Input CH BTU/hr 85,000 130,000
kW 25 38
Input DHW BTU/hr 85,000 130,000
kW 25 38
Heating capacity BTU/hr 78,000 119,000
kW 22.9 34.9
O
2
(at full load)
% 4,4 - 4,7 4,4 - 4,7
Electr. power consumption max. W
172 199
Electr. power consumption stand by W
14 14
Current V/Hz 120Vac/60Hz 120Vac/60Hz
Fuse rating A 5AF & 4AT 5AF & 4AT
Degree of protection acc. EN 60529 IPX0D IPX0D
Weight (empty) lbs / kg
236 / 107 243 / 110
Water content CH gallon / liter 0.9 / 3.5 1.3 / 5
Water content DHW gallon / liter
24 / 90 24 / 90
Water content Plumbing Kit gallon / liter 0.58 / 2.2 0.58 / 2.2
After run time pump CH min 5 5
After run time pump DHW min 1 1
P
MS
Water pressure min.-max.
PSI / bar 14-43 / 1-3 14-43 / 1-3
P
MW
Water pressure DHW max.
PSI / bar
145 / 10 145 / 10
Flow temperature max. °F / °C 176 / 80 176 / 80
Pump type UPER 20-58 UPER 20-78
Approvals ASME, CSA ASME, CSA
DHW flow
(
at T50°F
)
gallon/min 3.1 4.1
DHW flow
(
at T27.8°C
)
liter/min 11.73 15.5
DHW flow
(
at T75°F
)
gallon/min 2.1 3,2
DHW flow
(
at T41.7°C
)
liter/min 7.95 12.1
First hour rating gallon/hour
141
211
liter/hour
534
799
Pressure difference DHW PSI / bar 4.3 / 0.3 4.3 / 0.3
CSA number
CRN number
8101.7CL 8101.7CL
Q Premier

Installation & Servicing Instructions Rinnai Q Premier
18
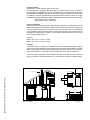
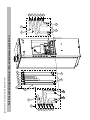
6 Connectingtheboiler
The boiler has the following connections, which can be positioned to the top, left side
or right side from the boilers by means of the pre-bend pipe kits. The connections on
the back of the boiler are engineered to work with only the Rinnai pre-bend pipe kits.
Nuts and gaskets are supplied with the boiler;
- The central heating circuit pipes.
Itisprovidedwitha3/4"malethreadontowhichthesupplyandreturnpipesof
theheatingsystemcanbescrewedaccordingtotheinstructionsinchapter6.1;
- The gas supply pipe.
Itisprovidedwitha3/4"malethreadontowhichthetailpieceofthegasvalvecan
bescrewed.Seefurtherchapter6.4;
- The condensation drain pipe.
Itconsistsofa1"(25mm)exibleplasticpipe.Thedrainpipecanbeconnected
tothisbymeansofanopenconnection.Seefurtherchapter6.6;
- The vent system and air supply system.
Itconsistsofaconcentricconnection3"/5"(80/125mm).Theboilercanbeconverted
toatwinpipeconnectionthatwillaccept80mmueandintakeairorwiththeuse
oftheincludedadapters3”PVC/CPVCueandintake.Seefurtherchapter6.7.
- Cold and hot water pipes for domestic hot water (DHW).
Itisprovidedwitha3/4"malethreadontowhichthecoldandhotwaterpipesand
hotwatercirculationreturnpipeoftheDHWsystemcanbescrewedaccordingto
theinstructionsinchapter6.5;
Thepipestobeconnectedtotheboilermustbecleanedbeforeconnectingin
ordertopreventdirtfromenteringanddamagingtheboiler.
Usethesuppliedgasketsinthe1"ttings.Usethespecialberring(indica-
tedonthegasketpackage)forthe1"gaspipetting.Iftheseinstructionsare
notfollowedexactly,areorexplosionmayresultcausingpropertydamage,
personalinjuryordeath.
NOTICE
i
s r
g
d
h cx
!
DANGER
8U442600
2
h c r s x g
s
r
h
c
x
g
s
r
g
x
c
h
d
d
d
boilerconnections gure7

Installation & Servicing Instructions Rinnai Q Premier
19
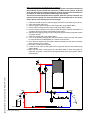
6.1 Centralheatingsystem
Connect the central heating system according to its instructions.
TheboilerpipescanbeconnectedtotheinstallationbymeansofNPTttings.
Whenremovingtheplasticsealingcapsfromthepipes,testingwatermaydrain
fromtheboiler.
Alowlossheaderispre-installedintheboiler.Thelowlossheadernotprovided
withservicevalves.Servicevalvesmustbeinstalledonthesupplyandreturn
connectionpipesoftheboiler.Dielectricunionsarenotprovidedwiththeboiler.
Dielectricunionsmustbeinstalledonthesupplyandreturnconnectionpipes
oftheboiler.
The boiler, when used in connection with a refrigeration system, must be
installedsothechilledmediumispipedinparallelwiththeboilerwithappropriate
valvestopreventthechilledmediumfromenteringtheboiler.
Theboilerpipingsystemofahotwaterboilerconnectedtoheatingcoilslocated
inairhandlingunitswheretheymaybeexposedtorefrigeratedaircirculation
mustbeequippedwithowcontrolvalvesorotherautomaticmeanstoprevent
gravitycirculationoftheboilerwaterduringthecoolingcycle.
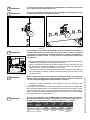
6.1.1 Pre-bendKitandInstallation
Rinnai provides 3 Pre-bend Plumbing Kit options; top, right side, and left side. One
of these options must be selected at the time of purchase. The pre-bend kit must be
tteddirectlyinthebackoftheboilerontheheatingwatersupplypipe,heatingwater
return pipe, domestic cold water pipe, domestic hot water pipe, domestic recirculation
water pipe, and the gas pipe.
Wheninstallingthesepre-bendpipescaremustbetaken.Ensurethatthersttwo
ribsonthethreadedttingattheendofthepre-bendpipearevisibleontheoutside
of the boiler; this will provide enough surface area to correctly use a backing wrench.
Always using a backing wrench to ensure that the pipe is not damaged during instal-
lation,seegure7aand7bforthecorrectpositionofthebackingwrench.Always
useabackingwrenchwhenattachingpipesandttingstotheboiler.Ifabacking
wrench is not used damage to the boiler piping might occur.
Failuretoproperlyuseabackingwrenchcouldresultindamageorbrokenpipes
intheboilers.Damagetotheboilerandpipingcausedbyincorrectinstallation
isnotcoveredbythewarranty.
NOTICE
i
NOTICE
i
NOTICE
i
NOTICE
i
gure7a gure7b

Installation & Servicing Instructions Rinnai Q Premier
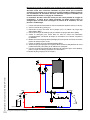
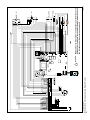
20
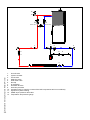
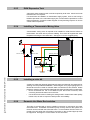
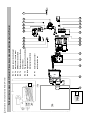
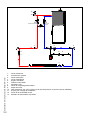
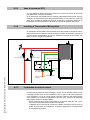
Boilerbasicpiping gure8
T
P
V1
Service valve
V2
Service valve
1. shutovalve
2. system circulator
3. check valve
4. balancing valve
5. boiler drain valve
6. dirt trap
7. air separator
8. automaticllvalve
9. backowpreventer
10. expansiontank(incasethecontentofthebuilt-inexpansiontankisnotsucient)
11. bypass for system cleaning
12. ASME 30 psi pressure relief valve
13. Temperature and pressure gauge
1
2
3
4
56
7
8 9
10
11
12
13
La page est en cours de chargement...
La page est en cours de chargement...
La page est en cours de chargement...
La page est en cours de chargement...
La page est en cours de chargement...
La page est en cours de chargement...
La page est en cours de chargement...
La page est en cours de chargement...
La page est en cours de chargement...
La page est en cours de chargement...
La page est en cours de chargement...
La page est en cours de chargement...
La page est en cours de chargement...
La page est en cours de chargement...
La page est en cours de chargement...
La page est en cours de chargement...
La page est en cours de chargement...
La page est en cours de chargement...
La page est en cours de chargement...
La page est en cours de chargement...
La page est en cours de chargement...
La page est en cours de chargement...
La page est en cours de chargement...
La page est en cours de chargement...
La page est en cours de chargement...
La page est en cours de chargement...
La page est en cours de chargement...
La page est en cours de chargement...
La page est en cours de chargement...
La page est en cours de chargement...
La page est en cours de chargement...
La page est en cours de chargement...
La page est en cours de chargement...
La page est en cours de chargement...
La page est en cours de chargement...
La page est en cours de chargement...
La page est en cours de chargement...
La page est en cours de chargement...
La page est en cours de chargement...
La page est en cours de chargement...
La page est en cours de chargement...
La page est en cours de chargement...
La page est en cours de chargement...
La page est en cours de chargement...
La page est en cours de chargement...
La page est en cours de chargement...
La page est en cours de chargement...
La page est en cours de chargement...
La page est en cours de chargement...
La page est en cours de chargement...
La page est en cours de chargement...
La page est en cours de chargement...
La page est en cours de chargement...
La page est en cours de chargement...
La page est en cours de chargement...
La page est en cours de chargement...
La page est en cours de chargement...
La page est en cours de chargement...
La page est en cours de chargement...
La page est en cours de chargement...
La page est en cours de chargement...
La page est en cours de chargement...
La page est en cours de chargement...
La page est en cours de chargement...
La page est en cours de chargement...
La page est en cours de chargement...
La page est en cours de chargement...
La page est en cours de chargement...
La page est en cours de chargement...
La page est en cours de chargement...
La page est en cours de chargement...
La page est en cours de chargement...
La page est en cours de chargement...
La page est en cours de chargement...
La page est en cours de chargement...
La page est en cours de chargement...
La page est en cours de chargement...
La page est en cours de chargement...
La page est en cours de chargement...
La page est en cours de chargement...
La page est en cours de chargement...
La page est en cours de chargement...
La page est en cours de chargement...
La page est en cours de chargement...
La page est en cours de chargement...
La page est en cours de chargement...
La page est en cours de chargement...
La page est en cours de chargement...
La page est en cours de chargement...
La page est en cours de chargement...
La page est en cours de chargement...
La page est en cours de chargement...
La page est en cours de chargement...
La page est en cours de chargement...
La page est en cours de chargement...
La page est en cours de chargement...
La page est en cours de chargement...
La page est en cours de chargement...
La page est en cours de chargement...
La page est en cours de chargement...
La page est en cours de chargement...
La page est en cours de chargement...
La page est en cours de chargement...
La page est en cours de chargement...
La page est en cours de chargement...
La page est en cours de chargement...
La page est en cours de chargement...
La page est en cours de chargement...
La page est en cours de chargement...
La page est en cours de chargement...
La page est en cours de chargement...
La page est en cours de chargement...
La page est en cours de chargement...
La page est en cours de chargement...
La page est en cours de chargement...
La page est en cours de chargement...
La page est en cours de chargement...
La page est en cours de chargement...
La page est en cours de chargement...
La page est en cours de chargement...
La page est en cours de chargement...
La page est en cours de chargement...
La page est en cours de chargement...
La page est en cours de chargement...
La page est en cours de chargement...
La page est en cours de chargement...
La page est en cours de chargement...
La page est en cours de chargement...
La page est en cours de chargement...
La page est en cours de chargement...
La page est en cours de chargement...
La page est en cours de chargement...
La page est en cours de chargement...
La page est en cours de chargement...
La page est en cours de chargement...
La page est en cours de chargement...
La page est en cours de chargement...
La page est en cours de chargement...
La page est en cours de chargement...
La page est en cours de chargement...
La page est en cours de chargement...
La page est en cours de chargement...
La page est en cours de chargement...
La page est en cours de chargement...
La page est en cours de chargement...
La page est en cours de chargement...
La page est en cours de chargement...
La page est en cours de chargement...
La page est en cours de chargement...
La page est en cours de chargement...
La page est en cours de chargement...
La page est en cours de chargement...
La page est en cours de chargement...
La page est en cours de chargement...
La page est en cours de chargement...
La page est en cours de chargement...
La page est en cours de chargement...
La page est en cours de chargement...
La page est en cours de chargement...
La page est en cours de chargement...
La page est en cours de chargement...
La page est en cours de chargement...
La page est en cours de chargement...
La page est en cours de chargement...
La page est en cours de chargement...
La page est en cours de chargement...
-
 1
1
-
 2
2
-
 3
3
-
 4
4
-
 5
5
-
 6
6
-
 7
7
-
 8
8
-
 9
9
-
 10
10
-
 11
11
-
 12
12
-
 13
13
-
 14
14
-
 15
15
-
 16
16
-
 17
17
-
 18
18
-
 19
19
-
 20
20
-
 21
21
-
 22
22
-
 23
23
-
 24
24
-
 25
25
-
 26
26
-
 27
27
-
 28
28
-
 29
29
-
 30
30
-
 31
31
-
 32
32
-
 33
33
-
 34
34
-
 35
35
-
 36
36
-
 37
37
-
 38
38
-
 39
39
-
 40
40
-
 41
41
-
 42
42
-
 43
43
-
 44
44
-
 45
45
-
 46
46
-
 47
47
-
 48
48
-
 49
49
-
 50
50
-
 51
51
-
 52
52
-
 53
53
-
 54
54
-
 55
55
-
 56
56
-
 57
57
-
 58
58
-
 59
59
-
 60
60
-
 61
61
-
 62
62
-
 63
63
-
 64
64
-
 65
65
-
 66
66
-
 67
67
-
 68
68
-
 69
69
-
 70
70
-
 71
71
-
 72
72
-
 73
73
-
 74
74
-
 75
75
-
 76
76
-
 77
77
-
 78
78
-
 79
79
-
 80
80
-
 81
81
-
 82
82
-
 83
83
-
 84
84
-
 85
85
-
 86
86
-
 87
87
-
 88
88
-
 89
89
-
 90
90
-
 91
91
-
 92
92
-
 93
93
-
 94
94
-
 95
95
-
 96
96
-
 97
97
-
 98
98
-
 99
99
-
 100
100
-
 101
101
-
 102
102
-
 103
103
-
 104
104
-
 105
105
-
 106
106
-
 107
107
-
 108
108
-
 109
109
-
 110
110
-
 111
111
-
 112
112
-
 113
113
-
 114
114
-
 115
115
-
 116
116
-
 117
117
-
 118
118
-
 119
119
-
 120
120
-
 121
121
-
 122
122
-
 123
123
-
 124
124
-
 125
125
-
 126
126
-
 127
127
-
 128
128
-
 129
129
-
 130
130
-
 131
131
-
 132
132
-
 133
133
-
 134
134
-
 135
135
-
 136
136
-
 137
137
-
 138
138
-
 139
139
-
 140
140
-
 141
141
-
 142
142
-
 143
143
-
 144
144
-
 145
145
-
 146
146
-
 147
147
-
 148
148
-
 149
149
-
 150
150
-
 151
151
-
 152
152
-
 153
153
-
 154
154
-
 155
155
-
 156
156
-
 157
157
-
 158
158
-
 159
159
-
 160
160
-
 161
161
-
 162
162
-
 163
163
-
 164
164
-
 165
165
-
 166
166
-
 167
167
-
 168
168
-
 169
169
-
 170
170
-
 171
171
-
 172
172
-
 173
173
-
 174
174
-
 175
175
-
 176
176
-
 177
177
-
 178
178
-
 179
179
-
 180
180
-
 181
181
-
 182
182
-
 183
183
-
 184
184
-
 185
185
-
 186
186


dans d''autres langues
- English: Rinnai QP130N Operating instructions
Documents connexes
-
Rinnai E110SRN Mode d'emploi
-
-
Rinnai E75CP Guide d'installation
-
Rinnai Q175CN Mode d'emploi
-
-
-
-
Rinnai M120CN Mode d'emploi
-
Rinnai REB-A4400FF-US Mode d'emploi
-
Autres documents
-
Bryant BWH Le manuel du propriétaire
-
Riello Caldariello Condens 25 KIS Manuel utilisateur
-
Extech Instruments TL625 Manuel utilisateur
-
Riello START 28 KI NG Manuel utilisateur
-
Samsung AEN160YDEHA Mode d'emploi
-
-
elco R604 Mode d'emploi
-
Kospel EKCO.T Manuel utilisateur
-
Airwell ECF 45 OG 4T Installation and Maintenance Manual
-
ACV Delta performance ventouse FV (2004) Le manuel du propriétaire