
1
MicroLoop
Operating Manual –
English
Operating Manual –
CareFusion USA
Manuel d’utilisation -
Français
Betriebshandbuch -
Deutsch
Manual de funcionamiento –
Español
Manual de Operação -
Português
Gebruiksaanwijzing –
Nederlands
Bruksanvisning –
Svenska
Manuale operativo –
Italiano
Instrukcja obsługi –
Polska
Руководство пользователя -
Русский


1
Contents
I. Introduction – English........................................................ 6
Overview.......................................................................... 9
Getting started ................................................................10
Calibration Check .............................................................15
Customisation..................................................................17
Administration Mode.........................................................18
Printing...........................................................................19
PC connection using SPCS .................................................19
Cleaning the Transducer....................................................21
Servicing.........................................................................22
Consumables/ supporting products.....................................23
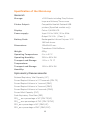
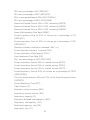
Specification of the MicroLoop............................................24
II. Introduction – CareFusion USA ..........................................28
Overview.........................................................................31
Getting started ................................................................32
Calibration Check .............................................................37
Customisation..................................................................39
Administration Mode.........................................................40
Printing...........................................................................41
PC connection using SPCS .................................................41
Cleaning the Transducer....................................................43
Servicing.........................................................................44
Consumables/ supporting products.....................................45
Specification of the MicroLoop............................................46
III. Introduction – Français .....................................................49
Vue d’ensemble ...............................................................52
Démarrage......................................................................53
Vérification d’étalonnage...................................................58
Personnalisation...............................................................60

2
Mode d’Administration ......................................................61
Impression externe ..........................................................62
Connexion au PC utilisant SPCS..........................................62
Nettoyage du capteur .......................................................64
Consommables ................................................................66
Spécifications du MicroLoop...............................................67
IV. Einführung – Deutsch .......................................................70
Überblick.........................................................................74
Startanleitung..................................................................75
Kalibrationsprüfung ..........................................................80
Individuelle Kon figuration.................................................82
Verwaltungsmodus ...........................................................83
Externes Drucken.............................................................84
Anschluss an einen PC mit SPCS Software ...........................85
Reinigen der Turbine ........................................................86
Wartung..........................................................................87
Verbrauchsmaterial/Zubehör .............................................88
Spezifikationen des MicroLoop ...........................................90
V. Introducción – Espanol......................................................93
General...........................................................................96
Instrucciones de Uso ........................................................97
Verificar la Calibración ....................................................102
Personalización ..............................................................104
Modo Administración ......................................................105
Impresión de resultados..................................................106
Conección a PC utilizando SPCS .......................................107
Limpieza del Transductor ................................................108
Servicio ........................................................................109
Desechables / Productos de Soporte.................................111
Especificaciones del MicroLoop.........................................112

3
VI. Introdução – Português...................................................115
Visão Geral....................................................................118
Iniciando a operação ......................................................119
Verificação da Calibragem ...............................................124
Personalização ...............................................................126
Modo de administração ...................................................127
Impressão.....................................................................128
Conexão ao PC utilizando o SPCS......................................128
Limpeza do transdutor ....................................................130
Assistência técnica .........................................................131
Consumíveis / Produtos de apoio......................................132
Especificações do MicroLoop ............................................133
VII. Inleiding– Nederlands .....................................................136
Overzicht ......................................................................139
Starten .........................................................................140
Kalibratiecontrole...........................................................145
Aanpassen aan de wensen van de klant ............................147
Administratie-modus ......................................................148
Extern printen................................................................149
PC-aansluiting met behulp van SPCS ................................150
Reinigen van de transducer .............................................151
Service .........................................................................152
Verbruiksartikelen / accessoires .......................................154
Specificatie van de MicroLoop ..........................................155
VIII.Inledning - Svenska........................................................158
Översikt........................................................................161
Komma igång ................................................................162
Kalibreringskontroll ........................................................167
Anpassning....................................................................168
Administreringsläge........................................................169
Extern utskrift................................................................171

4
Inkoppling till PC med SPCS ............................................171
Rengöra flodesmatare.....................................................173
Underhåll ......................................................................174
Produkter / Tillbehör.......................................................175
Specifikation av MicroLoop ..............................................176
IX. Introduzione - Italiano ....................................................179
Presentazione ................................................................182
Avvio............................................................................183
Verifica calibrazione........................................................188
Configurazione...............................................................190
Modalità amministratore .................................................191
Stampa esterna .............................................................192
Connessione a PC con SPCS.............................................192
Pulizia trasduttore ..........................................................194
Assistenza tecnica ..........................................................195
Consumabili / Prodotti di supporto....................................196
Specifiche .....................................................................197
X. Wstęp – Polska ..............................................................200
Ogólny opis ...................................................................203
Rozpoczęcie pracy ..........................................................204
Kontrola Kalibracyjna......................................................209
Konfiguracja ..................................................................211
Tryb administracyjny ......................................................212
Podłączenie zewnętrznej drukarki.....................................213
Współpraca z komputerem Program SPCS .........................213
Mycie i dezynfekcja przetwornika .....................................214
Serwis ..........................................................................215
Materiały zuŜywalne .......................................................216
Parametry techniczne .....................................................217

5
XI. Введение - Русский .......................................................220
Обзор...........................................................................223
Начало работы..............................................................224
Калибровка ..................................................................229
Установки пользователя ................................................231
Административный режим..............................................232
Печать через внешний принтер......................................233
Подключение к ПК при помощи SPCS..............................233
Очистка датчика............................................................235
Сервис..........................................................................236
Расходный материал / Дополнительные
принадлежности ...........................................................237
Спецификация..............................................................238
Customer Contact Information .........................................241


6
MicroLoop
Operating manual
I. Introduction - English
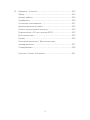
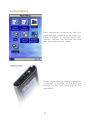
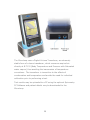
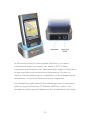
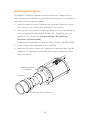
The MicroLoop is a mains/battery operated portable spirometer with
the unique combination of ease of use and sophistication. Ease of
use is assured through the use of context sensitive help screens,
accessed at a touch of a button, that explain every MicroLoop
feature. The MicroLoop is supplied with a cradle that may be
connected with the USB cables supplied, to either a PC or a printer.
The cradle also connects to the mains adapter so that the
MicroLoop’s batteries may be charged whilst it is placed in the
cradle. The blue lights on the cradle indicate that it is being
powered either by a PC connection or by the mains adapter. When
either of these sources of power is connected to the cradle, it is
ready to charge your MicroLoop.

7
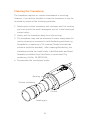
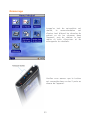
The MicroLoop uses the CareFusion Digital Volume Transducer, an
extremely stable form of volume transducer, which measures
expired air directly at B.T.P.S (Body Temperature and Pressure with
Saturated water vapour) thus avoiding the inaccuracies of
temperature corrections. The transducer is insensitive to the effects
of condensation and temperature and avoids the need for individual
calibration prior to performing a test.
Test results may be uploaded to a PC using Spirometry PC Software
and patient details may be downloaded to the MicroLoop.

8
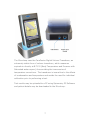
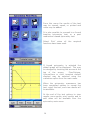
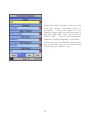
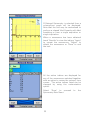
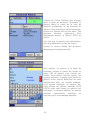
When the unit is turned on for the first
time the system customise menu is
displayed. Touch the name of the
required region with the stylus stored on
the left hand side of the unit and then
touch ‘Finish’. This will set the regional
defaults including language, if available.
If this screen is not displayed then touch
the ‘Customise’ icon on the main menu
followed by the ‘System’ icon.

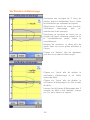
9
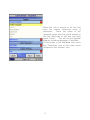
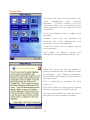
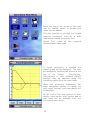
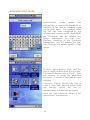
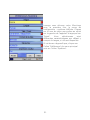
Overview
The MicroLoop uses a touch screen with
icons representing each function
available. A stylus, housed in the left
hand side of the unit, is provided for icon
screen activation and an optional mouse
is available.
Touch the displayed time to adjust time
and date.
Unused icons may be disabled by
touching the blue background and
selecting from the list displayed.
Touch the toolbox icon to adjust volume
and brightness.
Four levels of battery charge are
indicated by the segmented battery icon.
When this icon turns red the battery is
nearly exhausted and the batteries must
be charged – see Charging Procedure.
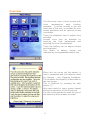
The complete functionality is described on
the help screen.
This is obtained by pressing the help
button (?).
Help text exists for every screen viewed
during the operation of the MicroLoop.
You are recommended to make full use of
the extensive Help screens provided.

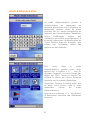
10
Getting Started
When performing a spirometry test the
recommended workflow is to enter the
patient’s details, or retrieve them from
memory, perform the required test and
then print and save the results.
Please ensure that the turbine transducer
is plugged in to either of the first two
sockets on the right hand side of the
instrument.

11
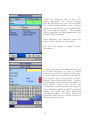
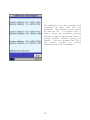
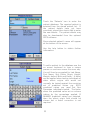
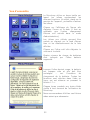
Touch the ‘Patients’ icon to enter the
patient database. The required patient
may be selected from the stored patient
list. If the patient details have not been
previously stored then touch Add to enter
the new patient’s details. The patient
details may also be downloaded from the
optional SPCS software.
Once selected, the patient’s name will
appear at the bottom of the screen.
Use the help button to obtain further
information.
To add a patient to the database use the
on screen keyboard to type a unique
patient ID and then touch the enter key.
You will then be prompted for Last Name,
First Name, Sex, Ethnic Origin, Height,
Weight, date of Birth and Factor. A factor
can be applied when testing individuals of
other ethnic origins who would not
normally be tested against the countries
set of predicted values eg ECCS predicted
values are used but Non Caucasian
individuals tested. The factor alters the
predicted value set on volume indices by
the percentage applied.

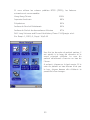
12
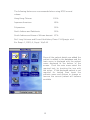
The following factors are recommended when using ECCS normal
values:
Hong Kong Chinese 100%
Japanese American 89%
Polynesians 90%
North Indians and Pakistanis 90%
South Indians and those of African descent 87%
Ref: Lung Volumes and Forced Ventilatory Flows. P.H.Quanjer et al.
Eur Respir J, 1993, 6, Suppl. 16p5-40
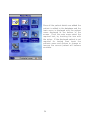
Once all the patient details are added the
patient is added to the database and the
main menu is displayed with the patient
name displayed at the bottom of the
screen. From the main menu select the
required test, by touching the icon with
the stylus. If the displayed patient is not
required for testing then touch the
patients name and options to change or
remove the current patient will become
available

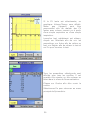
13
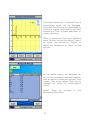
If Relaxed Spirometry is selected then a
volume/time graph will be displayed.
Note that the unit may be customised to
perform a relaxed Vital Capacity with tidal
breathing or from a single expiration or
single inspiration.
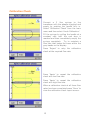
When a manoeuvre has been obtained
touch ‘Results’ to view the indices, ‘Again’
to repeat the manoeuvre, ‘Reject’ to
delete the manoeuvre or ‘Done’ to end
the test.
All the active indices are displayed for
any of the manoeuvres selected together
with an option to review the volume/ time
curves. The active indices listed can be
changed by using the customisation
option.
Select ‘Done’ to proceed to the
Spirometry Main Menu.

14
From this menu the results of the test
may be viewed, saved, or printed and
notes may be added.
It is also possible to proceed to a forced
baseline spirometry test, or a post
medication relaxed spirometry test.
Select ‘Exit’ when all the required
functions have been used.
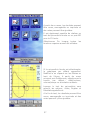
If forced spirometry is selected the
default graph will be displayed. This may
be changed by touching the arrows at the
top of the screen. Flow/Volume,
Volume/time or child incentive default
displays may be selected using the
customise option from the main menu.
When the spirometry manoeuvre has
been completed options to repeat the
test, reject the test, and view results will
be available.
At the end of the test options to view
results, save results, print results, and to
add notes will be available from the
spirometry main menu.

15
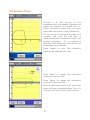
Calibration Check
Connect a 3 litre syringe to the
transducer with the adapter supplied and
empty by pushing the handle fully in.
Select ‘Calibration Check’ from the main
menu and then select ‘check Calibration’.
Fill the syringe by pulling the handle at a
constant rate until the end stop is
reached and then immediately empty the
syringe completely. Try to maintain a
flow rate that keeps the trace within the
grey bands on the display.
Press ‘Reject’ to retry the calibration
check at the required flow rate.
Press ‘Again’ to repeat the calibration
check at a low flow rate.
Press ‘Again’ to repeat the calibration
check at a high flow rate.
When a calibration check at all three flow
rates has been completed press ‘Done’ to
view the calibration check report screen.

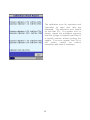
16
The calibration error for expiration and
inspiration at each flow rate are
displayed. The calibration error should
be less that 3%. If a greater error is
shown, repeat the procedure ensuring
that the syringe is emptied and filled in a
smooth manner without jerking the
handle. If an error greater than 3% is
still shown, inspect the turbine
transducer and clean if necessary.

17
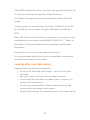
Customisation
The ‘Customise’ option from the main menu may be used to
configure many of the features of your MicroLoop and are divided
into system and spirometry options.
System options allow you to configure the following:
Language.
Height and weight units.
Date format.
Date separator.
Colour or monochrome printing (on external printer).
Personalised printout heading.
Spirometry options allow you to configure the following:
Relaxed spirometry mode (with or without tidal breathing).
Predicted value sets.
Predicted area or line display.
Display default.
Incentive display type.
Printed graphs.
Best test criteria
Interpretation and Lung Age indication.
Dyspnoea score and smoking status.
Daily calibration reminder.
Manual temperature adjustment.
Indices selection.
Note that when the language is selected, the height and weight
units, date format, and date separator will be automatically
changed. However this automatic selection may be overridden
manually.
La page est en cours de chargement...
La page est en cours de chargement...
La page est en cours de chargement...
La page est en cours de chargement...
La page est en cours de chargement...
La page est en cours de chargement...
La page est en cours de chargement...
La page est en cours de chargement...
La page est en cours de chargement...
La page est en cours de chargement...
La page est en cours de chargement...
La page est en cours de chargement...
La page est en cours de chargement...
La page est en cours de chargement...
La page est en cours de chargement...
La page est en cours de chargement...
La page est en cours de chargement...
La page est en cours de chargement...
La page est en cours de chargement...
La page est en cours de chargement...
La page est en cours de chargement...
La page est en cours de chargement...
La page est en cours de chargement...
La page est en cours de chargement...
La page est en cours de chargement...
La page est en cours de chargement...
La page est en cours de chargement...
La page est en cours de chargement...
La page est en cours de chargement...
La page est en cours de chargement...
La page est en cours de chargement...
La page est en cours de chargement...
La page est en cours de chargement...
La page est en cours de chargement...
La page est en cours de chargement...
La page est en cours de chargement...
La page est en cours de chargement...
La page est en cours de chargement...
La page est en cours de chargement...
La page est en cours de chargement...
La page est en cours de chargement...
La page est en cours de chargement...
La page est en cours de chargement...
La page est en cours de chargement...
La page est en cours de chargement...
La page est en cours de chargement...
La page est en cours de chargement...
La page est en cours de chargement...
La page est en cours de chargement...
La page est en cours de chargement...
La page est en cours de chargement...
La page est en cours de chargement...
La page est en cours de chargement...
La page est en cours de chargement...
-
 1
1
-
 2
2
-
 3
3
-
 4
4
-
 5
5
-
 6
6
-
 7
7
-
 8
8
-
 9
9
-
 10
10
-
 11
11
-
 12
12
-
 13
13
-
 14
14
-
 15
15
-
 16
16
-
 17
17
-
 18
18
-
 19
19
-
 20
20
-
 21
21
-
 22
22
-
 23
23
-
 24
24
-
 25
25
-
 26
26
-
 27
27
-
 28
28
-
 29
29
-
 30
30
-
 31
31
-
 32
32
-
 33
33
-
 34
34
-
 35
35
-
 36
36
-
 37
37
-
 38
38
-
 39
39
-
 40
40
-
 41
41
-
 42
42
-
 43
43
-
 44
44
-
 45
45
-
 46
46
-
 47
47
-
 48
48
-
 49
49
-
 50
50
-
 51
51
-
 52
52
-
 53
53
-
 54
54
-
 55
55
-
 56
56
-
 57
57
-
 58
58
-
 59
59
-
 60
60
-
 61
61
-
 62
62
-
 63
63
-
 64
64
-
 65
65
-
 66
66
-
 67
67
-
 68
68
-
 69
69
-
 70
70
-
 71
71
-
 72
72
-
 73
73
-
 74
74


dans d''autres langues
Autres documents
-
Hach TitraLab AT1222 Basic User Manual
-
-
-
Gima 33520 Le manuel du propriétaire
-
-
Starrett SR160 Manuel utilisateur
-
Medtronic OmniFilter bacteria filter Manuel utilisateur
-
Covidien Puritan Bennett Re/X800 expiratory bacteria filter Mode d'emploi
-
Drive DV55D Le manuel du propriétaire
-
 Welch Allyn 420TB spécification
