Hinweise zur Reinigung
Knoblauchschneider in die Einzelteile zerlegen.
Stempel unter fließendem Wasser reinigen.
Achtung: Transparente Lochplatte (1a) dabei
auf keinen Fall abnehmen. Der Knoblauch-
schneider ist dann nicht mehr funktionsfähig!
Quadratischen Kunststoffbehälter (3) aus dem
Unterteil lösen, seitliche Klipse zusammendrü-
cken und Schneidgitter herausziehen. Mit der
Spülbürste unter fließendem Wasser reinigen.
Unteren Kunststoffring (6) nach rechts
drehen, Schutzdeckel (7) abziehen. Beide Teile
abspülen. Knoblauchschneider nicht in die
Spülmaschine geben.
Beim Zusammenbauen in umgekehrter Rei-
henfolge verfahren.
Bitte beachten Sie:
Knoblauchzehe vorher schälen und das harte
Endstück abschneiden.
Immer nur eine Zehe einlegen.
Große Zehen halbieren oder vierteln.
Herzlichen Glückwunsch
zu Ihrer Wahl. Sie haben sich für ein Quali-
tätsprodukt von WMF entschieden.
Der Knoblauchschneider behandelt die
scharf-würzige Knolle so, dass ihr unver-
gleichlicher Geschmack erhalten bleibt. In
Sekundenschnelle werden die einzelnen Zehen
in gleichmäßige Würfel geschnitten, nicht zer-
drückt. Dabei gehen keine wertvollen Inhalts-
und Aromastoffe verloren, es läuft kein Saft
aus, gibt kein Rückstände und an den Händen
bleibt kein unangenehmer Geruch haften.
Hinweise zur Bedienung
Vor dem ersten Gebrauch Knoblauchschneider
zerlegen und die Einzelteile unter fließendem
Wasser abwaschen.
Zum Öffnen Knoblauchschneider am unteren
Teil (5) festhalten. Feststellring in der Mitte
(2) nach rechts drehen bis sich das Gehäuse
(1) löst. Gehäuse mit Stempel (1) nach oben
abziehen.
Geschälte Knoblauchzehe in den quadrati-
schen Kunststoffbehälter (3) legen. Stempel
aufsetzen und Gehäuse bis zum Anschlag nach
rechts drehen.
Unteren Schutzdeckel (7) abnehmen.
Unterteil (5) festhalten und Gehäuse (1) nach
rechts drehen.
Beim Drehen wird die Knoblauchzehe im
Schneidegitter in rechteckige Streifen zerteilt.
Das Schneidmesser am unteren Kunststoffring
(6) schneidet daraus Würfel.
Wenn die ganze Zehe zerschnitten ist, verhin-
dert eine Anschlagsperre das Überdrehen.
Congratulations
on your choice! You have chosen a quality
product from WMF.
The garlic slicer processes the pungent tuber
in a way that retains its incomparable taste.
In just a few seconds the individual cloves are
cut into equal-sized cubes and are not cruhed.
This way none of the valuable ingredients and
aromas are lost, nor is any of the juice, there
is no residue and your hands are not left with
an unpleasant smell.
Operating instructions
Before using the garlic slicer for the first time,
disassemble it and wash the individual parts
under running water.
To open the garlic slicer hold the lower
part (5). Turn the central ring (2) to the right
until the housing (1) becomes loose. Pull the
housing and puncher (1) upwards.
Place a peeled garlic clove in the square
plastic container (3). Attach the puncher and
turn the housing to the right as far as it will
go. Remove the lower protective cap (7).
Hold the lower part (5) firmly and turn the
housing (1) to the right.
By turning the housing, the garlic clove on
the cutting grid is sliced into rectangular
strips. The blade on the lower plastic ring (6)
then cuts them into cubes.
When the entire garlic clove has been cut,
there is a stop mechanism that prevents
against overwinding.
Nous vous félicitons pour votre choix.
Vous avez choisi un produit WMF de qualité.
Le coupe ail manipule les gousses fortement
épicés de façon, à ce que leur goût inoubliable
soit conservé. En quelques secondes, les
gousses sont coupées en dés réguliers, sans
être écrasées. Ainsi, pas de perte de substances
ou d‘arôme, pas de jus qui s‘écoule, pas de
déchets et aucune odeur désagréable ne
subsiste sur les mains.
Conseils d‘utilisation
Avant la première utilisation, démonter
le coupe ail et laver chaque pièce à l‘eau
courante.
Pour l‘ouverture, tenir fermement le coupe ail
sous la pièce (5). Tourner l‘anneau central (2)
vers la droite, jusqu‘à ce que le boitier (1) se
desserre. Retirer le boitier avec le poinçon (1)
vers le haut.
Poser la gousse d‘ail pelée dans le récipient
plastique carré (3). Poser le poinçon et tourner
le boitier vers la droite jusqu‘au seuil de
résistance.
Ôter le couvercle de protection inférieur (7).
Maintenir la partie inférieure (5) et tourner le
boitier (1) vers la droite.
En tournant, le coupe ail découpe la gousse
d‘ail avec la grille coupante en lanières
rectangulaires. Le couteau tranchant de
l‘anneau plastique inférieur (6) les découpe
en dés.
Lorsque la gousse est totalement découpée,
une sécurité d‘arrêt empêche le sur régime.
DE EN FR
Instructions for cleaning
Disassemble the garlic slicer into its individual
parts. Clean the puncher (1a) under running
water. Attention: Under no circumstances
must you remove the transparent perforated
plate, as otherwise the garlic slicer will no
longer work properly!
Remove the square plastic container (3) from
the lower part, press together the side clips
and remove the cutting grid. Use a brush to
clean it under running water. Turn the lower
plastic ring (6) to the right and remove the
protective cap (7). Rinse both parts. Do not
clean the garlic slicer in the dishwasher.
To re-assemble, perform the steps in reverse
order.
Please note:
Peel the garlic clove and cut off the hard end
before inserting in the slicer.
Only insert one garlic clove at a time.
Halve or quarter large garlic cloves.
Conseils de nettoyage
Démonter complètement le coupe ail.
Nettoyer le poinçon (1a) à l‘eau courante.
Attention: Le coupe ail n‘est alors plus en état
de fonctionnement.
Enlever le récipient plastique carré de la partie
inférieure, appuyer sur les clips latéraux et
retirer la grille de coupe. Nettoyer à l‘eau
courante avec une brosse de nettoyage.
Tourner l‘anneau plastique inférieur (6) vers la
droite, retirer le couvercle de protection (7).
Laver les deux pièces. Ne pas mettre le coupe
ail au lave-vaisselle.
Procéder au montage selon la procédure
inverse.
Attention:
Peler auparavant la gousse d‘ail et couper
l‘extrémité dure.
Toujours mettre une seule gousse.
Couper les grosses gousses en deux ou
en quatre.
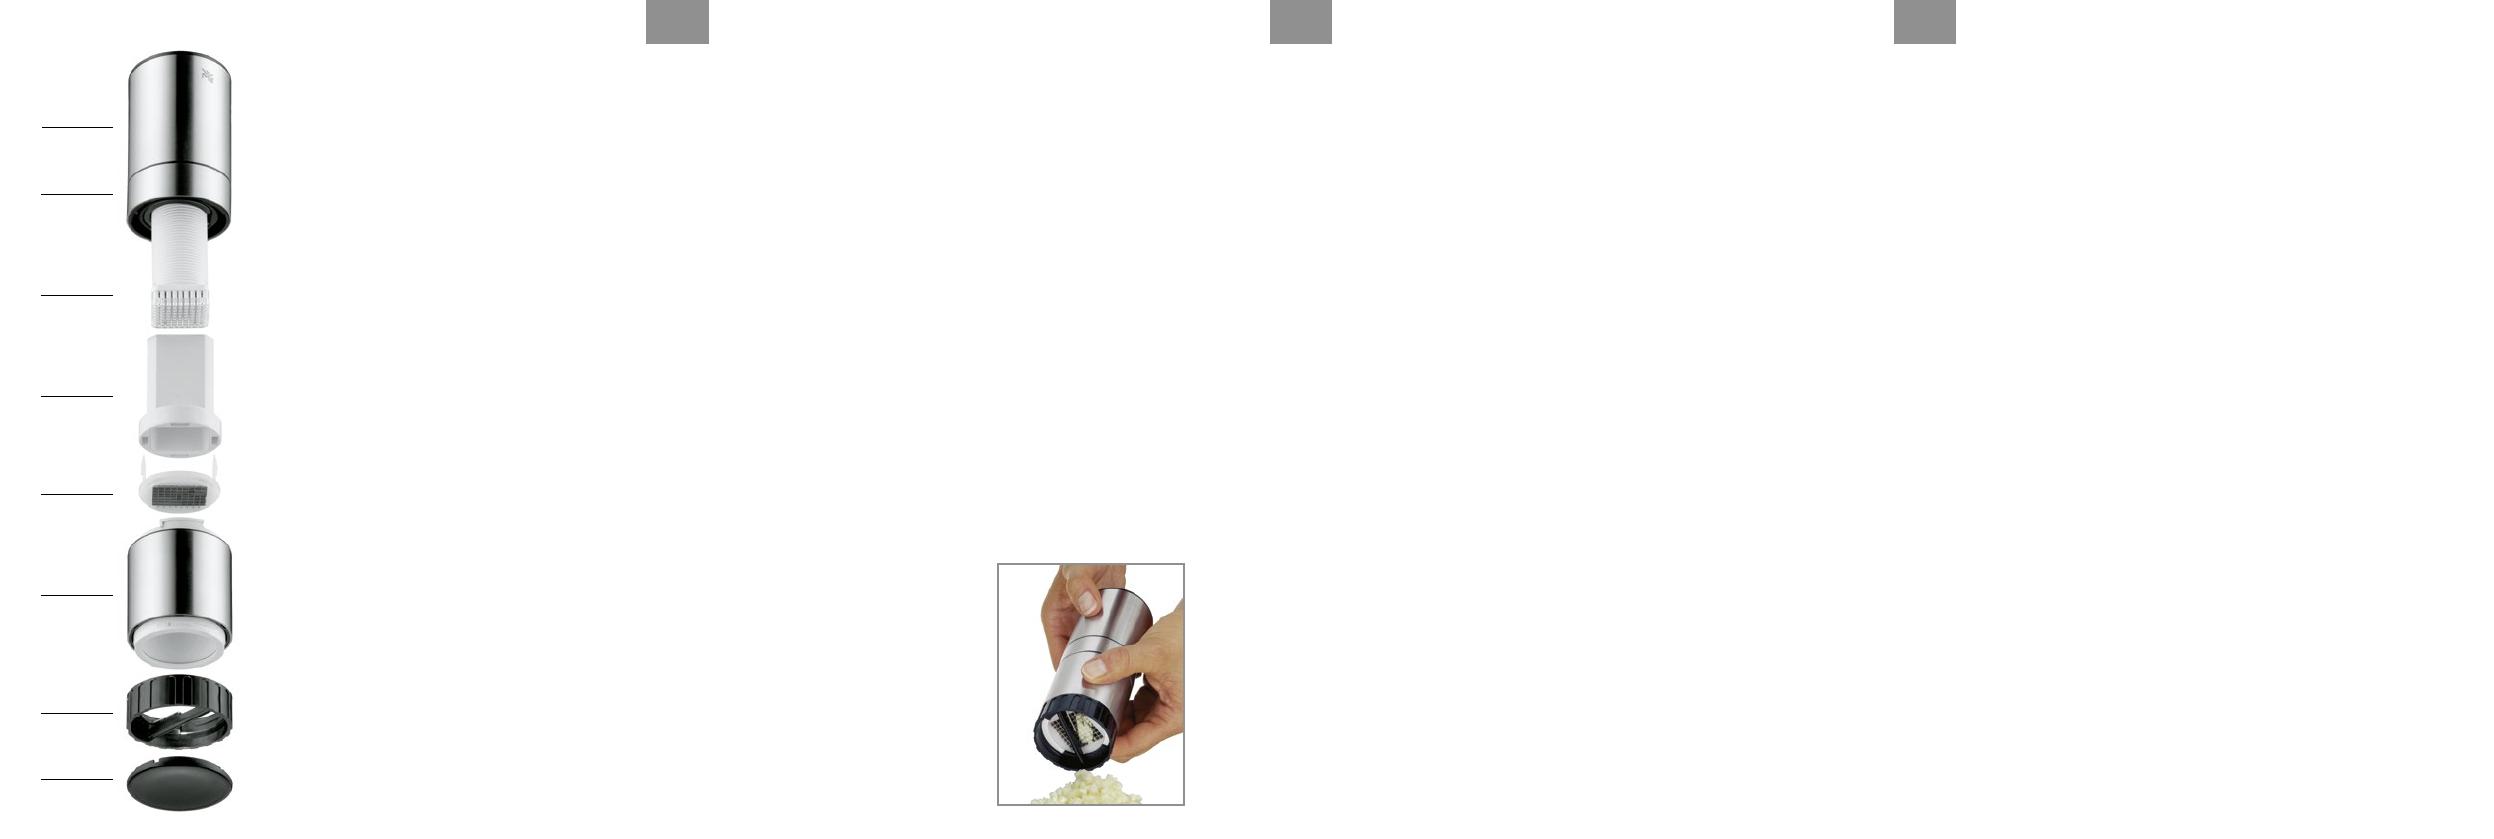
1 Gehäuse mit Stempel
Casing with stamp
Boîtier (avec tampon)
Carcasa (con tampón)
Parte superiore (con pistoncino)
带冲头的壳体
1a Stempel
Stamp
Tampon
Tampón
Pistoncino
冲头
2 Mittelring mit Feststellschraube
Central ring with fixing screw
Anneau central avec vis de serrage
Anillo central con tuerca sujección
Anello intermedio con vite di arresto
带固定螺钉的中间环
3 Behälter
Container
Réceptacle
Recipiente
Contenitore
容器
4 Schneidgitter
Cutting grid
Grille coupante
Rejilla corte
Griglia di taglio
切割栅
5 Gehäuse-Unterteil
Lower part
Partie inférieure
Base
Parte inferiore
壳体底座
6 Kunststoffring mit Schneidmesser
Plastic ring with cutting knife
Anneau plastique avec lame
Anillo plástico con cuchilla
Anello di plastica con lame
带切割刀的塑料环
7 Schutzdeckel
Protective cap
Couvercle de protection
Tapa protección
Coperchio di protezione
护盖
1
2
1a
3
4
5
6
7
