
FREEZERATOR_CONVERTIBLEREFRIGERATOR/FREEZER
REFRIGERADOR/CONGELADORCONVERTIBLEFREEZERATOR_
REFRIGERATEUR/CONGELATEURCONVERTIBLEFREEZERATOR_
_ii,'iiiiiii_i,jii_::i:i:!iii:,i:_:_¸_:iii:i::i!i_'!_ii!i_iiiii!iiiii_!i:,_i:iiii:_iiiiiiiO_ii_i_ii_ii_!!,!i__:ii:i::i"_iiiii_i_ji_ii_ii_!ii_!_!i!ii_iiiiii_?i_ii_
Table of Contents/lndice/Table des matieres ............ 2
IT'S TIME TO RETHINK THE GARAGE. TM
ES TIEMPO DE VOLVER A PENSAR EN EL GARAGE. TM
LE GARAGE REPENSI_. TM

TABLEOF CONTENTS
CONVERTIBLE REFRIGERATOR/FREEZER SAFETY ...................... 3
Proper Disposal of Your Old Refrigerator .......................................... 3
INSTALLATION INSTRUCTIONS ........................................................ 4
Unpack the Refrigerator ..................................................................... 4
Location Requirements ...................................................................... 4
Electrical Requirements ..................................................................... 5
Convertible Refrigerator/Freezer Doors ............................................. 5
Adjust the Doors ................................................................................ 7
Caster Installation ............................................................................... 7
Normal Sounds .................................................................................. 9
CONVERTIBLE
REFRIGERATOR/FREEZER USE ........................................................ 9
Ensuring Proper Air Circulation .......................................................... 9
Using the Controls ............................................................................. 9
UPPER COMPARTMENT FEATURES .............................................. 10
Upper Compartment Shelf ............................................................... 10
Upper Compartment Floor ............................................................... 10
LOWER COMPARTMENT FEATURES ............................................. 10
Shelves ............................................................................................ 10
Baskets ............................................................................................ 11
DOOR FEATURES .............................................................................. 11
Door Rails ........................................................................................ 11
Door Bins ......................................................................................... 11
Wire Door Shelf ................................................................................ 12
Can Rack ......................................................................................... 12
CONVERTIBLE REFRIGERATOR/FREEZER CARE ....................... 12
Cleaning ........................................................................................... 12
Changing the Light Bulbs ................................................................ 12
Power Interruptions ......................................................................... 12
Vacation and Moving Care .............................................................. 13
TROUBLESHOOTING ........................................................................ 13
ASSISTANCE OR SERVICE .............................................................. 14
In the U.S.A ...................................................................................... 14
In Canada ......................................................................................... 14
WARRANTY ........................................................................................ 15
iNDICE
SEGURIDAD DEL
REFRIGERADOR/CONGELADOR CONVERTIBLE ......................... 16
C6mo deshacerse de su refrigerador viejo ..................................... 16
INSTRUCClONES DE INSTALACION ............................................... 17
Desempaque el refrigerador ............................................................ 17
Requisitos de ubicaci6n ................................................................... 17
Requisitos el6ctricos ........................................................................ 18
Puertas del refrigerador/congelador convertible ............................. 18
Ajuste las puertas ............................................................................. 20
Instalaci6n de las ruedecillas ........................................................... 20
Son|dos normales ............................................................................ 22
USO DEL REFRIGERADOR/CONGELADOR CONVERTIBLE ....... 23
C6mo asegurar la debida circulaci6n de aire .................................. 23
Uso de los controles ........................................................................ 23
CARACTER|STICAS DEL COMPARTIMIENTO SUPERIOR ........... 24
Estante del compartimiento superior ............................................... 24
Base del aompartimiento superior ................................................... 24
CARACTERJSTICAS DEL COMPARTIMIENTO INFERIOR ............ 24
Estantes ........................................................................................... 24
Canastillas ........................................................................................ 25
CARACTERJSTICAS DE LA PUERTA ............................................... 25
Rieles de la puerta ........................................................................... 25
Recipientes de la puerta .................................................................. 25
Estante de alambre para la puerta .................................................. 25
Portalatas ......................................................................................... 26
CUIDADO DEL
REFRIGERADOR/CONGELADOR CONVERTIBLE ......................... 26
Limpieza ........................................................................................... 26
C6mo cambiar los focos ................................................................. 26
Cortes de corriente .......................................................................... 26
Cuidado durante las vacaciones y mudanzas ................................ 26
SOLUClON DE PROBLEMAS ........................................................... 27
AYUDA O SERVIClO TI_CNICO ........................................................ 28
En los EE.UU ................................................................................... 28
En Canada ....................................................................................... 28
GARANTiA .......................................................................................... 29
TABLEDESMATIERES
SleCU RITle DU
RIeFRIGI_RATEU R/CONGleLATEU R CONVERTIBLE ...................... 30
Mise au rebut de votre vieux r6frig6rateur ....................................... 30
INSTRUCTIONS D'INSTALLATION .................................................. 31
D6ballage du r6frig6rateur ............................................................... 31
Emplacement d'installation .............................................................. 31
Sp&cifications 61ectriques ................................................................ 32
Portes du r6frig6rateur/cong61ateur convertible .............................. 32
Ajustement des portes ..................................................................... 34
Installation des roulettes .................................................................. 34
Sons normaux .................................................................................. 36
UTILISATION DU
RleFRIGI_RATEU R/CONGleLATEU R CONVERTIBLE ...................... 36
Pour assurer une circulation d'air correcte ...................................... 36
Utilisation des commandes ............................................................. 36
CARACTI_RISTIQUES DU COMPARTIMENT SUPI_RIEUR ............ 37
Tablette du compartiment sup6rieur ............................................... 37
Fond du compartiment sup6rieur .................................................... 37
CARACTI_RISTIQUES DU COMPARTIMENT INFI_RIEUR ............. 38
Tablettes .......................................................................................... 38
Paniers ............................................................................................. 38
CARACTI_RISTIQUES DE LA PORTE .............................................. 39
Tringles dans la porte ...................................................................... 39
Balconnets dans la porte ................................................................. 39
Tablette m6tallique de porte ............................................................ 39
Porte-cannettes ............................................................................... 39
ENTRETIEN DU
RI_FRIGI_RATEU R/CONGI_LATEUR CONVERTIBLE ..................... 39
Nettoyage ........................................................................................ 39
Remplacement des ampoules d'6clairage ...................................... 40
Pannes de courant .......................................................................... 40
Entretien avant les vacances ou Iors d'un d6m6nagement ............ 40
DI_PANNAGE ...................................................................................... 41
ASSISTANCE OU SERVICE .............................................................. 42
GARANTIE ......................................................................................... 43

CONVERTIBLEREFRIGERATOR/FREEZERSAFETY
Your safety and the safety of others are very important.
We have provided many important safety messages in this manual and on your appliance. Always read and obey all safety
messages.
This is the safety alert symbol.
This symbol alerts you to potential hazards that can kill or hurt you and others.
All safety messages will follow the safety alert symbol and either the word "DANGER" or "WARNING."
These words mean:
You can be killed or seriously injured if you don't immediately
follow instructions.
You can be killed or seriously injured if you don't follow
instructions.
All safety messages will tell you what the potential hazard is, tell you how to reduce the chance of injury, and tell you what can
happen if the instructions are not followed.
IMPORTANT SAFETY INSTRUCTIONS
WARNING: To reduce the risk of fire, electric shock, or injury when using your convertible refrigerator/freezer, follow these
basic precautions:
m Plug into a grounded 3 prong outlet.
m Do not remove ground prong.
l Do not use an adapter.
m Do not use an extension cord.
m Disconnect power before servicing.
m Replace all parts and panels before operating.
• Use nonflammable cleaner.
• Keep flammable materials and vapors, such as gasoline,
away from convertible refrigerator/freezer.
• Use two or more people to move and install convertible
refrigerator/freezer.
• Remove doors or lid from your old freezer or refrigerator.
SAVE THESE INSTRUCTIONS
ProperDisposalofYourOld Refrigerator
Before You Throw Away Your Old Refrigerator
• Take off the doors.
• Leave the shelves in place so that children may not easily climb
inside.
IMPORTANT: Child entrapment and suffocation are not problems of
the past. Junked or abandoned refrigerators are still dangerous -
even if they will sit for "just a few days." If you are getting rid of your
old refrigerator, please follow these instructions to help prevent
accidents.

INSTALLATIONINSTRUCTIONS
iiiJi!i_ii_!::;;',_,,<::;iiiC!,_i'ii_i_'_ii_,!7_:;ii!'ii!i_l_{_i'_iii!iiil}ii(i17,z,7'i,'il;;i_!i_iii:i;:::_l_f_
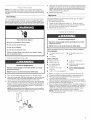
Excessive Weight Hazard
Use two or more people to move and install convertible
refrigerator/freezer.
Failure to do so can result in back or other injury.
Remove the Packaging
• Remove tape and glue residue from surfaces before turning on
the convertible refrigerator/freezer. Rub a small amount of liquid
dish soap over the adhesive with your fingers. Wipe with warm
water and dry.
• Do not use sharp instruments, rubbing alcohol, flammable fluids,
or abrasive cleaners to remove tape or glue. These products can
damage the surface of your convertible refrigerator/freezer. For
more information, see "Convertible Refrigerator/Freezer Safety."
When Moving Your Convertible Refrigerator/Freezer:
Your convertible refrigerator/freezer is heavy= When moving
the convertible refrigerator/freezer for cleaning or service,
be sure to protect the floor= Always pull the convertible
refrigerator/freezer straight out when moving it. Do not
wiggle or "walk" the convertible refrigerator/freezer when
trying to move it, as floor damage could occur=
NOTE: If casters are installed, unlock the casters before
trying to move your convertible refrigerator/freezer=
Clean Before Using
After you remove all of the packaging materials, clean the inside of
your convertible/refrigerator freezer before using it. See the cleaning
instructions in "Convertible Refrigerator/Freezer Care."
Ice Maker
Ice maker option not available.
E×plosion Hazard
Keep flammable materials and vapors, such as
gasoline, away from convertible refrigerator/freezer.
Failure to do so can result in death, explosion, or fire.
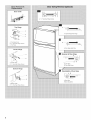
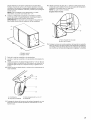
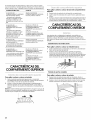
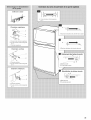
To ensure proper ventilation for your convertible refrigerator/freezer,
allow for _/_"(1.25 cm) space on each side and at the top. When
installing your convertible refrigerator/freezer next to a fixed wall,
leave a 2" (5.08 cm) minimum clearance on each side to allow for the
door to swing open.
NOTE: Do not install the convertible refrigerator/freezer near an
oven, radiator, or other heat source where the temperature will rise
above 110°F (43°C), nor in a location where the temperature will fall
below 0°F (-17°C).

_iii}}
Base Grille
A. Top Hinge Cover
B. %_" Hex-Head Hinge Screws
C. Top Hinge
Center Hinge
A. Center Hinge
B. %_" Hex-Head Hinge Screws
Bottom Hinge
A. Bottom Hinge
B. %_"Hex-Heacl Hinge S(;'rews
o o
o
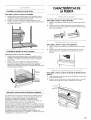
A. Cabinet Hinge Hole Plugs
A. Door Hinge Hole Plug
Removal of Door Stops
A. Door Stop
B. Door Stop Screw
Reinstallation of Door Stops
O
A. Door Stop
B. Door Stop Screw

NOTE: If the casters are installed on your convertible refrigerator/
freezer, the leveling screws will not work. Shims can be placed under
the casters to level a convertible refrigerator/freezer that has casters
installed.
Door Closing
Your convertible refrigerator/freezer has two front adjustable rollers -
one on the right and one on the left. If your convertible refrigerator/
freezer seems unsteady or you want the doors to close easier, adjust
the convertible refrigerator/freezer's tilt using the instructions below.
Electrical Shock Hazard
Plug into a grounded 3 prong outlet.
Do not remove ground prong,
Do not use an adapter,
Do not use an extension cord.
Failure to follow these instructions can result in death,
fire, or electrical shock.
1. Plug into a grounded 3 prong outlet.
2,
3.
4,
Excessive Weight Hazard
Use two or more people to move and install convertible
refrigerator/freezer,
Failure to do so can result in back or other injury.
Move the convertible refrigerator/freezer into its final position.
Remove the base grille. See Base Grille graphic. The two leveling
screws are part of the front roller assemblies which are at the
base of the convertible refrigerator/freezer on either side.
Use a screwdriver to adjust the leveling screws. Turn the leveling
screw to the right to raise that side of the convertible refrigerator/
freezer or turn the leveling screw to the left to lower that side. It
may take several turns of the leveling screws to adjust the tilt of
the convertible refrigerator/freezer.
NOTE: Having someone push against the top of the convertible
refrigerator/freezer takes some weight off the leveling screws and
rollers. This makes it easier to adjust the screws.
5. Open both doors again and check to make sure that they close
as easily as you like. If not, tilt the convertible refrigerator/freezer
slightly more to the rear by turning both leveling screws to the
right. It may take several more turns, and you should turn both
leveling screws the same amount.
6. Replace the base grille.
Align Doors
If the space between your doors looks uneven, you can adjust it
using the instructions below:
1. Pry off the top hinge cover.
2. Loosen the top hinge screws using a 5/16"socket or wrench.
3. Have someone hold the door in place or put a spacer between
the doors while you tighten the top hinge screws.
4. Replace the top hinge cover.
Excessive Weight Hazard
Use two or more people to move and install convertible
refrigerator/freezer,
Failure to do so can result in back or other injury.
Gather the required tools and parts before starting installation.
TOOLS NEEDED:
• W' Socket wrench or nut • 3/8"Socket wrench or nut
driver driver
• W' Wrench
PARTS SUPPLIED:
• Rigid casters (2) • V4-20 X 1V4" Hex-head
• Swivel casters (2) bolts (4)
• 5/16-18 Self-locking • Caster brackets (located in
hex-nuts (16) FeaturePak) (2)
• 546-18 x %" Hex-head • Plastic skids (shipped with
the convertible refrigerator/
bolts (16) freezer)
• 1/4-20 x 1V4"Lock washers (4)
1. Before you begin, turn the lower compartment control to off.
2. Unplug convertible refrigerator/freezer or disconnect power.
3. Remove food and any adjustable shelves and bins from
convertible refrigerator/freezer.
4. Open the lower compartment door and remove the base grille.
Remove the grille by grasping the grille with both hands, lifting up
and pulling bottom of the grille toward you.
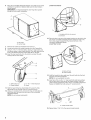
5. Place the plastic skids (shipped with the convertible refrigerator/
freezer) on the floor at least 3 ft (91.44 cm) apart. Lay a piece of
cardboard or other protective material over the skids. This will
elevate the convertible refrigerator/freezer to allow for easier
caster installation and also protect it from scratches.
NOTE: If the skids have been discarded or are not available,
2" x 4" boards may be used.

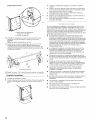
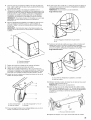
6. Lower Front Corner
Place the convertible refrigerator/freezer on its side on top of the
cardboard or protective material. Make sure the door hinge is
facing upward.
IMPORTANT: It is important that the door hinge face upward
during the entire caster installation.
4J
A. Top hinge
B. Center hinge
7. Remove the casters and fasteners from the box.
8. Locate and remove the caster brackets from the FeaturePak.
9. Using 5/16-18 x %" hex-head bolts, attach one rigid caster and
one swivel caster to each caster bracket. The rigid caster fits the
front of the bracket and the swivel caster fits on the rear.
10. Insert the hex-head bolts from the bottom and start the self-
locking nuts for each caster.
A. Leveling bolt (do not remove)
B. Unit bolt
13. Place the slot in the rear of the caster bracket over the hole in the
rear of the convertible refrigerator/freezer. Align the hole in the
front of the caster bracket with the hole in the front of the
convertible refrigerator/freezer.
Lower Rear Corner
A
B
A. Self-locking nut
B. Caster bracket
C. _8-18 x 7_,,Hex-head bolt
D. Caster
11. Hold the head of the hex-head bolts with a wrench while
tightening the self-locking nuts with a socket wrench.
12. Using a W' socket wrench, remove the four unit bolts (two on
each side) from the lower front and rear of the convertible
refrigerator/freezer.
NOTE: Do not remove leveling bolt.
A. Rear unit hole
B. Caster bracket
14. Hold the bracket in place and insert the unit bolts into the front
and rear unit holes and tighten.
NOTE: Do not overtighten the bolts.
15. Insert two of the V4-20 x 1V4" hex-head bolts and lock washers
into the two holes in the side of the caster bracket. Push the
caster bracket against the bottom of the convertible refrigerator/
freezer and tighten the bolts using a 3/8" socket wrench.
A
A. Caster bracket holes
16. Repeat steps 12 to 15 for the second caster bracket.

Complete the Assembly
1. Lock the front caster wheels.
2. Insert a small piece of cardboard between the caster brake and
the floor. This will help prevent the brake from rubbing on the
floor.
CONVERTIBLE
REFRIGERATOR/FREEZERUSE
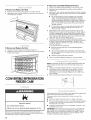
In order to ensure proper temperature, you need to permit airflow
between the lower and upper sections. As shown in the illustration,
the majority of the cold air enters the lower compartment through
vents behind the lower control box, flows through the lower section
and is recirculated through the opening in the top of the lower
compartment. The rest of the cold air enters the upper compartment
through the vent in the upper control box, then flows through the
upper section and is recirculated through the rear wall.
3. Stand the convertible refrigerator/freezer upright.
4. Replace the base grille by placing the metal clips in the openings
in the metal panel and rolling the grille downward until it snaps
into place.
5. Unlock the wheels and move the convertible refrigerator/freezer
into its desired location.
6. After the convertible refrigerator/freezer is in position, lock the
wheels.
7. Plug in convertible refrigerator/freezer or reconnect power.
Your new convertible refrigerator/freezer may make sounds that your
old one didn't make. Because the sounds are new to you, you might
be concerned about them. Most of the new sounds are normal. Hard
surfaces, such as the floor, walls, and cabinets, can make the sounds
seem louder. The following describes the kinds of sounds and what
may be making them.
• Your convertible refrigerator/freezer is designed to run efficiently,
to keep your food items at the desired temperatures and to
minimize energy usage. The high efficiency compressor and fans
may cause your convertible refrigerator/freezer to run longer than
your old one. You may also hear a pulsating or high-pitched
sound from the compressor or fans adjusting to optimize
performance.
• Your convertible refrigerator/freezer will sound louder than
regular refrigerators. This is due to the high fan speed. This
speed is necessary to keep the convertible refrigerator/freezer
operating properly in the harsher environments of most garages.
• You may hear a hissing noise after you close the lower
compartment door. This is due to the colder temperature of the
lower compartment and the stronger seal on the door.
• You may hear the evaporator fan motor circulating air through the
upper and lower compartments. The fan speed may increase as
you open the doors or add warm food.
• Rattling noises may come from the flow of refrigerant or items
stored on top of the convertible refrigerator/freezer.
• Water dripping on the defrost heater during a defrost cycle may
cause a sizzling sound.
• As each cycle ends, you may hear a gurgling sound due to the
refrigerant flowing in your convertible refrigerator/freezer.
• Contraction and expansion of the inside walls may cause a
popping noise.
• You may hear air being forced over the condenser by the
condenser fan.
• You may hear water running into the drain pan during the defrost
cycle.
Do not block any of these vents with food packages. If the vents are
blocked, airflow will be prevented and temperature and moisture
problems may occur.
IMPORTANT: Because air circulates between both sections, any
odors formed in one section will transfer to the other. You must
thoroughly clean both sections to eliminate odors. To prevent odor
transfer and drying out of food, wrap or cover foods tightly.
For your convenience, your convertible refrigerator/freezer controls
are preset at the factory with the upper compartment set in
refrigeration mode and the lower compartment controls set at the
midpoint. When you first install your convertible refrigerator/freezer,
make sure that the controls are still preset to the factory settings.
Upper Compartment Control
The upper compartment of your convertible refrigerator/freezer can
function as either a refrigerator or a freezer. The control in the upper
compartment allows you to switch it from Refrigerator Mode to
Freeze mode. Make sure that the correct mode for your storage
requirement is selected.
Your convertible refrigerator/freezer is designed for use in the garage.
If the upper compartment is set to Freeze, your usual setting for the
lower compartment should be adequate for most summer or winter
conditions. Under extreme summer or winter conditions, you may
need to make minor adjustments to the upper compartment control
in order to maintain the desired temperature in the upper
compartment.

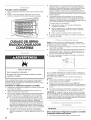
To Change the Upper Compartment to Freeze Mode:
• Turn the control all the way to FREEZE.
Freeze
I
Adjustfr_z_t _tting_
ix bott_ _om_rtm_nt
iI _Co__. Coldest
Freeze
I
Conv_r{__ol,,p_rtl,,_ to fr_z_,
Adjustf_z_r _tting_
in _ttom eomp_rtm_t
i___" Coldest
IMPORTANT: If the control is set between FREEZE and COLDEST
settings, the upper compartment may not operate in the desired
mode. The control should be set all the way to FREEZE to function
properly as a freezer, or in the range between COLD and COLDEST
to function properly as a refrigerator.
Lower Compartment Control
The lower compartment functions as a freezer at all times. The
control in the lower compartment controls the temperature in the
lower compartment and the temperature in the upper compartment
when the upper compartment is in Freeze mode.
NOTE: To turn your convertible refrigerator/freezer off, turn the lower
compartment control to the word OFF and the upper compartment to
FREEZE. Your convertible refrigerator/freezer will not cool when the
lower compartment control is set to OFR
IMPORTANT:
• When the upper compartment is in refrigeration mode, the
temperature is controlled by the upper control. When it is in
freeze mode, the temperature is controlled by the lower
compartment control.
• Give your convertible refrigerator/freezer time to cool down
completely before adding food. It is best to wait 24 hours before
you put food into the convertible refrigerator/freezer.
• If you add food before the convertible refrigerator/freezer has
cooled completely, your food may spoil. Adjusting the Lower and
Upper Compartment Controls to a colder than recommended
setting will not cool the compartments any faster.
Adjusting Controls
The settings indicated in the previous section should be correct for
normal household usage. The controls are set correctly when milk or
juice is as cold as you like and when ice cream is firm.
If the temperature is too warm or too cold in the lower or upper
compartment, first check the air vents to be sure they are not
blocked.
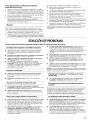
If you need to adjust temperatures, use the settings listed in the chart
below as a guide. Wait at least 24 hours between adjustments and
then recheck the temperatures.
............................. ........................................................... i
CONDITION/REASON: ADJUSTMENT:
LOWER COMPARTMENT section Adjust LOWER
too warm COMPARTMENT Control
- Door opened often, large amount toward coldest.
of food added or room temperature
very warm
CONDITION/REASON: ADJUSTMENT:
UPPER COMPARTMENT section If in Refrigerator Mode,
too warm adjust UPPER
- Door opened often, or large COMPARTMENT Control
amount of food added or very cold toward coldest.
room temperature (can't cycle often If in Freeze mode, adjust
enough) LOWER COMPARTMENT
Control toward coldest.
LOWER COMPARTMENT section
too cold
- Controls not set correctly for your
conditions
Adjust LOWER
COMPARTMENT Control
toward cold.
UPPER COMPARTMENT section too
cold
- Controls not set correctly for your
conditions
If in Refrigerator Mode
adjust UPPER
COMPARTMENT Control
toward cold.
If in Freeze mode, adjust
LOWER COMPARTMENT
Control toward cold.
UPPERCOMPARTMENT
FEATURES
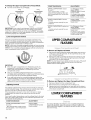
To Remove and Replace the Shelf:
1. Remove the shelf by lifting the entire shelf slightly and moving it
all the way to the left-hand side. Tilt the right-hand side up and
out of the shelf supports.
2. Replace the shelf by inserting the left-hand end all the way into
the shelf supports. Then, lower the right-hand end of the shelf
and insert it into the shelf supports.
NOTE: The shelf should lower slightly and lock into place. If the shelf
does not appear stable, make sure both ends of the shelf are
inserted into the shelf supports.
To Remove and Replace the Upper Compartment Floor:
1, Remove all items from the compartment floor.
2. Remove the floor by raising the front and lifting it out.
3. Replace the floor by inserting the two rear tabs into the holes in
the rear of the lower compartment. Lower the floor onto the liner
of the lower compartment.
LOWERCOMPARTMENT
FEATURES
For storage flexibility, the shelves in your convertible refrigerator/
freezer are adjustable. Adjust the shelves to different heights and
store similar foods together. This reduces the time the door is open
and saves energy.
10

Half-width Shelf/Frame
To Remove and Replace a Shelf/Frame:
1. Remove the shelf/frame by tilting it up at the front and lifting it
out of the shelf supports.
2. Replace the shelf/frame by guiding the rear shelf hooks into the
shelf supports. Tilt the front of the shelf up until rear shelf hooks
drop into the shelf supports. Check to make sure that the shelf is
securely in position.
Full-width Shelf
To Remove and Replace the Shelf:
1. Remove all items from the shelf. Remove the shelf by raising the
front and pulling it forward.
2. Replace the shelf by lifting the front while sliding the shelf back
until it locks into place.
Full-width Wire Basket
To Remove and Replace the Basket:
1. Remove all items from basket. Remove the basket by lifting the
front out of the ball-bearing slides, then lifting the basket out.
2. Replace the wire basket by first extending the ball-bearing slides,
then lowering the tabs on the sides of the wire basket into the
slides. Push the basket backward until it is under the shelf.
Frozen Food Storage Guide
Storage times will vary according to the quality and type of food, the
type of packaging or wrap used (should be airtight and moisture-
proof), and the storage temperature. Seal the package or container
securely to prevent taste and odor transfer throughout the product.
Ice crystals inside a sealed package are normal.
Put no more unfrozen food into the freezer than will freeze within
24 hours (no more than 2 to 3 Ibs of food per cubic foot [907-1,350 g
per 28 L] of freezer space). Leave enough space in the freezer for air
to circulate around packages. The freezer door must close tightly. For
more information on preparing food for freezing, check a freezer
guide or reliable cookbook.
DOOR FEATURES
Half-width Wire Basket
To Remove and Replace the Basket:
1. Remove all items from basket. Remove the basket by lifting the
front out of the slides, then lifting the basket out.
2. Replace the wire basket by lowering the basket into the slides
then pushing the basket backward until it is under the shelf.
oo
The door rails may be removed for easier cleaning.
To Remove and Replace the Rails:
1. Remove the rails by pulling straight up on each end of the rail.
2. Replace the rails by sliding the shelf rail into the slots on the door
and pushing the rail straight down until it stops.
To Remove and Replace the Bins:
1. Remove the bin by lifting it and pulling it straight out.
2. Replace the bin by sliding it in above the desired support and
pushing it down until it stops.
11

To Remove and Replace the Shelf:
1. Remove the wire door shelf by lifting it out of the door rail.
2. Replace the door shelf by sliding it into the back of the door rail
and snapping it into place.
To Remove and Replace the Rack:
1. Remove the rack by lifting it and pulling straight out.
2. Replace the rack by sliding it in above the supports and pushing
it down until it stops.
CONVERTIBLEREFRIGERATOR/
FREEZERCARE
To Clean Your Convertible Refrigerator/Freezer:
1, Unplug convertible refrigerator/freezer or disconnect power.
2. Remove all removable parts from inside, such as shelves,
crispers, etc.
3. Hand wash, rinse, and dry removable parts and interior surfaces
thoroughly. Use a clean sponge or soft cloth and a mild detergent
in warm water.
• Do not use abrasive or harsh cleaners such as window
sprays, scouring cleansers, flammable fluids, cleaning
waxes, concentrated detergents, bleaches or cleansers
containing petroleum products on plastic parts, interior and
door liners or gaskets. Do not use paper towels, scouring
pads, or other harsh cleaning tools. These can scratch or
damage materials.
• To help remove odors, you can wash interior walls with a
mixture of warm water and baking soda (2 tbs to 1 qt
[26 g to 0.95 L] of water).
4. Wash exteriors with a clean sponge or soft cloth and a mild
detergent in warm water. Do not use abrasive or harsh cleaners,
or cleaners designed for stainless steel. Dry thoroughly with a
soft cloth. For additional protection against damage to painted
metal exteriors, apply appliance wax (or auto paste wax) with a
clean, soft cloth. Do not wax plastic parts.
5. There is no need for routine condenser cleaning in normal
operating environments. If the environment is particularly greasy
or dusty, or there is significant pet traffic in the home, the
condenser should be cleaned every 2 to 3 months to ensure
maximum efficiency.
If you need to clean the condenser:
• Remove the base grille. See "Convertible Refrigerator/
Freezer Doors."
• Use a vacuum cleaner with a soft brush to clean the grille,
the open areas behind the grille and the front surface area of
the condenser.
• Replace the base grille when finished.
6. Plug in convertible refrigerator/freezer or reconnect power.
NOTE: Not all bulbs will fit your convertible refrigerator/freezer. Be
sure to replace the bulb with one of the same size, shape, and
wattage.
1. Unplug convertible refrigerator/freezer or disconnect power.
2. Remove the bulb from behind the control panel in the lower
compartment or from behind the light shield in the upper
compartment (on some models). Replace it with a bulb of the
same wattage.
3. Plug in convertible refrigerator/freezer or reconnect power.
/
Explosion Hazard
Use nonflammabme cleanero
Failure to do so can result in death, expmosion, or fire.
Both the lower and upper compartments defrost automatically.
However, clean both sections about once a month to prevent odors
from building up. Wipe up spills immediately.
If the power will be out for 24 hours or less, keep both compartment
doors closed to help food stay cold and frozen.
If the power will be out for more than 24 hours, do one of the
following:
• Remove all frozen food and store it in a frozen food locker.
• Place 2 Ibs (907 g) of dry ice in the convertible refrigerator/freezer
for every cubic foot (28 L) of freezer space. This will keep the
food frozen for 2 to 4 days.
• If neither a food locker nor dry ice is available, consume or can
perishable food at once.
REMEMBER= A full freezer stays cold longer than a partially filled
one. A freezer full of meat stays cold longer than a freezer full of
baked goods. If you see that food contains ice crystals, it may be
refrezen, although the quality and flavor may be affected. If the
condition of the food is poor, dispose of it.
12

Moving
'_Ji::i:::_,CC_ii_iiiO_'_'_iiC_%:::i:;i!ii'_J_iO_'iii!;!_ii!!,iiill:_iiiiiiiiiiii_iiiiil;_i_i::::i!_,¸
Vacations
If You Choose to Leave the Convertible Refrigerator/
Freezer On While You're Away:
1, Use up any perishables and freeze other items.
If You Choose to Turn the Convertible Refrigerator/Freezer
Off Before You Leave:
1, Remove all food from the convertible refrigerator/freezer.
2. Turn the lower compartment control to OrE Turn the upper
compartment control to FREEZE. See "Using the Controls."
3. Hand wash, rinse and dry removable parts and interior surfaces
thoroughly.
4. Tape rubber or wood blocks to the tops of both doors to prop
them open far enough for air to get in. This stops odor and mold
from building up.
When you are moving your convertible refrigerator/freezer to a new
home, follow these steps to prepare it for the move.
f. Remove all food from the convertible refrigerator/freezer and
pack all frozen food in dry ice.
2. Turn the lower compartment control to OFR Turn the upper
compartment control to FREEZE. See "Using the Controls."
3. Unplug your convertible refrigerator/freezer.
4. Empty the water from the defrost pan. Hand wash, rinse and dry
it thoroughly.
5. Hand wash, rinse and dry removable parts and interior surfaces
thoroughly.
6. Wrap removable parts well, and tape them together so they don't
shift and rattle during the move.
7. Unlock the casters so that the convertible refrigerator/freezer
rolls easily.
8. If you have not installed the casters, raise the front of the
convertible refrigerator/freezer so it rolls more easily. See "Adjust
the Doors."
9. Tape the doors closed and tape the power cord to the
convertible refrigerator/freezer cabinet.
When you get to your new home, put everything back and refer to the
"Installation Instructions" section for preparation instructions.
TROUBLESHOOTING
Try the solutions suggested here first in order to avoid the cost of
Your convertible refrigerator/freezer will not operate
• Is the power cord unplugged? Plug into a grounded 3 prong
outlet.
• Has a household fuse blown, or has a circuit breaker
tripped? Replace the fuse or reset the circuit breaker.
• Is the Lower Compartment Control turned to the OFF
position? See "Using the Controls."
• Is the convertible refrigerator/freezer defrosting? Recheck to
see if the convertible refrigerator/freezer is operating in
30 minutes. Your convertible refrigerator/freezer will regularly run
an automatic defrost cycle.
an unnecessary service call.
Are the doors opened often? The motor will run longer when
this occurs. Conserve energy by getting all items out at one time,
keeping food organized, and closing the door as soon as
possible.
• Is the control set correctly for the surrounding conditions?
See "Using the Controls."
• Are the doors closed completely? Close the doors firmly. If
they do not close completely, see "The doors will not close
completely" later in this section.
• Are the condenser coils dirty? This prevents air transfer and
makes the motor work harder. Clean the condenser coils. See
"Cleaning."
NOTE: Your new convertible refrigerator/freezer will run longer than
The lights do not work
• Is the power cord unplugged? Plug into a grounded 3 prong
outlet.
• Is a light bulb loose in the socket or burned out? See
"Changing the Light Bulbs."
There is water in the defrost drain pan
• Is the convertible refrigerator/freezer defrosting? The water
will evaporate. It is normal for water to drip into the defrost pan.
• Is it more humid than normal? When it is humid, expect that the
water in the defrost pan will take longer to evaporate.
The motor seems to runtoo much
• Is the room temperature hotter than normal? The motor will
run longer under warm conditions. At normal room temperatures,
your motor will run about 40% to 80% of the time. Under warmer
conditions, it will run even more.
• Has a large amount of food just been added to the
convertible refrigerator/freezer? Adding a large amount of
food warms the convertible refrigerator/freezer. The motor
normally will run longer to cool the convertible refrigerator/freezer
back down.
The convertible refrigerator/freezer seems to make too
much noise
• The sounds may be normal for your convertible refrigerator/
freezer. See "Normal Sounds."
The upper compartment front liner iswarm
The warmth is probably due to normal operation of the automatic
exterior moisture control. Additionally, the convertible refrigerator/
freezer is equipped with a heater to keep the convertible refrigerator/
freezer operating properly when the ambient temperature drops too
low.
Temperature is too warm
• Are the air vents blocked in either compartment? This
prevents cold air movement between the compartments. Move
objects away from the air vents. See "Ensuring Proper Air
Circulation" for air vent locations.
• Are the door(s) opened often? The convertible refrigerator/
freezer will warm when this occurs. Keep the convertible
refrigerator/freezer cool by getting all items out at one time,
keeping food organized, and closing the door as soon as
possible.
13

• Has a large amount of food just been added to the
convertible refrigerator/freezer? Adding a large amount of
food warms the convertible refrigerator/freezer. It can take
several hours for the convertible refrigerator/freezer to return to
the normal temperature.
• Are the controls set correctly for the surrounding conditions?
See "Using the Controls."
r
There is interior moisture buildup
r r ; r
• Are the air vents blocked in the convertible refrigerator/
freezer? Remove any objects from in front of the air vents. See
"Ensuring Proper Air Circulation" for air vent locations.
• Are the door(s) opened often? Avoid humidity buildup by
getting all items out at one time, keeping food organized, and
closing the door as soon as possible.
• Is the room humid? It is normal for moisture to build up inside
the convertible refrigerator/freezer when the room air is humid.
• Is the food packaged correctly? Check that all food is securely
wrapped. Wipe off damp food containers before placing them in
the convertible refrigerator/freezer.
• Is the control set correctly for the surrounding conditions?
See "Using the Controls."
• Was a self-defrost cycle completed? It is normal for droplets to
form after the convertible refrigerator/freezer self-defrosts.
The doors are difficultto open
• Are the gaskets dirty or sticky? Clean gaskets and the surface
that they touch. Rub a thin coat of paraffin wax on the gaskets
following cleaning.
• Have you opened the convertible refrigerator/freezer door
recently? Allow at least 10 seconds after closing the convertible
refrigerator/freezer door before trying to open the upper
compartment.
The doors will not close completely
• Are food packages blocking the door open? Rearrange
containers so that they fit more tightly.
• Are the crisper cover, pans, shelves, bins, or baskets out of
position? Put these items into their correct positions. See
"Lower Compartment Features" for more information.
• Are the gaskets sticking? Clean gaskets and the surface that
they touch. Rub a thin coat of paraffin wax on the gaskets
following cleaning.
• Does the convertible refrigerator/freezer wobble or seem
unstable? Level the convertible refrigerator/freezer. See "Adjust
the Doors."
• Were the doors removed during product installation and not
properly replaced? Remove and replace the doors according to
"Convertible Refrigerator/Freezer Doors," or call a qualified
service technician
ASSISTANCEORSERVICE
Before calling for assistance or service, please check
"Troubleshooting." It may save you the cost of a service call. If you
still need help, follow the instructions below.
When calling, please know the purchase date and the complete
model and serial number of your appliance. This information will help
us to better respond to your request.
If you need replacement parts
If you need to order replacement parts, we recommend that you only
use factory specified replacement parts. Factory specified
replacement parts will fit right and work right because they are made
with the same precision used to build every new Gladiator TM
GarageWorks appliance.
To locate factory specified replacement parts in your area, call us or
your nearest designated service center.
Call the Gladiator T"GarageWorks Customer eXperience Center
toll free: 1-866-342-4089.
Our consultants provide assistance with:
• Features and specifications on our full line of products.
• Installation information.
• Use and maintenance procedures.
• Accessory and repair parts sales.
• Specialized customer assistance (Spanish speaking, hearing
impaired, limited vision, etc.).
• Referrals to local dealers, repair parts distributors, and service
companies. Gladiator TM GarageWorks designated service
technicians are trained to fulfill the product warranty and provide
after-warranty service, anywhere in the United States.
To locate the Gladiator TM GarageWorks designated service
company in your area, you can also look in your telephone
directory Yellow Pages.
For further assistance
If you need further assistance, you can write to Gladiator TM
GarageWorks with any questions or concerns at:
Gladiator TM GarageWorks
Customer eXperience Center
553 Benson Road
Benton Harbor, MI 49022-2692
Please include a daytime phone number in your correspondence.
Call the Whirlpool Canada LP Customer Interaction Center toll free:
f-800-807-6777. Monday to Friday 8:00 a.m. - 6:00 p.m. (EST).
Saturday 8:30 a.m. - 4:30 p.m. (EST).
Our consultants provide assistance with:
• Features and specifications on our full line of appliances.
• Referrals to local dealers.
For further assistance
If you need further assistance, you can write to Whirlpool Canada LP
with any questions or concerns at:
Whirlpool Canada LP
Customer Interaction Center
1901 Minnesota Court
Mississauga, Ontario L5N 3A7
Please include a daytime phone number in your correspondence.
14

GLADIATORTM GARAGEWORKSFREEZERATOR
CONVERTIBLEREFRIGERATOR/FREEZERWARRANTY
ONE-YEAR FULL WARRANTY
For one year from the date of purchase, when this convertible refrigerator/freezer is operated and maintained according to instructions
attached to or furnished with the product, Gladiator TM GarageWorks will pay for FSP® replacement parts and repair labor costs to
correct defects in materials or workmanship. Service must be provided by a Whirlpool designated service company.
SECOND THROUGH FIFTH YEAR FULL WARRANTY ON SEALED REFRIGERATION SYSTEM PARTS AS LISTED
In the second through fifth years from the date of purchase, when this convertible refrigerator/freezer is operated and maintained
according to instructions attached to or furnished with the product, Gladiator TM GarageWorks will pay for FSP® replacement parts and
repair labor costs to correct defects in materials or workmanship in the sealed refrigeration system. These parts are: compressor,
evaporator, condenser, dryer, and connecting tubing. Service must be provided by a Whirlpool designated service company.
Gladiator TM GarageWorks or Whirlpool Canada LP will not pay for:
1. Service calls to correct the installation of your convertible refrigerator/freezer, to instruct you how to use your convertible
refrigerator/freezer, to replace house fuses or correct house wiring or plumbing, to replace light bulbs, or replacement water filters
other than as noted above.
2. Repairs when your convertible refrigerator/freezer is used in other than normal, single-family household use.
3. Pickup and delivery. Your convertible refrigerator/freezer is designed to be repaired in the home.
4. Damage resulting from accident, alteration, misuse, abuse, fire, flood, improper installation, acts of God, or use of products not
approved by Gladiator TM GarageWorks or Whirlpool Canada LR
5. Any food loss due to product failure.
6. Repairs to parts or systems resulting from unauthorized modifications made to the appliance.
7. Replacement parts or repair labor costs for units operated outside the United States or Canada.
8. In Canada, travel or transportation expenses for customers who reside in remote areas.
GLADIATOR TM GARAGEWORKS OR WHIRLPOOL CANADA LP SHALL NOT BE LIABLE
FOR INCIDENTAL OR CONSEQUENTIAL DAMAGES
Some states or provinces do not allow the exclusion or limitation of incidental or consequential damages, so this exclusion or limitation
may not apply to you. This warranty gives you specific legal rights, and you may also have other rights which vary from state to state or
province to province.
Outside the 50 United States and Canada, this warranty does not apply. Contact your authorized Gladiator TM GarageWorks
dealer to determine if another warranty applies.
If you need service, first see the "Troubleshooting" section of this book. After checking "Troubleshooting," additional help can be found
by checking the "Assistance or Service" section or by calling the Gladiator TM GarageWorks Customer eXperience Center,
1-866-342-4089 (toll-free), from anywhere in the U.S.A. In Canada, contact your Whirlpool Canada LP designated service company or
call 1-800-807-6777. 10/04
Keep this book and your sales slip together for future
reference. You must provide proof of purchase or installation
date for in-warranty service.
Write down the following information about your convertible
refrigerator/freezer to better help you obtain assistance or service
if you ever need it. You will need to know your complete model
number and serial number. You can find this information on the
model and serial number label located on the inside wall of the
lower compartment.
Dealer name
Address
Phone number
Model number
Serial number
Purchase date
15

SEGURIDADDELREFRIGERADOR/CONGELADORCONVERTIBLE
Su seguridad y la seguridad de los demas es muy importante.
Hemos incluido muchos mensajes importantes de seguridad en este manual yen su electrodomestico. Lea y obedezca siempre
todos los mensajes de seguridad=
Este es el sfmbolo de advertencia de seguridad.
Este sfmbolo le llama la atencion sobre peligros potenciales que pueden ocasionar la muerte o una lesion a
usted y a los dem_.s.
Todos los mensajes de seguridad ira.na continuacidn del simbolo de advertencia de seguridad y de la palabra
"PELIGRO" o "ADVERTENCIA". Estas palabras significan:
Si no sigue las instrucciones de inmediato, usted puede
morir o sufrir una lesion grave.
Si no sigue las instrucciones, usted puede morir o sufrir
una lesion grave.
Todos los mensajes de seguridad le diran el peligro potencial, le dir_.n como reducir las posibilidades de sufrir una lesion y Io que
puede suceder si no se siguen las instrucciones.
mNSTRUCCmONES IMPORTANTES DE SEGURIDAD
ADVERTENCL_: Para reducir el riesgo de incendio, choque electrico, o lesiones personales a! usar su
refrigerador/congelador convertible siga estas precauciones basicas:
mConecte a un contacto de pared de conexidn a tierra de
3 terminales=
z No quite la terminal de conexidn a tierra=
mNo use un adaptador.
mNo use extensiones electricas.
mDesconecte el suministro de energfa antes de darle servicio.
mVuelva a colocar todos los componentes y paneles antes de
hacerlo funcionar=
mUse un Iimpiador no inflamable.
mMantenga los materiales y vapores infiamabtes, tales como
gasolina, alejados deI refdgerador/congelador convertible.
mUse dos o mas personas para mover e instalar el
refrigerador/congelador convertible.
mRemueva tas puertas o la tapa de su congelador
o refrigerador vieio.
CONSERVAR ESTAS mNSTRUCCmONES
Cbmo deshacerse de surefrigeradorviejo
Peligro de Asfi×ia
Remueva maspuertas de su refrigerador viejoo
No seguir esta instrucci6n puede ocasionar la muerte
o daSo amcerebroo
IMPORTANTE: El atrapamiento y asfixia de ni5os no es un problema
del pasado. Los refrigeradores tirados y abandonados son un
peligro...a0n si van a quedar ahi "por unos pocos dias". Si Ud. estA
por deshacerse de su refrigerador viejo, por favor siga las
instrucciones que se dan a continuaci6n para prevenir accidentes.
Antes de tirar su refrigerador viejo:
• Saque las puertas.
• Deje los estantes en su lugar asi los ni5os no pueden meterse
adentro con facilidad.
16

INSTRUCCIONESDEINSTALACION
Petigre de Peso E×cesivo
Use dos e mas personas para mover e insta_ar
el refrigeradodcongelador convertible,
No seguir esta instrucci6n puede ocasionar una
_esi6n en _aespalda u otto tipe de lesiones.
Cbmo quitar los materiales de empaque
Quite los residues de cinta y goma de las superficies antes de
encender el refrigerador/congelador convertible. Frote un poco
de detergente liquido para vajillas sobre la cinta adhesiva con los
dedos. Limpie con agua tibia y seque.
No use instrumentos filosos, alcohol para fricciones, liquidos
inflamables, o productos de limpieza abrasives para eliminar los
restos de cinta o de goma. Estos productos pueden da5ar la
superficie de su refrigerador/congelador convertible. Para m&s
informaci6n, vea la secci6n "Seguridad del refrigerador/
congelador convertible".
Como mover su refrigerador/congelador convertible:
Su refrigerador/congelador convertible es muy pesado.
Cuando mueva su refrigerador/congelador convertible para
limpiarlo o darle servicio, proteja el piso. AI mover el
refrigerador/congelador convertible, siempre tire
directamente hacia afuera. No menee el refrigerador/
congelador convertible de lado a lado ni Io haga "caminar"
cuando Io trate de mover ya que podria dar*iar el piso.
NOTA: Si las ruedecillas estan instaladas, quite la traba de
las mismas antes de intentar mover su
refrigerador/congelador convertible.
Limpieza antes del uso
Una vez que usted haya quitado todos los materiales de empaque,
limpie el interior de su refrigerador/congelador convertible antes de
usarlo. Vea las instrucciones de limpieza en la secci6n "Cuidado del
refrigerador/congelador convertible".
F_brica de hielo
La opci6n de f_brica de hielo no est& disponible.
Peligro de Explosi6n
Mantenga los materiaies y vapores inflamab_es,
ta_es como gasolina, alejados de{
refrigerador/conge_ador convertible.
No seguir esta instrucci6n puede ocasionar _amuerte,
e×p_osi6n, o incendio.
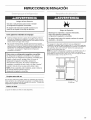
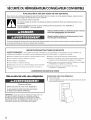
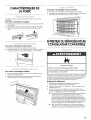
Para asegurar la adecuada ventilaci6n para su refrigerador/
congelador convertible, deje un espacio de _" (1,25 cm) a cada lado
y pot encima. Si Ud. instala el refrigerador/congelador convertible en
una pared fija, deje como minimo 2" (5,08 cm) a cada lado para
permitir que la puerta abra bien.
NOTA: No instale el refrigerador/congelador convertible cerca de un
homo, radiador u otra fuente de calor en donde la temperatura
aumentar& pot encima de los 110°F (43°C), ni en un lugar en donde
la temperatura baje a menos de 0°F (-17°C).
_/2"(%25 ore)
II I
II
mi
17

Peligro de Choque Em6ctrico
Conecte a un contacto de pared de conexi6n a tierra de
3 terminames.
No quite Jaterminal de conexi6n a tierra.
No use un adaptador.
No use un cabJe el6ctrico de extensi6n.
No seguir estas instrucciones puede ocasionar
marnuerte, incendio o cheque ei6ctrico.
Antes de mover el refrigerador/congelador convertible a su ubicaci6n
final, es importante asegurarse que tiene la conexi6n el6ctrica
adecuada. Su refrigerador/congelador convertible esta equipado con
un cable de suministro de energia m&s largo para facilitar la
ubicaci6n y el movimiento del refrigerador/congelador convertible.
M6todo de conexibn a tierra recomendado
Se requiere una fuente de energia el&ctrica de 115 Voltios, 60 Hz., CA
solamente y con fusibles de 15- 6 20-amperios, debidamente
conectados a tierra. Se recomienda que use un circuito separado
s61o para su refrigerador/congelador convertible. Use un
tomacorriente que no se pueda apagar con un interruptor. No use un
cable de extensi6n.
NOTA: Antes de realizar cualquier tipo de instalaci6n, limpieza o de
quitar un foco de luz, ponga el control del compartimiento inferior en
la posici6n OFF (Apagado), y luego desconecte el refrigerador/
congelador convertible de la fuente de energia. Cuando haya
terminado, reconecte el refrigerador/congelador convertible a la
fuente de energia el6ctrica y vuelva a poner el control en la posici6n
deseada.
HERRAMIENTAS NECESARIAS: Ilave tubular de cabeza hexagonal
de 5/16",destornillador Phillips No. 2, destornillador de cabeza plana,
Ilave ajustable de 5/16",cuchillo piano para masilla de 2"
IMPORTANTE:
• Quite todos los alimentos y cualquier recipiente ajustable o de
uso mOltiple de las puertas.
• Si usted s61o quiere quitar las puertas y volverlas a colocar, vea
las secciones "C6mo quitar las puertas y las bisagras" y "C6mo
volver a poner las puertas y las bisagras en su lugar".
• Todas las ilustraciones a que se hace referencia en las
instrucciones siguientes est&n incluidas m&s adelante en esta
secci6n despu6s de "Pasos finales."
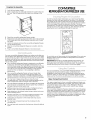
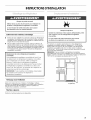
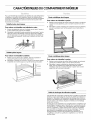
Cbmo quitar las puertas y las bisagras
Tornillo de bisagra de cabeza hexagonal de _6"
1. Desenchufe el refrigerador/congelador convertible o desconecte
el suministro de energia.
2. Abra la puerta del compartimiento inferior y quite la rejilla de la
base de la parte inferior del refrigerador/congelador convertible.
Vea la ilustraci6n Rejilla de la base.
3. Cierre la puerta del compartimiento inferior y mantenga las dos
puertas cerradas hasta que est6 listo para levantarlas y quitarlas
del gabinete.
NOTA: Mientras quita las bisagras siempre disponga de un
soporte adicional para las puertas. No se confie de los imanes de
la puerta para mantener las puertas en su sitio en tanto que estA
trabajando.
4. Quite los componentes de la bisagra superior como se muestra
en la ilustraci6n Bisagra superior. Levante y quite la puerta del
compartimiento superior del gabinete.
5. Quite los componentes de la bisagra central como se muestra en
la ilustraci6n de la Bisagra central. Levante y quite la puerta del
compartimiento inferior del gabinete.
6. Quite los componentes de la bisagra inferior como se muestra en
la ilustraci6n Bisagra inferior.
IMPORTANTE: Si usted desea cambiar el sentido de apertura de las
puertas para que se abran en el sentido opuesto, siga las
instrucciones en "Cambio del sentido de apertura de las puertas
(opcional)". Si usted no va a cambiar el sentido de apertura de las
puertas, vea la secci6n "C6mo volver a poner la puerta y las bisagras
en su lugar".
Cambio del sentido de apertura de las puertas (opcional}
Tornillo de Tapdn del orificio Tapdn del orificio
cabeza redonda del tomillo de la manija de la bisagra
de la manija de la puerta de la puerta
Gabinete
1, Quite los tornillos de bisagra de cabeza hexagonal de 5Ad' del
lado de la manija y col6quelos del lado opuesto. Vea la
ilustraci6n 1-1.
2. Quite los tapones de los orificios de las bisagras del gabinete y
col6quelos del lado opuesto. Vea la ilustraci6n 1-2.
Puertas
1, Quite el tap6n del orificio de la bisagra de la parte superior de la
puerta del compartimiento superior. Col6quelo del lado opuesto
como se muestra. Vea la ilustraci6n 2.
2. Quite el ret6n de las puertas del compartimiento superior y del
compartimiento inferior. Vea la ilustraci6n 3.
Cbmo volver a poner las puertas y las bisagras en su
lugar
NOTA: Si el sentido de apertura de la puerta se cambia, la imagen de
la puerta pudiera quedar invertida.
1. Vuelva a poner los componentes de la bisagra inferior en su sitio
como se indica. Apriete los tornillos. Vuelva a poner en su lugar
la puerta del compartimiento inferior.
NOTA: Mientras quita las bisagras siempre disponga de un
soporte adicional para las puertas. No se confie de los imanes de
la puerta para mantener las puertas en su sitio en tanto que estA
trabajando.
2. Arme los componentes de la bisagra central como se indica y
atornille todos los tornillos. Vea la ilustraci6n Bisagra central.
Vuelva a poner en su lugar la puerta del compartimiento superior.
3. Arme los componentes de la bisagra superior como se indica.
Vea la ilustraci6n Bisagra superior. No atornille completamente
los tornillos.
4. Alinee las puertas de tal manera que la parte inferior de la puerta
del compartimiento superior est6 alineada uniformemente con la
parte superior de la puerta del compartimiento inferior. Apriete
todos los tornillos.
18

Pasos finales
1. Revise todos los orificios para cerciorarse que los tapones de los
orificios y los tornillos est6n en su lugar. Vuelva a colocar en su
lugar la tapa de la bisagra superior. Vea la ilustraci6n Bisagra
superior.
2. Coloque en su lugar la rejilla de la base. Vea la ilustraciSn Rejilla
de la base.
3. Enchufe el refrigerador/congelador convertible o reconecte el
suministro de energia.
4. Regrese todas las partes movibles alas puertas y la comida el
refrigerado/congelador convertible.
Bisagra superior
........................ A
A. Tapa de la bisagra superior
B. Tornillos de cabeza
hexagonal de/a bisagra de _"
C. Bisagra superior
Bisagra central
A. Bisagra central
B. Torni//os de cabeza
hexagonal de/a bisagra de _h_"
ii,!_i!,iiiiiiiiiiiiiiiiiiil
Bisagra inferior
A
A. Bisagra inferior
B. Tornillos de cabeza
hexagonal de la bisagra de _"
°t.?," ;_o_ o
/"_' '.....................................................................A
A. Tom/dos de b/sadra de cabeza
hexagona/de _"
!
#
!
I
l
l
l
[]
A. Tapon del orificio de la bisagra
de la puerta
1
Cdmo quitar los retenes de
las puertas A
©
A. Reten de la puerta
B. Tornillo del reten de la puerta
Cbmo volver a instalar
los retenes de la puerta
©
A. Reten de la puerta
B. Tornillo del reten de la puerta
19

NOTA: Si tiene ruedecillas instaladas en su refrigerador/congelador
convertible, los tornillos niveladores no funcienar&n. Se pueden
colocar calzas debaje de las ruedecillas para nivelar un refrigerador/
congelador convertible que tenga las ruedecillas instaladas.
Cierre de la puerta
Su refrigerador/congelador convertible tiene dos rodillos frontales
regulables - uno a la derecha y otto a la izquierda. Si su refrigerador/
congelador convertible parece inestable ousted quiere que las
puertas se cierren con mayor facilidad, ajuste la inclinaci6n del
refrigerador/congelador convertible usando las instrucciones
siguientes.
Peligro de Cheque E_ectrico
Conecte a ur_cor_tacto de pared de cone×i6n a tierra de
3 terminates.
No quite la terminal de conexi6n a tierra.
No use an adaptador,
No use an cable e_ectrico de extensi6n,
No seguir estas instrucciones puede ocasionar
_amuerte, incendio o choque e_ectrico,
Conecte a un contacto de pared de conexiSn a tierra de
3 terminales.
NOTA: Haga que alguien empuje la parte superior del
refrigerador/congelador convertible, Io cual quita el peso de los
tornillos reguladores y los rodillos. Esto facilita el ajuste de los
tornillos.
5. Abra ambas puertas nuevamente y verifique para asegurarse que
se cierran con la facilidad que usted desea. De Io contrario,
incline el refrigerador/congelador convertible ligeramente m_ts
hacia la parte posterior, girando ambos tornillos reguladores
hacia la derecha. Puede tomar varias vueltas m_ts, y usted
deber_t girar ambos tornillos reguladores la misma cantidad de
veces.
6. Vuelva a colocar la rejilla de la base.
Alineamiento de la puerta
Si el espacio entre sus puertas parece desigual, puede ajustarlo
usando las instrucciones siguientes:
1. Quite la cubierta de la bisagra superior.
2. Afloje los tornillos de la bisagra superior usando una Ilave inglesa
o de boca tubular de 5/le".
3. Penga una persona para sostener la puerta en su lugar o
coloque entre las puertas algo que mantenga el espacio mientras
usted ajusta los tornilles de la bisagra superior.
4. Vuelva a colocar la cubierta de la bisagra superior.
Peligro de Peso E×cesivo
Use dos o mas personas para mover e insta_ar
el refrigerador/conge_ador convertiMe,
No seguir esta instrucci6n puede ocasionar una
lesiSn en la espalda u otto tipo de lesiones,
2. Acomode el refrigerador/congelador convertible hasta su
posici6n final.
3. Quite la rejilla de la base. Vea la ilustraci6n de la Rejilla de la
base. Los dos tornillos reguladores son parte de las piezas de
montaje del rodillo frontal, que est&n en la base del refrigerador/
congelador convertible a cada lado.
4. Use un destornillador para ajustar los tornillos reguladores. Gire
el tornillo regulador hacia la derecha para levantar ese lado del
refrigerador/congelador convertible o gire el tornillo regulador
hacia la izquierda para bajar ese lade. Puede precisar darle
varias vueltas a los tornillos reguladores para ajustar la
inclinaciSn del refrigerador/congelador convertible.
PIEZAS SUMINISTRADAS:
• Ruedecillas rigidas (2) •
• Ruedecillas giratorias (2)
• Contratuercas hexagonales de •
5/16"-18 (16)
• Pernos de cabeza hexagonal •
de 5A6-18 x %" (16)
• Pernos de cabeza hexagonal
de 1¼-20 x 11¼,,(4)
Arandelas de seguridad de
1A-20 x 11A" (4)
Soportes de ruedecillas
(ubicados en el paquete de
piezas) (2)
Correderas de plAstico
(enviadas con el refrigerador/
congelador convertible)
Petigro de Peso E×cesivo
Use dos o mas personas para mover e insta_ar
e_refrigerador/congetador convertible.
No seguir esta instrucci6n puede ocasionar una
_esi6n en _aespa_da u otto tipo de _esiones.
ReOna las herramientas y piezas necesarias antes de comenzar
la instalaci6n.
HERRAMIENTAS NECESARIAS:
• Llave de cube 0 Ilave para • Llave de cube o Ilave para
tuercas de 1/2" tuercas de 3/8"
• Llave de tuercas de 1/2"
1. Antes de comenzar, fije el control del compartimiento inferior a
OFF (Apagado).
2. Desenchufe el refrigerador/congelador convertible o desconecte
el suministro de energia.
3. Quite todos los alimentos y los estantes ajustables y los
recipientes del refrigerador/congelador convertible.
4. Abra la puerta del compartimiento inferior y quite la rejilla de la
base. Quite la rejilla sujetando la misma con ambas manes,
levantando y tirando de la parte inferior de la rejilla hacia usted.
5. Coloque las correderas de pl&stico (enviadas con el refrigerador/
congelador convertible) en el piso (ubicados en el paquete de
20
La page charge ...
La page charge ...
La page charge ...
La page charge ...
La page charge ...
La page charge ...
La page charge ...
La page charge ...
La page charge ...
La page charge ...
La page charge ...
La page charge ...
La page charge ...
La page charge ...
La page charge ...
La page charge ...
La page charge ...
La page charge ...
La page charge ...
La page charge ...
La page charge ...
La page charge ...
La page charge ...
La page charge ...
-
 1
1
-
 2
2
-
 3
3
-
 4
4
-
 5
5
-
 6
6
-
 7
7
-
 8
8
-
 9
9
-
 10
10
-
 11
11
-
 12
12
-
 13
13
-
 14
14
-
 15
15
-
 16
16
-
 17
17
-
 18
18
-
 19
19
-
 20
20
-
 21
21
-
 22
22
-
 23
23
-
 24
24
-
 25
25
-
 26
26
-
 27
27
-
 28
28
-
 29
29
-
 30
30
-
 31
31
-
 32
32
-
 33
33
-
 34
34
-
 35
35
-
 36
36
-
 37
37
-
 38
38
-
 39
39
-
 40
40
-
 41
41
-
 42
42
-
 43
43
-
 44
44


Gladiator GAFZ21XXRK00 Le manuel du propriétaire
- Taper
- Le manuel du propriétaire
- Ce manuel convient également à
dans d''autres langues
Documents connexes
-
Gladiator GARF19XXPK00 Le manuel du propriétaire
-
-
Gladiator GARF19XXPK01 Le manuel du propriétaire
-
-
 Gladiator Garageworks GAFZ30FDGB Guide d'installation
-
-

Autres documents
-
Whirlpool GAFZ21XXMK00 Manuel utilisateur
-
 Gladiator Garageworks W10131407A Manuel utilisateur
-
-
Gladiator Garageworks GARF19XXVK Manuel utilisateur
-
-
 Gladiator Garageworks 2253210A Manuel utilisateur
-
Kenmore 21.7 cu. ft. Side-by-Side Refrigerator - White ENERGY STAR Le manuel du propriétaire
-
Kenmore 25 cu. ft. Side-by-Side Refrigerator w/ SmartSense Cooling Technology - Bisque ENERGY STAR Le manuel du propriétaire
-
Kenmore Kenmore 106.5112 Le manuel du propriétaire
-

