Schumacher Motomaster Eliminator 011-3008-0 – CT052 12V Battery Tester & Charging System Analyzer Le manuel du propriétaire
- Taper
- Le manuel du propriétaire

headline bars
continuation tabs
notes
warnings
model no. 011-3008-0
®
MD
headline bars
continuation tabs
notes
warnings
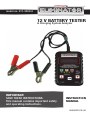
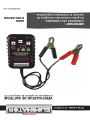
IMPORTANT:
SAVE THESE INSTRUCTIONS.
This manual contains important safety
and operating instructions.
INSTRUCTION
MANUAL
12 V BATTERY TESTER
& Charging System Analyzer
0099002016-00

headline bars
continuation tabs
notes
warnings
WARRANTY
This MotoMaster Eliminator product carries a one
(1) year warranty against defects in workmanship
and materials. At its discretion, MotoMaster Canada
agrees to have any defective part(s) repaired or
replaced free of charge, within the stated warranty
period, when returned by the original purchaser
with proof of purchase.
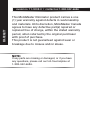
This product is not guaranteed against wear or
breakage due to misuse and/or abuse.
headline bars
continuation tabs
notes
warnings
NOTE:
If any parts are missing or damaged, or if you have
any questions, please call our toll-free helpline at
1-888-942-6686.
headline bars
continuation tabs
notes
warnings
model no. 11-3008-0 | contact us 1-888-942-6686

headline bars
continuation tabs
notes
warnings
®
MD
3
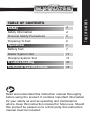
TABLE OF CONTENTS
TABLE OF CONTENTS
Safety
4
Safety Information 4
Personal Safety Precautions 5
Preparing To Test 6
Operation
7
Battery Test 7
Starter System Test 11
Charging System Test 13
Troubleshooting
16
Technical Specifications
18
Read and understand this instruction manual thoroughly
before using the product. It contains important information
for your safety as well as operating and maintenance
advice. Keep this instruction manual for future use. Should
this product be passed on to a third party, this instruction
manual must be included.

4
headline bars
continuation tabs
notes
warnings
model no. 011-3008-0 | contact us 1-888-942-6686
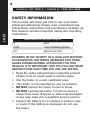
SAFETY
SAFETY INFORMATION
This manual will show you how to use your tester
safely and effectively. Please read, understand and
follow these instructions and precautions carefully, as
this manual contains important safety and operating
instructions.
Abbreviations and Acronyms
V Volt
CCA Cold Cranking Amps
DC Direct Current
WORKING IN THE VICINITY OF A LEAD-ACID BATTERY
IS DANGEROUS. BATTERIES GENERATE EXPLOSIVE
GASES DURING NORMAL OPERATION. FOR THIS
REASON, IT IS IMPORTANT THAT YOU FOLLOW THESE
INSTRUCTIONS EACH TIME YOU USE THE TESTER.
• Read the entire manual before using this product.
Failure to do so could result in serious injury.
• Use the tester in a well-ventilated area.
• This tester is not intended for use by children.
• DO NOT expose the tester to rain or snow.
• DO NOT operate the tester if it has received a
sharp blow, been dropped or otherwise damaged
in any way; take it to a qualified service person.
• Inspect the battery for a cracked or broken case
or cover. If the battery is damaged, do not use
the tester.

headline bars
continuation tabs
notes
warnings
®
MD
5
SAFETY
• DO NOT disassemble the tester; take it to a
qualified service person when service or repair is
required. Incorrect reassembly may result in a risk
of fire or electric shock.
• Follow these instructions and those published by
the battery manufacturer and the manufacturer
of any equipment you intend to use in the vicinity
of the battery. Review the cautionary markings on
these products and on the engine.
PERSONAL SAFETY PRECAUTIONS
• Wear complete eye and clothing protection when
working near lead-acid batteries. Always have
someone nearby for help.
• Have plenty of fresh water, soap and baking soda
nearby, in case battery acid contacts your eyes,
skin or clothing. Wash immediately with soap and
water and seek medical attention.
• If battery acid comes into contact with eyes, flush
eyes immediately for at least 10 minutes and get
medical attention.
• Neutralize any acid spills thoroughly with baking
soda before attempting to clean up.
• Remove all personal metal items from your body,
such as rings, bracelets, necklaces and watches.
A lead-acid battery can produce a short circuit
current high enough to weld such objects to
metal, causing a severe burn.

6
headline bars
continuation tabs
notes
warnings
model no. 011-3008-0 | contact us 1-888-942-6686
SAFETY
• NEVER smoke or allow a spark or flame in the
vicinity of the battery or engine.
• Be extra cautious, to reduce risk of dropping a
metal tool onto battery. It might spark or short-
circuit battery or other electrical part that may
cause explosion.
PREPARING TO TEST
• Be sure area around battery is well ventilated
while battery is being tested.
• Clean battery terminals. Be careful to keep
corrosion from coming in contact with eyes.
• If the battery is not sealed, maintenance-free, add
distilled water in each cell until battery acid reaches
level specified by battery manufacturer. This helps
purge excessive gas from cells. Do not overfill.
• If necessary to remove battery from vehicle for
testing, always remove grounded terminal from
battery first. Make sure all accessories in the
vehicle are off, so as not to cause an arc.

headline bars
continuation tabs
notes
warnings
®
MD
7
OPERATION
IMPORTANT: For testing 12 V batteries only.
Suggested operational range 32°F (0°C) to 122°F
(50°C) ambient air temperature.
BATTERY TEST
1. Turn off the ignition, all accessories and any
loads. Close all vehicle doors and the trunk lid.
2. Clean the battery terminals.
3. Clip the red clamp to the positive (POS, P, +)
battery terminal.
4. Clip the black clamp to the negative (NEG. N, -)
battery terminal.
5. The display will light and show the battery
voltage.
NOTE: If display is blank, flickers or shows HI, Lo
or ---- , see Troubleshooting.
6. Press the button, then press
▲
or
▼
to select
bATT. Press to begin the test mode.
7. Select the battery type. Press
▲
or
▼
to select:
SLI (Standard SLI flooded batteries)
GEL (Gel cell batteries)
FLAt (AGM flat plate batteries)
SPL (AGM spiral batteries)
Press when the correct battery type is
displayed.
OPERATION

8
headline bars
continuation tabs
notes
warnings
model no. 011-3008-0 | contact us 1-888-942-6686
OPERATION
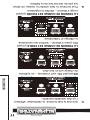
8. Select the battery rating. Press ▲or ▼to select:
CCA (Cold Cranking Amps)
CA [MCA]
(Cranking Amps [Marine Cranking Amps])
En (a European standard)
IEC (International Electrotechnical Commission
standard)
din (Deutsches Institut für Normung Standard)
Press when the correct rating type
is displayed.
9. Press
▲
or
▼
to input the battery capacity
of CCA (Cold Cranking Amps).
TEST RANGES:
CCA = 100 to 1200
CA [MCA] = 120 to 1440
EN = 90 to 1125
IEC = 65 to 790
DIN = 55 to 670
NOTE: If CCA rating is not shown on the battery,
use the following estimates:
GAS
L4
V6 V8
400 CCA 600 CCA 700 CCA
DIESEL
L4
V6 V8
500 CCA 700 CCA 1000 CCA

headline bars
continuation tabs
notes
warnings
®
MD
9
OPERATION
OPERATION
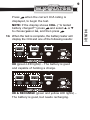
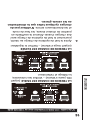
Press when the correct CCA rating is
displayed, to begin the test.
NOTE: If the display shows CHA- (“Is tested
battery charged?”) press and select
▲
or
▼
to choose yes or no, and then press .
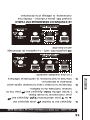
10. When the test is complete, the battery tester will
display the CCA and one of the following results:
OK (green LED lights) – The battery is good
and capable of holding a charge.
OK & RECHARGE (green and yellow LED lights) –
The battery is good, but needs recharging.

10
headline bars
continuation tabs
notes
warnings
model no. 011-3008-0 | contact us 1-888-942-6686
OPERATION
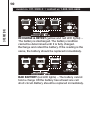
RECHARGE & RETEST
(yellow and red LED lights) –
The battery is discharged. The battery condition
cannot be determined until it is fully charged.
Recharge and retest the battery. If the reading is the
same, the battery should be replaced immediately.
BAD BATTERY (red LED lights) – The battery cannot
hold a charge OR the battery has at least one cell
short circuit. Battery should be replaced immediately.

headline bars
continuation tabs
notes
warnings
®
MD
11
OPERATION
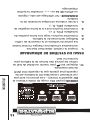
ERROR (right-hand red LED lights and Err shows
on the screen) –
The clamps are not connected
properly OR the tested battery is larger than
maximum testing CCA capacity.
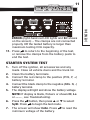
11. Press to return to the beginning of the test,
or remove the clamps from the battery posts to
end the test.
STARTER SYSTEM TEST
1. Turn off the ignition, all accessories and any
loads. Close all vehicle doors and the trunk lid.
2. Clean the battery terminals.
3. Connect the red clamp to the positive (POS, P, +)
battery terminal.
4. Connect the black clamp to the negative (NEG. N, -)
battery terminal.
5. The display will light and show the battery voltage.
NOTE: If display is blank, flickers or shows HI, Lo
or ---- , see Troubleshooting.
6. Press the button, then press ▲or ▼to select
SySt. Press to begin the test mode.
7. The screen will show CrAn. Press to read the
minimum voltage of the battery.

12
headline bars
continuation tabs
notes
warnings
headline bars
continuation tabs
notes
warnings
model no. 011-3008-0 | contact us 1-888-942-6686
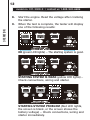
8. Start the engine. Read the voltage after cranking
the starter.
9. When the test is complete, the tester will display
one of the following results:
OK (green LED lights) – The starting system is good.
STARTING SYSTEM IS WEAK (yellow LED lights) –
Check connections, wiring and starter.
STARTING SYSTEM PROBLEM (Red LED lights,
the screen is blank, or the screen shows the
battery voltage) – Check connections, wiring and
starter immediately.
OPERATION

headline bars
continuation tabs
notes
warnings
®
MD
13
OPERATION
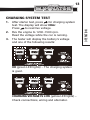
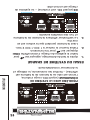
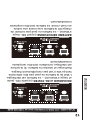
CHARGING SYSTEM TEST
1. After starter test, press for charging system
test. The display will show CHAr.
Press to read live voltage.
2. Rev the engine to 1200-1500 rpm.
Read the voltage while the car is running.
3. The tester will display the battery’s voltage
and one of the following results:
OK (green LED lights) – The charging system
is good.
CHARGING VOLTAGE IS LOW (yellow LED lights) –
Check connections, wiring and alternator.

14
headline bars
continuation tabs
notes
warnings
model no. 011-3008-0 | contact us 1-888-942-6686
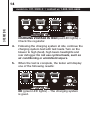
CHARGING VOLTAGE IS HIGH (red LED lights) –
Check the regulator.
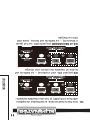
4. Following the charging system at idle, continue the
charging system test with test loads. Turn on the
blower to high (heat), high beam headlights and
rear defogger. Do not use cyclical loads, such as
air conditioning or windshield wipers.
5. When the test is complete, the tester will display
one of the following results:
OK (green LED lights) – The charging system
is good.
OPERATION

headline bars
continuation tabs
notes
warnings
®
MD
15
OPERATION
CHARGING VOLTAGE IS LOW (yellow LED lights) –
Check connections, wiring and alternator.
CHARGING VOLTAGE IS HIGH (red LED lights) –
Check the regulator.
6. To end the test, turn engine off and remove the
clamps from the battery posts.

16
headline bars
continuation tabs
notes
warnings
model no. 011-3008-0 | contact us 1-888-942-6686
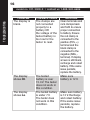
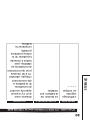
TROUBLESHOOTING
PROBLEM POSSIBLE CAUSE SOLUTION
The display is
blank.
The clamps are
not connected
properly to a
battery OR
the voltage of the
tested battery is
too low for the
tester to read.
Clean terminals and
rock clamps back
and forth to ensure
proper connection
to battery. Ensure
the red clamp is
connected to the
positive (POS, +)
terminal and the
black clamp is
connected to the
negative (NEG, -
terminal). If display
screen is still blank,
recharge and retest
battery. If the same
issue persists,
replace the battery.
The display
shows HI.
The tested
battery is over
15.0 V. The tester
does not work in
this condition.
Make sure
battery is 12 V.
The display
shows Lo.
The tested battery
is under 7 V.
The tester does
not work in this
condition.
Make sure battery
is 12 V. Recharge
and retest battery.
If the same issue
persists, replace
the battery.

headline bars
continuation tabs
notes
warnings
®
MD
17
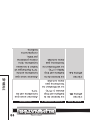
TROUBLESHOOTING
PROBLEM POSSIBLE CAUSE SOLUTION
The display
flickers or
shows - - - - .
The voltage
of the battery
being tested is
unstable.
Ensure no loads
are being drawn
from the battery.
If the battery was
recently charged,
wait 15-30
minutes to let the
battery voltage
stabilize, then
retest the battery.
If the same issue
persists, replace
the battery.
The display
shows Err and
the right-hand
red LED is lit.
The tested
battery is larger
than maximum
testing CCA
capacity.
Confirm the rating
of the tested
battery does not
exceed 1200 CCA
or 1440 CA (MCA).
headline bars
continuation tabs
notes
warnings
NOTE:
For more information about troubleshooting,
call toll-free: 1-888-942-6686.

18
headline bars
continuation tabs
notes
warnings
model no. 011-3008-0 | contact us 1-888-942-6686
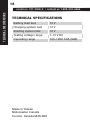
TECHNICAL SPECIFICATIONS
TECHNICAL SPECIFICATIONS
Battery load test 12 V
Charging system test 12 V
Starting system test 12 V
Testing voltage range 7-15 V DC
Operating range 100-1200 CCA (SAE)
Made in Taiwan
Motomaster Canada
Toronto, Canada M4S 2B8

22
headline bars
continuation tabs
notes
warnings
Nº de modèle : 011-3008-0 | Contactez-nous au 1 888 942-6686
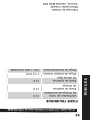
FICHE TECHNIQUE
FICHE TECHNIQUE
Vérification de l’état
de charge de la batterie
12 V
Essai du système
de charge
12 V
Essai du système
de démarrage
12 V
Plage de tension d’essai 7-15 V CC
Plage de fonctionnement 100-1 200 CCA (SAE)
Fabriqué au Taiwan
Motomaster Canada
Toronto, Canada M4S 2B8

headline bars
continuation tabs
notes
warnings
®
MD
21
Nº de modèle : 011-3008-0 | Contactez-nous au 1 888 942-6686
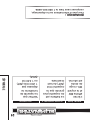
DÉPANNAGE
PROBLÈME CAUSE POSSIBLE SOLUTION
L’écran
affiche Err
et le voyant
DEL rouge
de droite
est allumé.
La batterie est
de capacité plus
grande que la
capacité CCA
(ADF) de test
maximale.
Vérifiez que
la capacité de
la batterie ne
dépasse pas
1 200 CCA (ADF)
ou 1 440 CA
(MCA).
headline bars
continuation tabs
notes
warnings
REMARQUE :
Pour plus d’informations sur le dépannage,
composez sans frais le 1 888 942-6686.
La page charge ...
La page charge ...
La page charge ...
La page charge ...
La page charge ...
La page charge ...
La page charge ...
La page charge ...
La page charge ...
La page charge ...
La page charge ...
La page charge ...
La page charge ...
La page charge ...
La page charge ...
La page charge ...
La page charge ...
La page charge ...
La page charge ...
La page charge ...
-
 1
1
-
 2
2
-
 3
3
-
 4
4
-
 5
5
-
 6
6
-
 7
7
-
 8
8
-
 9
9
-
 10
10
-
 11
11
-
 12
12
-
 13
13
-
 14
14
-
 15
15
-
 16
16
-
 17
17
-
 18
18
-
 19
19
-
 20
20
-
 21
21
-
 22
22
-
 23
23
-
 24
24
-
 25
25
-
 26
26
-
 27
27
-
 28
28
-
 29
29
-
 30
30
-
 31
31
-
 32
32
-
 33
33
-
 34
34
-
 35
35
-
 36
36
-
 37
37
-
 38
38
-
 39
39
-
 40
40


Schumacher Motomaster Eliminator 011-3008-0 – CT052 12V Battery Tester & Charging System Analyzer Le manuel du propriétaire
- Taper
- Le manuel du propriétaire
dans d''autres langues
Documents connexes
-
Schumacher Motomaster Eliminator 011-1981-2 – CT044 Workshop Series Battery Charger Le manuel du propriétaire
-
-
-
-
-
Autres documents
-
 Prime-Line G 3008 Guide d'installation
-
 Canadian Tire Branded MotoMaster 400 Lumen Flexible USB Rechargeable LED Worklight Le manuel du propriétaire
-
Energizer 9044199 Le manuel du propriétaire
-
 Clore Automotive PI15000X Manuel utilisateur
-
 Clore Automotive BA9 Manuel utilisateur
-
Bahco BBT Series Manuel utilisateur
-
 Napa Essentials 85-640 Manuel utilisateur


