Schumacher Motomaster 011-1977-4 – CT043 Classic Series Battery Charger Le manuel du propriétaire
- Catégorie
- Chargeurs de batterie de voiture
- Taper
- Le manuel du propriétaire

headline bars
tabs
continuation tabs
notes
warnings
headline bars
tabs
continuation tabs
notes
warnings
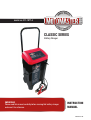
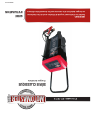
model no. 011-1977-4
IMPORTANT:
Please read this manual carefully before running this battery charger
and save it for reference.
INSTRUCTION
MANUAL
CLASSIC SERIES
Battery Charger
®
/MD
0099002023-00

headline bars
tabs
continuation tabs
notes
warnings
headline bars
tabs
continuation tabs
notes
warnings
headline bars
tabs
continuation tabs
notes
warnings
model no. 011-1977-4 | contact us 1-888-942-6686
2
WARRANTY
IF ANY PARTS ARE MISSING OR DAMAGED, OR IF YOU HAVE
ANY QUESTIONS, PLEASE CALL OUR TOLL-FREE HELPLINE
AT 1-888-942-6686.
Read and understand this instruction manual thoroughly before using the product.
It contains important information for your safety as well as operating and maintenance
advice.
Keep this instruction manual for future use. Should this product be passed on to a third
party, this instruction manual must be included.
This MotoMaster product carries a three (3) year warranty against defects in workmanship and materials.
At its discretion, MotoMaster Canada agrees to have any defective part(s) repaired or replaced free of
charge, within the stated warranty period, when returned by the original purchaser with proof of purchase.
This product is not guaranteed against wear or breakage due to misuse and/or abuse.

headline bars
tabs
continuation tabs
notes
warnings
headline bars
tabs
continuation tabs
notes
warnings
headline bars
tabs
continuation tabs
notes
warnings
3
TABLE OF CONTENTS
SAVE THESE INSTRUCTIONS
This manual contains important safety and operating instructions. Read all instructions and follow
them with use of this products
TABLE OF CONTENTS
Warranty
2
Safety
4
Connecting Your Battery
7
Know Your Charger
9
Operation
10
Charging Your Battery 10
Battery Charging Times 10
Aborted Charge 10
Desulfation Mode 11
Completion of Charge 11
Maintain Mode (Float Mode Monitoring) 11
Maintaining a Battery 11
Power-Up Auto Start 11
Using the Engine Start Feature 12
Maintenance
13
Troubleshooting
14
Technical Specifications
16

headline bars
tabs
continuation tabs
notes
warnings
headline bars
tabs
continuation tabs
notes
warnings
headline bars
tabs
continuation tabs
notes
warnings
model no. 011-1977-4 | contact us 1-888-942-6686
4
INTRODUCTION
This MotoMaster
®
battery charger features
advanced microprocessor technology making
battery charging faster, easier, and safer than ever
before. This manual will explain how to use the
charger safely and effectively.
Please read and follow these instructions and
precautions carefully.
SAFETY INFORMATION
• Read all instructions, warnings, and cautions
printed on the battery charger, battery and
vehicle or equipment using battery.
• Use the charger for charging lead-acid
batteries only (such as those used in cars,
trucks, motorcycles, boats, etc.).
• Battery chargers are not intended to supply
power to a low-voltage electrical system or
to charge dry-cell batteries commonly used
in household appliances such as radios, toys,
cameras, etc. Charging dry-cell batteries
may cause them to burst and cause injury to
persons and damage to property.
• Use of an attachment not recommended by
the battery charger manufacturer may result
in the risk of fire or electric shock.
• DO NOT disassemble the charger. Take it to
a qualified service professional if service or
repair is required. Incorrect assembly may
result in fire or electrical shock.
• To reduce risk of electrical shock, unplug the
charger from the outlet before attempting
any maintenance or cleaning.
• DO NOT expose charger to rain or snow.
• NEVER charge a frozen battery. If battery
acid becomes frozen, bring battery to a warm
area and allow it to thaw before you begin
charging.
• NEVER touch battery clamps together when
the charger is on. This may cause a spark
• NEVER operate a charger if it has received
a hard blow, been dropped or otherwise
damaged. Take it to a qualified professional
for inspection.
• NEVER pull out the plug by the cord when
unplugging the charger, as this may cause
damage to the cord or plug.
PERSONAL SAFETY INSTRUCTIONS
•
Make sure that someone is within range of
your voice to come to your aid if needed while
you work with or are near a lead-acid battery.
• Wear complete eye and clothing protection
when working with lead-acid batteries.
• Avoid touching your eyes while working with
a battery. Have plenty of fresh water and
soap nearby for use in case battery acid
contacts your eyes, skin or clothing. If this
happens, wash immediately with soap and
water, then get medical attention.
headline bars
tabs
continuation tabs
notes
warnings
WARNING!
Handling the cord on this product or objects associated with the use of this product may expose you to lead.
Wash hands after handling.
WARNING! RISK OF EXPLOSIVE GASES
Working in the vicinity of a lead-acid battery is dangerous. Batteries generate explosive gases during normal
battery operation. For this reason it is of the utmost importance that each time before using your charger, you
read and follow the instructions provided exactly. To reduce risk of battery explosion, follow these instructions
and those published by the battery manufacturer.
FPO
SAFETY

headline bars
tabs
continuation tabs
notes
warnings
headline bars
tabs
continuation tabs
notes
warnings
5
headline bars
tabs
continuation tabs
notes
warnings
headline bars
tabs
continuation tabs
notes
warnings
headline bars
tabs
continuation tabs
notes
warnings
SAFETY
• NEVER smoke or allow an open spark or
flame in the vicinity of the battery or engine.
Batteries generate explosive gases.
• Take care not to drop any metal tool or
object onto the battery. This may result in a
spark or short circuit across the battery or
another electrical device that may cause an
explosion.
• Remove all personal metal items, such as
rings, bracelets, necklaces, and watches
from your body while working with a lead-
acid battery. A battery can produce a short
circuit current high enough to weld such
objects to metal, causing a severe burn.
• NEVER attempt to charge a frozen battery
(see bullet point under Important Safety
Instructions).
• NEVER overcharge a battery.
• ALWAYS operate the battery charger in an
open, well-ventilated area.
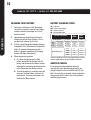
AC ELECTRICAL CONNECTIONS
PLUGGING CHARGER IN
Your charger requires a 3-pin, grounded 120 V AC
electrical wall outlet receptacle installed according
to local codes and ordinances.
USING AN EXTENSION CORD
The use of an extension cord is NOT
recommended. If an extension cord must be used,
follow these guidelines:
•
Make sure that the pins on the charger’s
power cord fit firmly into the extension cord
and that the extension cord fits firmly into the
receptacle.
• Check that the extension cord is properly
wired and in good electrical condition.
• Make sure that the wire size is large enough
for its length and for the AC ampere rating of
the charger, as specified in the chart below.
WARNING!
DO NOT operate the charger if it has a damaged power cord or plug. Have the cord replaced.
WARNING! RISK OF EXPLOSIVE GASES
Working in the vicinity of a lead-acid battery is dangerous. Batteries generate explosive gases during normal
battery operation. For this reason it is of the utmost importance that each time before using your charger, you
read and follow the instructions provided exactly. To reduce risk of battery explosion, follow these instructions
and those published by the battery manufacturer.
MINIMUM RECOMMENDED EXTENSION CORD
Length of Cord, Metres (Feet) AWG* Size of Cord
7.6 (25) 18
15.2 (50) 16
30.5 (100) 12
45.6 (150) 10
*AWG = American Wire Gauge
FPO

headline bars
tabs
continuation tabs
notes
warnings
headline bars
tabs
continuation tabs
notes
warnings
headline bars
tabs
continuation tabs
notes
warnings
headline bars
tabs
continuation tabs
notes
warnings
model no. 011-1977-4 | contact us 1-888-942-6686
6
headline bars
tabs
continuation tabs
notes
warnings
SAFETY
PREPARING TO CHARGE
CHARGER LOCATION
• DO NOT expose charger to rain or snow.
• Locate the charger as far away from the
battery being charged as the cables will
permit.
• Be sure to position the power cord to prevent
it from being stepped on, tripped over or
damaged.
• NEVER place charger directly above battery
being charged. Gases from the battery will
corrode and damage the charger.
• NEVER set a battery on top of a charger.
• NEVER allow battery acid to drop on charger.
• ALWAYS charge a battery in a well-ventilated
area.
BATTERY PREPARATION
• When removing battery from vehicle to
charge it, always remove grounded terminal
from battery first.
• Make sure all accessories in the vehicle are
OFF in order to prevent sparks.
• Be sure that the area around the battery is
well ventilated while being charged.
• Clean the battery terminals. Be careful to
keep corrosion or battery acid from getting in
or around your eyes.
• For batteries with removable vent caps, if
required, add distilled water to each cell until
the battery fluid reaches the level specified
by the battery manufacturer.
• DO NOT overfill.
• For batteries without removable vent caps,
carefully follow the manufacturer’s charging
instructions.
• Study all of the battery manufacturer’s
specific precautions and recommendations
for charging and for recommended rates of
charge.
• Make sure that you have a 12 V lead-acid
battery. Determine voltage of battery by
referring to the vehicles owner’s manual. If
the charger has an adjustable charge rate,
charge battery at the lowest rate first.
ASSEMBLY
• Remove all cord wraps and uncoil the cables
prior to using the battery charger.
• Extend the handle from the retracted position
by pulling it upward until it locks into place.
(Press the small silver buttons inward, if
necessary.)
WARNING!
Battery chargers may get hot during operation. DO NOT set charger on flammable materials
like carpeting, upholstery, paper, cardboard, etc. Charger may damage leather and plastic.
FPO

headline bars
tabs
continuation tabs
notes
warnings
headline bars
tabs
continuation tabs
notes
warnings
headline bars
tabs
continuation tabs
notes
warnings
7
headline bars
tabs
continuation tabs
notes
warnings
headline bars
tabs
continuation tabs
notes
warnings
CONNECTING YOUR BATTERY
NOTE:
NEVER allow the DC output clamps to touch each other. This may cause a spark.
Remove the AC plug from the electrical outlet before connecting and disconnecting the DC output clamps.
To reduce the risk of a spark near battery:
• Position AC and DC cords to reduce the risk of damage by hood, door, or moving engine part.
• Stay clear of fan blades, pulleys, and other parts that can cause injury.
• Check polarity of battery posts. A positive (POS, P, +) battery post usually has a larger
diam eter than a negative (NEG, N, -) battery post.
WARNING!
A spark near a battery may cause a battery explosion!
NOTE: a marine battery installed in a boat must be removed and charged
on shore. To charge it onboard requires equipment specially designed for
marine use.
BATTERY IN VEHICLE
(NEGATIVE GROUNDED)
1. Before connecting and disconnecting the DC
output clamps, remove the AC plug from the
electrical outlet.
2. Check polarity of battery posts.
A positive (POS, P, +) battery post usually has
a larger diameter than a negative (NEG, N, -)
battery post.
3. Connect the positive (red) clip from the
battery charger to the positive (POS, P, +)
ungrounded post of battery.
4. Connect the negative (black) clip to vehicle
chassis (must be a heavy gauge metal part of
the frame) or engine block away from battery.
DO NOT connect clip to carburetor, fuel lines,
or sheet-metal body parts.
5. Connect charger AC supply cord to electric
outlet. (Reverse process to remove charger.)
BATTERY IN VEHICLE
(POSITIVE GROUNDED)
1. Before connecting and disconnecting the DC
output clamps, remove the AC plug from the
electrical outlet.
2. Connect the negative (black) clip from the
battery charger to the negative (NEG, N, -)
ungrounded post of battery.
3. Connect the positive (red) clip to vehicle
chassis (must be a heavy gauge metal part of
the frame) or engine block away from battery.
DO NOT connect clip to carburetor, fuel lines,
or sheet-metal body parts.
4. Connect charger AC supply cord to electric
outlet. (Reverse process to remove charger.)
FPO

headline bars
tabs
continuation tabs
notes
warnings
headline bars
tabs
continuation tabs
notes
warnings
headline bars
tabs
continuation tabs
notes
warnings
headline bars
tabs
continuation tabs
notes
warnings
model no. 011-1977-4 | contact us 1-888-942-6686
8
headline bars
tabs
continuation tabs
notes
warnings
headline bars
tabs
continuation tabs
notes
warnings
CONNECTING YOUR BATTERY
WARNING!
A spark near a battery may cause a battery explosion!
NOTE: a marine battery installed in a boat must be removed and charged on shore.
To charge it onboard requires equipment specially designed for marine use.
NOTE:
NEVER allow the DC output clamps to touch each other. This may cause a spark.
Check polarity of battery posts. A positive (POS, P, +) battery post usually has a larger diameter
than a negative (NEG, N, -) battery post.
FPO
BATTERY REMOVED FROM VEHICLE
1. Before connecting and disconnecting the DC
output clamps, remove the AC plug from the
electrical outlet.
2. Connect the positive (red) charger clip to the
positive (POS, P, +) post of battery.
3. Attach at least a 60 cm (24˝) long 6-gauge
(AWG) insulated battery cable to a negative
(NEG, N, -) battery post.
4. Position yourself and the free end of cable
as far away from battery as possible, then
connect the negative (black) charger clip to
the free end of cable. DO NOT face battery
when making final connection.
5. Connect charger AC supply cord to electric
outlet. (Reverse process to remove charger.)
6. When disconnecting chargers, ALWAYS do so
in reverse sequence of connecting procedure
and break first connection while standing as
far away from battery as practical.

headline bars
tabs
continuation tabs
notes
warnings
headline bars
tabs
continuation tabs
notes
warnings
headline bars
tabs
continuation tabs
notes
warnings
9
KNOW YOUR CHARGER
START/STOP BUTTON
Press to immediately begin charging your properly
connected battery. If the button is not pressed,
charging should begin automatically in 30 seconds.
RATE SELECTION BUTTON
Use this button to select one of the following:
• 6 A Charge – For charging small and large
batteries. Not recommended for industrial
applications.
• 40 A<>15 A Boost Charge – For quickly
adding energy to a severely discharged or
large capacity battery prior to Engine Start,
or for fast charging of larger batteries.
• 200 A Engine Start – Provides additional
amps for cranking an engine with a weak or
run-down battery. Always use in combination
with a battery.
LED INDICATORS
• Charging (yellow) LED lit:
The charger is charging the battery.
• Charged/Maintaining (green) LED lit:
The battery is fully charged and the charger is
in maintain mode.
• Red LED solid: The connections are
reversed.
• Red LED blinking: The charger has detected
a problem with the battery.
See the Troubleshooting section for more
information.
headline bars
tabs
continuation tabs
notes
warnings
NOTE:
Charger will NOT begin charging if the solid Red LED is on, indicating the battery clamps are reversed.
See the Operation section for a complete description of the charger modes.

headline bars
tabs
continuation tabs
notes
warnings
model no. 011-1977-4 | contact us 1-888-942-6686
10
headline bars
tabs
continuation tabs
notes
warnings
OPERATION
CHARGING YOUR BATTERY
1. Follow the instructions in the Connecting
Your Battery section to connect your battery,
and then connect the charger to a live AC
electrical outlet.
2. Upon power-up, the default selection for
charge rate will be Boost Charge. If this is
not preferred, choose the 6 A rate.
3. Press the Start/Stop button to begin charging
immediately. If the Start button is not pressed
within 30 seconds after power-up, and a
battery is properly connected, the charging
process will begin automatically.
4. When charging is complete,
a. Or if done charging, press the Stop
button, disconnect the charger from AC
power, and disconnect the battery clamps
following the instructions for disconnection
in the Connecting Your Battery section.
b. To keep the battery in maintain mode, do
not press the Stop button, and leave all
connections. For more information, see
the Maintain Mode section.
BATTERY CHARGING TIMES
Ah – Amp Hour
CCA – Cold Cranking Amps
RC – Reserve Capacity
NR – Not Recommended
BATTERY SIZE/RATING
6 A
CHARGE
40 A<>15 A
BOOST
CHARGE
Small Batteries
25-32 Ah 1¼-3¼ h NR
Cars
and
Trucks
200-315 CCA 40-60 RC 3¾-4¾ h 1-1¼ h
315-550 CCA 60-85 RC 4¾-6 h 1¼-1½ h
550-1000 CCA 85-190 RC 6-11½ h 1½-3¼ h
Marine/Deep-Cycle
80 RC 6 h 1½ h
140 RC 9 h 2¼ h
160 RC 10 h 2½ h
180 RC 11 h 2¾ h
Times are based on a 50% discharged battery and may
change, depending on age and condition of battery.
ABORTED CHARGE
If charging cannot be completed normally,
charging will abort. When charging aborts, the
charger’s output is shut off and the Red LED will
blink. To reset after an aborted charge, unplug the
charger from the AC outlet, wait a few moments
and then plug it back in.

headline bars
tabs
continuation tabs
notes
warnings
headline bars
tabs
continuation tabs
notes
warnings
11
headline bars
tabs
continuation tabs
notes
warnings
OPERATION
DESULFATION MODE
If the battery is left discharged for an extended
period of time, it could become sulfated and not
accept a normal charge. If the charger detects
a sulfated battery, the charger will switch to a
special mode of operation designed for such
batteries. Normal charging will resume after the
battery is desulfated. Desulfation could take up to
10 hours. If desulfation fails, charging will abort
and the red LED will blink.
COMPLETION OF CHARGE
Charge completion is indicated by the Charged/
Maintaining (green) LED. When lit, the charger has
switched to the maintain mode of operation.
MAINTAIN MODE
(FLOAT MODE MONITORING)
When the Charged/Maintaining (green) LED is lit,
the charger has started maintain mode. In this
mode, the charger keeps the battery fully charged
by delivering a charge current when necessary. If
the charger has to provide an excessive maintain
current for a continuous 12 hour period, it will go
into abort mode (see Aborted Charge section). This
is usually caused by a drain on the battery or the
battery could be bad.
MAINTAINING A BATTERY
This product charges and maintains 12 V
batteries. The maintain mode technology allows
you to safely charge and maintain a healthy
battery for extended periods of time. However,
problems with the battery, electrical problems
in the vehicle, improper connections or other
unanticipated conditions could cause excessive
current draws. As such, occasionally monitoring
your battery and the charging process is required.
POWER-UP AUTO START
The charger is equipped with an auto-start feature
which is triggered only when the charger is first
powered up. If the Start button is not pressed within
30 seconds, the unit will search for a battery. If the
unit detects a battery that is properly connected,
the unit will set the rate to Boost Charge. The
charging process will automatically start, and the
Charging (yellow) LED will light.

headline bars
tabs
continuation tabs
notes
warnings
headline bars
tabs
continuation tabs
notes
warnings
headline bars
tabs
continuation tabs
notes
warnings
headline bars
tabs
continuation tabs
notes
warnings
model no. 011-1977-4 | contact us 1-888-942-6686
12
headline bars
tabs
continuation tabs
notes
warnings
headline bars
tabs
continuation tabs
notes
warnings
NOTE:
If you have charged the battery and it still will not start your car, do not use the Engine Start feature, or it could
damage the vehicle’s electrical system. Have the battery checked.
If the engine does turn over but never starts, there is not a problem with the starting system; there is a problem
somewhere else with the vehicle. STOP cranking the engine until the other problem has been diagnosed and corrected.
OPERATION
USING THE ENGINE START FEATURE
Your battery charger can be used to jump start
your car if the battery is low. Follow all safety
instructions and precautions for charging your
battery. Wear complete eye protection and
protective clothing.
1. With the charger unplugged from the AC outlet,
connect the charger to the battery following the
instructions given in Battery in Vehicle section.
2. Connect the charger to a live grounded 120 V
AC outlet.
3. With the charger plugged in and connected
to the battery and chassis, press the Rate
Selection button until the Engine Start LED is lit,
and then press the Start button.
4. Crank the engine until it starts or 5 seconds
pass. If the engine does not start, repeat. Do not
crank during the cool down period (see below).
This allows the charger and battery to cool
down. NOTE: During extremely cold weather, or
if the battery is under 2 V, charge the battery for
5 minutes before cranking the engine.
5. If the engine fails to start, charge the battery for
5 more minutes before attempting to crank the
engine again.
6. After the engine starts, unplug the AC power
cord before disconnecting the battery clamps
from the vehicle.
7. Clean and store the charger in a dry location.
ENGINE STARTING NOTES
During the starting sequence listed above, the
charger is set to one of four states:
• Wait for ready – The charger charges the
battery for 2 minutes before the Wait for
Cranking state. While waiting for ready,
the engine can be cranked. For severely
discharged batteries, it is not recommended
to crank during this time.
• Wait for cranking – The charger waits until
the engine is actually being cranked before
delivering the amps for engine start.
• Cranking – When cranking is detected, the
charger will automatically deliver up to its
maximum output as required by the starting
system for up to 5 seconds.
• Cool Down – After repeated cranking during
a 3-minute ready period, the charger enters a
mandatory 3-minute (180-second) cool down
state. After 2 hours of Engine Starting, the
unit will automatically exit from the Engine
Start mode, just as if the Stop button had
been pressed; the Charging LED will not be
lit. During this time, the Engine Start LED will
blink to indicate the Engine Start operation is
temporarily paused.
WARNING!
Using the Engine Start feature WITHOUT a battery installed in the vehicle could cause damage
to the vehicle’s electrical system.
FPO

headline bars
tabs
continuation tabs
notes
warnings
headline bars
tabs
continuation tabs
notes
warnings
headline bars
tabs
continuation tabs
notes
warnings
13
MAINTENANCE
MAINTENANCE
A minimal amount of care can keep your battery
charger working properly for years.
• Clean the clamps each time you are finished
charging. Wipe off any battery fluid that may
have come in contact with the clamps to
prevent corrosion.
• Occasionally cleaning the case of the charger
with a soft cloth will keep the finish shiny and
help prevent corrosion.
• Coil the input and output cords neatly when
storing the charger. This will help prevent
accidental damage to the cords and charger.
• Store the charger unplugged from the AC
power outlet in an upright position.
• Store inside, in a cool, dry place. Do not store
the clamps clipped together, on or around
metal, or clipped to the cables.

headline bars
tabs
continuation tabs
notes
warnings
headline bars
tabs
continuation tabs
notes
warnings
model no. 011-1977-4 | contact us 1-888-942-6686
14
TROUBLESHOOTING
headline bars
tabs
continuation tabs
notes
warnings
NOTE:
For more information about troubleshooting or replacement parts, call toll-free: 1-866-942-6686.
PROBLEM POSSIBLE CAUSE SOLUTION
The charger will not
turn on when properly
connected.
• AC outlet is dead.
• Poor electrical connection.
• Battery is defective.
• Check for open fuse or circuit
breaker supplying AC outlet.
• Check power cord and extension
cord for loose fitting plug.
• Have battery checked.
The battery is properly
connected, but the
Charging LED never lit.
The battery voltage is low. Press the Start/Stop button to start
charging.
Short or no start cycle
when cranking engine.
• Drawing more than the Engine
Start Rate.
• Failure to wait 3 minutes (180
seconds) between cranks.
• Clamps are not making a good
connection.
• AC cord and/or extension cord is
loose.
• No power at receptacle.
• The charger may be overheated.
• Battery may be severely discharged.
• Crank time varies with the amount of
current drawn. If cranking draws more
than the Engine Start Rate, crank time
may be less than 7 seconds.
• Wait 3 minutes of rest time before
the next crank, to allow the battery
and charger to cool down.
• Check for poor connection at
battery and frame.
• Check power cord and extension
cord for loose fitting plug.
• Check for open fuse or circuit
breaker supplying AC outlet.
• The thermal protector may have
tripped and needs a little longer to
close. Make sure the charger vents
are not blocked. Wait and try again.
• On a severely discharged battery,
use the Boost Charge setting for few
minutes, to help assist in cranking.

headline bars
tabs
continuation tabs
notes
warnings
headline bars
tabs
continuation tabs
notes
warnings
15
headline bars
tabs
continuation tabs
notes
warnings
TROUBLESHOOTING
PROBLEM POSSIBLE CAUSE SOLUTION
The Red LED is blinking. • The battery voltage is still below 10 V
after 2 hours of charging.
(or)
• In Maintain Mode, the output
current exceeds its maintain level
for 12 hours.
• Desulfation was unsuccessful.
• Lack of progress is detected and
battery voltage is below 14 V.
• The battery voltage drops to below
10.8 V in Maintain Mode.
• The battery may be defective. Make
sure there are no loads on the battery.
If there are, remove them. If there are
none, have the battery checked or
replaced.
• The battery may be defective. Have
battery checked or replaced.
• The battery may be overheated. If
so, allow the battery to cool. The
battery may be too large or have a
short circuit. Have battery checked
or replaced.
• The battery won’t hold a charge.
May be caused by a drain on the
battery or the battery could be bad.
Make sure there are no loads on the
battery. If there are remove them.
If there are none, have the battery
checked or replaced.

headline bars
tabs
continuation tabs
notes
warnings
16
headline bars
tabs
continuation tabs
notes
warnings
model no. 011-1977-4 | contact us 1-888-942-6686
Made in Mexico
Motomaster Canada
Toronto, Canada M4S 2B8
TECHNICAL SPECIFICATIONS
TECHNICAL SPECIFICATIONS
Input voltage 120 V AC
Input frequency 60 Hz
Input current 6 A cont., 65 A int.
Output voltage 12 V
Output current 12 V DC
6 A/15 A cont.
40 A/200 A int.

headline bars
tabs
continuation tabs
notes
warnings
16
headline bars
tabs
continuation tabs
notes
warnings
Nº de modèle : 011-1977-4 | Contactez-nous au 1 888 942-6686
Fabriqué au Mexique
Motomaster Canada
Toronto, Canada M4S 2B8
FICHE TECHNIQUE
FICHE TECHNIQUE
Tension d’entrée 120 V CA
Fréquence d’entrée 60 Hz
Courant d’entrée 6 A continu, 65 A intermittent
Tension de sortie 12 V
Courant de sortie 12 VCC
6 A/15 A continu
40 A/200 A intermittent

headline bars
tabs
continuation tabs
notes
warnings
headline bars
tabs
continuation tabs
notes
warnings
15
headline bars
tabs
continuation tabs
notes
warnings
DÉPANNAGE
PROBLÈME CAUSE POSSIBLE SOLUTION
Le voyant DEL rouge
clignote.
• La tension de la batterie est
toujours inférieure à 10 V après 2
heures de charge.
(ou)
• En mode Entretien, le courant
de sortie dépasse son niveau
d’entretien pendant 12 heures.
• La désulfatation a échoué.
• Un manque de progression est
détecté et la tension de la batterie
est inférieure à 14 V.
• La tension de la batterie chute
en dessous de 10,8 V en mode
Entretien.
• La batterie est peut-être
défectueuse. Assurez-vous
qu’aucune charge n’est connectée
à la batterie. S’il y en a, retirez-les.
S’il n’y en a pas, faites vérifier la
batterie ou remplacez-la.
• La batterie est peut-être
défectueuse. Faites vérifier la
batterie ou remplacez-la.
• La batterie est peut-être
surchauffée. Si tel est le cas,
laissez la batterie refroidir.
La batterie est peut-être trop
volumineuse ou présente un court-
circuit. Faites vérifier la batterie ou
remplacez-la.
• La batterie ne tient pas la charge.
Cela peut être dû à un appel de
courant de la batterie ou celle-
ci pourrait être endommagée.
Assurez-vous qu’aucune charge
n’est connectée à la batterie. S’il
y en a, retirez-les. S’il n’y en a
pas, faites vérifier la batterie ou
remplacez-la.

headline bars
tabs
continuation tabs
notes
warnings
headline bars
tabs
continuation tabs
notes
warnings
Nº de modèle : 011-1977-4 | Contactez-nous au 1 888 942-6686
14
DÉPANNAGE
headline bars
tabs
continuation tabs
notes
warnings
REMARQUE :
Pour plus d’informations sur le dépannage ou le remplacement de pièces, composez sans frais le 1 888 942-6686.
PROBLÈME CAUSE POSSIBLE SOLUTION
Le chargeur ne s’allume
pas une fois branché.
• La prise CA n’est pas alimentée en
courant.
• Il y a un mauvais raccordement
électrique.
• La batterie est défectueuse.
• Vérifiez l’état du fusible ou du
disjoncteur alimentant la prise CA.
• Vérifiez que le cordon d’alimentation
et la rallonge électrique ne sont pas
mal branchés.
• Faites vérifier la batterie.
La batterie est correctement
connectée, mais le voyant
DEL de charge ne s’est
jamais allumé.
La tension de la batterie est trop
basse.
Appuyez sur le bouton Marche/Arrêt
pour commencer à charger.
Cycle de démarrage
court ou inexistant
lors du démarrage du
moteur.
• Appel de courant supérieur que le
taux d’aide-démarrage.
• Défaut d’attendre 3 minutes (180
secondes) entre les tentatives de
démarrage.
• Les pinces ne font pas une bonne
connexion.
• Le cordon d’alimentation ou la
rallonge est desserré.
• Pas de courant à la prise.
• Le chargeur est peut-être
surchauffé.
• La batterie peut être gravement
déchargée.
• Le temps de démarrage varie en
fonction de l’appel de courant. Si
l’appel de courant au démarrage
est supérieur que le taux d’aide-
démarrage, le temps de démarrage
peut être inférieur à 7 secondes.
• Attendez 3 minutes avant la
prochaine tentative de démarrage
pour permettre à la batterie et au
chargeur de refroidir.
• Vérifiez la présence de mauvaise
connexion au niveau de la batterie
et du châssis.
• Vérifiez que le cordon d’alimentation
et la rallonge électrique ne sont pas
mal branchés.
• Vérifiez l’état du fusible ou du
disjoncteur alimentant la prise CA.
• Le protecteur thermique peut s’être
déclenché et avoir besoin d’un
peu plus de temps pour se rétablir.
Assurez-vous que les orifices de
ventilation du chargeur ne sont pas
obstrués. Attendez, puis réessayez.
• Sur une batterie fortement
déchargée, utilisez le réglage Boost
Charge (Charge rapide) pendant
quelques minutes pour vous aider à
démarrer le moteur.

headline bars
tabs
continuation tabs
notes
warnings
headline bars
tabs
continuation tabs
notes
warnings
13
headline bars
tabs
continuation tabs
notes
warnings
FONCTIONNEMENTENTRETIEN
ENTRETIEN
Un entretien minimal peut assurer le bon
fonctionnement de votre chargeur de batterie
pendant des années.
• Nettoyez les pinces chaque fois que vous
avez fini de charger. Essuyez tout liquide de
batterie susceptible d’avoir été en contact
avec les pinces afin d’éviter toute corrosion.
• Nettoyez occasionnellement le boîtier du
chargeur avec un chiffon doux gardera le fini
brillant et aidera à prévenir la corrosion.
• Enroulez soigneusement les cordons d’entrée
et de sortie lors du rangement du chargeur.
Cela aidera à prévenir les dommages
accidentels aux cordons et au chargeur.
• Rangez le chargeur débranché de la prise
secteur en position verticale.
• Entreposez-le dans un endroit frais et sec. Ne
rangez pas les pinces attachées ensemble,
sur ou autour d’un objet en métal, ou
attachées aux câbles.
NOTES CONCERNANT LE DÉMARRAGE
DU MOTEUR
Au cours de la séquence de démarrage indiquée
ci-dessus, le chargeur est défini sur l’un des
quatre états suivants :
• Attente pour Prêt – Le chargeur charge
la batterie pendant 2 minutes avant l’état
Attente pour démarrage. En attendant pour
l’état Prêt, e moteur peut être démarré. Pour
les batteries fortement déchargées, il n’est
pas recommandé de démarrer le moteur à
ce stade.
• Attente pour démarrage – Le chargeur
attend que le moteur soit en cours de
démarrage avant de fournir les ampères pour
l’aide-démarrage.
• Démarrage – Une fois le démarrage détecté,
le chargeur fournit automatiquement
au maximum de sa sortie les ampères
demandés par le système de démarrage
pendant 5 secondes maximum.
• Refroidissement – Après des démarrages
répétés pendant une période de préparation
de 3 minutes, le chargeur entre dans un
état de refroidissement obligatoire de 3
minutes (180 secondes). Après 2 heures de
démarrage du moteur, l’appareil quittera
automatiquement le mode d’aide-démarrage,
comme si le bouton Marche/Arrêt a été mis
en position d’arrêt; le voyant DEL de charge
ne sera pas allumé. Pendant ce temps, le
voyant DEL d’aide-démarrage clignotera
pour indiquer que l’aide-démarrage est
temporairement en pause.
La page charge ...
La page charge ...
La page charge ...
La page charge ...
La page charge ...
La page charge ...
La page charge ...
La page charge ...
La page charge ...
La page charge ...
La page charge ...
La page charge ...
-
 1
1
-
 2
2
-
 3
3
-
 4
4
-
 5
5
-
 6
6
-
 7
7
-
 8
8
-
 9
9
-
 10
10
-
 11
11
-
 12
12
-
 13
13
-
 14
14
-
 15
15
-
 16
16
-
 17
17
-
 18
18
-
 19
19
-
 20
20
-
 21
21
-
 22
22
-
 23
23
-
 24
24
-
 25
25
-
 26
26
-
 27
27
-
 28
28
-
 29
29
-
 30
30
-
 31
31
-
 32
32


Schumacher Motomaster 011-1977-4 – CT043 Classic Series Battery Charger Le manuel du propriétaire
- Catégorie
- Chargeurs de batterie de voiture
- Taper
- Le manuel du propriétaire
dans d''autres langues
Documents connexes
-
Schumacher Motomaster 011-1962-8 – CT051 Simple Series Onboard Battery Charger Le manuel du propriétaire
-
-
-
-
-
-
-
Autres documents
-
 Canadian Tire Branded MotoMaster 400 Lumen Flexible USB Rechargeable LED Worklight Le manuel du propriétaire
-
 Prime-Line N 6686 Mode d'emploi
-
Energizer 9044199 Le manuel du propriétaire
-
Motomaster 011-1504-0 Le manuel du propriétaire
-
Schumacher Electric PSC-12500A Le manuel du propriétaire
-
MasterCraft 2-Door Tall Cabinet Le manuel du propriétaire

