Dyna-Glo DGU505BAE-D Manuel utilisateur

Catégorie
Petits appareils de cuisine
Taper
Manuel utilisateur
1
Vertical Electric
Analog Smoker
MODEL #DGU505BAE / DGU505BAE-D
Français p. 28
Español p. 55
ATTACH YOUR RECEIPT HERE
Serial Number ________________________________ Purchase Date _________________________________
70-10-560
Rev. 4/20/16
Questions, problems, missing parts? Before returning to your retailer, call our
customer service department at 1-877-447-4768, 8:30 a.m. – 4:30 p.m. CST,
Monday – Friday or e-mail us at [email protected].
UL 1026 - sixth edition, 2012
Electric Household
Cooking and Food
Serving Appliances
CSA C22.2 No. 64-10
(reafrmed 2014)
Household Cooking and
Liquid-Heating Appliances
FOR OUTDOOR
USE ONLY
Use only with Class A GFI
(Ground Fault Interrupter)
2
STOP!
DYNA-GLO
®
VERTICAL GAS SMOKER
DYNA-GLO
®
VERTICAL ELECTRIC ANALOG SMOKER
3
TABLE OF CONTENTS
Safety Information ...........................................................................................................................3
Package Contents ...........................................................................................................................8
Hardware Contents .........................................................................................................................9
Preparation Before Assembly ........................................................................................................ ..9
Assembly Instructions ..................................................................................................................10
Operating Instructions ...................................................................................................................17
Tips On Smoking ...........................................................................................................................21
Care and Maintenance ..................................................................................................................23
Troubleshooting ...........................................................................................................................24
Replacement Parts List ................................................................................................................26
Warranty ......................................................................................................................................27
Please read and understand this entire manual before attempting to assemble, operate or install the
product. If you have any questions regarding the product, call our customer service department at
1-877-447-4768, 8:30 a.m.- 4:30 p.m. CST, Monday - Friday.
SAFETY INFORMATION
CAUTION
• When using electrical appliances, basic precautions should always be followed to
reduce the risk of re, electrical shock, and injury to persons.
DANGER
• Failure to follow these instructions could result in re or burn hazard which could
cause property damage, personal injury or death.
Assembler/Installer: This instruction manual contains important information necessary for the
proper assembly and safe use of this appliance. Read and follow all warnings and instructions
before assembling and using this appliance. Leave these instructions with the consumer.
Consumer/User: Follow all warnings and instructions when using this appliance.
SAVE THESE INSTRUCTIONS
4
IMPORTANT SAFEGUARDS
READ ALL INSTRUCTIONS, PRIOR TO USING THIS SMOKER
DO NOT use this product for anything other than its intended purpose. It is NOT intended for
commercial use. It is NOT intended to be installed or used in or on a recreational vehicle and/or boat.
DO NOT operate this smoker with a damaged cord or plug or after the smoker malfunctions, has
been dropped, or is damaged in any manner.
DO NOT use smoker within 10 feet (3 m) of a swimming pool, puddle, pond or other body of water.
• Keep smoker and electric controller dry and out of rain at all times.
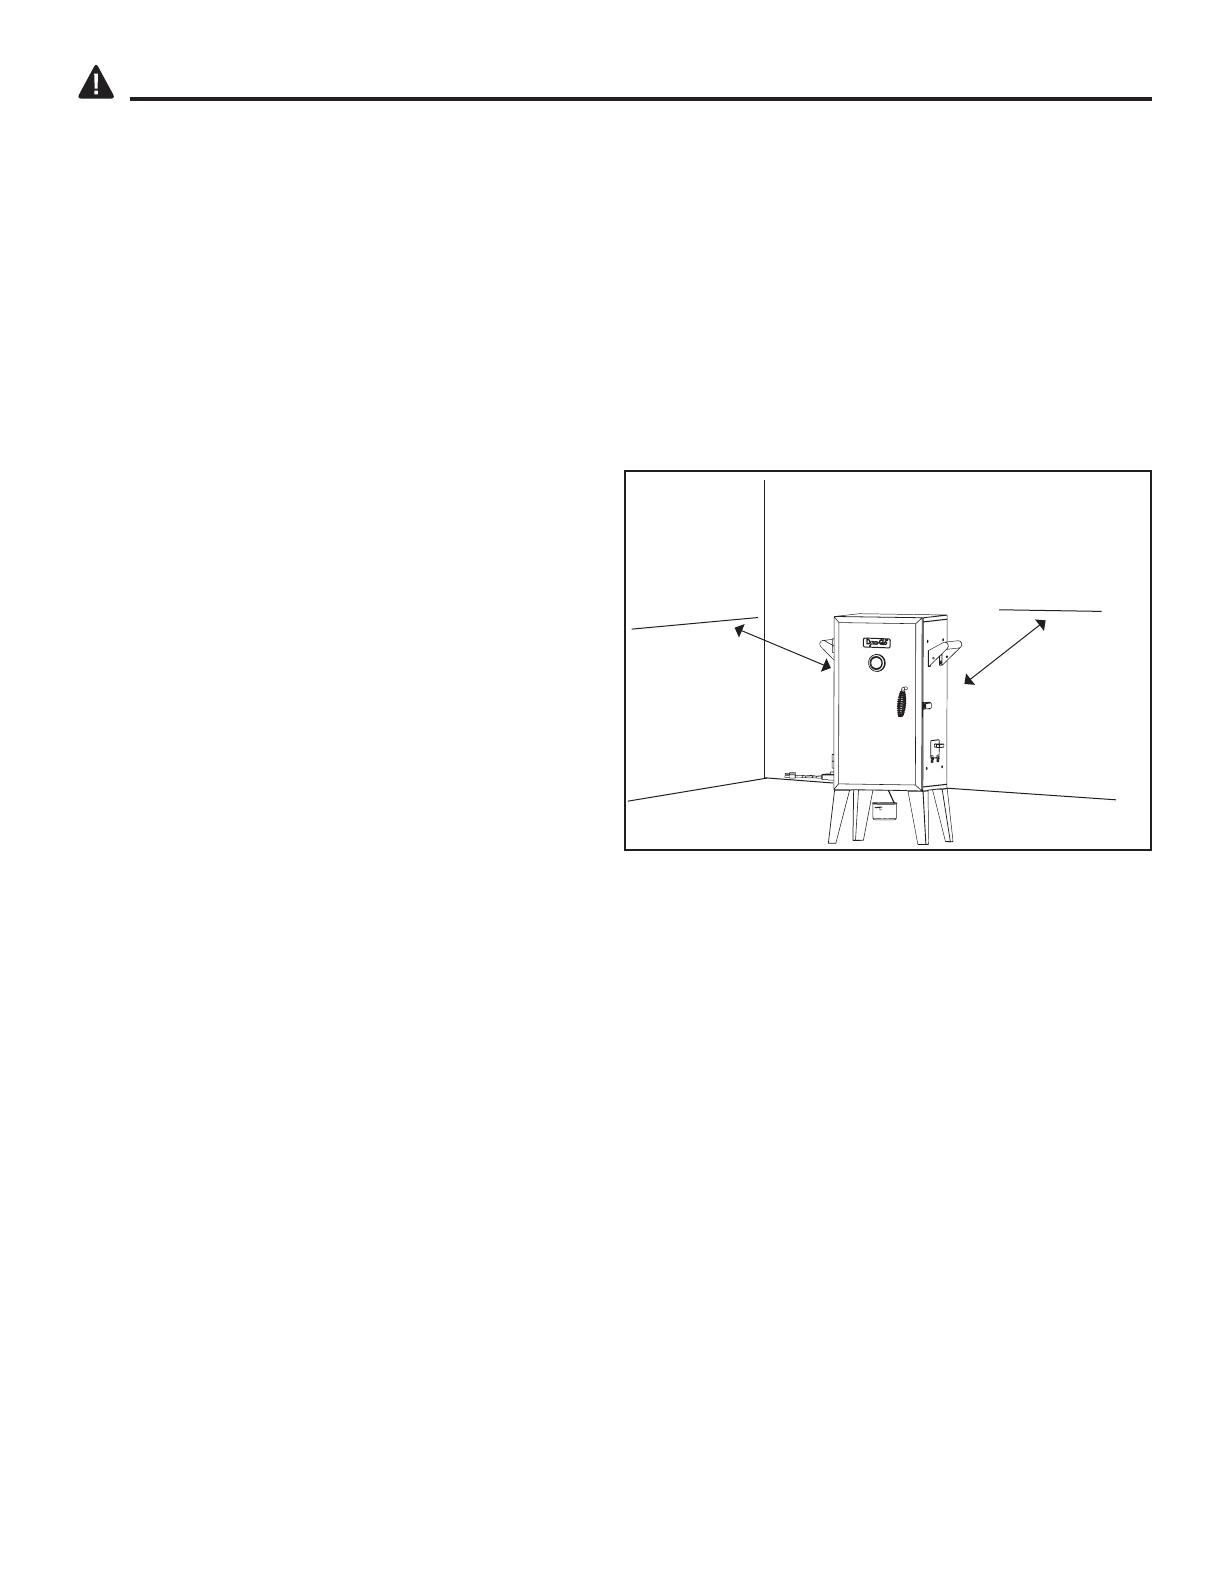
A minimum clearance of 36 in. (92 cm) to combustible material is required on the front, sides and
back. It is very important to always maintain
proper clearances to combustibles.
• When using avoring wood, add a sufcient
amount at the start of the cooking process, in
order to avoid re-adding wood during the cooking
process. Adding wood while operating may
splash hot water and cause serious injury.
• Check the water level at least every 2 hours. A
sizzling sound may indicate a low water level.
Follow instructions in this manual for adding
water while operating (see Page 17).
DO NOT use the appliance during an
electrical storm.
• Connect to properly grounded outlets only.
• Use only with a Class A GFI (Ground Fault Interrupter) protected circuit.
Arrange the power cord away from trafc areas to ensure that it is not tripped over.
• To disconnect the smoker, turn the smoker off by turning the control dial to O (OFF),
and removing the plug from the outlet.
DO NOT obstruct the ow of ventilated air for the appliance.
DO NOT use metal foil on the cooking grates. Doing so may result in damage to the smoker.
DO NOT use this appliance as a heater.
DO NOT use charcoal with this appliance. This appliance is not designed for use with charcoal
and a re will result if charcoal is used during operation. The re will create an unsafe condition
and damage the smoker.
• Use caution when opening the door of the smoker while in operation. Keep hands, face and body
safe from hot steam or are-ups. DO NOT inhale smoke.
• If you must dispose of ashes in less time than it takes for the ashes to completely cool down, then
remove the ashes from the appliance using insulated oven mitts or gloves and completely soak the
ashes with water before disposing of them in a noncombustible container.
DO NOT wear loose clothing while operating the smoker. Tie back long hair while operating the smoker.
ALWAYS wear shoes that fully cover your feet while operating the smoker.
SAFETY INFORMATION
36 in.
36 in.
92 cm
92 cm
5
DO NOT touch hot surfaces. Use handles or knobs.
• To protect against electrical shock do not immerse cord, plugs, or thermostat control assembly in
water or other liquid.
• Close supervision is necessary when any appliance is used by or near children.
• Unplug from outlet when not in use and before cleaning. Allow to cool before putting on or taking
off parts.
DO NOT operate any appliance with a damaged cord or plug or after the appliance malfunctions or
has been damaged in any manner. Return appliance to the nearest authorized service facility for
examination, repair, or adjustment.
• The use of accessory attachments not recommended by the appliance manufacturer may
cause injuries.
DO NOT use indoors.
DO NOT let cord hang over edge of table or counter, or touch hot surfaces.
• Do not place on or near a hot gas or electric burner, or in a heated oven.
• Extreme caution must be used when moving an appliance containing hot oil or other hot liquids.
Always attach plug to appliance rst, then plug cord into the wall outlet. To disconnect, turn the
control dial to O (OFF), then remove plug from wall outlet.
DO NOT use appliance for other than intended use.
• Use extreme caution when removing trays or disposing of hot grease.
DO NOT clean with metal scouring pads. Pieces can break off the pad and touch electrical parts,
creating a risk of electric shock.
• Fuel, such as charcoal briquettes, is not to be used with appliance.
• Use only on properly grounded outlet.
• Be sure that handles are assembled and fastened properly. See instructions regarding handles on
Page 11.
SAVE THESE INSTRUCTIONS.
SAFETY INFORMATION
WARNING
• DO NOT use 16 or 18 gauge extension cords. Damage to household wiring and/or
re could result.
THE USE OF AN EXTENSION CORD IS NOT RECOMMENDED.
READ ALL INSTRUCTIONS, PRIOR TO USING AN EXTENSION CORD WITH THIS SMOKER
• Use only OUTDOOR type with 3 prong grounding plug, rated for 15 amperes or more, approved by
UL, marked with a W-A and a tag stating “Suitable for Use with Outdoor Appliance”.
• Use the shortest length extension cord required. Do not connect 2 or more extension cords
together.
• Do not let cord hang over edge of table top or other items where it can be pulled by children or
tripped over.
6
SAFETY INFORMATION
Ground Fault Interrupter
• Since 1971 the National Electric Code (NEC) has required Ground Fault Interrupter
devices on all outdoor circuits.
• If your residence was built before 1971, check with a qualied electrician to determine if
a Ground Fault Interrupter protector exists.
• Do not use this appliance if the circuit does not have Class A GFI protection.
• Do not plug this appliance into an indoor circuit.
GENERAL SAFETY
READ ALL INSTRUCTIONS, PRIOR TO USING THIS SMOKER
• This appliance is for outdoor use only in well-ventilated areas. DO NOT operate it under a roof, in a
building, garage or any other enclosed area, or under overhead construction.
• Before each use check that no dead leaves or debris are under the appliance.
• Keep a re extinguisher near this product at all times.
Always unplug the smoker when not in use.
Allow the smoker and its components to cool completely before conducting any routine cleaning
or maintenance.
DO NOT use water or other liquid spray to clean the smoker without rst unplugging the unit.
Allow the smoker to cool to 115°F (45°C) before moving or storing. Use caution when lifting and
moving the appliance to avoid back strain or back injury.
DO NOT move the appliance while it is in use.
• When not in use, the smoker should be kept out of the elements or protected with a cover. Allow
the smoker to completely cool before placing the cover. Store this appliance in a dry, protected
location when possible.
• Use of accessory attachments not recommended by the appliance manufacturer may lead to injury
or property damage.
7
SAFETY INFORMATION
WARNING
To Avoid Serious Injury:
• While cooking, the smoker must be on a level, stable, noncombustible surface in an area
clear of combustible material, including long or dry grass.
• The use of alcohol, prescription or nonprescription drugs may impair the user’s ability to
properly assemble and safely operate this appliance.
DO NOT move the appliance while it is in use.
DO NOT store and use this appliance near gasoline or other combustible liquids or where
other combustible vapors may be present.
• The smoker should only be used in well ventilated areas.
DO NOT use this appliance as a heater.
DO NOT leave the appliance unattended while in use. Keep children and pets away from
the appliance at all times.
• This appliance will be hot during and after use. Use insulated oven mitts or gloves for
protection from hot surfaces or splatter from cooking liquids.
WARNING
CALIFORNIA PROPOSITION 65
1. Combustible by-products produced when using this product contains chemicals
known to the State of California to cause cancer, birth defects, or other
reproductive harm.
2. This product contains chemicals, including lead and lead compounds, known to
the State of California to cause cancer, birth defects or other reproductive harm.
Wash your hands after handling this product.
DANGER
In case of re, unplug smoker from outlet and allow re to burn out. Do not use
water to put out a re in this or another electrical appliance.
To avoid electrical shock disconnect electric cord before cleaning smoker. Never
immerse electric controller or heating element in any liquid.
To avoid the possibility of burns make sure the smoker is completely cooled before
removing and/or cleaning electric controller and heating element.
DO NOT use steel wool or wire brushes to clean the inside of the appliance. Pieces
can break off and touch electrical parts creating a risk of electric shock.
8
PACKAGE CONTENTS
PART DESCRIPTION QUANTITY
A Smoker cabinet assembly 1
B Side handle 2
C Door assembly 1
D Door handle assembly 1
E Wood chip access
door handle 1
F Cooking grate 3
G Water bowl 1
H Wood chip box 1
I Wood chip box support 1
J Grease cup 1
K Heating element assembly 1
L Thermostat control
assembly 1
M Temperature gauge 1
N Leg 4
O Door latch 1
P Door latch bracket 1
Q Air outlet 1
R Thermostat Shield 1
A
A
C
E
B
D
H
G
J
I
F
M
L
P
O
K
Q
N
R
9
Before beginning assembly of product, make sure all parts are present. Compare parts with
package contents list and hardware contents above. If any part is missing or damaged, do
not attempt to assemble the product. Please read and understand this entire manual before
attempting to assemble, operate or install the product. If you have any questions regarding
the product, call our customer service department at 1-877-447-4768, 8:30 a.m.- 4:30 p.m.
CST, Monday - Friday.
Estimated Assembly Time: 15 minutes
Tools Required for Assembly (not included): Phillips Screwdriver
PREPARATION BEFORE ASSEMBLY
HARDWARE CONTENTS
AA BB
¼”-20 x ½”
Screw
Qty. 16
#10-24 x 1”
Screw
Qty. 2
CC DD
#10-24
Screw
Qty. 4
#10-24 x ½”
Screw
Qty. 9
10
ASSEMBLY INSTRUCTIONS
1. CAUTION: This unit is HEAVY! Do not attempt
the rst 2 steps without assistance! Remove
the door assembly (C) by opening and sliding
the doors up and off the hinges.
With the assistance of a helper, turn the smoker
cabinet assembly (A) upside down. Align the legs
(N) on the front corners of the smoker cabinet
assembly (A). Secure with 8 ¼”-20 x ½” screws
(AA). Tighten all bolts.
2. With the assistance of a helper, stand the unit up
right on its legs on a rm and level surface. Insert
the tube of the air outlet (Q) through the inside of
smoker cabinet assembly (A) and attach using 2
#10-24 x 1” screws (BB) and 2 #10-24 nuts (CC).
1
A
2
Q
BB
C
A
Hardware Used
BB
#10-24 x 1”
Screw
x 2
Hardware Used
AA
¼”-20 x ½”
Screw
x 8
AA
N
CC
#10-24 Nut
x 2
CC
11
ASSEMBLY INSTRUCTIONS
3. Attach each of the side handles (B) to the smoker
cabinet assembly (A) using 4 ¼”-20 x ½” screws
(AA) per side.
4. Attach the door latch (O) to the smoker cabinet
assembly (A) using 2 #10-24 x ½” screws (DD).
A
O
AA
B
3
4
A
Hardware Used
AA
¼”-20 x ½”
Screw
x 8
Hardware Used
DD
#10-24 x ½”
Screw
x 2
DD
12
DD
ASSEMBLY INSTRUCTIONS
5. Remove the pre-assembled screw from the wood
chip access door handle (E) and install the handle
(E) on the side access door of the smoker
cabinet (A).
6. Attach the heating element assembly (K) to
the smoker cabinet assembly (A) using 2
#10-24 x ½” screws (DD) and 2 #10-24
Nuts (CC).
6
E
A
5
Hardware Used
CC
#10-24 Nut
x 2
DD
#10-24 x ½”
Screw
x 2
A
CC
K
7. Attach the thermostat shield (R) to the smoker
cabinet assembly (A) using 2 10#-24*1/2''
screws (DD) .
7
A
DD
R
Hardware Used
DD
#10-24 x ½”
Screw
x 2
13
8. Hang the grease cup (J) to the bottom of the
smoker cabinet assembly (A).
8
J
A
ASSEMBLY INSTRUCTIONS
9. Place water bowl (G) and wood chip box (H) on
the wood chip box support (I). Slide the wood chip
box support (I) onto the bottom rails of the pre-
installed wire supports.
A
H
9
G
I
14
ASSEMBLY INSTRUCTIONS
10. Insert cooking grates (F) on pre-installed wire
supports inside the smoker cabinet assembly (A).
11. Firmly insert the thermostat control assembly (L)
into the external housing of the heating
element assembly (K).
11
F
A
10
L
K
15
ASSEMBLY INSTRUCTIONS
12. Attach the door handle assembly (D) to the door
assembly (C) using 1 #10-24 x ½” screw (DD).
13. Attach the door latch bracket (P) to the door
assembly (C) using 2 #10-24 x ½” screws (DD).
C
P
DD
C
12
13
D
Hardware Used
DD
#10-24 x ½”
Screw
x 2
DD
Hardware Used
DD
#10-24 x ½”
Screw
x 1
16
ASSEMBLY INSTRUCTIONS
14. Remove the pre-installed washer and nut from the
temperature gauge (M) and insert the probe
through the middle hole of the door assembly (C).
Secure with pre-assembled washer and nut.
15. Attach the door assembly (C) to the smoker
cabinet assembly (A).
15
C
M
14
A
C
17
OPERATING INSTRUCTIONS
READ ALL INSTRUCTIONS PRIOR TO USING THE SMOKER FOR THE FIRST TIME
Before Initial Use:
Remove all packaging, hang tags, plastic straps, and sales stickers if present. Do not use sharp tools.
Wash cooking grates with warm, soapy water, rinse and allow to completely dry before placing them
back into the smoker.
Prior to initial use, it is important to “season” your smoker. Seasoning helps eliminate potential
factory residue that occurs during production and also enhances avoring, durability and overall
performance. Refer to Page 19 for instructions on how to season the smoker
Before Each Use:
READ ALL INSTRUCTIONS PRIOR TO USING THE SMOKER
• The smoker must be on a level, stable, noncombustible surface in an area clear of combustible
material, including long or dry grass.
Avoid moving the smoker over bumpy or uneven surfaces. Damage to the smoker may occur
as a result.
• To prevent household circuit breakers from tripping, keep electric smoker controls and cord
connections dry and do not use other electrical products on the same circuit.
• Make sure the grease tray, wood chip box and water bowl are clean and empty and placed back
into the smoker according to the instructions.
• Lightly coat each cooking grate with vegetable oil or vegetable oil spray, to prevent foods from
sticking to the grates during cooking.
DO NOT cover the cooking grates with metal foil.
WARNING
Failure to follow all manufacturers instructions could result in serious personal
injury and/or property damage.
Use care when operating your smoker.
To avoid possible are-ups or grease res, clean and empty the water bowl and
grease pan before use.
Read and follow all the information and safeguards in this product guide before
attempting to assemble or operating this smoker.
CAUTION
• Do not use sharp or pointed tools to clean smoker.
• Do not use abrasive oven cleaners, steel wool or metal brushes to clean porcelain
grates or smoker body. They will damage the nish.
• Replace damaged part(s) only with Dyna-Glo certied replacement parts. Do not
attempt to repair damaged parts.
18
OPERATING INSTRUCTIONS
Safety Guidelines
• Refer to the “Troubleshooting Section”, on Pages 24 and 25, for operational problems.
DO NOT open the smoker door while operating, unless it is necessary. Opening the door will allow
heat to escape and prolong the cooking time.
DO NOT USE CHARCOAL. This appliance is not designed for use with charcoal and a re will
result if charcoal is used during operation. The re will create an unsafe condition and damage
the smoker.
Wood Chips must be used to create the smoke and avor.
• In order to maintain optimal performance, cleaning the smoker after each use is highly
recommended. Wait until the smoker has completely cooled before cleaning. Refer to the
Care and Maintenance section on Page 23.
Control Dial Operating Instructions
O - Off
1 - Low Temperature Setting
2 - Medium Temperature Setting
3 - High Temperature Setting
NOTE: Always leave the water bowl in place while operating the smoker. If additional water is
needed during the cooking process, carefully pour water into the drip pan opening. DO NOT remove
the water bowl to add water. Avoid splashing water onto the heating element. Serious damage to the
heating element could result, along with are-ups and electrical failure.
The probe of the temperature control dial must be properly inserted into the external housing of
the heating element and the dial should be set to the O (OFF) position before plugging the cord
into an electrical (GFI) outlet. Refer to assembly instructions on Page 14 for inserting the
thermostat control.
1
2
3
Temperature Indicator Light
19
OPERATING INSTRUCTIONS
Seasoning the Smoker (Before Initial Use)
To season your smoker, follow these steps WITHOUT the use of food:
1. Place desired avoring woods in wood chip box and ll to ¾ full. DO NOT put water
in water bowl.
2. With the smoker door closed, turn the control dial to 3 (High) and maintain this burner setting
for 2 hours.
3. Once seasoning is complete, your smoker’s interior will have a durable, seasoned coating.
4. Allow the smoker completely cool, before cleaning out the wood chip box.
Cooking with the Smoker:
Turn the control dial clockwise (show clockwise icon) to set the desired temperature. The dial
can be turned to any position between 1 (Low) and 3 (High). Turn the dial up (to increase
the temperature) or down (to decrease the temperature), as needed, to ne-tune the desired
temperature.
NOTE: The burner will not turn on until the dial is set to "1" (Low). The indicator light, near the
control dial, will turn on and remain on until the smoker temperature has reached the desired setting.
Once the desired temperature is reached, the indicator light will turn off. The thermostat will
continue regulating the desired temperature by automatically cycling the burner on and off during
use. The internal temperature may uctuate plus or minus 10-15°F (5-8°C) as the appliance cycles
to maintain correct cooking temperature setting. Refer to Page 22 for more information on cooking
temperatures.
Using the Wood Chip Box:
The wood chip box is designed to provide a sustainable amount of smoke and avor during the cook-
ing process. Fill the box at least ½ to ¾ full with desired wood chips or wood pellets. Anything more
or less than this amount may not create the appropriate amount of smoke for adding avor. Refer
to Page 21 for the types of wood chips that are recommended for various foods. To add more wood
chips or pellets during the cooking process, simply open the side access door and place a small
handful of chips or pellets on the loader. Closing the door will allow the chips or pellets to fall into the
wood chip box. Do not use wood chunks or charcoal. NOTE: The use of wood chips or wood pellets
is not required during the cooking process.
NOTE: Always operate the smoker with the wood chip box in place – regardless of whether or not
wood chips are used.
Using the Water Bowl:
The use of water in the bowl is not required, but the water bowl MUST be in place during operation.
To use the bowl, ll to at least ¾ full with warm water, before turning on the smoker. Cold water may
prolong the cooking process. Do not overll the water bowl. Doing so may cause the water to splash
inside the smoker. IMPORTANT: Always cook with both the water bowl and wood chip box in place,
regardless of whether or not they are lled.
CAUTION
The smoker becomes HOT during use. Use heat resistant gloves while accessing the
inside of the smoker.
20
OPERATING INSTRUCTIONS
• In order to maintain optimal performance, cleaning the smoker after each use is highly recommended.
• Wait until the smoker has completely cooled before cleaning.
• Plastic or bristle brushes may be used for cleaning stubborn stains.
DO NOT use steel wool or wire brushes. Pieces can break off and touch electrical parts creating a
risk of electric shock.
• Clean the controller casing and heating element by wiping with a damp cloth. Use a mild detergent.
• Completely dry the controller casing and heating element before use. Failure to do so, may cause
damage to the controller and prevent the smoker from working properly.
• Clean the cooking grates with warm soapy water or with a water & baking soda solution. Non-
abrasive scouring powder can be used for stubborn stains.
• Clean the grease tray and water bowl with a damp cloth and warm soapy water. Allow the liquids
inside the water bowl and grease tray to cool completely before cleaning.
Avoid cleaning the cooking surfaces, while the smoker is still hot.
• Follow all warnings and safety precautions before removing meat from smoker or preparing the
unit for storage. Please see Page 3 for important warnings and safeguards.
CAUTION
• Do not use sharp or pointed tools to clean smoker.
• Do not use abrasive oven cleaners, steel wool or metal brushes to clean porcelain
grates or smoker body. They will damage the nish.
• Replace damaged part(s) only with Dyna-Glo certied replacement parts. Do not
attempt to repair damaged parts.
  • Page 1 1
  • Page 2 2
  • Page 3 3
  • Page 4 4
  • Page 5 5
  • Page 6 6
  • Page 7 7
  • Page 8 8
  • Page 9 9
  • Page 10 10
  • Page 11 11
  • Page 12 12
  • Page 13 13
  • Page 14 14
  • Page 15 15
  • Page 16 16
  • Page 17 17
  • Page 18 18
  • Page 19 19
  • Page 20 20
  • Page 21 21
  • Page 22 22
  • Page 23 23
  • Page 24 24
  • Page 25 25
  • Page 26 26
  • Page 27 27
  • Page 28 28
  • Page 29 29
  • Page 30 30
  • Page 31 31
  • Page 32 32
  • Page 33 33
  • Page 34 34
  • Page 35 35
  • Page 36 36
  • Page 37 37
  • Page 38 38
  • Page 39 39
  • Page 40 40
  • Page 41 41
  • Page 42 42
  • Page 43 43
  • Page 44 44
  • Page 45 45
  • Page 46 46
  • Page 47 47
  • Page 48 48
  • Page 49 49
  • Page 50 50
  • Page 51 51
  • Page 52 52
  • Page 53 53
  • Page 54 54
  • Page 55 55
  • Page 56 56
  • Page 57 57
  • Page 58 58
  • Page 59 59
  • Page 60 60
  • Page 61 61
  • Page 62 62
  • Page 63 63
  • Page 64 64
  • Page 65 65
  • Page 66 66
  • Page 67 67
  • Page 68 68
  • Page 69 69
  • Page 70 70
  • Page 71 71
  • Page 72 72
  • Page 73 73
  • Page 74 74
  • Page 75 75
  • Page 76 76
  • Page 77 77
  • Page 78 78
  • Page 79 79
  • Page 80 80
  • Page 81 81
  • Page 82 82
  • Page 83 83

Dyna-Glo DGU505BAE-D Manuel utilisateur

Catégorie
Petits appareils de cuisine
Taper
Manuel utilisateur